"Keep Your Shorts Viewer-Friendly Fixing Image Absence"

Keep Your Shorts Viewer-Friendly: Fixing Image Absence
Video thumbnails are important since they encourage people to click and watch the video. But what if your set YouTube Shorts thumbnail is not showing? YouTube will use a random part of the video as the thumbnail. It may be an unflattering or uninteresting shot. Then, your Shorts video is doomed.
That said, it is a problem you want to solve. Here are 7 FAQs about YouTube Shorts thumbnails. They may help you with fixing this issue.

Q1. Can I Customize YouTube Shorts Thumbnails?
Yes, you can. YouTube did allow short-form video creators to upload custom thumbnails for their Shorts. However, they aren’t that optimized. For instance, some people may not see them on the Shorts shelf. Also, if you share a link to the video somewhere else, the old video thumbnail may show instead of the new one.
Adding a custom thumbnail for YouTube Shorts is the same as adding one for long-form videos on the platform. Follow these steps:
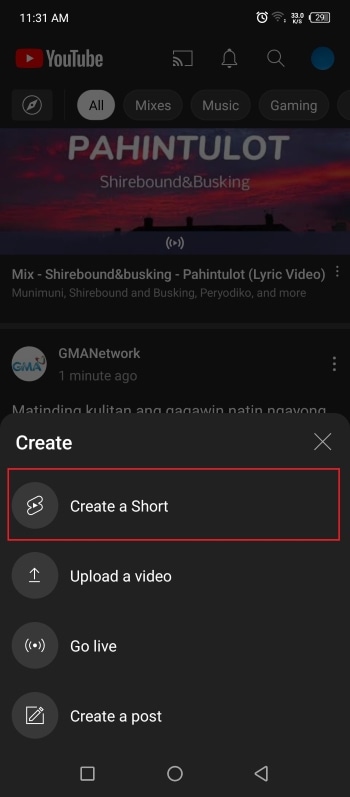
- Open the YouTube mobile app. Click the “Plus” icon at the bottom center > “Create Short.” Upload, edit, and post your video.
- Get to your desktop computer or laptop. Open your channel’s YouTube Studio.
- On the left navigation menu, click “Content.”
- Click the “pencil” icon next to the Shorts you just uploaded. This video should be at the top of the list.
- Navigate to the Thumbnail section. Click “Create Thumbnail.”
Q2. Why Are YouTube Shorts Thumbnails Not Showing?
It’s not you who’s the only one with Shorts thumbnails not showing. Many short-form content creators on the platform are also facing this issue. A YouTuber took to Reddit to complain about how he uploaded custom thumbnails for all his videos. The thumbnails are correct in the editor. However, YouTube still displays a random frame as the thumbnail on the Shorts shelf.
“They ALL have randomly selected different parts of each video I have uploaded & somehow generated a new/unknown thumbnail that was neither what I uploaded as the custom option nor 1 of the 3 that YouTube auto populated.”
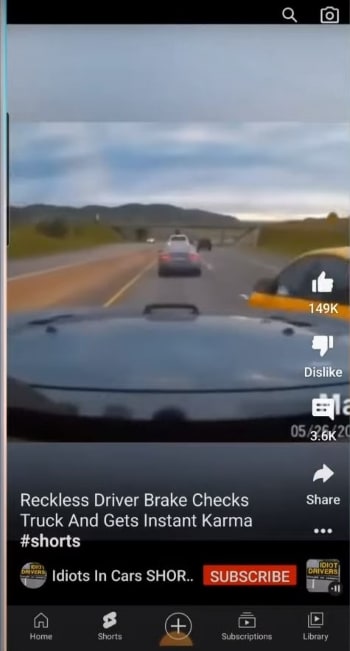
The reason behind this is the difference in the thumbnail size. Regular YouTube video thumbnails are in the ratio of 16:9. Meanwhile, Shorts uses a ratio of 9:16. The thing is that YouTube does not yet allow you to upload 9:16 thumbnails. Thus, the thumbnail for Shorts may show correctly on the video section but not on the Shorts shelf.
Q3. How to Fix YouTube Shorts Thumbnail Problem?
Unfortunately, there is no reliable fix to this problem yet. YouTubers have tried different things in hopes that YouTube will display the correct thumbnail for their Shorts.
Some YouTubers have tried using different images. Others have experimented with changing the aspect ratio of the thumbnail or using Adobe editor for ratios. Clearing histories and cache, using different browsers, resizing, and changing the images’ resolution have also been done. Sadly, these are all failed attempts.
Q4. How To Boost Views When I Have no Control Over YouTube Shorts Thumbnails?
Attracting viewers on Shorts is the same as attracting viewers on the main YouTube. You use interesting thumbnails and video titles. Since thumbnails are out of the options, selecting great video titles has become even more important.
Here are some pointers. Your title should be at most 40 characters. Also, it should be concise and irresistible. And forget about SEO since no one is searching for YouTube Shorts anyway. People consume what they see in their feeds. So instead, the title should be “snappy.” It should intrigue, entertain, or enlighten the viewers. That will net you some views for your Shorts content.
Q5. How To Get More Views on YouTube Shorts?
Forgoing the intro is the way to go. An intro will just prolong the video when people are in Shorts to find bite-sized videos. So jump right into the video content. You can also start the video with a still frame instead. Using hashtags, captions, and text effects are also recommended. And interacting with your audience through comments and pinned comments will keep them coming back to your Shorts channel.
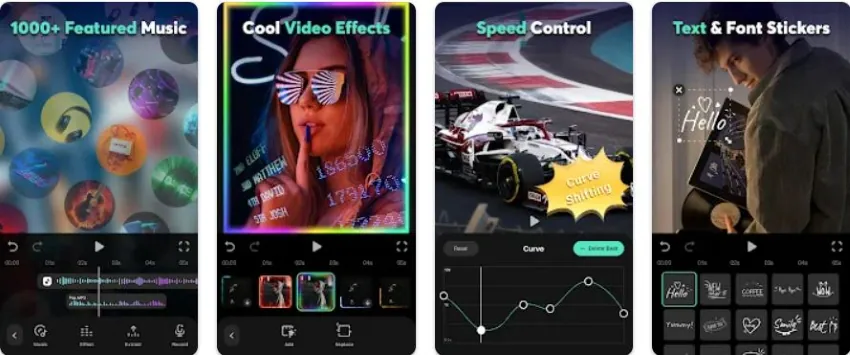
Of course, ensuring that the video quality is high is key to getting more views. For that, you need a good video editor. You can try Wondershare Filmora , a powerful and easy-to-use video editor.
Free Download For Win 7 or later(64-bit)
Free Download For macOS 10.14 or later
The best thing is that you don’t need to transfer the video from your phone to your computer and back. Wondershare Filmora is available on mobile. And it’s one of the best tools for enhancing a short-form video.
Short-form video watchers love filters, transitions, and effects. And Filmora gives you access to all of that. It provides you with fun and amazing filters, effects, transitions, and stamps that can add a wow factor to your short-form video.
Q6. Do YouTube Shorts Make Money?
Making money from YouTube Shorts was challenging. The platform pays content creators who are doing well through the Creator Fund. However, as Shorts grew, the payout became smaller.
Luckily, that’s going to change. Starting this year, Shorts will be a part of the YouTube Partner Program. This means that you can make money from the ads that people watch on Shorts. According to YouTube, creators will keep 45% of the revenue. It will be distributed based on your share of total Shorts views.
YouTube also adjusted the requirements to qualify for the YPP. They made it easier for Shorts content creators to get into the program.
Q7. How Do You Make YouTube Shorts Play Normal?
You can watch Shorts like normal YouTube videos where you can rewind when you want to. Follow these steps.
On a Desktop Computer
- Open a Shorts video on YouTube.
- Pause the video.
- Click “Library” on the left panel.
- Select the Shorts you just watched. It should be on the top and first on the list.
On a Mobile Phone
- Open the YouTube app. Watch a Shorts video.
- Like the Shorts video.
- Tap “Library”
- Scroll down to find “Liked Videos.” Click on it.
- Select the Shorts video you just watched. It should be at the top of the list.
Conclusion
Unfortunately, custom thumbnails not showing on Shorts does not have a fix yet. So to attract viewers, you must leverage the things in your control. You must title your videos in a way that will make users click the video. Also, adding effects and filters on the video using an editor like Wondershare Filmora can help.
Users can subscribe to Shorts channels. And if they see that your videos are well-edited and high-quality, they’ll be more likely to do so. Once they are subscribed, they will see and watch your videos more often.
Simplified Cross-Platform Listening: Top 5 Playlist Conversion Resources
Do you want to transfer your playlist to YouTube Music from Spotify? After all, there are some significant advantages to using the former over the latter. For one, YouTube Music offers a broader range of songs and videos without ads.
Though Spotify is a widely used music streaming app, its many limitations for non-Premium members have driven users to look for alternatives. For example, 30-second ads that play every 15 minutes and the inability to skip songs are among the app’s most frustrating features.
So, if you’re ready to convert Spotify playlists to YouTube Music, let’s get started!
Recommendation And Guidance For Using The Playlist Transfer Tools
With Spotify and YouTube Music, you can access millions of songs and playlists at the click of a button.
But what if you want to move your Spotify playlist to YouTube Music? Luckily, the following 5 best tools can help you to do just that.
| Name | Price | Transfer amount limit | Speed | Compatibility |
|---|---|---|---|---|
| Playlist Buddy | Free | 250 songs per playlist. | 1 minute | YouTube and Spotify |
| TuneMyMusic | Free | 1,000 tracks | 38 seconds. | Spotify, Itunes, Apple Music, Nanpster, YouTube, Deezer, Tidal, Google Play Music, and Amazon Music |
| Soundiiz | Free | 200 tracks | 26 seconds. | Spotify, Apple Music, YouTube Music, TIDAL, and more |
| Playlist Converter | Free | unlimited | Slow processing | YouTube Music, Spotify, PLS, Deezer |
| SongShift | Free | Unlimited | 40 seconds | Spotify, YouTube Music, Apple Music, Deezer, Amazon Music, Discogs, and more |
Playlist Buddy
Playlist Buddy is a free-to-use online tool that is fully dedicated to converting your Spotify playlist to YouTube within a minute. The program is quick, easy, and simple- so there’s no excuse not to try it out!
Key Features
- Transfers playlists one-by-one
- Free to use
- Compatible with YouTube and Spotify
- Can convert your lists to a CSV file
Limitations
- Cannot be used for other music streaming services
- Limited to only 250 tracks per playlist
How To Use?
To transfer your Spotify Playlist to YouTube Music using the Playlist Buddy, do the following steps:
Step1 First, open a browser on your PC and visit the “Playlist Buddy” site. Click “Login to Spotify.”
Step2 Now, click “Agree” to provide access to your account information. Click the “Sign in YouTube” button and log in to your account.
Step3 Select your Spotify playlist, click “Convert Playlist,” and Playlist Buddy will start transferring your Spotify to YouTube playlist.

Tune My Music
Tune My Music is another free tool that offers 96% accuracy while converting your Spotify playlist to YouTube Music. With this platform, you can transfer up to 1000 tracks at a time in just a few seconds.
Key Features
- Intuitive interface and workflow
- Can transfer playlists in batches
- Transfers tracks in 38 seconds
- Synchronizes two playlists from two different music services
- Backups your songs
Limitations
- Does not transfer playlists/tracks in order
- No playlist descriptions
How To Use?
The following steps will help you use the TuneMyMusic platform to convert your Spotify playlist to YouTube Music:
Step1 Visit the Tune My Music website using your browser and click the “Let’s Start” option.
Step2 On the “Select The Source” page, choose “Spotify” as your source and sign in to your account.
Step3 Now, load your Spotify playlist or paste its URL from your account. Click “Next: Select Destination” on the next page and choose “YouTube Music” from the given options.
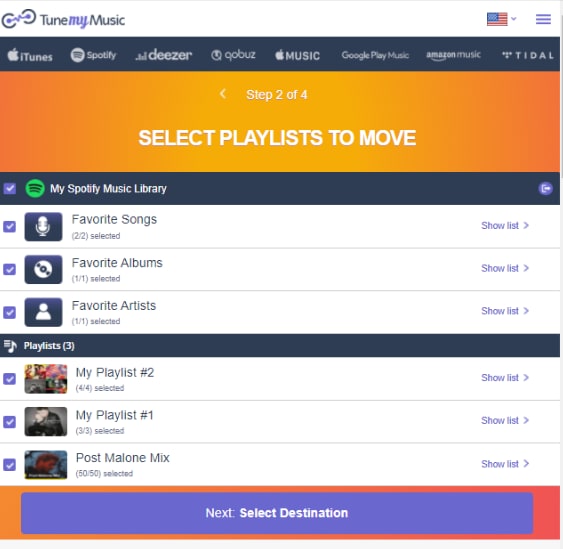
Finally, click “Start Moving My Music” to convert your Spotify playlist to YouTube Music.
Soundiiz
If you want to quickly and instantly convert your Spotify playlist to YouTube, Soundiiz is the right solution for you! This tool is free and compatible with multiple musics streaming services.
Key Features
- 98% accuracy while transferring songs
- Fast transfer of playlists between many platforms
- No app download is required
- Excellent UI
Limitations
- Transfers albums, artists, and liked songs only in the premium version
- Can only transfer 200 tracks
How To Use
Follow these steps to convert your Spotify playlist to YouTube music using Soundiiz:
Step1 In the first step, visit the Soundiiz website and click the “Start Now” option.
Step2 Select the “Sign in with Spotify” option from the list to log in to your account and click “Access” to provide permission to access your details.

Step3 Select “YouTube Music” from the left-side panel and click “Connect.” Now, sign in to your account.
Step4 Now, open the “Transfer” tab, choose “Spotify” as a source, and go to “Playlists.” Choose the Spotify playlist and click “Confirm and Continue.”

Step5 Configure your playlist and click the “Save Configuration” option. Next, click “Confirm” and choose “YouTube Music” on the next page to convert your Spotify to a YouTube playlist.
Playlist Converter
Playlist Converter allows you to take your favorite Spotify playlists and convert them to YouTube Music, Apple Music, Google Play Music, or Amazon Music.
This handy platform is easy-to-use and only takes a few minutes to convert your favorite playlists.
Key Features
- Converts to multiple music sources and file formats
- Available for free
- Unlimited transfers
- No registration is required
Limitations
- Not much accurate
- It takes time to process
How To Use?
To use the Playlist Converter tool for converting Spotify playlists to YouTube Music, follow these steps in sequence:
Step1 Visit the Playlist Converter website using your browser and go to the “Spotify” tab.
Step2 Click “Log in with Spotify” and sign in to your account. Make sure to provide access to your details.
Step3 Select your Spotify playlist and click “Export to YouTube Account.” Next, click the “Login With YouTube and Export the Playlist” option and sign in to your account.

Playlist Converter will fetch your playlist details and transfer them to your YouTube account.
SongShift
SongShift is an iOS app that allows you to transfer your songs between music streaming platforms. It’s an excellent way to keep all your song tracks in one place, no matter where you prefer to stream them.
The app is easy to use and only takes a few steps to get started!
Key Features
- It lets you fix mismatches
- Excellent user experience and interface
- Transfers tracks to multiple music streaming platforms
- Unlimited song transfer
Limitations
- Only available for iOS devices
How To Use?
Here’s how you can use the SongShift app to convert your Spotify playlist to your YouTube Music account:
Step1 Open the App Store on your iOS device, install the SongShift app and launch it.
Step2 On the app’s main page, tap “Connect Your Music” and go to the “Music Services” page. Select “Spotify” and click the “Connect” option.
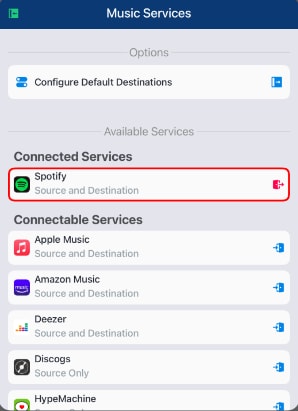
Step3 Now, sign in to your Spotify account and tap the “Plus” icon at the bottom of the screen.
Step4 Tap the “Setup Source” option under New Configuration and choose “Spotify” as the source service.
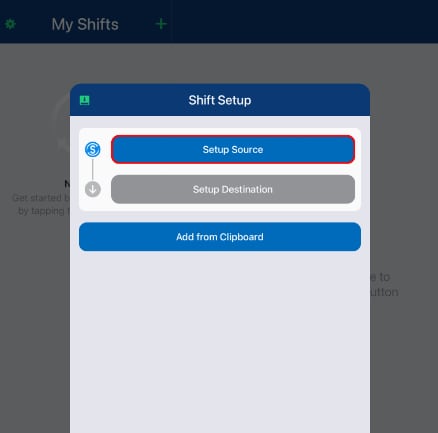
Next, tap “Playlist” under the “Select Media Type” header and find your Spotify playlist.
Step5 Afterward, tap the “Setup Destination” option and select “YouTube Music.” Now, choose your destination type and tap “I’m Finished” to start transferring your Spotify playlist to YouTube Music.
Bonus Video Tutorial: Another Way To See the Music - Audio Visualization Effects
Hopefully, this article helped resolve your query, and you can now quickly transfer all your favorite playlists from Spotify to YouTube Music.
Besides, before the end, we want to show you another exciting way to feel the music - Audio Visualization Effects. The effect will intelligently match the sound in your video while also adding dynamic effects. You can try it in a user-friendly video editor Filmora . If you want to know more about the effect and how to realize it with Filmoea, please watch the video we specially prepared for you below.
Free Download For Win 7 or later(64-bit)
Free Download For macOS 10.14 or later
Conclusion
This comprehensive guide recommends the 5 best tools to help you convert Spotify playlists to YouTube Music. In addition, we’ve provided a step-by-step process of using each tool, its key features, and its limitations to help you make the right decisions.
Playlist Buddy is a free-to-use online tool that is fully dedicated to converting your Spotify playlist to YouTube within a minute. The program is quick, easy, and simple- so there’s no excuse not to try it out!
Key Features
- Transfers playlists one-by-one
- Free to use
- Compatible with YouTube and Spotify
- Can convert your lists to a CSV file
Limitations
- Cannot be used for other music streaming services
- Limited to only 250 tracks per playlist
How To Use?
To transfer your Spotify Playlist to YouTube Music using the Playlist Buddy, do the following steps:
Step1 First, open a browser on your PC and visit the “Playlist Buddy” site. Click “Login to Spotify.”
Step2 Now, click “Agree” to provide access to your account information. Click the “Sign in YouTube” button and log in to your account.
Step3 Select your Spotify playlist, click “Convert Playlist,” and Playlist Buddy will start transferring your Spotify to YouTube playlist.

Tune My Music
Tune My Music is another free tool that offers 96% accuracy while converting your Spotify playlist to YouTube Music. With this platform, you can transfer up to 1000 tracks at a time in just a few seconds.
Key Features
- Intuitive interface and workflow
- Can transfer playlists in batches
- Transfers tracks in 38 seconds
- Synchronizes two playlists from two different music services
- Backups your songs
Limitations
- Does not transfer playlists/tracks in order
- No playlist descriptions
How To Use?
The following steps will help you use the TuneMyMusic platform to convert your Spotify playlist to YouTube Music:
Step1 Visit the Tune My Music website using your browser and click the “Let’s Start” option.
Step2 On the “Select The Source” page, choose “Spotify” as your source and sign in to your account.
Step3 Now, load your Spotify playlist or paste its URL from your account. Click “Next: Select Destination” on the next page and choose “YouTube Music” from the given options.

Finally, click “Start Moving My Music” to convert your Spotify playlist to YouTube Music.
Soundiiz
If you want to quickly and instantly convert your Spotify playlist to YouTube, Soundiiz is the right solution for you! This tool is free and compatible with multiple musics streaming services.
Key Features
- 98% accuracy while transferring songs
- Fast transfer of playlists between many platforms
- No app download is required
- Excellent UI
Limitations
- Transfers albums, artists, and liked songs only in the premium version
- Can only transfer 200 tracks
How To Use
Follow these steps to convert your Spotify playlist to YouTube music using Soundiiz:
Step1 In the first step, visit the Soundiiz website and click the “Start Now” option.
Step2 Select the “Sign in with Spotify” option from the list to log in to your account and click “Access” to provide permission to access your details.

Step3 Select “YouTube Music” from the left-side panel and click “Connect.” Now, sign in to your account.
Step4 Now, open the “Transfer” tab, choose “Spotify” as a source, and go to “Playlists.” Choose the Spotify playlist and click “Confirm and Continue.”

Step5 Configure your playlist and click the “Save Configuration” option. Next, click “Confirm” and choose “YouTube Music” on the next page to convert your Spotify to a YouTube playlist.
Playlist Converter
Playlist Converter allows you to take your favorite Spotify playlists and convert them to YouTube Music, Apple Music, Google Play Music, or Amazon Music.
This handy platform is easy-to-use and only takes a few minutes to convert your favorite playlists.
Key Features
- Converts to multiple music sources and file formats
- Available for free
- Unlimited transfers
- No registration is required
Limitations
- Not much accurate
- It takes time to process
How To Use?
To use the Playlist Converter tool for converting Spotify playlists to YouTube Music, follow these steps in sequence:
Step1 Visit the Playlist Converter website using your browser and go to the “Spotify” tab.
Step2 Click “Log in with Spotify” and sign in to your account. Make sure to provide access to your details.
Step3 Select your Spotify playlist and click “Export to YouTube Account.” Next, click the “Login With YouTube and Export the Playlist” option and sign in to your account.

Playlist Converter will fetch your playlist details and transfer them to your YouTube account.
SongShift
SongShift is an iOS app that allows you to transfer your songs between music streaming platforms. It’s an excellent way to keep all your song tracks in one place, no matter where you prefer to stream them.
The app is easy to use and only takes a few steps to get started!
Key Features
- It lets you fix mismatches
- Excellent user experience and interface
- Transfers tracks to multiple music streaming platforms
- Unlimited song transfer
Limitations
- Only available for iOS devices
How To Use?
Here’s how you can use the SongShift app to convert your Spotify playlist to your YouTube Music account:
Step1 Open the App Store on your iOS device, install the SongShift app and launch it.
Step2 On the app’s main page, tap “Connect Your Music” and go to the “Music Services” page. Select “Spotify” and click the “Connect” option.

Step3 Now, sign in to your Spotify account and tap the “Plus” icon at the bottom of the screen.
Step4 Tap the “Setup Source” option under New Configuration and choose “Spotify” as the source service.

Next, tap “Playlist” under the “Select Media Type” header and find your Spotify playlist.
Step5 Afterward, tap the “Setup Destination” option and select “YouTube Music.” Now, choose your destination type and tap “I’m Finished” to start transferring your Spotify playlist to YouTube Music.
Bonus Video Tutorial: Another Way To See the Music - Audio Visualization Effects
Hopefully, this article helped resolve your query, and you can now quickly transfer all your favorite playlists from Spotify to YouTube Music.
Besides, before the end, we want to show you another exciting way to feel the music - Audio Visualization Effects. The effect will intelligently match the sound in your video while also adding dynamic effects. You can try it in a user-friendly video editor Filmora . If you want to know more about the effect and how to realize it with Filmoea, please watch the video we specially prepared for you below.
Free Download For Win 7 or later(64-bit)
Free Download For macOS 10.14 or later
Conclusion
This comprehensive guide recommends the 5 best tools to help you convert Spotify playlists to YouTube Music. In addition, we’ve provided a step-by-step process of using each tool, its key features, and its limitations to help you make the right decisions.
Also read:
- [New] 2024 Approved Enhancing Insta Videos 3 Simple Border Techniques
- [New] 2024 Approved Top Techniques Succeeding in Spotify Advertising
- [New] 2024 Approved Unlock the Full Potential of Video Content with Studio's Power
- [New] 9 Powerful Methods to Make Money on Your YouTube Shorts
- [New] A Novice's Pathway to Writing YouTube Video Plans
- [New] Boosting Revenue with YouTube Short Videos – A Complete Plan
- [Updated] YouTube TV Demystified Your Complete Reference
- 2024 Approved Cutting-Edge Camera & Recording Apps for Smartphones' Most Reliable Sources
- Breakthrough in Video Production Advanced Techniques for Uploading 360° Content on YouTube for 2024
- Elevate Your Video Content on TikTok
- How to Change Location on TikTok to See More Content On your Lava Yuva 3 | Dr.fone
- In 2024, Does YouTube Offer Regular Viewers Money?
- In 2024, How to Transfer Contacts from Tecno Pova 6 Pro 5G To Phone | Dr.fone
- Pair Off in Perfection 7 Stunning Wedding Films From Youtube + Vimeo
- Unveiling the Latest Innovations with Tom - A Comprehensive Hardware Review
- Title: Keep Your Shorts Viewer-Friendly Fixing Image Absence
- Author: Steven
- Created at : 2025-01-05 16:40:00
- Updated at : 2025-01-10 18:57:22
- Link: https://youtube-clips.techidaily.com/keep-your-shorts-viewer-friendly-fixing-image-absence/
- License: This work is licensed under CC BY-NC-SA 4.0.


