
:max_bytes(150000):strip_icc()/brainstorming-business-businessman-businesswoman-colleagues-communication-1431569-pxhere.com-a3fe04375b74482188dd8e567d8d348d.jpg)
"IPhone Expertise Continuous Video Play"
IPhone Expertise: Continuous Video Play
How to Loop A Video on iPhone?

Shanoon Cox
Mar 27, 2024• Proven solutions
For Win 7 or later (64-bit)
 Secure Download
For macOS 10.14 or later
Secure Download
Click here to get Filmora for PC by email
or Try Filmora App for mobile >>>
download filmora app for ios ](https://app.adjust.com/b0k9hf2%5F4bsu85t ) download filmora app for android ](https://app.adjust.com/b0k9hf2%5F4bsu85t )
Nowadays, we can see a trend of people posting looping videos on their social media. These looping videos are fascinating and fun to watch. A loop is a popular element in photography and especially music videos, the idea being that the camera appears to magically repeat itself as many times as there are photos or frames showing the action. They can also simply recur a sequence a certain number of times, then stop.
Now some people don’t know how to make looping videos, so in this article, we are going to discuss how to loop a video on iPhone videos and also how to loop YouTube videos on iPhone. Let’s get started.
- Part 1: Convert iPhone Live Photos to a Loop Video
- Part 2: Repeat Slideshow Video to Loop on iPhone
- Part 3: Loop YouTube Videos On iPhone
- Part 4: Best Apps to Loop Videos on iPhone and iPad
- Part 5: Better Way to Loop and Create Boomerang Videos in Filmora Video Editor
- Part 6: Frequently Asked Questions About Choosing Best Free Video Editor for Windows
Part 1: How to Convert iPhone Live Photos to a Loop Video
A loop video is a short video that plays in repeat/ indefinitely. Loop videos can be created with features on social media apps and third-party apps.
iPhone has a setting that allows you to edit the photos to loop or bounce videos, and it only works with a photo feature called ‘live photo’. The live photo feature records 1.5 seconds moving picture when you click on the shutter button.
The live photo feature can be edited to create a loop video, and you can do that by following these steps:
- Before creating the video, you need to have the live picture saved on your phone.
To do this, capture a live photo by opening your camera app. Then click on the live photo icon, which is located in the upper right corner. And tap on the shutter button.
- Afterward, you locate the live photo you want to convert to a loop video by going to the Photos apps. Then click on Albums > Media Types> Live photos.

- After locating and clicking on the live picture, you will see the Live tab in the upper left corner. Click on the arrow down to view other options, including Loop, Bounce, and long exposure.

- Select the effect you want to create (loop) and save the file. The loop feature plays the video in a one-way order. So, to make it more interesting, you can select the bounce effect, which makes it play back and forth.
- You can share the created loop video with the share icon at the lower-left corner.

Part 2: Repeat Slideshow to Loop Video on iPhone for Free
Slideshow videos are a very fun way to see your content. People gather around a screen to enjoy these beautiful memories of their life. Here is a step-by-step guide on how to loop a slideshow video on iPhone.
- First, go to your gallery and select a video that you want to make a slideshow of.
- Add that video to an album in your gallery under any name.
- Pause the slideshow video, and you will see Options button at the bottom. Click it and then enable the Repeat option.

Now open that video from the album and start playing the video. That video will start playing in a loop until you make it stop.
Part 3: How to Loop YouTube Videos On iPhone?
Now coming to the part that we discussed in the intro, how to loop YouTube videos on iPhone. So here, we will show you a step-by-step guide on how to loop the videos on your iPhone.
- Launch YouTube on your iPhone and log in to your account if you are not already logged in.
- Now go to the “Search” option and lookup for the desired video that you want to loop, and add it to the playlist. There are two ways you can do that. Click and hold on to the video; a small menu will appear, then click on “Add to” to make a playlist. Start the video and then scroll down a bit and on the extreme right side, click on the “Add to” option, and then name the playlist.
- After that, go back to the main menu and on the lower bottom right side of the screen, click on “Library,” and then select the new playlist.
- Start playing the video, and under the video, click on the drop-down button, and on the left side of the drop-down screen, there is a loop button, click on that, and it will start to play the loop infinitely.
Check this ultimate guide to looping YouTube videos to get more ways.
Part 4: Best Apps to Loop Videos on iPhone and iPad
1. Loopideo - Loop Videos

Loopideo is the app on our list that is an answer to how to loop a video on iPhone. It lets you import any video from your play that you want to play in a loop. This is a great tool when it comes to individual and organizational presentations. This powerful app can be very useful for you in many cases.
2. Loop Video – GIF Maker

The second app on our list is Loop Video GIF Maker. It is very fun and easy to use the tool. It allows you to make the videos loop by turning them into GIFs. Loop Video GIF Maker allows you to import any video from your gallery into your app. You can then convert into a looping GIF. You can also choose the playback speed of the GIF after you can export it to the gallery or upload it to your social media directly from the app.
3. Loopideo Pro

Loopideo Pro is a more feature-filled app on the App Store. Loopideo allows you to make the videos loop an unlimited amount of times. You can also choose the formats that you want to convert the looping video into. This app also gives you the option to choose the playback speed and then can also convert it into GIF speed so that you can save it in your gallery.
4. iMovie
iMovie is a more professional app that is available on the list. This app allows you to loop not only the video but also edit the video. This allows you to play the video in a loop for an unlimited amount of time in the built-in player, but when it comes to saving the looping video, it is not possible because you would need an unlimited amount of space to save that video.
5. Looper

The last app on our list is a looper, and it is a very fun and easy-to-use app available on this list. Choose a video from your gallery, Local Videos, or iCloud Drive. Select the times you want the video to repeat and play. You can also export your video in reverse or in GIF format.
Bonus: Record a Looping Video with Boomerang app on iPhone
To make a looping video on your iPhone, you can either download the boomerang app or use the boomerang video on Instagram.
If you are using the Boomerang app, take these steps to make a looping video:
- Launch the Boomerang from Instagram app on your iPhone, if you haven’t installed it already, click on the search bar and type in Boomerang in the App Store.
- The welcome screen will appear, swipe left and tap on Get started. Allow it to access to your camera, location, and photos. After you are done setting up, you can make the videos.
- To make a boomerang video, click and hold the shutter button. Hold the shutter for a few seconds and move the phone across the image or scene.
- A preview of the looping video will appear; tap on Done to save the video. Or click on the X symbol to make a new video.
- You can change the settings to record a selfie video by clicking on the curved arrows symbol. And you can also tap the lightning sign to put the flash on and off.
To make the video with the Instagram Boomerang feature:
- Open the Instagram app, and then swipe left as if to add a story.
- Click on the boomerang icon (infinity symbol). Press and hold the shutter to make the video.
- Preview the video, and you can add texts, songs, markups, and stickers to the video.
- And then click on the arrow-down symbol to save/ download the video. You can share the video to close friends or your story.
Part 5: What If You’d Like to Loop Videos on Computer?
Filmora is one of the most popular video editors among video creators. It gives you high-quality end product, smooth slowing down & speeding up movements, voiceovers on top of music tracks and transitions between audio & video clips. But another amazing benefit of this computer video editor is that you can produce a loop video.
![]()

The Best Video Looper on Windows and Mac
- Loop and repeat videos multiple times
- Copy and paste clips easily
- Built-in plentiful templates and effects
- Export to MP4, MOV, MKV, GIF and multiple formats
For Win 7 or later (64-bit)
Secure Download
For macOS 10.14 or later
Secure Download
Click here to get Filmora for PC by email
or Try Filmora App for mobile >>>
download filmora app for ios ](https://app.adjust.com/b0k9hf2%5F4bsu85t ) download filmora app for android ](https://app.adjust.com/b0k9hf2%5F4bsu85t )
In this part, I’m going to show you how to create looping video in Filmora video editor with the reverse effect. It’s actually really easy and doesn’t require any complicated steps. You’ll be able to create a cool, looping video in no time! So, let’s get started!
Step 1: Import Videos to Filmora video editor
Launch Filmora video editor on your Windows or Mac computer and then make a new project. Import videos as you can see it has been already imported all the media in the media library from your which you want to loop effect, and then drag the video clip to the timeline.

Step 2: Copy and Paste the Video
After drag and drop the video to the timeline, make a copy of it (Ctrl+C). Go to the last frame and paste this video again.

Step 3: Enable Reverse Speed effect
Right click on the pasted video and go to Speed and Duration option in which custom speed dialog box where you can adjust the speed.
In the Custom Speed dialog box you will find the speed, duration, reverse and ripple options. To make a video with loop effects, click the Reverse option to reverse the video play back from end to start frames automatically. Click OK to save the settings.

Now you have got a video with one looping count, if you want the video to loop several times, you can select these 2 clips and paste it based on your needs to get a continuous looping effect.

We hope you found this post helpful in learning how to create looping video with Filmora video editor. This makes them perfect for use as GIFs because they are never ending! What’s more, you can create a looping video in Filmora video editor by adding a sound that plays continuously. If you’re looking to make an endlessly repeating animated image or video clip using just one still image, look no further than Filmora video editor. It’s easy and fun to use.
For Win 7 or later (64-bit)
Secure Download
For macOS 10.14 or later
Secure Download
Click here to get Filmora for PC by email
or Try Filmora App for mobile >>>
download filmora app for ios ](https://app.adjust.com/b0k9hf2%5F4bsu85t ) download filmora app for android ](https://app.adjust.com/b0k9hf2%5F4bsu85t )
Part 6: Frequently Asked Question About Looping Videos on iPhone
- What is a looping video?
It means a video that repeats for a specific number of times or maybe an unlimited amount of times automatically. For example, a GIF.
- Can I loop videos an unlimited number of times?
Yes, it is possible to loop a video an unlimited amount of times. You can learn how to loop a video on iPhone by using the methods that we discussed above in the whole article. It is not possible to save the infinitely looping because it will take an infinite amount of memory.
- Does the view count if I play a YouTube video in a loop?
No, YouTube will not count repeated views if they all come over and over again from the same sources. This is to maintain the overall quality of YouTube and make it scam-free.
For Win 7 or later (64-bit)
Secure Download
For macOS 10.14 or later
Secure Download
Click here to get Filmora for PC by email
or Try Filmora App for mobile >>>
download filmora app for ios ](https://app.adjust.com/b0k9hf2%5F4bsu85t ) download filmora app for android ](https://app.adjust.com/b0k9hf2%5F4bsu85t )
Shanoon Cox
Shanoon Cox is a writer and a lover of all things video.
Follow @Shanoon Cox
Shanoon Cox
Mar 27, 2024• Proven solutions
For Win 7 or later (64-bit)
Secure Download
For macOS 10.14 or later
Secure Download
Click here to get Filmora for PC by email
or Try Filmora App for mobile >>>
download filmora app for ios ](https://app.adjust.com/b0k9hf2%5F4bsu85t ) download filmora app for android ](https://app.adjust.com/b0k9hf2%5F4bsu85t )
Nowadays, we can see a trend of people posting looping videos on their social media. These looping videos are fascinating and fun to watch. A loop is a popular element in photography and especially music videos, the idea being that the camera appears to magically repeat itself as many times as there are photos or frames showing the action. They can also simply recur a sequence a certain number of times, then stop.
Now some people don’t know how to make looping videos, so in this article, we are going to discuss how to loop a video on iPhone videos and also how to loop YouTube videos on iPhone. Let’s get started.
- Part 1: Convert iPhone Live Photos to a Loop Video
- Part 2: Repeat Slideshow Video to Loop on iPhone
- Part 3: Loop YouTube Videos On iPhone
- Part 4: Best Apps to Loop Videos on iPhone and iPad
- Part 5: Better Way to Loop and Create Boomerang Videos in Filmora Video Editor
- Part 6: Frequently Asked Questions About Choosing Best Free Video Editor for Windows
Part 1: How to Convert iPhone Live Photos to a Loop Video
A loop video is a short video that plays in repeat/ indefinitely. Loop videos can be created with features on social media apps and third-party apps.
iPhone has a setting that allows you to edit the photos to loop or bounce videos, and it only works with a photo feature called ‘live photo’. The live photo feature records 1.5 seconds moving picture when you click on the shutter button.
The live photo feature can be edited to create a loop video, and you can do that by following these steps:
- Before creating the video, you need to have the live picture saved on your phone.
To do this, capture a live photo by opening your camera app. Then click on the live photo icon, which is located in the upper right corner. And tap on the shutter button.
- Afterward, you locate the live photo you want to convert to a loop video by going to the Photos apps. Then click on Albums > Media Types> Live photos.
- After locating and clicking on the live picture, you will see the Live tab in the upper left corner. Click on the arrow down to view other options, including Loop, Bounce, and long exposure.
- Select the effect you want to create (loop) and save the file. The loop feature plays the video in a one-way order. So, to make it more interesting, you can select the bounce effect, which makes it play back and forth.
- You can share the created loop video with the share icon at the lower-left corner.
Part 2: Repeat Slideshow to Loop Video on iPhone for Free
Slideshow videos are a very fun way to see your content. People gather around a screen to enjoy these beautiful memories of their life. Here is a step-by-step guide on how to loop a slideshow video on iPhone.
- First, go to your gallery and select a video that you want to make a slideshow of.
- Add that video to an album in your gallery under any name.
- Pause the slideshow video, and you will see Options button at the bottom. Click it and then enable the Repeat option.
Now open that video from the album and start playing the video. That video will start playing in a loop until you make it stop.
Part 3: How to Loop YouTube Videos On iPhone?
Now coming to the part that we discussed in the intro, how to loop YouTube videos on iPhone. So here, we will show you a step-by-step guide on how to loop the videos on your iPhone.
- Launch YouTube on your iPhone and log in to your account if you are not already logged in.
- Now go to the “Search” option and lookup for the desired video that you want to loop, and add it to the playlist. There are two ways you can do that. Click and hold on to the video; a small menu will appear, then click on “Add to” to make a playlist. Start the video and then scroll down a bit and on the extreme right side, click on the “Add to” option, and then name the playlist.
- After that, go back to the main menu and on the lower bottom right side of the screen, click on “Library,” and then select the new playlist.
- Start playing the video, and under the video, click on the drop-down button, and on the left side of the drop-down screen, there is a loop button, click on that, and it will start to play the loop infinitely.
Check this ultimate guide to looping YouTube videos to get more ways.
Part 4: Best Apps to Loop Videos on iPhone and iPad
1. Loopideo - Loop Videos
Loopideo is the app on our list that is an answer to how to loop a video on iPhone. It lets you import any video from your play that you want to play in a loop. This is a great tool when it comes to individual and organizational presentations. This powerful app can be very useful for you in many cases.
2. Loop Video – GIF Maker
The second app on our list is Loop Video GIF Maker. It is very fun and easy to use the tool. It allows you to make the videos loop by turning them into GIFs. Loop Video GIF Maker allows you to import any video from your gallery into your app. You can then convert into a looping GIF. You can also choose the playback speed of the GIF after you can export it to the gallery or upload it to your social media directly from the app.
3. Loopideo Pro
Loopideo Pro is a more feature-filled app on the App Store. Loopideo allows you to make the videos loop an unlimited amount of times. You can also choose the formats that you want to convert the looping video into. This app also gives you the option to choose the playback speed and then can also convert it into GIF speed so that you can save it in your gallery.
4. iMovie
iMovie is a more professional app that is available on the list. This app allows you to loop not only the video but also edit the video. This allows you to play the video in a loop for an unlimited amount of time in the built-in player, but when it comes to saving the looping video, it is not possible because you would need an unlimited amount of space to save that video.
5. Looper
The last app on our list is a looper, and it is a very fun and easy-to-use app available on this list. Choose a video from your gallery, Local Videos, or iCloud Drive. Select the times you want the video to repeat and play. You can also export your video in reverse or in GIF format.
Bonus: Record a Looping Video with Boomerang app on iPhone
To make a looping video on your iPhone, you can either download the boomerang app or use the boomerang video on Instagram.
If you are using the Boomerang app, take these steps to make a looping video:
- Launch the Boomerang from Instagram app on your iPhone, if you haven’t installed it already, click on the search bar and type in Boomerang in the App Store.
- The welcome screen will appear, swipe left and tap on Get started. Allow it to access to your camera, location, and photos. After you are done setting up, you can make the videos.
- To make a boomerang video, click and hold the shutter button. Hold the shutter for a few seconds and move the phone across the image or scene.
- A preview of the looping video will appear; tap on Done to save the video. Or click on the X symbol to make a new video.
- You can change the settings to record a selfie video by clicking on the curved arrows symbol. And you can also tap the lightning sign to put the flash on and off.
To make the video with the Instagram Boomerang feature:
- Open the Instagram app, and then swipe left as if to add a story.
- Click on the boomerang icon (infinity symbol). Press and hold the shutter to make the video.
- Preview the video, and you can add texts, songs, markups, and stickers to the video.
- And then click on the arrow-down symbol to save/ download the video. You can share the video to close friends or your story.
Part 5: What If You’d Like to Loop Videos on Computer?
Filmora is one of the most popular video editors among video creators. It gives you high-quality end product, smooth slowing down & speeding up movements, voiceovers on top of music tracks and transitions between audio & video clips. But another amazing benefit of this computer video editor is that you can produce a loop video.
![]()
The Best Video Looper on Windows and Mac
- Loop and repeat videos multiple times
- Copy and paste clips easily
- Built-in plentiful templates and effects
- Export to MP4, MOV, MKV, GIF and multiple formats
For Win 7 or later (64-bit)
Secure Download
For macOS 10.14 or later
Secure Download
Click here to get Filmora for PC by email
or Try Filmora App for mobile >>>
download filmora app for ios ](https://app.adjust.com/b0k9hf2%5F4bsu85t ) download filmora app for android ](https://app.adjust.com/b0k9hf2%5F4bsu85t )
In this part, I’m going to show you how to create looping video in Filmora video editor with the reverse effect. It’s actually really easy and doesn’t require any complicated steps. You’ll be able to create a cool, looping video in no time! So, let’s get started!
Step 1: Import Videos to Filmora video editor
Launch Filmora video editor on your Windows or Mac computer and then make a new project. Import videos as you can see it has been already imported all the media in the media library from your which you want to loop effect, and then drag the video clip to the timeline.
Step 2: Copy and Paste the Video
After drag and drop the video to the timeline, make a copy of it (Ctrl+C). Go to the last frame and paste this video again.
Step 3: Enable Reverse Speed effect
Right click on the pasted video and go to Speed and Duration option in which custom speed dialog box where you can adjust the speed.
In the Custom Speed dialog box you will find the speed, duration, reverse and ripple options. To make a video with loop effects, click the Reverse option to reverse the video play back from end to start frames automatically. Click OK to save the settings.
Now you have got a video with one looping count, if you want the video to loop several times, you can select these 2 clips and paste it based on your needs to get a continuous looping effect.

We hope you found this post helpful in learning how to create looping video with Filmora video editor. This makes them perfect for use as GIFs because they are never ending! What’s more, you can create a looping video in Filmora video editor by adding a sound that plays continuously. If you’re looking to make an endlessly repeating animated image or video clip using just one still image, look no further than Filmora video editor. It’s easy and fun to use.
For Win 7 or later (64-bit)
Secure Download
For macOS 10.14 or later
Secure Download
Click here to get Filmora for PC by email
or Try Filmora App for mobile >>>
download filmora app for ios ](https://app.adjust.com/b0k9hf2%5F4bsu85t ) download filmora app for android ](https://app.adjust.com/b0k9hf2%5F4bsu85t )
Part 6: Frequently Asked Question About Looping Videos on iPhone
- What is a looping video?
It means a video that repeats for a specific number of times or maybe an unlimited amount of times automatically. For example, a GIF.
- Can I loop videos an unlimited number of times?
Yes, it is possible to loop a video an unlimited amount of times. You can learn how to loop a video on iPhone by using the methods that we discussed above in the whole article. It is not possible to save the infinitely looping because it will take an infinite amount of memory.
- Does the view count if I play a YouTube video in a loop?
No, YouTube will not count repeated views if they all come over and over again from the same sources. This is to maintain the overall quality of YouTube and make it scam-free.
For Win 7 or later (64-bit)
Secure Download
For macOS 10.14 or later
Secure Download
Click here to get Filmora for PC by email
or Try Filmora App for mobile >>>
download filmora app for ios ](https://app.adjust.com/b0k9hf2%5F4bsu85t ) download filmora app for android ](https://app.adjust.com/b0k9hf2%5F4bsu85t )
Shanoon Cox
Shanoon Cox is a writer and a lover of all things video.
Follow @Shanoon Cox
Optimize YouTube Visibility: Harness the Potential of Tags
Create High-Quality Video - Wondershare Filmora
An easy and powerful YouTube video editor
Numerous video and audio effects to choose from
Detailed tutorials provided by the official channel
Tagging your content online greatly impacts how viewers will react to your post. However, it doesn’t end at adding tags; you need to know more. Be savvy to put the tags strategically depending on your topic’s trending. So, why add a tag to YouTube videos? You want to gain enough clicks, yes, right? And that’s what hashtags do. They are online content features that will push the number of clicks to an unimaginable level.
Your content will gain more views and go viral within a short time. After all, that’s what we purpose for when posting videos. No one wants to put effort into editing videos and posting then don’t get a considerable number of views or clicks. But also, know that the ball is at your court. There are no go-zone areas when it comes to dealing with YouTube tags. Check this article on what to do for more views.
In this article
02 How will YouTube tag affect your video performance?
03 Things to consider before you start adding a tag.
04 How to add a tag to YouTube video
What is a YouTube tag?
A tag is a word used to describe a video or image. It is generally added to video titles and descriptions or used independently. They make YouTubers easily discover other posts with similar tags. YouTube tags are vital as they help the YouTube algorithm fully understand the videos you post. It’s by this that those who are interested in your video get hooked to them.
For tags to work ideally, you need to include your brand-specific tags before adding similar tags. YouTube auto-suggest is another gem in this scenario. Just see what YouTube suggests when you type while searching other similar topics. For great results, place the most important keywords and tags first, as these will act as the face of your video.
How will YouTube tag affect your video performance?
It is YouTube tags that help viewers to find videos they are searching for on YouTube. Besides, this is how it works: An audience will type keywords into YouTube’s search bar. Then videos with the same tag and keywords will appear in the search results. If not correctly done, the YouTube tag could affect your video performance and lead to such outcomes.
1. No adequate audience engagement
Your main focus should be audience engagement. You are trying to drive the attention of many YouTube users as possible. A small mistake, and you lose track. It is wise to know the best approach to use your tags. Improper YouTube tagging will not drive enough audience to your channel. You, therefore, won’t get adequate audience engagement.
2. Your video won’t go viral
Anything selling should strive to reach thousands and probably millions of viewers. Perhaps you have put in several days and months of work on a single video, only for it to be viewed by a few fellows. You will feel like a waste of time when you put so much effort, yet your videos don’t go viral. It means there will be fewer people looking out for your content.
3. Limited chances of your video ranking high
If you don’t do YouTube tagging the right way, then the chances are that your video won’t rank high. Everyone feels better when they get a pat on the back for a well-done job. But what happens if there is no traffic to your video? You probably lose the urge to continue doing more videos. Just play right, so you are not demoralized whenever you post your videos.
Things to consider before you start adding a tag
If used properly, YouTube tags are a great way for your video and business to perform well. You’ll attract the audience and probably get a flux of customers. And the tricks are just at your fingertips. You only need to give the best approach possible to all the steps of your YouTube tagging. Here are some tips to help you out.
1) Use keyword variations
Try to use variations of keywords to increase the chances of your video ranking high. The audience will use several phrases to lead them to the right YouTube video. More so, they’ll even change the order of keywords for best results. It would be best to strive to appear in as many searches as possible. The best option is to use the “YouTube” tag generator to gather as many relevant tags as possible. It will pop you more ideas and let you identify the most important core terms that you can build on.
2) Research competitors
This trick works well for you before you add a tag to a YouTube video. Check out what your competitors are up to and what tags they use. While you check at what competitors do, also mind the trending tags. You don’t want to be left behind in the quick-paced technological advances. But ensure your searches are related to your content. Any misleading tags will plunge you into more drawbacks. Checking out on the latest trends will help you generate more ideas for useful keywords that make your videos rank better.
3) Conduct keyword research
Research is a vital point to start from. By this, you’ll find other keyword possibilities for your video. Don’t just think of keywords out of the blue but ensure that the audience searches what you use. It is better to check out the generic relationship between YouTube tags and your video content. Find keywords that will directly link to what your video is all about. You can also find out what has worked for those in your industry to know the best approach to give.
4) Write a keyword-optimized title and description
Ensure that the texts associated with your video are keyword-optimized. Your audience will majorly rely on the video title and description. The description should emphasize more on what the title is. Consider that first, and then find the kinds of tags that would correlate with both your title and description. Besides, it is the best way for your audience to quickly find your videos as the keywords will directly link them.
5) Don’t go overboard
Even though there are no limits on words for YouTube tags, don’t use so many words; it may turn away your audience. Instead, focus on adding relevant tags but don’t stuff in keywords. Going overboard may automatically take you off the topic and mislead your audience.
How to add a tag to a YouTube video
Adding the right YouTube tag will increase the chances of YouTubers finding and watching your video. Here are the steps how to add a tag to a YouTube video.
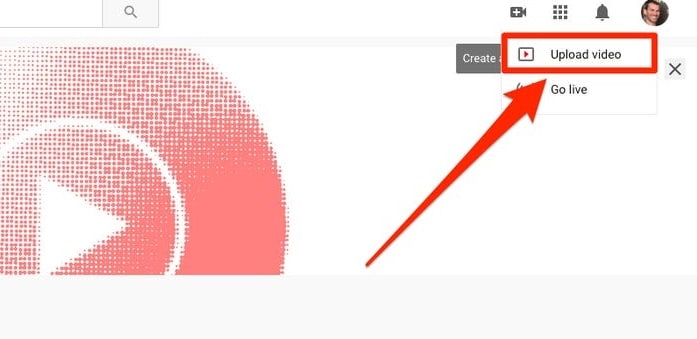
Step 1. First, log in to your YouTube account and hit the “Camera” icon. It is located at the top-right corner of your screen.
Step 2. Check the drop-down menu and choose the “Upload Video” option.
Step 3. Select from your videos which one to upload. Then click on the “Edit” tab to add relevant information like keywords, descriptions, etc.
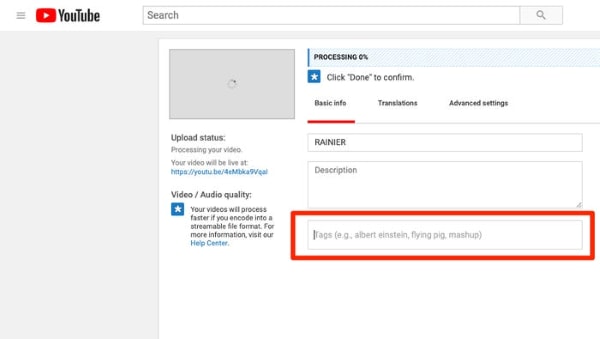
Step 4. Give your video a name and description. Ensure the description correlates to the title of your video.
Step 5. Add relevant tags, separating them with commas. You can use from five to fifteen tags. YouTube may ignore your tags if they are more than 15.
Step 6. Click on the “Save” tab to complete the upload.

Make Your Video Better with Filmora
You may know how to add a tag to a YouTube video, but you might not know how to come up with a compelling piece of video. Filmora works in simple steps to produce a quality video that makes heads turn around. Its powerful editing tools enable you to add several effects for better viewing. It has over 800 stunning effects to enhance your videos with. The export feature also lets you upload your videos to YouTube in any format just with a click of a button.
Key Features
- Edit and export your videos at a high resolution of up to 4K
- Easily remove any background noise from the video
- Make unique clips by slowing them down or increasing speed up to ten times
- It supports GIF files among other output formats
- Easily flip your clips and play them backward.
For Win 7 or later (64-bit)
For macOS 10.12 or later
Conclusion
● YouTube tags play a vital role for you and your potential customers. YouTube’s algorithm uses your tags to match them to similar search queries. When properly utilized, tags can bring an over flux of customers to your video. You have to know how to add a tag to a YouTube video for better results. Remember that YouTube tags can also drive away customers if not properly utilized. We have covered the effects and the best approach when settling on YouTube tags.
● Nonetheless, ensure your videos are top-notch before you tag them around. The best video editor – Filmora – works to produce high-end videos. Try it and gain additional traffic to your video.
Tagging your content online greatly impacts how viewers will react to your post. However, it doesn’t end at adding tags; you need to know more. Be savvy to put the tags strategically depending on your topic’s trending. So, why add a tag to YouTube videos? You want to gain enough clicks, yes, right? And that’s what hashtags do. They are online content features that will push the number of clicks to an unimaginable level.
Your content will gain more views and go viral within a short time. After all, that’s what we purpose for when posting videos. No one wants to put effort into editing videos and posting then don’t get a considerable number of views or clicks. But also, know that the ball is at your court. There are no go-zone areas when it comes to dealing with YouTube tags. Check this article on what to do for more views.
In this article
02 How will YouTube tag affect your video performance?
03 Things to consider before you start adding a tag.
04 How to add a tag to YouTube video
What is a YouTube tag?
A tag is a word used to describe a video or image. It is generally added to video titles and descriptions or used independently. They make YouTubers easily discover other posts with similar tags. YouTube tags are vital as they help the YouTube algorithm fully understand the videos you post. It’s by this that those who are interested in your video get hooked to them.
For tags to work ideally, you need to include your brand-specific tags before adding similar tags. YouTube auto-suggest is another gem in this scenario. Just see what YouTube suggests when you type while searching other similar topics. For great results, place the most important keywords and tags first, as these will act as the face of your video.
How will YouTube tag affect your video performance?
It is YouTube tags that help viewers to find videos they are searching for on YouTube. Besides, this is how it works: An audience will type keywords into YouTube’s search bar. Then videos with the same tag and keywords will appear in the search results. If not correctly done, the YouTube tag could affect your video performance and lead to such outcomes.
1. No adequate audience engagement
Your main focus should be audience engagement. You are trying to drive the attention of many YouTube users as possible. A small mistake, and you lose track. It is wise to know the best approach to use your tags. Improper YouTube tagging will not drive enough audience to your channel. You, therefore, won’t get adequate audience engagement.
2. Your video won’t go viral
Anything selling should strive to reach thousands and probably millions of viewers. Perhaps you have put in several days and months of work on a single video, only for it to be viewed by a few fellows. You will feel like a waste of time when you put so much effort, yet your videos don’t go viral. It means there will be fewer people looking out for your content.
3. Limited chances of your video ranking high
If you don’t do YouTube tagging the right way, then the chances are that your video won’t rank high. Everyone feels better when they get a pat on the back for a well-done job. But what happens if there is no traffic to your video? You probably lose the urge to continue doing more videos. Just play right, so you are not demoralized whenever you post your videos.
Things to consider before you start adding a tag
If used properly, YouTube tags are a great way for your video and business to perform well. You’ll attract the audience and probably get a flux of customers. And the tricks are just at your fingertips. You only need to give the best approach possible to all the steps of your YouTube tagging. Here are some tips to help you out.
1) Use keyword variations
Try to use variations of keywords to increase the chances of your video ranking high. The audience will use several phrases to lead them to the right YouTube video. More so, they’ll even change the order of keywords for best results. It would be best to strive to appear in as many searches as possible. The best option is to use the “YouTube” tag generator to gather as many relevant tags as possible. It will pop you more ideas and let you identify the most important core terms that you can build on.
2) Research competitors
This trick works well for you before you add a tag to a YouTube video. Check out what your competitors are up to and what tags they use. While you check at what competitors do, also mind the trending tags. You don’t want to be left behind in the quick-paced technological advances. But ensure your searches are related to your content. Any misleading tags will plunge you into more drawbacks. Checking out on the latest trends will help you generate more ideas for useful keywords that make your videos rank better.
3) Conduct keyword research
Research is a vital point to start from. By this, you’ll find other keyword possibilities for your video. Don’t just think of keywords out of the blue but ensure that the audience searches what you use. It is better to check out the generic relationship between YouTube tags and your video content. Find keywords that will directly link to what your video is all about. You can also find out what has worked for those in your industry to know the best approach to give.
4) Write a keyword-optimized title and description
Ensure that the texts associated with your video are keyword-optimized. Your audience will majorly rely on the video title and description. The description should emphasize more on what the title is. Consider that first, and then find the kinds of tags that would correlate with both your title and description. Besides, it is the best way for your audience to quickly find your videos as the keywords will directly link them.
5) Don’t go overboard
Even though there are no limits on words for YouTube tags, don’t use so many words; it may turn away your audience. Instead, focus on adding relevant tags but don’t stuff in keywords. Going overboard may automatically take you off the topic and mislead your audience.
How to add a tag to a YouTube video
Adding the right YouTube tag will increase the chances of YouTubers finding and watching your video. Here are the steps how to add a tag to a YouTube video.
Step 1. First, log in to your YouTube account and hit the “Camera” icon. It is located at the top-right corner of your screen.
Step 2. Check the drop-down menu and choose the “Upload Video” option.
Step 3. Select from your videos which one to upload. Then click on the “Edit” tab to add relevant information like keywords, descriptions, etc.
Step 4. Give your video a name and description. Ensure the description correlates to the title of your video.
Step 5. Add relevant tags, separating them with commas. You can use from five to fifteen tags. YouTube may ignore your tags if they are more than 15.
Step 6. Click on the “Save” tab to complete the upload.
Make Your Video Better with Filmora
You may know how to add a tag to a YouTube video, but you might not know how to come up with a compelling piece of video. Filmora works in simple steps to produce a quality video that makes heads turn around. Its powerful editing tools enable you to add several effects for better viewing. It has over 800 stunning effects to enhance your videos with. The export feature also lets you upload your videos to YouTube in any format just with a click of a button.
Key Features
- Edit and export your videos at a high resolution of up to 4K
- Easily remove any background noise from the video
- Make unique clips by slowing them down or increasing speed up to ten times
- It supports GIF files among other output formats
- Easily flip your clips and play them backward.
For Win 7 or later (64-bit)
For macOS 10.12 or later
Conclusion
● YouTube tags play a vital role for you and your potential customers. YouTube’s algorithm uses your tags to match them to similar search queries. When properly utilized, tags can bring an over flux of customers to your video. You have to know how to add a tag to a YouTube video for better results. Remember that YouTube tags can also drive away customers if not properly utilized. We have covered the effects and the best approach when settling on YouTube tags.
● Nonetheless, ensure your videos are top-notch before you tag them around. The best video editor – Filmora – works to produce high-end videos. Try it and gain additional traffic to your video.
Also read:
- 2024 Approved Confirming YouTube Pro-Rated Earnings
- The Ultimate Gear List for Any Aspiring Vlogger - Top 12 Cameras
- [New] Cutting Through the Noise Optimal Thumbnail Sizes
- [Updated] Essential Steps to Designing Exceptional YouTube Thumbnails
- [New] 9 Top-Tier YouTube Fitness Tips to Captivate Audience's Movement
- Seamless Online Video Capture Hub
- 2024 Approved A Comprehensive Guide to Creating Viral YouTube Shorts Videos
- [Updated] Enhancing Visibility Popularize Your YouTube Short Videos
- [New] Essential YouTube Equipment For Starting Your Channel - What Do You Really Need?
- 20+ Hashes to Skyrocket Your Short Film's Popularity for 2024
- 2024 Approved Enhance Discoverability with Effective Video Tags
- In 2024, Breakdown of Profit From a Million Youtube Watches
- Audio Matters Ensuring Excellent Sound in Your YouTube Shots for 2024
- Quick Tricks Randomizing YouTube Videos on All Devices
- Boosting Video Appeal Implementing Neon Borders in Thumbnails for 2024
- Acquire High-Quality Sounds for Media Creators!
- Dissecting Purchased Engagement Assessing Its Role in Channel Development
- [Updated] Craft Your Online Identity with Customized YouTube URLs
- 2024 Approved Discover the Prime Lineup of Affordable Cutting Tools
- Step Up Your Stream Simultaneous Views on One Screen
- [Updated] Engaging Viewers with Ease The Art of Confidently Filming
- 2024 Approved Essential Tips for Editing Your Videos in YouTube Studio
- Improving Accessibility with On-Screen Text Elements on YouTube Videos
- From Phone Pics to Professional Videos Selecting the Top 9 Enhancers
- 2024 Approved Essential Tools Ranking the Best Mobile Videography Apps
- Seamless Creation at Your Fingertips Selecting Android's Top Editors
- In 2024, Essentials for Efficient YouTube Content Trimming
- In 2024, Elevating Youtube Prominence with Expert Use of the Hub
- Creating Simple Videos Top 10 YouTube Projects Anyone Can Do for 2024
- In 2024, A Comprehensive Look at Editing and Uploading Virtual Reality Videos to YouTube
- Crafting Stunning YouTubers' Imagery A Comprehensive Walkthrough
- [New] Easy Ways to Make a Great Educational Video for YouTube
- 2024 Approved Everything You Need to Know About YouTube Basic & Premium
- Tailoring Your Content to Perfection YouTube Edits in Sony Vegas Style
- [New] In 2024, Video Flexibility Unleashed 5 Powerful Online Methods to Edit Videos on Vimeo
- [New] The Ultimate Handbook for Watching Facebook Livestreams for 2024
- New Mastering Mobile Sound Recording A Curated List of Top 7 Non-Audacity Apps for Android, Updated
- [Updated] 2024 Approved Easy Techniques for Using Screencastify App
- In 2024, iPhone X Asking for Passcode after iOS 17/14 Update, What to Do? | Dr.fone
- In 2024, Guide Add LUTs in Premiere Pro with Ease
- In 2024, Ultimate Guide on iPhone 15 iCloud Activation Lock Bypass
- Remove the lock of Tecno Pop 8
- Updated 2024 Approved Top-Notch MTS Video Editors 5 Recommendations
- [Updated] In 2024, Optimal Techniques for Recording Your YouTube Events
- How To Restore Missing Messages Files from Xiaomi Redmi Note 12T Pro
- [Updated] In 2024, Accessing the Archives of Social Media History PC & Mobile Guide
- [New] In 2024, 5 Best GBA Emulators for iOS You Can Find
- Updated Explore Advanced Methods to Clear Up Background Noise in Digital Media
- In 2024, Collage Wizardry Secrets Unveiled
- Transform Your Screen with Webcam Creativity for 2024
- In 2024, How to Transfer Contacts from Samsung Galaxy S24 Ultra to Other Android Devices Devices? | Dr.fone
- Title: "IPhone Expertise Continuous Video Play"
- Author: Steven
- Created at : 2024-05-25 19:49:27
- Updated at : 2024-05-26 19:49:27
- Link: https://youtube-clips.techidaily.com/iphone-expertise-continuous-video-play/
- License: This work is licensed under CC BY-NC-SA 4.0.
