
:max_bytes(150000):strip_icc()/TravelTech_GettyImages-1410662282_CROPPED_d3sign-03c2cdf5be314894b99757426813be51.jpg)
Integrate YouTube Content Into Google Slides Effectively
Integrate YouTube Content Into Google Slides Effectively
Create High-Quality Video - Wondershare Filmora
An easy and powerful YouTube video editor
Numerous video and audio effects to choose from
Detailed tutorials provided by the official channel
Google Slide presentation is a powerful tool for creators to keep their audience engaged. This online platform lets you create and demonstrate your ideas. It will capture your viewers’ attention from the very beginning. It also doesn’t matter whatever learning style you engage. Adding YouTube videos to Google Slide will appeal to all levels of individuals.
More so, it is the best way to provide a break for both the audience and the creator. You can break Google Slide presentations with videos to offer some break. Viewers and the presenter get a breather in the process. The presenter can take a short break from speaking while the video plays. Let’s now dive into how to embed a YouTube video in Google Slides.

In this article
01 Why should we add a video to Google Slides?
02 How to add a YouTube video to Google Slide
03 How to choose the right video for your Slides?
Why should we add a video to Google Slides?
There is a great impact of adding video to Google Slides.
For attention
Videos will automatically awaken you, especially if your thoughts have started to sway during a presentation. A video has a direct way of showing creativity. The audience automatically connects the dots between the video and the presentation lines alike.
To stimulate discussion
A picture is worth a thousand words. There is a way that an added video will help the audience connect to the day’s topic. It will bring up several ideas and stir up discussion with the presenter.
Easy following
With videos embedded in Google Slide, viewers will find it easy to understand and digest. Videos automatically eliminate boredom and make any topic interesting.
How to add a YouTube video to Google Slide
Use these two methods to add a YouTube video to Google Slides. Via the Search and Direct link.
Method 1. Embed YouTube video to Google Slide by search and selection
Google has owned YouTube since the year 2006. You can, therefore, integrate Google’s products with YouTube easily.
Step 1. First, go to the slide where you want to embed your video.
Step 2. Then choose the “Insert” option from the menu bar and hit the “Video” option.

Step 3. It would be best if you now viewed the “YouTube” search bar to type in the video you want to embed. You can use keywords to search for the video in question and view instant search results.
Step 4. Then select the video you want to embed, and you’ll see it appear on the “Slide.”

Step 5. Format your video. Remember that the entire video will be embedded. You don’t necessarily need the whole video. It is time to select just a brief but relevant clip from the video to use. Then position your video to the right point using the axes from the exact starting point to the finished part you want the video to appear in.
Method 2. Embed YouTube video to Google Slide by direct link
You can engage this method if you want to include the entire video.
Step 1. Get the URL of the specific YouTube video that you want to use.

Step 2. Then go to your browser’s “Address bar” to copy the YouTube link.
Step 3. Next, open the “Presentation” slide to put your video to.
Step 4. Choose the “Insert” tab from the menu bar.
Step 5. Then hit on the “Video” option from the drop-down menu that appears.
Step 6. A new window will open automatically. Choose the “By URL” tab.
Step 7. Then paste the YouTube video URL in the “Paste YouTube URL Here” bar section.

Step 8. Wait for the video file to load and press the “Select” option. The video will immediately appear in the presentation slide. Just drag and drop the video in your preferred position.
Note: You can do a few edits inside the application. Set the timer when your video should start and when to stop. You can also adjust the video player size.
How to choose the right video for your Slides?
Not all videos will make an impact on your Google Slide. You need to use the best shot that adds value to your presentation. These guidelines will help you to settle on the best video.
Be Professional – choose the best video for your presentation. Remember that the video is part of the presentation and carries more weight. Settling for quality video will bring out the professionalism in you.
Relevant – how do you know that what you are showing your audience corresponds to the presentation piece? Ensure that the video you add has something to do with the Google Slide presentation topic. The two should naturally flow to make it easy to understand the whole concept.
Precise – your presentation is not about the video. The ideal length should not exceed 60 seconds. The longer the video, the greater the chance for your audience to lose track along the way.
Know every footage you are working with – this will help you pick the best shots for your presentation. So, learn every aspect of the video before settling down to use it.
Add new content – even though one content may suit several presentations, don’t rely on the same piece each time. Your audience will want to feel something fresh each time you are presenting. So, compose different videos for different scenarios to make that big impact.
Create an eye-catching video for your Slides with Filmora
The video quality matters when it comes to creating your Slides. The best video creator – Filmora – works in simple steps to give you an eye-catching video. It will create videos for all scenarios like marketing, tutorial, gaming, etc.
Key features of Filmora
- It offers you advanced video effects like filters, motion elements, etc
- You can multiply your fun with multiple screens with the Split Screen feature
- Easily change backgrounds using the Green Screen feature
- The speed control lets you fast forward or slow down a special moment
- Import your video clips to social media platforms
- You can also adjust the audio of your tracks using the Audio Mixer feature
Follow this guide to create a video for your slide with Filmora
Step 1. Launch Filmora
First, begin by downloading and installing Filmora on your computer device. Once installed, launch it and allow it to run. You can either create a new project or open an existing project to work on.
Step 2. Create a new project
Here, click on the “New Project” tab on the app’s welcome screen. The editor should load immediately. Then proceed to register the product. Just hit on the “Register” tab.
Step 3. Import video
Check the upper left corner of your screen to see the “Import” tab. Click on it and choose the “Import Media Files” option. Next, navigate to the location of your computer’s local list to select the clip or video you want to edit. Then, hit the “Import” button to add the video to the timeline for editing.
Step 4. Edit video
Drag and drop the raw footage to Filmora’s timeline to begin editing. Here, you can trim, add other video clips, merge, and add effects as you wish. Likewise, you can add opening titles, subtitles, and end credits to your video. More so, this tool offers different templates to use. Just drag and drop the templates you wish to use to a specific location on the timeline.
Step 5. Preview your file
Last but not least, you can preview your files. Click on the “Play” tab to start previewing your video clips. The main essence of this part is to allow you to make the necessary changes to your clips if there is a need.
Step 6. Export and Share
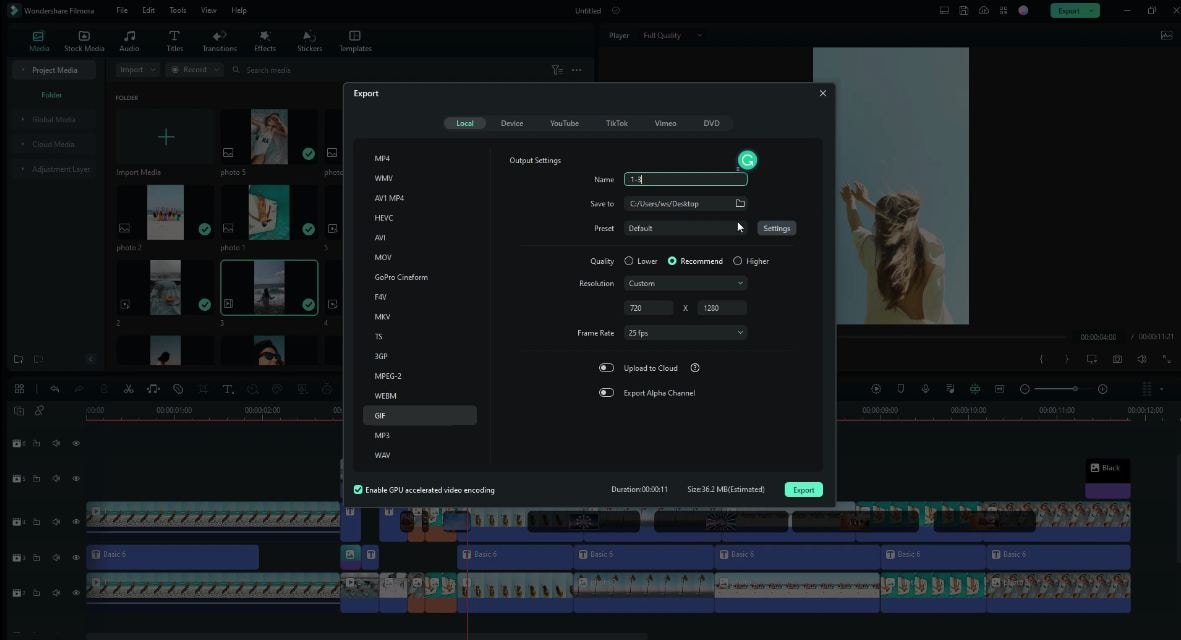
With Filmora, you can export your file to various social media platforms. But first, go to the “Output window” and select the video file format to use. This software supports several output formats to apply to any platform and device. Just click on the “Format” tab and choose the file format to use. Then also change the resolution and other parameters like frame rate and channel of your video in the “Settings” section. Finally, share your video to your YouTube channel and get ready to add the video to the Google Slide presentation.
For Win 7 or later (64-bit)
For macOS 10.12 or later
Conclusion
● You now know how to put a YouTube video in Google Slides the simple way. You can search for your YouTube videos or directly use the URL link. Whatever the case, remember that it’s the quality of your video that carries more weight. Thanks to the availability of third-party apps that you can use to create and improve the quality of your videos.
● Filmora is at your service to create high-resolution videos that you can export in any format to your YouTube channel. The tool is intuitive, and it won’t matter whether you haven’t tried it before. It is a perfect choice for both professionals and first-time users.
Google Slide presentation is a powerful tool for creators to keep their audience engaged. This online platform lets you create and demonstrate your ideas. It will capture your viewers’ attention from the very beginning. It also doesn’t matter whatever learning style you engage. Adding YouTube videos to Google Slide will appeal to all levels of individuals.
More so, it is the best way to provide a break for both the audience and the creator. You can break Google Slide presentations with videos to offer some break. Viewers and the presenter get a breather in the process. The presenter can take a short break from speaking while the video plays. Let’s now dive into how to embed a YouTube video in Google Slides.
In this article
01 Why should we add a video to Google Slides?
02 How to add a YouTube video to Google Slide
03 How to choose the right video for your Slides?
Why should we add a video to Google Slides?
There is a great impact of adding video to Google Slides.
For attention
Videos will automatically awaken you, especially if your thoughts have started to sway during a presentation. A video has a direct way of showing creativity. The audience automatically connects the dots between the video and the presentation lines alike.
To stimulate discussion
A picture is worth a thousand words. There is a way that an added video will help the audience connect to the day’s topic. It will bring up several ideas and stir up discussion with the presenter.
Easy following
With videos embedded in Google Slide, viewers will find it easy to understand and digest. Videos automatically eliminate boredom and make any topic interesting.
How to add a YouTube video to Google Slide
Use these two methods to add a YouTube video to Google Slides. Via the Search and Direct link.
Method 1. Embed YouTube video to Google Slide by search and selection
Google has owned YouTube since the year 2006. You can, therefore, integrate Google’s products with YouTube easily.
Step 1. First, go to the slide where you want to embed your video.
Step 2. Then choose the “Insert” option from the menu bar and hit the “Video” option.
Step 3. It would be best if you now viewed the “YouTube” search bar to type in the video you want to embed. You can use keywords to search for the video in question and view instant search results.
Step 4. Then select the video you want to embed, and you’ll see it appear on the “Slide.”
Step 5. Format your video. Remember that the entire video will be embedded. You don’t necessarily need the whole video. It is time to select just a brief but relevant clip from the video to use. Then position your video to the right point using the axes from the exact starting point to the finished part you want the video to appear in.
Method 2. Embed YouTube video to Google Slide by direct link
You can engage this method if you want to include the entire video.
Step 1. Get the URL of the specific YouTube video that you want to use.
Step 2. Then go to your browser’s “Address bar” to copy the YouTube link.
Step 3. Next, open the “Presentation” slide to put your video to.
Step 4. Choose the “Insert” tab from the menu bar.
Step 5. Then hit on the “Video” option from the drop-down menu that appears.
Step 6. A new window will open automatically. Choose the “By URL” tab.
Step 7. Then paste the YouTube video URL in the “Paste YouTube URL Here” bar section.
Step 8. Wait for the video file to load and press the “Select” option. The video will immediately appear in the presentation slide. Just drag and drop the video in your preferred position.
Note: You can do a few edits inside the application. Set the timer when your video should start and when to stop. You can also adjust the video player size.
How to choose the right video for your Slides?
Not all videos will make an impact on your Google Slide. You need to use the best shot that adds value to your presentation. These guidelines will help you to settle on the best video.
Be Professional – choose the best video for your presentation. Remember that the video is part of the presentation and carries more weight. Settling for quality video will bring out the professionalism in you.
Relevant – how do you know that what you are showing your audience corresponds to the presentation piece? Ensure that the video you add has something to do with the Google Slide presentation topic. The two should naturally flow to make it easy to understand the whole concept.
Precise – your presentation is not about the video. The ideal length should not exceed 60 seconds. The longer the video, the greater the chance for your audience to lose track along the way.
Know every footage you are working with – this will help you pick the best shots for your presentation. So, learn every aspect of the video before settling down to use it.
Add new content – even though one content may suit several presentations, don’t rely on the same piece each time. Your audience will want to feel something fresh each time you are presenting. So, compose different videos for different scenarios to make that big impact.
Create an eye-catching video for your Slides with Filmora
The video quality matters when it comes to creating your Slides. The best video creator – Filmora – works in simple steps to give you an eye-catching video. It will create videos for all scenarios like marketing, tutorial, gaming, etc.
Key features of Filmora
- It offers you advanced video effects like filters, motion elements, etc
- You can multiply your fun with multiple screens with the Split Screen feature
- Easily change backgrounds using the Green Screen feature
- The speed control lets you fast forward or slow down a special moment
- Import your video clips to social media platforms
- You can also adjust the audio of your tracks using the Audio Mixer feature
Follow this guide to create a video for your slide with Filmora
Step 1. Launch Filmora
First, begin by downloading and installing Filmora on your computer device. Once installed, launch it and allow it to run. You can either create a new project or open an existing project to work on.
Step 2. Create a new project
Here, click on the “New Project” tab on the app’s welcome screen. The editor should load immediately. Then proceed to register the product. Just hit on the “Register” tab.
Step 3. Import video
Check the upper left corner of your screen to see the “Import” tab. Click on it and choose the “Import Media Files” option. Next, navigate to the location of your computer’s local list to select the clip or video you want to edit. Then, hit the “Import” button to add the video to the timeline for editing.
Step 4. Edit video
Drag and drop the raw footage to Filmora’s timeline to begin editing. Here, you can trim, add other video clips, merge, and add effects as you wish. Likewise, you can add opening titles, subtitles, and end credits to your video. More so, this tool offers different templates to use. Just drag and drop the templates you wish to use to a specific location on the timeline.
Step 5. Preview your file
Last but not least, you can preview your files. Click on the “Play” tab to start previewing your video clips. The main essence of this part is to allow you to make the necessary changes to your clips if there is a need.
Step 6. Export and Share
With Filmora, you can export your file to various social media platforms. But first, go to the “Output window” and select the video file format to use. This software supports several output formats to apply to any platform and device. Just click on the “Format” tab and choose the file format to use. Then also change the resolution and other parameters like frame rate and channel of your video in the “Settings” section. Finally, share your video to your YouTube channel and get ready to add the video to the Google Slide presentation.
For Win 7 or later (64-bit)
For macOS 10.12 or later
Conclusion
● You now know how to put a YouTube video in Google Slides the simple way. You can search for your YouTube videos or directly use the URL link. Whatever the case, remember that it’s the quality of your video that carries more weight. Thanks to the availability of third-party apps that you can use to create and improve the quality of your videos.
● Filmora is at your service to create high-resolution videos that you can export in any format to your YouTube channel. The tool is intuitive, and it won’t matter whether you haven’t tried it before. It is a perfect choice for both professionals and first-time users.
From Idea to Execution: An Essential Guide to YouTube Shorts Template Design
YouTube Shorts are short, 60-second videos that can be shared across all social media platforms. They’re a great way to quickly and easily share your message with your audience. As a result, many creators are turning to YouTube Shorts Templates to help them create professional-looking videos that stand out.
YouTube Shorts Templates can create a wide variety of videos, from product demos and how-tos to vlogs and comedy skits. They can help you create polished and engaging videos without the need for expensive equipment or a lot of editing experience.

This article will explore everything you need to know about YouTube Shorts Templates, including how to use them, tips for creating great videos, and examples of how other creators use them to boost their views and reach.
Overview of YouTube Shorts
YouTube Shorts is a new feature launched by YouTube in September 2020, which allows users to create short, 15-second videos that can be shared across all social media platforms. According to the statistics of EarthWeb , YouTube Shorts has seen tremendous growth in popularity since its launch, with billions of views every day.
According to YouTube, in the U.S. alone, the watch time for Shorts has grown over 4x since November 2020, and by December 2021, daily active users of Shorts exceeded 200M. As per YouTube’s official blog, In India, Shorts watch time has grown by over 20x since its launch, and by the end of 2021, India had over 150M daily active users.
In addition to the strong growth in views and engagement, YouTube Shorts has also become a powerful tool for creators to reach new audiences and grow their channels.
According to a study by Influencer Marketing Hub, YouTube Shorts have a higher engagement rate than traditional YouTube videos, with Shorts receiving an average of 3x more comments and likes than regular videos. The study also shows that Shorts videos have a higher completion rate of 60% compared to traditional videos with 40%.
As a result of the popularity of YouTube Shorts, many creators are now turning to YouTube Shorts Templates to help them create professional-looking videos that stand out. YouTube Shorts Templates can create a wide variety of videos, from product demos and how-tos to vlogs and comedy skits. They can help you create polished and engaging videos without the need for expensive equipment or a lot of editing experience.
How To Get Profit from Short Videos
There are a few ways to monetize your YouTube Shorts videos and turn them into a source of profit. One way is through YouTube’s built-in monetization options, such as displaying ads on your videos, sponsorships, and affiliate marketing. Another way is to use your Shorts videos’ popularity to promote your products or services.
You can also use YouTube Shorts to drive traffic to your website, where you can sell products or services. Collaborating with brands and promoting their products in your videos can also be a great way to monetize your content. It’s important to remember that building a sizable audience and creating high-quality content is key to monetizing your YouTube Shorts.
Benefits of Using Templates to Create YouTube Shorts
There are several benefits to using templates to create YouTube Shorts, including:

- Time-saving: Templates provide a pre-designed structure for your video, which saves you time and effort in creating a polished and professional-looking video.
- Consistency: Templates can help you maintain a consistent look and feel for your videos, which helps to build your brand and make your videos easily recognizable.
- Cost-effective: Templates can be cost-effective, eliminating the need for expensive equipment or editing software.
- Increased engagement: Templates can help you create engaging videos that capture your audience’s attention and increase the likelihood of them watching and engaging with your content.
- Access to a wider audience: Templates can help increase your views and reach, which can help you grow your channel and reach a wider audience.
- Easy to use: Templates are easy to use, even if you have yet to gain any prior video editing experience.
Using templates allows you to quickly create high-quality, professional-looking videos while also saving money and reaching a wider audience.
How to Make YouTube Shorts Using a Video Editor With Templates
Creating YouTube Shorts using a video editor with templates is a great way to save time and effort while still producing polished, professional-looking videos. One great video editor that can be used for this purpose is Filmora. Filmora has desktop and mobile versions, so you can create YouTube Shorts using any device.
Video Templates Feature of Filmora
With Wondershare Filmora , users can access a variety of templates for YouTube Shorts, which can be easily customized to fit the style and theme of their videos. These templates include various themes such as travel, vlogs, product demos, and more.
Wondershare Filmora also provides a wide range of editing tools, such as text, music, and effects, to help users create engaging and visually appealing videos. Filmora’s templates are an easy and efficient way to create visually appealing and engaging YouTube Shorts that stand out from the rest.
Free Download For Win 7 or later(64-bit)
Free Download For macOS 10.14 or later
Step-by-Step Guide to Create YouTube Shorts With Templates Using Filmora for Desktop
Creating professional-looking YouTube Shorts can be time-consuming and daunting, especially if you have limited experience with video editing. However, using a video editor like Filmora, you can easily create high-quality YouTube Shorts using templates. This step-by-step guide will show you how to use Filmora’s video templates feature to create visually appealing YouTube Shorts on your desktop.
Step 1. Start Wondershare Filmora on your computer. On the “Templates” tab, you will find a variety of component templates to choose from.

Step 2. Select the template you want to use and place it on the timeline point.

Step 3. Add your videos, pictures, and audio files to the designated placeholders in the template to replace the sample ones.

Step 4. Trim, edit the clip or add other effects, texts and stickers as you like.

Step 5. Click the “Export“ button on the upper part to save your clip.
When creating YouTube Shorts, it is important to remember that these videos are vertical. You can easily find vertical video templates in Filmora’s template library. So select the one that best fits your needs and style.
Step-by-Step Guide to Use YouTube Shorts Video Templates With Filmora for Mobile
Creating professional-looking YouTube Shorts on mobile devices is now more accessible than ever. This step-by-step guide will show you how to use Filmora’s video templates feature to create visually appealing YouTube Shorts on your mobile device.
Step 1. Install the Filmora app on your device, then open it.

Step 2. Tap the “Template“ button on the screen’s bottom right.

Step 3. Select the template you wish to use.
Step 4. Press the “Make Video“ button to download the chosen template.

Step 5. Add the necessary footage to edit the template, then tap “Next.”

Step 6. You can preview the video and make any necessary changes.

Step 7. Tap the “Export“ button to save the completed video.

If you want to learn more about using Filmora’s video templates feature to create YouTube Shorts on your mobile device, we recommend watching this video tutorial:
YouTube Shorts Video Template Resources in Filmora
Filmora offers a wide variety of video templates that can be used to create YouTube Shorts. These templates include various themes such as an event, sports, fashion, lifestyle, and more. These templates can be found in Filmora’s library, making it easy for users to find the perfect template for their YouTube Short.
1. Event YouTube Shorts Template

Event YouTube Shorts Templates are an interactive way for creators to showcase their events dynamically and engagingly. These templates come with pre-designed elements such as animations, backgrounds, and text styles that are perfect for highlighting the key moments and creating excitement among the audience. It’s an effective way to make the event more engaging and interactive for the audience.
2. Sports YouTube Shorts Video Template

Sports YouTube Shorts video templates are pre-designed, customizable video templates for creating short, engaging sports-related content for YouTube’s Shorts feature. These templates often include scoreboards, team logos, and highlights footage and can be easily customized with your text, images, and videos. They are ideal for sports teams, athletes, and content creators looking to quickly and easily create professional-looking videos.
3. Fashion YouTube Shorts Template

Fashion YouTube Shorts templates are pre-designed video templates that can be used to create visually appealing and engaging content for fashion-related YouTube Shorts. These templates often include elements such as fashion models, clothing and accessory displays, and trendy backgrounds and can be easily customized to suit the creator’s specific needs and aesthetic. They can be used to create various types of videos, including fashion lookbooks, product reviews, and styling tutorials.
4. Life Style Shorts Template

Lifestyle YouTube Shorts templates often include elements such as different lifestyle scenes, like traveling, cooking, home decor, and DIY projects, and can be easily customized to suit the creator’s specific needs and aesthetic. They can create various videos, including travel vlogs, recipe videos, and DIY tutorials.
Conclusion
YouTube Shorts are a great way to connect with your audience and promote your brand. Using a video editor like Filmora, you can easily create high-quality YouTube Shorts using templates. Filmora offers various video templates that can be used to create YouTube Shorts, including templates for events, sports, fashion, and lifestyle.
Filmora templates are fully customizable, meaning you can change the text, images, and colors to match your brand. These templates can be found in Filmora’s library, making it easy for users to find the perfect template for their YouTube Short. With the help of Filmora, you can easily create professional-looking YouTube Shorts that stand out and capture your audience’s attention.
Free Download For macOS 10.14 or later
Step-by-Step Guide to Create YouTube Shorts With Templates Using Filmora for Desktop
Creating professional-looking YouTube Shorts can be time-consuming and daunting, especially if you have limited experience with video editing. However, using a video editor like Filmora, you can easily create high-quality YouTube Shorts using templates. This step-by-step guide will show you how to use Filmora’s video templates feature to create visually appealing YouTube Shorts on your desktop.
Step 1. Start Wondershare Filmora on your computer. On the “Templates” tab, you will find a variety of component templates to choose from.
Step 2. Select the template you want to use and place it on the timeline point.
Step 3. Add your videos, pictures, and audio files to the designated placeholders in the template to replace the sample ones.
Step 4. Trim, edit the clip or add other effects, texts and stickers as you like.
Step 5. Click the “Export“ button on the upper part to save your clip.
When creating YouTube Shorts, it is important to remember that these videos are vertical. You can easily find vertical video templates in Filmora’s template library. So select the one that best fits your needs and style.
Step-by-Step Guide to Use YouTube Shorts Video Templates With Filmora for Mobile
Creating professional-looking YouTube Shorts on mobile devices is now more accessible than ever. This step-by-step guide will show you how to use Filmora’s video templates feature to create visually appealing YouTube Shorts on your mobile device.
Step 1. Install the Filmora app on your device, then open it.
Step 2. Tap the “Template“ button on the screen’s bottom right.
Step 3. Select the template you wish to use.
Step 4. Press the “Make Video“ button to download the chosen template.
Step 5. Add the necessary footage to edit the template, then tap “Next.”
Step 6. You can preview the video and make any necessary changes.
Step 7. Tap the “Export“ button to save the completed video.
If you want to learn more about using Filmora’s video templates feature to create YouTube Shorts on your mobile device, we recommend watching this video tutorial:
YouTube Shorts Video Template Resources in Filmora
Filmora offers a wide variety of video templates that can be used to create YouTube Shorts. These templates include various themes such as an event, sports, fashion, lifestyle, and more. These templates can be found in Filmora’s library, making it easy for users to find the perfect template for their YouTube Short.
1. Event YouTube Shorts Template
Event YouTube Shorts Templates are an interactive way for creators to showcase their events dynamically and engagingly. These templates come with pre-designed elements such as animations, backgrounds, and text styles that are perfect for highlighting the key moments and creating excitement among the audience. It’s an effective way to make the event more engaging and interactive for the audience.
2. Sports YouTube Shorts Video Template
Sports YouTube Shorts video templates are pre-designed, customizable video templates for creating short, engaging sports-related content for YouTube’s Shorts feature. These templates often include scoreboards, team logos, and highlights footage and can be easily customized with your text, images, and videos. They are ideal for sports teams, athletes, and content creators looking to quickly and easily create professional-looking videos.
3. Fashion YouTube Shorts Template
Fashion YouTube Shorts templates are pre-designed video templates that can be used to create visually appealing and engaging content for fashion-related YouTube Shorts. These templates often include elements such as fashion models, clothing and accessory displays, and trendy backgrounds and can be easily customized to suit the creator’s specific needs and aesthetic. They can be used to create various types of videos, including fashion lookbooks, product reviews, and styling tutorials.
4. Life Style Shorts Template
Lifestyle YouTube Shorts templates often include elements such as different lifestyle scenes, like traveling, cooking, home decor, and DIY projects, and can be easily customized to suit the creator’s specific needs and aesthetic. They can create various videos, including travel vlogs, recipe videos, and DIY tutorials.
Conclusion
YouTube Shorts are a great way to connect with your audience and promote your brand. Using a video editor like Filmora, you can easily create high-quality YouTube Shorts using templates. Filmora offers various video templates that can be used to create YouTube Shorts, including templates for events, sports, fashion, and lifestyle.
Filmora templates are fully customizable, meaning you can change the text, images, and colors to match your brand. These templates can be found in Filmora’s library, making it easy for users to find the perfect template for their YouTube Short. With the help of Filmora, you can easily create professional-looking YouTube Shorts that stand out and capture your audience’s attention.
Also read:
- [New] Cutting-Edge Conjurations in Filmmaking
- [Updated] Essential YouTube End Screen Templates for Content Makers
- In 2024, A Guide to Upload Twitch Streams to YouTube
- Tripping Up? Avoid Common Tripod Mistakes in Vlogging
- Weaving Narrative Threads Into Trailers
- [New] Affordable Minecraft Video Graphics
- [New] Building a Brand Through Consistently Engaging Vlogs
- Journey Through Virtual Realms on YouTube's Channel
- A Comprehensive Walkthrough Setting Up Your First WireCast Livestream to Youtube
- Precise Video Queue A Step-by-Step Guide to Creating an Effective Playlist on YouTube
- Professional GIF Designers' Choice List
- 2024 Approved Crafting the Perfect Panel of Playback with YouTube
- Mini YouTube Content Explained
- Distinctive Digital Monikers for Video Creators for 2024
- The Best of the Best 8 Mirrorless Cameras for Live Streaming
- [New] Automatic Cycling of Videos on iPhone Ease
- In 2024, 10 Fastest Growing YouTube Channels to Light Up Your Mind
- Loop & Love Effortless YouTube Video Views on Your TV Screen
- Comparing TikTok & YouTube Shorts for Personal Content Creation
- [New] Dive Deep Into Designing Dynamic YouTube Live Thumbnails
- 2024 Approved Audiovisual Powerhouses Select Best Laptops for Editing
- In 2024, Coherent and Curated YouTube Playlists Online & Mobile Assembly Guide
- Top 10 Game Recorder Software List
- Cutting-Edge Techniques A Guide to Next-Level Effectiveness in Your YouTube Ads for 2024
- Optimal Methods for Mobile Video Sharing on YouTube
- Expert Insights Into YouTube Thumbnail Design
- Effortless Sound Sourcing The Top 15 Freebie Audiosites for 2024
- Thrifty Tips for Hosting Webinars on YouTube
- Students' Gateway to History The Top 10 Youtube Archives
- Humor Hub Catching the Best Comedy Channels Ever
- The Small Business Video Marketing Playbook
- Stream Freedom on the Go Download Your Favorite YouTube Tracks iOS
- Crafting Perfect Thumbnails for Higher Clickthrough Rates
- [New] Best Voice Conversion Tools for Vlogging Professionals
- The Ultimate DIY Guide for Building Powerful YouTube Ad Videos
- [New] How to Embed A YouTube Playlist On a Website
- Buy YouTube Subscribers - Hundreds of Subscribers for $5, In 2024
- In 2024, Crafting a Cash-Flow Career with Content Creation Like Ajey Nagar
- [New] Easy Ways to Make a Great Educational Video for YouTube
- Youtubers' Edge The Ultimate Guide to Apps for Short Form Edits
- Cutting Through Complexity Twitch Content on YouSocial Media Giant
- Twitter's Most Popular Amazon Originals in 2E'23 For 2024
- [New] Automated Calendar Management for Remote Teams for 2024
- Best Video Repair tool to Fix and Repair Corrupt MP4,MOV,AVI video files of Tecno Camon 20 Pro 5G
- [New] 2024 Approved Enhancing OBS on a Thrifty Computer
- Best Ways on How to Unlock/Bypass/Swipe/Remove Honor Play 8T Fingerprint Lock
- Updated Eliminating Lyrics and Choirs with Precision A Complete Guide to Using Adobe Auditions Voice Reduction Capabilities
- Repair damaged, unplayable video files of Itel A60s on Windows
- In 2024, Premium Solutions for Remote Team Interaction
- 5 Ways to Restart Oppo A78 5G Without Power Button | Dr.fone
- Undelete lost call logs from Huawei P60
- In 2024, How to Unlock SIM Card on OnePlus 12R online without jailbreak
- Updated In 2024, The Future of Silence Leading Applications for Pure Auditory Experience
- [New] 2024 Approved Rank the Best FB Video Downloaders - Here's How
- [New] 2024 Approved Restoring Functionality in OBS Capture Device
- How To Change Text In Premiere Pro
- How to Reset Gmail Password on Vivo Y27s Devices
- Updated Best Celebrity Voice Generator Tools You Cannot Miss
- [New] Logitech's Full-Blown 4K Webcam - Complete Reveal & Evaluation for 2024
- [Updated] In 2024, The Ultimate List of Best Mac & PC Screen Recorders
- [Updated] Perilous Pathways Decade’s #10 Adventures for 2024
- In 2024, The Reaper Experience Features, Applications, and Step-by-Step Tutorial Guides
- Updated 2024 Approved An In-Depth Look at Embedding Audios Within Windows-Based Animated Gifs
- Hassle-Free Ways to Remove FRP Lock from Samsung Galaxy S24+ Phones with/without a PC
- iSpoofer is not working On Vivo T2 5G? Fixed | Dr.fone
- New In 2024, The Essential Guide to the Best 7 Audio Editors for Professional Guitarists
- Enhance Visual Storytelling Techniques for Seamless Audio Integration in Adobe After Effects
- New In 2024, 6 Essential Audio Converters for Music Lovers and More
- Garmin's Pioneering Ultra 30 Camera - A Critical Assessment
- [New] 2024 Approved Quick Guide to LOL Gaming Broadcasts (3 Methods)
- Updated 2024 Approved Add Tags to Your Videos Best MP4 Editors for Windows and macOS
- In 2024, 3uTools Virtual Location Not Working On Oppo A78? Fix Now | Dr.fone
- [Updated] In 2024, Essential Guide to Economical, Multiplatform Video Conferencing Software
- Title: Integrate YouTube Content Into Google Slides Effectively
- Author: Steven
- Created at : 2024-05-25 19:49:06
- Updated at : 2024-05-26 19:49:06
- Link: https://youtube-clips.techidaily.com/integrate-youtube-content-into-google-slides-effectively/
- License: This work is licensed under CC BY-NC-SA 4.0.
