
:max_bytes(150000):strip_icc()/how-to-watch-the-crow-movies-in-order-742a37ba4e0748e3a691420484c36796.jpg)
Inspecting Dialogues in YouTube Vids
Inspecting Dialogues in YouTube Vids
How to Search Comments on YouTube Quickly?

Richard Bennett
Mar 27, 2024• Proven solutions
Are you trying to search for something on a document or a web page? You know how to do that. You use the combination ‘Ctrl + F’ for Windows or ‘Command + F’ for Mac. But searching comments from the YouTube comments section can be tricky because –
- There are many comments on the video, most of which do not load immediately. You can keep scrolling and still not find the desired comment.
- Managing and analyzing the vast number of comments can be difficult for as busy a platform as YouTube.
So, if you want to search YouTube comments quickly, what can you do? We will show you in this blog.
Part 1: Using the Built-in YouTube Studio Feature to Search Comments
How does the built-in YouTube Studio Feature make searching comments on YouTube easier?
Comments are the best way to interact with subscribers on YouTube. YouTube’s Studio is a new addition to help creators filter and respond to comments and create a healthy community . Sometimes, YouTubers also receive hateful and inappropriate comments. You can use the Studio Feature to report or delete those comments as well.
If you have a channel, you can use this feature in some simple steps.
- Visit YouTubewebsite on your desktop and sign in to your YouTube account.
- Go to the top right corner of your homepage, and you will find your profile icon. Click on it and from the drop-down menu, select the YouTube Studio option.
- This will take you to the YouTube Studio home page. On the left side, find and click on the Comments option, and then you will see all comments your YouTube channel has received.
- You can now click on the Filter icon from the comments section and type in the search term directly. Or, you can click the Search from the options, and type in the words you are looking for.
- Click on Apply, and you will see the comments with the keywords you chose.
Besides the comment search feature, the YouTube Studio also has some in-built search filter categories, such as –
Search: Search for comments with particular search terms. You can also search comments posted by a specific channel by using their username as the search term.
Contains questions: Filter the comments which have questions.
Channel member status: Search for comments from the channel members. YouTube channel membership is only available to channels joined YouTube Partner Program.
Subscriber count: Filter comments with the channel subscriber count, you can search for comments from channels with a minimum number of subscribers (from 100-10M).
Response status: Filter the comments to which you have responded or haven’t responded to.
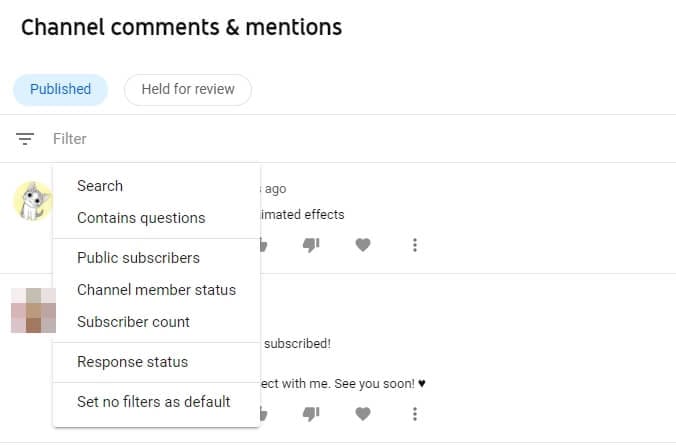
You can combine these additional filters to narrow your comments search for YouTube.
Part 2: Using YCS – YouTube Comment Search Extension
You can use the YouTube Comment Search browser extension supported by Google Chrome to help you search YouTube comments effortlessly. To use it, follow these steps below.
- First, you need to install this extension. You can click this URL https://chrome.google.com/webstore/detail/ycs-youtube-comment-searc/pmfhcilikeembgbiadjiojgfgcfbcoaa?hl=en Or, you can open the Chrome Extensions page, and in the search bar at the top, type in YCS – YouTube Comment Search and press Enter.
- Click on the result that appears and then tap on the Add to Chrome button. This will add the extension to your browser.
- Once you add the extension, openYouTube on your browser. Click on the video where you want to search the comments. You will find the YouTube Comment Search extension below it.
- Tap on ‘Load comments’ and wait till the extension loads all the comments on the video.
- Now type your keywords, press Enter, and YCS will show all comments having the keyword you typed.

Part 3: Using Comments Search for YouTube Extension
If you are looking for an easy method to search YouTube comments, you can use the Comments Search for YouTube extension. Google Chrome supports this extension that allows you to search comments on YouTube without leaving the website.
How can you use this extension to search YouTube comments? Here is a simple step-by-step tutorial.
- First, you need to download the extension fromGithub . Then, locate the file on your computer and unzip it.
- Next, you need to install it in the browser. Open your Chrome browser, and from the top right corner, click on the three vertical dots. You will find the Settings option towards the end of the drop-down menu, and then click on it.
- When the Settings page opens, select Extensions from the panel on the left side of the webpage. This will take you to a new tab.
- On the top right corner of the page, there will be a toggle switch called Developer Mode. Turn it on if it is off.
- Once the Developer Mode is on, you will see three options now. Click on Load unpacked. Locate the downloaded extension file and click on it. Finally, disable Developer Mode.
When you complete these steps, you click on the extension icon to search comments on YouTube. You can also do this by using the combination ‘Ctrl + S’ on the target YouTube page. The extension also includes some advanced features like –
1. Global Mode
In this mode, you can type ‘global: your parameter’ to search all comments on the channel that fit your parameter.
2. Advanced Mode
This mode allows you to enter special commands to carry out an advanced search. Some including typing –
- ‘:’ to look for comments with timestamps
- ‘:all’ to see all comments
- ‘:creator’ to get comments made by the creator
Part 4: How Do You Search Comments You Have Posted on YouTube?
Did you post a comment on your favorite celebrity’s video? Do you think it may be embarrassing and want to delete it now but cannot find it now amidst so many comments? It is where you can make use of YouTube’s Comment History feature.
YouTube has now added this feature which you can see all the comments you ever posted on YouTube in one place.
How to Use the Comment History feature to Search Comments?
You can see all the comments you have posted in the Comment History in a few quick steps.
- You have to visit YouTube on your desktop and sign in using your Google account.
- Once you sign in, click on the three horizontal lines at the top left corner of your YouTube page.
- Click on the History option and then you will find the option called Comments on the right side of your YouTube History page. Click on it to see all your YouTube comments.

You can also access the Comments History page directly fromhere .
Part 5: How to Find Out Who Posts the Most Comments on Your YouTube Videos?
If you are a creator on YouTube, the comments section becomes very important. Subscribers comment words of praise, encouragement, and feedback which help you grow. You may want to keep track of your most loyal followers. The best way to know that is by knowing who comments most on your videos.
Here is how you can figure out who is your channel super fan on the YouTube mobile app.
- Open YouTube app on your mobile device, and then sign in.
- From your public videos, select one from where you want to gather insights about your subscribers. Click on the video and scroll down to see the comments section.
- Choose a comment by someone whose engagement with your channel you want to check.
- On the left side of the comment, you will see the icon of the person’s channel. Click on it and you will see a pop-up menu with insights about the person. Here, you can learn about the number of comments they have posted on your channel.
This feature is helpful as it lists more than the number of comments made by someone. You can see insights like when they joined YouTube, how many subscribers they have, when someone subscribed to your channel, how many comments anyone posted on your videos, and how many responses they got from you. You can even see glimpses of all their comments. Clicking on them will take you to the whole conversation.
You can also see their channel’s banner from this section, which should tell you their channel’s niche.
Final Thoughts
YouTube is a global platform to share helpful and entertaining videos. The comments section of each video contains informative comments, feedback, and essential timestamps. Searching YouTube comments can help someone understand if the video is valuable or not. For many creators, the comments become the only way to engage with their supporters and create a tight-knit community.
Find feedback or questions. Report offensive comments. If you are a regular YouTube user, use our tips and tricks to search comments quickly and grow your channel.
Richard Bennett
Richard Bennett is a writer and a lover of all things video.
Follow @Richard Bennett
Richard Bennett
Mar 27, 2024• Proven solutions
Are you trying to search for something on a document or a web page? You know how to do that. You use the combination ‘Ctrl + F’ for Windows or ‘Command + F’ for Mac. But searching comments from the YouTube comments section can be tricky because –
- There are many comments on the video, most of which do not load immediately. You can keep scrolling and still not find the desired comment.
- Managing and analyzing the vast number of comments can be difficult for as busy a platform as YouTube.
So, if you want to search YouTube comments quickly, what can you do? We will show you in this blog.
Part 1: Using the Built-in YouTube Studio Feature to Search Comments
How does the built-in YouTube Studio Feature make searching comments on YouTube easier?
Comments are the best way to interact with subscribers on YouTube. YouTube’s Studio is a new addition to help creators filter and respond to comments and create a healthy community . Sometimes, YouTubers also receive hateful and inappropriate comments. You can use the Studio Feature to report or delete those comments as well.
If you have a channel, you can use this feature in some simple steps.
- Visit YouTubewebsite on your desktop and sign in to your YouTube account.
- Go to the top right corner of your homepage, and you will find your profile icon. Click on it and from the drop-down menu, select the YouTube Studio option.
- This will take you to the YouTube Studio home page. On the left side, find and click on the Comments option, and then you will see all comments your YouTube channel has received.
- You can now click on the Filter icon from the comments section and type in the search term directly. Or, you can click the Search from the options, and type in the words you are looking for.
- Click on Apply, and you will see the comments with the keywords you chose.
Besides the comment search feature, the YouTube Studio also has some in-built search filter categories, such as –
Search: Search for comments with particular search terms. You can also search comments posted by a specific channel by using their username as the search term.
Contains questions: Filter the comments which have questions.
Channel member status: Search for comments from the channel members. YouTube channel membership is only available to channels joined YouTube Partner Program.
Subscriber count: Filter comments with the channel subscriber count, you can search for comments from channels with a minimum number of subscribers (from 100-10M).
Response status: Filter the comments to which you have responded or haven’t responded to.
You can combine these additional filters to narrow your comments search for YouTube.
Part 2: Using YCS – YouTube Comment Search Extension
You can use the YouTube Comment Search browser extension supported by Google Chrome to help you search YouTube comments effortlessly. To use it, follow these steps below.
- First, you need to install this extension. You can click this URL https://chrome.google.com/webstore/detail/ycs-youtube-comment-searc/pmfhcilikeembgbiadjiojgfgcfbcoaa?hl=en Or, you can open the Chrome Extensions page, and in the search bar at the top, type in YCS – YouTube Comment Search and press Enter.
- Click on the result that appears and then tap on the Add to Chrome button. This will add the extension to your browser.
- Once you add the extension, openYouTube on your browser. Click on the video where you want to search the comments. You will find the YouTube Comment Search extension below it.
- Tap on ‘Load comments’ and wait till the extension loads all the comments on the video.
- Now type your keywords, press Enter, and YCS will show all comments having the keyword you typed.
Part 3: Using Comments Search for YouTube Extension
If you are looking for an easy method to search YouTube comments, you can use the Comments Search for YouTube extension. Google Chrome supports this extension that allows you to search comments on YouTube without leaving the website.
How can you use this extension to search YouTube comments? Here is a simple step-by-step tutorial.
- First, you need to download the extension fromGithub . Then, locate the file on your computer and unzip it.
- Next, you need to install it in the browser. Open your Chrome browser, and from the top right corner, click on the three vertical dots. You will find the Settings option towards the end of the drop-down menu, and then click on it.
- When the Settings page opens, select Extensions from the panel on the left side of the webpage. This will take you to a new tab.
- On the top right corner of the page, there will be a toggle switch called Developer Mode. Turn it on if it is off.
- Once the Developer Mode is on, you will see three options now. Click on Load unpacked. Locate the downloaded extension file and click on it. Finally, disable Developer Mode.
When you complete these steps, you click on the extension icon to search comments on YouTube. You can also do this by using the combination ‘Ctrl + S’ on the target YouTube page. The extension also includes some advanced features like –
1. Global Mode
In this mode, you can type ‘global: your parameter’ to search all comments on the channel that fit your parameter.
2. Advanced Mode
This mode allows you to enter special commands to carry out an advanced search. Some including typing –
- ‘:’ to look for comments with timestamps
- ‘:all’ to see all comments
- ‘:creator’ to get comments made by the creator
Part 4: How Do You Search Comments You Have Posted on YouTube?
Did you post a comment on your favorite celebrity’s video? Do you think it may be embarrassing and want to delete it now but cannot find it now amidst so many comments? It is where you can make use of YouTube’s Comment History feature.
YouTube has now added this feature which you can see all the comments you ever posted on YouTube in one place.
How to Use the Comment History feature to Search Comments?
You can see all the comments you have posted in the Comment History in a few quick steps.
- You have to visit YouTube on your desktop and sign in using your Google account.
- Once you sign in, click on the three horizontal lines at the top left corner of your YouTube page.
- Click on the History option and then you will find the option called Comments on the right side of your YouTube History page. Click on it to see all your YouTube comments.
You can also access the Comments History page directly fromhere .
Part 5: How to Find Out Who Posts the Most Comments on Your YouTube Videos?
If you are a creator on YouTube, the comments section becomes very important. Subscribers comment words of praise, encouragement, and feedback which help you grow. You may want to keep track of your most loyal followers. The best way to know that is by knowing who comments most on your videos.
Here is how you can figure out who is your channel super fan on the YouTube mobile app.
- Open YouTube app on your mobile device, and then sign in.
- From your public videos, select one from where you want to gather insights about your subscribers. Click on the video and scroll down to see the comments section.
- Choose a comment by someone whose engagement with your channel you want to check.
- On the left side of the comment, you will see the icon of the person’s channel. Click on it and you will see a pop-up menu with insights about the person. Here, you can learn about the number of comments they have posted on your channel.
This feature is helpful as it lists more than the number of comments made by someone. You can see insights like when they joined YouTube, how many subscribers they have, when someone subscribed to your channel, how many comments anyone posted on your videos, and how many responses they got from you. You can even see glimpses of all their comments. Clicking on them will take you to the whole conversation.
You can also see their channel’s banner from this section, which should tell you their channel’s niche.
Final Thoughts
YouTube is a global platform to share helpful and entertaining videos. The comments section of each video contains informative comments, feedback, and essential timestamps. Searching YouTube comments can help someone understand if the video is valuable or not. For many creators, the comments become the only way to engage with their supporters and create a tight-knit community.
Find feedback or questions. Report offensive comments. If you are a regular YouTube user, use our tips and tricks to search comments quickly and grow your channel.
Richard Bennett
Richard Bennett is a writer and a lover of all things video.
Follow @Richard Bennett
From Ingredients to Inspiration: Cooking Videos
How to Make a Cooking Video in Steps - an Ultimate Guide
Richard Bennett
Mar 27, 2024• Proven solutions
Cooking and food-oriented videos are among the most outreaching and popular categories of content to publish online, notably, on YouTube, Facebook, or Instagram. So if you are a cooking aficionado, you have excellent potential to gain positive attention and a loyal audience. But to create engaging videos, you’d need a lot more than excellent culinary skills. This article aims to enlighten aspiring food and recipe vloggers about the essentials of video making straight out of the oven, to create enriched content that’s professional, neat, and viral-worthy.
- Part 1: What to Prepare Before Making a Recipe Video?
- Part 2: Make a Cooking Video with Filmora: a Step-by-Step Guide
- Part 3: Tips to Make Your Cooking Videos Stand Out
- Part 4: How to Promote Your Cooking Channel on YouTube?
What to Prepare Before Making a Recipe Video
While you would know best about the prep work needed for the recipes, the prep work for making a video starts with a plan. What goes into the plan?
Brainstorm this equation - Main Content + Duration + Light + Sound + Camera + Camera Angle, Shots & Transition.
The main content is how you picture the finished video. Ask yourself - Do you want an intro gig? Are you going to talk in the video or show only hands and the cooking with a piece of background music? How do you wish to present the ingredients? Would there be additional tips? At what platform are you going to publish your content? How long should be your clippings? Consider all these questions to chalk out a basic framework of your video
The camera is a pivotal element. Whether it is a smartphone or a hi-fidelity digital camera, it is worthwhile to familiarise the best positions and light orientations and the capacity of the device to produce the best quality picture.
How is your sound going to be like? If you are going to talk in the video, it is recommended that you use a microphone. Or else, you can also use background sound. But to mix sound with the video, you’d need an excellent sound editing tool.
Finally, comes the editing and finishing part. Eventually, you’ll need purposive video-editing software to help you work out the video transitions, sound, and visual effects.Choose a toolkit that is easy to learn and that you can get comfortable with so that the job of video editing doesn’t take the focus away from the main task of cooking.

Now, once you have all the essential ingredients to create your video, start practicing. Remember that it is the most natural thing for the first videos to appear amateurish or inept. And that is part of the plan. Don’t be disheartened and keep going.
Make a Cooking Video with Filmora: a Step-by-Step Guide
As one of the easiest-to-use video editing tools, the full-featured Filmora is the right choice considering it can fit most of your needs. Moreover, you’d be delighted to know that the software also has a series of features and functions and even tutorial videos dedicated to cooking videos.


Step 1: Filming the Video
Whether you are going to present a traditional cook-with-me style video or feature the contemporary “jump-cut” style focusing on speedy short videos, you need to prepare all the equipment and ingredients to suit the frame by frame shots. Consider spills, drops, overcooking, etc. as part of the process, so keep adequate substitutes to continue with your project unwaveringly. If you are using a phone, keep it fully charged up. And have a plan beforehand about what you should do when you get an urgent call while shooting. Also, consider doing a site investigation of the shooting spot for any fragile items, pointy corners, slippery areas, curious pets, etc. to avoid trips and falls in the middle of the filming, especially when working with a cameraman who’s following your movement. If you are using a tripod, and floor-standing lights, remember to secure the equipment with plenty of adhesive tapes, lest they bump into an expensive trip or fall.
Step 2: mport Your Video In Filmora
You need to sync the device that you used to film the video with the computer that has Filmora installed. It may be a phone or a camcorder. Once the devices are synced, you should launch the Filmora software and go the “Media” button at the top right toolbar. There you will find the “Import” button. You will get a pop-up message asking you to choose the type of device. Select the right one, and your video will be imported in the Filmora interface.
Step 3: Edit Video Pace: Time-Lapse, Jump Cut, Slow Motion
To create crisp, fast-paced videos, you don’t have to gobble up the content eyeing at the duration. Think smart when you have the resources of a tool like Filmora. Here are the three best features that help you create fast-paced yet well-defined recipes.
Time-Lapse: The time-lapse feature allows you to adjust the speed of the video from slow-motion to 10x faster. To use this, double click on a specific clip in your imported video and open the custom speed settings. Use the adjusting meter beside speed to make your clip as fast or slow as you want. You may use the same feature to introduce the slow-motion effects in certain areas of the video.
Now, when you are using either the fast-forward or slow-motion effects, it is best to have stable video footage with consistent lighting and a static background. There are also the options of Reverse Speed that can play the clip backward, as in flash-back. The Ripple edit feature allows you to cut short a long clip seamlessly.
Jump Cut: The Jump Cut is about snipping unwanted areas in the clip. It may sound like the Ripple edit mentioned above, but the ripple edit is more functional for cutting short a continuous video so that the viewer won’t realize the snip. For the Jump Cut, it doesn’t have to be a constant clip. You can get to the next frame or scene with an abracadabra move.
To use Jump Cut, place the cursor over the starting of the clip that you want to cut, and right-click on it and select “Split” (the “scissors” feature on the toolbar does the same thing). To make this look neat, preview the portion of the clip once again and delete the cuts between two clips with the same right-click.
Step 4: Understanding Transitions on Filmora
Transitions make your video more interactive and help you segregate the video from frame-to-frame with effects like dissolve, fade, flash, etc. there are numerous transition options available within the Filmora suit.
The best way to do this drag and drop the clips on the timeline is to trim parts of the clip to shorten it. Once you have all the clips in place, go to the “Transitions” options at the top toolbar to apply it on the end or start of each clip.
Step 5: Audio, Playback & Sound Edits
There are plenty of options that you can remove background noise, add voiceover, add music, and detach audio from video. Refer to the Audios section from your toolbar.
Step 6: Save to Drive/ Emport/ Publish
Once you are satisfied with your content, then go to Export. Choose the format of the video, MOV, MP4, MPG, etc. and whether you wish to publish directly or save to drive.
Tips to Make Your Cooking Videos Stand Out
- Lighting is your best friend. Invest in some quality spotlights or use the best of daylight.
- Mind your video duration. Short and Simple videos get the most views, but your content should not look incomplete. It is not a fact that long and elaborate videos do not get a place on the table; it is all about the relevance of your content. So don’t stop till you get enough.
- If you appear in the video, keep yourself always look good.
- Keep your video titles relevant and prominent, so that people looking for it can readily find it.
- Have a scrumptious custom thumbnail.
How to Promote Your Cooking Channel on YouTube
- Create an inventory before publishing videos. YouTube vlogging is valued for consistency. If you have a list of 10, 15, 20 videos, then you can have enough time in hand to film your next videos.
- Have a consistent style to create brand recognition. Do you think branding is not for Vlogs? Well, I suppose you might be wrong. Branding is for anyone who uses it.
- Share the link of your YouTube videos on other platforms like Twitter and Facebook.
- Encourage your viewers to comment on the video.
- Explore the different YouTube SEO strategies and use the accurate keywords in your video descriptions with hashtags.
With prior planning and practicing, you are bent on developing more confident moves and camera angles. Once you have that, follow this step by step guide to gain speed and prowess and also enjoy the whole adventure.
Richard Bennett
Richard Bennett is a writer and a lover of all things video.
Follow @Richard Bennett
Richard Bennett
Mar 27, 2024• Proven solutions
Cooking and food-oriented videos are among the most outreaching and popular categories of content to publish online, notably, on YouTube, Facebook, or Instagram. So if you are a cooking aficionado, you have excellent potential to gain positive attention and a loyal audience. But to create engaging videos, you’d need a lot more than excellent culinary skills. This article aims to enlighten aspiring food and recipe vloggers about the essentials of video making straight out of the oven, to create enriched content that’s professional, neat, and viral-worthy.
- Part 1: What to Prepare Before Making a Recipe Video?
- Part 2: Make a Cooking Video with Filmora: a Step-by-Step Guide
- Part 3: Tips to Make Your Cooking Videos Stand Out
- Part 4: How to Promote Your Cooking Channel on YouTube?
What to Prepare Before Making a Recipe Video
While you would know best about the prep work needed for the recipes, the prep work for making a video starts with a plan. What goes into the plan?
Brainstorm this equation - Main Content + Duration + Light + Sound + Camera + Camera Angle, Shots & Transition.
The main content is how you picture the finished video. Ask yourself - Do you want an intro gig? Are you going to talk in the video or show only hands and the cooking with a piece of background music? How do you wish to present the ingredients? Would there be additional tips? At what platform are you going to publish your content? How long should be your clippings? Consider all these questions to chalk out a basic framework of your video
The camera is a pivotal element. Whether it is a smartphone or a hi-fidelity digital camera, it is worthwhile to familiarise the best positions and light orientations and the capacity of the device to produce the best quality picture.
How is your sound going to be like? If you are going to talk in the video, it is recommended that you use a microphone. Or else, you can also use background sound. But to mix sound with the video, you’d need an excellent sound editing tool.
Finally, comes the editing and finishing part. Eventually, you’ll need purposive video-editing software to help you work out the video transitions, sound, and visual effects.Choose a toolkit that is easy to learn and that you can get comfortable with so that the job of video editing doesn’t take the focus away from the main task of cooking.
Now, once you have all the essential ingredients to create your video, start practicing. Remember that it is the most natural thing for the first videos to appear amateurish or inept. And that is part of the plan. Don’t be disheartened and keep going.
Make a Cooking Video with Filmora: a Step-by-Step Guide
As one of the easiest-to-use video editing tools, the full-featured Filmora is the right choice considering it can fit most of your needs. Moreover, you’d be delighted to know that the software also has a series of features and functions and even tutorial videos dedicated to cooking videos.
Step 1: Filming the Video
Whether you are going to present a traditional cook-with-me style video or feature the contemporary “jump-cut” style focusing on speedy short videos, you need to prepare all the equipment and ingredients to suit the frame by frame shots. Consider spills, drops, overcooking, etc. as part of the process, so keep adequate substitutes to continue with your project unwaveringly. If you are using a phone, keep it fully charged up. And have a plan beforehand about what you should do when you get an urgent call while shooting. Also, consider doing a site investigation of the shooting spot for any fragile items, pointy corners, slippery areas, curious pets, etc. to avoid trips and falls in the middle of the filming, especially when working with a cameraman who’s following your movement. If you are using a tripod, and floor-standing lights, remember to secure the equipment with plenty of adhesive tapes, lest they bump into an expensive trip or fall.
Step 2: mport Your Video In Filmora
You need to sync the device that you used to film the video with the computer that has Filmora installed. It may be a phone or a camcorder. Once the devices are synced, you should launch the Filmora software and go the “Media” button at the top right toolbar. There you will find the “Import” button. You will get a pop-up message asking you to choose the type of device. Select the right one, and your video will be imported in the Filmora interface.
Step 3: Edit Video Pace: Time-Lapse, Jump Cut, Slow Motion
To create crisp, fast-paced videos, you don’t have to gobble up the content eyeing at the duration. Think smart when you have the resources of a tool like Filmora. Here are the three best features that help you create fast-paced yet well-defined recipes.
Time-Lapse: The time-lapse feature allows you to adjust the speed of the video from slow-motion to 10x faster. To use this, double click on a specific clip in your imported video and open the custom speed settings. Use the adjusting meter beside speed to make your clip as fast or slow as you want. You may use the same feature to introduce the slow-motion effects in certain areas of the video.
Now, when you are using either the fast-forward or slow-motion effects, it is best to have stable video footage with consistent lighting and a static background. There are also the options of Reverse Speed that can play the clip backward, as in flash-back. The Ripple edit feature allows you to cut short a long clip seamlessly.
Jump Cut: The Jump Cut is about snipping unwanted areas in the clip. It may sound like the Ripple edit mentioned above, but the ripple edit is more functional for cutting short a continuous video so that the viewer won’t realize the snip. For the Jump Cut, it doesn’t have to be a constant clip. You can get to the next frame or scene with an abracadabra move.
To use Jump Cut, place the cursor over the starting of the clip that you want to cut, and right-click on it and select “Split” (the “scissors” feature on the toolbar does the same thing). To make this look neat, preview the portion of the clip once again and delete the cuts between two clips with the same right-click.
Step 4: Understanding Transitions on Filmora
Transitions make your video more interactive and help you segregate the video from frame-to-frame with effects like dissolve, fade, flash, etc. there are numerous transition options available within the Filmora suit.
The best way to do this drag and drop the clips on the timeline is to trim parts of the clip to shorten it. Once you have all the clips in place, go to the “Transitions” options at the top toolbar to apply it on the end or start of each clip.
Step 5: Audio, Playback & Sound Edits
There are plenty of options that you can remove background noise, add voiceover, add music, and detach audio from video. Refer to the Audios section from your toolbar.
Step 6: Save to Drive/ Emport/ Publish
Once you are satisfied with your content, then go to Export. Choose the format of the video, MOV, MP4, MPG, etc. and whether you wish to publish directly or save to drive.
Tips to Make Your Cooking Videos Stand Out
- Lighting is your best friend. Invest in some quality spotlights or use the best of daylight.
- Mind your video duration. Short and Simple videos get the most views, but your content should not look incomplete. It is not a fact that long and elaborate videos do not get a place on the table; it is all about the relevance of your content. So don’t stop till you get enough.
- If you appear in the video, keep yourself always look good.
- Keep your video titles relevant and prominent, so that people looking for it can readily find it.
- Have a scrumptious custom thumbnail.
How to Promote Your Cooking Channel on YouTube
- Create an inventory before publishing videos. YouTube vlogging is valued for consistency. If you have a list of 10, 15, 20 videos, then you can have enough time in hand to film your next videos.
- Have a consistent style to create brand recognition. Do you think branding is not for Vlogs? Well, I suppose you might be wrong. Branding is for anyone who uses it.
- Share the link of your YouTube videos on other platforms like Twitter and Facebook.
- Encourage your viewers to comment on the video.
- Explore the different YouTube SEO strategies and use the accurate keywords in your video descriptions with hashtags.
With prior planning and practicing, you are bent on developing more confident moves and camera angles. Once you have that, follow this step by step guide to gain speed and prowess and also enjoy the whole adventure.
Richard Bennett
Richard Bennett is a writer and a lover of all things video.
Follow @Richard Bennett
Also read:
- Unveiling the Cash Generated by Every Viewed Stream
- Creating Profit on YouTube The Ultimate List of Top Business Channels
- Dissecting the Financial Strategy of T-Series in Video Platforms
- [New] Beauty Blogging Beginnings Crafting a Captivating YouTube Channel
- [Updated] Breaking Into the Digital Realm The WireCast Approach for YouTube Streamers
- Driving Revenue with Well-Crafted YouTube Channel Trailers for 2024
- Transform Your On-Screen Identity Into a Brand on YouTube
- [Updated] BiteVideo Innovator
- In 2024, Enhance Your Online Presence with These 50 Complimentary Banners
- MP3 Mastery Guide Top 10 Video-to-Audio Picks
- [New] Achieving Virality on YouTube Essential Steps Demystified
- [New] Download YouTube Videos Directly
- [Updated] Elevate Your YouTube Presence Strategic Tagging and Titling Techniques
- Film Fan's Choice Cutting-Edge YouTube Channels
- Mastering YT Analytics Counting Eyeballs & Cash
- In 2024, Comprehensive List of Top 9 Free Video Channel Branding Aids
- Join YouTube MCN or Not ULTIMATE Guide
- In 2024, Comedy Canvas Painting Laughter with Top 10 Video Concepts
- 2024 Approved Access Free Photographic Treasures Through Favored 4 Youtube Clips
- Mastering YouTube Studio Ultimate Video Edits Techniques
- 2024 Approved Crafting an Inviting Subscribe Icon for YouTube Videographers
- [New] Digital Delegates Top YouTube Creators by Followers
- Advanced Techniques for YouTube Card Use
- 2024 Approved Enhance TV Screens With Automatic Loops of YouTube
- [Updated] Boost Visibility with a Bespoke YouTube Channel URL
- 10 Iconic Beauty Personalities to Follow on YouTube for 2024
- In 2024, Enhancing Video Quality Editing Tips for Published Content
- 2024 Approved Adding Audio Descriptions to Videos on YouTube
- Full Guide on Mirroring Your Asus ROG Phone 8 to Your PC/Mac | Dr.fone
- [New] 2024 Approved Conducting the Crescendo Infusing Instagram Reels with Sounds
- In 2024, Top 5 Car Locator Apps for Lava Blaze 2 Pro | Dr.fone
- The Complete Walkthrough to Emoji-Enriched Discord Statuses for 2024
- Updated Discover the Top 5 Budget-Friendly Audio Intensity Normalizers
- Reasons for Realme GT 5 Stuck on Startup Screen and Ways To Fix Them | Dr.fone
- In 2024, Disabling iPhone X Parental Restrictions With/Without Password
- [New] Crafting Impressive Big Heads on TikTok A Detailed Walkthrough (3 Steps) for 2024
- [Updated] In 2024, The Voyage to Trustworthiness Becoming a Confirmed Disco Partner
- Cross-Platform Content Transfer YouTube Meets Facebook
- In 2024, Guide to Instantly Diminish Audio Volume Gently
- New In 2024, VSDC Video Editor Mac Alternatives Free and Paid Options
- Best Ways to Bypass iCloud Activation Lock from Apple iPhone 6s Plus/iPad/iPod
- [Updated] In 2024, Step-by-Step Guide for Efficient Documentation of Your Online Collaborations
- [New] In 2024, Behind the Scenes Mastering the Craft of Streaming Archiving
- In 2024, FRP Hijacker by Hagard Download and Bypass your Samsung Galaxy A23 5G FRP Locks
- [New] 2024 Approved ScreenMasters Unite!
- [Updated] Crafting Innovative FB Videos Unique Ad Creation Techniques for 2024
- 2024 Approved Unleash Power in Social Media 10 Advanced Tactics for FB Optimization
- In 2024, How to Remove Activation Lock On the iPhone 15 Without Previous Owner?
- In 2024, How to Transfer Contacts from Xiaomi Redmi Note 12 4G To Phone | Dr.fone
- [New] In 2024, The Motivational Lens Capturing Stirring Scenes on IG
- [Updated] In 2024, Tunefab's Innovative Approach to Video Capturing
- Navigating the Intricacies of Networked Livestream with VLC
- Title: Inspecting Dialogues in YouTube Vids
- Author: Steven
- Created at : 2024-05-25 19:48:46
- Updated at : 2024-05-26 19:48:46
- Link: https://youtube-clips.techidaily.com/inspecting-dialogues-in-youtube-vids/
- License: This work is licensed under CC BY-NC-SA 4.0.
