
:max_bytes(150000):strip_icc()/Screenshot2023-08-11at4.09.52PM-a2b7cc4dc04d49deac45f59296fd703f.jpg)
"Innovative Split-Screen Videos for YouTube Sharing"
Innovative Split-Screen Videos for YouTube Sharing
How to Make a Creative Split-screen Video for YouTube?

Liza Brown
Oct 26, 2023• Proven solutions
If we talk about post-production techniques and visual effects, then Split Screen has to be one of the smartest picks. After all, it lets us narrate our story via two (or more) screens and gives our audience a superior viewing experience. Though, a lot of users find it hard to implement the split-screen effect on YouTube videos. Here, I will let you know how to come up with all kinds of YouTube split-screen videos by using a professional video editor.
Part 1: The Diverse Applications of Split-screen Videos
Before we discuss how to work on YouTube split-screen videos, let’s quickly consider some major applications of this video effect.
One of the most popular applications of split-screen videos is for comparing two or more instances or perspectives in the same frame. For example, you might wish to depict the lifestyle of two people from different parts of the world or simply compare the effect of various seasons in a single video.

Videos are the best visual storytelling tools and just like any story, they can also have different perspectives. Ideally, the split-screen effect would be one of the best ways to show your audience all kinds of perspectives that can take place in your story.
One of the best examples was depicted in the movie “500 Days of Summer” in which we got several Expectations vs. Reality shots. These split-screen shots depicted the two major perspectives of the story in a single frame.

Have you ever wondered how filmmakers create a clone of a person in movies? To do that, we make the protagonist record both the scenes in front of the same background. Later, we implement a split-screen effect in which both the clips are combined in such a way that it makes the audience believe as if the scene has both, the character and their clone placed flawlessly.

Watch Video! Use Split-Screen for Your YouTube Videos
Part 2: How to Make Creative YouTube Split-screen Videos with Wondershare Filmora ?
If you want to come up with professional YouTube split-screen videos, then consider using a resourceful tool like Wondershare Filmora. Recently, the company has launched Wondershare Filmora for Mac V10.2 with an upgraded set of newly-added split-screen templates . Therefore, you can simply use the wide range of split-screen templates in Filmora and drag-and-drop your videos to implement the effect.
- Wondershare Filmora has recently added an extensive range of split-screen templates that you can instantly use and customize to meet your requirements.
- Apart from YouTube split-screen templates, you can also find options for other social platforms such as Instagram, Facebook, TikTok, etc.
- Without undergoing any technical hassle, you can just drag and drop your videos to the split-screen template and further make the needed changes.
- There are also dedicated options to edit the split-screen video, apply color correction, and even implement different stunning animated effects.
- Besides that, you can use Filmora to access numerous other editing options like motion tracking, keyframing, audio ducking, auto reframing, action cam editing, and more.


Creating or editing YouTube split-screen videos in Wondershare Filmora is extremely easy and can be done in the following way:
Step 1: Import the Videos You Want to Edit to Wondershare Filmora
Before you edit your YouTube split-screen video, you need to import clips to the application. To do this, just launch Wondershare Filmora on your system and click on the “Import” button to load your videos. You can also go to its Menu > File > Import Media to do the same.

Step 2: Select the Split-screen Template and Add Your Videos
Great! Once you have loaded the interface of Filmora, you can locate a “Split Screen” section from the top. Just click on it to browse a wide range of split-screen video templates for YouTube to include two, three, or more clips. You can just double-click any template to get its preview and drag-and-drop it to the timeline to start working on it.

If you want, you can take the playhead and drag the pointer to adjust the length of the split-screen template on the timeline. To add your clips, just double-click on the split-screen template and click on the drop icon from the preview window. Now, click on the source clip to add it to the template and adjust its position to get the desired effects.

Step 3: Edit Your YouTube Split-screen Video
Following the same drill, you can include multiple clips to the YouTube split-screen template. You can further go to its editing features and explore the “Video” tab to scale, reposition, or rotate your clips. There are also options to add borders in the split-screen effect to separate the clips distinctively in the video.

Apart from that, you can also go to the “Color” section to access various color correction features. From here, you can adjust the brightness, temperature, saturation, tint, and other effects in the video.

If you want to make your YouTube split-screen video more appealing, then go to the “Motion” feature. Here, you can easily implement any existing animated template for transitions and other effects.

Besides that, you can also click on the edit icon from the bottom panel of the Preview section to edit your videos separately.

Step 4: Export the YouTube Split-screen Video
That’s it! Once you are done editing the split-screen video, you can export it from Filmora and save it on your Mac. Just click on the Export option and select a location to save the YouTube split-screen video. There are also additional features to save the video in different formats, video resolutions, and frame rates here that you can explore.

There you go! After following this guide, you would be able to come up with all kinds of YouTube split-screen videos on your Mac. Ideally, with the help of a resourceful tool like Wondershare Filmora, working on a split-screen video is an effortless task. Since the tool has numerous split-screen templates for YouTube, you can just select any template, and customize it to create a stunning YouTube split-screen video in minutes.
Liza Brown
Liza Brown is a writer and a lover of all things video.
Follow @Liza Brown
Liza Brown
Oct 26, 2023• Proven solutions
If we talk about post-production techniques and visual effects, then Split Screen has to be one of the smartest picks. After all, it lets us narrate our story via two (or more) screens and gives our audience a superior viewing experience. Though, a lot of users find it hard to implement the split-screen effect on YouTube videos. Here, I will let you know how to come up with all kinds of YouTube split-screen videos by using a professional video editor.
Part 1: The Diverse Applications of Split-screen Videos
Before we discuss how to work on YouTube split-screen videos, let’s quickly consider some major applications of this video effect.
One of the most popular applications of split-screen videos is for comparing two or more instances or perspectives in the same frame. For example, you might wish to depict the lifestyle of two people from different parts of the world or simply compare the effect of various seasons in a single video.
Videos are the best visual storytelling tools and just like any story, they can also have different perspectives. Ideally, the split-screen effect would be one of the best ways to show your audience all kinds of perspectives that can take place in your story.
One of the best examples was depicted in the movie “500 Days of Summer” in which we got several Expectations vs. Reality shots. These split-screen shots depicted the two major perspectives of the story in a single frame.
Have you ever wondered how filmmakers create a clone of a person in movies? To do that, we make the protagonist record both the scenes in front of the same background. Later, we implement a split-screen effect in which both the clips are combined in such a way that it makes the audience believe as if the scene has both, the character and their clone placed flawlessly.
Watch Video! Use Split-Screen for Your YouTube Videos
Part 2: How to Make Creative YouTube Split-screen Videos with Wondershare Filmora ?
If you want to come up with professional YouTube split-screen videos, then consider using a resourceful tool like Wondershare Filmora. Recently, the company has launched Wondershare Filmora for Mac V10.2 with an upgraded set of newly-added split-screen templates . Therefore, you can simply use the wide range of split-screen templates in Filmora and drag-and-drop your videos to implement the effect.
- Wondershare Filmora has recently added an extensive range of split-screen templates that you can instantly use and customize to meet your requirements.
- Apart from YouTube split-screen templates, you can also find options for other social platforms such as Instagram, Facebook, TikTok, etc.
- Without undergoing any technical hassle, you can just drag and drop your videos to the split-screen template and further make the needed changes.
- There are also dedicated options to edit the split-screen video, apply color correction, and even implement different stunning animated effects.
- Besides that, you can use Filmora to access numerous other editing options like motion tracking, keyframing, audio ducking, auto reframing, action cam editing, and more.
Creating or editing YouTube split-screen videos in Wondershare Filmora is extremely easy and can be done in the following way:
Step 1: Import the Videos You Want to Edit to Wondershare Filmora
Before you edit your YouTube split-screen video, you need to import clips to the application. To do this, just launch Wondershare Filmora on your system and click on the “Import” button to load your videos. You can also go to its Menu > File > Import Media to do the same.
Step 2: Select the Split-screen Template and Add Your Videos
Great! Once you have loaded the interface of Filmora, you can locate a “Split Screen” section from the top. Just click on it to browse a wide range of split-screen video templates for YouTube to include two, three, or more clips. You can just double-click any template to get its preview and drag-and-drop it to the timeline to start working on it.
If you want, you can take the playhead and drag the pointer to adjust the length of the split-screen template on the timeline. To add your clips, just double-click on the split-screen template and click on the drop icon from the preview window. Now, click on the source clip to add it to the template and adjust its position to get the desired effects.
Step 3: Edit Your YouTube Split-screen Video
Following the same drill, you can include multiple clips to the YouTube split-screen template. You can further go to its editing features and explore the “Video” tab to scale, reposition, or rotate your clips. There are also options to add borders in the split-screen effect to separate the clips distinctively in the video.
Apart from that, you can also go to the “Color” section to access various color correction features. From here, you can adjust the brightness, temperature, saturation, tint, and other effects in the video.
If you want to make your YouTube split-screen video more appealing, then go to the “Motion” feature. Here, you can easily implement any existing animated template for transitions and other effects.
Besides that, you can also click on the edit icon from the bottom panel of the Preview section to edit your videos separately.
Step 4: Export the YouTube Split-screen Video
That’s it! Once you are done editing the split-screen video, you can export it from Filmora and save it on your Mac. Just click on the Export option and select a location to save the YouTube split-screen video. There are also additional features to save the video in different formats, video resolutions, and frame rates here that you can explore.
There you go! After following this guide, you would be able to come up with all kinds of YouTube split-screen videos on your Mac. Ideally, with the help of a resourceful tool like Wondershare Filmora, working on a split-screen video is an effortless task. Since the tool has numerous split-screen templates for YouTube, you can just select any template, and customize it to create a stunning YouTube split-screen video in minutes.
Liza Brown
Liza Brown is a writer and a lover of all things video.
Follow @Liza Brown
Crafting a Narrative Template for Online Educational Videos
How to structure YouTube videos

Richard Bennett
Mar 27, 2024• Proven solutions
Creating a YouTube channel and uploading video content is only one part of the key to your success. With so much competition on the platform, it’s crucial that you stand out from the crowd with efficient, professional videos that are a pleasure to watch.
Without some planning and structure in mind before you begin filming, it’s all too easy to get a bit lost and start to ramble or fumble your words. Video’s filled with ‘umm’ and ‘err’ are neither pleasant to watch nor engaging.
If you’re serious about making a great YouTube channel and developing a loyal fan base, you’re going to need a workable structure for every video to help you stay on track. Here’s what you need to know:
Quick Jump Menu
- Why is structuring your video important?
- How should you structure YouTube Video Content?
- Ready to go out and make amazing videos?
Why is structuring your video important?
The structure of your video can make all the difference between a successful YouTube channel and a big waste of time. Your objective is to get people watching more and watching all the way to the end. A great structure can:
- Build interest and engagement: By keeping something in reserve and naturally building interest as you go along, people will be compelled to watch longer and interact more with your channel.
- Helps you rank higher: Longer and higher numbers of views will demonstrate your position as an authority well. The YouTube algorithm uses these metrics as part of their ranking factor, so the more and longer views you get, the higher you’ll rank in search.
- Builds consistency and familiarity: If all your videos follow a typical structure, your fans will come to be familiar with your format. They’ll know what to expect from your content and will watch more regularly as a result.
So, now you understand why structure is so important to your channel, let’s take a look at ways in which you can create an amazing structure for every video you produce.
How should you structure YouTube video content?
There are some key elements of a YouTube video’s structure which can make it more natural, more engaging and more fun to watch. When you’re planning your structure, you should follow a logical timeline to take the viewer from start to finish easily, and to ensure you get the actions you want at the end.
Intro
People love to be told what’s about to happen, and an intro can be a crucial step in ensuring they are going to continue watching your content. By explaining clearly what they are about to see, why it’s important to them and what problems you’re aiming to solve, you’ll keep them hooked and prevent them from browsing away to the next search result.
An introduction doesn’t need to be long or particularly involved. Remember, you don’t want to give away all your information here, as what you want is to encourage them to watch until the end. Something like “I’m going to show you … which will help you to …” is fine.
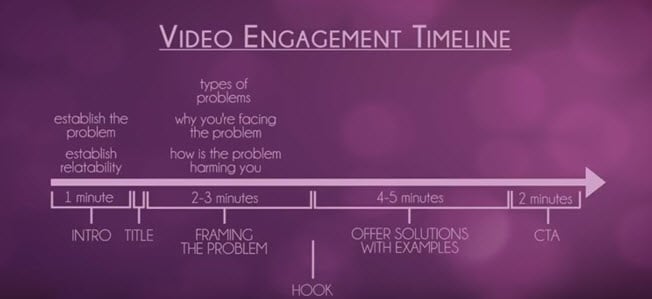
Your idea and purpose need to be conveyed fast and effectively if you’re keen to get their interest. Most viewers will decide within the first three to five seconds of a video if they want to invest their time in watching, so it’s crucial you capture their interest and engage them fast to stop them drifting away.
Main content
Once you’ve introduced your video, it’s time to start working through your content. This should be done by:
- Framing the problem
What are the types of problems that your viewers will have encountered which your video can solve? How is the problem affecting you and your viewers? Take around two to three minutes to describe the problems that you hope your video will solve, and work on being empathetic so people can relate to you and the issue you’re discussing.
- Offer solutions with examples
Move on to your solution to the problem. How did you find this solution? Is it easy to implement? Take around four to five minutes to address your solution and give examples of how it works in practice.
Now you’ve addressed the issue that your video content will solve, you’re almost ready to ask them to take the next step. Almost. There’s one more key element in your structure that you need to remember to include.
Hook
The hook can be placed anywhere in your content, although it’s most successful when placed either in the introduction or while you are framing the problem. The hook is a tidbit that aims to encourage a full viewing of your video, so don’t give away your solutions but do give them a reason to carry on watching.
If there’s a particular point where you think they might become bored or distracted, this is a great time to insert your hook. Come up with a powerful hook, for instance ‘with my solution I managed to go from ten views to two hundred in an hour’ or ‘when you hear this solution you’ll understand how I tripled my profits overnight’. Give them a reason to want to stay to the end.
Outro
Your outro shouldn’t just be about signing off in your unique way with some lovely music and visuals. This is the point at which you can ask something back from your audience, whatever that may be. We call this a ‘call to action’, and it could eb something as simple as subscribing through to something more involved like visiting your website.
Think about what you want from your audience; what should they do next? Remember to ask via a strong call to action, otherwise you’ve simply given them some free advice with very little in the way of a return for you.
Script or no script?
Many YouTubers shy away from using any sort of script, feeling that this will make them less relatable and natural. Choosing whether or not to script is entirely up to you; some people feel more comfortable with a script to hand, whereas others prefer to just wing it as they go.
If you don’t feel a script would work for you, do consider having a very rough outline of your structure and the points you want to make readily available while filming. It will help you regain control if you do happen to lose your place and will ensure you get all the information across that you’d planned to.
If you do think a full script would work better for you, make sure you are able to come across as naturally as possible while reading it. Write your script the same way you speak and run through a few times so you’re not squinting at words while you’re on camera. If you regularly wander off script, this could be a sign that a freer flowing style is more your thing.
Read More to Get : How to Loop a YouTube Video >>
Ready to go out and make amazing videos?
Having a structure to your videos might seem a little unnatural at first, but there’s plenty of evidence to show that people who take the time to plan their content get far better results than those who just improvise. If you’re unsure of the best structure for your content, watch videos made by others in your niche to see how they organize theirs.
That’s not to say you have to copy the leaders to be a success; indeed, you’ll be far more successful on YouTube if you continue to be unique. But there’s always room to learn from the best and to take inspiration from those who’ve been getting the very best results.
Richard Bennett
Richard Bennett is a writer and a lover of all things video.
Follow @Richard Bennett
Richard Bennett
Mar 27, 2024• Proven solutions
Creating a YouTube channel and uploading video content is only one part of the key to your success. With so much competition on the platform, it’s crucial that you stand out from the crowd with efficient, professional videos that are a pleasure to watch.
Without some planning and structure in mind before you begin filming, it’s all too easy to get a bit lost and start to ramble or fumble your words. Video’s filled with ‘umm’ and ‘err’ are neither pleasant to watch nor engaging.
If you’re serious about making a great YouTube channel and developing a loyal fan base, you’re going to need a workable structure for every video to help you stay on track. Here’s what you need to know:
Quick Jump Menu
- Why is structuring your video important?
- How should you structure YouTube Video Content?
- Ready to go out and make amazing videos?
Why is structuring your video important?
The structure of your video can make all the difference between a successful YouTube channel and a big waste of time. Your objective is to get people watching more and watching all the way to the end. A great structure can:
- Build interest and engagement: By keeping something in reserve and naturally building interest as you go along, people will be compelled to watch longer and interact more with your channel.
- Helps you rank higher: Longer and higher numbers of views will demonstrate your position as an authority well. The YouTube algorithm uses these metrics as part of their ranking factor, so the more and longer views you get, the higher you’ll rank in search.
- Builds consistency and familiarity: If all your videos follow a typical structure, your fans will come to be familiar with your format. They’ll know what to expect from your content and will watch more regularly as a result.
So, now you understand why structure is so important to your channel, let’s take a look at ways in which you can create an amazing structure for every video you produce.
How should you structure YouTube video content?
There are some key elements of a YouTube video’s structure which can make it more natural, more engaging and more fun to watch. When you’re planning your structure, you should follow a logical timeline to take the viewer from start to finish easily, and to ensure you get the actions you want at the end.
Intro
People love to be told what’s about to happen, and an intro can be a crucial step in ensuring they are going to continue watching your content. By explaining clearly what they are about to see, why it’s important to them and what problems you’re aiming to solve, you’ll keep them hooked and prevent them from browsing away to the next search result.
An introduction doesn’t need to be long or particularly involved. Remember, you don’t want to give away all your information here, as what you want is to encourage them to watch until the end. Something like “I’m going to show you … which will help you to …” is fine.
Your idea and purpose need to be conveyed fast and effectively if you’re keen to get their interest. Most viewers will decide within the first three to five seconds of a video if they want to invest their time in watching, so it’s crucial you capture their interest and engage them fast to stop them drifting away.
Main content
Once you’ve introduced your video, it’s time to start working through your content. This should be done by:
- Framing the problem
What are the types of problems that your viewers will have encountered which your video can solve? How is the problem affecting you and your viewers? Take around two to three minutes to describe the problems that you hope your video will solve, and work on being empathetic so people can relate to you and the issue you’re discussing.
- Offer solutions with examples
Move on to your solution to the problem. How did you find this solution? Is it easy to implement? Take around four to five minutes to address your solution and give examples of how it works in practice.
Now you’ve addressed the issue that your video content will solve, you’re almost ready to ask them to take the next step. Almost. There’s one more key element in your structure that you need to remember to include.
Hook
The hook can be placed anywhere in your content, although it’s most successful when placed either in the introduction or while you are framing the problem. The hook is a tidbit that aims to encourage a full viewing of your video, so don’t give away your solutions but do give them a reason to carry on watching.
If there’s a particular point where you think they might become bored or distracted, this is a great time to insert your hook. Come up with a powerful hook, for instance ‘with my solution I managed to go from ten views to two hundred in an hour’ or ‘when you hear this solution you’ll understand how I tripled my profits overnight’. Give them a reason to want to stay to the end.
Outro
Your outro shouldn’t just be about signing off in your unique way with some lovely music and visuals. This is the point at which you can ask something back from your audience, whatever that may be. We call this a ‘call to action’, and it could eb something as simple as subscribing through to something more involved like visiting your website.
Think about what you want from your audience; what should they do next? Remember to ask via a strong call to action, otherwise you’ve simply given them some free advice with very little in the way of a return for you.
Script or no script?
Many YouTubers shy away from using any sort of script, feeling that this will make them less relatable and natural. Choosing whether or not to script is entirely up to you; some people feel more comfortable with a script to hand, whereas others prefer to just wing it as they go.
If you don’t feel a script would work for you, do consider having a very rough outline of your structure and the points you want to make readily available while filming. It will help you regain control if you do happen to lose your place and will ensure you get all the information across that you’d planned to.
If you do think a full script would work better for you, make sure you are able to come across as naturally as possible while reading it. Write your script the same way you speak and run through a few times so you’re not squinting at words while you’re on camera. If you regularly wander off script, this could be a sign that a freer flowing style is more your thing.
Read More to Get : How to Loop a YouTube Video >>
Ready to go out and make amazing videos?
Having a structure to your videos might seem a little unnatural at first, but there’s plenty of evidence to show that people who take the time to plan their content get far better results than those who just improvise. If you’re unsure of the best structure for your content, watch videos made by others in your niche to see how they organize theirs.
That’s not to say you have to copy the leaders to be a success; indeed, you’ll be far more successful on YouTube if you continue to be unique. But there’s always room to learn from the best and to take inspiration from those who’ve been getting the very best results.
Richard Bennett
Richard Bennett is a writer and a lover of all things video.
Follow @Richard Bennett
Also read:
- Inside the World of Haul and Try-On Videos
- 2024 Approved Discover 7 Premium Android AdBlocking Tools
- A Deep Dive Into YouTube’s Income Models
- Transform Your ASMR Experience Into Proficiently Produced Videos
- Prodigious Platform Professionals
- Uncovering the Truth Behind Zero Viewer Counts in Youtube
- Bypassing YouTube's Copyright Strike Legal Strategies and Precautions
- [Updated] Crafting the Perfect Harmony Fusing Lyrics & Images with Lyric Video Maker
- In the Year 2024, How to Follow Sourav Joshi on YouTube Income
- [New] Enhancing Video Impact Interpreting YouTube Metrics Wisely
- Fresh Vlog Discussion Ideas Each Day
- YouTube Monetization CarryMinati (Ajey Nagar) YouTube Income 2023
- [Updated] Enchanting Editing YouTube's Best Video Magic Hits
- [Updated] YouTube Comment Finder You Should Try
- Best Bits of Bulb Tech - Top 17 Choices
- Binge Your Way Into Animated Gifs Turning YouTube Content Without Downloads
- [New] Earn More Maximizing Income Through YouTube Mobile Advertising
- Boredom's Ender The Ultimate List of Jovial YouTube Content
- Dominating Digital Space Top 5 YouTube Tactics Revealed for 2024
- 2024 Approved Best Binge-Watch Top 10 Free Films Online
- Virtual Vanguard Over a Hundred Games Galore
- In 2024, Elevate Your Team with Expert Talent Selections
- In 2024, Become the Brand You Want With Our Exclusive Set of FREE Graphics
- Premier Lineup Best Free Video Editors Unveiled
- Thriving in the World of YouTube Broadcasting Master Class
- 2024 Approved Collect Priceless Imagery From Trusted 4 YouTube Directories
- Streamlining Video Content for YouTube and TikTok Audience
- Unlocking the Audience'eat Top 10 Strategies to Make Your YouTube Videos a Hit!
- 2024 Approved Effortless Spotify-to-YouTube Playlist Conversion 5 Must-Have Apps
- Diversify Referrals Tactics for Effective YouTube Backlinks
- Mastering the Art of Personalizing YouTube Visuals
- Monetizing CarryMinati Journey to 2023 Income
- Essential Insights Into YouTube's Content Policy Framework
- [New] Elevate Traffic Ethical Practices for Amplifying Content Views
- The Ultimate Guide 8 Real-World Promotion Tools for Videos
- YouTube Ventures Steps for Monetizing Content
- In 2024, Educators' Guide to Thriving YouTube Channels – 10 Must-Know Secrets
- Essential History Series YouTube Recommendations for Learners
- Updated In 2024, Get Steady The Best Free Video Stabilizer Apps for Android Phones
- In 2024, Is GSM Flasher ADB Legit? Full Review To Bypass Your Lava Agni 2 5G Phone FRP Lock
- [Updated] 2024 Approved Anon FB Live Watchers Group
- 2024 Approved Directing Traffic From TikTok to Twitter
- 2024 Approved Android and iPhones Finest 3D Animation Apps You Cant Miss
- [Updated] In 2024, CaptureCare Essential Guide to IG Photo & Video Resize
- [New] In 2024, TikTok Trends Navigating Copyright Laws for Your Videos
- [New] In 2024, Quick-Shift Video Techniques Mastering Transitions
- [Updated] Stay Relevant Discover the Top 20 TikTok Caption Masterpieces
- In 2024, Complete Review & Guide to Techeligible FRP Bypass and More For Poco X5
- [Updated] Elite Fighters Unleashed Selecting Superior Street Fighter Clones for 2024
- New Top 3D Video Creation Tools You Need to Try
- [Updated] 2024 Approved Bridging Identities with 100 Creative and Empowering Insta Captions
- [New] Counterclockwise Playback in Instagram Videos for 2024
- Updated Essential 6 Online Sound Clipping Utilities
- In 2024, How To Bypass iCloud By Checkra1n Even From Apple iPhone 6s Plus If Youve Tried Everything
- Updated 2024 Approved Tutorial Guides for Video Maker with Song
- [New] Exclusive List of Premium Screen-Free Gaming on Android Devices for 2024
- [Updated] High-Definition Recorders Revealed 5 Devices to Watch for 2024
- [New] Virtual Stage War Is Likee Poised to Overtake TikTok for 2024
- In 2024, Ways To Find Unlocking Codes For Lava Blaze Pro 5G Phones
- Super Easy Ways To Deal with Infinix Smart 8 Unresponsive Screen | Dr.fone
- Updated Import Songs Into Adobe Premiere CC for Soundtracking for 2024
- In 2024, 20 Great Tools for Live Streaming & Webcam Recordings
- Meizu 21 Messages Recovery - Recover Deleted Messages from Meizu 21
- New Elevating Your Vocal Range Deepening Tones with Filmoras Tools
- Title: "Innovative Split-Screen Videos for YouTube Sharing"
- Author: Steven
- Created at : 2024-05-25 19:48:24
- Updated at : 2024-05-26 19:48:24
- Link: https://youtube-clips.techidaily.com/innovative-split-screen-videos-for-youtube-sharing/
- License: This work is licensed under CC BY-NC-SA 4.0.
