
In 2024, Essential YouTube Video Editing Techniques
Essential YouTube Video Editing Techniques
YouTube Video Editor Guide and Review

Richard Bennett
Mar 27, 2024• Proven solutions
YouTube has had a video editor for a long time, but over time it has changed for the better. 2010 was when the first major overhaul happened, and since then more and more features have been added. There is still the question if the YouTube Video Editor is good, and if it replaces desktop editors. Hopefully, our YouTube Video Editor Review helps you figure out if you want to use the editor.
Want to make your YouTube video more attractive and beautiful? here I recommend an easy-to-use video editing software - Wondershare Filmora which not only allows you cut, crop, rotate, and split your videos in minutes, but also simplify the advanced video editing like green screen effect and PIP. You can also find over 300 video effects like Fashion, Beauty, Gaming, Education, etc.


YouTube Video Editor Review
Note: From 20th September 2017 users will no longer be able to use the complimentary editing suite. Check the best YouTube video editor alternatives from this complete guide.
In the early days of the YouTube Video Editor , all you could do was trim video clips, arrange the clips on a timeline, add in basic transitions, and add music. Now the YouTube video editor is able to add video effects to the video and create multiple projects at the same time. While the editor can do more, it has stayed a simple tool.
This simplicity makes it very easy and quick to use. Unlike desktop editors, the YouTube Editor processes much faster. Since the tool is designed to be easy to use, you can learn to use the YouTube Editor in very little time. However, due to its simplicity, it does not offer all the same features. Some of the features that are missing means that it is not suited for every project.
The Basic Features
1.The editor

The YouTube Video Editor does come with some standard video editing functions like video splicing, Audioswap, and cropping videos. The video editor needs to have the videos already uploaded to YouTube. Along with using your own videos, you have the option to use videos that are part of the Creative Commons library. There transitions, and other features that other standard video editors have. Audioswap is easy to use, and there is access to the Creative Commons library in the editor.
2. The Enhancements

The Enhancements that are included in the YouTube Video Editor are not the best tools, but they are still pretty good overall. Enhancements can be found by clicking on a video picture after it has been added to the project. Enhancements are broken into four categories: Quick Fixes, Filters, Text, and Audio. Quick fixes are basic adjustments for small issues like the contrast and saturation of the video. YouTube added an auto-fix button and stabilize video button to make it quick to fix these issues. The filters, text, and audio, are about the same that you would find with any other video editing software.
Related: Want to know how to use the Enhancements feature in YouTube? Check this tutorial to know more: How to use YouTube Enhancements.
Pros and Cons of the YouTube Video Editor
The Pros of the YouTube Editor are that is it is free and has a huge library of free video clips and music. It is also super easy to learn. If you have a Google+ account, you can photos to your video straight from your cloud storage. You also have access to all the videos that you have uploaded to YouTube. All the features are easy to use, and many can be dragged and dropped making editing easy. Google is still improving the YouTube Video Editor to have more features and run smoother.
Related: Want to know YouTube alternatives? Check this article to know more: YouTube Video Editor Alternatives
The major con for YouTube Video Editor is that it only has the basic video editing features at the moment. Another major con is that the video editor is fully online. This means that a refresh is needed to see the changes that you have made. After the refresh of the video, the video jumps back to the beginning of the video making it frustrating to edit the end of a video. There is also no real way of shortening music in the editor at the moment. Unlike many desk top video editors, you cannot overlap music or video clips. This means that some of the transitions are choppy.
The Bottom Line
Since Google is still working on the YouTube Video Editor, hopefully, most of kinks will be worked out soon. While the YouTube Video Editor is getting better, it is still have the most basic features. The easy to use nature of the editor may mean that it stays more of a simple to use video tool. This does make it easy to edit, and it’s good for most projects. Millions of people use this editor because it is so easy to use. However, more advanced projects are still going to need a desktop video editor. We are hoping to see more advanced features in the future.
Many YouTubers and everyday people like the YouTube Video Editor, for its ease of use and the quick video editing that it provides. However, if it is right for you, depends greatly on what you are trying to do. If you plan on doing any editing past cropping videos, adding type and transitions, and switching music, you are better off using a desktop video editor. Hopefully, this YouTube Video Editor Review helps you figure out if YouTube’s editor is the right one of your projects.
Richard Bennett
Richard Bennett is a writer and a lover of all things video.
Follow @Richard Bennett
Richard Bennett
Mar 27, 2024• Proven solutions
YouTube has had a video editor for a long time, but over time it has changed for the better. 2010 was when the first major overhaul happened, and since then more and more features have been added. There is still the question if the YouTube Video Editor is good, and if it replaces desktop editors. Hopefully, our YouTube Video Editor Review helps you figure out if you want to use the editor.
Want to make your YouTube video more attractive and beautiful? here I recommend an easy-to-use video editing software - Wondershare Filmora which not only allows you cut, crop, rotate, and split your videos in minutes, but also simplify the advanced video editing like green screen effect and PIP. You can also find over 300 video effects like Fashion, Beauty, Gaming, Education, etc.
YouTube Video Editor Review
Note: From 20th September 2017 users will no longer be able to use the complimentary editing suite. Check the best YouTube video editor alternatives from this complete guide.
In the early days of the YouTube Video Editor , all you could do was trim video clips, arrange the clips on a timeline, add in basic transitions, and add music. Now the YouTube video editor is able to add video effects to the video and create multiple projects at the same time. While the editor can do more, it has stayed a simple tool.
This simplicity makes it very easy and quick to use. Unlike desktop editors, the YouTube Editor processes much faster. Since the tool is designed to be easy to use, you can learn to use the YouTube Editor in very little time. However, due to its simplicity, it does not offer all the same features. Some of the features that are missing means that it is not suited for every project.
The Basic Features
1.The editor
The YouTube Video Editor does come with some standard video editing functions like video splicing, Audioswap, and cropping videos. The video editor needs to have the videos already uploaded to YouTube. Along with using your own videos, you have the option to use videos that are part of the Creative Commons library. There transitions, and other features that other standard video editors have. Audioswap is easy to use, and there is access to the Creative Commons library in the editor.
2. The Enhancements
The Enhancements that are included in the YouTube Video Editor are not the best tools, but they are still pretty good overall. Enhancements can be found by clicking on a video picture after it has been added to the project. Enhancements are broken into four categories: Quick Fixes, Filters, Text, and Audio. Quick fixes are basic adjustments for small issues like the contrast and saturation of the video. YouTube added an auto-fix button and stabilize video button to make it quick to fix these issues. The filters, text, and audio, are about the same that you would find with any other video editing software.
Related: Want to know how to use the Enhancements feature in YouTube? Check this tutorial to know more: How to use YouTube Enhancements.
Pros and Cons of the YouTube Video Editor
The Pros of the YouTube Editor are that is it is free and has a huge library of free video clips and music. It is also super easy to learn. If you have a Google+ account, you can photos to your video straight from your cloud storage. You also have access to all the videos that you have uploaded to YouTube. All the features are easy to use, and many can be dragged and dropped making editing easy. Google is still improving the YouTube Video Editor to have more features and run smoother.
Related: Want to know YouTube alternatives? Check this article to know more: YouTube Video Editor Alternatives
The major con for YouTube Video Editor is that it only has the basic video editing features at the moment. Another major con is that the video editor is fully online. This means that a refresh is needed to see the changes that you have made. After the refresh of the video, the video jumps back to the beginning of the video making it frustrating to edit the end of a video. There is also no real way of shortening music in the editor at the moment. Unlike many desk top video editors, you cannot overlap music or video clips. This means that some of the transitions are choppy.
The Bottom Line
Since Google is still working on the YouTube Video Editor, hopefully, most of kinks will be worked out soon. While the YouTube Video Editor is getting better, it is still have the most basic features. The easy to use nature of the editor may mean that it stays more of a simple to use video tool. This does make it easy to edit, and it’s good for most projects. Millions of people use this editor because it is so easy to use. However, more advanced projects are still going to need a desktop video editor. We are hoping to see more advanced features in the future.
Many YouTubers and everyday people like the YouTube Video Editor, for its ease of use and the quick video editing that it provides. However, if it is right for you, depends greatly on what you are trying to do. If you plan on doing any editing past cropping videos, adding type and transitions, and switching music, you are better off using a desktop video editor. Hopefully, this YouTube Video Editor Review helps you figure out if YouTube’s editor is the right one of your projects.
Richard Bennett
Richard Bennett is a writer and a lover of all things video.
Follow @Richard Bennett
Capture YouTube in Full - Free Screencast Tutorials You Need Right Now
How To Record Screencast From YouTube For Free

Max Wales
Mar 27, 2024• Proven solutions
Screencasting is a simple task anyone can do it with ease. All that you need to do is download a software program, press the record button and soon all movements on your device screen video will be recorded. Crazy video gamers do the same thing to share their interesting game videos on YouTube channels.
There is a wide range of software tools that can assists you with screencasting needs. Even YouTube itself has the ability to capture device screens without the need for additional software tool. If you are interested to know how it can be done, simply go through the details below.
Note: We resolutely oppose all forms of copyright-infringing downloads. This tutorial is only for downloading YouTube videos/audio materials from your own channel.
![]()

The All-in-One Screen Recorder & Video Editor
- Record desktop screen, voiceover, and webcam simultaneously
- Edit recorded clips quickly with a wide range of professional tools
- Built-in plentiful templates and effects
- Export to MP4, MOV, MKV, GIF and multiple formats
For Win 7 or later (64-bit)
For macOS 10.12 or later
 Secure Download
Recording Screencast Video with YouTube
Step 1: Open YouTube on your computer and sign by using your Google Account. On the top left corner, you will find the Upload button, press it and go to live streaming section and choose events from the drop-down menu. When you are doing this for the very first time, YouTube will ask your phone number to verify the streaming process. You can also click here to get to the Livestreaming page directly.
Step 2: On the create an event page, add a title for your screencast video; set privacy terms and then hit “Go Live Now” option.

Step 3: The Hangout on Air page will get opened. It will allow you to select-deselect webcam recording as well as mic recording.
Step 4: Hit the screen share button from the left toolbox and choose the desktop window that you wish to record. Now press start the Broadcast button to start screen recording. Note that it is a private session that cannot be watched by anyone else.
Step 5: When your video is ready to go to YouTube video dashboard and choose your recent screencast video. Download it to Google Drive and share it with the world.
A better way to record Screencast and Upload to YouTube
For those who are interested in capturing screencast with high-quality videos and need an easy to use the built-in editor to customize these videos; it is good to look for some dedicated screencast tools. Experts recommend using Wondershare Filmora due to its advanced features and interactive software platform.
Top Features
- Filmora is one of the most interactive software tools that works perfectly on Windows and Mac platforms.
- It supports more than 50 media file formats.
- Filmora allows users to record with Webcam and PC simultaneously.
- It is possible to record audio from mic input and internal computer audio as well.
- With Filmora users can record high paced videos at 120fps.
- Add markers to important frames during recording.
There are so many benefits of using Filmora for YouTube screencast video recordings. The biggest trouble with YouTube based recording is that when you try it for the very first time, YouTube will take 24 hours to verify your account for the live streaming. But by using Filmora, you can do this task instantly at any hour of the day. Another great news is that Fillmore Scrn comes with a built-in video editor that allows users to customize videos with ease. Once your videos are ready, you can share them directly to social media platforms including YouTube, Facebook, Twitch, and Vimeo etc.
Let’s watch the video below to check how to record your screen with Filmora and upload the recorded video to YouTube.
Conclusion
With all impressive features, there is no doubt to say that Filmora can serve your screencasting needs in the best possible manner. Whether you are a crazy gamer interested to share your adventure videos with the world or want to create useful tutorials for your audience, Filmora is your best companion for all your needs.
Max Wales
Max Wales is a writer and a lover of all things video.
Follow @Max Wales
Max Wales
Mar 27, 2024• Proven solutions
Screencasting is a simple task anyone can do it with ease. All that you need to do is download a software program, press the record button and soon all movements on your device screen video will be recorded. Crazy video gamers do the same thing to share their interesting game videos on YouTube channels.
There is a wide range of software tools that can assists you with screencasting needs. Even YouTube itself has the ability to capture device screens without the need for additional software tool. If you are interested to know how it can be done, simply go through the details below.
Note: We resolutely oppose all forms of copyright-infringing downloads. This tutorial is only for downloading YouTube videos/audio materials from your own channel.
![]()
The All-in-One Screen Recorder & Video Editor
- Record desktop screen, voiceover, and webcam simultaneously
- Edit recorded clips quickly with a wide range of professional tools
- Built-in plentiful templates and effects
- Export to MP4, MOV, MKV, GIF and multiple formats
For Win 7 or later (64-bit)
For macOS 10.12 or later
Secure Download
Recording Screencast Video with YouTube
Step 1: Open YouTube on your computer and sign by using your Google Account. On the top left corner, you will find the Upload button, press it and go to live streaming section and choose events from the drop-down menu. When you are doing this for the very first time, YouTube will ask your phone number to verify the streaming process. You can also click here to get to the Livestreaming page directly.
Step 2: On the create an event page, add a title for your screencast video; set privacy terms and then hit “Go Live Now” option.
Step 3: The Hangout on Air page will get opened. It will allow you to select-deselect webcam recording as well as mic recording.
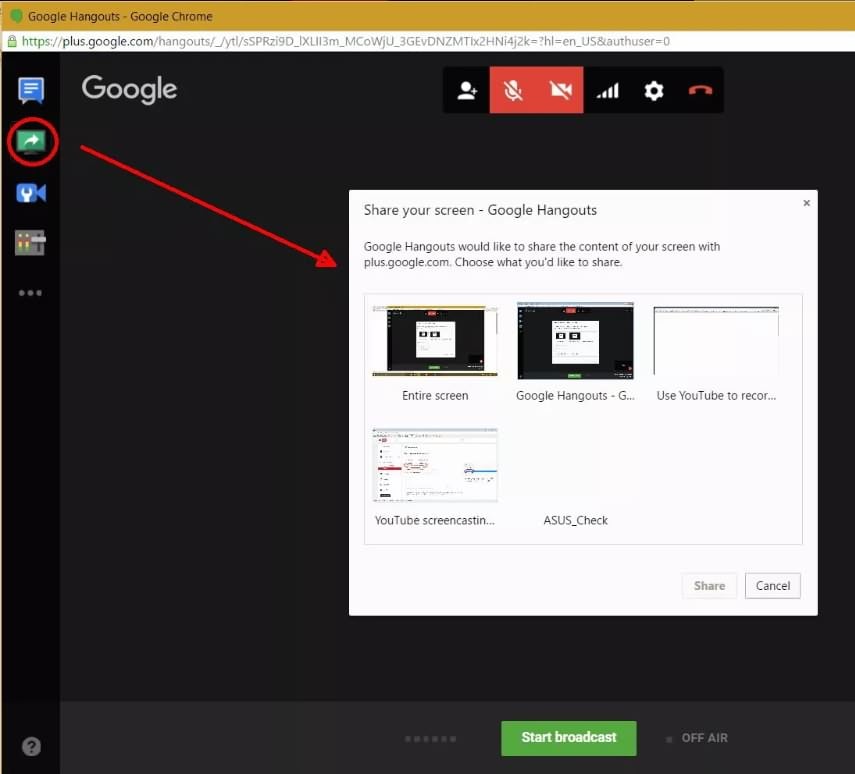
Step 4: Hit the screen share button from the left toolbox and choose the desktop window that you wish to record. Now press start the Broadcast button to start screen recording. Note that it is a private session that cannot be watched by anyone else.
Step 5: When your video is ready to go to YouTube video dashboard and choose your recent screencast video. Download it to Google Drive and share it with the world.
A better way to record Screencast and Upload to YouTube
For those who are interested in capturing screencast with high-quality videos and need an easy to use the built-in editor to customize these videos; it is good to look for some dedicated screencast tools. Experts recommend using Wondershare Filmora due to its advanced features and interactive software platform.
Top Features
- Filmora is one of the most interactive software tools that works perfectly on Windows and Mac platforms.
- It supports more than 50 media file formats.
- Filmora allows users to record with Webcam and PC simultaneously.
- It is possible to record audio from mic input and internal computer audio as well.
- With Filmora users can record high paced videos at 120fps.
- Add markers to important frames during recording.
There are so many benefits of using Filmora for YouTube screencast video recordings. The biggest trouble with YouTube based recording is that when you try it for the very first time, YouTube will take 24 hours to verify your account for the live streaming. But by using Filmora, you can do this task instantly at any hour of the day. Another great news is that Fillmore Scrn comes with a built-in video editor that allows users to customize videos with ease. Once your videos are ready, you can share them directly to social media platforms including YouTube, Facebook, Twitch, and Vimeo etc.
Let’s watch the video below to check how to record your screen with Filmora and upload the recorded video to YouTube.
Conclusion
With all impressive features, there is no doubt to say that Filmora can serve your screencasting needs in the best possible manner. Whether you are a crazy gamer interested to share your adventure videos with the world or want to create useful tutorials for your audience, Filmora is your best companion for all your needs.
Max Wales
Max Wales is a writer and a lover of all things video.
Follow @Max Wales
Also read:
- [New] Incorinasmatic Mix Sharing Songs in Social Spaces for 2024
- [Updated] Best Practices for Designing Compelling YouTube Video Thumbnails
- Charting Your Course in YouTubing Dodge These Top 8 Common Missteps for 2024
- Command Prompt Secrets: 5 Entertaining Hacks
- Curate a Perfect Playlist on YouTube A Step-by-Step Guide for 2024
- Embodying the Mystery | Free Book
- Enhance Creativity with These Top 6 Instagram Reel Tools for 2024
- Is YouTube's 4-Second Trick Effective?
- Overcoming the Hurdle: Effective Solutions for Error Code 0X800F081F in .NET Framework 3.5 Deployment
- Sizzling Shots Capturing Culinary Magic
- Streamline Your Information with Mematic's App for 2024
- Title: In 2024, Essential YouTube Video Editing Techniques
- Author: Steven
- Created at : 2025-01-06 17:40:04
- Updated at : 2025-01-10 18:02:06
- Link: https://youtube-clips.techidaily.com/in-2024-essential-youtube-video-editing-techniques/
- License: This work is licensed under CC BY-NC-SA 4.0.