In 2024, Essential Tech for New Channel Launches
Essential Tech for New Channel Launches
The Best YouTube Equipment: What You Need to Start Your Channel

Richard Bennett
Mar 27, 2024• Proven solutions
When you first started your vlog you likely looked for tips from well-established vloggers. Something that may have been surprising was the amount of equipment it takes to run a successful vlog. Besides your camera you need equipment for stabilizing it, for lighting your shots, and for recording better audio than your camera is capable of. If you still don’t know which camera to use, this article will tell you the best cameras for YouTube .
Do not be overwhelmed! There are loads of affordable options for YouTube equipment. There are even some tricks you can use to get by without some pieces of equipment until you are ready to make the investment.
Here are examples of some of the best YouTube equipment. Watch for the ‘Free Option!’ at the bottom of every section!
1. Stabilizers for YouTube
Selfie Stick: A lot of vloggers like to record from their phones, and selfie sticks make great stabilizers. You can put one end on the ground and use your selfie stick similarly to a monopod. Selfie sticks are also very affordable. The Cazbe Selfie Stick is only about $40. If you want to be a bit more sophisticated about your smartphone video then you might consider the KumbaCam 3 Axis Smart Phone Stabilizer, which is described as a ‘selfie stick on steroids’. It is a pricier option at $350.

Tripod: A tripod is what most people think of when they think of stabilizing their cameras. Tripods come in different weights and sizes, and there are even tripods specifically for smartphones. There is a wide range of pricing for tripods. Mid-range is about $50.

Free Option! Any Available Surface: Kitchen tables. Desks. Park benches. Trees. Your friend’s shoulder, if you ask nicely. Anything you can rest your camera on top of can be used to record a steady video.
2. Lighting for YouTube Videos
Softbox Lights: These are the kinds of lights that were probably used to take your school photos. They create soft, diffused, light and can be fairly affordable. The LimoStudio 700W Photography Softbox Lighting Kit is $167, and that is about the average.

LED Panel Light: LED panels produce high quality light. Prices vary. The Aputure Amaran AL-528S LED Video Light costs $358 (with stand). There are also LED panel lights which can be mounted onto your camera, like the Julius Studio NEW 160 LED 160 Dimmable Ultra High Power Panel Light which costs $111.

Free Option! The Sun: Natural light is always powerful enough to make your videos look great. Consider recording outside, or near a window in your house.
3. Audio Equipment for YouTube
Snoball: A Blue Snoball USB mic is an extremely affordable option at $60, although it does not have good range. You have to stay close to your computer if you use a Snoball.

Shotgun: You can get a shotgun mic to attach to your camera at a fairly decent price. The RØDE Video Shotgun Mic is only $140. You will not be able to stray far from your camera as it works best when you are close to it.

MP3 Recorder: A very high quality voice recorder is one way to record great audio and still be able to move freely. The Roland R-05 WAVE/MP3 Recorder is a great choice at $200.

LAV System: A lavalier, or lapel, mic system is a lot of vloggers’ favorite way to record dialogue because the mics are small and clip right on to your clothing. This is a more expensive option. The Sony LAV Wireless Mic System is $600.

Free Option! Audacity: Audacity is free audio recording/editing software that is popular with vloggers. If you do not have access to an external mic then you might be able to increase the quality of your sound recording using Audacity. You can download the latest version of Audacity for free from Audacityteam.org
4. Editing Your YouTube Videos
Filmora Video Editor: Filmora is a great program for beginners, but it is also powerful enough to satisfy more experienced vloggers. Filmora has both advanced tools like green screen or picture-in-picture, and a lot of fun features like filters, animated titles, and overlays.
 Download Mac Version ](https://tools.techidaily.com/wondershare/filmora/download/ )
Adobe Premiere Pro: Premiere is professional grade software that boasts an ‘industry-leading video production toolset’. You can get Premiere Pro as part of the single-app Creative Cloud plan for $19.99 a month.
Free Option! Filmora: Filmora’s mobile app, Filmora, is available for free for a limited time for both Android and iPhone. It has a ton of features, and a really intuitive interface designed specifically for the mobile format.
Richard Bennett
Richard Bennett is a writer and a lover of all things video.
Follow @Richard Bennett
Richard Bennett
Mar 27, 2024• Proven solutions
When you first started your vlog you likely looked for tips from well-established vloggers. Something that may have been surprising was the amount of equipment it takes to run a successful vlog. Besides your camera you need equipment for stabilizing it, for lighting your shots, and for recording better audio than your camera is capable of. If you still don’t know which camera to use, this article will tell you the best cameras for YouTube .
Do not be overwhelmed! There are loads of affordable options for YouTube equipment. There are even some tricks you can use to get by without some pieces of equipment until you are ready to make the investment.
Here are examples of some of the best YouTube equipment. Watch for the ‘Free Option!’ at the bottom of every section!
1. Stabilizers for YouTube
Selfie Stick: A lot of vloggers like to record from their phones, and selfie sticks make great stabilizers. You can put one end on the ground and use your selfie stick similarly to a monopod. Selfie sticks are also very affordable. The Cazbe Selfie Stick is only about $40. If you want to be a bit more sophisticated about your smartphone video then you might consider the KumbaCam 3 Axis Smart Phone Stabilizer, which is described as a ‘selfie stick on steroids’. It is a pricier option at $350.
Tripod: A tripod is what most people think of when they think of stabilizing their cameras. Tripods come in different weights and sizes, and there are even tripods specifically for smartphones. There is a wide range of pricing for tripods. Mid-range is about $50.
Free Option! Any Available Surface: Kitchen tables. Desks. Park benches. Trees. Your friend’s shoulder, if you ask nicely. Anything you can rest your camera on top of can be used to record a steady video.
2. Lighting for YouTube Videos
Softbox Lights: These are the kinds of lights that were probably used to take your school photos. They create soft, diffused, light and can be fairly affordable. The LimoStudio 700W Photography Softbox Lighting Kit is $167, and that is about the average.
LED Panel Light: LED panels produce high quality light. Prices vary. The Aputure Amaran AL-528S LED Video Light costs $358 (with stand). There are also LED panel lights which can be mounted onto your camera, like the Julius Studio NEW 160 LED 160 Dimmable Ultra High Power Panel Light which costs $111.
Free Option! The Sun: Natural light is always powerful enough to make your videos look great. Consider recording outside, or near a window in your house.
3. Audio Equipment for YouTube
Snoball: A Blue Snoball USB mic is an extremely affordable option at $60, although it does not have good range. You have to stay close to your computer if you use a Snoball.
Shotgun: You can get a shotgun mic to attach to your camera at a fairly decent price. The RØDE Video Shotgun Mic is only $140. You will not be able to stray far from your camera as it works best when you are close to it.
MP3 Recorder: A very high quality voice recorder is one way to record great audio and still be able to move freely. The Roland R-05 WAVE/MP3 Recorder is a great choice at $200.
LAV System: A lavalier, or lapel, mic system is a lot of vloggers’ favorite way to record dialogue because the mics are small and clip right on to your clothing. This is a more expensive option. The Sony LAV Wireless Mic System is $600.
Free Option! Audacity: Audacity is free audio recording/editing software that is popular with vloggers. If you do not have access to an external mic then you might be able to increase the quality of your sound recording using Audacity. You can download the latest version of Audacity for free from Audacityteam.org
4. Editing Your YouTube Videos
Filmora Video Editor: Filmora is a great program for beginners, but it is also powerful enough to satisfy more experienced vloggers. Filmora has both advanced tools like green screen or picture-in-picture, and a lot of fun features like filters, animated titles, and overlays.
Download Mac Version ](https://tools.techidaily.com/wondershare/filmora/download/ )
Adobe Premiere Pro: Premiere is professional grade software that boasts an ‘industry-leading video production toolset’. You can get Premiere Pro as part of the single-app Creative Cloud plan for $19.99 a month.
Free Option! Filmora: Filmora’s mobile app, Filmora, is available for free for a limited time for both Android and iPhone. It has a ton of features, and a really intuitive interface designed specifically for the mobile format.
Richard Bennett
Richard Bennett is a writer and a lover of all things video.
Follow @Richard Bennett
No Money, Just Screen Time: How To Record YouTube
How To Record Screencast From YouTube For Free

Max Wales
Mar 27, 2024• Proven solutions
Screencasting is a simple task anyone can do it with ease. All that you need to do is download a software program, press the record button and soon all movements on your device screen video will be recorded. Crazy video gamers do the same thing to share their interesting game videos on YouTube channels.
There is a wide range of software tools that can assists you with screencasting needs. Even YouTube itself has the ability to capture device screens without the need for additional software tool. If you are interested to know how it can be done, simply go through the details below.
Note: We resolutely oppose all forms of copyright-infringing downloads. This tutorial is only for downloading YouTube videos/audio materials from your own channel.
![]()

The All-in-One Screen Recorder & Video Editor
- Record desktop screen, voiceover, and webcam simultaneously
- Edit recorded clips quickly with a wide range of professional tools
- Built-in plentiful templates and effects
- Export to MP4, MOV, MKV, GIF and multiple formats
For Win 7 or later (64-bit)
For macOS 10.12 or later
 Secure Download
Recording Screencast Video with YouTube
Step 1: Open YouTube on your computer and sign by using your Google Account. On the top left corner, you will find the Upload button, press it and go to live streaming section and choose events from the drop-down menu. When you are doing this for the very first time, YouTube will ask your phone number to verify the streaming process. You can also click here to get to the Livestreaming page directly.
Step 2: On the create an event page, add a title for your screencast video; set privacy terms and then hit “Go Live Now” option.

Step 3: The Hangout on Air page will get opened. It will allow you to select-deselect webcam recording as well as mic recording.
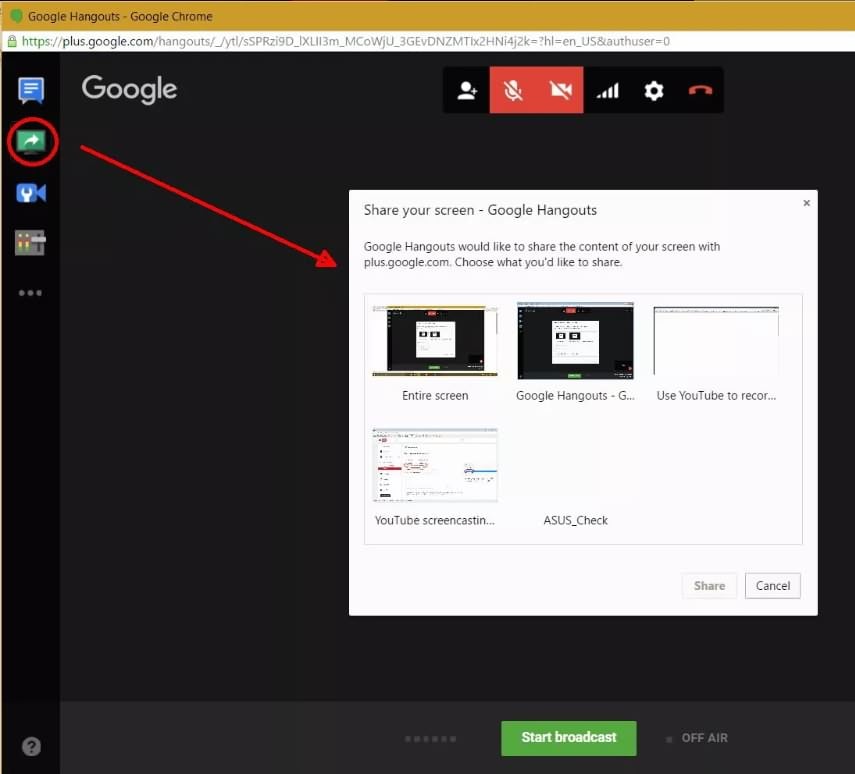
Step 4: Hit the screen share button from the left toolbox and choose the desktop window that you wish to record. Now press start the Broadcast button to start screen recording. Note that it is a private session that cannot be watched by anyone else.
Step 5: When your video is ready to go to YouTube video dashboard and choose your recent screencast video. Download it to Google Drive and share it with the world.
A better way to record Screencast and Upload to YouTube
For those who are interested in capturing screencast with high-quality videos and need an easy to use the built-in editor to customize these videos; it is good to look for some dedicated screencast tools. Experts recommend using Wondershare Filmora due to its advanced features and interactive software platform.

Top Features
- Filmora is one of the most interactive software tools that works perfectly on Windows and Mac platforms.
- It supports more than 50 media file formats.
- Filmora allows users to record with Webcam and PC simultaneously.
- It is possible to record audio from mic input and internal computer audio as well.
- With Filmora users can record high paced videos at 120fps.
- Add markers to important frames during recording.
There are so many benefits of using Filmora for YouTube screencast video recordings. The biggest trouble with YouTube based recording is that when you try it for the very first time, YouTube will take 24 hours to verify your account for the live streaming. But by using Filmora, you can do this task instantly at any hour of the day. Another great news is that Fillmore Scrn comes with a built-in video editor that allows users to customize videos with ease. Once your videos are ready, you can share them directly to social media platforms including YouTube, Facebook, Twitch, and Vimeo etc.
Let’s watch the video below to check how to record your screen with Filmora and upload the recorded video to YouTube.
Conclusion
With all impressive features, there is no doubt to say that Filmora can serve your screencasting needs in the best possible manner. Whether you are a crazy gamer interested to share your adventure videos with the world or want to create useful tutorials for your audience, Filmora is your best companion for all your needs.
Max Wales
Max Wales is a writer and a lover of all things video.
Follow @Max Wales
Max Wales
Mar 27, 2024• Proven solutions
Screencasting is a simple task anyone can do it with ease. All that you need to do is download a software program, press the record button and soon all movements on your device screen video will be recorded. Crazy video gamers do the same thing to share their interesting game videos on YouTube channels.
There is a wide range of software tools that can assists you with screencasting needs. Even YouTube itself has the ability to capture device screens without the need for additional software tool. If you are interested to know how it can be done, simply go through the details below.
Note: We resolutely oppose all forms of copyright-infringing downloads. This tutorial is only for downloading YouTube videos/audio materials from your own channel.
![]()
The All-in-One Screen Recorder & Video Editor
- Record desktop screen, voiceover, and webcam simultaneously
- Edit recorded clips quickly with a wide range of professional tools
- Built-in plentiful templates and effects
- Export to MP4, MOV, MKV, GIF and multiple formats
For Win 7 or later (64-bit)
For macOS 10.12 or later
Secure Download
Recording Screencast Video with YouTube
Step 1: Open YouTube on your computer and sign by using your Google Account. On the top left corner, you will find the Upload button, press it and go to live streaming section and choose events from the drop-down menu. When you are doing this for the very first time, YouTube will ask your phone number to verify the streaming process. You can also click here to get to the Livestreaming page directly.
Step 2: On the create an event page, add a title for your screencast video; set privacy terms and then hit “Go Live Now” option.
Step 3: The Hangout on Air page will get opened. It will allow you to select-deselect webcam recording as well as mic recording.
Step 4: Hit the screen share button from the left toolbox and choose the desktop window that you wish to record. Now press start the Broadcast button to start screen recording. Note that it is a private session that cannot be watched by anyone else.
Step 5: When your video is ready to go to YouTube video dashboard and choose your recent screencast video. Download it to Google Drive and share it with the world.
A better way to record Screencast and Upload to YouTube
For those who are interested in capturing screencast with high-quality videos and need an easy to use the built-in editor to customize these videos; it is good to look for some dedicated screencast tools. Experts recommend using Wondershare Filmora due to its advanced features and interactive software platform.
Top Features
- Filmora is one of the most interactive software tools that works perfectly on Windows and Mac platforms.
- It supports more than 50 media file formats.
- Filmora allows users to record with Webcam and PC simultaneously.
- It is possible to record audio from mic input and internal computer audio as well.
- With Filmora users can record high paced videos at 120fps.
- Add markers to important frames during recording.
There are so many benefits of using Filmora for YouTube screencast video recordings. The biggest trouble with YouTube based recording is that when you try it for the very first time, YouTube will take 24 hours to verify your account for the live streaming. But by using Filmora, you can do this task instantly at any hour of the day. Another great news is that Fillmore Scrn comes with a built-in video editor that allows users to customize videos with ease. Once your videos are ready, you can share them directly to social media platforms including YouTube, Facebook, Twitch, and Vimeo etc.
Let’s watch the video below to check how to record your screen with Filmora and upload the recorded video to YouTube.
Conclusion
With all impressive features, there is no doubt to say that Filmora can serve your screencasting needs in the best possible manner. Whether you are a crazy gamer interested to share your adventure videos with the world or want to create useful tutorials for your audience, Filmora is your best companion for all your needs.
Max Wales
Max Wales is a writer and a lover of all things video.
Follow @Max Wales
Also read:
- [New] Blueprint for Buzzing Outro
- [Updated] In 2024, Clip Concoction Station
- 2024 Approved Are There Benefits to Purchasing YouTube Engagement?
- 2024 Approved Dive Into the World of Enhanced YouTube Content with Premium Subscription
- 2024 Approved Easy YouTube Introduction Design Tips and Tricks
- Easy Guide: Obtaining Your Logitech M525 Driver and Setup Programs
- In 2024, Hassle-Free Ways to Remove FRP Lock from Itel P55 5G Phones with/without a PC
- In 2024, Unlock Your Disabled iPhone X Without iTunes in 5 Ways | Dr.fone
- Perfect Your Strategy Top-Rated Techniques for Video Marketing
- Revamped Dell XPS Series: Elevating Portability Meets Cutting-Edge Artificer Intelligence, Retaining Timeless Design | ZDNet
- Top TP-Link Archer A6 AC1200 Wireless Router Analysis for Cost-Effective Speed and Connectivity
- Which Pokémon can Evolve with a Moon Stone For Apple iPhone 15 Plus? | Dr.fone
- Title: In 2024, Essential Tech for New Channel Launches
- Author: Steven
- Created at : 2025-01-08 19:07:34
- Updated at : 2025-01-10 17:14:15
- Link: https://youtube-clips.techidaily.com/in-2024-essential-tech-for-new-channel-launches/
- License: This work is licensed under CC BY-NC-SA 4.0.