
:max_bytes(150000):strip_icc()/alternate-route-plan-google-maps-1616470-90734d793e9743d596ade9b27be0b34b.png)
In 2024, Essential Strategies for Uploading Video Quality 4K on YouTub
Essential Strategies for Uploading Video Quality 4K on YouTub
Create High-Quality Video - Wondershare Filmora
An easy and powerful YouTube video editor
Numerous video and audio effects to choose from
Detailed tutorials provided by the official channel
Many people have a strong desire to make videos. Whether you make videos for a living or as a pastime, it doesn’t matter. When you make a fantastic film that you’re pleased with, you want to show it off to your friends and family. YouTube, the most popular site for sharing videos on various themes, is one of the most incredible places to start.
YouTube is fantastic for sharing videos, but it can be harsh on artists due to the high bar for content and video quality. If you want to succeed as a YouTuber, you must create videos that are informative and high-resolution. This is critical since your viewers may wish to watch your movies on a computer screen or a 4K smart TV.
If you’ve decided to make videos in 4K resolution, you’ll find information on recommended encoding settings, how to upload a video to YouTube, potential problems, and more below.
In this article
01 What Is The Distinction Between Various Resolutions?
02 Why Would You Want To Upload A 4k Video?
03 What Is The Best Way To Upload A 4k Video To Youtube?
04 Tips On How To Make Sure The Video You’re Uploading Is Of High Quality
What Is The Distinction Between Various Resolutions?
The number of pixels on a screen is referred to as resolution. Low resolution indicates fewer pixels and typically less space, whereas high resolution means more pixels and generally greater space and detail. You probably have a poor resolution if you’re using a standard laptop or an old screen.
When watching a video on a larger screen, the resolution significantly impacts your viewing experience. Whether it’s a live stream or an on-demand movie, the correct resolution is crucial to reaching a wider audience, and this is where iPhones and iPads appear to have an advantage. Let’s take a closer look at each of these resolution types and their associated pixel sizes.
1. SD RESOLUTION (STANDARD DEFINITION)
Previously, resolutions were separated into SD (Standard Definition) and HD (High Definition) categories. SD was defined as a video with a resolution of less than 720p. However, as television and computer monitor display resolutions improved over time, a video was less likely to be shot in Standard Definition.
The following are the most common standard video resolutions:
- 640 × 360 pixels (or 360p)
- 640 × 480 pixels (or 480p)
2. RESOLUTION: 720P HD (HIGH DEFINITION)
The lowest video resolution is 720p, which is commonly referred to as ‘HD.’ 720p (1280 x 720 pixels) is a resolution recognized for modest web content, even though most videos require at least 1080p. Because most computer monitors are now in HD, the recommended practice for web and streaming is to choose a resolution higher than 720p.
The resolution of HD videos is usually: 1280 x 720 pixels (or 720p)
3. 1080P FULL HD RESOLUTION
1080p resolutions, also known as ‘Full HD,’ have become the industry standard for a clear HD video that doesn’t take up a lot of storage space. It’s also worth noting that this is the standard screen resolution for all smartphones.
The resolution of full HD videos is usually: 1920 x 1080 pixels (or 1080p)
4. 2K RESOLUTION WITH QHD (QUAD HIGH DEFINITION)
Quad HD resolution, or QHD for short, is widely found on high-end smartphones and gaming monitors. The resolution of 1440p is four times that of HD Ready (or 720p HD). Many high-end smartphones have a Quad HD+ resolution (296 x 1440 pixels), which is ideal for 1440p. Another common screen resolution is 2K, which allows for larger displays and reframing without sacrificing quality or image editing.
The resolution of QHD and 2K videos is:
- 2560 x 1440 pixels in QHD (or 1440p)
- 2048 x 1080 pixels in 2K (or 1080p)
5. 4K (OR UHD/ULTRA-HIGH-DEFINITION) RESOLUTION
This sort of resolution, often known as 4Kor UHD (Ultra High Definition), has a pixel size of 3840 x 2160 pixels. It has a similar appearance to 2K, but it provides video artists more room to edit and zoom in. For vivid color, graphics, or dramatic viewing, both 2K and 4K resolutions are available. Unless you wish to tweak colors or trim in closer, there aren’t enough visible distinctions between 2K and 4K. So, it matters when you want to change a certain detail, but it doesn’t matter when someone else is looking at it.
The resolution of 4K videos is: 3840 x 2160 (or 2160p / simply 4K) is a resolution of 3840 x 2160 pixels.
Why Would You Want To Upload A 4k Video?
YouTube is the second-largest social media site, with approximately 1.9 billion monthly active users. YouTube is where you want to be to access this large audience and promote your brand, with one billion hours of video watched every day on the platform.
However, for your target audience to watch your videos, you must ensure excellent video quality. Poorly shot or edited films may alienate your viewers, especially when there are billions of other videos to choose from on the site.
- 4k is the most satisfactory resolution for uploading to YouTube. Although not every viewer can watch videos in 4k, it ensures that your visitors get the best possible experience.
- Traditional Full HD (1920 x 1080) TVs feature four times as many pixels as 4K TVs. Because of the higher pixel density, the picture quality of 4K TVs is more colorful and detailed, even on TV displays of the same size. This distinction is most noticeable on large-screen televisions.
- Even if you recorded in 1080p and upscaled to 4K, you should post in 4K to YouTube for the finest image quality. Recording in 1080p, editing in 1080p, exporting in 4k, and YouTube viewing is sharper in 1080p.
- With 4K, you get stunning visuals with a resolution of 38402160, which is four times that of Full-HD. That’s why visuals appear crisp and lifelike, even on large-screen TVs rather than pixelated. Down-converted 4K to Full-HD photographs have superior quality and resolution than images shot in Full-HD from the start.
What Is The Best Way To Upload A 4k Video To Youtube?
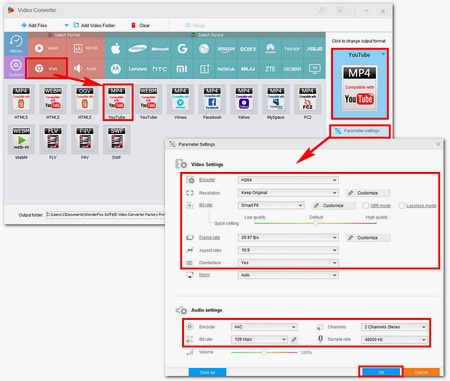
The YouTube upload process is not complicated, but it does need several steps. You can finally post your video once it has been prepared and converted to MP4 format.
Follow the steps below to post your video to YouTube:
1. Go to YouTube.com in your browser.
2. Log in to your account and click the “Create” symbol, which looks like a camera with a plus sign, in the right corner of the menu bar.
3. Select “Upload video” from the drop-down menu.
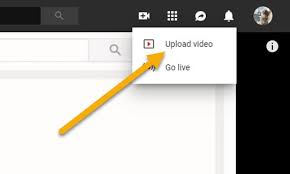
4. Drag and drop your video file into the upload box, or select your file from the “Select File” menu and click “Open.”
5. Make a note of the title and description while YouTube is processing your video.

6. Select a video thumbnail from the options or upload your own and select your “Audience” from the drop-down menu. To manage age restriction settings.
7. Select “More Options” to add searchable keywords to your video, manage subtitles and comments, and more.
8. Select if you want to add promotions to your video by clicking “Next.”
9. Finally, click “Next” and wait for the video to be processed entirely before publishing it.
10. You can also automatically set it to publish at a later date.
Tips On How To Make Sure The Video You’re Uploading Is Of High Quality
The following are five tips for amateur and top newbie YouTubers who want to improve their videos.
1. Cut Your Video Into Clips And Organize It
While it may appear to be the simplest solution to perform an entire video at once, this might make the process tedious or even damage your video if you are interrupted or make a speech error. Smaller video segments are easier to edit and blend into a single, well-formatted video.
2. Youtube Video Export
You can also modify your videos in various formats to your heart’s content before exporting them to YouTube and publishing them. Although uploading and exporting may take some time, the quality of your video will significantly increase, and the time and work you put in will be evident.
3. Change Up Your Shots
Rather than keeping your camera fixed, try varied angles while shooting. This may not work for all of your videos, but it is critical to keep your viewers engaged while they watch them, especially if you want them to stay until the finish and come back for more. Unless you’re talking about anything incredibly essential, sitting and listening to someone talk for more than 10 minutes without the camera moving will quickly become dull or old.
4. Transitions And Effects
When editing a video with numerous parts, the use of effects and transitions can considerably impact the overall quality of the video. Filmora is far more sophisticated than Windows Movie Maker and iMovie on Mac. It also allows you to create a professional-looking YouTube video with hundreds of presets such as filters, overlays, components, transitions, and blending several layers of effects and audio to enhance your YouTube tale.
Wondershare Filmii is one of the greatest choices for Windows for beginners who wish to create video footage with templates automatically. Smart video templates, trendy filters and overlays, fun stickers and motion components, and, most importantly, advanced editing capabilities are all available.
For Win 7 or later (64-bit)
For macOS 10.12 or later
Conclusion
● This is pretty much everything we’ve gathered to assist you in uploading 4K videos to YouTube. Do not become worried. Your 4K video will be in low resolution when you first publish it. This is due to YouTube’s high-resolution processing requiring time. It could take a few hours for your video to be available in 4K mode.
● The duration, format, frame rate, and resolution of your video all affect the processing time for high-definition videos. If you don’t want your video to be seen unless it has a high-quality option, upload it as unlisted and then publish it once 4K resolution is available.
Many people have a strong desire to make videos. Whether you make videos for a living or as a pastime, it doesn’t matter. When you make a fantastic film that you’re pleased with, you want to show it off to your friends and family. YouTube, the most popular site for sharing videos on various themes, is one of the most incredible places to start.
YouTube is fantastic for sharing videos, but it can be harsh on artists due to the high bar for content and video quality. If you want to succeed as a YouTuber, you must create videos that are informative and high-resolution. This is critical since your viewers may wish to watch your movies on a computer screen or a 4K smart TV.
If you’ve decided to make videos in 4K resolution, you’ll find information on recommended encoding settings, how to upload a video to YouTube, potential problems, and more below.
In this article
01 What Is The Distinction Between Various Resolutions?
02 Why Would You Want To Upload A 4k Video?
03 What Is The Best Way To Upload A 4k Video To Youtube?
04 Tips On How To Make Sure The Video You’re Uploading Is Of High Quality
What Is The Distinction Between Various Resolutions?
The number of pixels on a screen is referred to as resolution. Low resolution indicates fewer pixels and typically less space, whereas high resolution means more pixels and generally greater space and detail. You probably have a poor resolution if you’re using a standard laptop or an old screen.
When watching a video on a larger screen, the resolution significantly impacts your viewing experience. Whether it’s a live stream or an on-demand movie, the correct resolution is crucial to reaching a wider audience, and this is where iPhones and iPads appear to have an advantage. Let’s take a closer look at each of these resolution types and their associated pixel sizes.
1. SD RESOLUTION (STANDARD DEFINITION)
Previously, resolutions were separated into SD (Standard Definition) and HD (High Definition) categories. SD was defined as a video with a resolution of less than 720p. However, as television and computer monitor display resolutions improved over time, a video was less likely to be shot in Standard Definition.
The following are the most common standard video resolutions:
- 640 × 360 pixels (or 360p)
- 640 × 480 pixels (or 480p)
2. RESOLUTION: 720P HD (HIGH DEFINITION)
The lowest video resolution is 720p, which is commonly referred to as ‘HD.’ 720p (1280 x 720 pixels) is a resolution recognized for modest web content, even though most videos require at least 1080p. Because most computer monitors are now in HD, the recommended practice for web and streaming is to choose a resolution higher than 720p.
The resolution of HD videos is usually: 1280 x 720 pixels (or 720p)
3. 1080P FULL HD RESOLUTION
1080p resolutions, also known as ‘Full HD,’ have become the industry standard for a clear HD video that doesn’t take up a lot of storage space. It’s also worth noting that this is the standard screen resolution for all smartphones.
The resolution of full HD videos is usually: 1920 x 1080 pixels (or 1080p)
4. 2K RESOLUTION WITH QHD (QUAD HIGH DEFINITION)
Quad HD resolution, or QHD for short, is widely found on high-end smartphones and gaming monitors. The resolution of 1440p is four times that of HD Ready (or 720p HD). Many high-end smartphones have a Quad HD+ resolution (296 x 1440 pixels), which is ideal for 1440p. Another common screen resolution is 2K, which allows for larger displays and reframing without sacrificing quality or image editing.
The resolution of QHD and 2K videos is:
- 2560 x 1440 pixels in QHD (or 1440p)
- 2048 x 1080 pixels in 2K (or 1080p)
5. 4K (OR UHD/ULTRA-HIGH-DEFINITION) RESOLUTION
This sort of resolution, often known as 4Kor UHD (Ultra High Definition), has a pixel size of 3840 x 2160 pixels. It has a similar appearance to 2K, but it provides video artists more room to edit and zoom in. For vivid color, graphics, or dramatic viewing, both 2K and 4K resolutions are available. Unless you wish to tweak colors or trim in closer, there aren’t enough visible distinctions between 2K and 4K. So, it matters when you want to change a certain detail, but it doesn’t matter when someone else is looking at it.
The resolution of 4K videos is: 3840 x 2160 (or 2160p / simply 4K) is a resolution of 3840 x 2160 pixels.
Why Would You Want To Upload A 4k Video?
YouTube is the second-largest social media site, with approximately 1.9 billion monthly active users. YouTube is where you want to be to access this large audience and promote your brand, with one billion hours of video watched every day on the platform.
However, for your target audience to watch your videos, you must ensure excellent video quality. Poorly shot or edited films may alienate your viewers, especially when there are billions of other videos to choose from on the site.
- 4k is the most satisfactory resolution for uploading to YouTube. Although not every viewer can watch videos in 4k, it ensures that your visitors get the best possible experience.
- Traditional Full HD (1920 x 1080) TVs feature four times as many pixels as 4K TVs. Because of the higher pixel density, the picture quality of 4K TVs is more colorful and detailed, even on TV displays of the same size. This distinction is most noticeable on large-screen televisions.
- Even if you recorded in 1080p and upscaled to 4K, you should post in 4K to YouTube for the finest image quality. Recording in 1080p, editing in 1080p, exporting in 4k, and YouTube viewing is sharper in 1080p.
- With 4K, you get stunning visuals with a resolution of 38402160, which is four times that of Full-HD. That’s why visuals appear crisp and lifelike, even on large-screen TVs rather than pixelated. Down-converted 4K to Full-HD photographs have superior quality and resolution than images shot in Full-HD from the start.
What Is The Best Way To Upload A 4k Video To Youtube?
The YouTube upload process is not complicated, but it does need several steps. You can finally post your video once it has been prepared and converted to MP4 format.
Follow the steps below to post your video to YouTube:
1. Go to YouTube.com in your browser.
2. Log in to your account and click the “Create” symbol, which looks like a camera with a plus sign, in the right corner of the menu bar.
3. Select “Upload video” from the drop-down menu.
4. Drag and drop your video file into the upload box, or select your file from the “Select File” menu and click “Open.”
5. Make a note of the title and description while YouTube is processing your video.
6. Select a video thumbnail from the options or upload your own and select your “Audience” from the drop-down menu. To manage age restriction settings.
7. Select “More Options” to add searchable keywords to your video, manage subtitles and comments, and more.
8. Select if you want to add promotions to your video by clicking “Next.”
9. Finally, click “Next” and wait for the video to be processed entirely before publishing it.
10. You can also automatically set it to publish at a later date.
Tips On How To Make Sure The Video You’re Uploading Is Of High Quality
The following are five tips for amateur and top newbie YouTubers who want to improve their videos.
1. Cut Your Video Into Clips And Organize It
While it may appear to be the simplest solution to perform an entire video at once, this might make the process tedious or even damage your video if you are interrupted or make a speech error. Smaller video segments are easier to edit and blend into a single, well-formatted video.
2. Youtube Video Export
You can also modify your videos in various formats to your heart’s content before exporting them to YouTube and publishing them. Although uploading and exporting may take some time, the quality of your video will significantly increase, and the time and work you put in will be evident.
3. Change Up Your Shots
Rather than keeping your camera fixed, try varied angles while shooting. This may not work for all of your videos, but it is critical to keep your viewers engaged while they watch them, especially if you want them to stay until the finish and come back for more. Unless you’re talking about anything incredibly essential, sitting and listening to someone talk for more than 10 minutes without the camera moving will quickly become dull or old.
4. Transitions And Effects
When editing a video with numerous parts, the use of effects and transitions can considerably impact the overall quality of the video. Filmora is far more sophisticated than Windows Movie Maker and iMovie on Mac. It also allows you to create a professional-looking YouTube video with hundreds of presets such as filters, overlays, components, transitions, and blending several layers of effects and audio to enhance your YouTube tale.
Wondershare Filmii is one of the greatest choices for Windows for beginners who wish to create video footage with templates automatically. Smart video templates, trendy filters and overlays, fun stickers and motion components, and, most importantly, advanced editing capabilities are all available.
For Win 7 or later (64-bit)
For macOS 10.12 or later
Conclusion
● This is pretty much everything we’ve gathered to assist you in uploading 4K videos to YouTube. Do not become worried. Your 4K video will be in low resolution when you first publish it. This is due to YouTube’s high-resolution processing requiring time. It could take a few hours for your video to be available in 4K mode.
● The duration, format, frame rate, and resolution of your video all affect the processing time for high-definition videos. If you don’t want your video to be seen unless it has a high-quality option, upload it as unlisted and then publish it once 4K resolution is available.
Top 7 Video Enhancement Cameras To Skyrocket Your Blogging
Best 7 DSLR Vlogging Cameras

Shanoon Cox
Nov 01, 2022• Proven solutions
DSLR cameras are great for vloggers who are serious about filmmaking. But with so many DSLR cameras to choose from, it can be difficult to make a decision on one. We have come up with a list of seven of the best DSLR vlogging cameras to help you with your search.
WHAT TO LOOK FOR IN A VLOGGING CAMERA
1. Fully articulated screen (flip screen)
2. Good continual autofocus while recording video
3. Good focus priority through face recognition
4. Touch to focus
5. Good low-light performance
6. external mic jack, hot/cold shoe bracket
7. optical image stabilization
8. good battery life
Check out my full list of 10 Things To Look For In A Vlogging Camera to understand the importance of these camera features.
THE 7 BEST DSLR CAMERAS FOR VLOGGING
| Camera | Release Date | Sensor Size | Flip Screen | Mic Port | Price | |
|---|---|---|---|---|---|---|
| CanonEOS6D Mark II | 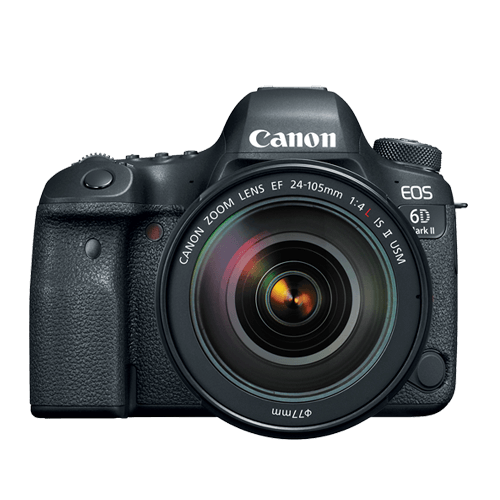 |
June2017 | Full frame(35.9 x 24 mm) | Fully Articulated | Yes | $$ |
| CanonEOS RebelSL2 | 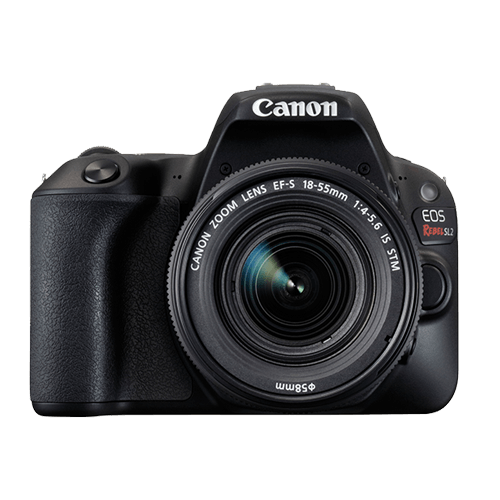 |
June2017 | APS-C(22.3 x 14.9 mm) | Fully Articulated | Yes | $ |
| CanonEOS RebelT7i | 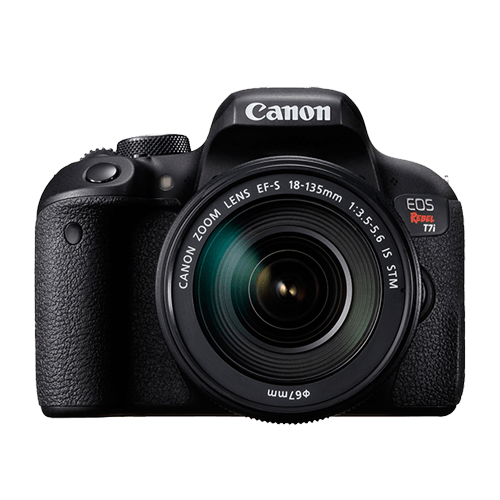 |
February2017 | APS-C(22.3 x 14.9 mm) | Fully Articulated | Yes | $- |
| CanonEOS77D | 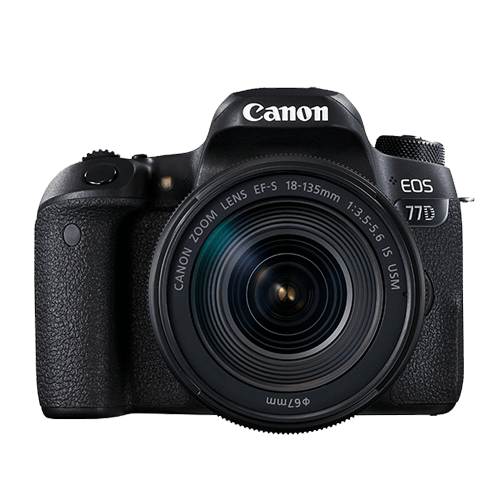 |
February2017 | APS-C(22.3 x 14.9 mm) | Fully Articulated | Yes | $- |
| NikonD5600 | 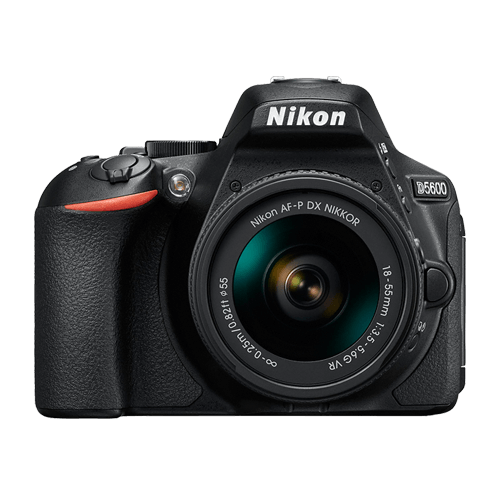 |
November2016 | APS-C(23.5 x 15.6 mm) | Fully Articulated | Yes | $- |
| CanonEOS5D Mark IV | 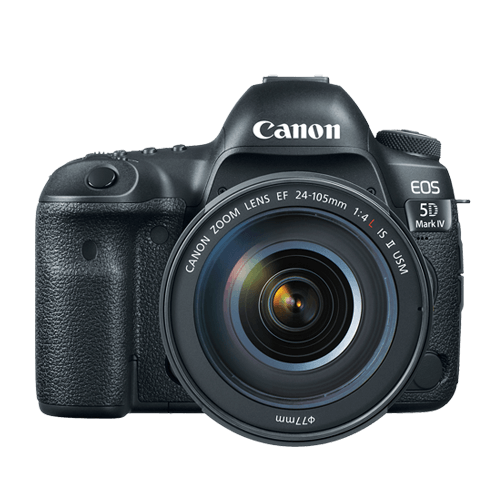 |
August2017 | Full frame(36 x 24 mm) | No | Yes | $$$ |
| CanonEOS80D | 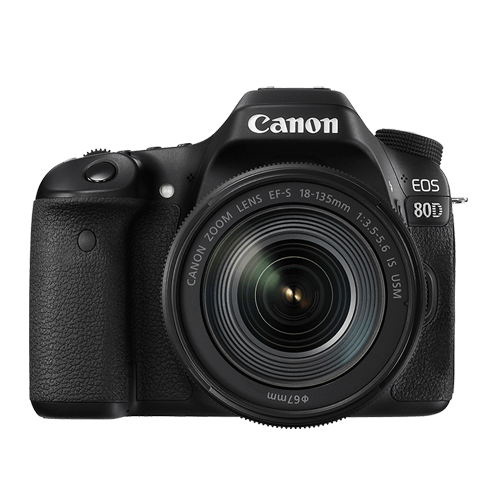 |
February2016 | APS-C(22.5 x 15 mm) | Fully Articulated | Yes | $$ |
|
Best daily DSLR camera for vlogging: Canon EOS T7i The camera you use to record your daily vlogs doesn’t have to be the best camera on the market. It just has to offer enough options to make the process of making a vlog as smooth as it can possibly be. The T7i is not the most powerful DSLR camera out there, but its 24.2 MP APS-C CMOS sensor and a DIGIC 7 image processor are more than enough to meet the needs of most daily vloggers. You can record full HD 1080p videos at 60 fps and use this camera to create HDR and time-lapse movies. You can set the T7i’s ISO up as high as 51200, which is pretty good. The T7i’s dual pixel CMOS AF system makes sure that the camera focuses quickly and it helps you avoid creating video clips that are out focus. There’s also a built-in Wi-FI with an NFC feature that enables you to share your videos with a smartphone device you connect to the camera. PROS - Long battery life - Remarkable image quality at high ISO values CONS - Can’t record 4K videos - Viewfinder is tiny |
|---|---|
|
Best entry-level DSLR camera for vlogging: Canon EOS SL2 The Canon EOS SL2 was released just a year ago and it wins our 2018 vote for the best entry-level DSLR camera for vlogging. The SL2 packs a lot of features in a compact camera body. The camera only weighs 1 lb, which is considered light among most DSLR cameras. Many vloggers may enjoy the fact that they can hold up this light camera in front of themselves with more ease. Like a lot of entry-level DSLR cameras, the SL2 comes with an APS-C crop sensor. With ISO capabilities that can reach up to 51200, you’ll be able to film up to full HD 1080p videos at 60 fps, even under low light conditions. All recent Canon cameras perform very well when it comes to autofocus and the SL2 is no exception. It does, however, have fewer points of focus. The SL2 comes with a 9-point AF system. The SL2 also has a fully-articulated screen and a microphone jack. PROS - Microphone jack - Wi-Fi connectivity CONS - No 4K video support - Optical image stabilizer could be better |
|
Best mid-range DSLR camera for vlogging: Canon EOS 80D The Canon EOS 80D is the successor of the 70D which was at one time considered by many YouTubers the ultimate DSLR camera for vlogging. The 80D is a larger camera than the SL2, weighing 1.61 lbs. In its larger build, this camera additionally (compared to the SL2) packs a 45-point AF system, longer battery life, a headphone port, and it is environmentally sealed so you can shoot in tough conditions. This camera’s great performance in autofocusing makes it a great mid-range DSLR camera for vlogging. PROS - Feature-rich - Continuous AF feature performs beautifully while recording high-res videos CONS - Just one SD card slot - PC sync connection features could be better |
|
Best professional DSLR camera for vlogging: Canon EOS 6D Mark II There’s a lot of DSLR cameras that come with a fully-articulated screen and a microphone jack, but the Canon EOS 6D Mark II is actually the only one in the market that comes equipped with both of those, plus a full-frame sensor. It is its full-frame sensor that really sets this camera apart from the other vlogging DLSR cameras. Because of its full-frame sensor, this camera performs much better in low light conditions. With this larger sensor, you’ll also be able to capture footage that looks more cinematic with high-quality bokeh (more blur to your out-of-focus areas). The 6D Mark II also has great battery life compared to all the reviewed cameras above. Unfortunately, this camera does not shoot in 4K. PROS - ISO sensitivity goes up to 102400 - Amazing touchscreen controls CONS - No 4K video recording option - No USB 3.0 |
Want to compare even more cameras? Check out…
12 Best Vlogging Cameras
Top 11 Cheap Vlogging Cameras
8 Best Mirrorless Cameras For Vlogging
12 Best Vlogging Cameras With A Flip Screen
Shanoon Cox
Shanoon Cox is a writer and a lover of all things video.
Follow @Shanoon Cox
Shanoon Cox
Nov 01, 2022• Proven solutions
DSLR cameras are great for vloggers who are serious about filmmaking. But with so many DSLR cameras to choose from, it can be difficult to make a decision on one. We have come up with a list of seven of the best DSLR vlogging cameras to help you with your search.
WHAT TO LOOK FOR IN A VLOGGING CAMERA
1. Fully articulated screen (flip screen)
2. Good continual autofocus while recording video
3. Good focus priority through face recognition
4. Touch to focus
5. Good low-light performance
6. external mic jack, hot/cold shoe bracket
7. optical image stabilization
8. good battery life
Check out my full list of 10 Things To Look For In A Vlogging Camera to understand the importance of these camera features.
THE 7 BEST DSLR CAMERAS FOR VLOGGING
| Camera | Release Date | Sensor Size | Flip Screen | Mic Port | Price | |
|---|---|---|---|---|---|---|
| CanonEOS6D Mark II | |
June2017 | Full frame(35.9 x 24 mm) | Fully Articulated | Yes | $$ |
| CanonEOS RebelSL2 | |
June2017 | APS-C(22.3 x 14.9 mm) | Fully Articulated | Yes | $ |
| CanonEOS RebelT7i | |
February2017 | APS-C(22.3 x 14.9 mm) | Fully Articulated | Yes | $- |
| CanonEOS77D | |
February2017 | APS-C(22.3 x 14.9 mm) | Fully Articulated | Yes | $- |
| NikonD5600 | |
November2016 | APS-C(23.5 x 15.6 mm) | Fully Articulated | Yes | $- |
| CanonEOS5D Mark IV | |
August2017 | Full frame(36 x 24 mm) | No | Yes | $$$ |
| CanonEOS80D | |
February2016 | APS-C(22.5 x 15 mm) | Fully Articulated | Yes | $$ |
|
Best daily DSLR camera for vlogging: Canon EOS T7i The camera you use to record your daily vlogs doesn’t have to be the best camera on the market. It just has to offer enough options to make the process of making a vlog as smooth as it can possibly be. The T7i is not the most powerful DSLR camera out there, but its 24.2 MP APS-C CMOS sensor and a DIGIC 7 image processor are more than enough to meet the needs of most daily vloggers. You can record full HD 1080p videos at 60 fps and use this camera to create HDR and time-lapse movies. You can set the T7i’s ISO up as high as 51200, which is pretty good. The T7i’s dual pixel CMOS AF system makes sure that the camera focuses quickly and it helps you avoid creating video clips that are out focus. There’s also a built-in Wi-FI with an NFC feature that enables you to share your videos with a smartphone device you connect to the camera. PROS - Long battery life - Remarkable image quality at high ISO values CONS - Can’t record 4K videos - Viewfinder is tiny |
|---|---|
|
Best entry-level DSLR camera for vlogging: Canon EOS SL2 The Canon EOS SL2 was released just a year ago and it wins our 2018 vote for the best entry-level DSLR camera for vlogging. The SL2 packs a lot of features in a compact camera body. The camera only weighs 1 lb, which is considered light among most DSLR cameras. Many vloggers may enjoy the fact that they can hold up this light camera in front of themselves with more ease. Like a lot of entry-level DSLR cameras, the SL2 comes with an APS-C crop sensor. With ISO capabilities that can reach up to 51200, you’ll be able to film up to full HD 1080p videos at 60 fps, even under low light conditions. All recent Canon cameras perform very well when it comes to autofocus and the SL2 is no exception. It does, however, have fewer points of focus. The SL2 comes with a 9-point AF system. The SL2 also has a fully-articulated screen and a microphone jack. PROS - Microphone jack - Wi-Fi connectivity CONS - No 4K video support - Optical image stabilizer could be better |
|
Best mid-range DSLR camera for vlogging: Canon EOS 80D The Canon EOS 80D is the successor of the 70D which was at one time considered by many YouTubers the ultimate DSLR camera for vlogging. The 80D is a larger camera than the SL2, weighing 1.61 lbs. In its larger build, this camera additionally (compared to the SL2) packs a 45-point AF system, longer battery life, a headphone port, and it is environmentally sealed so you can shoot in tough conditions. This camera’s great performance in autofocusing makes it a great mid-range DSLR camera for vlogging. PROS - Feature-rich - Continuous AF feature performs beautifully while recording high-res videos CONS - Just one SD card slot - PC sync connection features could be better |
|
Best professional DSLR camera for vlogging: Canon EOS 6D Mark II There’s a lot of DSLR cameras that come with a fully-articulated screen and a microphone jack, but the Canon EOS 6D Mark II is actually the only one in the market that comes equipped with both of those, plus a full-frame sensor. It is its full-frame sensor that really sets this camera apart from the other vlogging DLSR cameras. Because of its full-frame sensor, this camera performs much better in low light conditions. With this larger sensor, you’ll also be able to capture footage that looks more cinematic with high-quality bokeh (more blur to your out-of-focus areas). The 6D Mark II also has great battery life compared to all the reviewed cameras above. Unfortunately, this camera does not shoot in 4K. PROS - ISO sensitivity goes up to 102400 - Amazing touchscreen controls CONS - No 4K video recording option - No USB 3.0 |
Want to compare even more cameras? Check out…
12 Best Vlogging Cameras
Top 11 Cheap Vlogging Cameras
8 Best Mirrorless Cameras For Vlogging
12 Best Vlogging Cameras With A Flip Screen
Shanoon Cox
Shanoon Cox is a writer and a lover of all things video.
Follow @Shanoon Cox
Also read:
- From Humble Beginnings to Sponsored Success Channels' Blueprint
- Dodge Digital Watchers Accelerating View Count Growth
- Clearing Up Confusion A Guide to Understanding YouTube Strikes for 2024
- Developing A Streamlined YouTube Subscribe Link
- [Updated] Craft Your Narrative Best Free Mobile Editors, Android Focus
- The Insider's Guide to On-Screen Text in YouTube Media
- [Updated] Best Practices in Confirming Your YouTube Access
- Leveraging Libraries Improving Efficiency in Your JavaScript Projects
- [Updated] 10 Superior YouTube Mp3 Extractors
- Disrupt Unbidden YouTube Content Feeds for 2024
- Sourav Joshi's Predictions on YouTube Profits in the New Year
- Elevate Your YouTube Channel Perfecting Video Scriptwriting Skills
- [New] 20 Must-Have Video Tools For New Creators
- 2024 Approved Elevate Your Learning The Top 10 Educational Historians YT
- [Updated] Building a Billion-View Empire Your Step-by-Step Youtube Strategy
- Eco Marketing Merge Screens & CTA Success
- How to Produce Compelling Haul Content on a Budget
- 3 Creative Ways to Enhance YouTube Videos with Neon Edges
- Unleash the Power of Digital Advertising with Our Comprehensive Set of 50 FREE YouTube Banners
- [Updated] Easy Techniques for Snagging YouTube Songs and Commentary
- In 2024, End Credits Designed for You Free Top 6 Suggestions
- Instantaneity in Playlist Dissemination Webby
- Structuring Tutorials for Clarity on YouTube
- 2024 Approved Chuckling Challenge Brainstroming 7 Humorous YouTube Videos
- In 2024, Club Vibes Best DJ Template Video Selections
- Outshine Others Expert Tips on Making YouTube Shorts Pop
- In 2024, Ascending 8 Media Makers Dominating Viewership
- Charting Your Course Building Plays on YouTube for 2024
- In 2024, Channel Your Inner DJ Discover These Innovative 20 Music Sources on YouTube
- A Step-by-Step Approach to Discard YouTube Watch Later Items for 2024
- Boredom's Ender The Ultimate List of Jovial YouTube Content
- In 2024, Best Recording Equipment For Creating YouTube Masterpieces
- [New] Duo-Ing Melodies for Virtual Fame for 2024
- [New] Mobile Sharing Strategies Bytes & Vids, Not Retweets
- Best Fixes For Oppo Reno 11F 5G Hard Reset | Dr.fone
- [Updated] 2024 Approved Unlock the Secrets of Top-Notch Video Capture Techniques
- Resolve Your Apple iPhone 13 Pro Keeps Asking for Outlook Password | Dr.fone
- How to Transfer Data from Xiaomi 14 to BlackBerry | Dr.fone
- Unleash the Power of Words How to Enchant Tinder Users with a Bio
- [Updated] Advanced Photo Manipulation Focus on Content, Not Backdrop
- In 2024, How to Cast Samsung Galaxy A25 5G to Computer for iPhone and Android? | Dr.fone
- Capture Your Screen on Chromebook Methods 4 You for 2024
- Does Samsung Galaxy A54 5G Have Find My Friends? | Dr.fone
- In 2024, How to Unlock iPhone 12?
- 2024 Approved OGG Conversion Made Easy Top Tools and Tips
- In 2024, The Most Effective Ways to Bypass Apple iPhone 12 mini Activation Lock
- Acoustic Data Recording Sounds & Speech
- 3 Ways to Change Location on Facebook Marketplace for Poco M6 Pro 4G | Dr.fone
- [New] Best Frame Rate Selection for Effective Slow Motion Capture
- In 2024, 10 Best Fake GPS Location Spoofers for Motorola Edge 40 | Dr.fone
- [New] Ready, Set, Resize Transformative Techniques for Mac's Instagram Content for 2024
- Everything You Need To Know About Unlocked Apple iPhone 8 Plus | Dr.fone
- How to Fix Android.Process.Media Has Stopped on Honor 70 Lite 5G | Dr.fone
- For People Wanting to Mock GPS on Oppo Find N3 Devices | Dr.fone
- How Do I SIM Unlock My iPhone 11 Pro Max?
- [Updated] Finding Heartfelt Connections in Discord Chats for 2024
- [New] 2024 Approved Step-by-Step for Turning Insta Videos Into MP3s
- In 2024, The Best iSpoofer Alternative to Try On Oppo Reno 11F 5G | Dr.fone
- In 2024, 3 Easy Methods to Unlock iCloud Locked Apple iPhone 15 Pro Max/iPad/iPod
- Title: In 2024, Essential Strategies for Uploading Video Quality 4K on YouTub
- Author: Steven
- Created at : 2024-05-25 19:46:52
- Updated at : 2024-05-26 19:46:52
- Link: https://youtube-clips.techidaily.com/in-2024-essential-strategies-for-uploading-video-quality-4k-on-youtub/
- License: This work is licensed under CC BY-NC-SA 4.0.
