
:max_bytes(150000):strip_icc()/4060ti-39bff0d880304752bcded280abd0cf89.jpg)
In 2024, Essential Editing Techniques for YT Channel Summaries
Essential Editing Techniques for YT Channel Summaries
How to Edit YouTube Channel Description

Richard Bennett
Mar 27, 2024• Proven solutions
With millions of videos that can be found online, your goal is to optimize your visibility. One thing that can help would be adding a YouTube channel description. In the rest of this post, we will tackle why it is important, and more importantly, how you can have it edited.
You May Also Like: YouTube SEO Complete Guide >>
How to Edit YouTube Videos Title/Descriptions >>
Recommendation: The best video editor for YouTubers - Wondershare Filmora , not only allows you to cut, crop, rotate, reverse videos, but also offers your advanced features like PIP, Green Screen, or audio mixing. What’s more, you can find lots of effects for Fashion, gaming, education, tutorial, sports, etc. Check this article to know more.
 Download Mac Version ](https://tools.techidaily.com/wondershare/filmora/download/ )
Why YouTube channel description is important
If you have a YouTube channel and if you are not getting the number of views that you wish to have, there are possibly several problems. Maybe, your content is not enticing enough. Or maybe, it is because you do not have the right YouTube channel description. Generally speaking, the description of your channel will provide visitors of a snapshot of what the channel is all about. It appears in the about tab of your page. This is an elevator pitch, which will be an opportunity for you to show other people why they should watch your videos.
You may also like:
How to edit title, description and tags for YouTube videos
How to Create a Killer YouTube Channel Trailer >>
Without a YouTube channel description, visitors won’t be aware of what you can offer. Take note of the fact that their attention span is minimal. They do not have the luxury of time to see each and every video in your channel. They will only click on it if they know that it is going to be valuable if there is any good that they can gain from such. This is where the importance of a well-crafted description enters the picture. Here are some tips on how you can optimize your channel description.
1. Use the right keywords
Adding right keywords to your channel description will help to make sure that your YouTube channel will appear on the top of search engine results. Use keyword research tools that are available in order to determine which ones will add value to your description. And in your video description, you should add at least one core keywords to your channel description.
2. Advertise your programming schedule
By providing this information, visitors will know when exactly they can go back and check for latest updates from your channel.
3. Create a strong first impression
If you YouTube channel description are boring, chances are, visitors will no longer bother to view the contents. Create a powerful and enticing description that will trigger viewers to make a favorable action.
How to edit your YouTube Channel Description [Step by Step Tutorial]
This is actually a process that is pretty much straightforward, provided that you know how it can be done. Here are the simple steps that you should follow:
- Open your YouTube account.
- Click on My Channel

- Activate the “Customize the layout of your channel” option by entering the Setting button on the right corner of your Subscribe icon.

- Click on “About.”

- Then you can edit the channel description here

Note: In the newer YouTube version, click the option “CUSTOMIZE CHANNEL” and then you can change your channel description by clicking the About Tab.
- Write the description that you want to show up when people visit your YouTube channel. It is not enough that you write just any sentence. Make sure that it is sweet and simple. Be as concise and informative as possible. Use simple words, yet make sure that they are powerful and can stir the visitor to make a favorable action. Also, see to it that it makes use of the right keywords that are related to your channel.
- Click on “View as” which will allow the YouTube channel description to show up for New visitor or returning subscriber.

In sum, adding a YouTube channel description does not need to be a complicated process. Just follow the tips mentioned above and make sure to pay attention to crafting the right message. It must be keyword-optimized and must captivate attention of your visitors.
Check this video to know how to optimize YouTube SEO:
Download Mac Version ](https://tools.techidaily.com/wondershare/filmora/download/ )
Bonus: Tips for YouTube Video Description
Here we have also found out some useful tips for YouTube video description:

1. Take full advantage of the First Line
As the most important text in the YouTube video description, the text in the first line will appear both in the YouTube search result and the social media. It is recommended to write a short video description but for SEO purpose, keep in mind to contain the main keywords and write a clickbaity text.
Besides the first line, Line 2 and Line 3 are also most visible in the video description. You can write a short explanation text for Line 1 or tell the audiences what to do next such as download the software or sub to your channel.
2.Add helpful text to the description
It is highly recommended to add additional relevant content to the video description to help audience to get to know you better. You can add a brief summary of the video content or the transcript of the video here. Normally, you can add anything that is worth mentioning such as the equipment or software that you are using to make the video.
Richard Bennett
Richard Bennett is a writer and a lover of all things video.
Follow @Richard Bennett
Richard Bennett
Mar 27, 2024• Proven solutions
With millions of videos that can be found online, your goal is to optimize your visibility. One thing that can help would be adding a YouTube channel description. In the rest of this post, we will tackle why it is important, and more importantly, how you can have it edited.
You May Also Like: YouTube SEO Complete Guide >>
How to Edit YouTube Videos Title/Descriptions >>
Recommendation: The best video editor for YouTubers - Wondershare Filmora , not only allows you to cut, crop, rotate, reverse videos, but also offers your advanced features like PIP, Green Screen, or audio mixing. What’s more, you can find lots of effects for Fashion, gaming, education, tutorial, sports, etc. Check this article to know more.
Download Mac Version ](https://tools.techidaily.com/wondershare/filmora/download/ )
Why YouTube channel description is important
If you have a YouTube channel and if you are not getting the number of views that you wish to have, there are possibly several problems. Maybe, your content is not enticing enough. Or maybe, it is because you do not have the right YouTube channel description. Generally speaking, the description of your channel will provide visitors of a snapshot of what the channel is all about. It appears in the about tab of your page. This is an elevator pitch, which will be an opportunity for you to show other people why they should watch your videos.
You may also like:
How to edit title, description and tags for YouTube videos
How to Create a Killer YouTube Channel Trailer >>
Without a YouTube channel description, visitors won’t be aware of what you can offer. Take note of the fact that their attention span is minimal. They do not have the luxury of time to see each and every video in your channel. They will only click on it if they know that it is going to be valuable if there is any good that they can gain from such. This is where the importance of a well-crafted description enters the picture. Here are some tips on how you can optimize your channel description.
1. Use the right keywords
Adding right keywords to your channel description will help to make sure that your YouTube channel will appear on the top of search engine results. Use keyword research tools that are available in order to determine which ones will add value to your description. And in your video description, you should add at least one core keywords to your channel description.
2. Advertise your programming schedule
By providing this information, visitors will know when exactly they can go back and check for latest updates from your channel.
3. Create a strong first impression
If you YouTube channel description are boring, chances are, visitors will no longer bother to view the contents. Create a powerful and enticing description that will trigger viewers to make a favorable action.
How to edit your YouTube Channel Description [Step by Step Tutorial]
This is actually a process that is pretty much straightforward, provided that you know how it can be done. Here are the simple steps that you should follow:
- Open your YouTube account.
- Click on My Channel
- Activate the “Customize the layout of your channel” option by entering the Setting button on the right corner of your Subscribe icon.
- Click on “About.”
- Then you can edit the channel description here
Note: In the newer YouTube version, click the option “CUSTOMIZE CHANNEL” and then you can change your channel description by clicking the About Tab.
- Write the description that you want to show up when people visit your YouTube channel. It is not enough that you write just any sentence. Make sure that it is sweet and simple. Be as concise and informative as possible. Use simple words, yet make sure that they are powerful and can stir the visitor to make a favorable action. Also, see to it that it makes use of the right keywords that are related to your channel.
- Click on “View as” which will allow the YouTube channel description to show up for New visitor or returning subscriber.
In sum, adding a YouTube channel description does not need to be a complicated process. Just follow the tips mentioned above and make sure to pay attention to crafting the right message. It must be keyword-optimized and must captivate attention of your visitors.
Check this video to know how to optimize YouTube SEO:
Download Mac Version ](https://tools.techidaily.com/wondershare/filmora/download/ )
Bonus: Tips for YouTube Video Description
Here we have also found out some useful tips for YouTube video description:
1. Take full advantage of the First Line
As the most important text in the YouTube video description, the text in the first line will appear both in the YouTube search result and the social media. It is recommended to write a short video description but for SEO purpose, keep in mind to contain the main keywords and write a clickbaity text.
Besides the first line, Line 2 and Line 3 are also most visible in the video description. You can write a short explanation text for Line 1 or tell the audiences what to do next such as download the software or sub to your channel.
2.Add helpful text to the description
It is highly recommended to add additional relevant content to the video description to help audience to get to know you better. You can add a brief summary of the video content or the transcript of the video here. Normally, you can add anything that is worth mentioning such as the equipment or software that you are using to make the video.
Richard Bennett
Richard Bennett is a writer and a lover of all things video.
Follow @Richard Bennett
Record Screen and Upload to YouTube [PC, Mac, Online]
10 Record Screen and Upload to YouTube Tools [PC, Mac, Online]
Richard Bennett
Mar 27, 2024• Proven solutions
Recording the screen, including the audio, can help you introduce your gaming flow, show how to perform a task on the computer, or create a presentation. You can also upload the screen record to YouTube for free. There are several solutions if you want to record your screen and upload it to YouTube. You can record the screen with some screen recording software on your Mac or your Windows PC or with some online screen recording software or the screen recording feature built-in YouTube itself. In this article, we will show you how to to record screens and upload to YouTube on Windows and Mac with some screen recorders , some of which are free to use, or freemium, which are built in your computer. Check it out now.
- Part 1: Record Screen and Upload to YouTube Directly on PC
- Part 2: Record Screen and Upload to YouTube Online
- Part 3: Record Screen and Upload it to YouTube on Mac
Recommended YouTube Screen Recorders to Record Screen and Upload to YouTube Directly [Windows & Mac]
The following YouTube screen recording software can be used on both Windows and Mac computers. You can record the entire screen or a particular portion of the screen, record your own voiceover or add music to the recorded video and then upload it to YouTube directly.
Using Wondershare Filmora
Filmora is an easy-to-use yet powerful enough video editing software which features the Recording tools. Using Filmora, you can record the desktop screen , audio and webcam simultaneously. But compared with Filmora, the highest frame rates that Filmora can capture at 1 second is 60FPS.

Launch Wondershare Filmora and choose Full Feature mode to begin a project. Go to the Record tab and choose Record PC Screen. There are three types of screen recording to choose from – Target Window, Full Screen and Custom. You can also choose to record computer system audio or record from microphone. Click the icons to turn them off or on accordingly. Click Settings to see if there’s anything you need to adjust before recording.
Download Mac Version ](https://tools.techidaily.com/wondershare/filmora/download/ )
The recorded footage will be loaded to the Media panel directly, you can then cut out imperfect frames, add some texts and titles, or apply transitions and filters to it. To upload the recorded screen video, click the Export in the main interface, and then switch to YouTube tab in the Export window.

Sign in your YouTube account and complete the video info accordingly and then click the Export button to upload the recorded video to YouTube directly.
If you are looking for more screen recorders which can run on Windows, Mac, Linux, Android, iOS or online for different purposes, you can check our picks of the best screen recorders for all platforms based on different purposes.
Part 1: How to Record Screen on Windows PC and Upload to YouTube Directly
1. Bandicam
To record screen using Bandicam, select “Screen Recording” and a green-edged rectangle window will appear. Adjust the rectangle window on the video then play the video.
Clicking the REC button will change the green-edged line of the rectangle window to red. Click the stop button to stop recording. To watch the recorded video, go to the “General” tab and click “Open.”
You can also upload your desired videos to YouTube from Bandicam by clicking the “Upload” button found under Bandicam’s “Output” tab.

2. Using Microsoft Expression Encoder 4
You can download Microsoft Expression Encoder 4 to record the screen of your device and upload it to YouTube. The software has a screen capture tool and encoder. Install the software as you would usually do. There’ll be 2 shortcuts in the start menu – Microsoft Expression Encoder 4 Screen Capture (used to capture the screen) and Microsoft Expression Encoder 4 (converts the screen into a video that can be uploaded to YouTube).
3. Using Ezvid
Ezvid can record screen and audio simultaneously. It can also capture the whole area of the screen, making it perfect for tutorial videos. Ezvid also has speech synthesis that translates text captions into artificial human language, so it can easily produce human sound with only a click of a button.
4. Using Smartpixel
Smartpixel is a screen recorder for Android and Windows. It has a user-friendly interface and different editing as well as recording functions. Smartpixel can export various video formats such as 3gp, MP4, wmv, avi and flv. It also allows you to upload videos to different online platforms like GoPlay and YouTube.
Part 2: How to Record Screen Online
1. Using YouTube
You can now also record desktop screen with the features in YouTube. To start recording the screen using YouTube, you just need to sign-in to the website using your Google Account. Click “Creator Studio”. Go to Live Streaming and choose “Events”. You’ll be directed to the “Create Event” page. Provide the title for your screencast video, set the video’s privacy to either Private or Unlisted.
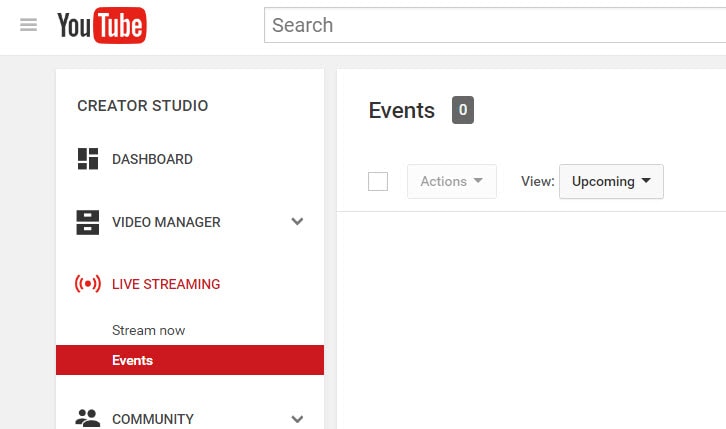
Click “Go Live Now” The Hangouts on Air page will open. Start the webcam from recording by clicking the camera icon. If you don’t want to record audio, you can just click the microphone icon.
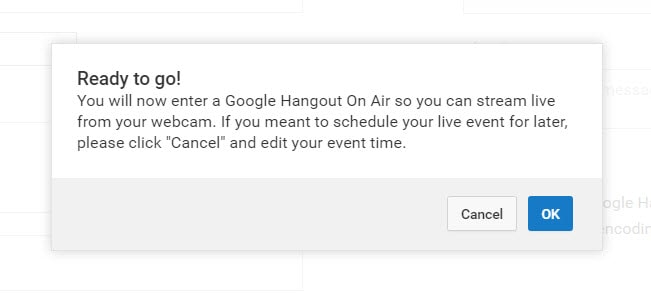
Click “Screenshare” and choose a desktop window that you want to record for the screencast. Click “Start Screenshare” to share the screen then click the “Start Broadcast” button to begin recording the screen. When you’re done recording, just “Stop Broadcast” and go to the YouTube website. The new screencast video is stored in your YouTube video dashboard. You can share the video or download it to your Google Drive.
For more details, you can check How to record YouTube videos . If you’re looking for more online screen recorders for YouTube, you can check our picks of the 10 Best Free Online Screen Recorders .
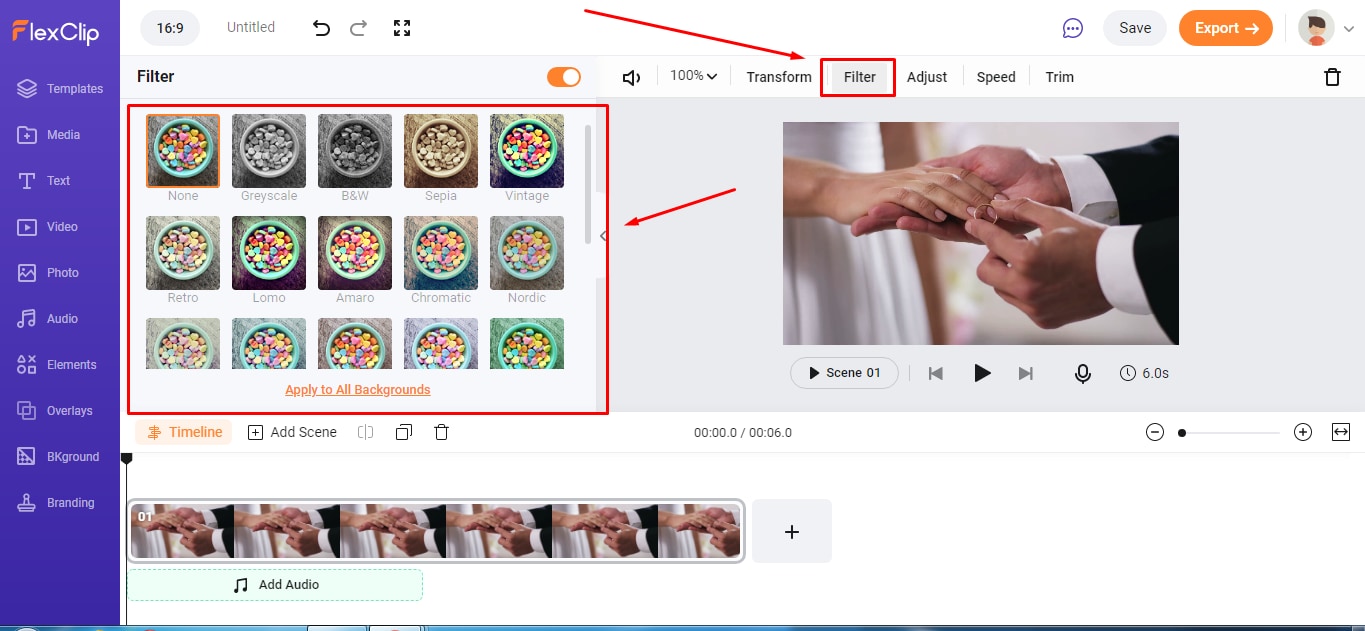
2. Using FlexClip - Free Online Screen Recorder
FlexClip is a complete bundle of creativity. Why so? It is because it’s a web-based tool that helps you with image and video editing and post-production. It also offers a free online screen recording option.
FlexClip lets you record your webcam, screen, and audio with a simple click. Contrarily, you can also record simultaneous screens without a hitch! It can record almost anything that is being displayed on your computer screen. So be it gameplays, seminars, courses, presentations, or anything, you can always use this program to save your recording.
And once you’re done capturing the screen, FlexClip also allows you to edit your recording. You can add subtitles, highlights, overlays, and annotations to increase your video’s worth. So no wonder why FlexClip is one of the leading web-based software for free online screen capturing, especially if you want to make great YouTube videos.
The recording process is easy. All you need to do is visit the website and click the “Start Recording” button.
Then, choose your layout to start recording the screen and audio. When you’re finished, just hit the “Stop” button to end recording to edit the video in FlexClip’s built-in video editor. Lastly, download the screencast to upload it to your YouTube channel.
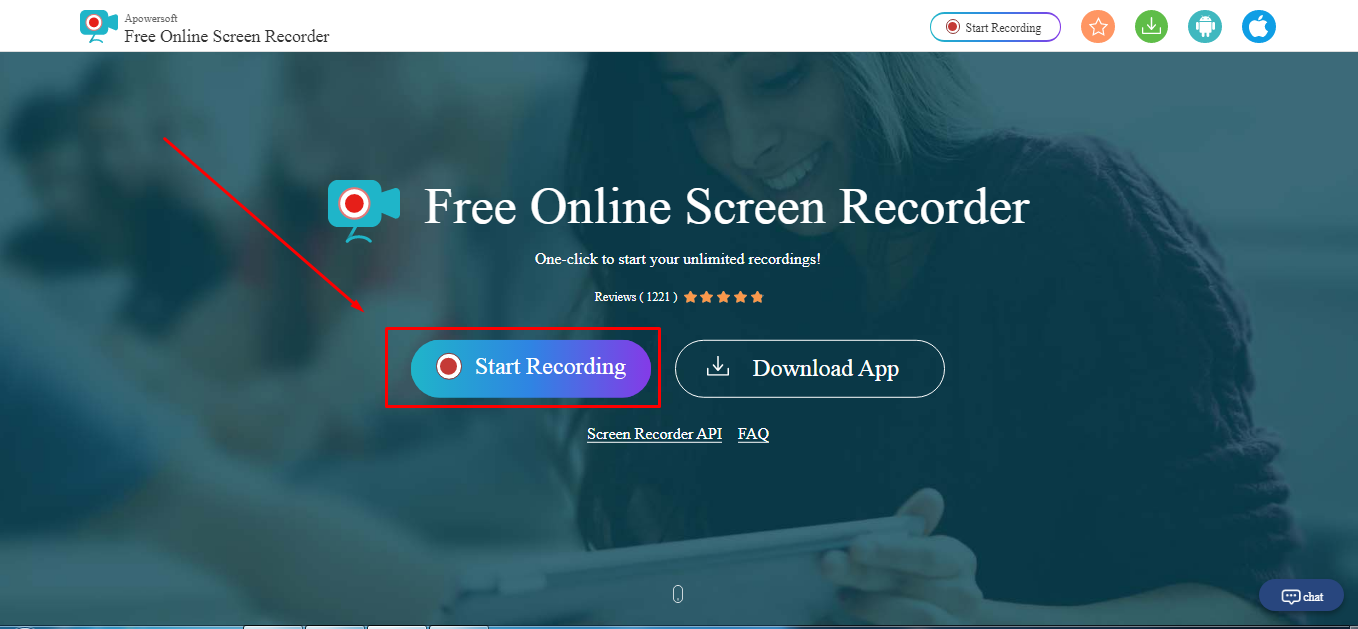
3. Using Apowersoft - Online Screen Recorder (Free)
Apowersoft is a renowned company that creates digital products, including file compressors, watermark removers, and more. Since there’s a growing demand for screen recorders for YouTube, the Apowersoft creators have also launched a “Free Online Screen Recorder.” Yup! You’re reading the right name.
Apowersoft – Free Online Screen Recorder eases the screen recording process. While it’s an online tool, you can also download the app on your Mac or Windows OS.
It’s a free program with simple features, such as a screen and webcam recording with audio. So if your YouTube content doesn’t require overlays, subtitles, or other editing stuff, this software is ideal due to its simplicity.
You can click the “Start Recording” button to get started.
.
Then, select the screen you wish to record, and save the captured screen to your local disk or cloud so you can upload the videos later to your YouTube channel.
Part 3: How to Record Screen for YouTube with Free Screen Recorder on Mac
1. Using QuickTime Player
QuickTime Player can be used to record movies from your camera or the screen of your iPad, iPod touch or iPhone. It can also record your Mac’s screen or record audio from your microphone. To record the screen of your Pad, iPod touch or iPhone, you should use the movie-recording function. You can use it to record the screen for YouTube video, or you can also record the YouTube video and empower it with your creativity.
For more details of using QuickTime Player to record YouTube videos, check our guide: How to record videos with Quicktime.
2. Using Screen Flow
Screen Flow is our second pick for Mac. Although it’s paid software, you can still enjoy the blessings of this screen recorder through the trial version. It’s a very handy tool that allows Mac screen recording and all iOS devices, such as iPhones and iPad.
Okay! So what’s good about screen flow? Let’s uncover. Firstly, it’s an editor + screen recorder specifically made for YouTube. You can capture the screen and edit the footage before uploading it to your channel.
Secondly, this software allows you to record simultaneous screens and your webcam. Plus, you can also record your voice through its mic recording option.
Another great thing about Screen Flow is that it has numerous video filters and a customizable title library. It also permits you to save screen recordings on your Mac or directly share them to your YouTube channel, other social media accounts, websites, or cloud storage in a few clicks.
Here’s a video to help you get started with screen recording on your Mac using Screen Flow:
3. Using Vmaker
Vmaker is another authentic software to record screens for your YouTube videos. It’s a free program, but you can buy premium versions to unlock more features.
The tool is trusted by many software review websites, such as “crozdesk.” It is available on both Mac and Windows OS. However, it seems like this software performs well on Mac operating systems.
Vmaker allows you to record your screen, your favorite YouTube videos, and the audio – all together! You can record the entire Mac screen or a specific portion in HD quality. Moreover, the software allows you to pick resolutions up to 4K to record the media.
This program also offers editing features like adding subtitles, music, flip, blur, trim, and more to create an awesome video. All videos are saved to your cloud workspace once you finish recording. Then, you can share the recorded video screens on your YouTube.
The tool is ideal for making tutorials, courses, demos, and product review videos. All you need to do is download Vmaker on your Mac. Choose a webcam, screen, or both with audio for recording. Start recording in the highest quality. Edit your video and share it on your YouTube channel.
Conclusion
Above are some screen recorders that you can use to record YouTube videos or record the screen and webcam simultaneously to make a video and upload it it to YouTube. If you want to record a screen video and edit it further, you should try Wondershare Filmora video editor.
Download Mac Version ](https://tools.techidaily.com/wondershare/filmora/download/ )
FAQs
Q1. How do you record your screen on a Mac for YouTube?
There are some great tools for screen recording on Mac for YouTube. The most loved and enjoyed program is Filmora by Wondershare. It’s a professional tool for screen recording and video editing. Most importantly, it has a user-friendly interface and records your screen in high quality.
Another option is the Quick Time Player. This program also allows screen recording. Likewise, Screen Flow is also a great program for screen capturing for YouTube on Mac.
Q2. Can I screen-record and upload it to YouTube?
There are two ways to do it. First, you can download the free or paid screen recording software on your Windows or macOS. Second, you can look for online screen recorders like FlexClip or the built-in YouTube recorder and directly share the recorded video to your channel.
Some tools, like Apowersoft and Vmaker, save screen recordings to the cloud or local disk. And there’s no direct sharing of the recorded screens to your YouTube channel. So if you’re using such programs, you will need to sign in to your YouTube channel and upload the file from your computer hard drive.
Q3. How do I record my computer screen for 2022?
Some of the greatest video editing and screen recording tools like Filmora, Bandicam, and FlexClip allow you to record your computer screen. Depending on the software, you can directly share the video to your YouTube channel. Or, save the video on your computer and then upload it on your channel.
Richard Bennett
Richard Bennett is a writer and a lover of all things video.
Follow @Richard Bennett
Richard Bennett
Mar 27, 2024• Proven solutions
Recording the screen, including the audio, can help you introduce your gaming flow, show how to perform a task on the computer, or create a presentation. You can also upload the screen record to YouTube for free. There are several solutions if you want to record your screen and upload it to YouTube. You can record the screen with some screen recording software on your Mac or your Windows PC or with some online screen recording software or the screen recording feature built-in YouTube itself. In this article, we will show you how to to record screens and upload to YouTube on Windows and Mac with some screen recorders , some of which are free to use, or freemium, which are built in your computer. Check it out now.
- Part 1: Record Screen and Upload to YouTube Directly on PC
- Part 2: Record Screen and Upload to YouTube Online
- Part 3: Record Screen and Upload it to YouTube on Mac
Recommended YouTube Screen Recorders to Record Screen and Upload to YouTube Directly [Windows & Mac]
The following YouTube screen recording software can be used on both Windows and Mac computers. You can record the entire screen or a particular portion of the screen, record your own voiceover or add music to the recorded video and then upload it to YouTube directly.
Using Wondershare Filmora
Filmora is an easy-to-use yet powerful enough video editing software which features the Recording tools. Using Filmora, you can record the desktop screen , audio and webcam simultaneously. But compared with Filmora, the highest frame rates that Filmora can capture at 1 second is 60FPS.
Launch Wondershare Filmora and choose Full Feature mode to begin a project. Go to the Record tab and choose Record PC Screen. There are three types of screen recording to choose from – Target Window, Full Screen and Custom. You can also choose to record computer system audio or record from microphone. Click the icons to turn them off or on accordingly. Click Settings to see if there’s anything you need to adjust before recording.
Download Mac Version ](https://tools.techidaily.com/wondershare/filmora/download/ )
The recorded footage will be loaded to the Media panel directly, you can then cut out imperfect frames, add some texts and titles, or apply transitions and filters to it. To upload the recorded screen video, click the Export in the main interface, and then switch to YouTube tab in the Export window.
Sign in your YouTube account and complete the video info accordingly and then click the Export button to upload the recorded video to YouTube directly.
If you are looking for more screen recorders which can run on Windows, Mac, Linux, Android, iOS or online for different purposes, you can check our picks of the best screen recorders for all platforms based on different purposes.
Part 1: How to Record Screen on Windows PC and Upload to YouTube Directly
1. Bandicam
To record screen using Bandicam, select “Screen Recording” and a green-edged rectangle window will appear. Adjust the rectangle window on the video then play the video.
Clicking the REC button will change the green-edged line of the rectangle window to red. Click the stop button to stop recording. To watch the recorded video, go to the “General” tab and click “Open.”
You can also upload your desired videos to YouTube from Bandicam by clicking the “Upload” button found under Bandicam’s “Output” tab.
2. Using Microsoft Expression Encoder 4
You can download Microsoft Expression Encoder 4 to record the screen of your device and upload it to YouTube. The software has a screen capture tool and encoder. Install the software as you would usually do. There’ll be 2 shortcuts in the start menu – Microsoft Expression Encoder 4 Screen Capture (used to capture the screen) and Microsoft Expression Encoder 4 (converts the screen into a video that can be uploaded to YouTube).
3. Using Ezvid
Ezvid can record screen and audio simultaneously. It can also capture the whole area of the screen, making it perfect for tutorial videos. Ezvid also has speech synthesis that translates text captions into artificial human language, so it can easily produce human sound with only a click of a button.
4. Using Smartpixel
Smartpixel is a screen recorder for Android and Windows. It has a user-friendly interface and different editing as well as recording functions. Smartpixel can export various video formats such as 3gp, MP4, wmv, avi and flv. It also allows you to upload videos to different online platforms like GoPlay and YouTube.
Part 2: How to Record Screen Online
1. Using YouTube
You can now also record desktop screen with the features in YouTube. To start recording the screen using YouTube, you just need to sign-in to the website using your Google Account. Click “Creator Studio”. Go to Live Streaming and choose “Events”. You’ll be directed to the “Create Event” page. Provide the title for your screencast video, set the video’s privacy to either Private or Unlisted.
Click “Go Live Now” The Hangouts on Air page will open. Start the webcam from recording by clicking the camera icon. If you don’t want to record audio, you can just click the microphone icon.
Click “Screenshare” and choose a desktop window that you want to record for the screencast. Click “Start Screenshare” to share the screen then click the “Start Broadcast” button to begin recording the screen. When you’re done recording, just “Stop Broadcast” and go to the YouTube website. The new screencast video is stored in your YouTube video dashboard. You can share the video or download it to your Google Drive.
For more details, you can check How to record YouTube videos . If you’re looking for more online screen recorders for YouTube, you can check our picks of the 10 Best Free Online Screen Recorders .
2. Using FlexClip - Free Online Screen Recorder
FlexClip is a complete bundle of creativity. Why so? It is because it’s a web-based tool that helps you with image and video editing and post-production. It also offers a free online screen recording option.
FlexClip lets you record your webcam, screen, and audio with a simple click. Contrarily, you can also record simultaneous screens without a hitch! It can record almost anything that is being displayed on your computer screen. So be it gameplays, seminars, courses, presentations, or anything, you can always use this program to save your recording.
And once you’re done capturing the screen, FlexClip also allows you to edit your recording. You can add subtitles, highlights, overlays, and annotations to increase your video’s worth. So no wonder why FlexClip is one of the leading web-based software for free online screen capturing, especially if you want to make great YouTube videos.
The recording process is easy. All you need to do is visit the website and click the “Start Recording” button.
Then, choose your layout to start recording the screen and audio. When you’re finished, just hit the “Stop” button to end recording to edit the video in FlexClip’s built-in video editor. Lastly, download the screencast to upload it to your YouTube channel.
3. Using Apowersoft - Online Screen Recorder (Free)
Apowersoft is a renowned company that creates digital products, including file compressors, watermark removers, and more. Since there’s a growing demand for screen recorders for YouTube, the Apowersoft creators have also launched a “Free Online Screen Recorder.” Yup! You’re reading the right name.
Apowersoft – Free Online Screen Recorder eases the screen recording process. While it’s an online tool, you can also download the app on your Mac or Windows OS.
It’s a free program with simple features, such as a screen and webcam recording with audio. So if your YouTube content doesn’t require overlays, subtitles, or other editing stuff, this software is ideal due to its simplicity.
You can click the “Start Recording” button to get started.
.
Then, select the screen you wish to record, and save the captured screen to your local disk or cloud so you can upload the videos later to your YouTube channel.
Part 3: How to Record Screen for YouTube with Free Screen Recorder on Mac
1. Using QuickTime Player
QuickTime Player can be used to record movies from your camera or the screen of your iPad, iPod touch or iPhone. It can also record your Mac’s screen or record audio from your microphone. To record the screen of your Pad, iPod touch or iPhone, you should use the movie-recording function. You can use it to record the screen for YouTube video, or you can also record the YouTube video and empower it with your creativity.
For more details of using QuickTime Player to record YouTube videos, check our guide: How to record videos with Quicktime.
2. Using Screen Flow
Screen Flow is our second pick for Mac. Although it’s paid software, you can still enjoy the blessings of this screen recorder through the trial version. It’s a very handy tool that allows Mac screen recording and all iOS devices, such as iPhones and iPad.
Okay! So what’s good about screen flow? Let’s uncover. Firstly, it’s an editor + screen recorder specifically made for YouTube. You can capture the screen and edit the footage before uploading it to your channel.
Secondly, this software allows you to record simultaneous screens and your webcam. Plus, you can also record your voice through its mic recording option.
Another great thing about Screen Flow is that it has numerous video filters and a customizable title library. It also permits you to save screen recordings on your Mac or directly share them to your YouTube channel, other social media accounts, websites, or cloud storage in a few clicks.
Here’s a video to help you get started with screen recording on your Mac using Screen Flow:
3. Using Vmaker
Vmaker is another authentic software to record screens for your YouTube videos. It’s a free program, but you can buy premium versions to unlock more features.
The tool is trusted by many software review websites, such as “crozdesk.” It is available on both Mac and Windows OS. However, it seems like this software performs well on Mac operating systems.
Vmaker allows you to record your screen, your favorite YouTube videos, and the audio – all together! You can record the entire Mac screen or a specific portion in HD quality. Moreover, the software allows you to pick resolutions up to 4K to record the media.
This program also offers editing features like adding subtitles, music, flip, blur, trim, and more to create an awesome video. All videos are saved to your cloud workspace once you finish recording. Then, you can share the recorded video screens on your YouTube.
The tool is ideal for making tutorials, courses, demos, and product review videos. All you need to do is download Vmaker on your Mac. Choose a webcam, screen, or both with audio for recording. Start recording in the highest quality. Edit your video and share it on your YouTube channel.
Conclusion
Above are some screen recorders that you can use to record YouTube videos or record the screen and webcam simultaneously to make a video and upload it it to YouTube. If you want to record a screen video and edit it further, you should try Wondershare Filmora video editor.
Download Mac Version ](https://tools.techidaily.com/wondershare/filmora/download/ )
FAQs
Q1. How do you record your screen on a Mac for YouTube?
There are some great tools for screen recording on Mac for YouTube. The most loved and enjoyed program is Filmora by Wondershare. It’s a professional tool for screen recording and video editing. Most importantly, it has a user-friendly interface and records your screen in high quality.
Another option is the Quick Time Player. This program also allows screen recording. Likewise, Screen Flow is also a great program for screen capturing for YouTube on Mac.
Q2. Can I screen-record and upload it to YouTube?
There are two ways to do it. First, you can download the free or paid screen recording software on your Windows or macOS. Second, you can look for online screen recorders like FlexClip or the built-in YouTube recorder and directly share the recorded video to your channel.
Some tools, like Apowersoft and Vmaker, save screen recordings to the cloud or local disk. And there’s no direct sharing of the recorded screens to your YouTube channel. So if you’re using such programs, you will need to sign in to your YouTube channel and upload the file from your computer hard drive.
Q3. How do I record my computer screen for 2022?
Some of the greatest video editing and screen recording tools like Filmora, Bandicam, and FlexClip allow you to record your computer screen. Depending on the software, you can directly share the video to your YouTube channel. Or, save the video on your computer and then upload it on your channel.
Richard Bennett
Richard Bennett is a writer and a lover of all things video.
Follow @Richard Bennett
Also read:
- [Updated] Essential Guides to the Top 10 Student-Focused History Vlogs
- Boosting Revenue The Content Creator's Playbook for 2024
- Flash Forward Quick Youtube Playlists Distribution
- [New] Epic Playlist Over a Hundred Top-Tier Titles
- Complete Guide What Does Unlisted Mean on YouTube
- Critical Components Affecting YouTube Video Scores for 2024
- [New] Essential Guide to Aspect Ratios for Effective YouTube Engagement
- [Updated] Enchanting Edit YouTube's Ultimate Magic Tricks
- Rapid Relay Youtube Playlists to the Public
- Improving Accessibility with On-Screen Text Elements on YouTube Videos
- [Updated] Adding Audio Descriptions to Videos on YouTube
- Thriving as an Online Gaming Content Creator
- [New] 11-Year-Old Video Sensation Unprecedented Wealth Accumulation
- Unique Video Monikers Brainstorming Insights
- Giggle Gallery Exploring the Best 15 Hilarious Video Picks
- Guidance to YouTube Music Mix
- In 2024, Crafting Your Custom YouTube Subscriber URL
- 2024 Approved Embarking on an Avatar's Adventure to Internet Fame
- Enhancing Content Discovery via Thumbnails
- 2024 Approved Dissecting the Best YouTube Music Troupes
- Skyrocket Subscribers and Engagement - Top 12 Video Promotion Tactics
- Optimal Video Kick-Offs Selecting the Top 16 for More Viewers
- [Updated] Deciphering Digital Dominance YouTube Content Strategy Comparison
- Organizing Chaos A Guide to YouTube List Shuffling
- Ensuring Visibility Fixing Missing Shorts Thumbnails for 2024
- [Updated] Create Professional Movies on YouTube Quickly
- How to Step Into Virtual Entertainment and Gain Notoriety
- In 2024, Download Free MCB Skin Designs
- In 2024, Channel Growth Blueprint Selecting Between Studio and Latest Beta
- [Updated] Deciphering Ad Revenue and Affiliate Opportunities on YouTube
- Charting Your Way to Frequent Payments From YouTube
- Monetize Like a Pro How to Use Youtube Studio on Any Device
- Decoding the Cost Per Thousand Views on YouTube for Successful Earning
- Piecing Together Attention-Grabbing Channel Snippets
- 2024 Approved Boost Your Channel Top 14 Gaming Vids for YouTube Success
- 8 Sites to Download Free Green Screen Backgrounds and Footage
- Direct Download of YouTube Content
- Time Is Money - Learn to Slash YouTube Video Durations
- [New] A Teacher's Guide to Enhancing Learning Through YouTube Videos
- Earnings Demystified YouTube Shorts Revenue Split Explained
- [New] Elevate Thumbnail Imagery Fantasy Landscapes & Effects Guide
- Comprehensive Conversion Guide for AVI Media to Web-Ready GIF in Filmora for 2024
- [New] Mastering Mingle Link Up on PC, Android, iOS for 2024
- New In 2024, Essential Roles and Their Impact During Filming Phase
- Updated Aspect Ratio Mastery The Secret to Making Your Facebook Videos Stand Out for 2024
- Optimized Protocols Snapshots of GoToMeetings Made Simple for 2024
- [New] In 2024, The Compre Point Guide to Instagram's Inquiry Tool
- [Updated] 2024 Approved Navigating Social Media Landscape Facebook Daily Use
- [Updated] 2024 Approved Building a Fanbase Key Strategies for Desktop TikTok Videos
- [Updated] In 2024, The Complete 2023 Guide to Effortless FB Posting Tools
- [New] In 2024, Streaming Software Showdown The Ultimate Guide to OBS Vs. ShadowPlay
- [Updated] Leveraging WhatsApp's Features for Twitter Video Distribution
- Precision Sculpting Perfect Circles, Spheres in Minecraft World
- How to Transfer Data After Switching From Vivo Y100i Power 5G to Latest Samsung | Dr.fone
- New Top Picks 10 Intro Maker Sites with Free and Paid Features
- Unlocking an iCloud Locked iPad and iPhone 15 Pro
- In 2024, The Essential List 8 Leading Sound Recording Applications
- Cross-Network Laughter Who's Tops Today, In 2024
- Sim Unlock Oppo A1x 5G Phones without Code 2 Ways to Remove Android Sim Lock
- Updated From Novice to Pro The Best iPhone Video Editing Apps for 2024
- [New] How to Record a Webinar for 2024
- In 2024, Split, Trim, and Merge AVI Videos Top Video Cutting Tools Reviewed
- Unlocking the Power of Smart Lock A Beginners Guide for Nokia Users
- New In 2024, The Essential Directory of Fee-Free, High-Quality Audio Player Applications for Android and iOS Devices
- [New] 2024 Approved Cut Out Clutter in Audio Audacity’s Noise Suppression Tips
- In 2024, Steps to Ensure Whole Sound in FB Video Playbacks
- In 2024, How to Unlock Apple ID Activation Lock From iPhone XR?
- [New] 2024 Approved Stream Success Linking Twitch Feeds to FB Networks
- New 2024 Approved 8 Video Editing Software That Wont Slow You Down
- Title: In 2024, Essential Editing Techniques for YT Channel Summaries
- Author: Steven
- Created at : 2024-05-25 19:46:33
- Updated at : 2024-05-26 19:46:33
- Link: https://youtube-clips.techidaily.com/in-2024-essential-editing-techniques-for-yt-channel-summaries/
- License: This work is licensed under CC BY-NC-SA 4.0.
