
:max_bytes(150000):strip_icc()/shutterstock_331471589-using-facebook-585c074c3df78ce2c34f61c8.jpg)
"In 2024, Enhancing Presentations Adding YouTube to Google Slides"
Enhancing Presentations: Adding YouTube to Google Slides
Create High-Quality Video - Wondershare Filmora
An easy and powerful YouTube video editor
Numerous video and audio effects to choose from
Detailed tutorials provided by the official channel
Google Slide presentation is a powerful tool for creators to keep their audience engaged. This online platform lets you create and demonstrate your ideas. It will capture your viewers’ attention from the very beginning. It also doesn’t matter whatever learning style you engage. Adding YouTube videos to Google Slide will appeal to all levels of individuals.
More so, it is the best way to provide a break for both the audience and the creator. You can break Google Slide presentations with videos to offer some break. Viewers and the presenter get a breather in the process. The presenter can take a short break from speaking while the video plays. Let’s now dive into how to embed a YouTube video in Google Slides.

In this article
01 Why should we add a video to Google Slides?
02 How to add a YouTube video to Google Slide
03 How to choose the right video for your Slides?
Why should we add a video to Google Slides?
There is a great impact of adding video to Google Slides.
For attention
Videos will automatically awaken you, especially if your thoughts have started to sway during a presentation. A video has a direct way of showing creativity. The audience automatically connects the dots between the video and the presentation lines alike.
To stimulate discussion
A picture is worth a thousand words. There is a way that an added video will help the audience connect to the day’s topic. It will bring up several ideas and stir up discussion with the presenter.
Easy following
With videos embedded in Google Slide, viewers will find it easy to understand and digest. Videos automatically eliminate boredom and make any topic interesting.
How to add a YouTube video to Google Slide
Use these two methods to add a YouTube video to Google Slides. Via the Search and Direct link.
Method 1. Embed YouTube video to Google Slide by search and selection
Google has owned YouTube since the year 2006. You can, therefore, integrate Google’s products with YouTube easily.
Step 1. First, go to the slide where you want to embed your video.
Step 2. Then choose the “Insert” option from the menu bar and hit the “Video” option.

Step 3. It would be best if you now viewed the “YouTube” search bar to type in the video you want to embed. You can use keywords to search for the video in question and view instant search results.
Step 4. Then select the video you want to embed, and you’ll see it appear on the “Slide.”

Step 5. Format your video. Remember that the entire video will be embedded. You don’t necessarily need the whole video. It is time to select just a brief but relevant clip from the video to use. Then position your video to the right point using the axes from the exact starting point to the finished part you want the video to appear in.
Method 2. Embed YouTube video to Google Slide by direct link
You can engage this method if you want to include the entire video.
Step 1. Get the URL of the specific YouTube video that you want to use.

Step 2. Then go to your browser’s “Address bar” to copy the YouTube link.
Step 3. Next, open the “Presentation” slide to put your video to.
Step 4. Choose the “Insert” tab from the menu bar.
Step 5. Then hit on the “Video” option from the drop-down menu that appears.
Step 6. A new window will open automatically. Choose the “By URL” tab.
Step 7. Then paste the YouTube video URL in the “Paste YouTube URL Here” bar section.

Step 8. Wait for the video file to load and press the “Select” option. The video will immediately appear in the presentation slide. Just drag and drop the video in your preferred position.
Note: You can do a few edits inside the application. Set the timer when your video should start and when to stop. You can also adjust the video player size.
How to choose the right video for your Slides?
Not all videos will make an impact on your Google Slide. You need to use the best shot that adds value to your presentation. These guidelines will help you to settle on the best video.
Be Professional – choose the best video for your presentation. Remember that the video is part of the presentation and carries more weight. Settling for quality video will bring out the professionalism in you.
Relevant – how do you know that what you are showing your audience corresponds to the presentation piece? Ensure that the video you add has something to do with the Google Slide presentation topic. The two should naturally flow to make it easy to understand the whole concept.
Precise – your presentation is not about the video. The ideal length should not exceed 60 seconds. The longer the video, the greater the chance for your audience to lose track along the way.
Know every footage you are working with – this will help you pick the best shots for your presentation. So, learn every aspect of the video before settling down to use it.
Add new content – even though one content may suit several presentations, don’t rely on the same piece each time. Your audience will want to feel something fresh each time you are presenting. So, compose different videos for different scenarios to make that big impact.
Create an eye-catching video for your Slides with Filmora
The video quality matters when it comes to creating your Slides. The best video creator – Filmora – works in simple steps to give you an eye-catching video. It will create videos for all scenarios like marketing, tutorial, gaming, etc.
Key features of Filmora
- It offers you advanced video effects like filters, motion elements, etc
- You can multiply your fun with multiple screens with the Split Screen feature
- Easily change backgrounds using the Green Screen feature
- The speed control lets you fast forward or slow down a special moment
- Import your video clips to social media platforms
- You can also adjust the audio of your tracks using the Audio Mixer feature
Follow this guide to create a video for your slide with Filmora
Step 1. Launch Filmora
First, begin by downloading and installing Filmora on your computer device. Once installed, launch it and allow it to run. You can either create a new project or open an existing project to work on.
Step 2. Create a new project
Here, click on the “New Project” tab on the app’s welcome screen. The editor should load immediately. Then proceed to register the product. Just hit on the “Register” tab.
Step 3. Import video
Check the upper left corner of your screen to see the “Import” tab. Click on it and choose the “Import Media Files” option. Next, navigate to the location of your computer’s local list to select the clip or video you want to edit. Then, hit the “Import” button to add the video to the timeline for editing.
Step 4. Edit video
Drag and drop the raw footage to Filmora’s timeline to begin editing. Here, you can trim, add other video clips, merge, and add effects as you wish. Likewise, you can add opening titles, subtitles, and end credits to your video. More so, this tool offers different templates to use. Just drag and drop the templates you wish to use to a specific location on the timeline.
Step 5. Preview your file
Last but not least, you can preview your files. Click on the “Play” tab to start previewing your video clips. The main essence of this part is to allow you to make the necessary changes to your clips if there is a need.
Step 6. Export and Share
With Filmora, you can export your file to various social media platforms. But first, go to the “Output window” and select the video file format to use. This software supports several output formats to apply to any platform and device. Just click on the “Format” tab and choose the file format to use. Then also change the resolution and other parameters like frame rate and channel of your video in the “Settings” section. Finally, share your video to your YouTube channel and get ready to add the video to the Google Slide presentation.
For Win 7 or later (64-bit)
For macOS 10.12 or later
Conclusion
● You now know how to put a YouTube video in Google Slides the simple way. You can search for your YouTube videos or directly use the URL link. Whatever the case, remember that it’s the quality of your video that carries more weight. Thanks to the availability of third-party apps that you can use to create and improve the quality of your videos.
● Filmora is at your service to create high-resolution videos that you can export in any format to your YouTube channel. The tool is intuitive, and it won’t matter whether you haven’t tried it before. It is a perfect choice for both professionals and first-time users.
Google Slide presentation is a powerful tool for creators to keep their audience engaged. This online platform lets you create and demonstrate your ideas. It will capture your viewers’ attention from the very beginning. It also doesn’t matter whatever learning style you engage. Adding YouTube videos to Google Slide will appeal to all levels of individuals.
More so, it is the best way to provide a break for both the audience and the creator. You can break Google Slide presentations with videos to offer some break. Viewers and the presenter get a breather in the process. The presenter can take a short break from speaking while the video plays. Let’s now dive into how to embed a YouTube video in Google Slides.
In this article
01 Why should we add a video to Google Slides?
02 How to add a YouTube video to Google Slide
03 How to choose the right video for your Slides?
Why should we add a video to Google Slides?
There is a great impact of adding video to Google Slides.
For attention
Videos will automatically awaken you, especially if your thoughts have started to sway during a presentation. A video has a direct way of showing creativity. The audience automatically connects the dots between the video and the presentation lines alike.
To stimulate discussion
A picture is worth a thousand words. There is a way that an added video will help the audience connect to the day’s topic. It will bring up several ideas and stir up discussion with the presenter.
Easy following
With videos embedded in Google Slide, viewers will find it easy to understand and digest. Videos automatically eliminate boredom and make any topic interesting.
How to add a YouTube video to Google Slide
Use these two methods to add a YouTube video to Google Slides. Via the Search and Direct link.
Method 1. Embed YouTube video to Google Slide by search and selection
Google has owned YouTube since the year 2006. You can, therefore, integrate Google’s products with YouTube easily.
Step 1. First, go to the slide where you want to embed your video.
Step 2. Then choose the “Insert” option from the menu bar and hit the “Video” option.
Step 3. It would be best if you now viewed the “YouTube” search bar to type in the video you want to embed. You can use keywords to search for the video in question and view instant search results.
Step 4. Then select the video you want to embed, and you’ll see it appear on the “Slide.”
Step 5. Format your video. Remember that the entire video will be embedded. You don’t necessarily need the whole video. It is time to select just a brief but relevant clip from the video to use. Then position your video to the right point using the axes from the exact starting point to the finished part you want the video to appear in.
Method 2. Embed YouTube video to Google Slide by direct link
You can engage this method if you want to include the entire video.
Step 1. Get the URL of the specific YouTube video that you want to use.
Step 2. Then go to your browser’s “Address bar” to copy the YouTube link.
Step 3. Next, open the “Presentation” slide to put your video to.
Step 4. Choose the “Insert” tab from the menu bar.
Step 5. Then hit on the “Video” option from the drop-down menu that appears.
Step 6. A new window will open automatically. Choose the “By URL” tab.
Step 7. Then paste the YouTube video URL in the “Paste YouTube URL Here” bar section.
Step 8. Wait for the video file to load and press the “Select” option. The video will immediately appear in the presentation slide. Just drag and drop the video in your preferred position.
Note: You can do a few edits inside the application. Set the timer when your video should start and when to stop. You can also adjust the video player size.
How to choose the right video for your Slides?
Not all videos will make an impact on your Google Slide. You need to use the best shot that adds value to your presentation. These guidelines will help you to settle on the best video.
Be Professional – choose the best video for your presentation. Remember that the video is part of the presentation and carries more weight. Settling for quality video will bring out the professionalism in you.
Relevant – how do you know that what you are showing your audience corresponds to the presentation piece? Ensure that the video you add has something to do with the Google Slide presentation topic. The two should naturally flow to make it easy to understand the whole concept.
Precise – your presentation is not about the video. The ideal length should not exceed 60 seconds. The longer the video, the greater the chance for your audience to lose track along the way.
Know every footage you are working with – this will help you pick the best shots for your presentation. So, learn every aspect of the video before settling down to use it.
Add new content – even though one content may suit several presentations, don’t rely on the same piece each time. Your audience will want to feel something fresh each time you are presenting. So, compose different videos for different scenarios to make that big impact.
Create an eye-catching video for your Slides with Filmora
The video quality matters when it comes to creating your Slides. The best video creator – Filmora – works in simple steps to give you an eye-catching video. It will create videos for all scenarios like marketing, tutorial, gaming, etc.
Key features of Filmora
- It offers you advanced video effects like filters, motion elements, etc
- You can multiply your fun with multiple screens with the Split Screen feature
- Easily change backgrounds using the Green Screen feature
- The speed control lets you fast forward or slow down a special moment
- Import your video clips to social media platforms
- You can also adjust the audio of your tracks using the Audio Mixer feature
Follow this guide to create a video for your slide with Filmora
Step 1. Launch Filmora
First, begin by downloading and installing Filmora on your computer device. Once installed, launch it and allow it to run. You can either create a new project or open an existing project to work on.
Step 2. Create a new project
Here, click on the “New Project” tab on the app’s welcome screen. The editor should load immediately. Then proceed to register the product. Just hit on the “Register” tab.
Step 3. Import video
Check the upper left corner of your screen to see the “Import” tab. Click on it and choose the “Import Media Files” option. Next, navigate to the location of your computer’s local list to select the clip or video you want to edit. Then, hit the “Import” button to add the video to the timeline for editing.
Step 4. Edit video
Drag and drop the raw footage to Filmora’s timeline to begin editing. Here, you can trim, add other video clips, merge, and add effects as you wish. Likewise, you can add opening titles, subtitles, and end credits to your video. More so, this tool offers different templates to use. Just drag and drop the templates you wish to use to a specific location on the timeline.
Step 5. Preview your file
Last but not least, you can preview your files. Click on the “Play” tab to start previewing your video clips. The main essence of this part is to allow you to make the necessary changes to your clips if there is a need.
Step 6. Export and Share
With Filmora, you can export your file to various social media platforms. But first, go to the “Output window” and select the video file format to use. This software supports several output formats to apply to any platform and device. Just click on the “Format” tab and choose the file format to use. Then also change the resolution and other parameters like frame rate and channel of your video in the “Settings” section. Finally, share your video to your YouTube channel and get ready to add the video to the Google Slide presentation.
For Win 7 or later (64-bit)
For macOS 10.12 or later
Conclusion
● You now know how to put a YouTube video in Google Slides the simple way. You can search for your YouTube videos or directly use the URL link. Whatever the case, remember that it’s the quality of your video that carries more weight. Thanks to the availability of third-party apps that you can use to create and improve the quality of your videos.
● Filmora is at your service to create high-resolution videos that you can export in any format to your YouTube channel. The tool is intuitive, and it won’t matter whether you haven’t tried it before. It is a perfect choice for both professionals and first-time users.
Unveiling T-Series’ Youtube Earnings
Founded by Gulshan Kumar on 11 July 1983, T-Series is an Indian Music record label with over 220 million subscribers on YouTube. Lately, there have been lots of controversies about the T-Series YouTube income, and one common question that we see is “What is T-Series income on YouTube?”
So, if you have the same question, then, you’ve come to the right page to find an answer. In this post, we’ve covered everything you need to know about the T-Series YouTube income. So, without wasting much time, let’s dive in to find out more.
Part 1: Information Box on T Series
Before we reveal all you need to know about T-Series YouTube income, here is an overview of Who T-Series is.
| Name | T-Series |
|---|---|
| Real Name | Bhushan Kumar Dua |
| Net Worth (2022) | $515.4 Million |
| Monthly Income and Salary | Approximately $8.6 Million |
| Yearly Income | Over $128 Million |
| Type | Private |
| Industry | Music & Entertainment |
| Founded | 11 July 1983; 39 years ago in Delhi, India |
| Founder | Gulshan Kumar |
| Key People | Bhushan Kumar Dua (Chairman, managing director), Krishan Kumar, Neeraj Kalyan (President) |
| Services | Music record label % Film production |
| YouTube Channel | T-Series |
| Awards and Recognition | Creator Awards |
Now you have an overview of what T-Series YouTube channel income is, read on to discover more
Part 2: T-Series YouTube Earning and Stats
T-Series main source of revenue is the views and adverts, and as of when this article was written, research shows that T-Series attracts more than 2.15 billion views per month. Since a YouTube channel could earn an average of $3 to $5 per one thousand views, it can be estimated that T-Series earn a monthly income of up to $8.6 Million per month, and could make up to over 128 Million per year. Do you still want to find out more? Check out the table on T-Series stats;
| Estimated Monthly Earning (USD/INDIAN RUPEES) | $8.6 Million / R.S699 Million |
|---|---|
| Estimated Yearly Earning (USD/INDIAN RUPEES) | Approximately $128 Million / R.S 10.4 Billion |
| Total Videos Uploads | 17, 516 |
| Total Views | 202,606,674,113 |
| Subscribers | 225 Million |
| Years Active | 16 years |
| Genre | Music |
T-Series is very popular on all social media platforms, including Facebook, Twitter, and Instagram. He has been in the game for so long that anyone believes in the content he creates. The company was discovered in the 1980s by Gulshan Kumar a cassette tape business, and it was focused on devotional music, especially Hindu hymns and Bollywood music.M

The good thing back then was that T-Series was the first of its kind, and the devotional music market was really big, especially amongst old folks. So, it was easy for T-Series music to reach the right audience within a short time, and it had its first breakthrough in the late 1980s.
Fast forward to 2004, telecommunication companies were having complaints from mobile phone users who were not satisfied with their ringtones. So, T-Series became their plug and started 30-second of their music to them. Then, in 2009, when YouTube was launched in India, T-Series discovered lots of his music where being uploaded on YouTube illegally. This led to a ruling against YouTube, and in January 2011, T-Series published its first video on YouTube.
Since 2011 till now, T-Series has experienced tremendous growth. T-Series has up to 29 different YouTube channels with total subscribers of 225million with over a billion views monthly, making them one of the top-leading YouTube channels globally. Right now,
Part 3: Why Is T-Series Trending on YouTube?
Since you already know what T-Series income on YouTube is, you might be eager to find out what he did that made him so popular and became a trend on YouTube. Well, the truth is, T-Series is not doing anything no one can do. However, he has been in the industry for so long that his YouTube channel is like a dish for many viewers, especially the ones in India.
Below are the three main things why T-Series is always trending on YouTube;
Huge YouTube Channel Monthly Visits
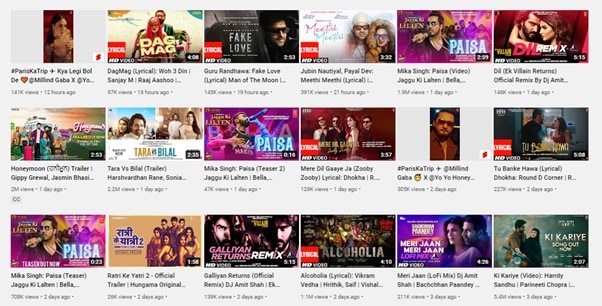
Boasting monthly views of over 100 million per month, T-Series is one of the few YouTube channels that usually have millions of visits from users globally every month. Research shows that the YouTube channel usually has approximately 7.9million visitors per month. This huge monthly visit helps them stay at the top of most YouTube searches that relates with his videos keywords, thus making them trend more when compared with his competitor’s YouTube channel.
Large Subscriber Base
With over 225 million subscribers and still counting, T-Series YouTube channel is a home for many folks to listen to music and see movie thrillers. The large subscriber base plays a huge role in his trend, and the subscriber base continues to increase, he still has the high chance of maintaining his trend within the industry for a very long time.
Regular Posting of Quality Videos
Having a huge YouTube subscriber base is one thing, but being able to deliver quality video content that anyone would love to watch is different. T-Series has been consistent in delivering quality videos, that immediately he uploads a new video on YouTube, he starts getting massive views instantly. Many folks are always eager to see his next upload on YouTube. This has been the same thing for T-Series over the past years, and it has helped him gained more and more popularity.
Bonus Tip: How to be a YouTuber and Make Videos like t series
To be a YouTube-like T-Series you don’t only need to put in the hard work in what you do, you also need to be smart and stay consistent. Plus, you must acquire advanced video editing software that will help you create videos that will make you stand out in the industry. One such video editing software is Wondershare’s Filmora video editor.
Filmora is a video editing powerhouse that boasts lots of efficient tools that one can use to edit every aspect of a video clip. From removing background noise to editing audio, adding transitions, applying effects, and lots more. The tool is one that any YouTuber must have at his/her fingertips.
Besides, Filmora offers lots of free built-in video effects from popular platforms like FilmStock, Pixel, Unsplash, and many others. The amazing thing is you don’t necessarily need video editing skills to utilize the features of the software.
Here is how to use Filmora to Create Impressive Videos for YouTube;
Free Download For Win 7 or later(64-bit)
Free Download For macOS 10.14 or later
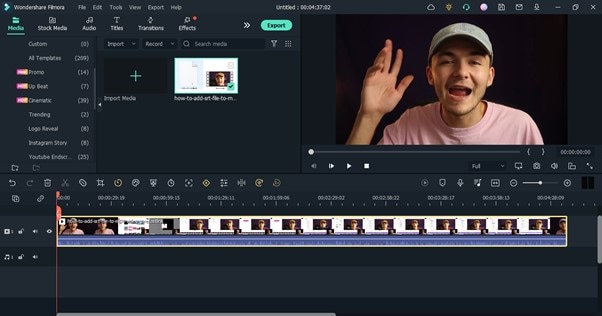
Step1 Download the latest version of Filmora from the official website and install it. Then, launch the tool and use the Import button to upload the YouTube video you wish to edit.
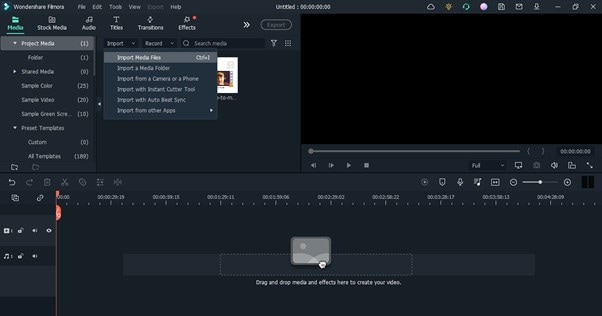
Drag-n-drop the imported video to the Timeline.
Step2 Navigate to the top of the screen and select Effects. Choose AI Portrait from the left-hand side. After that, drag-n-drop a preferred AI Portrait effect to the Timeline. Then, adjust it to the section of your video you want it to be displayed.
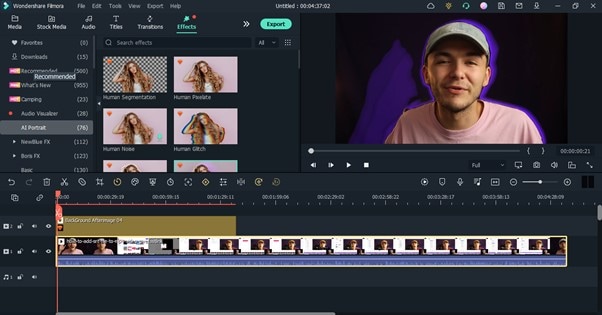
You can also change the AI Portrait effect settings. To do that, double-click on the effect from the timeline to prompt a pop-up window. Apply the AI Portrait effect from there.
Step3 You can add royalty-free music to your YouTube video by clicking Audio from the top. Then, select the preferred audio to use in the video and move it to the timeline.
To adjust your audio settings, double-click the audio clip from the timeline and use the relevant button to balance audio fade-in and fade-out, volume, pitch, etc.
Step4 Another crucial thing you need to do is to add Subscribe watermark. To do this, click the >> icon next to Export from the top of the screen and select Element.
Locate and click ‘Social Media Show Element 07’ Effects. Drag-n-drop the selected effect to the Timeline.

Step5 Change the position where the Subscribe watermark should appear in your video. Then, play the video to preview it.
Step6 After you’re done with the editing, click the Export button from the top bar and choose Burn DVD from the drop-down list that shows up.
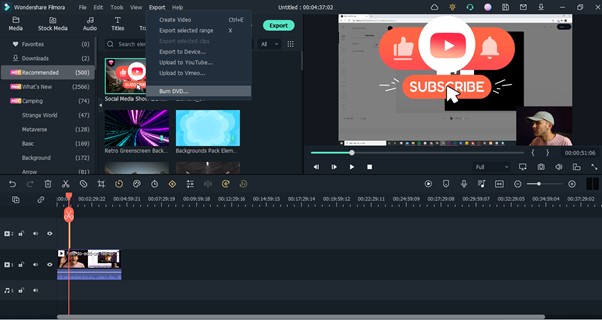
Spet 7: A pop-up window will appear on your PC screen. Select where you want to save the edited video file from the Folder Path section. Then, enter the file name in Lable. Click Export to finish.

Final Words
That’s all on T-Series income on YouTube. T-Series did not just become successful overnight. It took consistent hard work. The team put so much effort not just to come up with ideas and create videos, but also to invest in the right tools to make their videos stand out in the industry. If you’re looking to start your YouTube journey and be like T-Series some days, you should start now. The first move you should make is to invest in Wondershare Filmora software, as it has lots of tools to offer for editing videos with high quality.
Free Download For Win 7 or later(64-bit)
Free Download For macOS 10.14 or later
Part 1: Information Box on T Series
Before we reveal all you need to know about T-Series YouTube income, here is an overview of Who T-Series is.
| Name | T-Series |
|---|---|
| Real Name | Bhushan Kumar Dua |
| Net Worth (2022) | $515.4 Million |
| Monthly Income and Salary | Approximately $8.6 Million |
| Yearly Income | Over $128 Million |
| Type | Private |
| Industry | Music & Entertainment |
| Founded | 11 July 1983; 39 years ago in Delhi, India |
| Founder | Gulshan Kumar |
| Key People | Bhushan Kumar Dua (Chairman, managing director), Krishan Kumar, Neeraj Kalyan (President) |
| Services | Music record label % Film production |
| YouTube Channel | T-Series |
| Awards and Recognition | Creator Awards |
Now you have an overview of what T-Series YouTube channel income is, read on to discover more
Part 2: T-Series YouTube Earning and Stats
T-Series main source of revenue is the views and adverts, and as of when this article was written, research shows that T-Series attracts more than 2.15 billion views per month. Since a YouTube channel could earn an average of $3 to $5 per one thousand views, it can be estimated that T-Series earn a monthly income of up to $8.6 Million per month, and could make up to over 128 Million per year. Do you still want to find out more? Check out the table on T-Series stats;
| Estimated Monthly Earning (USD/INDIAN RUPEES) | $8.6 Million / R.S699 Million |
|---|---|
| Estimated Yearly Earning (USD/INDIAN RUPEES) | Approximately $128 Million / R.S 10.4 Billion |
| Total Videos Uploads | 17, 516 |
| Total Views | 202,606,674,113 |
| Subscribers | 225 Million |
| Years Active | 16 years |
| Genre | Music |
T-Series is very popular on all social media platforms, including Facebook, Twitter, and Instagram. He has been in the game for so long that anyone believes in the content he creates. The company was discovered in the 1980s by Gulshan Kumar a cassette tape business, and it was focused on devotional music, especially Hindu hymns and Bollywood music.M
The good thing back then was that T-Series was the first of its kind, and the devotional music market was really big, especially amongst old folks. So, it was easy for T-Series music to reach the right audience within a short time, and it had its first breakthrough in the late 1980s.
Fast forward to 2004, telecommunication companies were having complaints from mobile phone users who were not satisfied with their ringtones. So, T-Series became their plug and started 30-second of their music to them. Then, in 2009, when YouTube was launched in India, T-Series discovered lots of his music where being uploaded on YouTube illegally. This led to a ruling against YouTube, and in January 2011, T-Series published its first video on YouTube.
Since 2011 till now, T-Series has experienced tremendous growth. T-Series has up to 29 different YouTube channels with total subscribers of 225million with over a billion views monthly, making them one of the top-leading YouTube channels globally. Right now,
Part 3: Why Is T-Series Trending on YouTube?
Since you already know what T-Series income on YouTube is, you might be eager to find out what he did that made him so popular and became a trend on YouTube. Well, the truth is, T-Series is not doing anything no one can do. However, he has been in the industry for so long that his YouTube channel is like a dish for many viewers, especially the ones in India.
Below are the three main things why T-Series is always trending on YouTube;
Huge YouTube Channel Monthly Visits
Boasting monthly views of over 100 million per month, T-Series is one of the few YouTube channels that usually have millions of visits from users globally every month. Research shows that the YouTube channel usually has approximately 7.9million visitors per month. This huge monthly visit helps them stay at the top of most YouTube searches that relates with his videos keywords, thus making them trend more when compared with his competitor’s YouTube channel.
Large Subscriber Base
With over 225 million subscribers and still counting, T-Series YouTube channel is a home for many folks to listen to music and see movie thrillers. The large subscriber base plays a huge role in his trend, and the subscriber base continues to increase, he still has the high chance of maintaining his trend within the industry for a very long time.
Regular Posting of Quality Videos
Having a huge YouTube subscriber base is one thing, but being able to deliver quality video content that anyone would love to watch is different. T-Series has been consistent in delivering quality videos, that immediately he uploads a new video on YouTube, he starts getting massive views instantly. Many folks are always eager to see his next upload on YouTube. This has been the same thing for T-Series over the past years, and it has helped him gained more and more popularity.
Bonus Tip: How to be a YouTuber and Make Videos like t series
To be a YouTube-like T-Series you don’t only need to put in the hard work in what you do, you also need to be smart and stay consistent. Plus, you must acquire advanced video editing software that will help you create videos that will make you stand out in the industry. One such video editing software is Wondershare’s Filmora video editor.
Filmora is a video editing powerhouse that boasts lots of efficient tools that one can use to edit every aspect of a video clip. From removing background noise to editing audio, adding transitions, applying effects, and lots more. The tool is one that any YouTuber must have at his/her fingertips.
Besides, Filmora offers lots of free built-in video effects from popular platforms like FilmStock, Pixel, Unsplash, and many others. The amazing thing is you don’t necessarily need video editing skills to utilize the features of the software.
Here is how to use Filmora to Create Impressive Videos for YouTube;
Free Download For Win 7 or later(64-bit)
Free Download For macOS 10.14 or later
Step1 Download the latest version of Filmora from the official website and install it. Then, launch the tool and use the Import button to upload the YouTube video you wish to edit.
Drag-n-drop the imported video to the Timeline.
Step2 Navigate to the top of the screen and select Effects. Choose AI Portrait from the left-hand side. After that, drag-n-drop a preferred AI Portrait effect to the Timeline. Then, adjust it to the section of your video you want it to be displayed.
You can also change the AI Portrait effect settings. To do that, double-click on the effect from the timeline to prompt a pop-up window. Apply the AI Portrait effect from there.
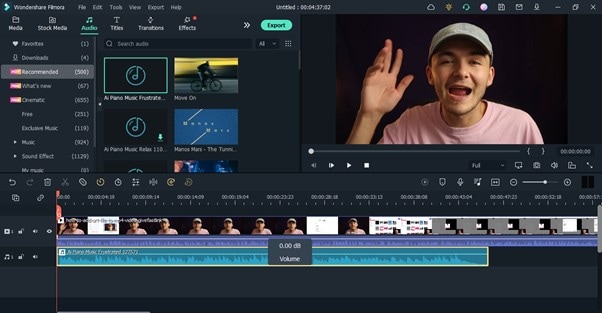
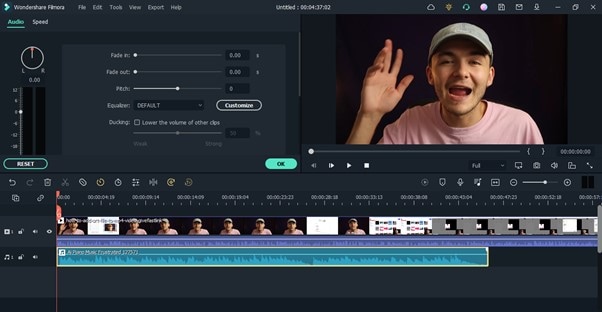
Step3 You can add royalty-free music to your YouTube video by clicking Audio from the top. Then, select the preferred audio to use in the video and move it to the timeline.
To adjust your audio settings, double-click the audio clip from the timeline and use the relevant button to balance audio fade-in and fade-out, volume, pitch, etc.
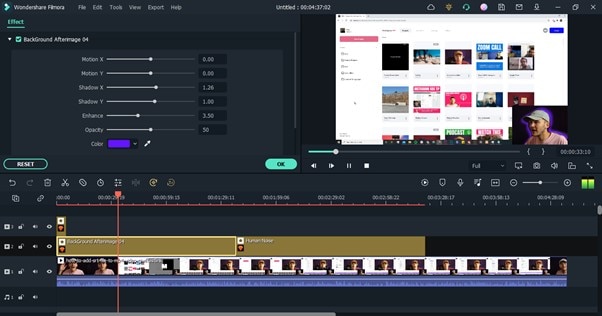
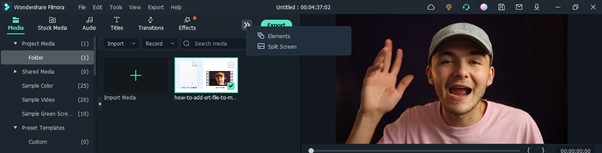
Step4 Another crucial thing you need to do is to add Subscribe watermark. To do this, click the >> icon next to Export from the top of the screen and select Element.
Locate and click ‘Social Media Show Element 07’ Effects. Drag-n-drop the selected effect to the Timeline.
Step5 Change the position where the Subscribe watermark should appear in your video. Then, play the video to preview it.
Step6 After you’re done with the editing, click the Export button from the top bar and choose Burn DVD from the drop-down list that shows up.
Spet 7: A pop-up window will appear on your PC screen. Select where you want to save the edited video file from the Folder Path section. Then, enter the file name in Lable. Click Export to finish.
Final Words
That’s all on T-Series income on YouTube. T-Series did not just become successful overnight. It took consistent hard work. The team put so much effort not just to come up with ideas and create videos, but also to invest in the right tools to make their videos stand out in the industry. If you’re looking to start your YouTube journey and be like T-Series some days, you should start now. The first move you should make is to invest in Wondershare Filmora software, as it has lots of tools to offer for editing videos with high quality.
Free Download For Win 7 or later(64-bit)
Free Download For macOS 10.14 or later
Also read:
- Filming Made Easy Selecting the Right Audio Devices
- Daily Digital Domination Top 10 YouTube Viewership Ranking for 2024
- 2024 Approved Completely Erase Your Connection with YouTube Shorts
- Rethink Your YouTube Videos with These Non-Youtube Edits
- Global Earning Maestro of Video Content
- [New] Earning in the E-Commerce Arena via Engaging Reviews
- In 2024, DIY Delights in Motion Personalized Animation Artistry
- Ensuring Visual Presentation YouTube Shorts Thumbnails Fix for 2024
- In 2024, Are Influencer Marketing Tactics on YouTube Effective for Long-Term Success?
- In 2024, Analyzing Why YouTube Features Specific Comments
- 2024 Approved Broadview Networks Navigating MCN Choices
- Procure Visual Gold From Leading 4 Video Content Creators
- Unlocking YouTube Success Try These Proven Traffic Boosters
- [Updated] 10 Quick Setup Ideas for Successful YouTube Business Ventures
- [New] Can a Brief Subscribe Boost Your Content Viewing?
- [New] 15 Best YouTube Channels for Stock Market to Follow
- Claim Cost-Free Visuals From Highest-Rated 4 YouTube Sources for 2024
- [New] Effortless Techniques Crafting YouTube Shorts Images on the Fly
- Alluring Backgrounds for Engaging Videos
- Critical Components Affecting YouTube Video Scores for 2024
- In 2024, Boost Your Buzz Factor with These 3 Dynamic Approaches to YouTube Video Reactions
- In 2024, Earnings Empire Constructing a Profitable YouTube Channel
- Unleash Creativity with Customizable Animated Subscribers on YouTube (Filmora)
- Perfect Harmony The Ultimate Guide to Youtube's Anime Vids
- In 2024, Essential Techniques in YouTube Movie Production
- [Updated] A Step-by-Step Guide for Creating Channel Trailers that Convert Viewers Into Customers
- [New] Chasing Channel Currency The Updated Youtube Partner Guide
- 2024 Approved Building Mental Armor Against Online Critics
- In 2024, A Compre Written in Sounds YouTube Playlists Decoded
- [New] Does Artific Written by Charles Kingsley Include Any of These Themes From 'The Nurse's Diary'?
- Boost Your Video Impact Expert Tips on Using WM Maker
- 2024 Approved 5 Next-Level Editors to Transcend the Standard Youtube Videos
- Updated 2024 Approved Thorough Exploration of Nero SoundEditing Suite
- 6 Methods to Share Apple iPhone 8 Plus Screen with PC | Dr.fone
- Premier 10 Creative Filters Elevating Your Social Media Game for 2024
- [New] Exclusive Apps to Remove Logos From Android/iOS Videos
- Beyond Vegas Pro 10 Exceptional Video Editing Software Options for Mac Users
- [New] Archive PowerPoint Into Video Repository for 2024
- [New] In-Depth Guide to Extracting Vimeo Media for 2024
- [Updated] In 2024, Achieving Flawless Zoom Meeting Setups
- [New] 2024 Approved Facebook Video Marketing Top 20 Strategies to Watch
- [Updated] Explore the HD Landscape YouTube, Twitters, and More for 2024
- 2024 Approved Cost-Free Webinar Software for Recording Sessions
- New In 2024, Are You Thinking of Making Videos and Marketing on Instagram? Here Is Everything that You Need to Know About the Video Dimensions for Instagram. Lets Have a Look at It
- [New] In 2024, Maximize Your Impact Top 10 Insta Tools for Post Management
- Network Locked SIM Card Inserted On Your Motorola Phone? Unlock It Now
- Guide to Correcting & Confirming Your Age Information on TikTok
- [Updated] Snap the Scene Comprehensive, No-Cost PC/Mac Capture Tools for 2024
- In 2024, Fake the Location to Get Around the MLB Blackouts on Tecno Pop 8 | Dr.fone
- Influencer Insight Essential Hashtags for Maximum Impact for 2024
- Updated Unleash the Pro in You Turn Everyday Moments Into Breathtaking Films for 2024
- [New] Unlocking the Power of Capturing FaceTime Calls for 2024
- [New] Elevating Edit Quality The Ultimate Guide for OBS Studios
- 2024 Approved Leading Open Source Streaming Apps Reviewed
- Best 3 Vivo X100 Emulator for Mac to Run Your Wanted Android Apps | Dr.fone
- In 2024, Unveiling the Magic of Jazz Foundational Knowledge for Newcomers
- Ultimate Guide from Lenovo ThinkPhone FRP Bypass
- [Updated] Revisiting Radeon Review and Restore for 2024
- In 2024, Ultimate Guide from Xiaomi Redmi Note 13 Pro+ 5G FRP Bypass
- Title: "In 2024, Enhancing Presentations Adding YouTube to Google Slides"
- Author: Steven
- Created at : 2024-05-25 19:45:40
- Updated at : 2024-05-26 19:45:40
- Link: https://youtube-clips.techidaily.com/in-2024-enhancing-presentations-adding-youtube-to-google-slides/
- License: This work is licensed under CC BY-NC-SA 4.0.
