
:max_bytes(150000):strip_icc()/462313453-56a1ad945f9b58b7d0c1a0ea-b88ee2f1e77f4b0f9dc42f22a7042136.jpg)
In 2024, Elite Transcribers for YouTube Clips
Elite Transcribers for YouTube Clips
Have you ever wondered why there is a need to transcribe YouTube videos? Well, let us enlighten you! Turning content from YouTube to text is essential for numerous content creators as it allows them to gain more views. Recent studies have shown that around 33% of the audience watching YouTube videos do not necessarily watch them in English. So, by converting them to text, translation becomes a whole lot easier and subtitles can be generated more efficiently.
In this article, we will explore the procedure through how one can convert a YouTube video to text, and learn about numerous effective online YouTube video to text software.
In this article
01 How to Convert YouTube Video to Texts by Copy/Paste YouTube Transcript
02 Best YouTube Video to Text Converters Online
Part 1: How to Convert YouTube Video to Texts by Copy/Paste YouTube Transcript
When people think “Get the transcript from YouTube” they believe it is going to be a daunting and lengthy procedure. Well, let us tell you that it is certainly not! All you have to do is follow the steps outlined below to transcribe YouTube video to text - that too through the YouTube player itself.
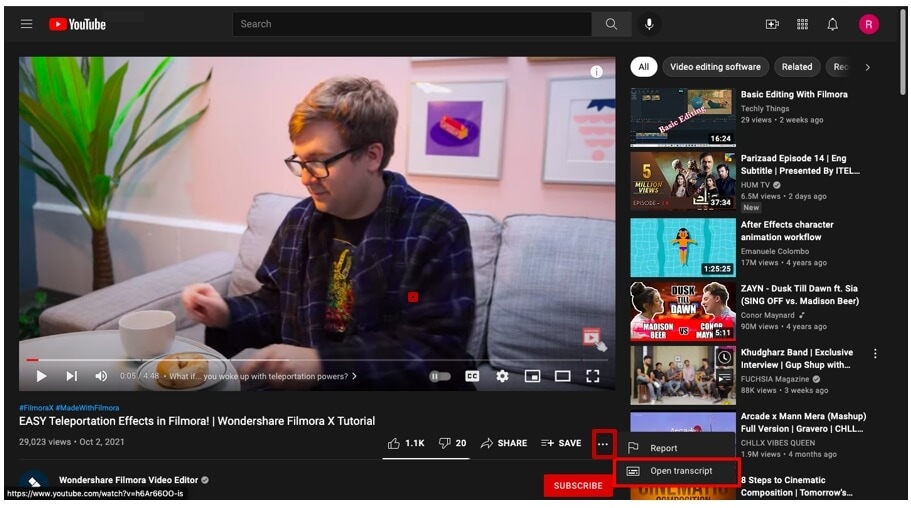
First what you have to do is open YouTube and select any video for which you require the transcript. Once you have selected the video, wait for it to load and then click the three dots located beneath the video, as shown in the image below.
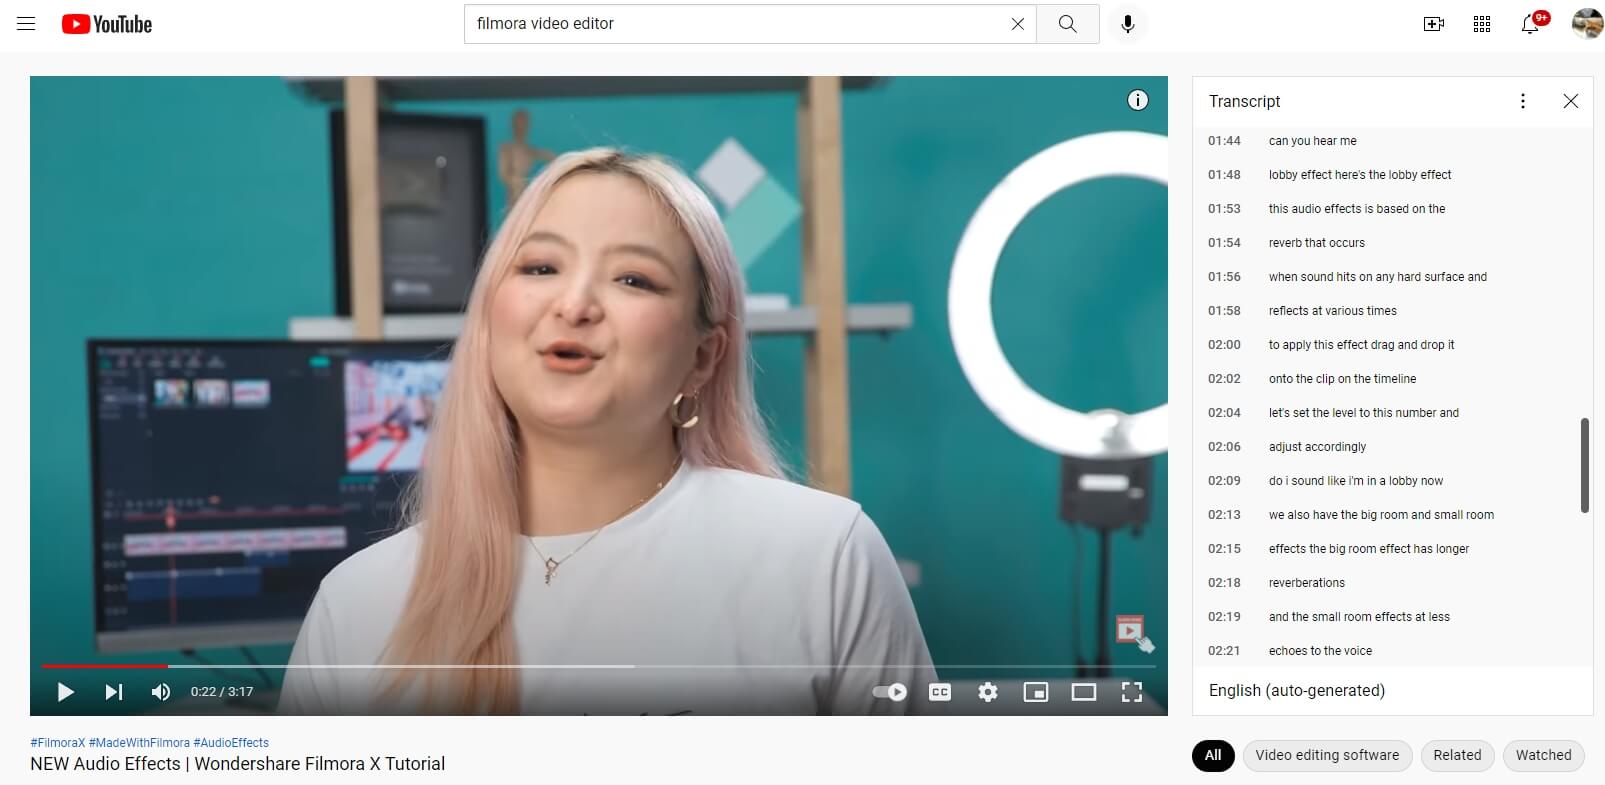
Following that, a menu will appear, just select the “Open Transcript” option and the transcription will open on the top right side of your screen.
Simply select the entire transcript using your mouse, then copy and paste it into a new Word Document or Google Document. If you don’t need the timestamps, you can click the three-dot icon to toggle timestamps off.

By following the steps outlined above, you can convert a YouTube video to text in less than five seconds!
Part 2: Best YouTube Video to Text Converters Online
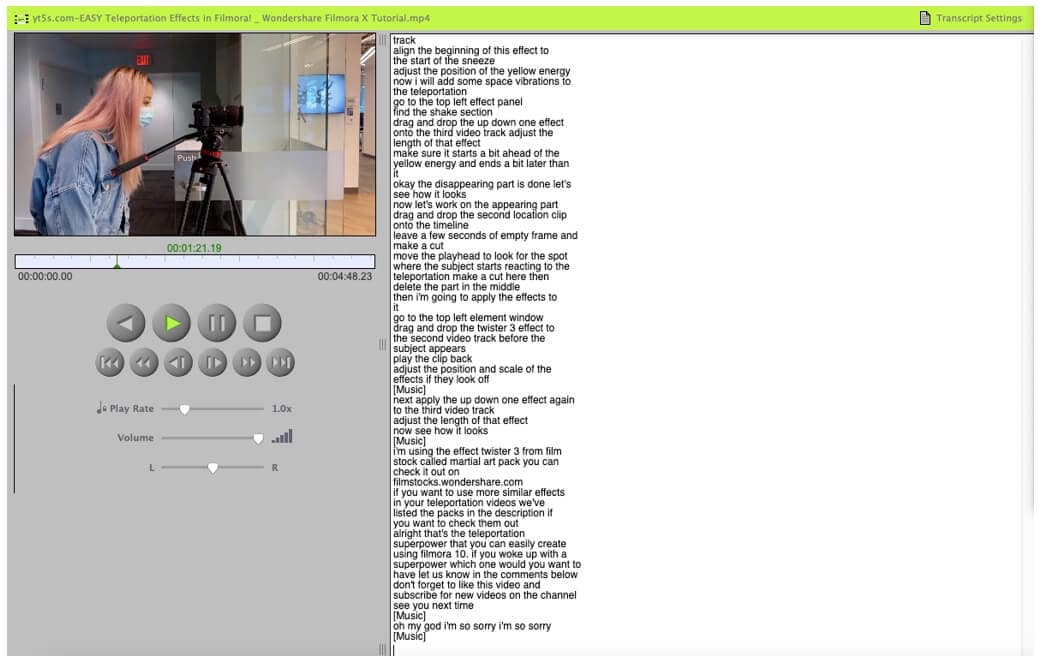
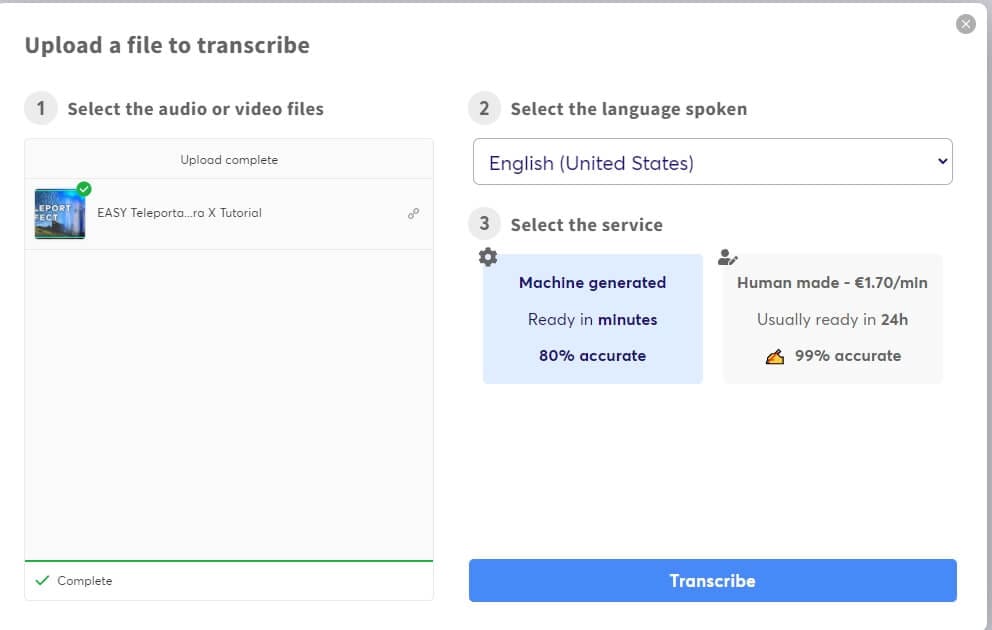
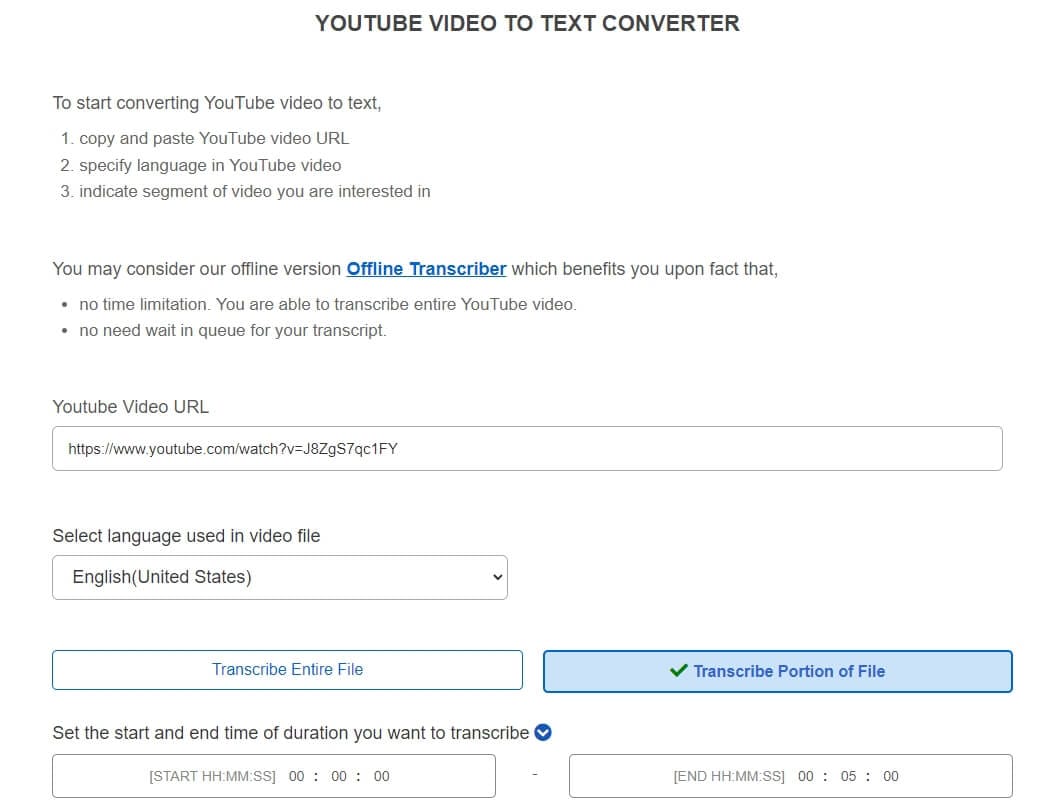
Aside from the basic method of getting the transcription from YouTube itself, many individuals make use of effective YouTube video to text converter online free. This allows them to get the complete video into text, small parts of the video to text, as well as options to convert the text into multiple languages. Below are some of the best software to convert YouTube video to text online.
1. Inqscribe
This high-quality cross-platform tool allows users to transcribe audio and video files into text . Whether it is a meeting recording or a YouTube video - you can convert them all to text. Making use of this free online software is extremely easy, all one has to do is just upload their file and click the process. Then the system will automatically transcribe the video into a text document for you. The software is uni code so all file formats are supported such as txt, XML, HTML, WebVTT, and more. The only drawback of this online software is that video files that are larger than a certain limit cannot be accepted.
2. Sonix
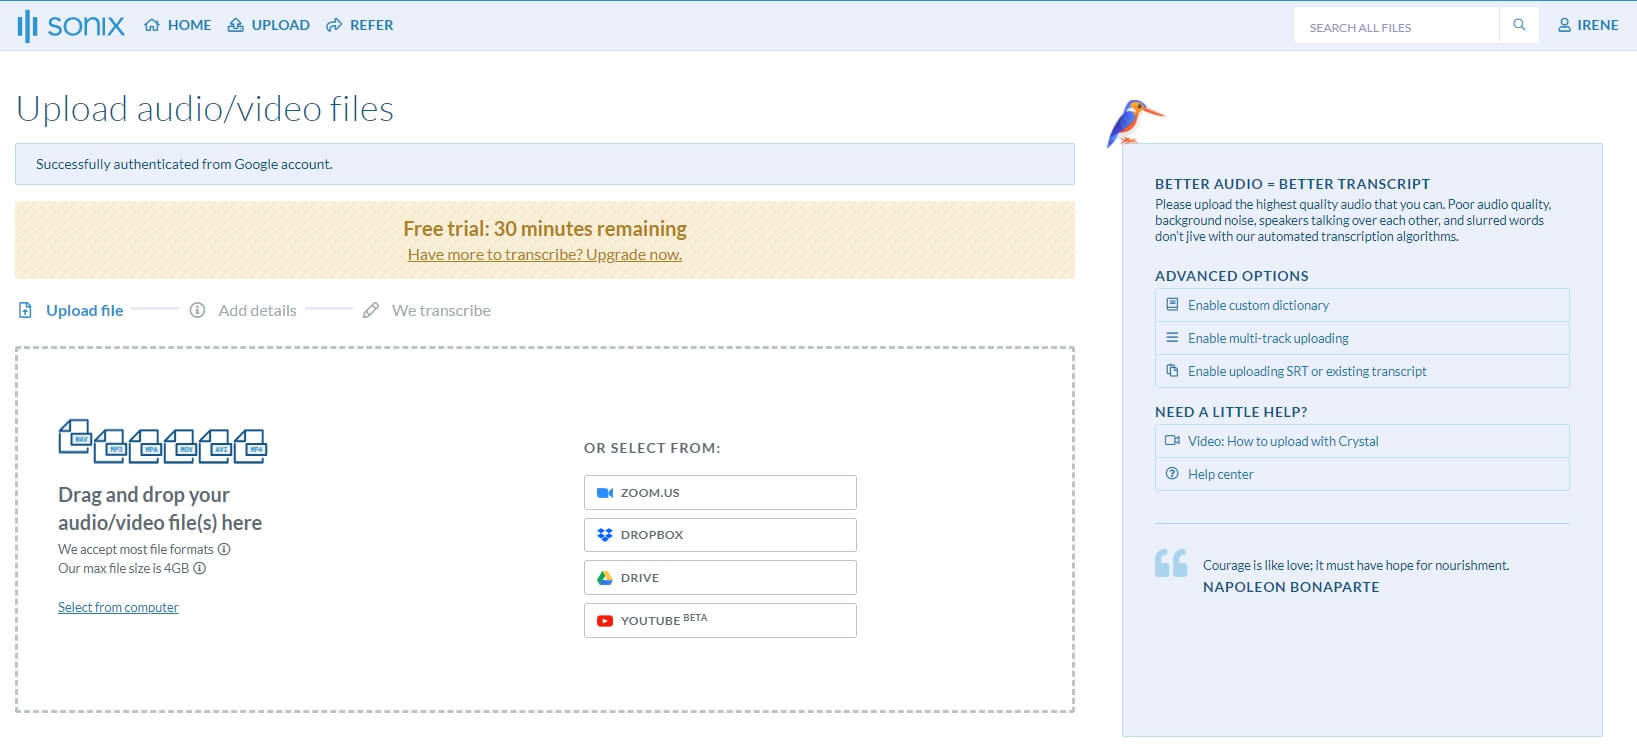
For individuals who have premium quality audio transcription, a tool by the name of Sonix is the right choice for you. This tool enables users to turn all types of YouTube videos into text. All they have to do is simply download the YouTube video they need to transcribe and then upload it to the online interface. From there, this software uses its comprehensive text reader to convert the video to text. This platform supports more than 40 different language choice inputs and outputs. Users are allowed to transcribe up to five videos for free, then they must pay a subscription fee.
3. Otter
This video-to-text converter works best in real-time. Simply play the audio of a YouTube video and let Otter do its magic. In real-time it will convert audio into text. Moreover, if you would like to only convert some parts of the audio to text, that is possible with this tool as well.
All you need to do is play the audio accordingly and the text will automatically generate itself. The AVI (Ambient Voice Intelligence) of this tool allows it to accurately understand what the audio is saying to transcribe the video. While many do find this tool handy, learning how to use it can be a tiny bit tedious and confusing.
Note: Currently, Otter doesn’t support uploading YouTube video link, you may need to download the YouTube video first and then upload it from desktop.
4. oTranscribe
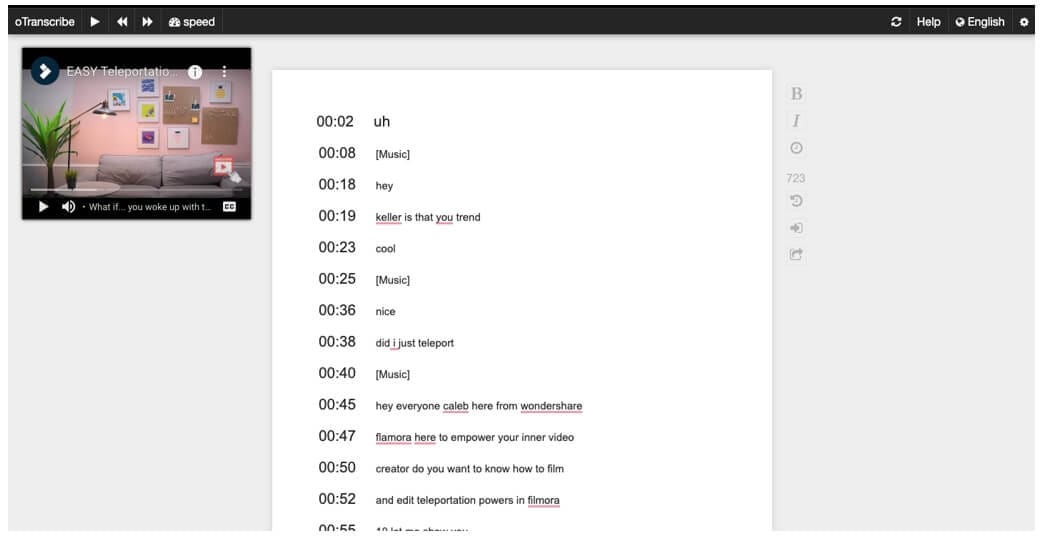
This online transcription tool is extremely easy and convenient to use - and it is entirely free! All you need to do is head on over to its homepage and drop a link to the YouTube video that you would like to transcribe. Then from there, you can access the video and text all at the same time, without having to switch between videos.
The best part is that you can record and translate text according to your need, cut and miss parts that you do not require. This tool supports all file formats which just adds to convince. The only challenge is that it will only accept videos and translate them into English.
5. Go Transcribe
If you are looking to convert any sort of video format to text, then Go Transcribe might just be the tool that you require. This tool makes use of the latest voice technology to convert videos to text - and gives you the output in the form of an SRT, PDF, or DOC, which are all editable. All you need to do is upload the video in one of the formats below,
- 3PG
- FLV
- AVI
- MOV
- MPG
- MPEG
Then simply click the processing options and your video will be generated into a text file within minutes. However, this software may require a subscription fee.
files. Moreover, the output format is PDF which individuals cannot edit unless they convert the PDF to a TXT file online using different software.
6. Trint
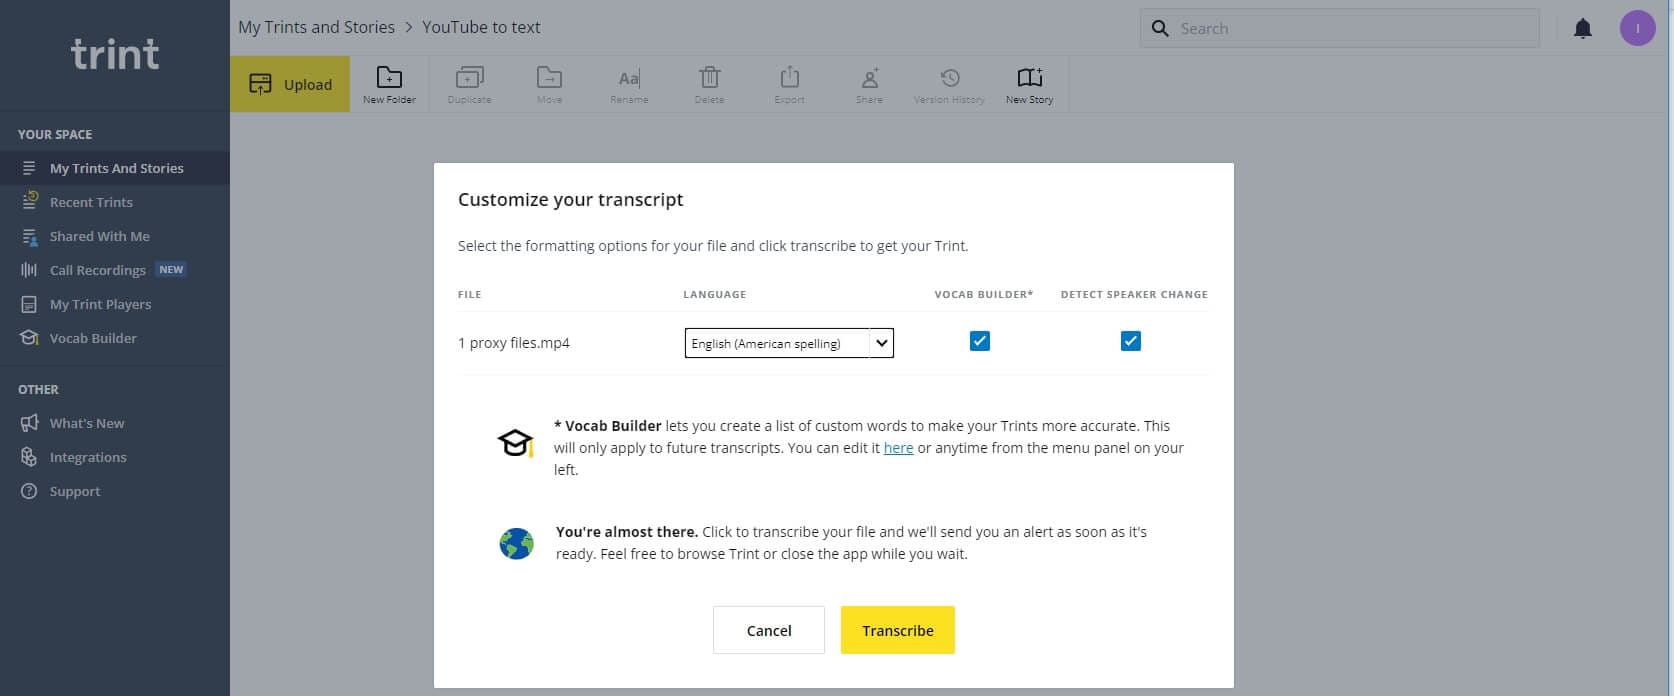
Turn your speech to text through magic - or in other words, through state-of-the-art technology. Trint is an online transcription tool that allows individuals to turn video files into text. People can download and upload numerous video files at once and turn them into text documents.
This is an extremely handy tool to have considering it comes with numerous options such as editing the text, only inducing certain parts of the video in the text, and so much more. This tool only has one shortcoming, it only accepts English language videos.
7. Happy Scribe
If you are wondering how, you will convert YouTube video to text, then we have just the answer for you. Make use of Happy Scribe to automatically transcribe all sorts of audio and video into comprehensive and readable text. You can get numerous features and options in this tool such as advanced grammatical functions as well as timestamps.
If your videos are in different languages, do not worry because Happy Scribe has more than 60 language formats. However, to make use of added features, individuals will need to pay for the tool and upgrade to the pro version.
8. 360Converter
360Converter, as its name suggests is a video to text converter which individuals can use online and offline. All you need to do is download and then upload the YouTube video that you would like to transcribe and the tool will automatically generate the text for you. The supported video formats include 3GP, MP4, MOV, AVI, and many more. This tool uses advanced technology to get accurate language and grammatical transcriptions, so everything is word to word - the exact same as the video. While this tool is extremely user-friendly, many state that it takes a while to process videos to text.
Key Takeaways!
Technology has come a long way which is why we now have numerous options available online to help us convert YouTube videos to text in less than 5-10 minutes. All you have to do is upload the file and let the tool do its magic! You can transcribe in different languages, segments, and so much more now!
Transform Long Videos into Short Ones Instantly
Turn long videos into viral clips. Effortlessly transform lengthy videos into engaging, shareable clips.

02 Best YouTube Video to Text Converters Online
Part 1: How to Convert YouTube Video to Texts by Copy/Paste YouTube Transcript
When people think “Get the transcript from YouTube” they believe it is going to be a daunting and lengthy procedure. Well, let us tell you that it is certainly not! All you have to do is follow the steps outlined below to transcribe YouTube video to text - that too through the YouTube player itself.
First what you have to do is open YouTube and select any video for which you require the transcript. Once you have selected the video, wait for it to load and then click the three dots located beneath the video, as shown in the image below.
Following that, a menu will appear, just select the “Open Transcript” option and the transcription will open on the top right side of your screen.
Simply select the entire transcript using your mouse, then copy and paste it into a new Word Document or Google Document. If you don’t need the timestamps, you can click the three-dot icon to toggle timestamps off.
By following the steps outlined above, you can convert a YouTube video to text in less than five seconds!
Part 2: Best YouTube Video to Text Converters Online
Aside from the basic method of getting the transcription from YouTube itself, many individuals make use of effective YouTube video to text converter online free. This allows them to get the complete video into text, small parts of the video to text, as well as options to convert the text into multiple languages. Below are some of the best software to convert YouTube video to text online.
1. Inqscribe
This high-quality cross-platform tool allows users to transcribe audio and video files into text . Whether it is a meeting recording or a YouTube video - you can convert them all to text. Making use of this free online software is extremely easy, all one has to do is just upload their file and click the process. Then the system will automatically transcribe the video into a text document for you. The software is uni code so all file formats are supported such as txt, XML, HTML, WebVTT, and more. The only drawback of this online software is that video files that are larger than a certain limit cannot be accepted.
2. Sonix
For individuals who have premium quality audio transcription, a tool by the name of Sonix is the right choice for you. This tool enables users to turn all types of YouTube videos into text. All they have to do is simply download the YouTube video they need to transcribe and then upload it to the online interface. From there, this software uses its comprehensive text reader to convert the video to text. This platform supports more than 40 different language choice inputs and outputs. Users are allowed to transcribe up to five videos for free, then they must pay a subscription fee.
3. Otter
This video-to-text converter works best in real-time. Simply play the audio of a YouTube video and let Otter do its magic. In real-time it will convert audio into text. Moreover, if you would like to only convert some parts of the audio to text, that is possible with this tool as well.
All you need to do is play the audio accordingly and the text will automatically generate itself. The AVI (Ambient Voice Intelligence) of this tool allows it to accurately understand what the audio is saying to transcribe the video. While many do find this tool handy, learning how to use it can be a tiny bit tedious and confusing.
Note: Currently, Otter doesn’t support uploading YouTube video link, you may need to download the YouTube video first and then upload it from desktop.
4. oTranscribe
This online transcription tool is extremely easy and convenient to use - and it is entirely free! All you need to do is head on over to its homepage and drop a link to the YouTube video that you would like to transcribe. Then from there, you can access the video and text all at the same time, without having to switch between videos.
The best part is that you can record and translate text according to your need, cut and miss parts that you do not require. This tool supports all file formats which just adds to convince. The only challenge is that it will only accept videos and translate them into English.
5. Go Transcribe
If you are looking to convert any sort of video format to text, then Go Transcribe might just be the tool that you require. This tool makes use of the latest voice technology to convert videos to text - and gives you the output in the form of an SRT, PDF, or DOC, which are all editable. All you need to do is upload the video in one of the formats below,
- 3PG
- FLV
- AVI
- MOV
- MPG
- MPEG
Then simply click the processing options and your video will be generated into a text file within minutes. However, this software may require a subscription fee.
files. Moreover, the output format is PDF which individuals cannot edit unless they convert the PDF to a TXT file online using different software.
6. Trint
Turn your speech to text through magic - or in other words, through state-of-the-art technology. Trint is an online transcription tool that allows individuals to turn video files into text. People can download and upload numerous video files at once and turn them into text documents.
This is an extremely handy tool to have considering it comes with numerous options such as editing the text, only inducing certain parts of the video in the text, and so much more. This tool only has one shortcoming, it only accepts English language videos.
7. Happy Scribe
If you are wondering how, you will convert YouTube video to text, then we have just the answer for you. Make use of Happy Scribe to automatically transcribe all sorts of audio and video into comprehensive and readable text. You can get numerous features and options in this tool such as advanced grammatical functions as well as timestamps.
If your videos are in different languages, do not worry because Happy Scribe has more than 60 language formats. However, to make use of added features, individuals will need to pay for the tool and upgrade to the pro version.
8. 360Converter
360Converter, as its name suggests is a video to text converter which individuals can use online and offline. All you need to do is download and then upload the YouTube video that you would like to transcribe and the tool will automatically generate the text for you. The supported video formats include 3GP, MP4, MOV, AVI, and many more. This tool uses advanced technology to get accurate language and grammatical transcriptions, so everything is word to word - the exact same as the video. While this tool is extremely user-friendly, many state that it takes a while to process videos to text.
Key Takeaways!
Technology has come a long way which is why we now have numerous options available online to help us convert YouTube videos to text in less than 5-10 minutes. All you have to do is upload the file and let the tool do its magic! You can transcribe in different languages, segments, and so much more now!
Transform Long Videos into Short Ones Instantly
Turn long videos into viral clips. Effortlessly transform lengthy videos into engaging, shareable clips.
The Ultimate Guide: Online Audio Recordings From YouTube
How to Record Audio from YouTube

Max Wales
Mar 27, 2024• Proven solutions
It happens several times when we are watching some videos on YouTube and the background music of the videos appeal us the most. We go online and start searching for that unknown but heart touching song. Unfortunately, the song is not available online. But it doesn’t mean that you cannot add that song to your playlist. The great news is that there are so many advanced audio recording software tools that allow users to record audios directly from YouTube videos.
Sometimes, we are interested to play our favorite music during a long hour journey, but the missing internet connectivity does not allow us to stream it online. In such a situation also, you can get your free music easily on your iPad, iPhone, or any handheld device and it can be later burnt into CD as well. Now you might be interested to know how all this can happen without the “Record Audio” button on YouTube. Don’t worry! Below we have highlighted three simple methods to do this task:
- Method 1: Capture Audio from YouTube with Online YouTube2MP3 Converter
- Method 2: Recording YouTube Audio with Audacity
- Method 3: Recording Sound with Streaming Audio Recorder
- Method 4: Record Audio with Filmora
Note: We resolutely oppose all forms of copyright-infringing downloads. This tutorial is only for downloading YouTube videos/audio materials from your own channel.
![]()

The All-in-One Screen Recorder & Video Editor
- Record desktop screen , voiceover, and webcam simultaneously
- Edit recorded clips quickly with a wide range of professional tools
- Built-in plentiful templates and effects
- Export to MP4, MOV, MKV, GIF and multiple formats
For Win 7 or later (64-bit)
For macOS 10.12 or later
 Secure Download
Method 1: Capture Audio from YouTube with Online YouTube2MP3 Converter
The simplest technique to record audio from YouTube videos is to use a trustworthy online application that can perform the conversion from video to MP3 file . In this article, I am going to show you how to capture audio from YouTube with the assist of a free online convert tool named YouTube to MP3. To do this, simply follow these simple steps:

- Visit the YouTube video page and copy the URL of the video whose audio you want to get in form of an MP3
- Go to the internet and open the online YouTube to MP3 converter tool.
- Paste your video URL in the text field available at the top of the website page.
- Choose your output file format as mp3.
- Hit the Convert conversion button.
- When the conversion is done, you will get a download button on the screen. Hit the Download button and soon your file will be saved to your device.
If you think using YouTube to MP3 Converter to capture audio from YouTube meets your needs, you can visit this online converter: youtubetomp3music.com . While, if you find need a better solution, then keep reading.
Method 2: Recording Sound from YouTube with Audacity
In case if you are interested to record yourself or want to capture just a small portion of the video’s sound, it is good to start with the Audacity program. Following simple steps will assist you to complete your recording process with this handy tool:
- First, download the Audacity program on your system. Note that it is available for free, so anyone can get it easily from the internet.
- Run the setup to begin the installation process and follow on-screen guidelines to finish the process.
- Open Audacity software on your system and from the top menu bar hit the Edit option and then go to Preferences.

- In the Device section of Preferences window, switch to the Recording section.
- Choose Stereo Mix option. In case if it is disabled by default, you may need to enable it first. To do this, go to the control panel of your computer, go to Hardware and Sound section and then switch to Sound section. Now go to Recording tab and right click with the mouse on the blank space of the screen. From the drop-down menu choose Show Disabled Devices option. You will find Stereo Mix Device option on the screen; right click on this device and hit Enable option.

- Hit Ok to save the new sound settings. After these settings, you will have to open the Audacity program again to work with Stereo Mix option.
- It is time to open your YouTube video and hit the record button. Make sure the connection is fast enough to play video without any interruption, otherwise keep it loaded in advance. Play the video and when done, hit the stop button on Audacity program.
- This file can be exported and saved to a device with the MP3 file format.
Method 3: Recording Sound with Streaming Audio Recorder
The third choice for recording YouTube audios is using Streaming Audio Recorder . The great news is that this software cannot only record audios for you rather at the same time it is loaded with advanced editor tool that allows easy cutting and splicing of sounds for the creation of customized videos. With Streaming Audio Recorder, you can also convert your videos into various file formats.
You will be happy to hear that this recorder is not just dedicated to YouTube platform only rather it can also work perfectly with Grooveshark, Jango, and Spotify. Below are few simple steps that you can use to complete the audio recording task with Streaming Audio Recorder:

- Go to the internet and download Streaming Audio Recorder. Install and open the program.
- Hit gear icon on the main interface and then move to settings. Set source of the audio input as System Sound.
- Start playing your desired YouTube video and on recorder, hit the record button instantly.
- As soon as the recording task is complete, hit the Stop button and your recorded audio will be soon saved to the targeted folder.
Recommended: Record Audio and Save to MP3 Format with Wondershare Filmora


You can also use Filmora to record your YouTube audio and then save the recorded audio or the video to MP3 format at exporting and then you can listen to the recorded audio and music even when there is no network connection.
With these advanced tools, the audio recording task becomes quite simple and easy. Even beginners can handle with without any trouble. If you are interested to capture your favorite tracks from online videos, it is right time to choose any of the above suitable methods and start recording your audio.
You can change the voice in audio , or add fade in and fade out effects, or edit the recorded audio file with more tools. The recorded media files can be further customized as well as shared on other social media platforms. It is a great idea for today’s creative young generation. These handy tools can make your audio recording task quite easier and resultant files can be saved in a variety of file formats for further sharing.
If you want to edit the record audio further, like adjust the audio pitch, remove background noise, mix the audio balance, equalize the audio, you can also try Filmora. It allows you to record the audio, webcam and desktop screen automatically . And it works on 64-bit Windows7/8/10, and Mac OS X 10.11 El Capitan and late.
Max Wales
Max Wales is a writer and a lover of all things video.
Follow @Max Wales
Max Wales
Mar 27, 2024• Proven solutions
It happens several times when we are watching some videos on YouTube and the background music of the videos appeal us the most. We go online and start searching for that unknown but heart touching song. Unfortunately, the song is not available online. But it doesn’t mean that you cannot add that song to your playlist. The great news is that there are so many advanced audio recording software tools that allow users to record audios directly from YouTube videos.
Sometimes, we are interested to play our favorite music during a long hour journey, but the missing internet connectivity does not allow us to stream it online. In such a situation also, you can get your free music easily on your iPad, iPhone, or any handheld device and it can be later burnt into CD as well. Now you might be interested to know how all this can happen without the “Record Audio” button on YouTube. Don’t worry! Below we have highlighted three simple methods to do this task:
- Method 1: Capture Audio from YouTube with Online YouTube2MP3 Converter
- Method 2: Recording YouTube Audio with Audacity
- Method 3: Recording Sound with Streaming Audio Recorder
- Method 4: Record Audio with Filmora
Note: We resolutely oppose all forms of copyright-infringing downloads. This tutorial is only for downloading YouTube videos/audio materials from your own channel.
![]()
The All-in-One Screen Recorder & Video Editor
- Record desktop screen , voiceover, and webcam simultaneously
- Edit recorded clips quickly with a wide range of professional tools
- Built-in plentiful templates and effects
- Export to MP4, MOV, MKV, GIF and multiple formats
For Win 7 or later (64-bit)
For macOS 10.12 or later
Secure Download
Method 1: Capture Audio from YouTube with Online YouTube2MP3 Converter
The simplest technique to record audio from YouTube videos is to use a trustworthy online application that can perform the conversion from video to MP3 file . In this article, I am going to show you how to capture audio from YouTube with the assist of a free online convert tool named YouTube to MP3. To do this, simply follow these simple steps:
- Visit the YouTube video page and copy the URL of the video whose audio you want to get in form of an MP3
- Go to the internet and open the online YouTube to MP3 converter tool.
- Paste your video URL in the text field available at the top of the website page.
- Choose your output file format as mp3.
- Hit the Convert conversion button.
- When the conversion is done, you will get a download button on the screen. Hit the Download button and soon your file will be saved to your device.
If you think using YouTube to MP3 Converter to capture audio from YouTube meets your needs, you can visit this online converter: youtubetomp3music.com . While, if you find need a better solution, then keep reading.
Method 2: Recording Sound from YouTube with Audacity
In case if you are interested to record yourself or want to capture just a small portion of the video’s sound, it is good to start with the Audacity program. Following simple steps will assist you to complete your recording process with this handy tool:
- First, download the Audacity program on your system. Note that it is available for free, so anyone can get it easily from the internet.
- Run the setup to begin the installation process and follow on-screen guidelines to finish the process.
- Open Audacity software on your system and from the top menu bar hit the Edit option and then go to Preferences.
- In the Device section of Preferences window, switch to the Recording section.
- Choose Stereo Mix option. In case if it is disabled by default, you may need to enable it first. To do this, go to the control panel of your computer, go to Hardware and Sound section and then switch to Sound section. Now go to Recording tab and right click with the mouse on the blank space of the screen. From the drop-down menu choose Show Disabled Devices option. You will find Stereo Mix Device option on the screen; right click on this device and hit Enable option.
- Hit Ok to save the new sound settings. After these settings, you will have to open the Audacity program again to work with Stereo Mix option.
- It is time to open your YouTube video and hit the record button. Make sure the connection is fast enough to play video without any interruption, otherwise keep it loaded in advance. Play the video and when done, hit the stop button on Audacity program.
- This file can be exported and saved to a device with the MP3 file format.
Method 3: Recording Sound with Streaming Audio Recorder
The third choice for recording YouTube audios is using Streaming Audio Recorder . The great news is that this software cannot only record audios for you rather at the same time it is loaded with advanced editor tool that allows easy cutting and splicing of sounds for the creation of customized videos. With Streaming Audio Recorder, you can also convert your videos into various file formats.
You will be happy to hear that this recorder is not just dedicated to YouTube platform only rather it can also work perfectly with Grooveshark, Jango, and Spotify. Below are few simple steps that you can use to complete the audio recording task with Streaming Audio Recorder:
- Go to the internet and download Streaming Audio Recorder. Install and open the program.
- Hit gear icon on the main interface and then move to settings. Set source of the audio input as System Sound.
- Start playing your desired YouTube video and on recorder, hit the record button instantly.
- As soon as the recording task is complete, hit the Stop button and your recorded audio will be soon saved to the targeted folder.
Recommended: Record Audio and Save to MP3 Format with Wondershare Filmora
You can also use Filmora to record your YouTube audio and then save the recorded audio or the video to MP3 format at exporting and then you can listen to the recorded audio and music even when there is no network connection.
With these advanced tools, the audio recording task becomes quite simple and easy. Even beginners can handle with without any trouble. If you are interested to capture your favorite tracks from online videos, it is right time to choose any of the above suitable methods and start recording your audio.
You can change the voice in audio , or add fade in and fade out effects, or edit the recorded audio file with more tools. The recorded media files can be further customized as well as shared on other social media platforms. It is a great idea for today’s creative young generation. These handy tools can make your audio recording task quite easier and resultant files can be saved in a variety of file formats for further sharing.
If you want to edit the record audio further, like adjust the audio pitch, remove background noise, mix the audio balance, equalize the audio, you can also try Filmora. It allows you to record the audio, webcam and desktop screen automatically . And it works on 64-bit Windows7/8/10, and Mac OS X 10.11 El Capitan and late.
Max Wales
Max Wales is a writer and a lover of all things video.
Follow @Max Wales
Also read:
- [Updated] A Step-by-Step Manual on Repetitive Watch Experiences in YT
- 2024 Approved Elevate Streams Using YouTube's AV1 Settings
- Video Alchemy on a PC Transforming Footage Into YouTube Gold
- [Updated] Essential MP4 Software Elevate Your Mac Productions
- Growth in Focus Building a Foundation of YouTube Backlinks
- From Good to Great Transformative Tactics with Studio
- [New] Capture Your Best Moments Top 8 Mirrorless Cameras For You
- [Updated] Cutting-Edge Editing with YouTube's Studio Editor
- The Ultimate Guide to Free Online Video Tools for All
- 2024 Approved Dominating the Digital Space with Trending Content
- [Updated] Best 3D Software for Dynamic YouTube Intros
- 5 Innovative YT Tales Share Your Life Journey
- Essential Sites for Fetching Video Intro Files for 2024
- Expert Insights on Incorporating Hashtags for Game Streams
- [Updated] Discover Device-Friendly Ways to Locate Your YT Comments
- 2024 Approved 7 Uncomplicated Steps for Skyrocketing Subscribers
- Decoding Monetization How Much Creators Earn Per Ad on YouTube?
- Editorial Spellbinding Secrets Revealed for 2024
- Climbing to YouTube Zenith A Step-by-Step Guide to Creative Studio Mastery
- Unlocking the Power of Android Time-Lapses
- 2024 Approved Best Free Video Editing Software for Beginners
- 2024 Approved A Decade of Digital Disguise Expert Tips on Snapchat Filters
- [New] Digital Discovery Twitter's Highest-Viewed Video Hits
- [Updated] Leverage Hashtags for Top-Ranked FB Pages for 2024
- [New] 2024 Approved Innovative Ideas for FB Slideshow Creations
- [Updated] 2024 Approved Mastering the Nuances of Sound in TikTok Media Voice Manipulation Techniques
- Updated In 2024, The Power of Music in Videos
- New No Budget? No Problem! 10 Free Open-Source Video Editors for 2024
- 2024 Approved Stardew's Ultimate Customization Guide The Top 7 Mods Listed
- [Updated] Laughing Matters The Viral Meme Scoreboard for 2024
- How to Get and Use Pokemon Go Promo Codes On Lava Yuva 2 Pro | Dr.fone
- [Updated] Elevating Visual Clarity in Digital Facebook Broadcasts
- [Updated] In 2024, How to Enhance Your Discord Experience with FREE Animation Emojis
- [New] Essential Tags for TikTok Fame and Viral Potential for 2024
- [New] A Step-by-Step Approach to Enhancing Your Instagram Video Sizes for 2024
- Title: In 2024, Elite Transcribers for YouTube Clips
- Author: Steven
- Created at : 2024-05-25 19:44:47
- Updated at : 2024-05-26 19:44:47
- Link: https://youtube-clips.techidaily.com/in-2024-elite-transcribers-for-youtube-clips/
- License: This work is licensed under CC BY-NC-SA 4.0.
