:max_bytes(150000):strip_icc()/GettyImages-1407509890-920de041a49448b4970783337d3d00ff.jpg)
In 2024, Dissecting Revenue Allocation for Shortform Content Makers
Dissecting Revenue Allocation for Shortform Content Makers
YouTube Shorts have become a craze in the recent past as creators try to get the best out of them. These are short, vertical videos that are 60 seconds long. Originally a way of YouTube attempting to compete with TikTok, Shorts have become a household name. However, are YouTube shorts monetized? Can you get paid for YouTube shorts? The increasing interest in monetizing Shorts has inspired many creators working on their video creation. This article answers the question of can YouTube Shorts be monetized and explains how the revenue-sharing model works.
YouTube Shorts Editor A cross-platform helps creators edit the vertical videos quickly and easily!
Free Download Free Download Learn More

Part 1. Unveiling the Mystery of YouTube Shorts Revenue Sharing
YouTube launched the Shorts platform in 2021, which gained popularity within a short period. By the end of the first year, some videos had racked up more than half a billion views and counties. This begged the question: can you get paid from YouTube shorts?
Yes, YouTube updated its Partner Program, allowing the revenue-sharing model to benefit Shorts creators. The platform pools all the money it gets from advertisers every month from the Shorts feeds. It then shares that money with creators based on the number of views. Since the launch of this program in February 2023, the previous YouTube Shorts Fund became defunct.
The ad revenue-sharing model on YouTube Shorts may seem complex, but let’s break it down
- Every month YouTube pools all the revenue it generates from ads that appear in the Shorts feed.
- YouTube calculates that is going to the Creators Pool. A chuck of this money goes towards paying for songs used in YouTube Shorts. For instance, only a third of the ad revenue generated from a Shorts goes to the Creator Pool if it used two songs while the rest goes to paying for the music.
- YouTube divides the Creator pool depending on the number of views they contributed. If a creator generated 5% of the Shorts views during a period, they are assigned 5% of the Creator Pool.
- From that amount, YouTube keeps 55% of its share while you get paid the remaining 45%. If a creator’s 5% amounted to $800, then they will receive $360.
So, is YouTube shorts monetized? Yes, the ads-sharing model defines the amount of money a creator can earn from Shorts every month. Depending on the number of views generated, high-performing Shorts can bring in a huge amount of money.
Part 2. YouTube Shorts Monetization: Eligibility Criteria and Earnings Potential
YouTube Shorts provides creators with an exceptional way of making extra income. Let’s have a look at what it takes and what the numbers say:
Eligibility Criteria
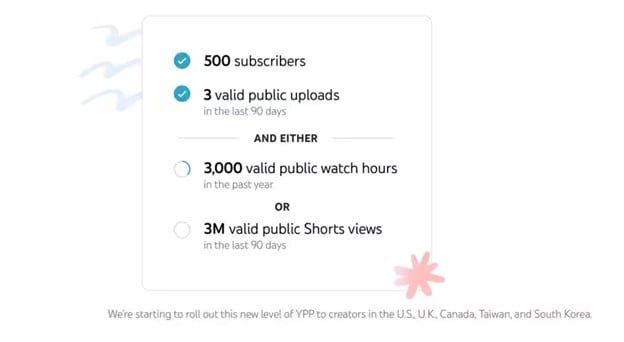
If you are wondering, can I monetize YouTube shorts? To start earning ad revenue from Shorts, you need to be part of the YouTube Partner Program (YPP) This is the gateway to YouTube monetization opportunities. With the latest YouTube shorts monetization 2023 policy, the platform lowered the eligibility criteria.
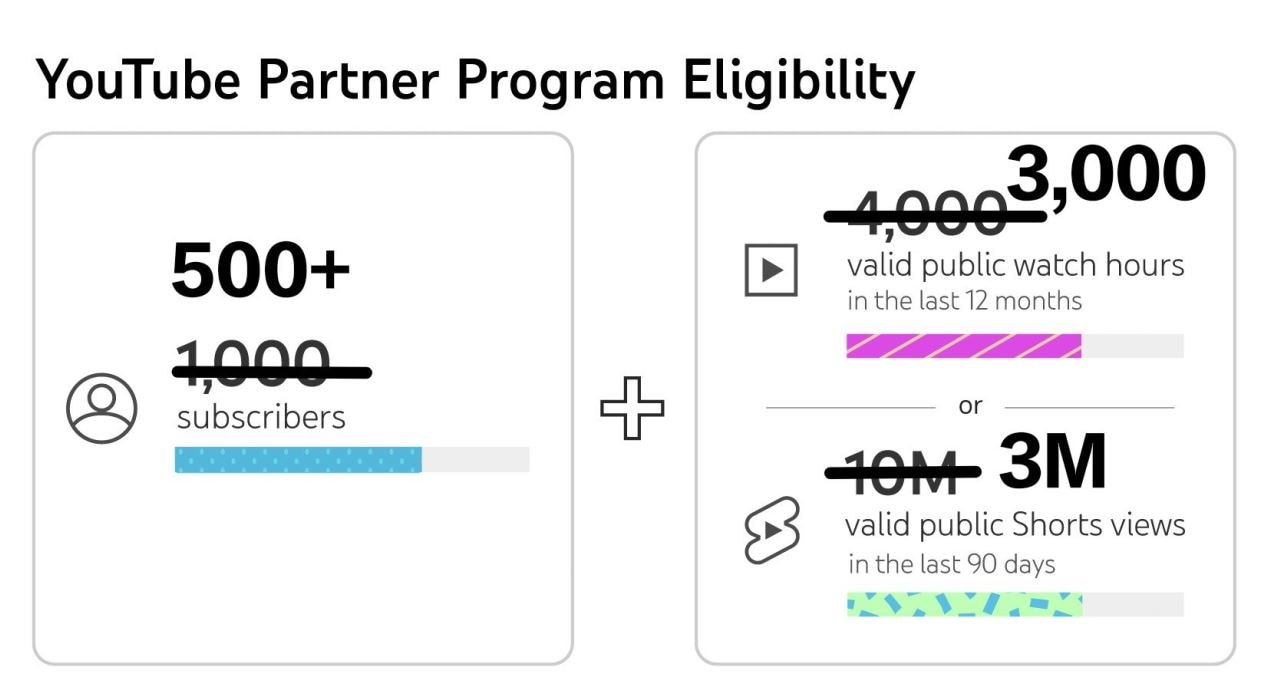
To be eligible to the YPP, you will need:
- At least 500 Subscribers
- At least 3,000 valid public hours in the last 12 months, or
- At least 3M valid public Shorts views in the last 90 days
This means that your YouTube channel must have gained some traction before monetizing your shorts. The following YouTube short monetization 2023 requirements are also needed:
- Live in a region where the YPP is available
- Comply with YouTube’s channel monetization policies
- Have no Community Guidelines strikes on your channel
- Have an active AdSense account
- Have 2-step verification turned on for your Google account
How Much Can You Earn With Shorts
YouTube Shorts have the potential to make a huge amount of money for creators. In fact, YouTube monetize Shorts in a quite generous way. Here are a few examples to give you an idea of the numbers:
- James Seo (573,000 subscribers) - Earned $445.09 from 10.3 million Shorts views
- Riley Lemon (84,000 subscribers) - Earned $76.23 from 1.9 million Shorts views
- Matthew King (212,000 subscribers) – Earned $163.73 from 4.2 million Shorts views
- Hassan Khadair (2.1 million subscribers) – Earned $872.14 from 22 million Shorts views
Part 3. How to Start Earning from YouTube Shorts
Eligible creators start earning from YouTube Shorts when they opt-in to the program. You need to make sure you are eligible and agree to start receiving revenue from your creations.
Are You Eligible for YouTube Shorts Earnings?
Shorts creators growing their channel and are yet to meet the minimum requirements can track their eligibility status by selecting “Notify me when I’m eligible” in YouTube Studio’s Earn section.
When you become eligible, follow these steps to apply for the YPP program:
- Sign in to YouTube on a computer or the YouTube Studio app on a mobile
- Click on your profile picture, and choose YouTube Studio
- Click Earn on the left menu, then select Apply
- Click Start to review your eligibility and accept the base terms
- Click Start to set up an AdSense account. You may also choose to link an existing active one.
- Your application will be in Progress in the Get Reviewed step.
Once you have completed these steps, your YouTube Channel will be reviewed. You can expect to hear a decision within a month of enrolling you in the program.
How to opt in for YouTube Shorts Monetization
After being approved and enrolled in the YPP program, you need to opt in to monetize your channel. Remember that you will not be automatically signed up for the ad revenue-sharing model. Here are a few more steps you need to take:
- Sign in to YouTube Studio
- Select Earn in the left menu
- Click Get Started for every module to review and accept their terms
- Accept the Base Terms and the Shorts Monetization Module to monetize Shorts
Once your Shorts are monetized, track the progress and amount of money earned through YouTube Analytics.
Other Ways to Monetize YouTube Shorts
The YPP program is the only ad-based monetization option for YouTube Shorts. However, there are other ways of earning:
- Selling Subscription Memberships: Turn your YouTube to membership and charge monthly payments in exchange for perks like badges and exclusive content.
- Monetize Livestreams: Features such as super stickers and super chat allow creators to make money when fans pay to send highlighted messages.
- Selling Merchandise and Products: Make additional income by selling branded merchandise like apparel or product lines in your content niche.
- Secure Paid Brand Partnerships: Interacting directly with brands and negotiating sponsorship deals.
- Join an Affiliate Program: An affiliate program will pay you revenue associated with clicks to links hosted on your channel.
Part 4. Edit Your YouTube Videos to Shorts with Wondershare Filmora
To earn more from your YouTube Shorts, you need quality content that keeps your viewers entertained. With Shorts having a limit of 60 seconds, you want to make sure that you cover the most essential footage. Wondershare Filmora is a versatile video editing software that helps creators edit their vertical videos quickly and easily. The mobile app is specifically great for editing shorts on the go:
Free Download For Win 7 or later(64-bit)
Free Download For macOS 10.14 or later
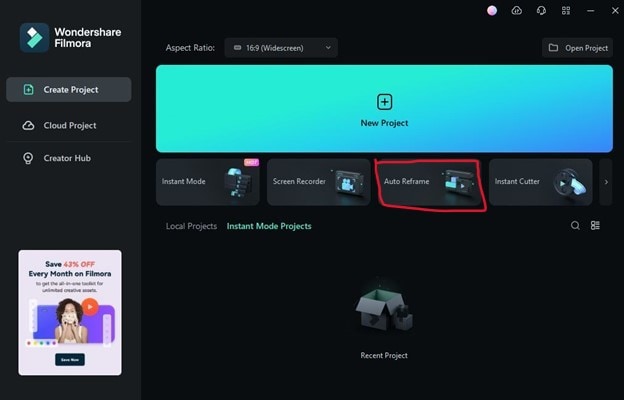
Editing your videos with Filmora is quite straightforward. One of the features that work well for YouTube shorts is the Auto Reframe.
Auto Reframe
The Auto Reframe feature allows creators to resize videos automatically with no editing skills needed. This is a great tool for converting your horizontal YouTube videos to Shorts format. It also boosts your potential audience while saving you precious time and effort you would have used editing. To use this feature, choose any of the following options:
1. Open Filmora and Select Auto Reframe
After opening Filmora, head over to the main interface. You will find the Auto Reframe option on the right side. Click on it to open the reframing feature.
2. Launch Directly from the Video
Click File, followed by Import Media. Select the file that you gave imported in the timeline and right-click on it. Then select Auto Reframe.
3. Use the Tools Option
You may also use the Auto Reframe feature by clicking on the Tools feature on the top menu bar. Then click on Auto Reframe.
Other Filmora Features for Editing Shorts
- Split Screen Video Editor – A choice of pre-made templates to create split-screen videos instantly.
- Add Text to Video – Directly add texts to your videos, including subtitles and captions.
- Text To Speech – Instantly convert your text files to voice and introduce more elements that will enrich your Shorts video.
Conclusion
YouTube Short’s revenue-sharing programs offer a great opportunity for creators specializing in short-form content to earn money on the platform. Once eligible for the YPP program, you can start earning a nice cash bonus monthly. However, you will need to create quality content that keeps your audience entertained and engaged. We recommend using Wondershare Filmora to edit your Shorts and make them more relatable to the audience,
Free Download Free Download Learn More
Part 1. Unveiling the Mystery of YouTube Shorts Revenue Sharing
YouTube launched the Shorts platform in 2021, which gained popularity within a short period. By the end of the first year, some videos had racked up more than half a billion views and counties. This begged the question: can you get paid from YouTube shorts?
Yes, YouTube updated its Partner Program, allowing the revenue-sharing model to benefit Shorts creators. The platform pools all the money it gets from advertisers every month from the Shorts feeds. It then shares that money with creators based on the number of views. Since the launch of this program in February 2023, the previous YouTube Shorts Fund became defunct.
The ad revenue-sharing model on YouTube Shorts may seem complex, but let’s break it down
- Every month YouTube pools all the revenue it generates from ads that appear in the Shorts feed.
- YouTube calculates that is going to the Creators Pool. A chuck of this money goes towards paying for songs used in YouTube Shorts. For instance, only a third of the ad revenue generated from a Shorts goes to the Creator Pool if it used two songs while the rest goes to paying for the music.
- YouTube divides the Creator pool depending on the number of views they contributed. If a creator generated 5% of the Shorts views during a period, they are assigned 5% of the Creator Pool.
- From that amount, YouTube keeps 55% of its share while you get paid the remaining 45%. If a creator’s 5% amounted to $800, then they will receive $360.
So, is YouTube shorts monetized? Yes, the ads-sharing model defines the amount of money a creator can earn from Shorts every month. Depending on the number of views generated, high-performing Shorts can bring in a huge amount of money.
Part 2. YouTube Shorts Monetization: Eligibility Criteria and Earnings Potential
YouTube Shorts provides creators with an exceptional way of making extra income. Let’s have a look at what it takes and what the numbers say:
Eligibility Criteria
If you are wondering, can I monetize YouTube shorts? To start earning ad revenue from Shorts, you need to be part of the YouTube Partner Program (YPP) This is the gateway to YouTube monetization opportunities. With the latest YouTube shorts monetization 2023 policy, the platform lowered the eligibility criteria.
To be eligible to the YPP, you will need:
- At least 500 Subscribers
- At least 3,000 valid public hours in the last 12 months, or
- At least 3M valid public Shorts views in the last 90 days
This means that your YouTube channel must have gained some traction before monetizing your shorts. The following YouTube short monetization 2023 requirements are also needed:
- Live in a region where the YPP is available
- Comply with YouTube’s channel monetization policies
- Have no Community Guidelines strikes on your channel
- Have an active AdSense account
- Have 2-step verification turned on for your Google account
How Much Can You Earn With Shorts
YouTube Shorts have the potential to make a huge amount of money for creators. In fact, YouTube monetize Shorts in a quite generous way. Here are a few examples to give you an idea of the numbers:
- James Seo (573,000 subscribers) - Earned $445.09 from 10.3 million Shorts views
- Riley Lemon (84,000 subscribers) - Earned $76.23 from 1.9 million Shorts views
- Matthew King (212,000 subscribers) – Earned $163.73 from 4.2 million Shorts views
- Hassan Khadair (2.1 million subscribers) – Earned $872.14 from 22 million Shorts views
Part 3. How to Start Earning from YouTube Shorts
Eligible creators start earning from YouTube Shorts when they opt-in to the program. You need to make sure you are eligible and agree to start receiving revenue from your creations.
Are You Eligible for YouTube Shorts Earnings?
Shorts creators growing their channel and are yet to meet the minimum requirements can track their eligibility status by selecting “Notify me when I’m eligible” in YouTube Studio’s Earn section.
When you become eligible, follow these steps to apply for the YPP program:
- Sign in to YouTube on a computer or the YouTube Studio app on a mobile
- Click on your profile picture, and choose YouTube Studio
- Click Earn on the left menu, then select Apply
- Click Start to review your eligibility and accept the base terms
- Click Start to set up an AdSense account. You may also choose to link an existing active one.
- Your application will be in Progress in the Get Reviewed step.
Once you have completed these steps, your YouTube Channel will be reviewed. You can expect to hear a decision within a month of enrolling you in the program.
How to opt in for YouTube Shorts Monetization
After being approved and enrolled in the YPP program, you need to opt in to monetize your channel. Remember that you will not be automatically signed up for the ad revenue-sharing model. Here are a few more steps you need to take:
- Sign in to YouTube Studio
- Select Earn in the left menu
- Click Get Started for every module to review and accept their terms
- Accept the Base Terms and the Shorts Monetization Module to monetize Shorts
Once your Shorts are monetized, track the progress and amount of money earned through YouTube Analytics.
Other Ways to Monetize YouTube Shorts
The YPP program is the only ad-based monetization option for YouTube Shorts. However, there are other ways of earning:
- Selling Subscription Memberships: Turn your YouTube to membership and charge monthly payments in exchange for perks like badges and exclusive content.
- Monetize Livestreams: Features such as super stickers and super chat allow creators to make money when fans pay to send highlighted messages.
- Selling Merchandise and Products: Make additional income by selling branded merchandise like apparel or product lines in your content niche.
- Secure Paid Brand Partnerships: Interacting directly with brands and negotiating sponsorship deals.
- Join an Affiliate Program: An affiliate program will pay you revenue associated with clicks to links hosted on your channel.
Part 4. Edit Your YouTube Videos to Shorts with Wondershare Filmora
To earn more from your YouTube Shorts, you need quality content that keeps your viewers entertained. With Shorts having a limit of 60 seconds, you want to make sure that you cover the most essential footage. Wondershare Filmora is a versatile video editing software that helps creators edit their vertical videos quickly and easily. The mobile app is specifically great for editing shorts on the go:
Free Download For Win 7 or later(64-bit)
Free Download For macOS 10.14 or later
Editing your videos with Filmora is quite straightforward. One of the features that work well for YouTube shorts is the Auto Reframe.
Auto Reframe
The Auto Reframe feature allows creators to resize videos automatically with no editing skills needed. This is a great tool for converting your horizontal YouTube videos to Shorts format. It also boosts your potential audience while saving you precious time and effort you would have used editing. To use this feature, choose any of the following options:
1. Open Filmora and Select Auto Reframe
After opening Filmora, head over to the main interface. You will find the Auto Reframe option on the right side. Click on it to open the reframing feature.
2. Launch Directly from the Video
Click File, followed by Import Media. Select the file that you gave imported in the timeline and right-click on it. Then select Auto Reframe.
3. Use the Tools Option
You may also use the Auto Reframe feature by clicking on the Tools feature on the top menu bar. Then click on Auto Reframe.
Other Filmora Features for Editing Shorts
- Split Screen Video Editor – A choice of pre-made templates to create split-screen videos instantly.
- Add Text to Video – Directly add texts to your videos, including subtitles and captions.
- Text To Speech – Instantly convert your text files to voice and introduce more elements that will enrich your Shorts video.
Conclusion
YouTube Short’s revenue-sharing programs offer a great opportunity for creators specializing in short-form content to earn money on the platform. Once eligible for the YPP program, you can start earning a nice cash bonus monthly. However, you will need to create quality content that keeps your audience entertained and engaged. We recommend using Wondershare Filmora to edit your Shorts and make them more relatable to the audience,
Thumbnail Triumphs: A Smartphone Guide to Engaging YouTube Videos
As a content creator, you know the importance of a visually appealing thumbnail for YouTube videos. It gives your viewers a sneak peek of what they can expect from your video and helps it stand out in the crowded world of YouTube.
When creating your thumbnail, it’s important to remember that the recommended size is 1280 x 720 pixels and a minimum width of 640 pixels. With these dimensions in mind, let’s dive into how you can easily create stunning thumbnails for your YouTube videos using your mobile phone.

Method 1. Make a YouTube Thumbnail on iPhone With the iPhone Photos App
One way to create a thumbnail for your YouTube video on your iPhone is to use the built-in Photos app. The Photos app comes pre-installed on all iPhones and offers a range of editing tools you can use to create a thumbnail.
The Photos app on your iPhone offers a range of features that you can use to create a custom thumbnail for your YouTube video. Here are some of the features you can use:
- Crop: The crop tool allows you to resize and reposition your thumbnail image by trimming away any unnecessary parts of the image.
- Rotate: The rotate tool lets you adjust the orientation of your thumbnail image. You can rotate the image clockwise or counterclockwise to achieve the desired angle.
- Adjust lighting and color: The lighting and color tools allow you to adjust the brightness, contrast, saturation, and other aspects of the thumbnail image to enhance its overall appearance.
- Add text: You can use the text tool to add words or phrases to your thumbnail image. This can be a great way to include a call-to-action or to highlight a key feature of your video.
- Add filters and stickers: The Photos app includes a range of filters and stickers that you can use to give your thumbnail image a unique look. You can experiment with filters and stickers to find the perfect one for your thumbnail.
To create a thumbnail using the Photos app on your iPhone, follow these steps:
Step1 Open the Photos app and find the image you want to use as your thumbnail. Tap on the image to open it.

Step2 Tap the Edit button in the top right corner of the screen. Use the crop and rotate tools to adjust the perspective and the aspect ratio of 16:9.

Step3 Tap the Filters button to access the filter effects. Scroll through the available filters and tap on one to apply it to your thumbnail image.

Step4 To write or draw on the image, tap the Markup button. This will open a toolbar with a variety of drawing and text tools. Use these tools to add your personal touch to the thumbnail.

Step5 When you’re satisfied with your thumbnail, tap Done in the top right corner of the screen.

Pros
- Convenient
- Easy to use
- Versatile
Cons
- Limited customization option
- Lower image quality
This method is best for users looking for a quick and easy way to create a thumbnail on the go and doesn’t need many customization options. It’s also a good option for users needing computer or graphic design software access. If you’re looking for more advanced customization options or higher image quality, consider using other methods or software.
Method 2. Make YouTube Thumbnails on Android/iPhone With Third-Party Apps
In addition to using the built-in Photos app on your iPhone or Android device, there are also many third-party apps that you can use to create YouTube thumbnails. Some popular options include Canva, Adobe Spark, and FotoJet. These apps offer a wider range of customization options and design templates, making it easy to create professional-looking thumbnails even if you have yet to gain graphic design experience.
One popular third-party app for creating YouTube thumbnails on both iPhone and Android devices is PixelLab. PixelLab is a powerful graphic design app with many features and tools for creating custom thumbnails. With PixelLab, you can add text, shapes, and stickers to your thumbnail image and adjust the image’s color, lighting, and other aspects to get the perfect look. You can also import your images or graphics for your thumbnail design.
Here are the steps to create a thumbnail using PixelLab on your Android or iOS device:
Step1 Open the Play Store and search for PixelLab. Install the app.
![]()
Step2 Tap the “+” icon to add an image from your gallery.
![]()
Step3 Edit the image using the available tools, such as cropping, rotating, and adjusting the color and lighting.
![]()
Step4 Add text to the image and customize it to your liking.
![]()
Step5 Change the resolution of the image to 1280 x 720 pixels.
![]()
Step6 Save the image to your gallery by exporting it.
![]()
Pros
- More customization options
- Advanced editing tools
- High image quality
Cons
- Requires a separate app download
- It may require a learning curve
This method is best for users looking for more advanced customization options and higher image quality for their YouTube thumbnails. It’s also a good option for users with experience with graphic design software and who are comfortable using advanced editing tools. If you’re looking for a quick and easy way to create a thumbnail and only need a few customization options, consider using the built-in Photos app or other simpler methods.
How To Add Thumbnails to YouTube Videos on Mobile
Once you’ve created your thumbnail image, it’s time to add it to your YouTube video. Adding a thumbnail to your YouTube video on your mobile device is a simple process that only requires a few steps.
Here’s how to do it on your mobile device:
Step1 Open the YouTube app on your mobile device and sign in to your account.

Step2 Tap on the My Videos tab to view a list of your uploaded videos.

Step3 Tap on the video and tap the “Edit“ button in the top right corner of the screen.

Step4 Tap the Custom thumbnail button and upload the image you want to use from your photo library.

Step5 Tap Save in the top right corner to upload the thumbnail to your video.

That’s it! Your new thumbnail will now be displayed on your YouTube video, helping it stand out and attract more views. You can repeat this process for other videos if you want to add a custom thumbnail.
It May Interest You – Make YouTube Thumbnails on Windows/Mac
While it’s convenient to create YouTube thumbnails on your mobile device, there may be times when you need to create a thumbnail on your Windows or Mac computer.
For example, if you need to create a thumbnail with a higher resolution or more advanced customization options, you may find it easier to do so on a computer. Additionally, a computer may be more efficient if you’re working on a larger thumbnail project and need to create multiple thumbnails simultaneously.
One popular tool for creating YouTube thumbnails on a Windows or Mac computer is Filmora. Wondershare Filmora is a powerful video editing software that allows you to easily edit and enhance your YouTube videos and create custom thumbnails for your videos.
Free Download For Win 7 or later(64-bit)
Free Download For macOS 10.14 or later
With Filmora, you can add text, graphics, and special effects to your thumbnail image and import and edit multiple images. Filmora is a great tool for creating professional-looking YouTube thumbnails on your Windows or Mac computer.
To create a thumbnail using Filmora on your Windows or Mac computer, follow these steps:
Step1 Launch Filmora, add the picture to the timeline and select the AI Portrait option in the Effects panel to cut out the subject from the background.

Step2 Scale up and reposition the photo.

Step3 Add a new background to the track below the picture. Use the other editing tools in Filmora to customize the image as desired, such as adding text, graphics, and special effects.

Step4 When you are done editing the thumbnail, take a snapshot by clicking the camera icon.

Step5 Locate the thumbnail in your local drive.

For more detailed instructions and a visual guide, you can watch the following video tutorial:
Add a video
This video will show you how to use Filmora to create a custom thumbnail for your YouTube video, step by step.
People Also Ask
Here are some common questions that people have when it comes to creating YouTube thumbnails on mobile.
Q1. What App Do Youtubers Use To Make Thumbnails?
There are many different apps and tools that YouTubers use to create thumbnails for their videos. The best app for creating YouTube thumbnails will depend on your needs and skill level.
If you’re looking for a quick and easy way to create a thumbnail on your mobile device, start with the built-in Photos app or a third-party app like Canva. If you need more advanced customization options or are comfortable with graphic design software, consider using Adobe Photoshop or another tool.
Q2. What Is YouTube Thumbnail Size?
The recommended size for YouTube thumbnails is 1280 x 720 pixels. This size balances quality and file size, ensuring that your thumbnail looks sharp and loads quickly. It’s also important to note that YouTube thumbnails are displayed at different sizes depending on the device and context in which they are viewed.
For example, a thumbnail may be displayed at a larger size when it’s shown as the main thumbnail for a video but smaller when it’s shown in a list of related videos.
Q3. What Thumbnail Gets the Most Clicks?
There is no one-size-fits-all answer to this question, as the thumbnail that gets the most clicks can vary depending on the topic of your video, your target audience, and other factors.
However, the key to getting clicks on your thumbnail is to make it visually appealing and relevant to your video. Experiment with different thumbnail designs and track which ones get the most clicks to help you identify what works best for your channel.
Conclusion
Many tools are available for creating YouTube thumbnails, including the built-in Photos app on mobile devices and third-party apps like Pixelab. One particularly powerful option is Filmora, a video editing software with features for creating custom thumbnails, such as adding text, graphics, and special effects.
Whether you create your thumbnails on your mobile device or your computer, use a high-quality image and make the thumbnail relevant to your video to increase the chances of it getting clicked.
This method is best for users looking for a quick and easy way to create a thumbnail on the go and doesn’t need many customization options. It’s also a good option for users needing computer or graphic design software access. If you’re looking for more advanced customization options or higher image quality, consider using other methods or software.
Method 2. Make YouTube Thumbnails on Android/iPhone With Third-Party Apps
In addition to using the built-in Photos app on your iPhone or Android device, there are also many third-party apps that you can use to create YouTube thumbnails. Some popular options include Canva, Adobe Spark, and FotoJet. These apps offer a wider range of customization options and design templates, making it easy to create professional-looking thumbnails even if you have yet to gain graphic design experience.
One popular third-party app for creating YouTube thumbnails on both iPhone and Android devices is PixelLab. PixelLab is a powerful graphic design app with many features and tools for creating custom thumbnails. With PixelLab, you can add text, shapes, and stickers to your thumbnail image and adjust the image’s color, lighting, and other aspects to get the perfect look. You can also import your images or graphics for your thumbnail design.
Here are the steps to create a thumbnail using PixelLab on your Android or iOS device:
Step1 Open the Play Store and search for PixelLab. Install the app.
![]()
Step2 Tap the “+” icon to add an image from your gallery.
![]()
Step3 Edit the image using the available tools, such as cropping, rotating, and adjusting the color and lighting.
![]()
Step4 Add text to the image and customize it to your liking.
![]()
Step5 Change the resolution of the image to 1280 x 720 pixels.
![]()
Step6 Save the image to your gallery by exporting it.
![]()
Pros
- More customization options
- Advanced editing tools
- High image quality
Cons
- Requires a separate app download
- It may require a learning curve
This method is best for users looking for more advanced customization options and higher image quality for their YouTube thumbnails. It’s also a good option for users with experience with graphic design software and who are comfortable using advanced editing tools. If you’re looking for a quick and easy way to create a thumbnail and only need a few customization options, consider using the built-in Photos app or other simpler methods.
How To Add Thumbnails to YouTube Videos on Mobile
Once you’ve created your thumbnail image, it’s time to add it to your YouTube video. Adding a thumbnail to your YouTube video on your mobile device is a simple process that only requires a few steps.
Here’s how to do it on your mobile device:
Step1 Open the YouTube app on your mobile device and sign in to your account.
Step2 Tap on the My Videos tab to view a list of your uploaded videos.
Step3 Tap on the video and tap the “Edit“ button in the top right corner of the screen.
Step4 Tap the Custom thumbnail button and upload the image you want to use from your photo library.
Step5 Tap Save in the top right corner to upload the thumbnail to your video.
That’s it! Your new thumbnail will now be displayed on your YouTube video, helping it stand out and attract more views. You can repeat this process for other videos if you want to add a custom thumbnail.
It May Interest You – Make YouTube Thumbnails on Windows/Mac
While it’s convenient to create YouTube thumbnails on your mobile device, there may be times when you need to create a thumbnail on your Windows or Mac computer.
For example, if you need to create a thumbnail with a higher resolution or more advanced customization options, you may find it easier to do so on a computer. Additionally, a computer may be more efficient if you’re working on a larger thumbnail project and need to create multiple thumbnails simultaneously.
One popular tool for creating YouTube thumbnails on a Windows or Mac computer is Filmora. Wondershare Filmora is a powerful video editing software that allows you to easily edit and enhance your YouTube videos and create custom thumbnails for your videos.
Free Download For Win 7 or later(64-bit)
Free Download For macOS 10.14 or later
With Filmora, you can add text, graphics, and special effects to your thumbnail image and import and edit multiple images. Filmora is a great tool for creating professional-looking YouTube thumbnails on your Windows or Mac computer.
To create a thumbnail using Filmora on your Windows or Mac computer, follow these steps:
Step1 Launch Filmora, add the picture to the timeline and select the AI Portrait option in the Effects panel to cut out the subject from the background.
Step2 Scale up and reposition the photo.
Step3 Add a new background to the track below the picture. Use the other editing tools in Filmora to customize the image as desired, such as adding text, graphics, and special effects.
Step4 When you are done editing the thumbnail, take a snapshot by clicking the camera icon.
Step5 Locate the thumbnail in your local drive.
For more detailed instructions and a visual guide, you can watch the following video tutorial:
Add a video
This video will show you how to use Filmora to create a custom thumbnail for your YouTube video, step by step.
People Also Ask
Here are some common questions that people have when it comes to creating YouTube thumbnails on mobile.
Q1. What App Do Youtubers Use To Make Thumbnails?
There are many different apps and tools that YouTubers use to create thumbnails for their videos. The best app for creating YouTube thumbnails will depend on your needs and skill level.
If you’re looking for a quick and easy way to create a thumbnail on your mobile device, start with the built-in Photos app or a third-party app like Canva. If you need more advanced customization options or are comfortable with graphic design software, consider using Adobe Photoshop or another tool.
Q2. What Is YouTube Thumbnail Size?
The recommended size for YouTube thumbnails is 1280 x 720 pixels. This size balances quality and file size, ensuring that your thumbnail looks sharp and loads quickly. It’s also important to note that YouTube thumbnails are displayed at different sizes depending on the device and context in which they are viewed.
For example, a thumbnail may be displayed at a larger size when it’s shown as the main thumbnail for a video but smaller when it’s shown in a list of related videos.
Q3. What Thumbnail Gets the Most Clicks?
There is no one-size-fits-all answer to this question, as the thumbnail that gets the most clicks can vary depending on the topic of your video, your target audience, and other factors.
However, the key to getting clicks on your thumbnail is to make it visually appealing and relevant to your video. Experiment with different thumbnail designs and track which ones get the most clicks to help you identify what works best for your channel.
Conclusion
Many tools are available for creating YouTube thumbnails, including the built-in Photos app on mobile devices and third-party apps like Pixelab. One particularly powerful option is Filmora, a video editing software with features for creating custom thumbnails, such as adding text, graphics, and special effects.
Whether you create your thumbnails on your mobile device or your computer, use a high-quality image and make the thumbnail relevant to your video to increase the chances of it getting clicked.
Also read:
- [Updated] Exciting iOS Applications for Playing PSP Titles #1-5
- 3 Solutions to Hard Reset Nubia Z50S Pro Phone Using PC | Dr.fone
- Dynamic YouTube Follower Analyzers for 2024
- Easy & Speed Share YouTube Playlists Now
- Engage Audiences on All Sides Live 360-Degree Video Broadcasting for YouTube
- Enhance Your Livestreams on Mac with These Elite Software for 2024
- Get Smart with Your YouTube Thumbnails, Using a Mac
- How to Change/Add Location Filters on Snapchat For your OnePlus Ace 2V | Dr.fone
- How To Reset Apple iPhone 15 Pro? | Dr.fone
- New Transform Your Photos The Ultimate Guide to Animation Tools
- Top 6 Ways to Transfer Text Messages from Nokia C12 Pro to Other Android Devices | Dr.fone
- Title: In 2024, Dissecting Revenue Allocation for Shortform Content Makers
- Author: Steven
- Created at : 2025-01-08 18:28:02
- Updated at : 2025-01-10 19:04:23
- Link: https://youtube-clips.techidaily.com/in-2024-dissecting-revenue-allocation-for-shortform-content-makers/
- License: This work is licensed under CC BY-NC-SA 4.0.