
"In 2024, Discovering the Potential Apple Devices on Your YouTube Channel"
Discovering the Potential: Apple Devices on Your YouTube Channel
How to Record your iPhone or iPad Screen for YouTube

Richard Bennett
Mar 27, 2024• Proven solutions
There are a lot of reasons why you might want to use footage recorded from the screen of your apple device in your YouTube videos. Some people like to make YouTube tutorials about iPhone or iPad apps, others like to share their gaming experiences, and some need to use footage taken from their devices for presentations. Even if you do not think these kinds of videos suit your vlog, screen recording is a useful tool to have on your belt. You never know when one of your subscribers is going to ask you about your favorite mobile games.
Basically, there are three ways to record YouTube video on iPhone/iPad, including the built-in screen recorder (if you have updated to iOS 11 ), connecting iPhone to Mac and the last, some third party screen recorder. In this article, you will learn the three powerful methods one by one.
- Part1: Recording your iPhone screen in iOS 11
- Part2: Wired Using QuickTime on your Mac
- Part3: Wirelessly Using AirPlay and Reflector
Note: We resolutely oppose all forms of copyright-infringing downloads. This tutorial is only for downloading YouTube videos/audio materials from your own channel.
1. Recording your iPhone screen in iOS 11
You can find more information in this article: How to Record iPhone/iPad’s Screen in iOS 11 >>


2. Wired Using QuickTime on your Mac
If you have a Mac then you already have all the software you need.
Step 1: Connect your tablet or smartphone to your computer using a USB port, and then open QuickTime on your Mac. In QuickTime select ‘File’ and ‘New Movie Recording’. A recording window will pop up.
Step 2: In the recording window there will be a red ‘record’ button. Next to that button there will be an arrow. Click the arrow and a menu of recording options will appear. In the section where it says ‘Camera’ select your iPhone or iPad. In this menu you can also choose whether or not to record audio from your device, such sound effects from games.
Step 3: Once you are finished in this menu click record to begin recording the screen of your device. Click ‘stop’ when you are finished recording.
Although you can download a version of QuickTime for PC, the PC version does not have a screen recording option. If you have a PC you will need to use the second method.
3. Wirelessly Using AirPlay and Reflector(For Mac or PC!)
If you either prefer to do things wirelessly or own a PC then you will need to use a slightly more round-about method. Rather than recording directly from your iPhone you will be mirroring your device’s interface onto your computer screen and then recording it there.
Step 1: First, you will need to download a third party mirroring app. Reflector is the popular choice. You can download Reflector at Airsquirrels.com .Next, you need to have Apple’s Airplay on your device. Make sure Reflector that your computer and device are connected to the same wifi network.
Step 2: Open Reflector on your PC. Initially it will tell you there is no device connected.
Step 3: Open AirPlay on your device and make sure mirroring is turned on. Your computer’s name will show up as a receiver option. Select it.
Step 4: This will cause the display of your smartphone or tablet to pop up on your computer screen. Once your device is being mirrored on your computer, record your computer screen.
You can record your Mac or PC screen using Filmora Video Editor. Using Filmora you can crop out and record only your iPhone display instead of your entire computer screen. You can download the latest version of Filmora Video Editor at Filmora.wondershare.com.
If you have a Mac you can also record your computer screen in QuickTime following the same steps listed above, until it comes time to choose your camera. Then you record your desktop instead of your device. There are a few different screen recording programs you can download for PC.
Conclusion
After reading the three ways to record YouTube on iPhone/iPad, I am sure you want to give it a try. If you have any questions, please let us know!
Richard Bennett
Richard Bennett is a writer and a lover of all things video.
Follow @Richard Bennett
Richard Bennett
Mar 27, 2024• Proven solutions
There are a lot of reasons why you might want to use footage recorded from the screen of your apple device in your YouTube videos. Some people like to make YouTube tutorials about iPhone or iPad apps, others like to share their gaming experiences, and some need to use footage taken from their devices for presentations. Even if you do not think these kinds of videos suit your vlog, screen recording is a useful tool to have on your belt. You never know when one of your subscribers is going to ask you about your favorite mobile games.
Basically, there are three ways to record YouTube video on iPhone/iPad, including the built-in screen recorder (if you have updated to iOS 11 ), connecting iPhone to Mac and the last, some third party screen recorder. In this article, you will learn the three powerful methods one by one.
- Part1: Recording your iPhone screen in iOS 11
- Part2: Wired Using QuickTime on your Mac
- Part3: Wirelessly Using AirPlay and Reflector
Note: We resolutely oppose all forms of copyright-infringing downloads. This tutorial is only for downloading YouTube videos/audio materials from your own channel.
1. Recording your iPhone screen in iOS 11
You can find more information in this article: How to Record iPhone/iPad’s Screen in iOS 11 >>
2. Wired Using QuickTime on your Mac
If you have a Mac then you already have all the software you need.
Step 1: Connect your tablet or smartphone to your computer using a USB port, and then open QuickTime on your Mac. In QuickTime select ‘File’ and ‘New Movie Recording’. A recording window will pop up.
Step 2: In the recording window there will be a red ‘record’ button. Next to that button there will be an arrow. Click the arrow and a menu of recording options will appear. In the section where it says ‘Camera’ select your iPhone or iPad. In this menu you can also choose whether or not to record audio from your device, such sound effects from games.
Step 3: Once you are finished in this menu click record to begin recording the screen of your device. Click ‘stop’ when you are finished recording.
Although you can download a version of QuickTime for PC, the PC version does not have a screen recording option. If you have a PC you will need to use the second method.
3. Wirelessly Using AirPlay and Reflector(For Mac or PC!)
If you either prefer to do things wirelessly or own a PC then you will need to use a slightly more round-about method. Rather than recording directly from your iPhone you will be mirroring your device’s interface onto your computer screen and then recording it there.
Step 1: First, you will need to download a third party mirroring app. Reflector is the popular choice. You can download Reflector at Airsquirrels.com .Next, you need to have Apple’s Airplay on your device. Make sure Reflector that your computer and device are connected to the same wifi network.
Step 2: Open Reflector on your PC. Initially it will tell you there is no device connected.
Step 3: Open AirPlay on your device and make sure mirroring is turned on. Your computer’s name will show up as a receiver option. Select it.
Step 4: This will cause the display of your smartphone or tablet to pop up on your computer screen. Once your device is being mirrored on your computer, record your computer screen.
You can record your Mac or PC screen using Filmora Video Editor. Using Filmora you can crop out and record only your iPhone display instead of your entire computer screen. You can download the latest version of Filmora Video Editor at Filmora.wondershare.com.
If you have a Mac you can also record your computer screen in QuickTime following the same steps listed above, until it comes time to choose your camera. Then you record your desktop instead of your device. There are a few different screen recording programs you can download for PC.
Conclusion
After reading the three ways to record YouTube on iPhone/iPad, I am sure you want to give it a try. If you have any questions, please let us know!
Richard Bennett
Richard Bennett is a writer and a lover of all things video.
Follow @Richard Bennett
A Practical Approach to Incorporate YouTube Playlists Online
YouTube is an excellent resource for entertainment, education, and general information, but did you know you can also display a YouTube playlist on your website?
Embedding a YouTube playlist will allow you to showcase a collection of videos on a topic or theme on your website. It’s also a great way to keep your visitors engaged on your site for more extended periods.
To help you with the process, we’ll explore different step-by-step methods to embed a YouTube playlist on a website to add interactivity to your site.
So, if you’re ready to get started, read on!
How To Embed a YouTube Playlist on a Website
If you want to embed and display a YouTube playlist on your website, we’ll give you a complete rundown of the three methods you can try to get this done. But, of course, each method has its pros and cons, so you’ll need to decide which is right for you.
Here’s how to embed a YouTube playlist on a Website:
Embedding a YouTube Playlist on Website Using WordPress Plugin
The plugin is the simplest way to add a YouTube Playlist to your WordPress website. This will help you get this done in no time without having to write any code for the process.
With plugins like YouTube Feed Pro by Smash Balloon , you can extend your website’s functionality and create, customize, or embed a YouTube playlist with just a few clicks of a mouse.
To embed and add a YouTube playlist on your website page/post, do the following steps in sequence:
Step1 Launch a browser on your PC and head to your WordPress website’s login page. Sign in to your dashboard using your username and password.
Step2 Click the “Plugins” option from the left-hand side menu on the WordPress dashboard. Now, click “Add New” and use the search option to find and install the YouTube Feed Pro plugin. Afterward, click the “Activate” option to enable the plugin.
Step3 Click the “YouTube Feed” option from the left menu and open “All Feeds.” On the next page, click “Add New” at the top left of the screen.

You will now be asked what type of feed you want to create. Select “Playlist” and click “Next.”

Step4 You need to create your YouTube API Key , copy it, and paste it into the pop-up. Click “Add” to connect your YouTube account to the plugin.
Step5 Select the Playlist you want to display on your WordPress website and take its ID. Paste that in the next pop-up window and click “Next” to continue the process.

Your YouTube playlist will be connected to your WordPress website. To further customize it, select the template you want and click “Next.” You can also configure the Feed Layout and Color Scheme.

Step6 Once you are done with customization, click the “Embed” option on the top-right side of the screen, and a pop-up window will appear. Next, click “Add to a Page,” and a list of pages on your website will be displayed.
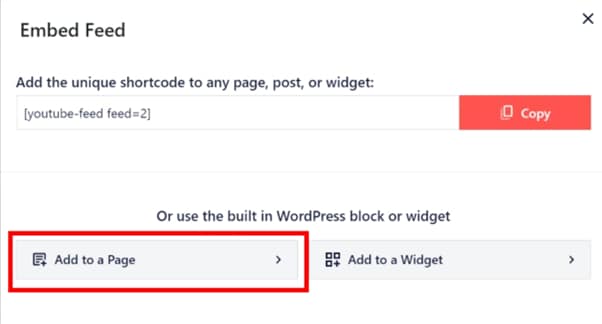
Choose your page and click “Add” at the bottom of the pop-up window. You’ll be directed to a new page where you can embed the feed. Click the “Plus” icon at the top-left of the screen, search for YouTube Feed and choose the Feeds for YouTube block to embed and add your playlist.
That’s about it! You’ve successfully embedded a YouTube playlist on your WordPress website.
Embedding a YouTube Playlist on a Website Using oEmbed Code
Another method to embed a YouTube playlist on your WordPress website is to use oEmbed Code. This method requires basic CSS, HTML, or Java knowledge; otherwise, you won’t be able to customize your playlist.
Moreover, this method is too complicated for beginners, and you will miss the customer support provided by WordPress plugin developers in case of any mishaps.
To use the oEmbed Code method, do the following steps:
Step1 In the first step, head to your YouTube account and access the Playlist you want to embed. Next, click the three dots below it and copy its URL.
Step2 Now, login to your WordPress dashboard and open the post or page editor where you want to add the playlist.
Step3 Paste the URL directly in the editor and click “Update” to save the changes.
WordPress will grab your playlist from YouTube and automatically show it in your post using oEmbed. The outcome is a single video with a menu that your viewers can click to see other videos in the playlist.
Embedding a YouTube Playlist on WebsiteUsing
A Bonus Tip: YouTube Video Maker - Filmora
If you find your YouTube videos as boring and not engaging as other content on your website, we recommend using Wondershare Filmora for your next project.
Free Download For Win 7 or later(64-bit)
Free Download For macOS 10.14 or later
With this software, you can quickly make eye-captivating YouTube videos by recording from a screen or webcam and can edit them using advanced editing features. Filmora also allows you to instantly export your content to YouTube with just a few clicks, which you can later embed into your website.
Some key features of Wondershare Filmora are as follows:
- Advanced video editing features include keyframing, speed ramping, Boris FX, Motion Tracking, Titles, and more.
- Massive library of preset templates, effects, transitions, animations, and royalty-free music.
- Instant Export to YouTube channel.
- Record from webcam, screen, and voiceover.
- Simple drag-and-drop interface.
Conclusion
This article discusses step-by-step methods to embed a YouTube playlist on a website using the WordPress plugin, oEmbed code, and iFrame embed code.
Additionally, we’ve recommended Wondershare Filmora for making engaging and captivating YouTube videos that you can export directly to your channel from the software.
We hope you’ve found this article informative and can now display your YouTube playlist on your site without hassle.
Also read:
- [New] In 2024, Decoding Virtual Realm Must-Know Phrases
- [Updated] In 2024, YouTube Tips & Tricks Halt the Snippet Views Effectively
- [Updated] Your Comprehensive Pricing Report - Cheapest Clouds
- Brother MFC-9330CDW Driver Download & Install Guide
- Decoding Unlisted Videos A Deep Dive Into YouTube Secrecy
- Dive Deep Into the World of Creator Studio for 2024
- Elevating Audience Excitement with Top Ideas for 2024
- From YouTube to IGTV Top Methods Unveiled
- How to Convert YouTube Videos Seamlessly Into AVI
- How to Enable AVI File Support in iTunes - A Comprehensive Tutorial
- In 2024, Tech-Driven Drones – The Rise of Syma X8C
- Mastering Instagram Video Edits Using Top Mobile Video Editing Applications
- Three Ways to Sim Unlock Sony Xperia 1 V
- Title: In 2024, Discovering the Potential Apple Devices on Your YouTube Channel
- Author: Steven
- Created at : 2025-01-09 18:18:00
- Updated at : 2025-01-10 16:12:19
- Link: https://youtube-clips.techidaily.com/in-2024-discovering-the-potential-apple-devices-on-your-youtube-channel/
- License: This work is licensed under CC BY-NC-SA 4.0.