
:max_bytes(150000):strip_icc()/delete-text-messages-from-iphone-2000548-1538ff10388f4876bcbe18bad9f43f33.png)
"In 2024, Digitally Delving Into Deleted YouTubes Easy Watch Options"
Digitally Delving Into Deleted YouTubes: Easy Watch Options
How to Watch Deleted YouTube Videos Online in 2 Ways | Ultimate Guide

Richard Bennett
Mar 27, 2024• Proven solutions


YouTube features a wide variety of corporate and user-generated content ranging from music to DIY videos. Along with all this massive inflow, there are scenarios where the video content that you like or wanted to watch gets deleted for any reason. Either the uploading channel deleted the video, or YouTube sometimes deletes videos for violating any of the platform’s rules – showing the dismal message “We’re sorry, this video is no longer available”. You’ll be thinking it is probably impossible to access deleted YouTube videos that you wanted to watch so badly. Though it may be true to some extent, in reality, nothing gets deleted from the internet. To help you watch deleted YouTube videos, we’ll dive into the two most handy methods down below. So, let get started.
You might be interested in How to Make a Playlist of Uploaded Videos and Others’ Video on YouTube>>>
- Part 1: Watch Deleted YouTube Videos with a URL
- Part 2: Watch Deleted YouTube Videos without a URL
- Part 3: Bonus Tip—Make Your Own YouTube Video with Wondershare FilmoraX
Part 1: Watch Deleted YouTube Videos with a URL
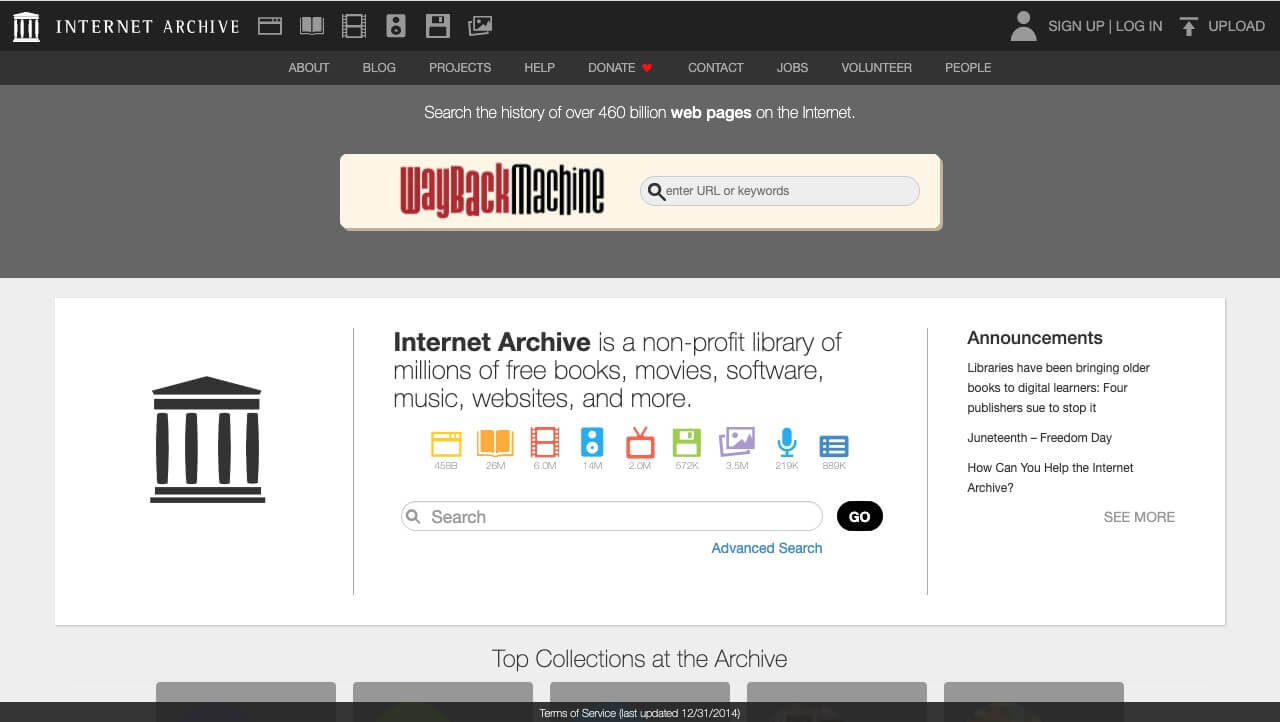
Internet Archive(known as the Wayback Machine) is a website archival system that has been collecting and cataloging websites since 1996. This means the system has effectively saved the site’s current layout and data. This enormous world archive of the Web’s past has amassed over 100 terabytes of storage with around 10 billion web pages.
On the archive.org website, you can find many of your favorite web site’s “snapshot” at a time in the past. For our case, we need to find and watch deleted YouTube videos, so for that, all we need is the link of the video, and we can most probably find it on archive.org. The steps for finding and restoring deleted YouTube videos are simple and as follows.
1. First of all, find the URL in your YouTube email, channel account if you’re searching for your uploaded video. You can find the link in browser history, in YouTube history, or you may have shared the link on social media.
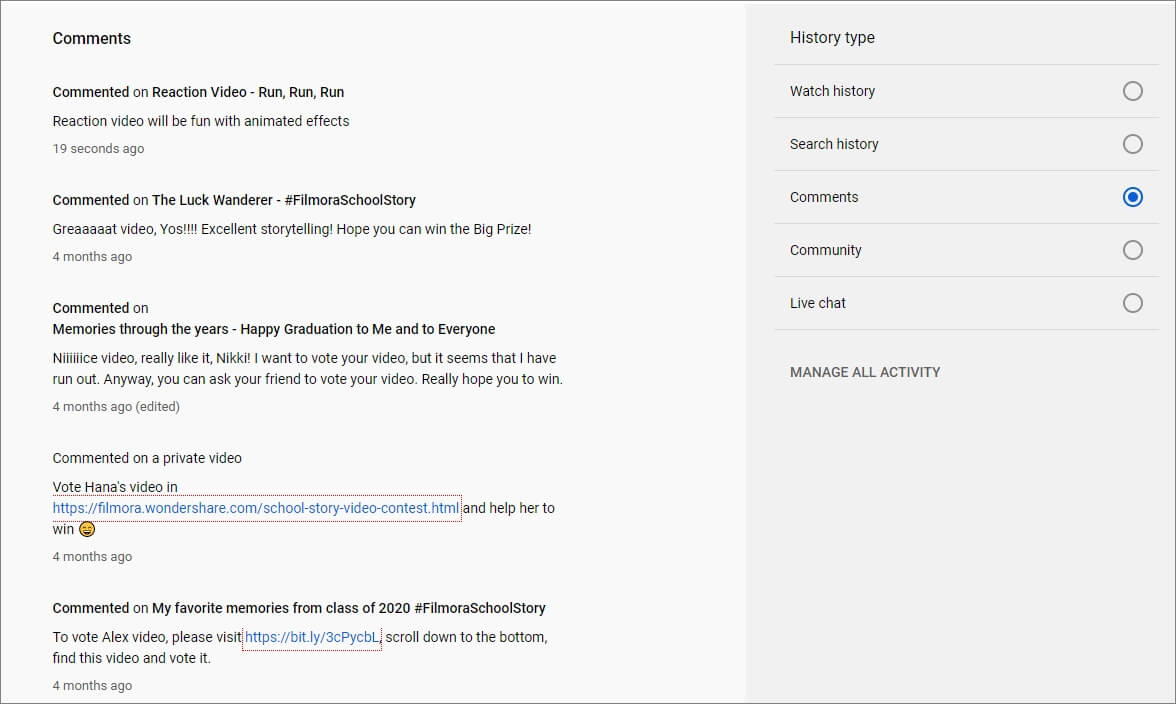
If you want to watch a deleted YouTube video using the Wayback Machine, you must find the link to the video you want to access; without the URL, you won’t be able to access the deleted YouTube video.
2. Head over to the archive.org website and paste the YouTube video URL in the search bar and press return.
3. Once you find your video on the internet archive, you can see the details of the video.
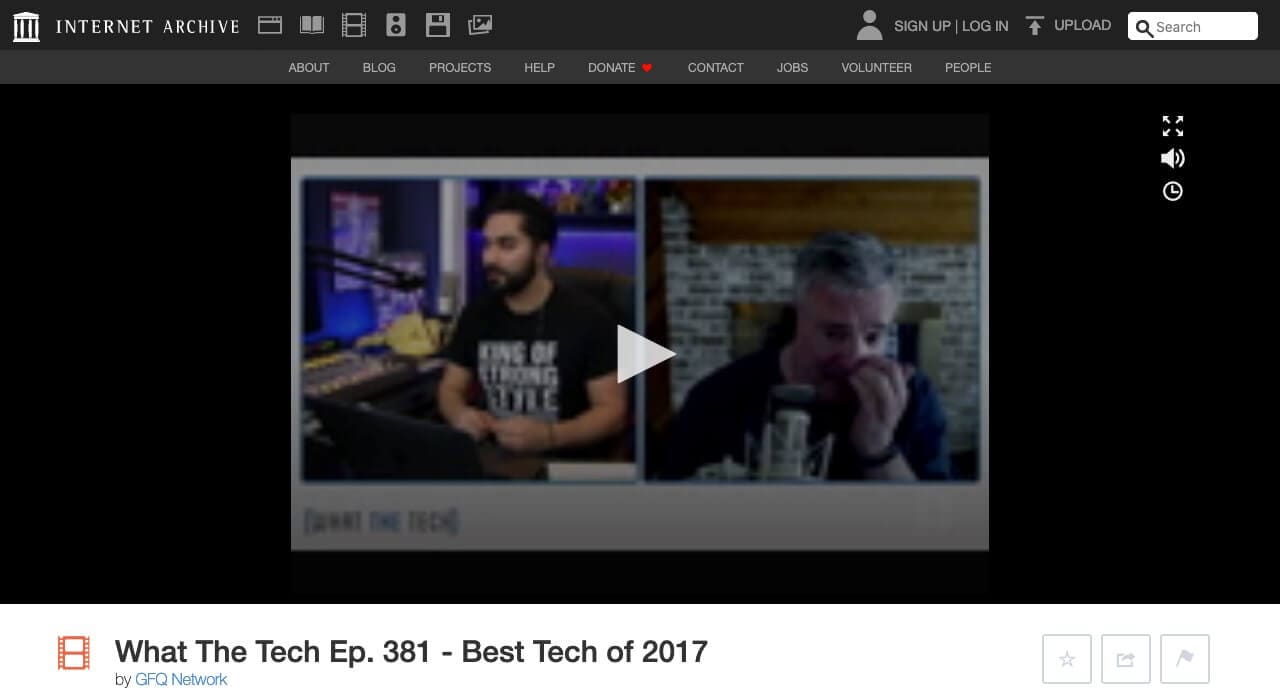
4. You won’t be able to play the video directly, but you should be able to download it. Right, click the video to find the option to download the video.

This method works mostly as the Wayback machine is pretty active and regularly crawls the web to archive the sites. But sometimes, this method may not work and would require a more sophisticated way to watch deleted YouTube videos.
Part 2: Watch Deleted YouTube Videos without a URL
But what if you don’t have a URL for the deleted YouTube video? The internet is a global village network. Everything on the internet is connected, and that connection makes it more useful for example, even though a YouTube video might be deleted, you can somehow access and watch the deleted YouTube videos without a URL because people always replicate videos and share them on other YouTube channels or social media platforms. To make sure you get to watch your favorite YouTube video again, we will dive into the vast internet and find the deleted YouTube videos.
This method can be a bit complicated and would require you to give full attention to find the video you want to watch that badly that you’ve landed on this article.
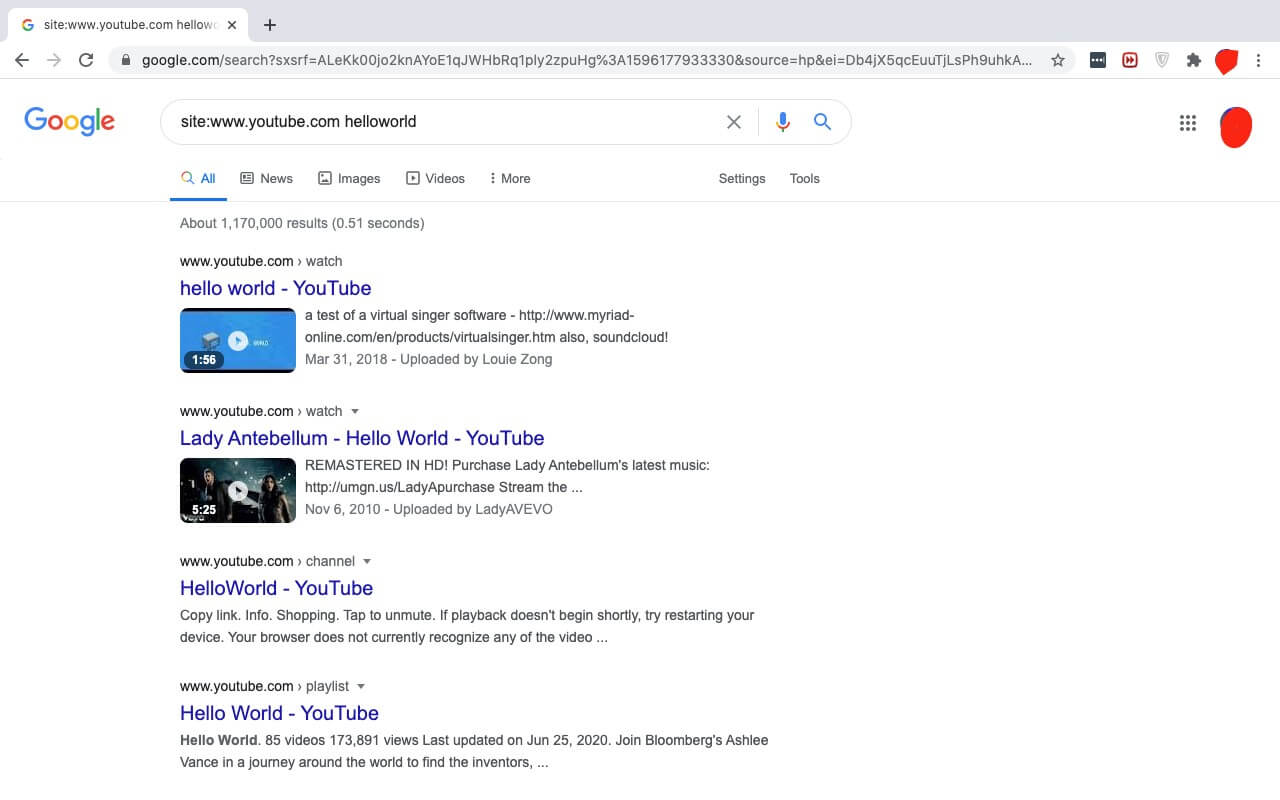
1. Open a new tab in your browser and go to the Google search bar. We’re going to employ a technique from the SEO expert’s toolbox – Google Search Operators.
2. In the search bar, type “site:www.youtube.com + name Of TheVideo”
3. This way Google will crawl all the name relevant videos only from the YouTube databases and move us closer to finding our deleted YouTube video.
4. If you know the video was shared by someone on Facebook or any other social media platform, you can change the site URL in the search bar, replacing YouTube with Facebook, for example.
5. Once you find the video URL, you can simply go back to the first method that we discussed and paste the URL into the internet archive. The archive will give you the video and you can enjoy watching a deleted YouTube video.
Note: If you still cannot find the video using this method, I’m sorry to tell you the video may be completely deleted from the server, and you cannot access it anymore.
Part 3: Bonus Tip—Make Your Own YouTube Video with Wondershare Filmora
Want to make a YouTube video again? Wondershare Filmora is a relatively lightweight and powerful platform you get an intuitive interface and the power to create wonderful, unique content. To help you make your own YouTube video with Filmora, we’ll go through a short introduction of the flow and features first:
- Organize media with folders and projects
- Cutting and trimming raw footage
- Unlimited Layering
- Visual effects and filters
- Attach/detach audio and music
- Add creative text and icons with a wide range of templates to choose from
- Advanced color correction tools
- Export videos to YouTube directly and support various output formats
Make a YouTube video with several clicks using Wondershare Filmora:
1. Download and install Wondershare Filmora on your computer by tapping the download wizard below. Remember to join the Wondershare Video Community to connect with other video creators.
2. Launch Wondershare Filmora, add your videos to the Media Library. And you’ll also be greeted with a sleek and simple interface with controls for everything such as transitions, titles, layering clips, soundtrack, and more.

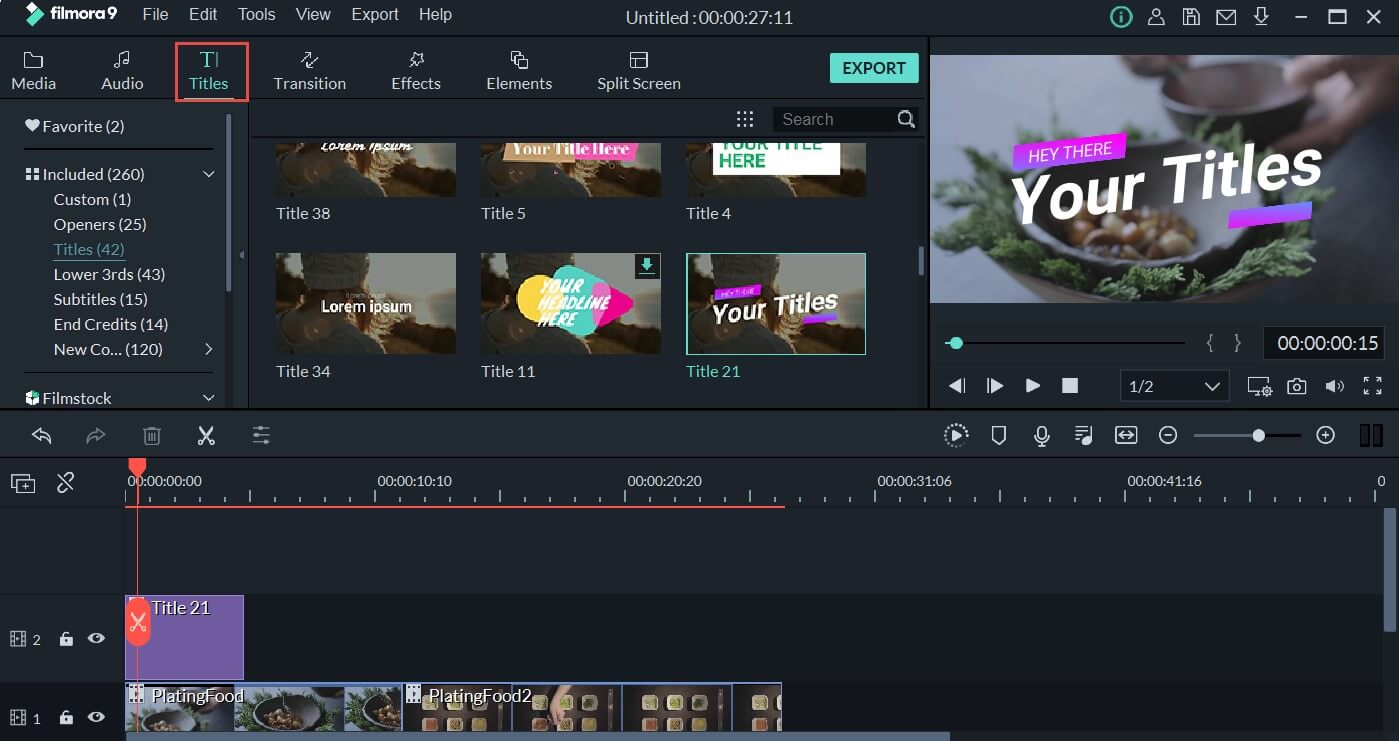
3. Add your video to the timeline, then go to the Titles tab, and you will see hundreds of titles and text templates. Select the template you love and add it to the video.
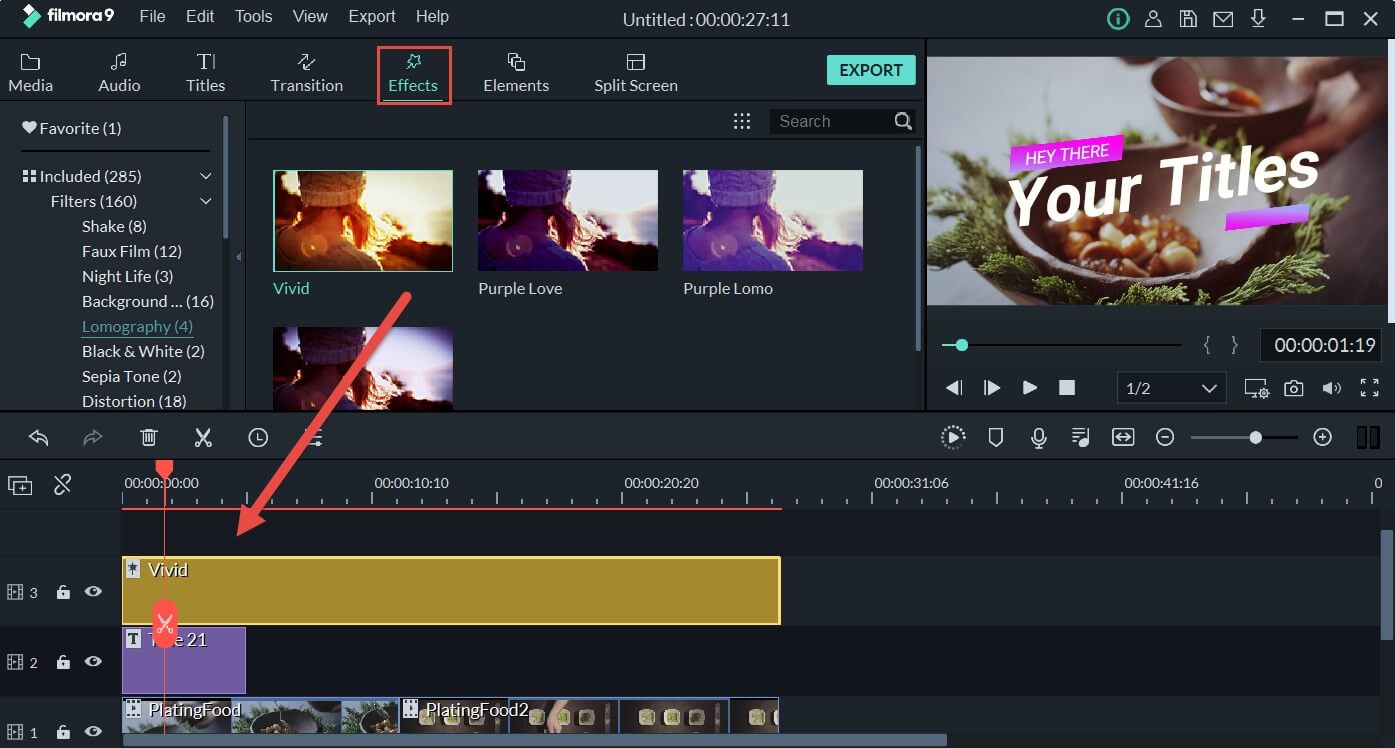
4. Then you can also go to the Effects tab and apply astonishing filters to the video
5. Once you’re done, you can click Export and upload your video to YouTube directly.
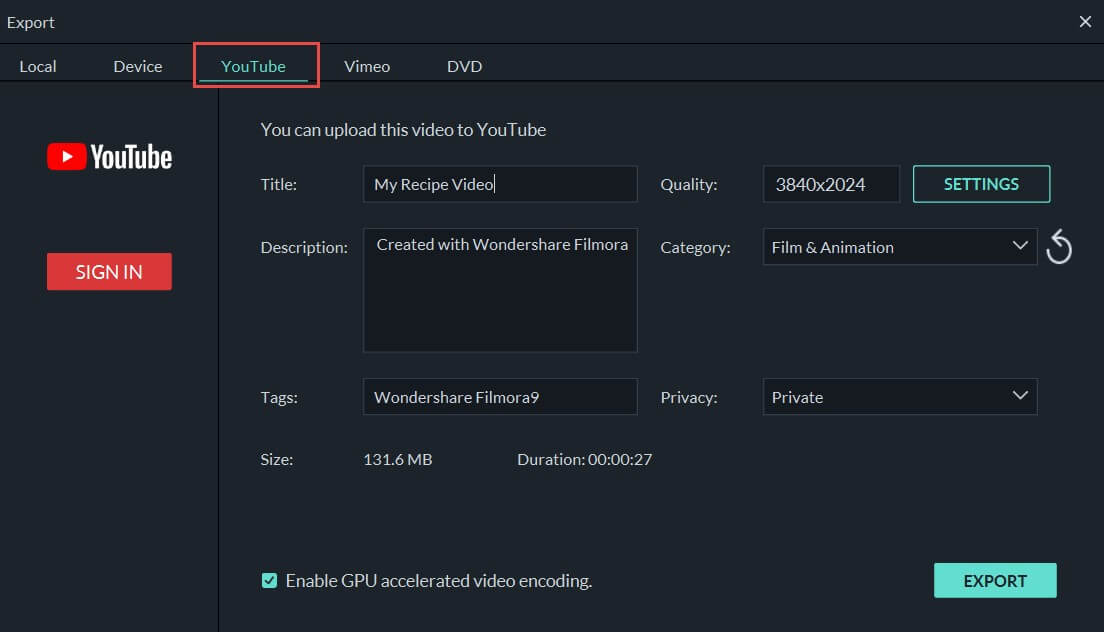
The free version will have a watermark on the exported video.
There’s nothing more delightful than to put your skills to work and save time by using Filmora. The time you save can be put into making more content and editing videos to boast of your creativity to friends.
Conclusion
YouTube has immersed so much in our day-to-day life that on average a mobile viewing session lasts more than 40 mins. To satiate our thirst for video content, YouTube has become the sole free platform. But even if your favorite song or movie gets deleted, you don’t have to worry as I’ve compiled the best solution to watch deleted YouTube videos and even be able to restore deleted YouTube videos to relish watching them with your friends and family. Leave your comments below if you love this article.
Richard Bennett
Richard Bennett is a writer and a lover of all things video.
Follow @Richard Bennett
Richard Bennett
Mar 27, 2024• Proven solutions
YouTube features a wide variety of corporate and user-generated content ranging from music to DIY videos. Along with all this massive inflow, there are scenarios where the video content that you like or wanted to watch gets deleted for any reason. Either the uploading channel deleted the video, or YouTube sometimes deletes videos for violating any of the platform’s rules – showing the dismal message “We’re sorry, this video is no longer available”. You’ll be thinking it is probably impossible to access deleted YouTube videos that you wanted to watch so badly. Though it may be true to some extent, in reality, nothing gets deleted from the internet. To help you watch deleted YouTube videos, we’ll dive into the two most handy methods down below. So, let get started.
You might be interested in How to Make a Playlist of Uploaded Videos and Others’ Video on YouTube>>>
- Part 1: Watch Deleted YouTube Videos with a URL
- Part 2: Watch Deleted YouTube Videos without a URL
- Part 3: Bonus Tip—Make Your Own YouTube Video with Wondershare FilmoraX
Part 1: Watch Deleted YouTube Videos with a URL
Internet Archive(known as the Wayback Machine) is a website archival system that has been collecting and cataloging websites since 1996. This means the system has effectively saved the site’s current layout and data. This enormous world archive of the Web’s past has amassed over 100 terabytes of storage with around 10 billion web pages.
On the archive.org website, you can find many of your favorite web site’s “snapshot” at a time in the past. For our case, we need to find and watch deleted YouTube videos, so for that, all we need is the link of the video, and we can most probably find it on archive.org. The steps for finding and restoring deleted YouTube videos are simple and as follows.
1. First of all, find the URL in your YouTube email, channel account if you’re searching for your uploaded video. You can find the link in browser history, in YouTube history, or you may have shared the link on social media.
If you want to watch a deleted YouTube video using the Wayback Machine, you must find the link to the video you want to access; without the URL, you won’t be able to access the deleted YouTube video.
2. Head over to the archive.org website and paste the YouTube video URL in the search bar and press return.
3. Once you find your video on the internet archive, you can see the details of the video.
4. You won’t be able to play the video directly, but you should be able to download it. Right, click the video to find the option to download the video.
This method works mostly as the Wayback machine is pretty active and regularly crawls the web to archive the sites. But sometimes, this method may not work and would require a more sophisticated way to watch deleted YouTube videos.
Part 2: Watch Deleted YouTube Videos without a URL
But what if you don’t have a URL for the deleted YouTube video? The internet is a global village network. Everything on the internet is connected, and that connection makes it more useful for example, even though a YouTube video might be deleted, you can somehow access and watch the deleted YouTube videos without a URL because people always replicate videos and share them on other YouTube channels or social media platforms. To make sure you get to watch your favorite YouTube video again, we will dive into the vast internet and find the deleted YouTube videos.
This method can be a bit complicated and would require you to give full attention to find the video you want to watch that badly that you’ve landed on this article.
1. Open a new tab in your browser and go to the Google search bar. We’re going to employ a technique from the SEO expert’s toolbox – Google Search Operators.
2. In the search bar, type “site:www.youtube.com + name Of TheVideo”
3. This way Google will crawl all the name relevant videos only from the YouTube databases and move us closer to finding our deleted YouTube video.
4. If you know the video was shared by someone on Facebook or any other social media platform, you can change the site URL in the search bar, replacing YouTube with Facebook, for example.
5. Once you find the video URL, you can simply go back to the first method that we discussed and paste the URL into the internet archive. The archive will give you the video and you can enjoy watching a deleted YouTube video.
Note: If you still cannot find the video using this method, I’m sorry to tell you the video may be completely deleted from the server, and you cannot access it anymore.
Part 3: Bonus Tip—Make Your Own YouTube Video with Wondershare Filmora
Want to make a YouTube video again? Wondershare Filmora is a relatively lightweight and powerful platform you get an intuitive interface and the power to create wonderful, unique content. To help you make your own YouTube video with Filmora, we’ll go through a short introduction of the flow and features first:
- Organize media with folders and projects
- Cutting and trimming raw footage
- Unlimited Layering
- Visual effects and filters
- Attach/detach audio and music
- Add creative text and icons with a wide range of templates to choose from
- Advanced color correction tools
- Export videos to YouTube directly and support various output formats
Make a YouTube video with several clicks using Wondershare Filmora:
1. Download and install Wondershare Filmora on your computer by tapping the download wizard below. Remember to join the Wondershare Video Community to connect with other video creators.
2. Launch Wondershare Filmora, add your videos to the Media Library. And you’ll also be greeted with a sleek and simple interface with controls for everything such as transitions, titles, layering clips, soundtrack, and more.
3. Add your video to the timeline, then go to the Titles tab, and you will see hundreds of titles and text templates. Select the template you love and add it to the video.
4. Then you can also go to the Effects tab and apply astonishing filters to the video
5. Once you’re done, you can click Export and upload your video to YouTube directly.
The free version will have a watermark on the exported video.
There’s nothing more delightful than to put your skills to work and save time by using Filmora. The time you save can be put into making more content and editing videos to boast of your creativity to friends.
Conclusion
YouTube has immersed so much in our day-to-day life that on average a mobile viewing session lasts more than 40 mins. To satiate our thirst for video content, YouTube has become the sole free platform. But even if your favorite song or movie gets deleted, you don’t have to worry as I’ve compiled the best solution to watch deleted YouTube videos and even be able to restore deleted YouTube videos to relish watching them with your friends and family. Leave your comments below if you love this article.
Richard Bennett
Richard Bennett is a writer and a lover of all things video.
Follow @Richard Bennett
Thrifty Tips for Hosting Webinars on YouTube
How to Host a Webinar on YouTube for Free

Max Wales
Mar 27, 2024• Proven solutions
Promoting products, offering educational content or in-depth tutorials on virtually any subject through webinars will enable you to reach new audiences and offer your services on a worldwide market. There are thousands of webinar software products and online platforms, but most of them are quite expensive and they require you to have a considerable amount of experience with the process of setting up and recording webinars.
An alternative solution is available if your budget is tight, but you’d still like to produce a great webinar. We are going to take you through all the steps you’ll need to take if you’d like to host a webinar for free and help you spread the word about the products and services you’re offering.
![]()

The All-in-One Screen Recorder & Video Editor
- Record desktop screen, voiceover, and webcam simultaneously
- Edit recorded clips quickly with a wide range of professional tools
- Built-in plentiful templates and effects
- Export to MP4, MOV, MKV, GIF and multiple formats
For Win 7 or later (64-bit)
For macOS 10.12 or later
 Secure Download
Hosting a Webinar for Free
The world’s largest video sharing platform also features broadcasting options that enable its users to schedule events and thus host webinars free of charge. Previously known as the Google Hangouts on Air, the YouTube Live feature is fairly simple to set up, but before you start your first webinar you will need to choose a landing page and a chatbox. If you already have a website you can simply copy and paste the embed link and create a landing page for your webinar, or you can use landing pages software products such as LeadPages or Unbounce if you don’t have your own online domain. For setting up chatboxes for your webinars we recommend using Chatroll or RumbleTalk platforms, although you’ll have to pay a fee if you choose to chat with your audience using these computer programs. So here’s how you can host your first webinar on YouTube for free.
Step 1. Create a YouTube Event
If you don’t already have an account on YouTube, you’ll have to create one before you can schedule your first live event. After making sure that you are logged in to your YouTube account head over to the Creator Studio, and click on the Live Streaming tab. Select the New Live Event option and proceed to insert the basic information about the event such as the title, date when the event should take place, tags or a short description of the webinar you’re planning.
The Advanced Settings tab will enable you the access to options that will allow you to assign the license and the owner of the webinar. You can also choose the language, set the location or select the category of the event.
Step 2. Copy the Embed Code and Paste it To Your Webinar’s Landing Page
When you adjust all the settings for your upcoming event, you should click on the Share button. This action will grant you access to the video’s embed link, so you can just copy it to your website, or to the landing page you’ve created with the appropriate software.
Step 3. Add the Chatbox to The Webinar’s Landing Page
Communicating with the audience during the webinar is important, and for that reason, embedding the chatbox link on the webinar’s landing page is a crucial step that will allow you to interact with the participants of your webinar. Chatbox platforms for live events such as Chatroll or RumbleTalk offer amazing features, but they cannot be used for free, which means that you’ll have to invest a certain amount of money in order to include a chatbox in your webinar.
Step 4. Publish the Webinar’s Landing Page and Get the URL
Making the event public a week or a few days before it takes place will provide you with enough time to promote it. Include the webinar’s landing page URL in the promotional social media posts and make sure to send out invites for your webinar to your friends and colleagues. Email marketing methods can help you get a larger number of attendees, which is the reason why investing time in the promotion of your webinar can prove to be extremely beneficial.
Step 5. Start your Webinar
Hit the Go Live Now button, when you are ready to start your first webinar and enjoy sharing your skills and knowledge with your audience. Even though YouTube offers a simple way to host webinars for free, it lacks the advanced options that enable you to use the prerecorded footage, keep track of the webinar’s analytics or create virtual whiteboards and polls.
Read More to Get : 10 Best Free Video Hosting Sites for Private/Business Online
Max Wales
Max Wales is a writer and a lover of all things video.
Follow @Max Wales
Max Wales
Mar 27, 2024• Proven solutions
Promoting products, offering educational content or in-depth tutorials on virtually any subject through webinars will enable you to reach new audiences and offer your services on a worldwide market. There are thousands of webinar software products and online platforms, but most of them are quite expensive and they require you to have a considerable amount of experience with the process of setting up and recording webinars.
An alternative solution is available if your budget is tight, but you’d still like to produce a great webinar. We are going to take you through all the steps you’ll need to take if you’d like to host a webinar for free and help you spread the word about the products and services you’re offering.
![]()
The All-in-One Screen Recorder & Video Editor
- Record desktop screen, voiceover, and webcam simultaneously
- Edit recorded clips quickly with a wide range of professional tools
- Built-in plentiful templates and effects
- Export to MP4, MOV, MKV, GIF and multiple formats
For Win 7 or later (64-bit)
For macOS 10.12 or later
Secure Download
Hosting a Webinar for Free
The world’s largest video sharing platform also features broadcasting options that enable its users to schedule events and thus host webinars free of charge. Previously known as the Google Hangouts on Air, the YouTube Live feature is fairly simple to set up, but before you start your first webinar you will need to choose a landing page and a chatbox. If you already have a website you can simply copy and paste the embed link and create a landing page for your webinar, or you can use landing pages software products such as LeadPages or Unbounce if you don’t have your own online domain. For setting up chatboxes for your webinars we recommend using Chatroll or RumbleTalk platforms, although you’ll have to pay a fee if you choose to chat with your audience using these computer programs. So here’s how you can host your first webinar on YouTube for free.
Step 1. Create a YouTube Event
If you don’t already have an account on YouTube, you’ll have to create one before you can schedule your first live event. After making sure that you are logged in to your YouTube account head over to the Creator Studio, and click on the Live Streaming tab. Select the New Live Event option and proceed to insert the basic information about the event such as the title, date when the event should take place, tags or a short description of the webinar you’re planning.
The Advanced Settings tab will enable you the access to options that will allow you to assign the license and the owner of the webinar. You can also choose the language, set the location or select the category of the event.
Step 2. Copy the Embed Code and Paste it To Your Webinar’s Landing Page
When you adjust all the settings for your upcoming event, you should click on the Share button. This action will grant you access to the video’s embed link, so you can just copy it to your website, or to the landing page you’ve created with the appropriate software.
Step 3. Add the Chatbox to The Webinar’s Landing Page
Communicating with the audience during the webinar is important, and for that reason, embedding the chatbox link on the webinar’s landing page is a crucial step that will allow you to interact with the participants of your webinar. Chatbox platforms for live events such as Chatroll or RumbleTalk offer amazing features, but they cannot be used for free, which means that you’ll have to invest a certain amount of money in order to include a chatbox in your webinar.
Step 4. Publish the Webinar’s Landing Page and Get the URL
Making the event public a week or a few days before it takes place will provide you with enough time to promote it. Include the webinar’s landing page URL in the promotional social media posts and make sure to send out invites for your webinar to your friends and colleagues. Email marketing methods can help you get a larger number of attendees, which is the reason why investing time in the promotion of your webinar can prove to be extremely beneficial.
Step 5. Start your Webinar
Hit the Go Live Now button, when you are ready to start your first webinar and enjoy sharing your skills and knowledge with your audience. Even though YouTube offers a simple way to host webinars for free, it lacks the advanced options that enable you to use the prerecorded footage, keep track of the webinar’s analytics or create virtual whiteboards and polls.
Read More to Get : 10 Best Free Video Hosting Sites for Private/Business Online
Max Wales
Max Wales is a writer and a lover of all things video.
Follow @Max Wales
Also read:
- In 2024, Converting Spotify Playlist Content for YouTube Music Compatibility
- Affordable Options Selecting the Right Cam for Your Needs for 2024
- 2024 Approved Discover These 10 Non-YouTube Video Sites for iPhone & Android Users
- [Updated] Channel Hunt Best Historical YouTubes That Every Student Should Watch
- Prosperous Gaming Vids Through Smart Hash Implementation
- [Updated] Elevate Your Media Content via YouTube Studio Editing Skills
- [New] Best Starting Points on YouTube Top 16 Opener List for Growth
- Elite Gamers' Capturing Solutions for 2024
- [Updated] Comparing Profit Potential DailyMovement and Youtube's Earnings
- [New] Creating a Lasting Impression The Ultimate YouTube Live Thumbnail Guide
- [Updated] Defending Your Videos Against YouTube Copyright Strikes
- 2024 Approved Boosting Engagement How to Optimize Multi-Streams Across Youtube & Twitch Platforms
- In 2024, Deciphering AdSense Profits on YouTube Revenue per KV Watched
- In 2024, Dominate Niche Markets with Tailored YouTube Shorts
- In 2024, Content Composer Arena
- Acoustic Mastery Secrets for Exceptional Audio Capture
- In 2024, 2 Ways to Increase Your YouTube Audience Fast
- [New] Add Fantastic Backgrounds for YouTube Thumbnails
- Updated In 2024, The Top English Voice Generator To Convert Text Into Desired Accent
- New 2024 Approved Enriching AVI Images with Auditory Elements in the 2023 Version
- 2024 Approved Seedling Selections A Farmer's Best Game Gems
- What Is a SIM Network Unlock PIN? Get Your Motorola G24 Power Phone Network-Ready
- [New] TickTock Wit Spotlight on Top TikTok Comedy Personalities
- What to Do if Google Play Services Keeps Stopping on Infinix Note 30 | Dr.fone
- Does Airplane Mode Turn off GPS Location On Vivo S17e? | Dr.fone
- Sync Twitch with Snapchat A Step-by-Step Guide for 2024
- New Voicemod AI Review Transforming Your Voice in Real Time
- [Updated] Ideal Fullscreen Recording Software Roundup PC/Mac Edition for 2024
- Exclusive Lineup Top 10 Sources for Vector Imagery
- In 2024, Maximize Your Video Impact with FREE Vimeo Editing
- Updated REAPER Essentials & Extras A Complete Rundown with Expert Commentary for 2024
- New Talkshoplive Reviews & Pro Tips Is This the Live Commerce Tool You Need for 2024
- In 2024, Catch or Beat Sleeping Snorlax on Pokemon Go For Nokia C22 | Dr.fone
- Title: "In 2024, Digitally Delving Into Deleted YouTubes Easy Watch Options"
- Author: Steven
- Created at : 2024-05-25 19:40:18
- Updated at : 2024-05-26 19:40:18
- Link: https://youtube-clips.techidaily.com/in-2024-digitally-delving-into-deleted-youtubes-easy-watch-options/
- License: This work is licensed under CC BY-NC-SA 4.0.
