
:max_bytes(150000):strip_icc()/what-do-the-lights-on-my-modem-mean-60c1c3bbac4840a39c2b7ab7b9ef07eb.jpg)
"In 2024, Digital Domain Decisions Short-Form Content"
Digital Domain Decisions: Short-Form Content
Create Your YouTube Shorts with Wondershare Filmora
An easy and powerful YouTube Shorts editor
Numerous video and audio effects to choose from
Detailed tutorials provided by the official channel
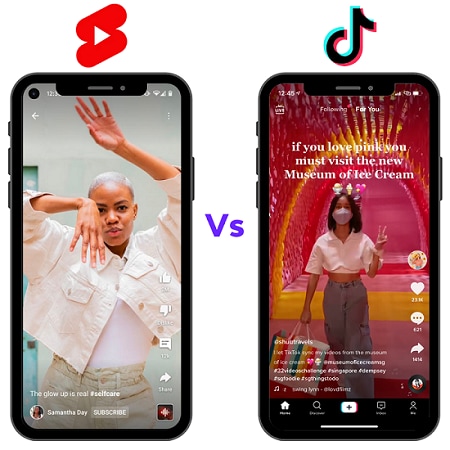
Social media platform is a solace to many users. You get entertained and also have a chance to share your videos with the world. Among the popular apps are TikTok and Shorts. TikTok got to the market earlier but has so far found a new competitor in the field. Shorts video has now fully emerged from YouTube and has almost the same playing ground. But it is still unclear whether YouTube Shorts and TikTok are comparable. While TikTok has over 2 billion downloads, YouTube, on the other hand, already has a massive audience for the tough tussle.
Both TikTok and Shorts give both creators and viewers the chance to share short videos for entertainment and promotional purposes. However, they are different in various aspects. Both the apps have their disadvantages and advantages, depending on a user’s preference. Dive into the next section to discover whether TikTok’s impact is about to be threatened by YouTube Shorts.
In this article
01 Are YouTube Shorts and Tiktok the same thing?
02 YouTube Shorts & TikTok: Which one Should You Choose for Personal Usage?
03 How to make quality videos for the apps you choose?
Are YouTube Shorts and Tiktok the same thing?
Shorts and TikTok are not the same in various ways. TikTok first emerged in the market way before Shorts. TikTok was initially known as musically; and later revamped fully as TikTok in 2016. It immediately gained a massive audience worldwide. This is what brought about competition from other apps, trying to replicate TikTok. Apps like Instagram and Facebook added some functionality to their platform to no match. Finally, YouTube pulled it off in 2020, rolling its version of Short videos but in beta version. These two apps have adequate similarities and differences.
They are both for short-form videos and allow creators to add music from audio libraries. You can also earn some good bucks with these two apps. However, they differ in some aspects. As Shorts can only be 15-seconds long, TikTok can go as long as three minutes. You can also view TikTok directly from its app while for Shorts, you need a separate app, YouTube.
YouTube Shorts & TikTok: Which one Should You Choose for Personal Usage?
Let’s focus on the TikTok and Shorts video by perusing the similarities and differences deeply.
- Similiarity
Check out in which aspects TikTok and Shorts are similar to each other.
1) Monetization
Both platforms provide creators with tools to earn money from their content. TikTok’s first move was to pay selected influencers about $500 for joining the app and creating content. Creators make money from TikTok by promoting products and services of their audience as well as launching their careers through the app. Likewise, brands also get to creators through the “TikTok Creator Marketplace” platform for promotions.
You can also earn on YouTube Shorts from Google AdSense. This is an in-built video monetization that creators use for showing ads on their videos. Earnings will accumulate every month-end for withdrawal.
2) Analytics
Both YouTube and Shorts offer analytics like adding comments, likes, shares, and many more. Likewise, you can view your videos on either desktop or mobile platforms. With both platforms, you get an endless number of videos to watch and discover by scrolling. Also, both apps focus on short videos to entertain viewers.
3) Subscribe directly to creators
You can directly get in touch with both YouTube shorts and TikTok creators. This gives an open leeway to discover new creators to follow and subscribe to. All you need to do is go to the creators’ videos in both feeds and hit the “Follow” or “Subscribe” button. Henceforth, you’ll start seeing what they post and keep in touch with their signs of progress.
4) Privacy
Both apps have taken consideration into privacy issues. They allow creators to set their videos to either private or public. By this, your audience will only view what is set as “Public”. You can deter this by setting your content to “Private” or choosing who can view your content. This is a good aspect to let only those who wish to view certain clips as per your wish.
5) Edit video
There’s much that your video can portray. In both apps, you choose what to give to your audience. Both platforms enable you edit your video before posting. You can alter the speed by increasing or decreasing it for slow motion. Also, you can set timers to help with the filming process among other functionalities.
- Difference
1) Instant messaging app
Generally, YouTube is not a traditional social media platform. Even though YouTube Shorts allows users to create videos, it is not a platform that users can engage in communication via instant messaging app. On the other hand, TikTok lets you directly message other users as you share experiences. This makes TikTok a one-stop social media exchange point where you easily interact with your peers and get instant feedback. You can also create group chats and keep the fun going.
2) In dependability
TikTok Shorts videos also differ from the concept of stand along and built-in features. TikTok is a standalone app that doesn’t depend on another app for its normal operations. Users can independently create content directly from the app. On the contrary, Shorts is a built-in app on YouTube and users have to access it via the YouTube platform. This may be a plus for YouTube but it could eventually turn away those who want to work independently from the app.
3) Interface
With TikTok, users can add video captions from the bottom left of the screen. It also comprises a large library of editing precepts like filters, greenscreen effects, among others. YouTube Shorts, on the other hand, is rich in a library of music. Users can access popular songs and directly switch to YouTube for trending videos as well.
- What More Should You Consider When Choosing - Your Personal Need
Settling on YouTube Shorts and TikTok largely depends on your preferences. But being that TikTok has been in the limelight for a longer time, it has mastered users’ and creators’ preferences, bringing more to the table than YouTube Shorts.
Both TikTok and Shorts have an immense user base. But being a standalone app, TikTok still has a chance of scaling the heights. Remember that Shorts is still in the “Beta” version and has not fully exploded even though it’s a built-in app on YouTube.
TikTok stands a chance of being chosen by many users as it is an independent platform. Users can connect with friends through news feed content or messaging. When it comes to editing tools, the app’s extensive library lets you add presets to your taste. It constantly keeps creators at bay, rolling new filters and effects for the unique creation of content. Additionally, TikTok engages users via its “Q&A” feature where users can pose any hot questions to creators for answers. And beauty is that creators can respond to such comments with a video. More so, you can use the “Discovery” tab to view trending hashtags and sounds, which YouTube Shorts lack.
With TikTok, users can add video captions from the bottom left of the screen. It also comprises a large library of editing precepts like filters, greenscreen effects, among others. YouTube Shorts, on the other hand, is rich in a library of music. Users can access popular songs and directly switch to YouTube for trending videos as well.
How to make quality videos for the apps you choose?
Even though TikTok and YouTube Shorts both let you edit your videos, you can stile up your game with other editing apps like Filmora. This app will save your time and effort while giving you compelling video outcomes. Filmora comprises advanced features such as social import to let you import video clips and photos from social media platforms. Filmora is available on both Windows and Mac, widely accessible on a vast array of devices.
- Video effects: Easily discover creative filters, transitions, and other motion elements.
- Split Screen: This feature lets you uniquely create fun videos by multiplying or splitting the screen.
- Color match: Apply color correction settings on various clips at once.
- Remove noise: Filmora lets you remove background noise, giving you quality video output.
For Win 7 or later (64-bit)
For macOS 10.12 or later
Conclusion
Settling on Shorts or Tiktok will largely depend on your preferences and personal needs. If you are looking for short video promotion on YouTube Shorts and Tiktok , you may need to consider different things. Yes, Shorts has some upper hand over TikTok like the ability to edit your videos after being published, a dislike button, and a scheduling tool that lets you schedule when your video goes live. TikTok is still above the cut being that it has been here long before Shorts. More so, it offers advanced editing features for quality video output. Above all, it works independently, a feature that most users adore as compared to the encasing of Shorts within YouTube.
Learn How to Add YouTube Video to Google Slides
Create High-Quality Video - Wondershare Filmora
An easy and powerful YouTube video editor
Numerous video and audio effects to choose from
Detailed tutorials provided by the official channel
Google Slide presentation is a powerful tool for creators to keep their audience engaged. This online platform lets you create and demonstrate your ideas. It will capture your viewers’ attention from the very beginning. It also doesn’t matter whatever learning style you engage. Adding YouTube videos to Google Slide will appeal to all levels of individuals.
More so, it is the best way to provide a break for both the audience and the creator. You can break Google Slide presentations with videos to offer some break. Viewers and the presenter get a breather in the process. The presenter can take a short break from speaking while the video plays. Let’s now dive into how to embed a YouTube video in Google Slides.

In this article
01 Why should we add a video to Google Slides?
02 How to add a YouTube video to Google Slide
03 How to choose the right video for your Slides?
Why should we add a video to Google Slides?
There is a great impact of adding video to Google Slides.
For attention
Videos will automatically awaken you, especially if your thoughts have started to sway during a presentation. A video has a direct way of showing creativity. The audience automatically connects the dots between the video and the presentation lines alike.
To stimulate discussion
A picture is worth a thousand words. There is a way that an added video will help the audience connect to the day’s topic. It will bring up several ideas and stir up discussion with the presenter.
Easy following
With videos embedded in Google Slide, viewers will find it easy to understand and digest. Videos automatically eliminate boredom and make any topic interesting.
How to add a YouTube video to Google Slide
Use these two methods to add a YouTube video to Google Slides. Via the Search and Direct link.
Method 1. Embed YouTube video to Google Slide by search and selection
Google has owned YouTube since the year 2006. You can, therefore, integrate Google’s products with YouTube easily.
Step 1. First, go to the slide where you want to embed your video.
Step 2. Then choose the “Insert” option from the menu bar and hit the “Video” option.

Step 3. It would be best if you now viewed the “YouTube” search bar to type in the video you want to embed. You can use keywords to search for the video in question and view instant search results.
Step 4. Then select the video you want to embed, and you’ll see it appear on the “Slide.”

Step 5. Format your video. Remember that the entire video will be embedded. You don’t necessarily need the whole video. It is time to select just a brief but relevant clip from the video to use. Then position your video to the right point using the axes from the exact starting point to the finished part you want the video to appear in.
Method 2. Embed YouTube video to Google Slide by direct link
You can engage this method if you want to include the entire video.
Step 1. Get the URL of the specific YouTube video that you want to use.

Step 2. Then go to your browser’s “Address bar” to copy the YouTube link.
Step 3. Next, open the “Presentation” slide to put your video to.
Step 4. Choose the “Insert” tab from the menu bar.
Step 5. Then hit on the “Video” option from the drop-down menu that appears.
Step 6. A new window will open automatically. Choose the “By URL” tab.
Step 7. Then paste the YouTube video URL in the “Paste YouTube URL Here” bar section.

Step 8. Wait for the video file to load and press the “Select” option. The video will immediately appear in the presentation slide. Just drag and drop the video in your preferred position.
Note: You can do a few edits inside the application. Set the timer when your video should start and when to stop. You can also adjust the video player size.
How to choose the right video for your Slides?
Not all videos will make an impact on your Google Slide. You need to use the best shot that adds value to your presentation. These guidelines will help you to settle on the best video.
Be Professional – choose the best video for your presentation. Remember that the video is part of the presentation and carries more weight. Settling for quality video will bring out the professionalism in you.
Relevant – how do you know that what you are showing your audience corresponds to the presentation piece? Ensure that the video you add has something to do with the Google Slide presentation topic. The two should naturally flow to make it easy to understand the whole concept.
Precise – your presentation is not about the video. The ideal length should not exceed 60 seconds. The longer the video, the greater the chance for your audience to lose track along the way.
Know every footage you are working with – this will help you pick the best shots for your presentation. So, learn every aspect of the video before settling down to use it.
Add new content – even though one content may suit several presentations, don’t rely on the same piece each time. Your audience will want to feel something fresh each time you are presenting. So, compose different videos for different scenarios to make that big impact.
Create an eye-catching video for your Slides with Filmora
The video quality matters when it comes to creating your Slides. The best video creator – Filmora – works in simple steps to give you an eye-catching video. It will create videos for all scenarios like marketing, tutorial, gaming, etc.
Key features of Filmora
- It offers you advanced video effects like filters, motion elements, etc
- You can multiply your fun with multiple screens with the Split Screen feature
- Easily change backgrounds using the Green Screen feature
- The speed control lets you fast forward or slow down a special moment
- Import your video clips to social media platforms
- You can also adjust the audio of your tracks using the Audio Mixer feature
Follow this guide to create a video for your slide with Filmora
Step 1. Launch Filmora
First, begin by downloading and installing Filmora on your computer device. Once installed, launch it and allow it to run. You can either create a new project or open an existing project to work on.
Step 2. Create a new project
Here, click on the “New Project” tab on the app’s welcome screen. The editor should load immediately. Then proceed to register the product. Just hit on the “Register” tab.
Step 3. Import video
Check the upper left corner of your screen to see the “Import” tab. Click on it and choose the “Import Media Files” option. Next, navigate to the location of your computer’s local list to select the clip or video you want to edit. Then, hit the “Import” button to add the video to the timeline for editing.
Step 4. Edit video
Drag and drop the raw footage to Filmora’s timeline to begin editing. Here, you can trim, add other video clips, merge, and add effects as you wish. Likewise, you can add opening titles, subtitles, and end credits to your video. More so, this tool offers different templates to use. Just drag and drop the templates you wish to use to a specific location on the timeline.
Step 5. Preview your file
Last but not least, you can preview your files. Click on the “Play” tab to start previewing your video clips. The main essence of this part is to allow you to make the necessary changes to your clips if there is a need.
Step 6. Export and Share
With Filmora, you can export your file to various social media platforms. But first, go to the “Output window” and select the video file format to use. This software supports several output formats to apply to any platform and device. Just click on the “Format” tab and choose the file format to use. Then also change the resolution and other parameters like frame rate and channel of your video in the “Settings” section. Finally, share your video to your YouTube channel and get ready to add the video to the Google Slide presentation.
For Win 7 or later (64-bit)
For macOS 10.12 or later
Conclusion
● You now know how to put a YouTube video in Google Slides the simple way. You can search for your YouTube videos or directly use the URL link. Whatever the case, remember that it’s the quality of your video that carries more weight. Thanks to the availability of third-party apps that you can use to create and improve the quality of your videos.
● Filmora is at your service to create high-resolution videos that you can export in any format to your YouTube channel. The tool is intuitive, and it won’t matter whether you haven’t tried it before. It is a perfect choice for both professionals and first-time users.
Google Slide presentation is a powerful tool for creators to keep their audience engaged. This online platform lets you create and demonstrate your ideas. It will capture your viewers’ attention from the very beginning. It also doesn’t matter whatever learning style you engage. Adding YouTube videos to Google Slide will appeal to all levels of individuals.
More so, it is the best way to provide a break for both the audience and the creator. You can break Google Slide presentations with videos to offer some break. Viewers and the presenter get a breather in the process. The presenter can take a short break from speaking while the video plays. Let’s now dive into how to embed a YouTube video in Google Slides.
In this article
01 Why should we add a video to Google Slides?
02 How to add a YouTube video to Google Slide
03 How to choose the right video for your Slides?
Why should we add a video to Google Slides?
There is a great impact of adding video to Google Slides.
For attention
Videos will automatically awaken you, especially if your thoughts have started to sway during a presentation. A video has a direct way of showing creativity. The audience automatically connects the dots between the video and the presentation lines alike.
To stimulate discussion
A picture is worth a thousand words. There is a way that an added video will help the audience connect to the day’s topic. It will bring up several ideas and stir up discussion with the presenter.
Easy following
With videos embedded in Google Slide, viewers will find it easy to understand and digest. Videos automatically eliminate boredom and make any topic interesting.
How to add a YouTube video to Google Slide
Use these two methods to add a YouTube video to Google Slides. Via the Search and Direct link.
Method 1. Embed YouTube video to Google Slide by search and selection
Google has owned YouTube since the year 2006. You can, therefore, integrate Google’s products with YouTube easily.
Step 1. First, go to the slide where you want to embed your video.
Step 2. Then choose the “Insert” option from the menu bar and hit the “Video” option.
Step 3. It would be best if you now viewed the “YouTube” search bar to type in the video you want to embed. You can use keywords to search for the video in question and view instant search results.
Step 4. Then select the video you want to embed, and you’ll see it appear on the “Slide.”
Step 5. Format your video. Remember that the entire video will be embedded. You don’t necessarily need the whole video. It is time to select just a brief but relevant clip from the video to use. Then position your video to the right point using the axes from the exact starting point to the finished part you want the video to appear in.
Method 2. Embed YouTube video to Google Slide by direct link
You can engage this method if you want to include the entire video.
Step 1. Get the URL of the specific YouTube video that you want to use.
Step 2. Then go to your browser’s “Address bar” to copy the YouTube link.
Step 3. Next, open the “Presentation” slide to put your video to.
Step 4. Choose the “Insert” tab from the menu bar.
Step 5. Then hit on the “Video” option from the drop-down menu that appears.
Step 6. A new window will open automatically. Choose the “By URL” tab.
Step 7. Then paste the YouTube video URL in the “Paste YouTube URL Here” bar section.
Step 8. Wait for the video file to load and press the “Select” option. The video will immediately appear in the presentation slide. Just drag and drop the video in your preferred position.
Note: You can do a few edits inside the application. Set the timer when your video should start and when to stop. You can also adjust the video player size.
How to choose the right video for your Slides?
Not all videos will make an impact on your Google Slide. You need to use the best shot that adds value to your presentation. These guidelines will help you to settle on the best video.
Be Professional – choose the best video for your presentation. Remember that the video is part of the presentation and carries more weight. Settling for quality video will bring out the professionalism in you.
Relevant – how do you know that what you are showing your audience corresponds to the presentation piece? Ensure that the video you add has something to do with the Google Slide presentation topic. The two should naturally flow to make it easy to understand the whole concept.
Precise – your presentation is not about the video. The ideal length should not exceed 60 seconds. The longer the video, the greater the chance for your audience to lose track along the way.
Know every footage you are working with – this will help you pick the best shots for your presentation. So, learn every aspect of the video before settling down to use it.
Add new content – even though one content may suit several presentations, don’t rely on the same piece each time. Your audience will want to feel something fresh each time you are presenting. So, compose different videos for different scenarios to make that big impact.
Create an eye-catching video for your Slides with Filmora
The video quality matters when it comes to creating your Slides. The best video creator – Filmora – works in simple steps to give you an eye-catching video. It will create videos for all scenarios like marketing, tutorial, gaming, etc.
Key features of Filmora
- It offers you advanced video effects like filters, motion elements, etc
- You can multiply your fun with multiple screens with the Split Screen feature
- Easily change backgrounds using the Green Screen feature
- The speed control lets you fast forward or slow down a special moment
- Import your video clips to social media platforms
- You can also adjust the audio of your tracks using the Audio Mixer feature
Follow this guide to create a video for your slide with Filmora
Step 1. Launch Filmora
First, begin by downloading and installing Filmora on your computer device. Once installed, launch it and allow it to run. You can either create a new project or open an existing project to work on.
Step 2. Create a new project
Here, click on the “New Project” tab on the app’s welcome screen. The editor should load immediately. Then proceed to register the product. Just hit on the “Register” tab.
Step 3. Import video
Check the upper left corner of your screen to see the “Import” tab. Click on it and choose the “Import Media Files” option. Next, navigate to the location of your computer’s local list to select the clip or video you want to edit. Then, hit the “Import” button to add the video to the timeline for editing.
Step 4. Edit video
Drag and drop the raw footage to Filmora’s timeline to begin editing. Here, you can trim, add other video clips, merge, and add effects as you wish. Likewise, you can add opening titles, subtitles, and end credits to your video. More so, this tool offers different templates to use. Just drag and drop the templates you wish to use to a specific location on the timeline.
Step 5. Preview your file
Last but not least, you can preview your files. Click on the “Play” tab to start previewing your video clips. The main essence of this part is to allow you to make the necessary changes to your clips if there is a need.
Step 6. Export and Share
With Filmora, you can export your file to various social media platforms. But first, go to the “Output window” and select the video file format to use. This software supports several output formats to apply to any platform and device. Just click on the “Format” tab and choose the file format to use. Then also change the resolution and other parameters like frame rate and channel of your video in the “Settings” section. Finally, share your video to your YouTube channel and get ready to add the video to the Google Slide presentation.
For Win 7 or later (64-bit)
For macOS 10.12 or later
Conclusion
● You now know how to put a YouTube video in Google Slides the simple way. You can search for your YouTube videos or directly use the URL link. Whatever the case, remember that it’s the quality of your video that carries more weight. Thanks to the availability of third-party apps that you can use to create and improve the quality of your videos.
● Filmora is at your service to create high-resolution videos that you can export in any format to your YouTube channel. The tool is intuitive, and it won’t matter whether you haven’t tried it before. It is a perfect choice for both professionals and first-time users.
Also read:
- In 2024, Best Free Introduction Software for Youtubers
- [New] Blueprint for Broadcasting Breaks
- [New] Cutting-Edge Conjurations in Filmmaking
- Daily Deeds for Digital Diaries Tips on Virtual Journeys
- 2024 Approved Channel Exploration Guide The Best Historical YouTube Selections for Students
- [New] DIY Tips to Cut Unwanted Sounds From Your Videos
- Efface Thin Borders for a Seamless YouTube Experience
- Youtube Shorts Earnings Guide Must-Knows & Future Potential
- Unmasking How To Locate My Comments Posts Online
- Crafting Timeless Videos with Retro Filmmaking Skills for 2024
- [Updated] Enhance Engagement Learn to Dim YouTube Video Backgrounds
- [New] Beginner's Ultimate List of YouTube Production Tools
- In 2024, Detailed Guide Crafting Powerful Video Thumbnails for Content Marketing
- Unique Channels Generating Top-Notch Video Naming
- In 2024, Engaging Viewers at the End of a YT Video
- StudioEdit Master Exquisite PC Cutting & Audio Mix
- Win 11 Guide to Storing .mov Files Effectively
- A Working Guide For Pachirisu Pokemon Go Map On Xiaomi Redmi Note 12 5G | Dr.fone
- [New] Expert's Blueprint to Mastering TikTok Icons and Triggers
- [New] Best Cameras in Phones for Professional Videos
- How to Rescue Lost Pictures from F5 Pro 5G?
- [New] Uploading to TikTok Made Simple Insights for Chrome/Android/iOS for 2024
- How to Repair corrupt MP4 and MOV files of Ace 2V?
- Embrace the Future Facebook Video Autoplay
- New FREE 8 Best Plugins for Logic Pro X for 2024
- [Updated] Chrome OS Talk Modifiers Selecting the Top 5 Cloud Speech Services
- The Magnificent Art of Pokemon Go Streaming On Honor Magic V2? | Dr.fone
- [Updated] 2024 Approved Unlock the Full Potential of TikTok on Apple/Windows Devices
- [Updated] 2024 Approved Making Impeccable Square Videos in iMovie for Instagram
- New In 2024, Quik Fix Exploring the Best PC Alternatives for Video Editing
- [Updated] Masterful Backup Techniques for iPhone to Snapchat Content
- In 2024, Two Ways to Track My Boyfriends Motorola Moto G73 5G without Him Knowing | Dr.fone
- Title: "In 2024, Digital Domain Decisions Short-Form Content"
- Author: Steven
- Created at : 2024-05-25 19:40:09
- Updated at : 2024-05-26 19:40:09
- Link: https://youtube-clips.techidaily.com/in-2024-digital-domain-decisions-short-form-content/
- License: This work is licensed under CC BY-NC-SA 4.0.
