
:max_bytes(150000):strip_icc()/computer-internals-with-red-LED-and-RGB-GettyImages-ebb5630f80ee4f8e874dd787739ad3cb.jpg)
"In 2024, Detailed Guide to Dollar Counts A Stepwise Strategy to Track YouTube Earnings"
Detailed Guide to Dollar Counts: A Stepwise Strategy to Track YouTube Earnings
There have been lots of user queries similar to the one above about how to check YouTube income lately. Honestly, YouTube has made it easy for users to track their revenue analytics on the platform, thus making it easy for creators to track how much they make and other revenue data.
So, if you don’t know how to check YouTube income, don’t worry, this article will teach you the simple steps to check your YouTube. Plus, you’ll find out how your YouTube earnings are calculated. Just stick with us.
Part 1: Follow the steps below to check your YouTube earnings
The process of checking YouTube income is pretty straightforward. So, regardless of what device you’re using to check, we’ve briefly explained the step-by-step instructions to carry out your YouTube income check within a few clicks.
Check on a computer
To check YouTube income on your PC or Mac, you just have to do the following;
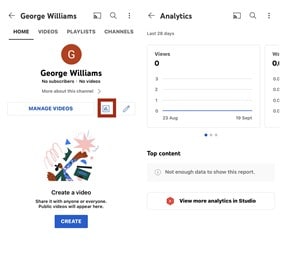
Step1 Open the browser app on your computer and sign in to your YouTube Studio .
Step2 Click Analytics from the left side of the screen.

Step3 On the Analytics screen, select Revenue from the top side of the screen to check your YouTube income.
There, you’ll find your YouTube income and other necessary data that you might need.
Check on a Mobile Device
The process of checking YouTube income on an Android or iOS device is also straightforward, and you can use either the YouTube app or the YouTube Studio app to perform the operation. The steps below explain the procedure;
YouTube App
Step1 Make sure you have the latest version of the YouTube app on your phone. If not, you can install it from Google Play Store or App Store.

Step2 Log in to your YouTube account and tap on the Profile icon at the top side. Then, select Your Channel.

Step3 Tap the Analytics icon from the middle menu. Your YouTube channel income and other data will be displayed on your phone screen.
YouTube Studio App
Step1 Launch the YouTube Studio app on your Android or iPhone.
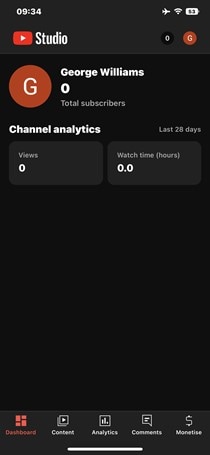
Step2 Tap Analytics from the bottom menu and select Revenue from the top of the screen.

The information that you’ll find in the YouTube revenue analytics includes the following;
- RPM (Revenue Per Mile); This is the metric that displays how much a creator has earned per 1000 video views.
- Playback-based CPM; This shows the average gross revenue per 1000 playbacks where an AD or more is displayed.
- Monthly Estimated Revenue; This report shows how much a YouTuber has earned from his/her channel in the last six months.
- Revenue Sources: Just as the name suggests, this shows you the data of how much is earned from each revenue source used on your YouTube channel.
- Transaction Revenue; The transaction revenue metric is a breakdown of how much a creator has earned from membership and merch.
- Top Earnings; It shows the data of the video with the highest estimated revenue.
- Ad Type; This displays the percentage of revenue earned from the different types of ads.
Part 2: How your YouTube earnings are calculated
Having known how to check YouTube income, if you’re still wondering how your earnings are calculated, here, we’ve discussed all the necessary information you need to know about how YouTube earnings are calculated.
YouTube earnings are calculated based on different factors. From CPC to CPM, estimated gross earnings per view, and more. Keep reading to find out more about how these factors affect your YouTube earnings;
CPM (Cost Per Mile): CPM is the amount an advertiser pays for every one thousand views of their ads. This means if an advertiser is paying you $10CPM, you’ll earn $10 on every 1000 views of their ads.
CPC (Cost Per Click): Most people think CPC is the same as CPM, but no they are not. Cost Per Click is the amount an advertiser pays for every viewer that clicks on their ads. If an advertiser is willing to pay $10, then you’ll earn $10 on every ad click.
Estimated Gross Earning Per Subscriber: You’ll notice whenever you watch a YouTube video, the creator always emphasizes you click the Subscribe button to get a notification on every new video he/she uploads. Well, they do this because the more subscribers they get, the more likely their videos appear in search results.
Also, if you have a huge Subscriber base, your videos tend to get more views, thereby increasing ad views, ad clicks, and your earnings.
All the factors explained above will determine how your YouTube earnings are calculated. However, keep in mind that you’ll receive only 55% of the total dollar advertisers pays while YouTube keeps the remaining 45%. If you get an average of $5 from an advertiser on every 1000 ad view, you’ll earn $5 x 55% which is approximately $2.75.
You can also calculate your YouTube channel total earnings by using the YouTube calculator .

Part 3: How do you increase your YouTube earnings?
1. Post quality videos
If your video is of low quality, then viewers might not find it interesting. For this reason, it’s important you post quality videos, and you need the Wondershare Filmora software for such an operation.
Filmora is one of the best video editing software that is trusted by millions of users globally because of its high efficiency. It supports lots of advanced tools that anyone can utilize to edit and spice up their videos. From adding transitions to applying effects, and more. It even offers a high-quality built-in preset that users can utilize for free to give their video the best quality they can ever think of.
Free Download For Win 7 or later(64-bit)
Free Download For macOS 10.14 or later
Step1 Install Filmora software on your computer.
Step2 Use the Import button to upload the video you created for your YouTube channel. You can also drag-n-drop it to the interface of the software.
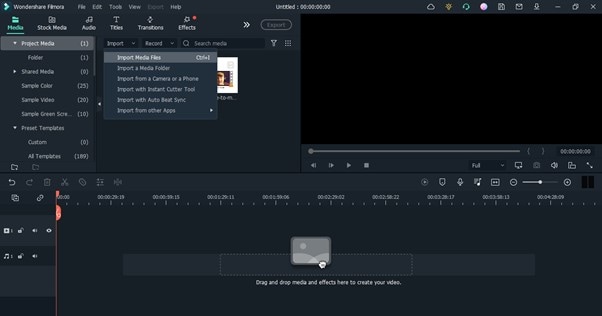
Step3 Drag-n-drop the video you uploaded to the Timeline.

Step4 To remove unwanted background from your video, click Effects from the top side of the screen. Select AI Portrait from the left side of the screen and select a preferred AI Portrait effect that you’ll like to use in the video.

Step5 Next, drag-n-dop the chosen AI Portrait effect to the timeline. After that, adjust the AI Portrait effect from the timeline. You can also add multiple effects by dragging and dropping them to the timeline.
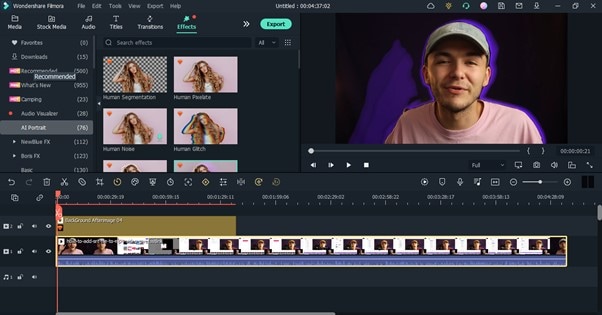
Step6 Double-click the AI Portrait effect from the Timeline. From the pop-up that appears, adjust the settings according to your requirements.

Step7 You can add Subscribe watermark by clicking the >> icon at the top of the screen, then select Element.

Choose the ‘Social Media Show Element 07’ Effects. Drag-n-drop the selected effect to the Timeline.

Step8 Preview the edited video. If you’re satisfied with the output, click the Export button at the top bar and choose Burn DVD from the drop-down list.

Step9 Enter file name in the box next to Label. Then, navigate to Folder Path and choose where you want the file to be saved. Afterward, click Export to Finish.

2. Upload videos regularly
Starting a YouTube channel can be quite hard from start, but make it a priority to upload at least two quality videos every week. Yes, the more quality videos you post, the more you attract the viewer to like your videos, and the higher your chances of getting new subscribers, thereby increasing your YouTube earnings.
3. Promote your Videos
Promoting your YouTube videos is a great way to increase your YouTube earnings. Once you post a new video on YouTube, you can share it to your other social media profiles or websites to increase views and attract new folks to watch the video. The more views you get the more money you’ll make.
Part 4: Hot FAQs on YouTube channel earnings check
Let’s take a look at some frequently asked questions from users like you.
1. Is monetizing on YouTube different from Google AdSense?
YouTube monetization involves making money from videos you upload on your YouTube channel. And Google AdSense is a means of monetizing your YouTube channel.
2. Why should you consider monetizing on YouTube creator?
Monetizing YouTube as a creator is a great way to earn passive income just by uploading videos. Research shows that an average YouTuber has the potential of earning $10,000 in revenue per year.
3. Which category is best for YouTube earnings?
The average CPM you earn from videos you upload on YouTube all depends on the niche of your video. The following are the best 5 categories best for YouTube earnings in 2022;
Make Money Online - $13.52
Social Media Marketing - $12.41
Finance & Investing - $12.25
Educational Videos - $9.89
Photography & Film Making - $7.31
Final Words
Checking YouTube income is not a big deal. This article has covered every necessary detail you need to know about checking your YouTube income on a PC or mobile phone. Also, if you don’t understand how YouTube earnings are calculated, we touched on that, and don’t hesitate to employ the tips discussed to increase your YouTube earnings.
Free Download For Win 7 or later(64-bit)
Free Download For macOS 10.14 or later
Part 1: Follow the steps below to check your YouTube earnings
The process of checking YouTube income is pretty straightforward. So, regardless of what device you’re using to check, we’ve briefly explained the step-by-step instructions to carry out your YouTube income check within a few clicks.
Check on a computer
To check YouTube income on your PC or Mac, you just have to do the following;
Step1 Open the browser app on your computer and sign in to your YouTube Studio .
Step2 Click Analytics from the left side of the screen.
Step3 On the Analytics screen, select Revenue from the top side of the screen to check your YouTube income.
There, you’ll find your YouTube income and other necessary data that you might need.
Check on a Mobile Device
The process of checking YouTube income on an Android or iOS device is also straightforward, and you can use either the YouTube app or the YouTube Studio app to perform the operation. The steps below explain the procedure;
YouTube App
Step1 Make sure you have the latest version of the YouTube app on your phone. If not, you can install it from Google Play Store or App Store.
Step2 Log in to your YouTube account and tap on the Profile icon at the top side. Then, select Your Channel.
Step3 Tap the Analytics icon from the middle menu. Your YouTube channel income and other data will be displayed on your phone screen.
YouTube Studio App
Step1 Launch the YouTube Studio app on your Android or iPhone.
Step2 Tap Analytics from the bottom menu and select Revenue from the top of the screen.
The information that you’ll find in the YouTube revenue analytics includes the following;
- RPM (Revenue Per Mile); This is the metric that displays how much a creator has earned per 1000 video views.
- Playback-based CPM; This shows the average gross revenue per 1000 playbacks where an AD or more is displayed.
- Monthly Estimated Revenue; This report shows how much a YouTuber has earned from his/her channel in the last six months.
- Revenue Sources: Just as the name suggests, this shows you the data of how much is earned from each revenue source used on your YouTube channel.
- Transaction Revenue; The transaction revenue metric is a breakdown of how much a creator has earned from membership and merch.
- Top Earnings; It shows the data of the video with the highest estimated revenue.
- Ad Type; This displays the percentage of revenue earned from the different types of ads.
Part 2: How your YouTube earnings are calculated
Having known how to check YouTube income, if you’re still wondering how your earnings are calculated, here, we’ve discussed all the necessary information you need to know about how YouTube earnings are calculated.
YouTube earnings are calculated based on different factors. From CPC to CPM, estimated gross earnings per view, and more. Keep reading to find out more about how these factors affect your YouTube earnings;
CPM (Cost Per Mile): CPM is the amount an advertiser pays for every one thousand views of their ads. This means if an advertiser is paying you $10CPM, you’ll earn $10 on every 1000 views of their ads.
CPC (Cost Per Click): Most people think CPC is the same as CPM, but no they are not. Cost Per Click is the amount an advertiser pays for every viewer that clicks on their ads. If an advertiser is willing to pay $10, then you’ll earn $10 on every ad click.
Estimated Gross Earning Per Subscriber: You’ll notice whenever you watch a YouTube video, the creator always emphasizes you click the Subscribe button to get a notification on every new video he/she uploads. Well, they do this because the more subscribers they get, the more likely their videos appear in search results.
Also, if you have a huge Subscriber base, your videos tend to get more views, thereby increasing ad views, ad clicks, and your earnings.
All the factors explained above will determine how your YouTube earnings are calculated. However, keep in mind that you’ll receive only 55% of the total dollar advertisers pays while YouTube keeps the remaining 45%. If you get an average of $5 from an advertiser on every 1000 ad view, you’ll earn $5 x 55% which is approximately $2.75.
You can also calculate your YouTube channel total earnings by using the YouTube calculator .
Part 3: How do you increase your YouTube earnings?
1. Post quality videos
If your video is of low quality, then viewers might not find it interesting. For this reason, it’s important you post quality videos, and you need the Wondershare Filmora software for such an operation.
Filmora is one of the best video editing software that is trusted by millions of users globally because of its high efficiency. It supports lots of advanced tools that anyone can utilize to edit and spice up their videos. From adding transitions to applying effects, and more. It even offers a high-quality built-in preset that users can utilize for free to give their video the best quality they can ever think of.
Free Download For Win 7 or later(64-bit)
Free Download For macOS 10.14 or later
Step1 Install Filmora software on your computer.
Step2 Use the Import button to upload the video you created for your YouTube channel. You can also drag-n-drop it to the interface of the software.
Step3 Drag-n-drop the video you uploaded to the Timeline.
Step4 To remove unwanted background from your video, click Effects from the top side of the screen. Select AI Portrait from the left side of the screen and select a preferred AI Portrait effect that you’ll like to use in the video.
Step5 Next, drag-n-dop the chosen AI Portrait effect to the timeline. After that, adjust the AI Portrait effect from the timeline. You can also add multiple effects by dragging and dropping them to the timeline.
Step6 Double-click the AI Portrait effect from the Timeline. From the pop-up that appears, adjust the settings according to your requirements.
Step7 You can add Subscribe watermark by clicking the >> icon at the top of the screen, then select Element.
Choose the ‘Social Media Show Element 07’ Effects. Drag-n-drop the selected effect to the Timeline.
Step8 Preview the edited video. If you’re satisfied with the output, click the Export button at the top bar and choose Burn DVD from the drop-down list.
Step9 Enter file name in the box next to Label. Then, navigate to Folder Path and choose where you want the file to be saved. Afterward, click Export to Finish.
2. Upload videos regularly
Starting a YouTube channel can be quite hard from start, but make it a priority to upload at least two quality videos every week. Yes, the more quality videos you post, the more you attract the viewer to like your videos, and the higher your chances of getting new subscribers, thereby increasing your YouTube earnings.
3. Promote your Videos
Promoting your YouTube videos is a great way to increase your YouTube earnings. Once you post a new video on YouTube, you can share it to your other social media profiles or websites to increase views and attract new folks to watch the video. The more views you get the more money you’ll make.
Part 4: Hot FAQs on YouTube channel earnings check
Let’s take a look at some frequently asked questions from users like you.
1. Is monetizing on YouTube different from Google AdSense?
YouTube monetization involves making money from videos you upload on your YouTube channel. And Google AdSense is a means of monetizing your YouTube channel.
2. Why should you consider monetizing on YouTube creator?
Monetizing YouTube as a creator is a great way to earn passive income just by uploading videos. Research shows that an average YouTuber has the potential of earning $10,000 in revenue per year.
3. Which category is best for YouTube earnings?
The average CPM you earn from videos you upload on YouTube all depends on the niche of your video. The following are the best 5 categories best for YouTube earnings in 2022;
Make Money Online - $13.52
Social Media Marketing - $12.41
Finance & Investing - $12.25
Educational Videos - $9.89
Photography & Film Making - $7.31
Final Words
Checking YouTube income is not a big deal. This article has covered every necessary detail you need to know about checking your YouTube income on a PC or mobile phone. Also, if you don’t understand how YouTube earnings are calculated, we touched on that, and don’t hesitate to employ the tips discussed to increase your YouTube earnings.
Free Download For Win 7 or later(64-bit)
Free Download For macOS 10.14 or later
Epicurean Escapades: Crafting Kitchen Films
How to Make a Cooking Video in Steps - an Ultimate Guide

Richard Bennett
Mar 27, 2024• Proven solutions
Cooking and food-oriented videos are among the most outreaching and popular categories of content to publish online, notably, on YouTube, Facebook, or Instagram. So if you are a cooking aficionado, you have excellent potential to gain positive attention and a loyal audience. But to create engaging videos, you’d need a lot more than excellent culinary skills. This article aims to enlighten aspiring food and recipe vloggers about the essentials of video making straight out of the oven, to create enriched content that’s professional, neat, and viral-worthy.
- Part 1: What to Prepare Before Making a Recipe Video?
- Part 2: Make a Cooking Video with Filmora: a Step-by-Step Guide
- Part 3: Tips to Make Your Cooking Videos Stand Out
- Part 4: How to Promote Your Cooking Channel on YouTube?
What to Prepare Before Making a Recipe Video
While you would know best about the prep work needed for the recipes, the prep work for making a video starts with a plan. What goes into the plan?
Brainstorm this equation - Main Content + Duration + Light + Sound + Camera + Camera Angle, Shots & Transition.
The main content is how you picture the finished video. Ask yourself - Do you want an intro gig? Are you going to talk in the video or show only hands and the cooking with a piece of background music? How do you wish to present the ingredients? Would there be additional tips? At what platform are you going to publish your content? How long should be your clippings? Consider all these questions to chalk out a basic framework of your video
The camera is a pivotal element. Whether it is a smartphone or a hi-fidelity digital camera, it is worthwhile to familiarise the best positions and light orientations and the capacity of the device to produce the best quality picture.
How is your sound going to be like? If you are going to talk in the video, it is recommended that you use a microphone. Or else, you can also use background sound. But to mix sound with the video, you’d need an excellent sound editing tool.
Finally, comes the editing and finishing part. Eventually, you’ll need purposive video-editing software to help you work out the video transitions, sound, and visual effects.Choose a toolkit that is easy to learn and that you can get comfortable with so that the job of video editing doesn’t take the focus away from the main task of cooking.

Now, once you have all the essential ingredients to create your video, start practicing. Remember that it is the most natural thing for the first videos to appear amateurish or inept. And that is part of the plan. Don’t be disheartened and keep going.
Make a Cooking Video with Filmora: a Step-by-Step Guide
As one of the easiest-to-use video editing tools, the full-featured Filmora is the right choice considering it can fit most of your needs. Moreover, you’d be delighted to know that the software also has a series of features and functions and even tutorial videos dedicated to cooking videos.


Step 1: Filming the Video
Whether you are going to present a traditional cook-with-me style video or feature the contemporary “jump-cut” style focusing on speedy short videos, you need to prepare all the equipment and ingredients to suit the frame by frame shots. Consider spills, drops, overcooking, etc. as part of the process, so keep adequate substitutes to continue with your project unwaveringly. If you are using a phone, keep it fully charged up. And have a plan beforehand about what you should do when you get an urgent call while shooting. Also, consider doing a site investigation of the shooting spot for any fragile items, pointy corners, slippery areas, curious pets, etc. to avoid trips and falls in the middle of the filming, especially when working with a cameraman who’s following your movement. If you are using a tripod, and floor-standing lights, remember to secure the equipment with plenty of adhesive tapes, lest they bump into an expensive trip or fall.
Step 2: mport Your Video In Filmora
You need to sync the device that you used to film the video with the computer that has Filmora installed. It may be a phone or a camcorder. Once the devices are synced, you should launch the Filmora software and go the “Media” button at the top right toolbar. There you will find the “Import” button. You will get a pop-up message asking you to choose the type of device. Select the right one, and your video will be imported in the Filmora interface.
Step 3: Edit Video Pace: Time-Lapse, Jump Cut, Slow Motion
To create crisp, fast-paced videos, you don’t have to gobble up the content eyeing at the duration. Think smart when you have the resources of a tool like Filmora. Here are the three best features that help you create fast-paced yet well-defined recipes.
Time-Lapse: The time-lapse feature allows you to adjust the speed of the video from slow-motion to 10x faster. To use this, double click on a specific clip in your imported video and open the custom speed settings. Use the adjusting meter beside speed to make your clip as fast or slow as you want. You may use the same feature to introduce the slow-motion effects in certain areas of the video.
Now, when you are using either the fast-forward or slow-motion effects, it is best to have stable video footage with consistent lighting and a static background. There are also the options of Reverse Speed that can play the clip backward, as in flash-back. The Ripple edit feature allows you to cut short a long clip seamlessly.
Jump Cut: The Jump Cut is about snipping unwanted areas in the clip. It may sound like the Ripple edit mentioned above, but the ripple edit is more functional for cutting short a continuous video so that the viewer won’t realize the snip. For the Jump Cut, it doesn’t have to be a constant clip. You can get to the next frame or scene with an abracadabra move.
To use Jump Cut, place the cursor over the starting of the clip that you want to cut, and right-click on it and select “Split” (the “scissors” feature on the toolbar does the same thing). To make this look neat, preview the portion of the clip once again and delete the cuts between two clips with the same right-click.
Step 4: Understanding Transitions on Filmora
Transitions make your video more interactive and help you segregate the video from frame-to-frame with effects like dissolve, fade, flash, etc. there are numerous transition options available within the Filmora suit.
The best way to do this drag and drop the clips on the timeline is to trim parts of the clip to shorten it. Once you have all the clips in place, go to the “Transitions” options at the top toolbar to apply it on the end or start of each clip.
Step 5: Audio, Playback & Sound Edits
There are plenty of options that you can remove background noise, add voiceover, add music, and detach audio from video. Refer to the Audios section from your toolbar.
Step 6: Save to Drive/ Emport/ Publish
Once you are satisfied with your content, then go to Export. Choose the format of the video, MOV, MP4, MPG, etc. and whether you wish to publish directly or save to drive.
Tips to Make Your Cooking Videos Stand Out
- Lighting is your best friend. Invest in some quality spotlights or use the best of daylight.
- Mind your video duration. Short and Simple videos get the most views, but your content should not look incomplete. It is not a fact that long and elaborate videos do not get a place on the table; it is all about the relevance of your content. So don’t stop till you get enough.
- If you appear in the video, keep yourself always look good.
- Keep your video titles relevant and prominent, so that people looking for it can readily find it.
- Have a scrumptious custom thumbnail.
How to Promote Your Cooking Channel on YouTube
- Create an inventory before publishing videos. YouTube vlogging is valued for consistency. If you have a list of 10, 15, 20 videos, then you can have enough time in hand to film your next videos.
- Have a consistent style to create brand recognition. Do you think branding is not for Vlogs? Well, I suppose you might be wrong. Branding is for anyone who uses it.
- Share the link of your YouTube videos on other platforms like Twitter and Facebook.
- Encourage your viewers to comment on the video.
- Explore the different YouTube SEO strategies and use the accurate keywords in your video descriptions with hashtags.
With prior planning and practicing, you are bent on developing more confident moves and camera angles. Once you have that, follow this step by step guide to gain speed and prowess and also enjoy the whole adventure.
Richard Bennett
Richard Bennett is a writer and a lover of all things video.
Follow @Richard Bennett
Richard Bennett
Mar 27, 2024• Proven solutions
Cooking and food-oriented videos are among the most outreaching and popular categories of content to publish online, notably, on YouTube, Facebook, or Instagram. So if you are a cooking aficionado, you have excellent potential to gain positive attention and a loyal audience. But to create engaging videos, you’d need a lot more than excellent culinary skills. This article aims to enlighten aspiring food and recipe vloggers about the essentials of video making straight out of the oven, to create enriched content that’s professional, neat, and viral-worthy.
- Part 1: What to Prepare Before Making a Recipe Video?
- Part 2: Make a Cooking Video with Filmora: a Step-by-Step Guide
- Part 3: Tips to Make Your Cooking Videos Stand Out
- Part 4: How to Promote Your Cooking Channel on YouTube?
What to Prepare Before Making a Recipe Video
While you would know best about the prep work needed for the recipes, the prep work for making a video starts with a plan. What goes into the plan?
Brainstorm this equation - Main Content + Duration + Light + Sound + Camera + Camera Angle, Shots & Transition.
The main content is how you picture the finished video. Ask yourself - Do you want an intro gig? Are you going to talk in the video or show only hands and the cooking with a piece of background music? How do you wish to present the ingredients? Would there be additional tips? At what platform are you going to publish your content? How long should be your clippings? Consider all these questions to chalk out a basic framework of your video
The camera is a pivotal element. Whether it is a smartphone or a hi-fidelity digital camera, it is worthwhile to familiarise the best positions and light orientations and the capacity of the device to produce the best quality picture.
How is your sound going to be like? If you are going to talk in the video, it is recommended that you use a microphone. Or else, you can also use background sound. But to mix sound with the video, you’d need an excellent sound editing tool.
Finally, comes the editing and finishing part. Eventually, you’ll need purposive video-editing software to help you work out the video transitions, sound, and visual effects.Choose a toolkit that is easy to learn and that you can get comfortable with so that the job of video editing doesn’t take the focus away from the main task of cooking.
Now, once you have all the essential ingredients to create your video, start practicing. Remember that it is the most natural thing for the first videos to appear amateurish or inept. And that is part of the plan. Don’t be disheartened and keep going.
Make a Cooking Video with Filmora: a Step-by-Step Guide
As one of the easiest-to-use video editing tools, the full-featured Filmora is the right choice considering it can fit most of your needs. Moreover, you’d be delighted to know that the software also has a series of features and functions and even tutorial videos dedicated to cooking videos.
Step 1: Filming the Video
Whether you are going to present a traditional cook-with-me style video or feature the contemporary “jump-cut” style focusing on speedy short videos, you need to prepare all the equipment and ingredients to suit the frame by frame shots. Consider spills, drops, overcooking, etc. as part of the process, so keep adequate substitutes to continue with your project unwaveringly. If you are using a phone, keep it fully charged up. And have a plan beforehand about what you should do when you get an urgent call while shooting. Also, consider doing a site investigation of the shooting spot for any fragile items, pointy corners, slippery areas, curious pets, etc. to avoid trips and falls in the middle of the filming, especially when working with a cameraman who’s following your movement. If you are using a tripod, and floor-standing lights, remember to secure the equipment with plenty of adhesive tapes, lest they bump into an expensive trip or fall.
Step 2: mport Your Video In Filmora
You need to sync the device that you used to film the video with the computer that has Filmora installed. It may be a phone or a camcorder. Once the devices are synced, you should launch the Filmora software and go the “Media” button at the top right toolbar. There you will find the “Import” button. You will get a pop-up message asking you to choose the type of device. Select the right one, and your video will be imported in the Filmora interface.
Step 3: Edit Video Pace: Time-Lapse, Jump Cut, Slow Motion
To create crisp, fast-paced videos, you don’t have to gobble up the content eyeing at the duration. Think smart when you have the resources of a tool like Filmora. Here are the three best features that help you create fast-paced yet well-defined recipes.
Time-Lapse: The time-lapse feature allows you to adjust the speed of the video from slow-motion to 10x faster. To use this, double click on a specific clip in your imported video and open the custom speed settings. Use the adjusting meter beside speed to make your clip as fast or slow as you want. You may use the same feature to introduce the slow-motion effects in certain areas of the video.
Now, when you are using either the fast-forward or slow-motion effects, it is best to have stable video footage with consistent lighting and a static background. There are also the options of Reverse Speed that can play the clip backward, as in flash-back. The Ripple edit feature allows you to cut short a long clip seamlessly.
Jump Cut: The Jump Cut is about snipping unwanted areas in the clip. It may sound like the Ripple edit mentioned above, but the ripple edit is more functional for cutting short a continuous video so that the viewer won’t realize the snip. For the Jump Cut, it doesn’t have to be a constant clip. You can get to the next frame or scene with an abracadabra move.
To use Jump Cut, place the cursor over the starting of the clip that you want to cut, and right-click on it and select “Split” (the “scissors” feature on the toolbar does the same thing). To make this look neat, preview the portion of the clip once again and delete the cuts between two clips with the same right-click.
Step 4: Understanding Transitions on Filmora
Transitions make your video more interactive and help you segregate the video from frame-to-frame with effects like dissolve, fade, flash, etc. there are numerous transition options available within the Filmora suit.
The best way to do this drag and drop the clips on the timeline is to trim parts of the clip to shorten it. Once you have all the clips in place, go to the “Transitions” options at the top toolbar to apply it on the end or start of each clip.
Step 5: Audio, Playback & Sound Edits
There are plenty of options that you can remove background noise, add voiceover, add music, and detach audio from video. Refer to the Audios section from your toolbar.
Step 6: Save to Drive/ Emport/ Publish
Once you are satisfied with your content, then go to Export. Choose the format of the video, MOV, MP4, MPG, etc. and whether you wish to publish directly or save to drive.
Tips to Make Your Cooking Videos Stand Out
- Lighting is your best friend. Invest in some quality spotlights or use the best of daylight.
- Mind your video duration. Short and Simple videos get the most views, but your content should not look incomplete. It is not a fact that long and elaborate videos do not get a place on the table; it is all about the relevance of your content. So don’t stop till you get enough.
- If you appear in the video, keep yourself always look good.
- Keep your video titles relevant and prominent, so that people looking for it can readily find it.
- Have a scrumptious custom thumbnail.
How to Promote Your Cooking Channel on YouTube
- Create an inventory before publishing videos. YouTube vlogging is valued for consistency. If you have a list of 10, 15, 20 videos, then you can have enough time in hand to film your next videos.
- Have a consistent style to create brand recognition. Do you think branding is not for Vlogs? Well, I suppose you might be wrong. Branding is for anyone who uses it.
- Share the link of your YouTube videos on other platforms like Twitter and Facebook.
- Encourage your viewers to comment on the video.
- Explore the different YouTube SEO strategies and use the accurate keywords in your video descriptions with hashtags.
With prior planning and practicing, you are bent on developing more confident moves and camera angles. Once you have that, follow this step by step guide to gain speed and prowess and also enjoy the whole adventure.
Richard Bennett
Richard Bennett is a writer and a lover of all things video.
Follow @Richard Bennett
Also read:
- Turn Your Videos Into a Revenue Stream with These Tips
- A-List Films Must-Watch Channel Compilation for 2024
- [Updated] Comprehensive Coverage Coalition Picking an MCN
- Eco Marketing Merge Screens & CTA Success for 2024
- Visualizing the Most Influential '23 Social Trends
- In 2024, Become a Trending Sensation with These Effective YouTube SEO Strategies
- Your Ultimate YT Shorts Companion
- Dismantle Bots, Elevate YouTube Watch Time for 2024
- Creative Conjurations YouTube Editing Wonders
- How Does YouTube Count Views? It's Not as Simple as You Think
- 2024 Approved Audiovisual Excellence on YouTube Through Enhancements
- [New] Discover Your Rhythm Assembling Tailored YouTube Playlists for the Digital Age (Web/Mobile)
- Experience the Future of Learning with These Channels
- In 2024, YouTube Comment Finder You Should Try
- Discovering the Hidden Gems in ASMR Creation for 2024
- Audiovisual Perfection Leading Audio Enhancement Apps for 2024
- A Beginner's Guide to Embedding YouTube Playlists in Code for 2024
- Sourav Joshi's Strategy for YouTube Earning in the Year 2024
- [Updated] Elevate Views, Not Video Length Expert Guide to YT Desc Templates
- Optimizing Personal Video Experience Building an Organized 'Watch Later' List
- How to Make Video Thumbnails for YouTube
- 2024 Approved Decoding the Payment Structure on YouTube
- In 2024, Android and iOS Top ASMR Audio Picks
- Crafting a Sports Highlight Step-by-Step Tutorial
- VisualPuzzle Editor
- Elevate Your Content's Visibility Strategic Use of Imagery in Video Thumbnails
- In 2024, Dual-Watch Dynamics Navigating YouTube in Parallel
- YouTube Snippets Overview Explained
- Fresh Topics to Cover in Your Vlogs
- New Premium Selection Best 10 Voice Recorders for Your Android Device for 2024
- Complete Guide For iPhone SE (2020) Lock Screen
- [New] 10 Essential Cam Shields for Privacy
- [New] Music Video Madness Top 10 on Social Sphere for 2024
- New Cut, Edit, Repeat Top 10 Free Video Editors for Ubuntu
- [New] 6 Innovative MC House Concepts for Community Living
- 2024 Approved Expert Tips to Enrich Virtual Meetings with Screen Sharing
- New 2024 Approved 5 Essential Online Aspect Ratio Calculators
- 10 Free Android Video Editing Apps That Dont Add Watermarks
- In 2024, How To Bypass Nokia C12 Pro FRP In 3 Different Ways
- In 2024, Android Guide for Backward Video Display
- The Finest Videophone Tools Free Edition Listed Here for 2024
- [New] The Future of Video Recording Insights Into Fraps
- Updated Looking to Create an Interesting LinkedIn Thumbnail? Know About the Types of LinkedIn Videos, Thumbnail, Their Specifications, and More for 2024
- Formulating Imaginative TikTok Credit Graphics
- 6 Fixes to Unfortunately WhatsApp has stopped Error Popups On Honor 90 GT | Dr.fone
- Updated 2024 Approved Enhancing Your Gaming Experience Incorporating Audio with KineMaster
- In 2024, Transform Your Videography Effortless Recording and Editing via Adobe Connect
- In 2024, Remove the Lock Screen Fingerprint Of Your Samsung Galaxy S23 Tactical Edition
- 10 Best Fake GPS Location Spoofers for Samsung Galaxy F54 5G | Dr.fone
- Visual Virtuosity Mastering Motivation on Instagram for 2024
- In 2024, How To Open Your iPhone 7 Without a Home Button
- How to Fix Android.Process.Media Has Stopped on Samsung Galaxy S23 | Dr.fone
- [New] 2024 Approved E-Education Video Logging
- Title: "In 2024, Detailed Guide to Dollar Counts A Stepwise Strategy to Track YouTube Earnings"
- Author: Steven
- Created at : 2024-05-25 19:40:00
- Updated at : 2024-05-26 19:40:00
- Link: https://youtube-clips.techidaily.com/in-2024-detailed-guide-to-dollar-counts-a-stepwise-strategy-to-track-youtube-earnings/
- License: This work is licensed under CC BY-NC-SA 4.0.
