
:max_bytes(150000):strip_icc()/IMG_20181029_144334716_HDR-5bd77873c9e77c005137f538.jpg)
"In 2024, Cutting-Edge Techniques for Setting the Optimal Size of Your YouTube Videos"
Cutting-Edge Techniques for Setting the Optimal Size of Your YouTube Videos
YouTube Video Dimensions/Size: Guide for Upload Settings

Richard Bennett
Mar 27, 2024• Proven solutions
Every social media offers a distinct range of dimensions and settings for their publication. So does YouTube.
It’s acutely important to be aware of your setting choices and choosing the right video, thumbnail and screen dimensions of a YouTube video to elevate the user experience.
Merely watching the videos on YouTube is much easier but being able to upload a video there using the right size matters a lot more than one thinks of.
But how can one master it all by himself? Here we are to guide you all along the way! So sit back and relax and enjoy your first-rated content!
You will Learn :
- The right YouTube video size for you
- Important guidelines for YouTube Video dimensions
- What’s the best YouTube video size for you?
- What is the right aspect ratio for YouTube videos
- The correct video image and YouTube screen size
- FAQs about Youtube upload settings
- Basic terminologies that you should know
The Best Video Editor for Successful YouTubers - Wondershare Filmora
As a easy-to-use video editor, Filmora is really perfect for successful YouTubers. Filmora not only allows you to cut, crop, rotate, reverse videos, but also offers your advanced features like PIP, Green Screen, or audio mixing. What’s more, you can find lots of effects for Fashion, gaming, education, tutorial, sports, etc.
Check below video to know more and download now to have a try for free.


The right YouTube video size for you
| Resolution | Equivalent Name | Quality |
|---|---|---|
| 3840×2160 | 2160p | 4K |
| 2560×1440 | 1440p | 2K |
| 1920×1080 | 1080p | Highest YouTube HD video resolution |
| 1280×720 | 720p | Least YouTube HD video resolution |
| 854×480 | 480p | Standard definition |
| 640×360 | 360p | Conventional website resolution |
| 426×240 | 240p | Least YouTube video size available |
Important guidelines for YouTube Video dimensions
| Maximum acceptable size of a YouTube video | 426 x 420p |
|---|---|
| Minimum acceptable size of a YouTube video | 3840 x 2160p |
| The right aspect ratio of a YouTube video | 16:9 |
| Maximum size of a YouTube file | 128GB |
| The maximum length of a YouTube video | 12 hours |
| Compatible YouTube video formats | avi mov mp4 (best video format for YouTube) 3GPP webM flv mpeg mpegps wmv |
In order to grasp all of the aforementioned configurations thoroughly, a pictorial depiction is a must. So here it is to give you a vivid vision.
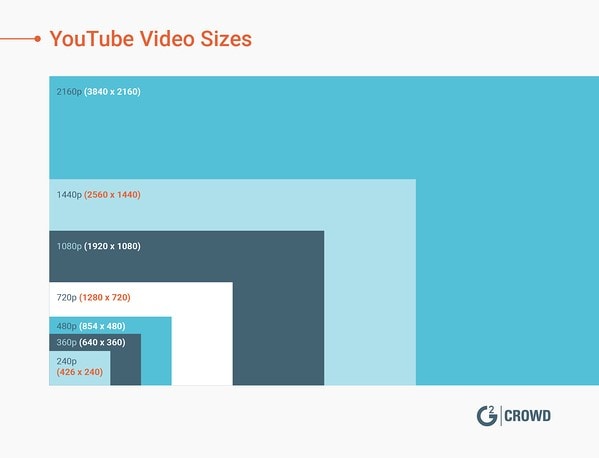
Image from learn.g2
What’s the best YouTube video size for you?
It is recommended by professionals to use the YouTube video dimensions 1080p, or 1920 x 1080.
These ones are the ideal because it will not only facilitate the video with a professional and elite look but also consumes relatively much less data. Moreover, if you use a phone for recording your videos then using the quality higher than the ones mentioned above will cost you with ample memory.
If you are a newbie to the world of YouTube and want to up the device’s storage game then 720p would still do wonders.
What is the video aspect ratio?
This term refers to the proportion of your video. In other words, the video aspect ratio can be defined as the width or breadth (of an image or screen) with respect to its height. Such a ratio can be expressed or represented in the form of “width x height.
That means an aspect ratio of 4x3 refers to an image that is 4 unit wide and 3 units high. Similarly, it can also be expressed with a colon in between the units such as 4:3 or 16:9.
The aspect ratio of a video merely refers to the relationship among the width and height respectively and not the actual physical size of the image.
The most common aspect ratios used in the video are depicted below for sound understanding:
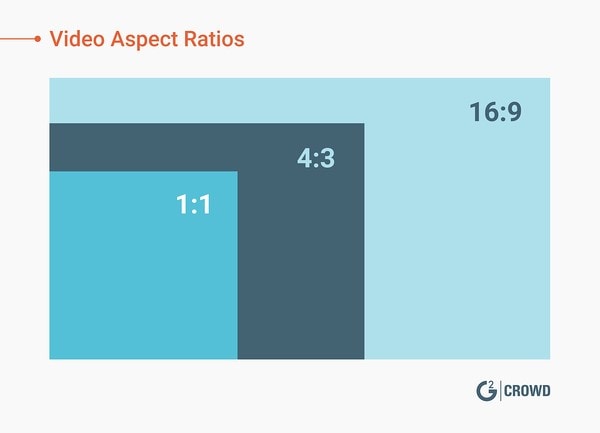
Image from learn.g2
The aspect ratio is the proportion of your video. This image displays the three most common aspect ratios.
Aspect ratio refers to the ratio of height and width although dimensions refer to two separate measurements of height and width rather than a ratio with “pixel” as its unit.
Standard aspect ratios
Below are the most common aspect ratios used for the video. There may be certain amendments to the ones mentioned below but the following formats are used mostly by the film and video makers.
Let’s review the quick breakdown of the available aspect ratio options that you can opt accordingly:
| Aspect ratio | Application |
|---|---|
| 1:1 or 1x1 | This aspect ratio will mostly be seen in the Instagram video. This 1:1 ratio gives a video a perfect square shape. |
| 4:3 or 4x3 | This aspect ratio was mostly seen few ages ago in almost the amidst 20th century on the TV. This was used to be a standard television format back then. So if you are a 90’s kid or an adult then you must be familiar with this format while watching your favorite old schooled sitcoms! |
| 16:9 or 16x9 | The format was enhanced to 16:9 aspect ratio for more HD quality and better viewing experience. This format is widely being used in televisions, theatres, DVD or high definition professional videos. |
| 21:9 or 21x9 | For more than merely an HD video quality and astonishing user experience, the formats have been upgraded to 21:9 aspect ratio. This is dominantly being used in the cinema for movie theatre releases. |
The right aspect ratio for YouTube videos
YouTube recommends using an aspect ratio of 16:9 according to the video player that YouTube uses. You are also given an option to upload your videos vertically but this will amend the aspect ratio respectively.
When you upload a video with an aspect ratio other than the one mention formerly then YouTube will automatically place the black bars on the sides. This is done to display the best quality video with the right resolution otherwise it will be displayed as distorted or cropped.
A vertical ratio with may be 4:3 video aspect ratio will be displayed like the image given below:

Image from learn.g2
The correct video image and YouTube screen size
Videos are undoubtedly the most important asset of YouTube but we cannot ignore the significance of the optimal images there! Using the right channel images will enhance the user experience and will ultimately level up your game!
The appealing and attractive cover photos, banners, thumbnails, channel icons possess equal importance as the video itself.
So don’t forget to tune your images! Just grab a cup of coffee and see how your views increase exponentially by this simple yet most important change!
Just skim through the checklist given below and you will be ready to nail it!
1. Perfect size for your YouTube profile photo
The profile photo of YouTube, often called a YouTube channel icon, is preferably a facial picture when is run by an individual and a respective logo if run by a brand or a business.
The suggested YouTube screen size of your YouTube profile picture or channel icon is 800 x800 pixels.
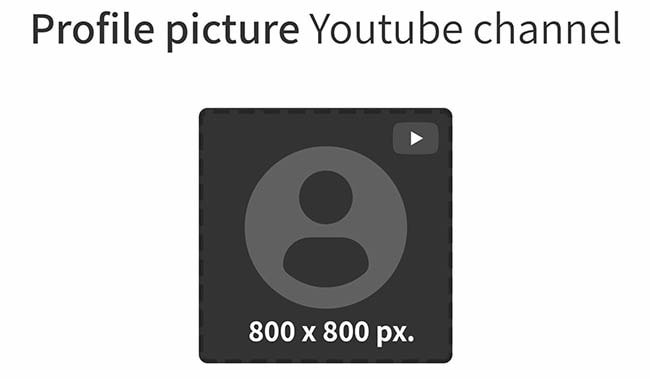
Image from metricool
2. Perfect size for your YouTube thumbnail photo
What is YouTube thumbnail?
A thumbnail photo is the picture of one of the frames of your video that you select to let the viewers see the quick glace or snapshot of your video while they browse YouTube.
You can choose any of the snapshots, technically known as a thumbnail, right after uploading your video on your channel. Either you can let YouTube choose any thumbnail or you choose your own.
Why is it important?
Choosing the appropriate thumbnail is one of the most important factors you cannot neglect. In order to gain views the most on your videos, a wise selection of a perfect YouTube video thumbnail dimensions will attract the viewers. Hence this will can uplift your views to a drastic extent.
A quick tip for the perfect YouTube thumbnail
Take a look at the popular you tubers and see what strategies they use when uploading their thumbnails. Usually, the video content is not as appealing as the thumbnail itself. That’s what you need to understand! Just see by yourself how large text and striking images will do wonders!
YouTube video thumbnail dimension for a perfect thumbnail image
The preferred YouTube screen size of your thumbnail image is 1280 x 720 pixels.
Similar to the YouTube video, the aspect ratio of your thumbnail is 16:9.
For even more clear understanding, look into this illustration:
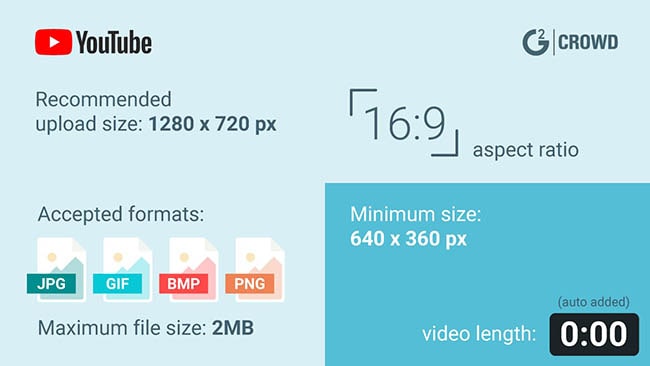
Image from learn.g2
3. Perfect size for your YouTube banner
YouTube offers two main areas for image display of your channel. One is an icon image while other is what YouTube calls “Channel Art”. This is the same as Facebook’s cover photo. People often call it “YouTube banner”. It is a header image displayed at the top of your channel.
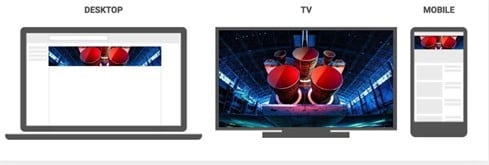
For each kind of display (mobile, desktop, and TV), channel art (or banner) dimension changes accordingly.
Either your cover photo or your YouTube banner is displayed at the top of the channel so it’s highly significant to consider what you are depicting about your channel through these images.
Hence, this being said or realized, selecting the appropriate banner resolution should be among your topmost priorities.
The recommended banner dimensions of a YouTube video as suggested by YouTube are 2560 x 1440 pixels. But the dimensions may slightly vary with the variation in the devices being used by the users.
| Displays | Banner image Dimensions |
|---|---|
| Video display | 2560 x 1440 pixels |
| Desktop display | 2560 x 423 pixels |
| Tablet display | 1855 x 423 pixels |
| Television | 2560 x 1440 pixels |
For a thorough understanding, refer to the image below:
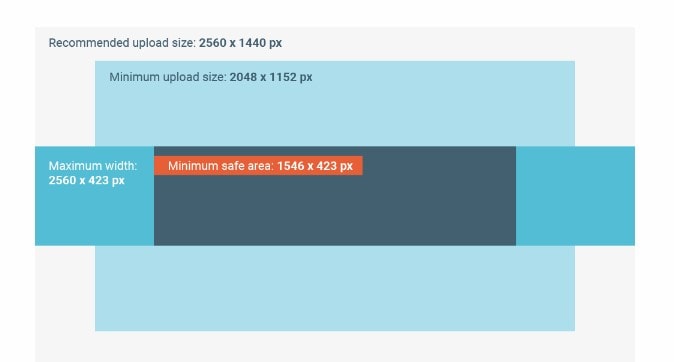
Image from learn.g2
The right cover photo size on TV
The image displayed when accessing YouTube from TV will appear and be uploaded full or maximized. So a wise image size must be opted. So the accurate resolution would be 2560 x 1440 pixels which will cover the entire background of your channel.
The right cover photo size on desktop displays
The image size may vary to some extent as per the browser you are accessing with or the desktop itself. But generally, the suggested cover photo size for desktop displays is 2560 x 423 pixels.
The right cover photo size on Tablet displays
As per the recommendation for uploading the image while specifically considering the table display is 1855 x 423 pixels. This will cover the area appropriately.
FAQs about Youtube upload settings

What is the maximum YouTube upload limit of size?
The allowed maximum video file size for uploading is 128GB at present.
What is the maximum YouTube upload limit of length?
The allowed maximum video length today for uploading is 12 hours.
How the default upload setting is reset on YouTube?
Step 1: Sign In to your YouTube account using a browser.
Step 2: By clicking your profile icon on the top right corner of the pane, you’ll see the YouTube Studio option. Click on it.
Step 3: Go on settings option where a pop-up window will appear.
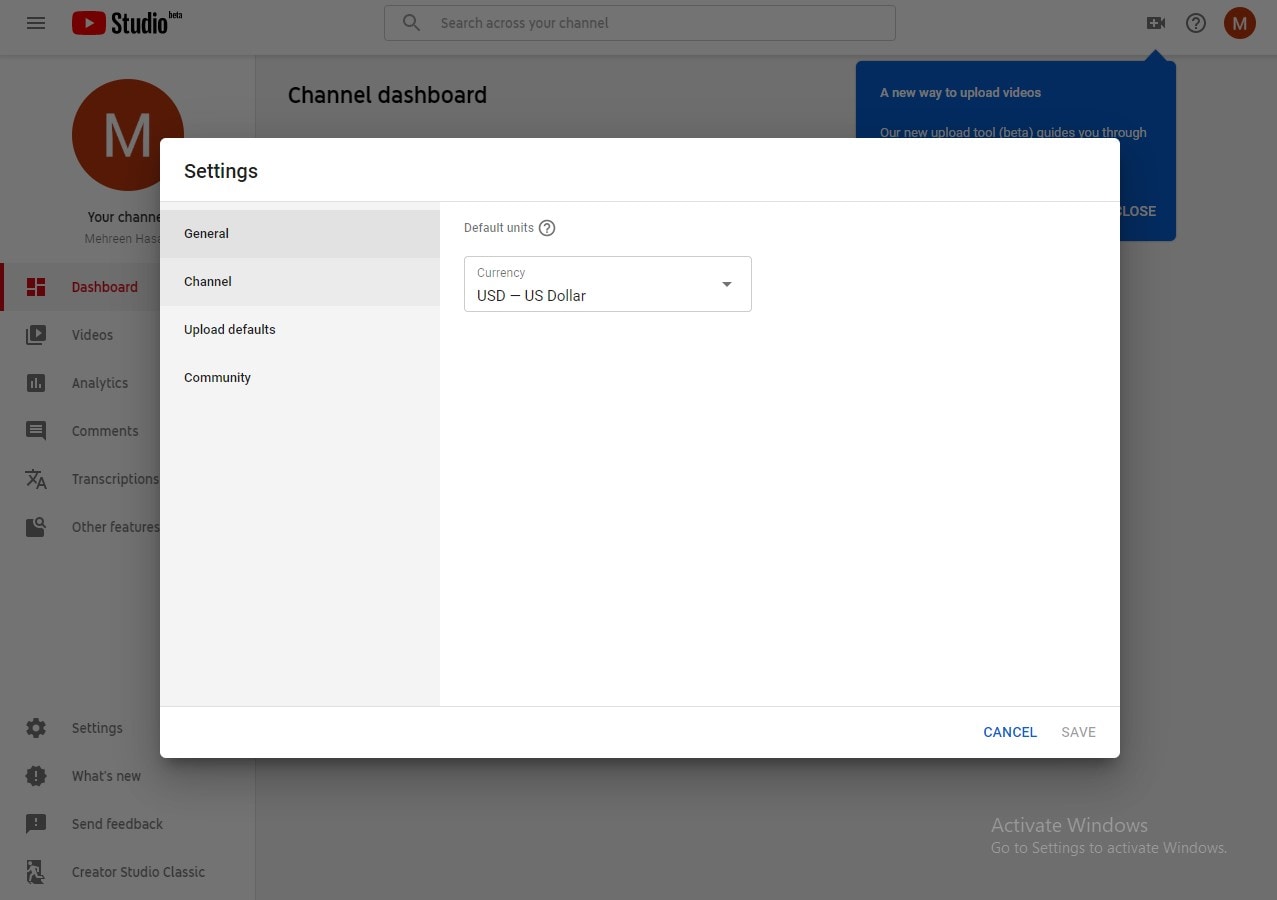
Step 4: Look for upload defaults and change the configurations on 2 tabs.
Step 5: Click on save button.
How is YouTube video uploaded using the mobile application?
Step 1: Sign in to your YouTube channel using your mobile phone.
Step 2: Tap on the video camera icon to upload a video. Grant access to your photo gallery and camera is asked by the app while uploading for the first time.
Step 3: You may “Go Live” or simply drag an already made video file to upload.
Step 4: Click “Next”.
Step 5: Enter the video name, select visibility level and then click upload.
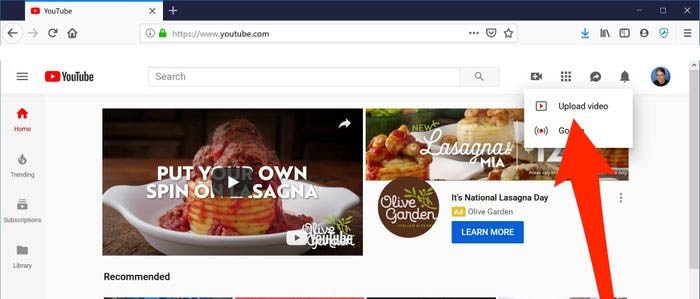
How is YouTube video uploaded using a web browser?
Step 1: Sign in to your YouTube account in a web browser.
Step 2: Click on the video icon appearing on the top of the pane.
Step 3: Click on upload video in the drop-down.
Step 4: You will be redirected to the video upload page. Click “public” under “Select files to upload” option and choose visibility level (public, private or scheduled).
Step 5: Click on a large arrow for video file selection or simply drag the file onto the page.
Step 6: You may enter miscellaneous information related to the video while the video is being uploaded.
Step 7: Click on publish and you are done!
Read More to Get : Best Video Websites Like YouTube >>
Basic terminologies that you should know
Video Format
A file format is a way that is standard for the storage of information in the encoded form within the computer file. It entails how exactly the bits are used while encoding the information in a digital storage medium.
So, a video file format is basically a type of file format in order to store the digital data of a video in the computer system. Mostly, video is often stored using the lossy compression in order to reduce the file size.
Frame Rate
“Frame rate” essentially entails the frequency (rate) at which the simultaneous images display on the screen. These images or called “frames”. Frame rate is expressed in “frames per second or FPS”. The unit or term is applicable for film, cameras, motion capture, video, and computer graphics. This is also known as “frame frequency”, expressed in the unit “hertz”
Resolution
Resolution is a measure to entail the clarity and sharpness of an image and most often used as a metric to judge the quality of cameras, monitors, printers, etc.
It basically refers to the number of different pixels in each dimension which can be viewed in any display device.
File Size
File size refers to the space that a file occupies in a storage medium, like hard drive or USB. The measure of file sizes can be expressed in bytes (B), kilobytes (KB), megabytes (MB), gigabytes (GB), terabytes (TB), and so on.
As shown in the picture below, the files listed in the Windows Explorer assorted as per the file with the largest size first. The file with the name “family-safety.jpg” occupies the largest size of 47 KB and the smallest one with 32 KB size.
Codec
Codec is a device or maybe a computer program that is used to encode or decode a stream of digital data or signal. A codec is a short form of “coder-decoder”.
The basic function of a coder is to encode the stream of data or signal for storage or transmission, usually in an encrypted form.
While, a decoder decodes the encoded (possibly encrypted) data, which is merely a reverse process of a coder. The application of codec are in streaming media, videoconferencing, and video editing applications.
Aspect ratio:
This term refers to the proportion of your video. In other words, the video aspect ratio can be defined as the width or breadth (of an image or screen) with respect to its height. Such a ratio can be expressed or represented in the form of “width x height.
That means an aspect ratio of 4x3 refers to an image that is 4 units wide and 3 units high. Similarly, it can also be expressed with a colon in between the units such as 4:3 or 16:9.
Need a YouTube support?
If you need any support, guidance or may face any queries related to anything regarding your YouTube channel, here’s the link of YouTube support .
Final Verdict
Hopefully, with this detailed guide, you are now ready to make a wise decision regarding customizing your videos and channel as per viewers likeliness. So get ready to see your channel grow drastically!
Richard Bennett
Richard Bennett is a writer and a lover of all things video.
Follow @Richard Bennett
Richard Bennett
Mar 27, 2024• Proven solutions
Every social media offers a distinct range of dimensions and settings for their publication. So does YouTube.
It’s acutely important to be aware of your setting choices and choosing the right video, thumbnail and screen dimensions of a YouTube video to elevate the user experience.
Merely watching the videos on YouTube is much easier but being able to upload a video there using the right size matters a lot more than one thinks of.
But how can one master it all by himself? Here we are to guide you all along the way! So sit back and relax and enjoy your first-rated content!
You will Learn :
- The right YouTube video size for you
- Important guidelines for YouTube Video dimensions
- What’s the best YouTube video size for you?
- What is the right aspect ratio for YouTube videos
- The correct video image and YouTube screen size
- FAQs about Youtube upload settings
- Basic terminologies that you should know
The Best Video Editor for Successful YouTubers - Wondershare Filmora
As a easy-to-use video editor, Filmora is really perfect for successful YouTubers. Filmora not only allows you to cut, crop, rotate, reverse videos, but also offers your advanced features like PIP, Green Screen, or audio mixing. What’s more, you can find lots of effects for Fashion, gaming, education, tutorial, sports, etc.
Check below video to know more and download now to have a try for free.
The right YouTube video size for you
| Resolution | Equivalent Name | Quality |
|---|---|---|
| 3840×2160 | 2160p | 4K |
| 2560×1440 | 1440p | 2K |
| 1920×1080 | 1080p | Highest YouTube HD video resolution |
| 1280×720 | 720p | Least YouTube HD video resolution |
| 854×480 | 480p | Standard definition |
| 640×360 | 360p | Conventional website resolution |
| 426×240 | 240p | Least YouTube video size available |
Important guidelines for YouTube Video dimensions
| Maximum acceptable size of a YouTube video | 426 x 420p |
|---|---|
| Minimum acceptable size of a YouTube video | 3840 x 2160p |
| The right aspect ratio of a YouTube video | 16:9 |
| Maximum size of a YouTube file | 128GB |
| The maximum length of a YouTube video | 12 hours |
| Compatible YouTube video formats | avi mov mp4 (best video format for YouTube) 3GPP webM flv mpeg mpegps wmv |
In order to grasp all of the aforementioned configurations thoroughly, a pictorial depiction is a must. So here it is to give you a vivid vision.
Image from learn.g2
What’s the best YouTube video size for you?
It is recommended by professionals to use the YouTube video dimensions 1080p, or 1920 x 1080.
These ones are the ideal because it will not only facilitate the video with a professional and elite look but also consumes relatively much less data. Moreover, if you use a phone for recording your videos then using the quality higher than the ones mentioned above will cost you with ample memory.
If you are a newbie to the world of YouTube and want to up the device’s storage game then 720p would still do wonders.
What is the video aspect ratio?
This term refers to the proportion of your video. In other words, the video aspect ratio can be defined as the width or breadth (of an image or screen) with respect to its height. Such a ratio can be expressed or represented in the form of “width x height.
That means an aspect ratio of 4x3 refers to an image that is 4 unit wide and 3 units high. Similarly, it can also be expressed with a colon in between the units such as 4:3 or 16:9.
The aspect ratio of a video merely refers to the relationship among the width and height respectively and not the actual physical size of the image.
The most common aspect ratios used in the video are depicted below for sound understanding:
Image from learn.g2
The aspect ratio is the proportion of your video. This image displays the three most common aspect ratios.
Aspect ratio refers to the ratio of height and width although dimensions refer to two separate measurements of height and width rather than a ratio with “pixel” as its unit.
Standard aspect ratios
Below are the most common aspect ratios used for the video. There may be certain amendments to the ones mentioned below but the following formats are used mostly by the film and video makers.
Let’s review the quick breakdown of the available aspect ratio options that you can opt accordingly:
| Aspect ratio | Application |
|---|---|
| 1:1 or 1x1 | This aspect ratio will mostly be seen in the Instagram video. This 1:1 ratio gives a video a perfect square shape. |
| 4:3 or 4x3 | This aspect ratio was mostly seen few ages ago in almost the amidst 20th century on the TV. This was used to be a standard television format back then. So if you are a 90’s kid or an adult then you must be familiar with this format while watching your favorite old schooled sitcoms! |
| 16:9 or 16x9 | The format was enhanced to 16:9 aspect ratio for more HD quality and better viewing experience. This format is widely being used in televisions, theatres, DVD or high definition professional videos. |
| 21:9 or 21x9 | For more than merely an HD video quality and astonishing user experience, the formats have been upgraded to 21:9 aspect ratio. This is dominantly being used in the cinema for movie theatre releases. |
The right aspect ratio for YouTube videos
YouTube recommends using an aspect ratio of 16:9 according to the video player that YouTube uses. You are also given an option to upload your videos vertically but this will amend the aspect ratio respectively.
When you upload a video with an aspect ratio other than the one mention formerly then YouTube will automatically place the black bars on the sides. This is done to display the best quality video with the right resolution otherwise it will be displayed as distorted or cropped.
A vertical ratio with may be 4:3 video aspect ratio will be displayed like the image given below:
Image from learn.g2
The correct video image and YouTube screen size
Videos are undoubtedly the most important asset of YouTube but we cannot ignore the significance of the optimal images there! Using the right channel images will enhance the user experience and will ultimately level up your game!
The appealing and attractive cover photos, banners, thumbnails, channel icons possess equal importance as the video itself.
So don’t forget to tune your images! Just grab a cup of coffee and see how your views increase exponentially by this simple yet most important change!
Just skim through the checklist given below and you will be ready to nail it!
1. Perfect size for your YouTube profile photo
The profile photo of YouTube, often called a YouTube channel icon, is preferably a facial picture when is run by an individual and a respective logo if run by a brand or a business.
The suggested YouTube screen size of your YouTube profile picture or channel icon is 800 x800 pixels.
Image from metricool
2. Perfect size for your YouTube thumbnail photo
What is YouTube thumbnail?
A thumbnail photo is the picture of one of the frames of your video that you select to let the viewers see the quick glace or snapshot of your video while they browse YouTube.
You can choose any of the snapshots, technically known as a thumbnail, right after uploading your video on your channel. Either you can let YouTube choose any thumbnail or you choose your own.
Why is it important?
Choosing the appropriate thumbnail is one of the most important factors you cannot neglect. In order to gain views the most on your videos, a wise selection of a perfect YouTube video thumbnail dimensions will attract the viewers. Hence this will can uplift your views to a drastic extent.
A quick tip for the perfect YouTube thumbnail
Take a look at the popular you tubers and see what strategies they use when uploading their thumbnails. Usually, the video content is not as appealing as the thumbnail itself. That’s what you need to understand! Just see by yourself how large text and striking images will do wonders!
YouTube video thumbnail dimension for a perfect thumbnail image
The preferred YouTube screen size of your thumbnail image is 1280 x 720 pixels.
Similar to the YouTube video, the aspect ratio of your thumbnail is 16:9.
For even more clear understanding, look into this illustration:
Image from learn.g2
3. Perfect size for your YouTube banner
YouTube offers two main areas for image display of your channel. One is an icon image while other is what YouTube calls “Channel Art”. This is the same as Facebook’s cover photo. People often call it “YouTube banner”. It is a header image displayed at the top of your channel.
For each kind of display (mobile, desktop, and TV), channel art (or banner) dimension changes accordingly.
Either your cover photo or your YouTube banner is displayed at the top of the channel so it’s highly significant to consider what you are depicting about your channel through these images.
Hence, this being said or realized, selecting the appropriate banner resolution should be among your topmost priorities.
The recommended banner dimensions of a YouTube video as suggested by YouTube are 2560 x 1440 pixels. But the dimensions may slightly vary with the variation in the devices being used by the users.
| Displays | Banner image Dimensions |
|---|---|
| Video display | 2560 x 1440 pixels |
| Desktop display | 2560 x 423 pixels |
| Tablet display | 1855 x 423 pixels |
| Television | 2560 x 1440 pixels |
For a thorough understanding, refer to the image below:
Image from learn.g2
The right cover photo size on TV
The image displayed when accessing YouTube from TV will appear and be uploaded full or maximized. So a wise image size must be opted. So the accurate resolution would be 2560 x 1440 pixels which will cover the entire background of your channel.
The right cover photo size on desktop displays
The image size may vary to some extent as per the browser you are accessing with or the desktop itself. But generally, the suggested cover photo size for desktop displays is 2560 x 423 pixels.
The right cover photo size on Tablet displays
As per the recommendation for uploading the image while specifically considering the table display is 1855 x 423 pixels. This will cover the area appropriately.
FAQs about Youtube upload settings
What is the maximum YouTube upload limit of size?
The allowed maximum video file size for uploading is 128GB at present.
What is the maximum YouTube upload limit of length?
The allowed maximum video length today for uploading is 12 hours.
How the default upload setting is reset on YouTube?
Step 1: Sign In to your YouTube account using a browser.
Step 2: By clicking your profile icon on the top right corner of the pane, you’ll see the YouTube Studio option. Click on it.
Step 3: Go on settings option where a pop-up window will appear.
Step 4: Look for upload defaults and change the configurations on 2 tabs.
Step 5: Click on save button.
How is YouTube video uploaded using the mobile application?
Step 1: Sign in to your YouTube channel using your mobile phone.
Step 2: Tap on the video camera icon to upload a video. Grant access to your photo gallery and camera is asked by the app while uploading for the first time.
Step 3: You may “Go Live” or simply drag an already made video file to upload.
Step 4: Click “Next”.
Step 5: Enter the video name, select visibility level and then click upload.
How is YouTube video uploaded using a web browser?
Step 1: Sign in to your YouTube account in a web browser.
Step 2: Click on the video icon appearing on the top of the pane.
Step 3: Click on upload video in the drop-down.
Step 4: You will be redirected to the video upload page. Click “public” under “Select files to upload” option and choose visibility level (public, private or scheduled).
Step 5: Click on a large arrow for video file selection or simply drag the file onto the page.
Step 6: You may enter miscellaneous information related to the video while the video is being uploaded.
Step 7: Click on publish and you are done!
Read More to Get : Best Video Websites Like YouTube >>
Basic terminologies that you should know
Video Format
A file format is a way that is standard for the storage of information in the encoded form within the computer file. It entails how exactly the bits are used while encoding the information in a digital storage medium.
So, a video file format is basically a type of file format in order to store the digital data of a video in the computer system. Mostly, video is often stored using the lossy compression in order to reduce the file size.
Frame Rate
“Frame rate” essentially entails the frequency (rate) at which the simultaneous images display on the screen. These images or called “frames”. Frame rate is expressed in “frames per second or FPS”. The unit or term is applicable for film, cameras, motion capture, video, and computer graphics. This is also known as “frame frequency”, expressed in the unit “hertz”
Resolution
Resolution is a measure to entail the clarity and sharpness of an image and most often used as a metric to judge the quality of cameras, monitors, printers, etc.
It basically refers to the number of different pixels in each dimension which can be viewed in any display device.
File Size
File size refers to the space that a file occupies in a storage medium, like hard drive or USB. The measure of file sizes can be expressed in bytes (B), kilobytes (KB), megabytes (MB), gigabytes (GB), terabytes (TB), and so on.
As shown in the picture below, the files listed in the Windows Explorer assorted as per the file with the largest size first. The file with the name “family-safety.jpg” occupies the largest size of 47 KB and the smallest one with 32 KB size.
Codec
Codec is a device or maybe a computer program that is used to encode or decode a stream of digital data or signal. A codec is a short form of “coder-decoder”.
The basic function of a coder is to encode the stream of data or signal for storage or transmission, usually in an encrypted form.
While, a decoder decodes the encoded (possibly encrypted) data, which is merely a reverse process of a coder. The application of codec are in streaming media, videoconferencing, and video editing applications.
Aspect ratio:
This term refers to the proportion of your video. In other words, the video aspect ratio can be defined as the width or breadth (of an image or screen) with respect to its height. Such a ratio can be expressed or represented in the form of “width x height.
That means an aspect ratio of 4x3 refers to an image that is 4 units wide and 3 units high. Similarly, it can also be expressed with a colon in between the units such as 4:3 or 16:9.
Need a YouTube support?
If you need any support, guidance or may face any queries related to anything regarding your YouTube channel, here’s the link of YouTube support .
Final Verdict
Hopefully, with this detailed guide, you are now ready to make a wise decision regarding customizing your videos and channel as per viewers likeliness. So get ready to see your channel grow drastically!
Richard Bennett
Richard Bennett is a writer and a lover of all things video.
Follow @Richard Bennett
Learn From the Greats: Strategies for Confident Online Sharing
8 Tips on How to Vlog Confidently Like Popular YouTubers
Richard Bennett
Oct 26, 2023• Proven solutions
For most people, vlogging is not something that comes naturally. Like any skill, it takes practice to improve. When someone is good at vlogging, they make it look easy.
When we watch the most popular YouTubers, the traits that make them successful are often invisible, because we are so consumed by their vlog. In this article, I’ll highlight 8 tips from the most accomplished vloggers on the Internet, so that you can vlog confidently and make the best YouTube videos.
1. Be Authentic
People opt to watch vlogs because they want to see something real.
Vlogging is about honesty, telling a story that is truthful and showing your personality. The most popular vloggers are likable because they don’t deceive the audience, they befriend them. Vloggers treat their audience with respect and that comes from being honest.
There will be an urge for you to mimic other vloggers, talking and acting the way they do, but savvy YouTube viewers will be able to see your faux personality pretty quickly.
Don’t focus on your image, but instead focus on your voice. What makes you different? That is how you will build a proper reputation.
2. Tell A Story
A vlog is not an assortment of footage haphazardly put together. A successful vlog must have a story: a conflict told with a beginning, middle, and end.
When you are casually telling a story to a friend, you are not thinking about the structure or the plot. You are focused on what happened and you want to communicate it as accurately as you can. While vlogging, you should approach it much the same way. Ad-libbing is fine. Stumbling is fine. Going back and repeating a part of the story is fine. By simply getting your story on camera, you now have all the pieces.
Once all the pieces of the story are captured — including your storytelling, b-roll, and other supportive footage — you must now cut out all the irrelevant or repetitive parts and edit it so it can be enjoyed as one cohesive tale.
Take a look at this example from Tiffany Alvord and notice how there are jump cuts both to skip information that can be assumed by the audience and add the tension to the story she’s telling.
3. Surprise and Delight Your Audience
There is a saying that a great ending to a story is that it is surprising, yet inevitable .
The ending needs to be justified even if there is a twist. Everything before that had worked to build up the tension and when it concludes it needs to be logical. However, the ending cannot be something that the audience can guess. Remember those mystery movies where you know who the murderer is after the first few scenes? Yeah… those aren’t satisfying. A good story ends with a surprise, and with everything prior leading up to it.
The gold standard example of a surprising, yet inevitable end is Casey Neistat’s bike lane video. Everything in the video is leading up to the end, but when you watch it the first time it’s unexpected, and that’s why it’s so good.
4. Be Inviting
A common trait of successful vloggers is that they are welcoming. They share their passion and encourage others to join in. Vlogging is about being a guide. It doesn’t matter if you are leading a tour of your home or showing your viewer an interesting new skill, it is important for you to approach the whole process with open arms.
Unlike being invited to a party, there is no obligation when it comes to YouTube. Your viewers can continue to live vicariously through you or they may be inspired by your experience and dare to try it themselves.
The opposite of inviting is rejecting, and when you are a vlogger, you don’t want to reject anyone from enjoying your videos.
5. Compose the Shot
Vlogging is a visual medium, and while the story is important, what is captured in the frame will play an impactful role in the video as well.
In a way, every vlogger needs to have a director’s eye for cinematography. I’m not saying that you need to be Wes Anderson to be an awesome vlogger, but knowing what is in the frame with you, the angle of the shot, the movement of the camera, and the quality of light will help the product look better.
The great thing about vlogging is that you will get a lot of practice framing shots, so I encourage you to learn the basics of video editing .
Check out this example from Rosanna Pansino , where she gives a tour of her bedroom.
The camera follows her fluidly throughout the video, but it is her eyes that guide both the camera moves and what she wants our attention to be directed to. Don’t hesitate to let the viewer know what you want them to see.
6. Be Prepared
While you can pick up a camera and start vlogging on the fly, being prepared enables you to produce the best video possible. Take a few minutes before you hit record simply to outline the key points you want to talk about and how the video will end, ensuring that after filming you haven’t forgotten a crucial part.
Additionally, knowing what to say makes you a better host for your vlog. Watch your favorite vlogger, I bet when they are speaking on camera, their speech is not littered with umms and ahhs…
Good preparation includes having all your gear ready for filming when you need it. There is nothing worse than being set to shoot and running out of battery or memory.
Take a look at Ashley Nichole in this vlog and notice that although she sounds spontaneous, it is also evident that she knows what she is going to talk about next.
7. Be Expressive
Remember those teachers that drone on and on, without adding any expression or passion to what they are lecturing? While they might have been perfectly suitable as teachers, they wouldn’t make good vloggers.
If you speak on camera in a monotone voice, you are not being expressive. Your facial and body language will match your lackluster performance. Even if you are talking about something you are excited about, if your demeanor doesn’t match that, then the video is going to be lifeless. Vlogging is a presentation, a performance. There needs to be energy.
Consider your audience: they are coming home from school or work, where there were classes and meetings, and the last thing they want to watch is a video of your speaking without energy.
Want to see a vlogger that is awesome at being expressive on camera? Check out Emma Chamberlain , if you haven’t already. Every word she says in her video is layered with emotion. We know exactly how she feels.
8. Stay Organized
The same way you should prepare before filming, it’s also important to be organized comes the editing phase. Editing is arguably the most time-consuming part of the vlogging process, so have a system for categorizing and finding your footages.
This is especially important when you have multiple video and audio files and if you are capturing footage over a number of days or in different locations.
Additionally, while filming your vlog, you are going to mess up. It’s also helpful to add a cue after you messed up, this can be a sound cue that causes the levels to spike (clapping or snapping your fingers work) or a video cue such as a dramatic gesture to the camera. When skipping through your footage to find the part where you messed up, later on, it’s easier to have a mark to help you locate it.
Vlogging is hard, so don’t make more work for yourself. Learn little tricks to make life easier for yourself at every step.
The more organized you are the more attention you can put into the creative aspect of vlogging, and less time finding a video file or syncing audio to video.
There you have it, 8 tips to help you vlog like the pros. Anyone can vlog. But only until you point a camera at yourself in public for the first time, do you realize how uncomfortable vlogging can be.
Even filming yourself in your room with the door closed — and nobody is in the house with you — can be a challenge for beginning vloggers. If you find watching your first few videos to be cringy, don’t be discouraged. There are fears of vlogging, but you can overcome them .
Take a look at some of the first videos from popular YouTubers and you can see that everyone had a starting point.
Do you have any vlogging tricks of your own? Leave a comment below.
If you want to find a video editing solution that empowers your imagination and creativity yet takes less effort, please try this robust and user-friendly video editing software Wondershare Filmora, which will definitely enhance your productivity and helps you to make money by making videos much easier.
Richard Bennett
Richard Bennett is a writer and a lover of all things video.
Follow @Richard Bennett
Richard Bennett
Oct 26, 2023• Proven solutions
For most people, vlogging is not something that comes naturally. Like any skill, it takes practice to improve. When someone is good at vlogging, they make it look easy.
When we watch the most popular YouTubers, the traits that make them successful are often invisible, because we are so consumed by their vlog. In this article, I’ll highlight 8 tips from the most accomplished vloggers on the Internet, so that you can vlog confidently and make the best YouTube videos.
1. Be Authentic
People opt to watch vlogs because they want to see something real.
Vlogging is about honesty, telling a story that is truthful and showing your personality. The most popular vloggers are likable because they don’t deceive the audience, they befriend them. Vloggers treat their audience with respect and that comes from being honest.
There will be an urge for you to mimic other vloggers, talking and acting the way they do, but savvy YouTube viewers will be able to see your faux personality pretty quickly.
Don’t focus on your image, but instead focus on your voice. What makes you different? That is how you will build a proper reputation.
2. Tell A Story
A vlog is not an assortment of footage haphazardly put together. A successful vlog must have a story: a conflict told with a beginning, middle, and end.
When you are casually telling a story to a friend, you are not thinking about the structure or the plot. You are focused on what happened and you want to communicate it as accurately as you can. While vlogging, you should approach it much the same way. Ad-libbing is fine. Stumbling is fine. Going back and repeating a part of the story is fine. By simply getting your story on camera, you now have all the pieces.
Once all the pieces of the story are captured — including your storytelling, b-roll, and other supportive footage — you must now cut out all the irrelevant or repetitive parts and edit it so it can be enjoyed as one cohesive tale.
Take a look at this example from Tiffany Alvord and notice how there are jump cuts both to skip information that can be assumed by the audience and add the tension to the story she’s telling.
3. Surprise and Delight Your Audience
There is a saying that a great ending to a story is that it is surprising, yet inevitable .
The ending needs to be justified even if there is a twist. Everything before that had worked to build up the tension and when it concludes it needs to be logical. However, the ending cannot be something that the audience can guess. Remember those mystery movies where you know who the murderer is after the first few scenes? Yeah… those aren’t satisfying. A good story ends with a surprise, and with everything prior leading up to it.
The gold standard example of a surprising, yet inevitable end is Casey Neistat’s bike lane video. Everything in the video is leading up to the end, but when you watch it the first time it’s unexpected, and that’s why it’s so good.
4. Be Inviting
A common trait of successful vloggers is that they are welcoming. They share their passion and encourage others to join in. Vlogging is about being a guide. It doesn’t matter if you are leading a tour of your home or showing your viewer an interesting new skill, it is important for you to approach the whole process with open arms.
Unlike being invited to a party, there is no obligation when it comes to YouTube. Your viewers can continue to live vicariously through you or they may be inspired by your experience and dare to try it themselves.
The opposite of inviting is rejecting, and when you are a vlogger, you don’t want to reject anyone from enjoying your videos.
5. Compose the Shot
Vlogging is a visual medium, and while the story is important, what is captured in the frame will play an impactful role in the video as well.
In a way, every vlogger needs to have a director’s eye for cinematography. I’m not saying that you need to be Wes Anderson to be an awesome vlogger, but knowing what is in the frame with you, the angle of the shot, the movement of the camera, and the quality of light will help the product look better.
The great thing about vlogging is that you will get a lot of practice framing shots, so I encourage you to learn the basics of video editing .
Check out this example from Rosanna Pansino , where she gives a tour of her bedroom.
The camera follows her fluidly throughout the video, but it is her eyes that guide both the camera moves and what she wants our attention to be directed to. Don’t hesitate to let the viewer know what you want them to see.
6. Be Prepared
While you can pick up a camera and start vlogging on the fly, being prepared enables you to produce the best video possible. Take a few minutes before you hit record simply to outline the key points you want to talk about and how the video will end, ensuring that after filming you haven’t forgotten a crucial part.
Additionally, knowing what to say makes you a better host for your vlog. Watch your favorite vlogger, I bet when they are speaking on camera, their speech is not littered with umms and ahhs…
Good preparation includes having all your gear ready for filming when you need it. There is nothing worse than being set to shoot and running out of battery or memory.
Take a look at Ashley Nichole in this vlog and notice that although she sounds spontaneous, it is also evident that she knows what she is going to talk about next.
7. Be Expressive
Remember those teachers that drone on and on, without adding any expression or passion to what they are lecturing? While they might have been perfectly suitable as teachers, they wouldn’t make good vloggers.
If you speak on camera in a monotone voice, you are not being expressive. Your facial and body language will match your lackluster performance. Even if you are talking about something you are excited about, if your demeanor doesn’t match that, then the video is going to be lifeless. Vlogging is a presentation, a performance. There needs to be energy.
Consider your audience: they are coming home from school or work, where there were classes and meetings, and the last thing they want to watch is a video of your speaking without energy.
Want to see a vlogger that is awesome at being expressive on camera? Check out Emma Chamberlain , if you haven’t already. Every word she says in her video is layered with emotion. We know exactly how she feels.
8. Stay Organized
The same way you should prepare before filming, it’s also important to be organized comes the editing phase. Editing is arguably the most time-consuming part of the vlogging process, so have a system for categorizing and finding your footages.
This is especially important when you have multiple video and audio files and if you are capturing footage over a number of days or in different locations.
Additionally, while filming your vlog, you are going to mess up. It’s also helpful to add a cue after you messed up, this can be a sound cue that causes the levels to spike (clapping or snapping your fingers work) or a video cue such as a dramatic gesture to the camera. When skipping through your footage to find the part where you messed up, later on, it’s easier to have a mark to help you locate it.
Vlogging is hard, so don’t make more work for yourself. Learn little tricks to make life easier for yourself at every step.
The more organized you are the more attention you can put into the creative aspect of vlogging, and less time finding a video file or syncing audio to video.
There you have it, 8 tips to help you vlog like the pros. Anyone can vlog. But only until you point a camera at yourself in public for the first time, do you realize how uncomfortable vlogging can be.
Even filming yourself in your room with the door closed — and nobody is in the house with you — can be a challenge for beginning vloggers. If you find watching your first few videos to be cringy, don’t be discouraged. There are fears of vlogging, but you can overcome them .
Take a look at some of the first videos from popular YouTubers and you can see that everyone had a starting point.
Do you have any vlogging tricks of your own? Leave a comment below.
If you want to find a video editing solution that empowers your imagination and creativity yet takes less effort, please try this robust and user-friendly video editing software Wondershare Filmora, which will definitely enhance your productivity and helps you to make money by making videos much easier.
Richard Bennett
Richard Bennett is a writer and a lover of all things video.
Follow @Richard Bennett
Also read:
- Ensuring Authenticity of Your YouTube Account for 2024
- In 2024, Elevating Channel Excellence with Best Ideas
- [New] Best YouTube Hubs for Professional Insights
- In 2024, Essential Tips for Producing Engaging Educational Content for YouTube
- Creating Engaging YouTube Openings & Closers for Free for 2024
- 2024 Approved Chasing Profit on Platforms YouTube Partner Application Steps
- 2024 Approved Enhancing Content Strategy with Targeted Tagging
- Premier 8 Edits Suites for Linux Buffs
- Innovative Approaches to YouTube Video Marketing
- [New] Dialing Up Engagement YouTube Thumbnails That Convert
- Elevate Your Youtube Presence Featuring Essential Channels Tutorial for 2024
- Banish YouTube Shorts Forever with Ease for 2024
- Mastering the Art of Viral YouTube Shorts Content
- Pioneering YouTube Success with Targeted SEO Practices
- [Updated] Download Custom MCB Banner Packs
- Effortless Online Guide YouTube Video to GIF Magic (No Download)
- No Cost Cinema – Your Guide to the Top 10 Free Film Shows Online
- [Updated] Accessing Your Own Custom-Designed Youtube Melodies
- [Updated] Craftsmanship in Marvellous Marvel Creation
- [New] Crafting Illusions with Video Edits
- 2024 Approved Content Creator's Den
- [Updated] Elevate Video Engagement by Inserting Captions
- Enhancing Video Content IPhone/iPad Screen Capture Basics for 2024
- [New] Clearing Up Opaque Video Views on YouTube
- How to Mirror Your Xiaomi Redmi Note 12T Pro Screen to PC with Chromecast | Dr.fone
- In 2024, 20 Leading No-Cost Digital Editing Platforms
- 2024 Approved Crafting a Personalized Auditory Experience on iOS
- [New] 2024 Approved Recover Lost Watch Visual Preview
- [Updated] Advanced Strategies for Removing Background in Figma
- In 2024, 3 Effective Methods to Fake GPS location on Android For your Lava Yuva 3 Pro | Dr.fone
- 2024 Approved Beyond Illusion The Three Pillars of Virtual Immersion (VR, AR, & MR)
- Remove Google FRP lock on Oppo Reno 10 5G
- Updated Sophisticated Acoustic Complement to Visual Content
- [Updated] 2024 Approved Enjoy Pure TikTok Videos - No Watermark Downloads
- New Say Goodbye to Windows Movie Maker Top Mac Equivalents for 2024
- 4 Solutions to Fix Unfortunately Your App Has Stopped Error on Samsung Galaxy S23 | Dr.fone
- [New] Review Unveiling the Potential of Vidma Capture Tech
- [Updated] The Meme Formula Combining Humor, Trendiness & Viral Video Potential
- [Updated] 2024 Approved The Hottest 8 Video Clips Trending Today Online
- How To Create an Apple Developer Account On iPhone 6 Plus
- Your Account Has Been Disabled in the App Store and iTunes On Apple iPhone 12 mini?
- [Updated] ASMR A Harmonious Journey to Wellbe Point
- [Updated] Essential Amazon Discoveries The Hottest TikTok Trends for 2024
- New Free Online Photo Background Remover and Blur Tools for 2024
- [New] From Flaws to Feats Transformative Video Editing on Mac
- Dealing with Disconnected LIVE Video Sessions on Facebook
- Title: "In 2024, Cutting-Edge Techniques for Setting the Optimal Size of Your YouTube Videos"
- Author: Steven
- Created at : 2024-05-25 19:39:01
- Updated at : 2024-05-26 19:39:01
- Link: https://youtube-clips.techidaily.com/in-2024-cutting-edge-techniques-for-setting-the-optimal-size-of-your-youtube-videos/
- License: This work is licensed under CC BY-NC-SA 4.0.
