
:max_bytes(150000):strip_icc()/PabloMartinez-32190b42c0114fdd92613612a5a2aa3e.png)
In 2024, Creating a Narrative Structure in Online Video Tutorials
Creating a Narrative Structure in Online Video Tutorials
How to structure YouTube videos

Richard Bennett
Mar 27, 2024• Proven solutions
Creating a YouTube channel and uploading video content is only one part of the key to your success. With so much competition on the platform, it’s crucial that you stand out from the crowd with efficient, professional videos that are a pleasure to watch.
Without some planning and structure in mind before you begin filming, it’s all too easy to get a bit lost and start to ramble or fumble your words. Video’s filled with ‘umm’ and ‘err’ are neither pleasant to watch nor engaging.
If you’re serious about making a great YouTube channel and developing a loyal fan base, you’re going to need a workable structure for every video to help you stay on track. Here’s what you need to know:
Quick Jump Menu
- Why is structuring your video important?
- How should you structure YouTube Video Content?
- Ready to go out and make amazing videos?
Why is structuring your video important?
The structure of your video can make all the difference between a successful YouTube channel and a big waste of time. Your objective is to get people watching more and watching all the way to the end. A great structure can:
- Build interest and engagement: By keeping something in reserve and naturally building interest as you go along, people will be compelled to watch longer and interact more with your channel.
- Helps you rank higher: Longer and higher numbers of views will demonstrate your position as an authority well. The YouTube algorithm uses these metrics as part of their ranking factor, so the more and longer views you get, the higher you’ll rank in search.
- Builds consistency and familiarity: If all your videos follow a typical structure, your fans will come to be familiar with your format. They’ll know what to expect from your content and will watch more regularly as a result.
So, now you understand why structure is so important to your channel, let’s take a look at ways in which you can create an amazing structure for every video you produce.
How should you structure YouTube video content?
There are some key elements of a YouTube video’s structure which can make it more natural, more engaging and more fun to watch. When you’re planning your structure, you should follow a logical timeline to take the viewer from start to finish easily, and to ensure you get the actions you want at the end.
Intro
People love to be told what’s about to happen, and an intro can be a crucial step in ensuring they are going to continue watching your content. By explaining clearly what they are about to see, why it’s important to them and what problems you’re aiming to solve, you’ll keep them hooked and prevent them from browsing away to the next search result.
An introduction doesn’t need to be long or particularly involved. Remember, you don’t want to give away all your information here, as what you want is to encourage them to watch until the end. Something like “I’m going to show you … which will help you to …” is fine.
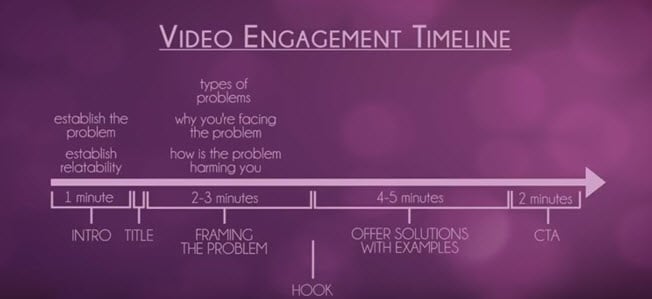
Your idea and purpose need to be conveyed fast and effectively if you’re keen to get their interest. Most viewers will decide within the first three to five seconds of a video if they want to invest their time in watching, so it’s crucial you capture their interest and engage them fast to stop them drifting away.
Main content
Once you’ve introduced your video, it’s time to start working through your content. This should be done by:
- Framing the problem
What are the types of problems that your viewers will have encountered which your video can solve? How is the problem affecting you and your viewers? Take around two to three minutes to describe the problems that you hope your video will solve, and work on being empathetic so people can relate to you and the issue you’re discussing.
- Offer solutions with examples
Move on to your solution to the problem. How did you find this solution? Is it easy to implement? Take around four to five minutes to address your solution and give examples of how it works in practice.
Now you’ve addressed the issue that your video content will solve, you’re almost ready to ask them to take the next step. Almost. There’s one more key element in your structure that you need to remember to include.
Hook
The hook can be placed anywhere in your content, although it’s most successful when placed either in the introduction or while you are framing the problem. The hook is a tidbit that aims to encourage a full viewing of your video, so don’t give away your solutions but do give them a reason to carry on watching.
If there’s a particular point where you think they might become bored or distracted, this is a great time to insert your hook. Come up with a powerful hook, for instance ‘with my solution I managed to go from ten views to two hundred in an hour’ or ‘when you hear this solution you’ll understand how I tripled my profits overnight’. Give them a reason to want to stay to the end.
Outro
Your outro shouldn’t just be about signing off in your unique way with some lovely music and visuals. This is the point at which you can ask something back from your audience, whatever that may be. We call this a ‘call to action’, and it could eb something as simple as subscribing through to something more involved like visiting your website.
Think about what you want from your audience; what should they do next? Remember to ask via a strong call to action, otherwise you’ve simply given them some free advice with very little in the way of a return for you.
Script or no script?
Many YouTubers shy away from using any sort of script, feeling that this will make them less relatable and natural. Choosing whether or not to script is entirely up to you; some people feel more comfortable with a script to hand, whereas others prefer to just wing it as they go.
If you don’t feel a script would work for you, do consider having a very rough outline of your structure and the points you want to make readily available while filming. It will help you regain control if you do happen to lose your place and will ensure you get all the information across that you’d planned to.
If you do think a full script would work better for you, make sure you are able to come across as naturally as possible while reading it. Write your script the same way you speak and run through a few times so you’re not squinting at words while you’re on camera. If you regularly wander off script, this could be a sign that a freer flowing style is more your thing.
Read More to Get : How to Loop a YouTube Video >>
Ready to go out and make amazing videos?
Having a structure to your videos might seem a little unnatural at first, but there’s plenty of evidence to show that people who take the time to plan their content get far better results than those who just improvise. If you’re unsure of the best structure for your content, watch videos made by others in your niche to see how they organize theirs.
That’s not to say you have to copy the leaders to be a success; indeed, you’ll be far more successful on YouTube if you continue to be unique. But there’s always room to learn from the best and to take inspiration from those who’ve been getting the very best results.
Richard Bennett
Richard Bennett is a writer and a lover of all things video.
Follow @Richard Bennett
Richard Bennett
Mar 27, 2024• Proven solutions
Creating a YouTube channel and uploading video content is only one part of the key to your success. With so much competition on the platform, it’s crucial that you stand out from the crowd with efficient, professional videos that are a pleasure to watch.
Without some planning and structure in mind before you begin filming, it’s all too easy to get a bit lost and start to ramble or fumble your words. Video’s filled with ‘umm’ and ‘err’ are neither pleasant to watch nor engaging.
If you’re serious about making a great YouTube channel and developing a loyal fan base, you’re going to need a workable structure for every video to help you stay on track. Here’s what you need to know:
Quick Jump Menu
- Why is structuring your video important?
- How should you structure YouTube Video Content?
- Ready to go out and make amazing videos?
Why is structuring your video important?
The structure of your video can make all the difference between a successful YouTube channel and a big waste of time. Your objective is to get people watching more and watching all the way to the end. A great structure can:
- Build interest and engagement: By keeping something in reserve and naturally building interest as you go along, people will be compelled to watch longer and interact more with your channel.
- Helps you rank higher: Longer and higher numbers of views will demonstrate your position as an authority well. The YouTube algorithm uses these metrics as part of their ranking factor, so the more and longer views you get, the higher you’ll rank in search.
- Builds consistency and familiarity: If all your videos follow a typical structure, your fans will come to be familiar with your format. They’ll know what to expect from your content and will watch more regularly as a result.
So, now you understand why structure is so important to your channel, let’s take a look at ways in which you can create an amazing structure for every video you produce.
How should you structure YouTube video content?
There are some key elements of a YouTube video’s structure which can make it more natural, more engaging and more fun to watch. When you’re planning your structure, you should follow a logical timeline to take the viewer from start to finish easily, and to ensure you get the actions you want at the end.
Intro
People love to be told what’s about to happen, and an intro can be a crucial step in ensuring they are going to continue watching your content. By explaining clearly what they are about to see, why it’s important to them and what problems you’re aiming to solve, you’ll keep them hooked and prevent them from browsing away to the next search result.
An introduction doesn’t need to be long or particularly involved. Remember, you don’t want to give away all your information here, as what you want is to encourage them to watch until the end. Something like “I’m going to show you … which will help you to …” is fine.
Your idea and purpose need to be conveyed fast and effectively if you’re keen to get their interest. Most viewers will decide within the first three to five seconds of a video if they want to invest their time in watching, so it’s crucial you capture their interest and engage them fast to stop them drifting away.
Main content
Once you’ve introduced your video, it’s time to start working through your content. This should be done by:
- Framing the problem
What are the types of problems that your viewers will have encountered which your video can solve? How is the problem affecting you and your viewers? Take around two to three minutes to describe the problems that you hope your video will solve, and work on being empathetic so people can relate to you and the issue you’re discussing.
- Offer solutions with examples
Move on to your solution to the problem. How did you find this solution? Is it easy to implement? Take around four to five minutes to address your solution and give examples of how it works in practice.
Now you’ve addressed the issue that your video content will solve, you’re almost ready to ask them to take the next step. Almost. There’s one more key element in your structure that you need to remember to include.
Hook
The hook can be placed anywhere in your content, although it’s most successful when placed either in the introduction or while you are framing the problem. The hook is a tidbit that aims to encourage a full viewing of your video, so don’t give away your solutions but do give them a reason to carry on watching.
If there’s a particular point where you think they might become bored or distracted, this is a great time to insert your hook. Come up with a powerful hook, for instance ‘with my solution I managed to go from ten views to two hundred in an hour’ or ‘when you hear this solution you’ll understand how I tripled my profits overnight’. Give them a reason to want to stay to the end.
Outro
Your outro shouldn’t just be about signing off in your unique way with some lovely music and visuals. This is the point at which you can ask something back from your audience, whatever that may be. We call this a ‘call to action’, and it could eb something as simple as subscribing through to something more involved like visiting your website.
Think about what you want from your audience; what should they do next? Remember to ask via a strong call to action, otherwise you’ve simply given them some free advice with very little in the way of a return for you.
Script or no script?
Many YouTubers shy away from using any sort of script, feeling that this will make them less relatable and natural. Choosing whether or not to script is entirely up to you; some people feel more comfortable with a script to hand, whereas others prefer to just wing it as they go.
If you don’t feel a script would work for you, do consider having a very rough outline of your structure and the points you want to make readily available while filming. It will help you regain control if you do happen to lose your place and will ensure you get all the information across that you’d planned to.
If you do think a full script would work better for you, make sure you are able to come across as naturally as possible while reading it. Write your script the same way you speak and run through a few times so you’re not squinting at words while you’re on camera. If you regularly wander off script, this could be a sign that a freer flowing style is more your thing.
Read More to Get : How to Loop a YouTube Video >>
Ready to go out and make amazing videos?
Having a structure to your videos might seem a little unnatural at first, but there’s plenty of evidence to show that people who take the time to plan their content get far better results than those who just improvise. If you’re unsure of the best structure for your content, watch videos made by others in your niche to see how they organize theirs.
That’s not to say you have to copy the leaders to be a success; indeed, you’ll be far more successful on YouTube if you continue to be unique. But there’s always room to learn from the best and to take inspiration from those who’ve been getting the very best results.
Richard Bennett
Richard Bennett is a writer and a lover of all things video.
Follow @Richard Bennett
Mastering iPhone Video Playback Cycles
How to Loop A Video on iPhone?

Shanoon Cox
Mar 27, 2024• Proven solutions
For Win 7 or later (64-bit)
 Secure Download
For macOS 10.14 or later
Secure Download
Click here to get Filmora for PC by email
or Try Filmora App for mobile >>>
download filmora app for ios ](https://app.adjust.com/b0k9hf2%5F4bsu85t ) download filmora app for android ](https://app.adjust.com/b0k9hf2%5F4bsu85t )
Nowadays, we can see a trend of people posting looping videos on their social media. These looping videos are fascinating and fun to watch. A loop is a popular element in photography and especially music videos, the idea being that the camera appears to magically repeat itself as many times as there are photos or frames showing the action. They can also simply recur a sequence a certain number of times, then stop.
Now some people don’t know how to make looping videos, so in this article, we are going to discuss how to loop a video on iPhone videos and also how to loop YouTube videos on iPhone. Let’s get started.
- Part 1: Convert iPhone Live Photos to a Loop Video
- Part 2: Repeat Slideshow Video to Loop on iPhone
- Part 3: Loop YouTube Videos On iPhone
- Part 4: Best Apps to Loop Videos on iPhone and iPad
- Part 5: Better Way to Loop and Create Boomerang Videos in Filmora Video Editor
- Part 6: Frequently Asked Questions About Choosing Best Free Video Editor for Windows
Part 1: How to Convert iPhone Live Photos to a Loop Video
A loop video is a short video that plays in repeat/ indefinitely. Loop videos can be created with features on social media apps and third-party apps.
iPhone has a setting that allows you to edit the photos to loop or bounce videos, and it only works with a photo feature called ‘live photo’. The live photo feature records 1.5 seconds moving picture when you click on the shutter button.
The live photo feature can be edited to create a loop video, and you can do that by following these steps:
- Before creating the video, you need to have the live picture saved on your phone.
To do this, capture a live photo by opening your camera app. Then click on the live photo icon, which is located in the upper right corner. And tap on the shutter button.
- Afterward, you locate the live photo you want to convert to a loop video by going to the Photos apps. Then click on Albums > Media Types> Live photos.

- After locating and clicking on the live picture, you will see the Live tab in the upper left corner. Click on the arrow down to view other options, including Loop, Bounce, and long exposure.

- Select the effect you want to create (loop) and save the file. The loop feature plays the video in a one-way order. So, to make it more interesting, you can select the bounce effect, which makes it play back and forth.
- You can share the created loop video with the share icon at the lower-left corner.

Part 2: Repeat Slideshow to Loop Video on iPhone for Free
Slideshow videos are a very fun way to see your content. People gather around a screen to enjoy these beautiful memories of their life. Here is a step-by-step guide on how to loop a slideshow video on iPhone.
- First, go to your gallery and select a video that you want to make a slideshow of.
- Add that video to an album in your gallery under any name.
- Pause the slideshow video, and you will see Options button at the bottom. Click it and then enable the Repeat option.

Now open that video from the album and start playing the video. That video will start playing in a loop until you make it stop.
Part 3: How to Loop YouTube Videos On iPhone?
Now coming to the part that we discussed in the intro, how to loop YouTube videos on iPhone. So here, we will show you a step-by-step guide on how to loop the videos on your iPhone.
- Launch YouTube on your iPhone and log in to your account if you are not already logged in.
- Now go to the “Search” option and lookup for the desired video that you want to loop, and add it to the playlist. There are two ways you can do that. Click and hold on to the video; a small menu will appear, then click on “Add to” to make a playlist. Start the video and then scroll down a bit and on the extreme right side, click on the “Add to” option, and then name the playlist.
- After that, go back to the main menu and on the lower bottom right side of the screen, click on “Library,” and then select the new playlist.
- Start playing the video, and under the video, click on the drop-down button, and on the left side of the drop-down screen, there is a loop button, click on that, and it will start to play the loop infinitely.
Check this ultimate guide to looping YouTube videos to get more ways.
Part 4: Best Apps to Loop Videos on iPhone and iPad
1. Loopideo - Loop Videos

Loopideo is the app on our list that is an answer to how to loop a video on iPhone. It lets you import any video from your play that you want to play in a loop. This is a great tool when it comes to individual and organizational presentations. This powerful app can be very useful for you in many cases.
2. Loop Video – GIF Maker

The second app on our list is Loop Video GIF Maker. It is very fun and easy to use the tool. It allows you to make the videos loop by turning them into GIFs. Loop Video GIF Maker allows you to import any video from your gallery into your app. You can then convert into a looping GIF. You can also choose the playback speed of the GIF after you can export it to the gallery or upload it to your social media directly from the app.
3. Loopideo Pro

Loopideo Pro is a more feature-filled app on the App Store. Loopideo allows you to make the videos loop an unlimited amount of times. You can also choose the formats that you want to convert the looping video into. This app also gives you the option to choose the playback speed and then can also convert it into GIF speed so that you can save it in your gallery.
4. iMovie
iMovie is a more professional app that is available on the list. This app allows you to loop not only the video but also edit the video. This allows you to play the video in a loop for an unlimited amount of time in the built-in player, but when it comes to saving the looping video, it is not possible because you would need an unlimited amount of space to save that video.
5. Looper

The last app on our list is a looper, and it is a very fun and easy-to-use app available on this list. Choose a video from your gallery, Local Videos, or iCloud Drive. Select the times you want the video to repeat and play. You can also export your video in reverse or in GIF format.
Bonus: Record a Looping Video with Boomerang app on iPhone
To make a looping video on your iPhone, you can either download the boomerang app or use the boomerang video on Instagram.
If you are using the Boomerang app, take these steps to make a looping video:
- Launch the Boomerang from Instagram app on your iPhone, if you haven’t installed it already, click on the search bar and type in Boomerang in the App Store.
- The welcome screen will appear, swipe left and tap on Get started. Allow it to access to your camera, location, and photos. After you are done setting up, you can make the videos.
- To make a boomerang video, click and hold the shutter button. Hold the shutter for a few seconds and move the phone across the image or scene.
- A preview of the looping video will appear; tap on Done to save the video. Or click on the X symbol to make a new video.
- You can change the settings to record a selfie video by clicking on the curved arrows symbol. And you can also tap the lightning sign to put the flash on and off.
To make the video with the Instagram Boomerang feature:
- Open the Instagram app, and then swipe left as if to add a story.
- Click on the boomerang icon (infinity symbol). Press and hold the shutter to make the video.
- Preview the video, and you can add texts, songs, markups, and stickers to the video.
- And then click on the arrow-down symbol to save/ download the video. You can share the video to close friends or your story.
Part 5: What If You’d Like to Loop Videos on Computer?
Filmora is one of the most popular video editors among video creators. It gives you high-quality end product, smooth slowing down & speeding up movements, voiceovers on top of music tracks and transitions between audio & video clips. But another amazing benefit of this computer video editor is that you can produce a loop video.
![]()

The Best Video Looper on Windows and Mac
- Loop and repeat videos multiple times
- Copy and paste clips easily
- Built-in plentiful templates and effects
- Export to MP4, MOV, MKV, GIF and multiple formats
For Win 7 or later (64-bit)
Secure Download
For macOS 10.14 or later
Secure Download
Click here to get Filmora for PC by email
or Try Filmora App for mobile >>>
download filmora app for ios ](https://app.adjust.com/b0k9hf2%5F4bsu85t ) download filmora app for android ](https://app.adjust.com/b0k9hf2%5F4bsu85t )
In this part, I’m going to show you how to create looping video in Filmora video editor with the reverse effect. It’s actually really easy and doesn’t require any complicated steps. You’ll be able to create a cool, looping video in no time! So, let’s get started!
Step 1: Import Videos to Filmora video editor
Launch Filmora video editor on your Windows or Mac computer and then make a new project. Import videos as you can see it has been already imported all the media in the media library from your which you want to loop effect, and then drag the video clip to the timeline.

Step 2: Copy and Paste the Video
After drag and drop the video to the timeline, make a copy of it (Ctrl+C). Go to the last frame and paste this video again.

Step 3: Enable Reverse Speed effect
Right click on the pasted video and go to Speed and Duration option in which custom speed dialog box where you can adjust the speed.
In the Custom Speed dialog box you will find the speed, duration, reverse and ripple options. To make a video with loop effects, click the Reverse option to reverse the video play back from end to start frames automatically. Click OK to save the settings.

Now you have got a video with one looping count, if you want the video to loop several times, you can select these 2 clips and paste it based on your needs to get a continuous looping effect.

We hope you found this post helpful in learning how to create looping video with Filmora video editor. This makes them perfect for use as GIFs because they are never ending! What’s more, you can create a looping video in Filmora video editor by adding a sound that plays continuously. If you’re looking to make an endlessly repeating animated image or video clip using just one still image, look no further than Filmora video editor. It’s easy and fun to use.
For Win 7 or later (64-bit)
Secure Download
For macOS 10.14 or later
Secure Download
Click here to get Filmora for PC by email
or Try Filmora App for mobile >>>
download filmora app for ios ](https://app.adjust.com/b0k9hf2%5F4bsu85t ) download filmora app for android ](https://app.adjust.com/b0k9hf2%5F4bsu85t )
Part 6: Frequently Asked Question About Looping Videos on iPhone
- What is a looping video?
It means a video that repeats for a specific number of times or maybe an unlimited amount of times automatically. For example, a GIF.
- Can I loop videos an unlimited number of times?
Yes, it is possible to loop a video an unlimited amount of times. You can learn how to loop a video on iPhone by using the methods that we discussed above in the whole article. It is not possible to save the infinitely looping because it will take an infinite amount of memory.
- Does the view count if I play a YouTube video in a loop?
No, YouTube will not count repeated views if they all come over and over again from the same sources. This is to maintain the overall quality of YouTube and make it scam-free.
For Win 7 or later (64-bit)
Secure Download
For macOS 10.14 or later
Secure Download
Click here to get Filmora for PC by email
or Try Filmora App for mobile >>>
download filmora app for ios ](https://app.adjust.com/b0k9hf2%5F4bsu85t ) download filmora app for android ](https://app.adjust.com/b0k9hf2%5F4bsu85t )
Shanoon Cox
Shanoon Cox is a writer and a lover of all things video.
Follow @Shanoon Cox
Shanoon Cox
Mar 27, 2024• Proven solutions
For Win 7 or later (64-bit)
Secure Download
For macOS 10.14 or later
Secure Download
Click here to get Filmora for PC by email
or Try Filmora App for mobile >>>
download filmora app for ios ](https://app.adjust.com/b0k9hf2%5F4bsu85t ) download filmora app for android ](https://app.adjust.com/b0k9hf2%5F4bsu85t )
Nowadays, we can see a trend of people posting looping videos on their social media. These looping videos are fascinating and fun to watch. A loop is a popular element in photography and especially music videos, the idea being that the camera appears to magically repeat itself as many times as there are photos or frames showing the action. They can also simply recur a sequence a certain number of times, then stop.
Now some people don’t know how to make looping videos, so in this article, we are going to discuss how to loop a video on iPhone videos and also how to loop YouTube videos on iPhone. Let’s get started.
- Part 1: Convert iPhone Live Photos to a Loop Video
- Part 2: Repeat Slideshow Video to Loop on iPhone
- Part 3: Loop YouTube Videos On iPhone
- Part 4: Best Apps to Loop Videos on iPhone and iPad
- Part 5: Better Way to Loop and Create Boomerang Videos in Filmora Video Editor
- Part 6: Frequently Asked Questions About Choosing Best Free Video Editor for Windows
Part 1: How to Convert iPhone Live Photos to a Loop Video
A loop video is a short video that plays in repeat/ indefinitely. Loop videos can be created with features on social media apps and third-party apps.
iPhone has a setting that allows you to edit the photos to loop or bounce videos, and it only works with a photo feature called ‘live photo’. The live photo feature records 1.5 seconds moving picture when you click on the shutter button.
The live photo feature can be edited to create a loop video, and you can do that by following these steps:
- Before creating the video, you need to have the live picture saved on your phone.
To do this, capture a live photo by opening your camera app. Then click on the live photo icon, which is located in the upper right corner. And tap on the shutter button.
- Afterward, you locate the live photo you want to convert to a loop video by going to the Photos apps. Then click on Albums > Media Types> Live photos.
- After locating and clicking on the live picture, you will see the Live tab in the upper left corner. Click on the arrow down to view other options, including Loop, Bounce, and long exposure.
- Select the effect you want to create (loop) and save the file. The loop feature plays the video in a one-way order. So, to make it more interesting, you can select the bounce effect, which makes it play back and forth.
- You can share the created loop video with the share icon at the lower-left corner.
Part 2: Repeat Slideshow to Loop Video on iPhone for Free
Slideshow videos are a very fun way to see your content. People gather around a screen to enjoy these beautiful memories of their life. Here is a step-by-step guide on how to loop a slideshow video on iPhone.
- First, go to your gallery and select a video that you want to make a slideshow of.
- Add that video to an album in your gallery under any name.
- Pause the slideshow video, and you will see Options button at the bottom. Click it and then enable the Repeat option.
Now open that video from the album and start playing the video. That video will start playing in a loop until you make it stop.
Part 3: How to Loop YouTube Videos On iPhone?
Now coming to the part that we discussed in the intro, how to loop YouTube videos on iPhone. So here, we will show you a step-by-step guide on how to loop the videos on your iPhone.
- Launch YouTube on your iPhone and log in to your account if you are not already logged in.
- Now go to the “Search” option and lookup for the desired video that you want to loop, and add it to the playlist. There are two ways you can do that. Click and hold on to the video; a small menu will appear, then click on “Add to” to make a playlist. Start the video and then scroll down a bit and on the extreme right side, click on the “Add to” option, and then name the playlist.
- After that, go back to the main menu and on the lower bottom right side of the screen, click on “Library,” and then select the new playlist.
- Start playing the video, and under the video, click on the drop-down button, and on the left side of the drop-down screen, there is a loop button, click on that, and it will start to play the loop infinitely.
Check this ultimate guide to looping YouTube videos to get more ways.
Part 4: Best Apps to Loop Videos on iPhone and iPad
1. Loopideo - Loop Videos
Loopideo is the app on our list that is an answer to how to loop a video on iPhone. It lets you import any video from your play that you want to play in a loop. This is a great tool when it comes to individual and organizational presentations. This powerful app can be very useful for you in many cases.
2. Loop Video – GIF Maker
The second app on our list is Loop Video GIF Maker. It is very fun and easy to use the tool. It allows you to make the videos loop by turning them into GIFs. Loop Video GIF Maker allows you to import any video from your gallery into your app. You can then convert into a looping GIF. You can also choose the playback speed of the GIF after you can export it to the gallery or upload it to your social media directly from the app.
3. Loopideo Pro
Loopideo Pro is a more feature-filled app on the App Store. Loopideo allows you to make the videos loop an unlimited amount of times. You can also choose the formats that you want to convert the looping video into. This app also gives you the option to choose the playback speed and then can also convert it into GIF speed so that you can save it in your gallery.
4. iMovie
iMovie is a more professional app that is available on the list. This app allows you to loop not only the video but also edit the video. This allows you to play the video in a loop for an unlimited amount of time in the built-in player, but when it comes to saving the looping video, it is not possible because you would need an unlimited amount of space to save that video.
5. Looper
The last app on our list is a looper, and it is a very fun and easy-to-use app available on this list. Choose a video from your gallery, Local Videos, or iCloud Drive. Select the times you want the video to repeat and play. You can also export your video in reverse or in GIF format.
Bonus: Record a Looping Video with Boomerang app on iPhone
To make a looping video on your iPhone, you can either download the boomerang app or use the boomerang video on Instagram.
If you are using the Boomerang app, take these steps to make a looping video:
- Launch the Boomerang from Instagram app on your iPhone, if you haven’t installed it already, click on the search bar and type in Boomerang in the App Store.
- The welcome screen will appear, swipe left and tap on Get started. Allow it to access to your camera, location, and photos. After you are done setting up, you can make the videos.
- To make a boomerang video, click and hold the shutter button. Hold the shutter for a few seconds and move the phone across the image or scene.
- A preview of the looping video will appear; tap on Done to save the video. Or click on the X symbol to make a new video.
- You can change the settings to record a selfie video by clicking on the curved arrows symbol. And you can also tap the lightning sign to put the flash on and off.
To make the video with the Instagram Boomerang feature:
- Open the Instagram app, and then swipe left as if to add a story.
- Click on the boomerang icon (infinity symbol). Press and hold the shutter to make the video.
- Preview the video, and you can add texts, songs, markups, and stickers to the video.
- And then click on the arrow-down symbol to save/ download the video. You can share the video to close friends or your story.
Part 5: What If You’d Like to Loop Videos on Computer?
Filmora is one of the most popular video editors among video creators. It gives you high-quality end product, smooth slowing down & speeding up movements, voiceovers on top of music tracks and transitions between audio & video clips. But another amazing benefit of this computer video editor is that you can produce a loop video.
![]()
The Best Video Looper on Windows and Mac
- Loop and repeat videos multiple times
- Copy and paste clips easily
- Built-in plentiful templates and effects
- Export to MP4, MOV, MKV, GIF and multiple formats
For Win 7 or later (64-bit)
Secure Download
For macOS 10.14 or later
Secure Download
Click here to get Filmora for PC by email
or Try Filmora App for mobile >>>
download filmora app for ios ](https://app.adjust.com/b0k9hf2%5F4bsu85t ) download filmora app for android ](https://app.adjust.com/b0k9hf2%5F4bsu85t )
In this part, I’m going to show you how to create looping video in Filmora video editor with the reverse effect. It’s actually really easy and doesn’t require any complicated steps. You’ll be able to create a cool, looping video in no time! So, let’s get started!
Step 1: Import Videos to Filmora video editor
Launch Filmora video editor on your Windows or Mac computer and then make a new project. Import videos as you can see it has been already imported all the media in the media library from your which you want to loop effect, and then drag the video clip to the timeline.
Step 2: Copy and Paste the Video
After drag and drop the video to the timeline, make a copy of it (Ctrl+C). Go to the last frame and paste this video again.
Step 3: Enable Reverse Speed effect
Right click on the pasted video and go to Speed and Duration option in which custom speed dialog box where you can adjust the speed.
In the Custom Speed dialog box you will find the speed, duration, reverse and ripple options. To make a video with loop effects, click the Reverse option to reverse the video play back from end to start frames automatically. Click OK to save the settings.
Now you have got a video with one looping count, if you want the video to loop several times, you can select these 2 clips and paste it based on your needs to get a continuous looping effect.

We hope you found this post helpful in learning how to create looping video with Filmora video editor. This makes them perfect for use as GIFs because they are never ending! What’s more, you can create a looping video in Filmora video editor by adding a sound that plays continuously. If you’re looking to make an endlessly repeating animated image or video clip using just one still image, look no further than Filmora video editor. It’s easy and fun to use.
For Win 7 or later (64-bit)
Secure Download
For macOS 10.14 or later
Secure Download
Click here to get Filmora for PC by email
or Try Filmora App for mobile >>>
download filmora app for ios ](https://app.adjust.com/b0k9hf2%5F4bsu85t ) download filmora app for android ](https://app.adjust.com/b0k9hf2%5F4bsu85t )
Part 6: Frequently Asked Question About Looping Videos on iPhone
- What is a looping video?
It means a video that repeats for a specific number of times or maybe an unlimited amount of times automatically. For example, a GIF.
- Can I loop videos an unlimited number of times?
Yes, it is possible to loop a video an unlimited amount of times. You can learn how to loop a video on iPhone by using the methods that we discussed above in the whole article. It is not possible to save the infinitely looping because it will take an infinite amount of memory.
- Does the view count if I play a YouTube video in a loop?
No, YouTube will not count repeated views if they all come over and over again from the same sources. This is to maintain the overall quality of YouTube and make it scam-free.
For Win 7 or later (64-bit)
Secure Download
For macOS 10.14 or later
Secure Download
Click here to get Filmora for PC by email
or Try Filmora App for mobile >>>
download filmora app for ios ](https://app.adjust.com/b0k9hf2%5F4bsu85t ) download filmora app for android ](https://app.adjust.com/b0k9hf2%5F4bsu85t )
Shanoon Cox
Shanoon Cox is a writer and a lover of all things video.
Follow @Shanoon Cox
Also read:
- In 2024, Discovering the Top 5 Smarter URL Lengtheners for YouTube
- Key Takeaways on YouTube TV An Overview of Its Advantages
- Top 9 Mobile Apps for Downloading YouTube Videos (Android)
- Leading Yoga Vids for a Healthier You at Home
- Viral Video Evolution YouTube's Favorites
- [Updated] Channel Cross-Promotion The Art of Collaborative Co-Stars
- [Updated] Essential Insights for ASMR Aficionados
- [New] Cutting-Edge Voice Altering Apps for Vloggers
- Captivating Audiences with Thrilling Unboxing Vids for 2024
- Comprehensive Review Evolution of Digital Entertainment
- Essential Low-Cost Footage Source Directory for 2024
- In 2024, Boost Video Engagement Top 8 YouTube Ranks Unveiled
- How to Animate and Make Your Own Effects
- Elevate Your Content's Visibility Strategic Use of Imagery in Video Thumbnails
- In 2024, Edit Like a Champion—Top Strategies for Beginner YouTubers
- [New] 5 Amazing Free YouTube Intro Makers Ranked
- [Updated] Designing Effective Video Previews for Channels
- In 2024, Dive Deep Into the Past with These Top 10 Student-Friendly YT Channels
- [New] Amp Up Your Media Get Free Soundtracks
- 2024 Approved Does the Sub4Sub Strategy Improve Content Consumption?
- 2024 Approved Channel Wrap-Up Strategies - Free YouTube End Screens Tutorial
- Beam It Up A Step-By-Step Approach to YouTube Video Luminance for 2024
- Perfecting Your Playlists Adapting Spotify to the YouTube Music Ecosystem
- 2024 Approved Business Beginnings Easier Than Ever Top 10 YouTube Channel Ideas
- Sound Engineering Tips to Elevate Your Video Content
- In 2024, Behind-the-Scenes Insights Deciphering What 'Unlisted' Means for YouTube Users
- Celebrating Beauty Innovators YouTube's Elite List
- In 2024, Best Free Video Cutting Apps Your Go-To List
- Achieving Affiliate Success with Online Videos
- In 2024, A Vlogger's Dream Exploring the Best 12 Video Capture Devices
- How to Confirm Your YouTube Account Securely?
- In 2024, Best Video Apps Review YouTube iPhones & Androids
- A Quick Guide to Purging Watched YouTube Videos for 2024
- [New] Crafting Easy YouTube Animation Subscribe Bars in Filmora
- Viewer Recognition The Play Button Reward Ribbon
- From Phone Ideas to Online Presence Simple YouTube Channel Creation Tips
- What's the Take-Home From Each YouTube Sponsored Play?
- Efficient iOS-Based Strategies for YouTube Postings
- The Expert's Guide Quick Removal of Your Youtube Comments
- Generate Interest Making Your Own YouTube Intros
- 2024 Approved Enhance Video Magic Find Your Favorite Mobile Edit Apps
- Outsmart Automated Views to Propel Your Channel
- Feast Your Eyes on 9 Whole-Film Winter Wonders No Charge
- In 2024, Ensuring Thumbnails Show Shorts Video Troubleshooting
- Access YouTube Tracks Without Spending a Dime 25+ No-Cost Audio Extractors
- [New] Editorial Spellbinding Secrets Revealed
- [Updated] Effortless Subscriber Acquisition for Enhanced Viewership
- 2024 Approved Best 5 YouTube Tag Generators & Tips to Tag Videos Properly
- In 2024, Elevating Audio Rates on YouTube Dual Device Approach
- Play Store Not Working On Motorola Moto G34 5G? 8 Solutions Inside | Dr.fone
- 9 Solutions to Fix Honor Play 8T System Crash Issue | Dr.fone
- How to Fake Snapchat Location on OnePlus Ace 2 Pro | Dr.fone
- [New] Laughing on TikTok Current Hits & Personalities
- The Key to Social Media Dominance Learning the Craft of Self-Replication on TikTok for 2024
- [Updated] In 2024, Maximizing TikTok Video Velocity Effectively
- In 2024, How to Change Realme Narzo 60 5G Location on Skout | Dr.fone
- [Updated] Affordable, High-Quality ASMR Recording Devices Revealed
- Full Solutions to Fix Error Code 920 In Google Play on Itel S23+ | Dr.fone
- Easy Guide to Xiaomi 14 Ultra FRP Bypass With Best Methods
- 2024 Approved TwitterVidsToWebM Direct Media Conversion
- How to Unlock Vivo Y36 Phone without Google Account?
- Steps to Sign-In with Google Meet (Laptop & Mobile)
- [New] SharpSnap Recorder for Windows 10 for 2024
- In 2024, Top 10 Vivo S17 Android SIM Unlock APK
- [New] In 2024, Elite Tips for Crafting Winning FB Videos
- Reliable User Guide to Fix Xiaomi Redmi Note 12 Pro 5G Running Slow and Freezing | Dr.fone
- Updated The Top 7 Techniques for Adding Humor Through Vocal Modification on the Phone
- [Updated] Windows & Mac-Friendly Techniques for FB Video Download
- How Do You Get Sun Stone Evolutions in Pokémon For Realme 11 Pro+? | Dr.fone
- Step Into the Future The Best 10 FREE Video Call Applications
- Remove FRP Lock on Motorola Moto G 5G (2023)
- In 2024, BenQ BL2711U Revealed Embracing the Future of 4K Technology
- In 2024, Additional Tips About Sinnoh Stone For Honor 90 | Dr.fone
- New In 2024, Go-To Websites Offering Complimentary Acoustic Guitar Melodies & Visual Inspirations
- Unveiling the Potential of Today's Drones for Tomorrow
- How To Bypass Poco X6 Pro FRP In 3 Different Ways
- [New] Deciphering Your Communication Needs Discord vs Skype Choice
- In 2024, Easy Tutorial for Activating iCloud on Apple iPhone 13 mini Safe and Legal
- Face Fluidity Adding Dynamic Blur to Photos via Picsart
- New Expert Tips for Seamless Audio Overlay on Videos Using Filmora for 2024
- How to Mirror Your Vivo V29 Screen to PC with Chromecast | Dr.fone
- Why Your Vivo X Fold 2 Screen Might be Unresponsive and How to Fix It | Dr.fone
- [New] Savvy Screens #10 Best Tools for Live Recording
- How to Mirror Tecno Spark Go (2023) to Mac? | Dr.fone
- [Updated] In 2024, Apeaksoft 2023 Screens Recording Insights
- In 2024, How to Unlock Apple iPhone 6s Plus with a Mask On
- How Can I Use a Fake GPS Without Mock Location On Oppo K11x? | Dr.fone
- New Revolutionize Your Edits The Best 10 Final Cut Pro X Plugins Free and Paid for 2024
- [Updated] Social Media Wiz How to Create Captivating Slideshow Stories for Facebook for 2024
- Laugh Ledger Spotlight on Rising Comedy Creators for 2024
- [New] In 2024, Discord's Best Sound Experience Unlocked by Advanced Bot Technologies
- Top 10 Audio Enhancement Software for iOS Devices
- [Updated] Expert Choice Top 10 Windows & PC TikTok Editors for 2024
- Updated The Best Free Divx Video Splitters and Cutters for 2024
- Title: In 2024, Creating a Narrative Structure in Online Video Tutorials
- Author: Steven
- Created at : 2024-05-25 19:38:05
- Updated at : 2024-05-26 19:38:05
- Link: https://youtube-clips.techidaily.com/in-2024-creating-a-narrative-structure-in-online-video-tutorials/
- License: This work is licensed under CC BY-NC-SA 4.0.
