
:max_bytes(150000):strip_icc()/004-how-to-see-everyone-on-google-meet-5088410-3eeb6cb239b84b20a4eb9c000cf45dd7.jpg)
In 2024, Crafting Universal Streams for YouTube & Beyond Networks
Crafting Universal Streams for YouTube & Beyond Networks
How to Stream to YouTube, Facebook, Twitch and Over 30 Platforms

Richard Bennett
Mar 27, 2024• Proven solutions
- Part1.How to Stream to YouTube, Twitch, Hitbox and other Platforms at the same time?
- Part2.How to Stream to YouTube and Facebook at the same time Without Restream Platform?
- Part3.About Restream.io
How to Stream to YouTube, Twitch, Hitbox and other Platforms at the same time?
Step 1: To begin with the process, first of all you need to go to <https://restream.io/ >. Sign up here and login with your account.

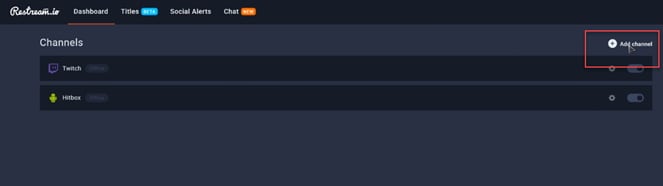
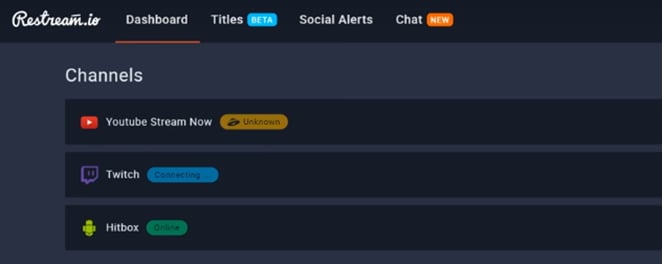
Step 2: Now go to the dashboard and simply add your channel.
Step 3: Here you will find so many streaming platforms like YouTube, uStream, Dailymotion, HitBox etc.
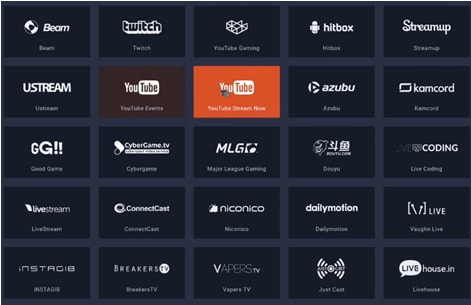
Step 4: Select your desired platform out of this wide list and then sign in.

Step 5: The screen will proceed with simple to follow steps; go with specified instructions and sign in to your desired streaming platform.
Step 6: Now you can easily turn On-Off your channels for streaming.
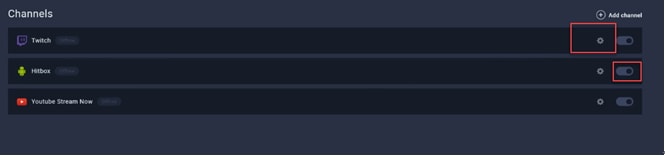
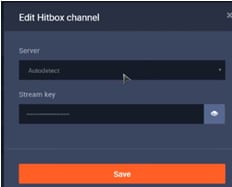
Step 7: It is time to edit your channel.
Step 8: Now put eye catching title for your live stream.
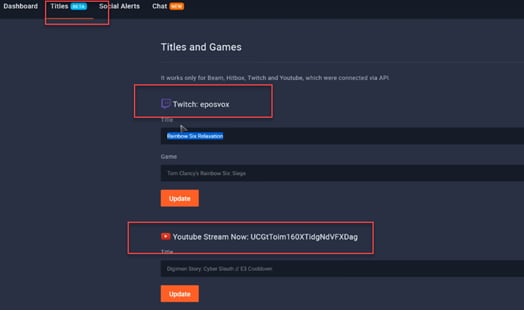
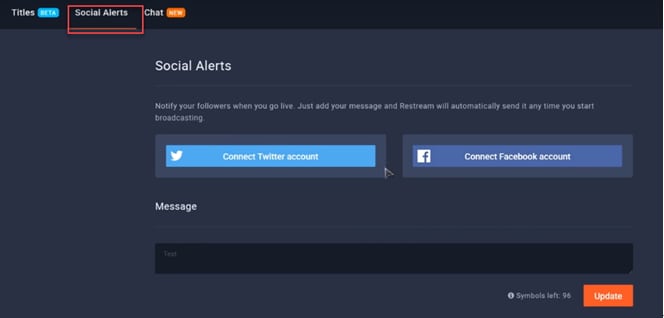
Step 9: This platform also allow users to get connected to their SNS account for the social alerts.
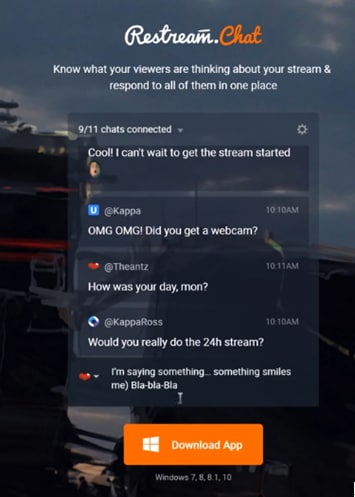
Step 10: Users can also manage their chats using interactive chat tools.
Step 11: Once you are done with all above settings on restream.io then it is time to start with streaming software. Professionals recommend using OBS, Wirecast or xSplit for best results and easy interface.

Step 12: Let us considered OBS for current restream.io services.
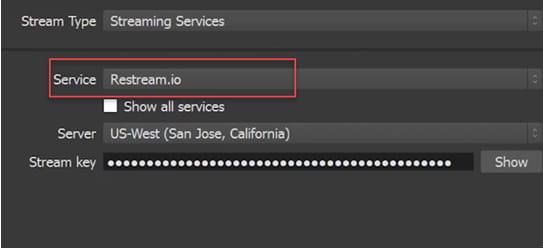
Step 13: Now simply copy your RTMP URL as well as the stream key from restream.io platform and paste it in the specified field on streaming software.
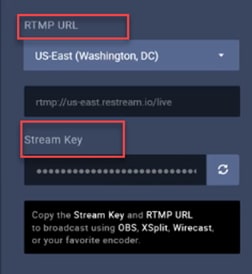
Step 14: As soon as you finished these settings then hit the Stream Button. Soon you will be able to find your videos on selected live stream platforms.
How to Stream to YouTube and Facebook at the same time Without Restream Platform?
Step 1: First of all you need to download Wirecast software tool on your device. Choose anyone from Wirecast Studio and Wirecast Pro as per your budget and needs. Get it installed.
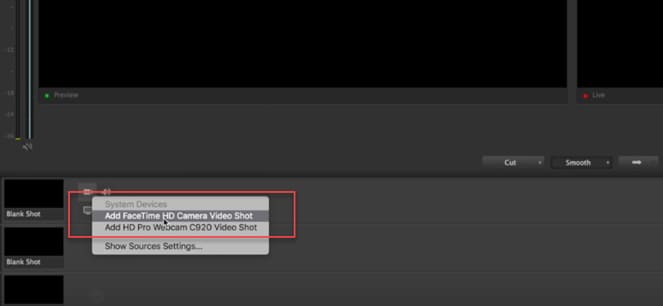
Step 2: Launch wirecast on your system and then add your camera.
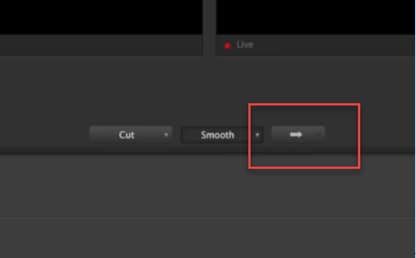
Step 3: Once you have added your camera to this tool then simply hit the Go Live button.
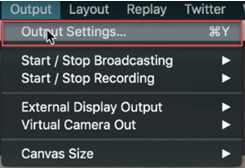
Step 4: Move to Output and adjust settings.
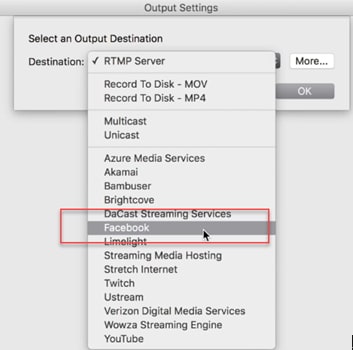
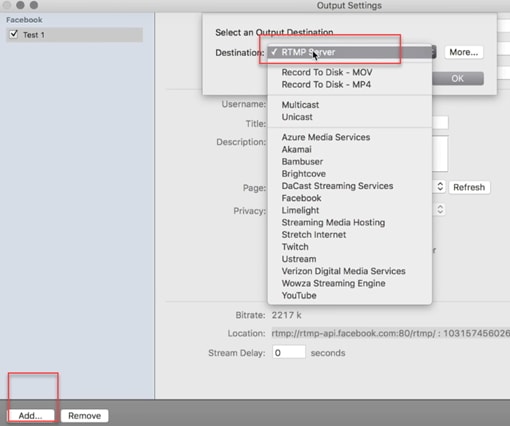
Step 5: From the drop down menu appearing on screen, choose Facebook as your destination.
Step 6: It is time to enter name and then click on Authenticate.
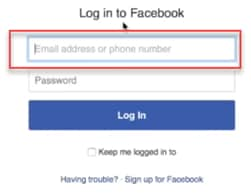
Step 7: You need to login to facebook now.

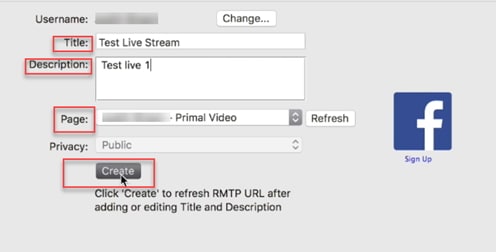
Step 8: Add your live stream title and an eye catching description.
Step 9: Select page for streaming and then hit the Create button.
Step 10: As soon as your facebook stream is developed, then go to bottom left corner of your screen and then click add. Create another live stream but instead of choosing YouTube as your preferences, select RTMP.
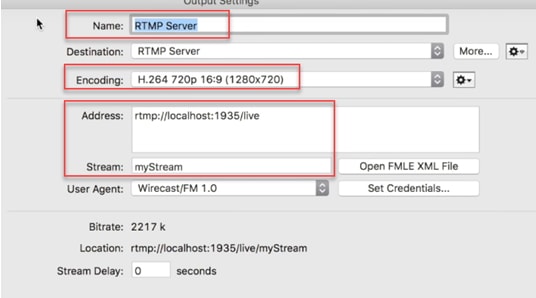
Step 11: Now add name for your YouTube stream and adjust the encoding quality to 720p. After this you need to move to YouTube and get your stream name as well as address from this platform.
Step 12: Move to YouTube creator studio and then select live streaming. Choose live stream now option and then find encoder setup.

Step 13: It is time to copy the server URL and paste it on Wirecast address. Also copy the stream name and paste it on Wirecast platform.
Step 14: Once all these settings are complete then hit OK.
Step 15: Now click Stream button on Wirecast platform.

About Restream.io
Restream.io allows streaming over 30 plus platforms with easy processing and intuitive interface. The best thing to know about this platform is that it never creates watermarks or pre-roll ads and there is no specific limit or restriction for stream duration. It not even forces users on specific bitrate limits. In simple words, here users can work with freedom and enjoy streaming with best results.
Restream Chats are highly interactive where users can add interesting imojies to grab more attention. It can be accessed on Window platform with all interactive features.
Richard Bennett
Richard Bennett is a writer and a lover of all things video.
Follow @Richard Bennett
Richard Bennett
Mar 27, 2024• Proven solutions
- Part1.How to Stream to YouTube, Twitch, Hitbox and other Platforms at the same time?
- Part2.How to Stream to YouTube and Facebook at the same time Without Restream Platform?
- Part3.About Restream.io
How to Stream to YouTube, Twitch, Hitbox and other Platforms at the same time?
Step 1: To begin with the process, first of all you need to go to <https://restream.io/ >. Sign up here and login with your account.
Step 2: Now go to the dashboard and simply add your channel.
Step 3: Here you will find so many streaming platforms like YouTube, uStream, Dailymotion, HitBox etc.
Step 4: Select your desired platform out of this wide list and then sign in.
Step 5: The screen will proceed with simple to follow steps; go with specified instructions and sign in to your desired streaming platform.
Step 6: Now you can easily turn On-Off your channels for streaming.
Step 7: It is time to edit your channel.
Step 8: Now put eye catching title for your live stream.
Step 9: This platform also allow users to get connected to their SNS account for the social alerts.
Step 10: Users can also manage their chats using interactive chat tools.
Step 11: Once you are done with all above settings on restream.io then it is time to start with streaming software. Professionals recommend using OBS, Wirecast or xSplit for best results and easy interface.
Step 12: Let us considered OBS for current restream.io services.
Step 13: Now simply copy your RTMP URL as well as the stream key from restream.io platform and paste it in the specified field on streaming software.
Step 14: As soon as you finished these settings then hit the Stream Button. Soon you will be able to find your videos on selected live stream platforms.
How to Stream to YouTube and Facebook at the same time Without Restream Platform?
Step 1: First of all you need to download Wirecast software tool on your device. Choose anyone from Wirecast Studio and Wirecast Pro as per your budget and needs. Get it installed.
Step 2: Launch wirecast on your system and then add your camera.
Step 3: Once you have added your camera to this tool then simply hit the Go Live button.
Step 4: Move to Output and adjust settings.
Step 5: From the drop down menu appearing on screen, choose Facebook as your destination.
Step 6: It is time to enter name and then click on Authenticate.
Step 7: You need to login to facebook now.
Step 8: Add your live stream title and an eye catching description.
Step 9: Select page for streaming and then hit the Create button.
Step 10: As soon as your facebook stream is developed, then go to bottom left corner of your screen and then click add. Create another live stream but instead of choosing YouTube as your preferences, select RTMP.
Step 11: Now add name for your YouTube stream and adjust the encoding quality to 720p. After this you need to move to YouTube and get your stream name as well as address from this platform.
Step 12: Move to YouTube creator studio and then select live streaming. Choose live stream now option and then find encoder setup.
Step 13: It is time to copy the server URL and paste it on Wirecast address. Also copy the stream name and paste it on Wirecast platform.
Step 14: Once all these settings are complete then hit OK.
Step 15: Now click Stream button on Wirecast platform.
About Restream.io
Restream.io allows streaming over 30 plus platforms with easy processing and intuitive interface. The best thing to know about this platform is that it never creates watermarks or pre-roll ads and there is no specific limit or restriction for stream duration. It not even forces users on specific bitrate limits. In simple words, here users can work with freedom and enjoy streaming with best results.
Restream Chats are highly interactive where users can add interesting imojies to grab more attention. It can be accessed on Window platform with all interactive features.
Richard Bennett
Richard Bennett is a writer and a lover of all things video.
Follow @Richard Bennett
Harness the Full Potential of Your YouTube Content Using WMM
How to Edit YouTube videos in Windows Movie Maker
Richard Bennett
Mar 27, 2024• Proven solutions
We all know YouTube is an important platform for sharing and watching videos. Are you a YouTuber looking for how to edit YouTube video with the best YouTube movie maker? You have come the right place if you wonder how to edit a video for YouTube on Windows. While, if you have free Windows Movie Maker already installed on your computer, you can edit YouTube videos in Windows Movie Maker and then upload to YouTube directly. In this article, I will show you all the information you need to know about how to edit a video for YouTube in Windows Movie Maker with step by step.
You may also like : The Ultimate Guide to YouTube Video Editing Tools
In case that you do not have free Windows Movie Maker in your computer, you may need to download it from other website since Microsoft has removed the downloading link after January 2017. Please pay attention when downloading the Movie Maker application from website and never download it from untrusted website.
A better way to edit YouTube Videos - Wondershare Filmora supports many formats including MP4, MOV, MKV, and FLV, which means that you will not need to convert the files before and after editing. Like Windows Movie Maker, Wondershare Filmora is easy to use but comes with many more features that allow for professional-grade videos. One of these features is the animated text. There are also built-in presets that you can use to quickly edit your videos. There is also the option to directly upload a video to YouTube from Filmora, so no time is wasted waiting for a video to process.
 Download Mac Version ](https://tools.techidaily.com/wondershare/filmora/download/ )
It is hard to list all the information of how to use Filmora to edit YouTube videos here, but we have composed an article about how to edit videos, you can check How to Edit Video in Filmora: Beginners’ Guide .
Windows Movie Maker YouTube: How to Edit YouTube Videos?
Before editing the video in Windows Movie Maker , you have to make sure that the video format is supported by free Windows Movie Maker. As you may know that Window Movie Maker only accept the following file formats at importing: .WMV/.ASF, .MPG (MPEG-1), .AVI (DV-AVI), .WMA, .WAV, and .MP3. Importing formats such as MP4/3GP, FLV and MOV, are also supported you are running Windows 7 or later and you have installed the necessary codec as well.
If your videos are not supported at importing in Windows Movie Maker, you may need to converter it first or choose a video editor like Filmora video editor which supports the almost all popular formats.
Step 1: Import Video Files Into Windows Movie Maker

To import video or photo into Windows Movie Maker, you can click on the button Add Videos or Photos located at the top of the program. A file window will open, and you can select the videos from any area of your computer. Once you have the files selected, click OK to import the files to the storyboard in the right hand panel.
You can also choose to record a webcam on your windows 10 or windows 7 computer and use it as the material.

Step 2: Trim/Cut/Split/Combine videos in Windows Movie Maker
Preview the video clips in the preview box. You can always use the Previous Frame or Next Frame to preview video frame by frame. When editing a video for YouTube, you may need to trim to remove unwanted parts from the video , combine several clips into a new one or split the video into several smaller parts .
To remove any parts of the video that you do not want in the final version of the video, locate the start frame that you want to remove in the storyboard, and then click the Split button to get the starting point of the split segment, and then locate the end frame that you want to remove and click Split again. Right-click the split video clip you want to remove and select Remove from the context menu. This can be done as many times as you want.

Step 3: Apply Transitions and Visual Effects to YouTube Video
Once you have all the clips that you want in your video, you can then add transitions to the video. At the top of Windows Movie Maker, there is a button that says Animations. This will open a menu that has different options. You need to select the clip, and add the transition that you want. The program does the rest of the work. You can see how it looks by clicking play.

Applying visual effects, overlays and filters work in the same way, but you click on Visual Effects, which is located at the top of the window. You can apply effects to any clip as along as the clip is selected first.
Step 4: Edit/Mute Audio in Video or Add New Audio Sound
If you are planning on adding music to your video, you should think about muting the audio in video or decrease the audio volume in Video. Double click the video clip to enter the Edit panel, and then then click on Video Volume button. You can then mute the audio by drag the volume slider to the left end. Of course, you can adjust the video audio volume per your need. This will affect the all the sounds on that video clip. If you want to mute all the clips, you need to select all the clips, or you will end up with one clip with no sound, and the rest of the clips having sound.

Once the sound has been adjusted on the clips, you can add new audio sound to the video. You can record narrations for your YouTube video in Windows Movie Maker by clicking Record narration button in Home tab and add music to video by clicking Add music button and select the music to import it. You can add music from your computer or find new music sound from AudioMicro, Vimeo or Free Music Archive online.

After importing the new audio file for your YouTube video, you can now adjust the music volume. In the Music Tools tab, there is an Option tab, you can control the volume and other options about the music.

Step 5: Add Title and Text to Video for YouTube
Windows Movie Maker allows you to add different types of text freely. You will see 3 buttons that allow different types of text to video: stationary title, captions and rolling credits. Click on Title, you can add text before the video begins; select Caption, you will write text to the video frames; and click Credits will add end credits to the end of the video.

After selecting the type of text you want, you can enter your text and edit the text effects. You can change the text duration and apply text visual effects, and change the text outline size and more.

Check the detailed information of How to Add Text in Windows Movie Maker .
Step 6: Save and Publish
Once all the edits are done, you can save the video by clicking on File then clicking on Publish Movie. You will need to select where you want to save the file and the file type. Since we are editing videos for YouTube, choose YouTube to upload the edited video to YouTube. You can also save the video in computer with different formats, resolution or burn to DVD. Windows Movie Maker also allows you to save the Video for Email or for mobile devices.

Conclusion
That’s it. That’s how you can edit your YouTube video with Windows Movie Maker. It is a great YouTube video editor to make video with various features. However, you may consider other YouTube movie maker as it won’t updated. Why not try Filmora. It is one of the best movie editor for YouTube. Download it now to have a try!
Download Mac Version ](https://tools.techidaily.com/wondershare/filmora/download/ )
Richard Bennett
Richard Bennett is a writer and a lover of all things video.
Follow @Richard Bennett
Richard Bennett
Mar 27, 2024• Proven solutions
We all know YouTube is an important platform for sharing and watching videos. Are you a YouTuber looking for how to edit YouTube video with the best YouTube movie maker? You have come the right place if you wonder how to edit a video for YouTube on Windows. While, if you have free Windows Movie Maker already installed on your computer, you can edit YouTube videos in Windows Movie Maker and then upload to YouTube directly. In this article, I will show you all the information you need to know about how to edit a video for YouTube in Windows Movie Maker with step by step.
You may also like : The Ultimate Guide to YouTube Video Editing Tools
In case that you do not have free Windows Movie Maker in your computer, you may need to download it from other website since Microsoft has removed the downloading link after January 2017. Please pay attention when downloading the Movie Maker application from website and never download it from untrusted website.
A better way to edit YouTube Videos - Wondershare Filmora supports many formats including MP4, MOV, MKV, and FLV, which means that you will not need to convert the files before and after editing. Like Windows Movie Maker, Wondershare Filmora is easy to use but comes with many more features that allow for professional-grade videos. One of these features is the animated text. There are also built-in presets that you can use to quickly edit your videos. There is also the option to directly upload a video to YouTube from Filmora, so no time is wasted waiting for a video to process.
Download Mac Version ](https://tools.techidaily.com/wondershare/filmora/download/ )
It is hard to list all the information of how to use Filmora to edit YouTube videos here, but we have composed an article about how to edit videos, you can check How to Edit Video in Filmora: Beginners’ Guide .
Windows Movie Maker YouTube: How to Edit YouTube Videos?
Before editing the video in Windows Movie Maker , you have to make sure that the video format is supported by free Windows Movie Maker. As you may know that Window Movie Maker only accept the following file formats at importing: .WMV/.ASF, .MPG (MPEG-1), .AVI (DV-AVI), .WMA, .WAV, and .MP3. Importing formats such as MP4/3GP, FLV and MOV, are also supported you are running Windows 7 or later and you have installed the necessary codec as well.
If your videos are not supported at importing in Windows Movie Maker, you may need to converter it first or choose a video editor like Filmora video editor which supports the almost all popular formats.
Step 1: Import Video Files Into Windows Movie Maker
To import video or photo into Windows Movie Maker, you can click on the button Add Videos or Photos located at the top of the program. A file window will open, and you can select the videos from any area of your computer. Once you have the files selected, click OK to import the files to the storyboard in the right hand panel.
You can also choose to record a webcam on your windows 10 or windows 7 computer and use it as the material.
Step 2: Trim/Cut/Split/Combine videos in Windows Movie Maker
Preview the video clips in the preview box. You can always use the Previous Frame or Next Frame to preview video frame by frame. When editing a video for YouTube, you may need to trim to remove unwanted parts from the video , combine several clips into a new one or split the video into several smaller parts .
To remove any parts of the video that you do not want in the final version of the video, locate the start frame that you want to remove in the storyboard, and then click the Split button to get the starting point of the split segment, and then locate the end frame that you want to remove and click Split again. Right-click the split video clip you want to remove and select Remove from the context menu. This can be done as many times as you want.
Step 3: Apply Transitions and Visual Effects to YouTube Video
Once you have all the clips that you want in your video, you can then add transitions to the video. At the top of Windows Movie Maker, there is a button that says Animations. This will open a menu that has different options. You need to select the clip, and add the transition that you want. The program does the rest of the work. You can see how it looks by clicking play.
Applying visual effects, overlays and filters work in the same way, but you click on Visual Effects, which is located at the top of the window. You can apply effects to any clip as along as the clip is selected first.
Step 4: Edit/Mute Audio in Video or Add New Audio Sound
If you are planning on adding music to your video, you should think about muting the audio in video or decrease the audio volume in Video. Double click the video clip to enter the Edit panel, and then then click on Video Volume button. You can then mute the audio by drag the volume slider to the left end. Of course, you can adjust the video audio volume per your need. This will affect the all the sounds on that video clip. If you want to mute all the clips, you need to select all the clips, or you will end up with one clip with no sound, and the rest of the clips having sound.
Once the sound has been adjusted on the clips, you can add new audio sound to the video. You can record narrations for your YouTube video in Windows Movie Maker by clicking Record narration button in Home tab and add music to video by clicking Add music button and select the music to import it. You can add music from your computer or find new music sound from AudioMicro, Vimeo or Free Music Archive online.
After importing the new audio file for your YouTube video, you can now adjust the music volume. In the Music Tools tab, there is an Option tab, you can control the volume and other options about the music.
Step 5: Add Title and Text to Video for YouTube
Windows Movie Maker allows you to add different types of text freely. You will see 3 buttons that allow different types of text to video: stationary title, captions and rolling credits. Click on Title, you can add text before the video begins; select Caption, you will write text to the video frames; and click Credits will add end credits to the end of the video.
After selecting the type of text you want, you can enter your text and edit the text effects. You can change the text duration and apply text visual effects, and change the text outline size and more.
Check the detailed information of How to Add Text in Windows Movie Maker .
Step 6: Save and Publish
Once all the edits are done, you can save the video by clicking on File then clicking on Publish Movie. You will need to select where you want to save the file and the file type. Since we are editing videos for YouTube, choose YouTube to upload the edited video to YouTube. You can also save the video in computer with different formats, resolution or burn to DVD. Windows Movie Maker also allows you to save the Video for Email or for mobile devices.
Conclusion
That’s it. That’s how you can edit your YouTube video with Windows Movie Maker. It is a great YouTube video editor to make video with various features. However, you may consider other YouTube movie maker as it won’t updated. Why not try Filmora. It is one of the best movie editor for YouTube. Download it now to have a try!
Download Mac Version ](https://tools.techidaily.com/wondershare/filmora/download/ )
Richard Bennett
Richard Bennett is a writer and a lover of all things video.
Follow @Richard Bennett
Also read:
- [Updated] Decoding the Functionality of YouTube's Media Hub
- A Novice's Roadmap to YouTube Traffic Success for 2024
- Increase Viewership Quickly Smart Streaming Across Platforms Like Youtube and Twitch
- [Updated] A Practical Approach to Incorporate YouTube Playlists Online
- Elevate Your Content's Visibility with These Gadgets for 2024
- [Updated] Entry-Level Expenditure Cost-Effective Platforms for YouTube Purchases
- Crack the Code Unearthing Hidden Gems in YouTube's Archive
- Streamline Your Online Listening Experience with Direct Capture
- Elevating Channel Excellence with Ideas & Vision for 2024
- [New] Achieving 1K Subs in a Weekend A Plan of Action
- In 2024, Cultivating Your Persona in the World of Gamers
- Professional & Amateur Cameras A YouTube Journey
- How to Capitalize on Youtube Shorts Must-Knows, Earning Prospects
- Moment's Best The Leading Youtube Video Tracks
- 2024 Approved Daily Dosage of Serenity Top Yoga Channels for Life
- Enhance Your Videography YouTube Studio Edition Techniques
- Unlocking Viewership on Multiple Channels (YouTube & Friends)
- [Updated] Essential Tips Creating Striking YouTube Video Previews
- 2024 Approved Access Exclusive Stock Images Through Vital 4 YouTube Sources
- Best Audio Modification Methods for YouTube Stars
- An Easy-to-Follow Guide Adding YouTube Playlists to Your Online Platform for 2024
- In 2024, Essential Video Marketing Strategies Top 8 Verified Services
- [Updated] Best Youtube Channel Name Ideas For Aspiring Vloggers & Film Makers (Maximum Length 156 Characters)
- Audio Artisans Crafting a Personal Library with 6 Best Free YouTube Apps
- [New] Elevate Your Brand Discovering the Essential 5 YouTube Strategies
- [Updated] Ace Your Look Celebrity YouTubers for the Year 2024
- Revenue Techniques for Gamers 2024
- Earnings Demystified YouTube Shorts Revenue Split Explained
- Top 9 Smartphone Gadgets for Aspiring Vloggers to Upgrade Their Craft
- [New] Discover Top Ten Unforgettable YouTube VR Videos
- 2024 Approved Craft a Memorable First Snap Your Shorts' Thumbnail Blueprint
- [Updated] Designing a Simple YouTube Subscriber Shortcut
- Sprucing Up Video Thumbnails with Captivating BGs
- 2024 Approved Clearing Tactics for YouTube's Stored Video Queue
- [Updated] 10 Best History YouTube Channels for Students & History Lovers
- [New] Elevate Video Performance Following the Path of Stars
- Cinematic Composer Software
- In 2024, Channel Title Genius Ideas for Your Video Hub
- Journey Through Time The Best History YT Channels Ranked #1-10
- [New] Composing Correspondents' Curtains
- How to Edit Audio on YouTube for 2024
- Enhancing Views with These Premium Tools for YouTube SEO
- Unraveling the Selection Process for Highlighted YouTube Comments
- [Updated] Build Your Brand with Dynamic Haul Videography
- [Updated] Captivating Charm Top Magicians & Their Video Cuts
- 2024 Approved A Comprehensive Tutorial for Transforming Vids Into Dollars
- Decode YouTube Shorts A Complete Breakdown
- Leveraging YouTube's Features to Improve Visuals
- Inspecting Dialogues in YouTube Vids
- Rapid Relay Youtube Playlists to the Public
- Excellent Top Picks Economical Cam Streaming Tech
- In 2024, Standing Out on TikTok Masterful PFP Techniques and Concepts
- [New] Advanced Screen Recorder Options for Mac, Not Including Bandicamp for 2024
- [Updated] Elevate Your Live Streaming with Phone Webcams and Filming Hacks
- [New] Streamline Social Tweet to FB Guide
- [Updated] Secrets of the Top Social Media Videos
- 9 Best Phone Monitoring Apps for Samsung Galaxy XCover 7 | Dr.fone
- 2024 Approved Ultra-High Clarity Webcam Software
- [New] 2024 Approved Free, Effortless Top 6 Online TikTop To MP3 Transformation Apps
- [Updated] The Complete Guide to Hulu Recording Across All Platforms for 2024
- How to Fix Error 495 While Download/Updating Android Apps On Vivo Y100A | Dr.fone
- [Updated] In 2024, Prime Video Streamers' Camera Picks for Quality Content
- Updated Vegas Pro vs Premiere Pro A Comprehensive Comparison for Video Editors for 2024
- Downloading SamFw FRP Tool 3.0 for Motorola Razr 40
- In 2024, Enhance Your Social Strategy with Twitter Videos & Instagram
- Mastering Facebook Giveaways A Step-by-Step Guide
- [Updated] In 2024, Digitally Rediscovering Past Facebook Sharing How-To for Tech Users
- How to retrieve erased music from ZTE Axon 40 Lite
- New How To Make Boring Videos Look Cool By B Rolls
- Innovative Filmmaking Methods for Multidevice Integration
- Unlock the Power of Visual Storytelling with Screen Capture Skills for 2024
- 2024 Approved Essential Tutorial How to Install Snapchat on macOS
- Boost Zoom Call Clarity Solving Sound Problems for 2024
- Updated 2024 Approved Unleash the Power of Voice Alteration Morphvox Techniques for Optimized Online Game Broadcasting
- New 2024 Approved The Best Things in Life Are Free Top 10 FCPX Plugins at No Cost
- New 2024 Approved Get Ready for Dramatic Effects Add Slow Mo to Your Videos for Free
- In 2024, How to Reset your Motorola G24 Power Lock Screen Password
- 2024 Approved Craft Impressive Clips With These Intros
- Does Apple iPhone SE Have Find My Friends? | Dr.fone
- 6 Ways to Change Spotify Location On Your Apple iPhone SE (2020) | Dr.fone
- Squeeze the Most Out of Your Storage 5 Best Free Video Compression Apps for 2024
- Best Camera Apps to Record Stunning Slow Movement Photos iPhone/Android
- 2024 Approved Mario Vs. Donkey Kong The Ultimate Switch Fighting Series
- Build Your Mark Affordable Logo Creation with Tailored Templates
- In 2024, OBS Studio Setting Up Your Skype Recording Environment
- In 2024, How to Turn Off Find My iPhone 8 Plus when Phone is Broken?
- In 2024, Best Pokemons for PVP Matches in Pokemon Go For Nubia Red Magic 9 Pro | Dr.fone
- Navigating Audio Tweaks Mastering Speed & Frequency Shifts Online for 2024
- New Speech Recognition Made Easy Converting Audio to Text
- [New] Screen Recording Pros Bandicam or Camtasia?
- Title: In 2024, Crafting Universal Streams for YouTube & Beyond Networks
- Author: Steven
- Created at : 2024-05-25 19:37:56
- Updated at : 2024-05-26 19:37:56
- Link: https://youtube-clips.techidaily.com/in-2024-crafting-universal-streams-for-youtube-and-beyond-networks/
- License: This work is licensed under CC BY-NC-SA 4.0.
