
:max_bytes(150000):strip_icc()/buffer-social-media-scheduling-3486540-74d00c122f704b87a889ee53de7a7eec.png)
"In 2024, Channel Naming Excellence Tips & Strategies"
Channel Naming Excellence: Tips & Strategies
Best YouTube Names Generators [+ How to Brainstorm]

Liza Brown
Oct 26, 2023• Proven solutions
It’s important to have a good name for your YouTube channel – something that people will remember. The following is a list of the 3 best YouTube name generators, an easy step-by-step for brainstorming, and instructions for updating your YouTube name.
Whether you’re a YouTuber beginner or want to improve your YouTube videos to the next level, a good YouTube video editing software will be a good helper. Wondershare Filmora is a video editor for all YouTube creators with plentiful effects and templates, and you can download it directly and have a try before purchasing.


- YouTube Name Generators
- How to Come Up With a Good YouTube Name
- How to Change Your YouTube Name
- Requesting a Custom URL for YouTube
Part 1: 3 Awesome YouTube Name Generators
Need some help brainstorming your channel name? Here are 3 tools for getting started. Even if you don’t use one of the names you generate you’ll get some great inspiration.
1. SpinXO
Key points:
- Lots of options
- Checks availability
This is a great generator. If you were brainstorming yourself, you’d probably write out a bunch of words related to yourself and the kinds of videos you want to make and see what goes together. SpinXO does that for you, and mixes in other words that sound good in usernames.
Here’s what happened when I tried to name a hypothetical baking channel:
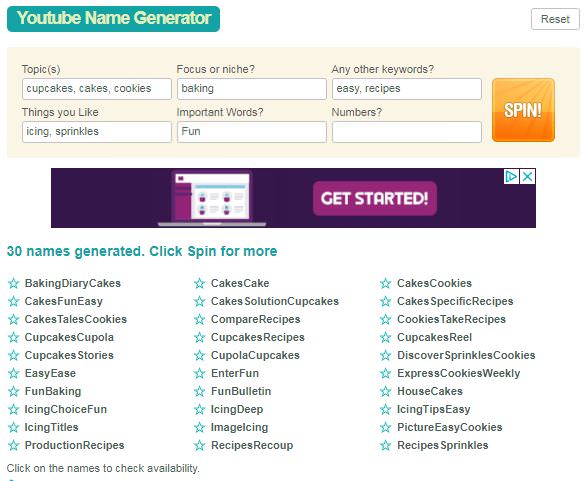
Not all of the results are great, but there are some cool sounding options in there.
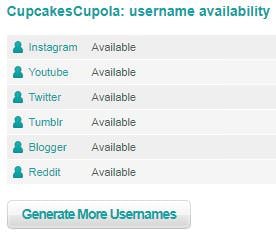
One of the most useful features of SpinXO is that you can check the availability of the usernames. I liked the sound of CupcakesCupola, and when I clicked on it I was able to see that nobody else was using it on other sites.
2. Name Generator
Key points:
- Can be hilarious
- Names tend to be a bit long
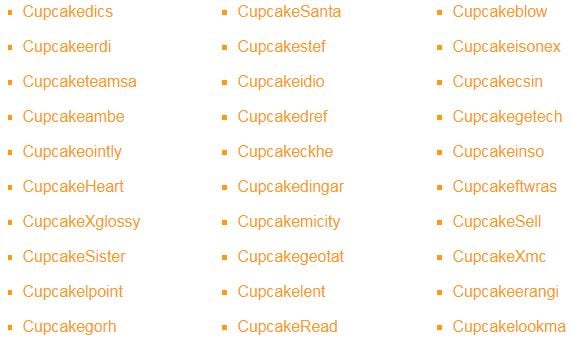
This is a fairly limited generator. You plunk in a prefix and a suffix, and it generates a random word or term to stuff between them. Here’s what I got for my fictional cupcake channel:
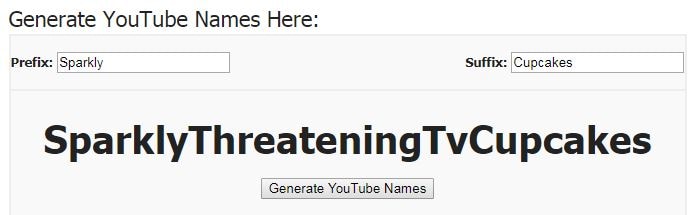
So, on one hand - that’s hilarious and I’m considering legally changing my name. On the other hand, all of the results look exactly like this (which means they’re all a bit too long). It shows you a longer list if you scroll down:
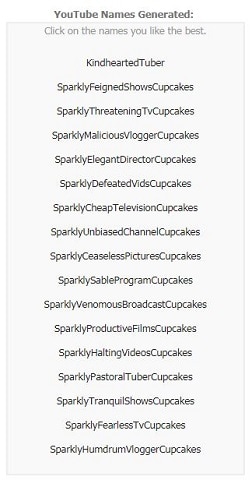
You can pick your favorite names and it’ll list them out so you can easily copy them into a word document. That’ll be useful if you’re collecting options from several sites.
3. Username Generator
Key points:
- Can generate a huge number of names at once
- You only input one word
For this name generator, you type in one important word and choose how many results you want to see. You can see up to 300 at once.

The generator will take your keyword and add endings (and occasional beginnings) to it. Some endings are words, and some are just suffixes. Here’s what I got:
Part 2: How to Come Up With a Good YouTube Name – 3 Easy Steps
The name of your YouTube channel needs to accomplish two things:
- Tell viewers what your channel is about
- Stick in viewer’s heads by being catchy and unique
Here’s how you can brainstorm the perfect name for your channel!
Step 1: Gather up relevant words
Open up a journal (or a word document) and start writing down words that relate to you and your channel.
You may want to make one list of ‘you’ words (personality traits, nicknames, titles, etc.) and another of words related to your channel’s category (i.e. gaming, makeup, or baking).
Step 2: Combinations
Start combining your ‘you’ words with your category words to see what sounds good. You may want to use one of the name generators above (anchor) for this part.
Try to keep your name fairly short (3 words or less) so it’s easier for people to remember. Don’t include numbers if you can avoid it.
Step 3: Say it out loud
Once you have a shortlist of potential names, read them aloud to yourself to make sure they sound good. Ideally, you want to get that ‘oh, that has a nice ring to it!’ feeling.
Part 3: How to Change Your YouTube Name
In the early days of YouTube, you couldn’t change your name, but now you can!
- Click on your account icon in the top right corner of YouTube and choose settings.
- Click Edit on Google.
- Update your name and click OK.
Part 4: Requesting a Custom URL for YouTube
Here are several types of YouTube channel URL , wouldn’t it be nice if, instead of a string of numbers and letters, your channel URL included your name? YouTube can do that for you!
You need…
- 100 Subscribers
- to have been on YouTube for 30 days
- use a photo as your channel icon/profile picture
- have uploaded channel art
Here’s how to get your custom URL:
- Click on your icon in the top right corner of YouTube and choose Advanced under Settings / the gear icon.
- If you meet the qualifications above, you’ll see ‘You’re eligible for a custom URL’ under Channel Settings.
- YouTube will show you the custom URL you’re approved for in the Get a custom URL box. You can’t change what’s there, but you can add to the end of it.
- Click Change URL after reading the terms of use.
You can delete your custom URL and claim a new one, but doing this might be confusing for your followers.
If you already have a YouTube channel name – are you happy with it? How did you choose it?
Liza Brown
Liza Brown is a writer and a lover of all things video.
Follow @Liza Brown
Liza Brown
Oct 26, 2023• Proven solutions
It’s important to have a good name for your YouTube channel – something that people will remember. The following is a list of the 3 best YouTube name generators, an easy step-by-step for brainstorming, and instructions for updating your YouTube name.
Whether you’re a YouTuber beginner or want to improve your YouTube videos to the next level, a good YouTube video editing software will be a good helper. Wondershare Filmora is a video editor for all YouTube creators with plentiful effects and templates, and you can download it directly and have a try before purchasing.
- YouTube Name Generators
- How to Come Up With a Good YouTube Name
- How to Change Your YouTube Name
- Requesting a Custom URL for YouTube
Part 1: 3 Awesome YouTube Name Generators
Need some help brainstorming your channel name? Here are 3 tools for getting started. Even if you don’t use one of the names you generate you’ll get some great inspiration.
1. SpinXO
Key points:
- Lots of options
- Checks availability
This is a great generator. If you were brainstorming yourself, you’d probably write out a bunch of words related to yourself and the kinds of videos you want to make and see what goes together. SpinXO does that for you, and mixes in other words that sound good in usernames.
Here’s what happened when I tried to name a hypothetical baking channel:
Not all of the results are great, but there are some cool sounding options in there.
One of the most useful features of SpinXO is that you can check the availability of the usernames. I liked the sound of CupcakesCupola, and when I clicked on it I was able to see that nobody else was using it on other sites.
2. Name Generator
Key points:
- Can be hilarious
- Names tend to be a bit long
This is a fairly limited generator. You plunk in a prefix and a suffix, and it generates a random word or term to stuff between them. Here’s what I got for my fictional cupcake channel:
So, on one hand - that’s hilarious and I’m considering legally changing my name. On the other hand, all of the results look exactly like this (which means they’re all a bit too long). It shows you a longer list if you scroll down:
You can pick your favorite names and it’ll list them out so you can easily copy them into a word document. That’ll be useful if you’re collecting options from several sites.
3. Username Generator
Key points:
- Can generate a huge number of names at once
- You only input one word
For this name generator, you type in one important word and choose how many results you want to see. You can see up to 300 at once.
The generator will take your keyword and add endings (and occasional beginnings) to it. Some endings are words, and some are just suffixes. Here’s what I got:
Part 2: How to Come Up With a Good YouTube Name – 3 Easy Steps
The name of your YouTube channel needs to accomplish two things:
- Tell viewers what your channel is about
- Stick in viewer’s heads by being catchy and unique
Here’s how you can brainstorm the perfect name for your channel!
Step 1: Gather up relevant words
Open up a journal (or a word document) and start writing down words that relate to you and your channel.
You may want to make one list of ‘you’ words (personality traits, nicknames, titles, etc.) and another of words related to your channel’s category (i.e. gaming, makeup, or baking).
Step 2: Combinations
Start combining your ‘you’ words with your category words to see what sounds good. You may want to use one of the name generators above (anchor) for this part.
Try to keep your name fairly short (3 words or less) so it’s easier for people to remember. Don’t include numbers if you can avoid it.
Step 3: Say it out loud
Once you have a shortlist of potential names, read them aloud to yourself to make sure they sound good. Ideally, you want to get that ‘oh, that has a nice ring to it!’ feeling.
Part 3: How to Change Your YouTube Name
In the early days of YouTube, you couldn’t change your name, but now you can!
- Click on your account icon in the top right corner of YouTube and choose settings.
- Click Edit on Google.
- Update your name and click OK.
Part 4: Requesting a Custom URL for YouTube
Here are several types of YouTube channel URL , wouldn’t it be nice if, instead of a string of numbers and letters, your channel URL included your name? YouTube can do that for you!
You need…
- 100 Subscribers
- to have been on YouTube for 30 days
- use a photo as your channel icon/profile picture
- have uploaded channel art
Here’s how to get your custom URL:
- Click on your icon in the top right corner of YouTube and choose Advanced under Settings / the gear icon.
- If you meet the qualifications above, you’ll see ‘You’re eligible for a custom URL’ under Channel Settings.
- YouTube will show you the custom URL you’re approved for in the Get a custom URL box. You can’t change what’s there, but you can add to the end of it.
- Click Change URL after reading the terms of use.
You can delete your custom URL and claim a new one, but doing this might be confusing for your followers.
If you already have a YouTube channel name – are you happy with it? How did you choose it?
Liza Brown
Liza Brown is a writer and a lover of all things video.
Follow @Liza Brown
Navigating the World of Content Delivery: A Comprehensive Video Upload Guide for YouTube
How To Upload Videos to YouTube [a Step-by-Step Guide]

Richard Bennett
Mar 27, 2024• Proven solutions
Want to learn how to upload videos to YouTube? Millions of people watch YouTube every day. Creating and posting YouTube videos can be a lot of fun, and if you get a lot of views and become popular you can also make money. YouTube videos are a creative way to connect with people all around the world.
These simple steps can assist you in learning how to upload YouTube videos from a desktop computer. You are going to Learn:
Edit YouTube with Powerful Video Editor
As a YouTuber, it is necessary to have an easy-to-use video editor, especially for beginners. Download Filmora for free and start your editing journey happily.
Part 1: Basic Rules You Need to Know Before Uploading
Clicking the ‘upload’ button is easy, but during the upload process, there are things you can do to help your video get views and maintain its quality. You should also keep an eye on the length and file size limits. The more basic things you need to consider carefully when you upload are the title, description, and tags of your video. These are part of what determines if and where your video comes up in people’s search results. There are also slightly more advanced video specs, like your video’s resolution, which will be helpful for you to understand as somebody who will be producing video content frequently. These sorts of specs will affect how long it takes your videos to upload and how much of the quality they maintain.
1. How Long Can my Video Be?
By default, your YouTube videos can only be 15 minutes long. You can post longer videos by going to the upload page and clicking on ‘Increase your Limit’ at the bottom. After you have followed the steps to verify your account you will be able to post videos that are a maximum of 11 hours long.
2. How Big a File Can I Upload?
Your file size was capped at 20GB, initially. If you follow the same steps for posting videos longer than 15 minutes then you can also increase your maximum file size to 128GB.
3. Other Basics
After you click the ‘upload’ button on YouTube you are taken to a page where you choose a category for your video and add a title, description, and tags. These are all important for getting hits so you should put some thought into them.
Title: Keep your title under 70 characters so none of it disappears into a ‘…’. The best titles make people curious or elicit an emotional response. Terms like ‘video’, ‘how-to’, and ‘tutorial’ are often typed into people’s searches so if they apply to your video it can help to put them in the title.
Description: A short synopsis of your video which includes your most important keyword. You have about three lines before your text is hidden by a ‘show more’ tab. If you are including the URL of your channel or other videos then you should make sure they are above the ‘show more’.
Tags: Use a lot of them. These are the keywords and terms people will be searching for when they find your video. YouTube will suggest some after you start adding. A quick way to find good keywords to use is to search for videos similar to yours and check out their tags. A while ago YouTube started hiding video tags by default but you can download a free, YouTube-certified, extension for Google Chrome which will allow you to see them from vidIQ.com.
4. Digging Deeper
To get your viewers to subscribe to your channel you will need to make sure your videos are not losing quality when you upload them. Here are some things to be aware of if you want your videos to look great on YouTube.
Resolution: the number of pixels in your image. For example when a video has a resolution of 1080p that means it has a grid of pixels that is 1920 x 1080. The more pixels you have the sharper your image.
Bitrate: Bitrate is a measurement of how compressed your file is, and the less compressed it is the more information there is per frame. Higher bitrates mean larger file sizes.
Your resolution and bitrate should complement each other. If you have a higher bitrate than is needed for your video’s resolution your file will be unnecessarily large. If your bitrate is too low for your resolution then you will not see the quality you expect.
YouTube has a list of recommended resolutions and bitrates at support.google.com/youtube/answer/1722171.
Aspect Ratio: the dimensions of your video, in terms of width and height. YouTube’s aspect ratio is 16:9, so your videos should also be 16:9. If they are not then you will get black bars on either side of your video after you upload it. The most common way that people end up with the wrong aspect ratio is by creating videos on their smartphones and holding them up and down instead of sideways.
Part 2: Steps to Upload Videos to YouTube
Uploading YouTube Video on Desktop:
1. Sign in to your YouTube account
2. Hit the upload button
3. Select your video type (Public, Private, Unlisted)
4. Manage the upload
5. Choose your thumbnail
Step 1: Sign in to your YouTube account
In order to upload videos to YouTube, the very first thing you need to do is sign in. The sign-in button is located at the top right corner of the YouTube homepage. If you have multiple accounts registered to one device, you will be asked to choose one to log in to.

Step 2: Hit the upload button
It is a simple step that you will have to follow right after you log in to YouTube. As soon as you enter YouTube, after using your Google account and password for login, you will find the upload button in the top right corner of the screen. Click on this button and it will take you to the dedicated upload page.
Step 3: Select your video type (Public, Private, Unlisted)
Choose your audience. If you wish to make your video available to everyone on YouTube, simply go to the privacy settings and choose the “Public” option from the drop-down menu.
If you do not want your video to be searchable, but still want to be able to easily share a link to it with your friends and family, choose the “Unlisted” option.
Those who wish to keep their video personal can choose the “Private” option from the drop-down menu. You can still share a private video with a limited number of people (as long as they have Google accounts).
The “Scheduled” option is available for choosing a future date and time to make the video available to viewers. Once you have selected your privacy level, simply upload your video from your device storage.

Step 4: Manage the upload
As soon as you have confirmed your video upload, you will find a progress bar on the screen. It will take some time depending on factors such as the resolution of the video and how long it is. In the meanwhile, you can write a title, description and add relevant tags for your video so that YouTube knows what search results to include it in and viewers can find it. Remember that YouTube is the second biggest search engine on the Internet, so take some time to optimize your keywords .
Step 5: Choose your thumbnail
Once your video uploading is complete, it is time to choose a creative thumbnail for your video. The system provides you with three options to choose from automatically, all of which will be screenshots from your video. It is usually better toupload your own custom thumbnail , as thumbnails are a very important factor in attracting viewers. Hit the “Done” button or use the “Publish” button to finalize your upload.
That’s how to upload a video on YouTube! Any questions?
Richard Bennett
Richard Bennett is a writer and a lover of all things video.
Follow @Richard Bennett
Richard Bennett
Mar 27, 2024• Proven solutions
Want to learn how to upload videos to YouTube? Millions of people watch YouTube every day. Creating and posting YouTube videos can be a lot of fun, and if you get a lot of views and become popular you can also make money. YouTube videos are a creative way to connect with people all around the world.
These simple steps can assist you in learning how to upload YouTube videos from a desktop computer. You are going to Learn:
Edit YouTube with Powerful Video Editor
As a YouTuber, it is necessary to have an easy-to-use video editor, especially for beginners. Download Filmora for free and start your editing journey happily.
Part 1: Basic Rules You Need to Know Before Uploading
Clicking the ‘upload’ button is easy, but during the upload process, there are things you can do to help your video get views and maintain its quality. You should also keep an eye on the length and file size limits. The more basic things you need to consider carefully when you upload are the title, description, and tags of your video. These are part of what determines if and where your video comes up in people’s search results. There are also slightly more advanced video specs, like your video’s resolution, which will be helpful for you to understand as somebody who will be producing video content frequently. These sorts of specs will affect how long it takes your videos to upload and how much of the quality they maintain.
1. How Long Can my Video Be?
By default, your YouTube videos can only be 15 minutes long. You can post longer videos by going to the upload page and clicking on ‘Increase your Limit’ at the bottom. After you have followed the steps to verify your account you will be able to post videos that are a maximum of 11 hours long.
2. How Big a File Can I Upload?
Your file size was capped at 20GB, initially. If you follow the same steps for posting videos longer than 15 minutes then you can also increase your maximum file size to 128GB.
3. Other Basics
After you click the ‘upload’ button on YouTube you are taken to a page where you choose a category for your video and add a title, description, and tags. These are all important for getting hits so you should put some thought into them.
Title: Keep your title under 70 characters so none of it disappears into a ‘…’. The best titles make people curious or elicit an emotional response. Terms like ‘video’, ‘how-to’, and ‘tutorial’ are often typed into people’s searches so if they apply to your video it can help to put them in the title.
Description: A short synopsis of your video which includes your most important keyword. You have about three lines before your text is hidden by a ‘show more’ tab. If you are including the URL of your channel or other videos then you should make sure they are above the ‘show more’.
Tags: Use a lot of them. These are the keywords and terms people will be searching for when they find your video. YouTube will suggest some after you start adding. A quick way to find good keywords to use is to search for videos similar to yours and check out their tags. A while ago YouTube started hiding video tags by default but you can download a free, YouTube-certified, extension for Google Chrome which will allow you to see them from vidIQ.com.
4. Digging Deeper
To get your viewers to subscribe to your channel you will need to make sure your videos are not losing quality when you upload them. Here are some things to be aware of if you want your videos to look great on YouTube.
Resolution: the number of pixels in your image. For example when a video has a resolution of 1080p that means it has a grid of pixels that is 1920 x 1080. The more pixels you have the sharper your image.
Bitrate: Bitrate is a measurement of how compressed your file is, and the less compressed it is the more information there is per frame. Higher bitrates mean larger file sizes.
Your resolution and bitrate should complement each other. If you have a higher bitrate than is needed for your video’s resolution your file will be unnecessarily large. If your bitrate is too low for your resolution then you will not see the quality you expect.
YouTube has a list of recommended resolutions and bitrates at support.google.com/youtube/answer/1722171.
Aspect Ratio: the dimensions of your video, in terms of width and height. YouTube’s aspect ratio is 16:9, so your videos should also be 16:9. If they are not then you will get black bars on either side of your video after you upload it. The most common way that people end up with the wrong aspect ratio is by creating videos on their smartphones and holding them up and down instead of sideways.
Part 2: Steps to Upload Videos to YouTube
Uploading YouTube Video on Desktop:
1. Sign in to your YouTube account
2. Hit the upload button
3. Select your video type (Public, Private, Unlisted)
4. Manage the upload
5. Choose your thumbnail
Step 1: Sign in to your YouTube account
In order to upload videos to YouTube, the very first thing you need to do is sign in. The sign-in button is located at the top right corner of the YouTube homepage. If you have multiple accounts registered to one device, you will be asked to choose one to log in to.
Step 2: Hit the upload button
It is a simple step that you will have to follow right after you log in to YouTube. As soon as you enter YouTube, after using your Google account and password for login, you will find the upload button in the top right corner of the screen. Click on this button and it will take you to the dedicated upload page.
Step 3: Select your video type (Public, Private, Unlisted)
Choose your audience. If you wish to make your video available to everyone on YouTube, simply go to the privacy settings and choose the “Public” option from the drop-down menu.
If you do not want your video to be searchable, but still want to be able to easily share a link to it with your friends and family, choose the “Unlisted” option.
Those who wish to keep their video personal can choose the “Private” option from the drop-down menu. You can still share a private video with a limited number of people (as long as they have Google accounts).
The “Scheduled” option is available for choosing a future date and time to make the video available to viewers. Once you have selected your privacy level, simply upload your video from your device storage.
Step 4: Manage the upload
As soon as you have confirmed your video upload, you will find a progress bar on the screen. It will take some time depending on factors such as the resolution of the video and how long it is. In the meanwhile, you can write a title, description and add relevant tags for your video so that YouTube knows what search results to include it in and viewers can find it. Remember that YouTube is the second biggest search engine on the Internet, so take some time to optimize your keywords .
Step 5: Choose your thumbnail
Once your video uploading is complete, it is time to choose a creative thumbnail for your video. The system provides you with three options to choose from automatically, all of which will be screenshots from your video. It is usually better toupload your own custom thumbnail , as thumbnails are a very important factor in attracting viewers. Hit the “Done” button or use the “Publish” button to finalize your upload.
That’s how to upload a video on YouTube! Any questions?
Richard Bennett
Richard Bennett is a writer and a lover of all things video.
Follow @Richard Bennett
Also read:
- 2024 Approved Day Jobs & Digital Passion Striking a Balance
- [New] Elevating Video Experience Non-Youtube Hubs Explained
- [New] Digital Dominance Highest Viewed YouTube Videos Today
- Extract and Save Video Previews, Free & Easy
- Step Into Stardom with These 10 Essential Channel Banner Makers
- Maximizing Vids for Cash Comparing Dm & Yo Strategies
- Your Ultimate Guide to Subscribing to Top YouTube News Networks
- [Updated] BeatCut Studio Pro Audio-Film Fusion on PC
- Boost or Bust Is Investing in Video Popularity Worthwhile?
- Master Your Content Essential Knowledge Before Uploading High-Res Videos on YouTube
- Capture Your Audience The Smartphone Guide to YouTube Thumbnails
- 2024 Approved Deciphering the Complexity of Online Content Monetization
- Transform Your Short-Form Content Top 10 Mobile Video Cutting Tools
- 2024 Approved Earn Extra Bucks Maximizing YouTube's Mobile Revenue Opportunities
- [New] Enhance Video Visibility Using Creator Studio Wisdom
- Adobe Premiere Pro 101 for YouTube Clips and Edits for 2024
- [New] Engage More Users with Dual-Stream Approach (YT+Twitch)
- [Updated] Best YouTube Video Ideas to Spark Inspiration [For YouTube Channels]
- Direct Video Transfer A Compreenas Guide to YouTube + TikTok Integration
- 2024 Approved Debunking YouTube Premium Benefits Vs. Costs
- In 2024, Crafting Viral Videos on YouTube A Strategic Plan
- [New] Eco-Friendly Cities Redefining Urban Spaces for Nature
- Enhance Creativity in Video Editing - These 7 Sources for 2024
- Essential Guide to Upgrade Your Shorts Into Premium Mp4 Files for 2024
- Enhance Viewer Engagement The Top 6 Methods for Higher YouTube Audience Retention
- [New] Becoming a Bull or Bear Best Stock Vids on YouTube
- [New] Elevate Videography Quality Top 7 Sound Effects Pick
- [Updated] Behind the Screen Essential Post-VidCon Gatherings
- Unleashing YouTube Talent The Best Themes for Channel Growth
- [New] Efficiently Incorporate YouTube Playlists for Engaging Pages
- Unrivaled Popularity Ranking the Top Subscribers on YouTube
- 2024 Approved Crafting a Cash-Flow Career with Content Creation Like Ajey Nagar
- [Updated] Boost Your Gaming Presence with These Top 14 Video Ideas
- Perfect Size Crafting Engaging Thumbnails
- Banishing the Blank Screen From YouTube Videos
- [Updated] Banishing the Blank Screen From YouTube Videos
- Is Purchasing YouTube Views Worth It for Channel Growth?
- Immersive History Education From YouTube's Best 10 Vlogs
- In 2024, Counteract Bot Visitors for Real Audience Growth
- [Updated] Business Breakthroughs on YouTube The Simplest Channel Launches Ranked
- [New] Discover Leading Video Ranking Tools for YouTube Success
- Mastering Gaming Content on YouTube
- [Updated] Boost Viewers Interaction via YouTube Cards
- 2024 Approved Crafting a Powerful Content Strategy Uncover the Best 5 YouTube Marketing Tactics
- [Updated] Bypass Youtube and Shine with These 5 Next-Gen Editing Software
- [Updated] Cutting-Edge Tech Meets Creativity Top 12 Camera Picks for Vloggers
- [Updated] 2024 Approved Masterful Video Cropping Elevate Your Content Game on Instagram
- In 2024, Your Account Has Been Disabled in the App Store and iTunes From iPhone 12 Pro?
- How To Transfer Data From iPhone 13 Pro To Other iPhone 11 devices? | Dr.fone
- Updated 2024 Approved The Ultimate Guide to Removing Background Noise in Audio Editing
- [New] 2024 Approved Streamline Team Conferencing via Discord's Screen Sharing
- New 2024 Approved Top Secrets for Converting Soundcloud Tracks to MP3 Files
- 2024 Approved Covert SnapMotion Concealing Your Picture Taking on the App
- [Updated] In 2024, Best Among Us Discord Bots
- New Optimal Soundscapes An Exhaustive Compilation of Top Voice Suppression Tools for Karaoke and Productions
- [Updated] Top Tools to Screen-Capture Discord Online Interactions
- [New] MP3 Recording Guide Exclusive to Free Skype Calls for 2024
- Becoming a Pro in TikTok Live Shopping Your Complete Guide for 2024
- [Updated] Expert Picks Premium, Costless Screencasting Apps Reviewed
- New 2024 Approved Prime 11 Mobile Audio Processing Software for Creatives
- [Updated] Bridging Social Gaps Sharing Tweets' Videos via Snapchat
- [New] 2024 Approved Live Streaming Pre-Recorded Videos The Facebook Approach
- In 2024, Here are Some Pro Tips for Pokemon Go PvP Battles On Poco C50 | Dr.fone
- DJI Airborne Series Entry Level, Mid-Range Models, Premium UHD Edition
- Title: "In 2024, Channel Naming Excellence Tips & Strategies"
- Author: Steven
- Created at : 2024-05-25 19:35:05
- Updated at : 2024-05-26 19:35:05
- Link: https://youtube-clips.techidaily.com/in-2024-channel-naming-excellence-tips-and-strategies/
- License: This work is licensed under CC BY-NC-SA 4.0.
