
:max_bytes(150000):strip_icc()/Maplocation_-5a492a4e482c52003601ea25.jpg)
"In 2024, Capture Your Audience The Smartphone Guide to YouTube Thumbnails"
Capture Your Audience: The Smartphone Guide to YouTube Thumbnails
As a content creator, you know the importance of a visually appealing thumbnail for YouTube videos. It gives your viewers a sneak peek of what they can expect from your video and helps it stand out in the crowded world of YouTube.
When creating your thumbnail, it’s important to remember that the recommended size is 1280 x 720 pixels and a minimum width of 640 pixels. With these dimensions in mind, let’s dive into how you can easily create stunning thumbnails for your YouTube videos using your mobile phone.

Method 1. Make a YouTube Thumbnail on iPhone With the iPhone Photos App
One way to create a thumbnail for your YouTube video on your iPhone is to use the built-in Photos app. The Photos app comes pre-installed on all iPhones and offers a range of editing tools you can use to create a thumbnail.
The Photos app on your iPhone offers a range of features that you can use to create a custom thumbnail for your YouTube video. Here are some of the features you can use:
- Crop: The crop tool allows you to resize and reposition your thumbnail image by trimming away any unnecessary parts of the image.
- Rotate: The rotate tool lets you adjust the orientation of your thumbnail image. You can rotate the image clockwise or counterclockwise to achieve the desired angle.
- Adjust lighting and color: The lighting and color tools allow you to adjust the brightness, contrast, saturation, and other aspects of the thumbnail image to enhance its overall appearance.
- Add text: You can use the text tool to add words or phrases to your thumbnail image. This can be a great way to include a call-to-action or to highlight a key feature of your video.
- Add filters and stickers: The Photos app includes a range of filters and stickers that you can use to give your thumbnail image a unique look. You can experiment with filters and stickers to find the perfect one for your thumbnail.
To create a thumbnail using the Photos app on your iPhone, follow these steps:
Step1 Open the Photos app and find the image you want to use as your thumbnail. Tap on the image to open it.

Step2 Tap the Edit button in the top right corner of the screen. Use the crop and rotate tools to adjust the perspective and the aspect ratio of 16:9.

Step3 Tap the Filters button to access the filter effects. Scroll through the available filters and tap on one to apply it to your thumbnail image.

Step4 To write or draw on the image, tap the Markup button. This will open a toolbar with a variety of drawing and text tools. Use these tools to add your personal touch to the thumbnail.

Step5 When you’re satisfied with your thumbnail, tap Done in the top right corner of the screen.

Pros
- Convenient
- Easy to use
- Versatile
Cons
- Limited customization option
- Lower image quality
This method is best for users looking for a quick and easy way to create a thumbnail on the go and doesn’t need many customization options. It’s also a good option for users needing computer or graphic design software access. If you’re looking for more advanced customization options or higher image quality, consider using other methods or software.
Method 2. Make YouTube Thumbnails on Android/iPhone With Third-Party Apps
In addition to using the built-in Photos app on your iPhone or Android device, there are also many third-party apps that you can use to create YouTube thumbnails. Some popular options include Canva, Adobe Spark, and FotoJet. These apps offer a wider range of customization options and design templates, making it easy to create professional-looking thumbnails even if you have yet to gain graphic design experience.
One popular third-party app for creating YouTube thumbnails on both iPhone and Android devices is PixelLab. PixelLab is a powerful graphic design app with many features and tools for creating custom thumbnails. With PixelLab, you can add text, shapes, and stickers to your thumbnail image and adjust the image’s color, lighting, and other aspects to get the perfect look. You can also import your images or graphics for your thumbnail design.
Here are the steps to create a thumbnail using PixelLab on your Android or iOS device:
Step1 Open the Play Store and search for PixelLab. Install the app.
![]()
Step2 Tap the “+” icon to add an image from your gallery.
![]()
Step3 Edit the image using the available tools, such as cropping, rotating, and adjusting the color and lighting.
![]()
Step4 Add text to the image and customize it to your liking.
![]()
Step5 Change the resolution of the image to 1280 x 720 pixels.
![]()
Step6 Save the image to your gallery by exporting it.
![]()
Pros
- More customization options
- Advanced editing tools
- High image quality
Cons
- Requires a separate app download
- It may require a learning curve
This method is best for users looking for more advanced customization options and higher image quality for their YouTube thumbnails. It’s also a good option for users with experience with graphic design software and who are comfortable using advanced editing tools. If you’re looking for a quick and easy way to create a thumbnail and only need a few customization options, consider using the built-in Photos app or other simpler methods.
How To Add Thumbnails to YouTube Videos on Mobile
Once you’ve created your thumbnail image, it’s time to add it to your YouTube video. Adding a thumbnail to your YouTube video on your mobile device is a simple process that only requires a few steps.
Here’s how to do it on your mobile device:
Step1 Open the YouTube app on your mobile device and sign in to your account.

Step2 Tap on the My Videos tab to view a list of your uploaded videos.

Step3 Tap on the video and tap the “Edit“ button in the top right corner of the screen.

Step4 Tap the Custom thumbnail button and upload the image you want to use from your photo library.

Step5 Tap Save in the top right corner to upload the thumbnail to your video.

That’s it! Your new thumbnail will now be displayed on your YouTube video, helping it stand out and attract more views. You can repeat this process for other videos if you want to add a custom thumbnail.
It May Interest You – Make YouTube Thumbnails on Windows/Mac
While it’s convenient to create YouTube thumbnails on your mobile device, there may be times when you need to create a thumbnail on your Windows or Mac computer.
For example, if you need to create a thumbnail with a higher resolution or more advanced customization options, you may find it easier to do so on a computer. Additionally, a computer may be more efficient if you’re working on a larger thumbnail project and need to create multiple thumbnails simultaneously.
One popular tool for creating YouTube thumbnails on a Windows or Mac computer is Filmora. Wondershare Filmora is a powerful video editing software that allows you to easily edit and enhance your YouTube videos and create custom thumbnails for your videos.
Free Download For Win 7 or later(64-bit)
Free Download For macOS 10.14 or later
With Filmora, you can add text, graphics, and special effects to your thumbnail image and import and edit multiple images. Filmora is a great tool for creating professional-looking YouTube thumbnails on your Windows or Mac computer.
To create a thumbnail using Filmora on your Windows or Mac computer, follow these steps:
Step1 Launch Filmora, add the picture to the timeline and select the AI Portrait option in the Effects panel to cut out the subject from the background.

Step2 Scale up and reposition the photo.

Step3 Add a new background to the track below the picture. Use the other editing tools in Filmora to customize the image as desired, such as adding text, graphics, and special effects.

Step4 When you are done editing the thumbnail, take a snapshot by clicking the camera icon.

Step5 Locate the thumbnail in your local drive.

For more detailed instructions and a visual guide, you can watch the following video tutorial:
Add a video
This video will show you how to use Filmora to create a custom thumbnail for your YouTube video, step by step.
People Also Ask
Here are some common questions that people have when it comes to creating YouTube thumbnails on mobile.
Q1. What App Do Youtubers Use To Make Thumbnails?
There are many different apps and tools that YouTubers use to create thumbnails for their videos. The best app for creating YouTube thumbnails will depend on your needs and skill level.
If you’re looking for a quick and easy way to create a thumbnail on your mobile device, start with the built-in Photos app or a third-party app like Canva. If you need more advanced customization options or are comfortable with graphic design software, consider using Adobe Photoshop or another tool.
Q2. What Is YouTube Thumbnail Size?
The recommended size for YouTube thumbnails is 1280 x 720 pixels. This size balances quality and file size, ensuring that your thumbnail looks sharp and loads quickly. It’s also important to note that YouTube thumbnails are displayed at different sizes depending on the device and context in which they are viewed.
For example, a thumbnail may be displayed at a larger size when it’s shown as the main thumbnail for a video but smaller when it’s shown in a list of related videos.
Q3. What Thumbnail Gets the Most Clicks?
There is no one-size-fits-all answer to this question, as the thumbnail that gets the most clicks can vary depending on the topic of your video, your target audience, and other factors.
However, the key to getting clicks on your thumbnail is to make it visually appealing and relevant to your video. Experiment with different thumbnail designs and track which ones get the most clicks to help you identify what works best for your channel.
Conclusion
Many tools are available for creating YouTube thumbnails, including the built-in Photos app on mobile devices and third-party apps like Pixelab. One particularly powerful option is Filmora, a video editing software with features for creating custom thumbnails, such as adding text, graphics, and special effects.
Whether you create your thumbnails on your mobile device or your computer, use a high-quality image and make the thumbnail relevant to your video to increase the chances of it getting clicked.
This method is best for users looking for a quick and easy way to create a thumbnail on the go and doesn’t need many customization options. It’s also a good option for users needing computer or graphic design software access. If you’re looking for more advanced customization options or higher image quality, consider using other methods or software.
Method 2. Make YouTube Thumbnails on Android/iPhone With Third-Party Apps
In addition to using the built-in Photos app on your iPhone or Android device, there are also many third-party apps that you can use to create YouTube thumbnails. Some popular options include Canva, Adobe Spark, and FotoJet. These apps offer a wider range of customization options and design templates, making it easy to create professional-looking thumbnails even if you have yet to gain graphic design experience.
One popular third-party app for creating YouTube thumbnails on both iPhone and Android devices is PixelLab. PixelLab is a powerful graphic design app with many features and tools for creating custom thumbnails. With PixelLab, you can add text, shapes, and stickers to your thumbnail image and adjust the image’s color, lighting, and other aspects to get the perfect look. You can also import your images or graphics for your thumbnail design.
Here are the steps to create a thumbnail using PixelLab on your Android or iOS device:
Step1 Open the Play Store and search for PixelLab. Install the app.
![]()
Step2 Tap the “+” icon to add an image from your gallery.
![]()
Step3 Edit the image using the available tools, such as cropping, rotating, and adjusting the color and lighting.
![]()
Step4 Add text to the image and customize it to your liking.
![]()
Step5 Change the resolution of the image to 1280 x 720 pixels.
![]()
Step6 Save the image to your gallery by exporting it.
![]()
Pros
- More customization options
- Advanced editing tools
- High image quality
Cons
- Requires a separate app download
- It may require a learning curve
This method is best for users looking for more advanced customization options and higher image quality for their YouTube thumbnails. It’s also a good option for users with experience with graphic design software and who are comfortable using advanced editing tools. If you’re looking for a quick and easy way to create a thumbnail and only need a few customization options, consider using the built-in Photos app or other simpler methods.
How To Add Thumbnails to YouTube Videos on Mobile
Once you’ve created your thumbnail image, it’s time to add it to your YouTube video. Adding a thumbnail to your YouTube video on your mobile device is a simple process that only requires a few steps.
Here’s how to do it on your mobile device:
Step1 Open the YouTube app on your mobile device and sign in to your account.
Step2 Tap on the My Videos tab to view a list of your uploaded videos.
Step3 Tap on the video and tap the “Edit“ button in the top right corner of the screen.
Step4 Tap the Custom thumbnail button and upload the image you want to use from your photo library.
Step5 Tap Save in the top right corner to upload the thumbnail to your video.
That’s it! Your new thumbnail will now be displayed on your YouTube video, helping it stand out and attract more views. You can repeat this process for other videos if you want to add a custom thumbnail.
It May Interest You – Make YouTube Thumbnails on Windows/Mac
While it’s convenient to create YouTube thumbnails on your mobile device, there may be times when you need to create a thumbnail on your Windows or Mac computer.
For example, if you need to create a thumbnail with a higher resolution or more advanced customization options, you may find it easier to do so on a computer. Additionally, a computer may be more efficient if you’re working on a larger thumbnail project and need to create multiple thumbnails simultaneously.
One popular tool for creating YouTube thumbnails on a Windows or Mac computer is Filmora. Wondershare Filmora is a powerful video editing software that allows you to easily edit and enhance your YouTube videos and create custom thumbnails for your videos.
Free Download For Win 7 or later(64-bit)
Free Download For macOS 10.14 or later
With Filmora, you can add text, graphics, and special effects to your thumbnail image and import and edit multiple images. Filmora is a great tool for creating professional-looking YouTube thumbnails on your Windows or Mac computer.
To create a thumbnail using Filmora on your Windows or Mac computer, follow these steps:
Step1 Launch Filmora, add the picture to the timeline and select the AI Portrait option in the Effects panel to cut out the subject from the background.
Step2 Scale up and reposition the photo.
Step3 Add a new background to the track below the picture. Use the other editing tools in Filmora to customize the image as desired, such as adding text, graphics, and special effects.
Step4 When you are done editing the thumbnail, take a snapshot by clicking the camera icon.
Step5 Locate the thumbnail in your local drive.
For more detailed instructions and a visual guide, you can watch the following video tutorial:
Add a video
This video will show you how to use Filmora to create a custom thumbnail for your YouTube video, step by step.
People Also Ask
Here are some common questions that people have when it comes to creating YouTube thumbnails on mobile.
Q1. What App Do Youtubers Use To Make Thumbnails?
There are many different apps and tools that YouTubers use to create thumbnails for their videos. The best app for creating YouTube thumbnails will depend on your needs and skill level.
If you’re looking for a quick and easy way to create a thumbnail on your mobile device, start with the built-in Photos app or a third-party app like Canva. If you need more advanced customization options or are comfortable with graphic design software, consider using Adobe Photoshop or another tool.
Q2. What Is YouTube Thumbnail Size?
The recommended size for YouTube thumbnails is 1280 x 720 pixels. This size balances quality and file size, ensuring that your thumbnail looks sharp and loads quickly. It’s also important to note that YouTube thumbnails are displayed at different sizes depending on the device and context in which they are viewed.
For example, a thumbnail may be displayed at a larger size when it’s shown as the main thumbnail for a video but smaller when it’s shown in a list of related videos.
Q3. What Thumbnail Gets the Most Clicks?
There is no one-size-fits-all answer to this question, as the thumbnail that gets the most clicks can vary depending on the topic of your video, your target audience, and other factors.
However, the key to getting clicks on your thumbnail is to make it visually appealing and relevant to your video. Experiment with different thumbnail designs and track which ones get the most clicks to help you identify what works best for your channel.
Conclusion
Many tools are available for creating YouTube thumbnails, including the built-in Photos app on mobile devices and third-party apps like Pixelab. One particularly powerful option is Filmora, a video editing software with features for creating custom thumbnails, such as adding text, graphics, and special effects.
Whether you create your thumbnails on your mobile device or your computer, use a high-quality image and make the thumbnail relevant to your video to increase the chances of it getting clicked.
Mastering YouTube Traffic for New Content Creators
The 12-step YouTube SEO Guide for Beginners Who Want More Views

Shanoon Cox
Oct 26, 2023• Proven solutions
The joy of creating on YouTube is often dampened by the disappointment of underperforming videos. You have published your content and it’s not getting the views you had hoped.
Well, let’s change that!
In this guide, I’m going to walk you through YouTube SEO from the very start to the very end.
Nothing complicated. No paid programs or expensive apps needed. We are going back to basics and get your videos discovered.
Ready?
Let’s Go!
Part 1: Research Your Topic and Competitors
Come up with a video idea . Can’t come up with one? Let me help. I heard you can make a mean scrambled egg, why don’t you show the world how you do it?
Excellent! Let’s go with that idea.
Wait, don’t go making the video yet. First, we have to do some research. We need to know what videos already exist out there.
Step 1: Find Related Videos
Do a quick search on YouTube to see what videos already exist on your topic.

Uh oh… your video will be competing against celebrities like Gordon Ramsay and Jamie Oliver.
Okay, don’t panic! There is a fantastic quote, credited to bestselling author, Jon Acuff , that goes:
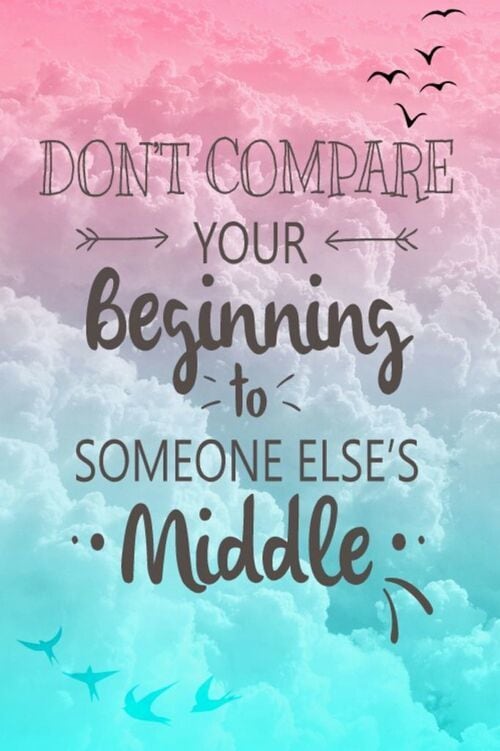
While researching your competition, you will feel overwhelmed, but remember, you are at the beginning, and Gordon Ramsay and Jamie Oliver are not even at their middle, they are way passed the finish line. You still have a long journey to go, so don’t get discouraged, get inspired!
Watch those videos and understand what they are all about.
Understand that people watch YouTube for 3 key reasons:
- To be entertained
- To learn something new
- To be inspired
A video that can hit all 3 marks is going to be positioned for success. Don’t fret too much about the competition, as long as your content is good, you will see improvement.
So if you think this scrambled egg idea can hit those 3 marks, then I encourage you to go to the next step. If you don’t, let’s regroup and brainstorm some more YouTube video ideas .
Step 2: Find Keywords
Now that we’ve decided that we are sticking with the video idea, we are ready to do some keyword research. Keywords are the words and phrases people type in the YouTube search bar to discover videos.
Come up with as many relevant keywords as you can. Start by entering a keyword into the YouTube search bar. This will tell you what are the most popular searches associated with that keyword:
Once you have an idea of what people are searching for related to your topic, you’ll want to find more relevant keywords. I like to use the free app, Ubersuggest to do that.

This app gives you a whole list of long-tail keywords, which are 3-4-word phrases which is specific to what your video is about.
Some you will use to dig deeper in and other you will deem irrelevant to your videos. A good way of determining the value of a keyword is by the stats the application shows.
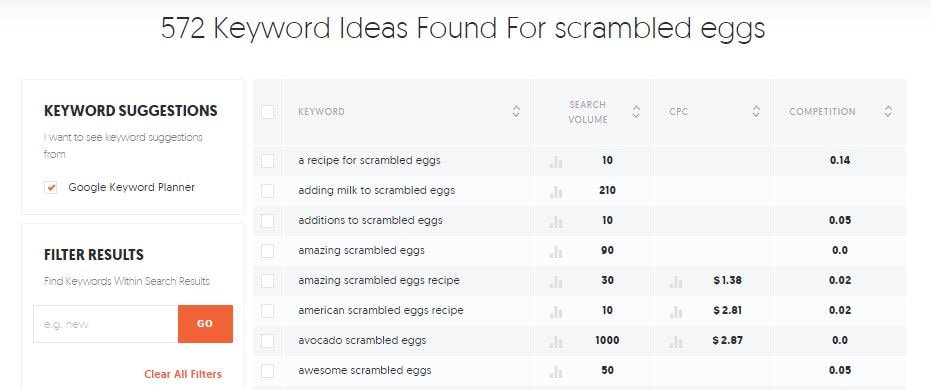
How to Read Keyword Suggestions
Once you have a list of keywords, you will see some numbers on the right-hand side. Here is what each one is about:
- Search volume is the number used to identify the popularity of the keyword. The higher the number the more people are searching for it.
- CPC is the value accredited by YouTube, determining how much advertisers are paying to target audiences who search for that keyword and click on the link.
- Competition is the number used to qualify how many other content are using that keyword.
The two categories that matter most to us right now is Search Volume and Competition. We want keywords with high search volume and low competition rate.
In the example above, you can see that the keyword “avocado scrambled eggs” has a Search Volume of 1,000 and a competition rate of 0.0. This is a good keyword to target, if you can incorporate an avocado to your dish… which of course you can!
Step 3: Write Title
I know you might want to deal with the Title, Description, and Tags after you’ve filmed and edited your video. But if you want to apply a YouTube SEO-focused strategy, then these should be addressed before you even pick up a camera as it can greatly dictate the content you end up creating.
A good YouTube title sparks curiosity, evokes emotional reaction, and promises value to your viewers.
Of course you can title your video simply: Making Scrambled Eggs
But does it spark curiosity? Not really… most people can make scrambled eggs.
Does it evoke any emotion? Maybe hunger… but even then, not really…
Finally, does it promise value? Well, assuming that most people can at least crack an egg into a pan, then hardly.
Your scrambled egg is special! Your video is special! We need to evoke that in the title — and as long as you are not writing any clickbait and deliver on what the title suggest, you can do this.
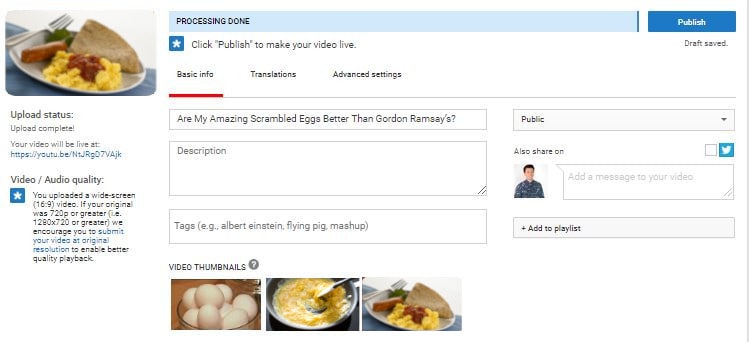
So, how about this: Are My Amazing Scrambled Eggs Better Than Gordon Ramsay’s?
Hmmm… Well, is it? We know that the Gordon Ramsay’s video has almost 30M views. Many people have already tried cooking it, I’m sure. There is only one way to find out, by encouraging others to try it over Gordon’s.
You don’t need to go for a somewhat contentious title like this, but that’s the idea, you want something that gets people curious, make them feel a certain way, and in the end, make them better for having watched your video.
See how a good title can guide the rest of your video?
Step 4: Write Description
You aren’t going to be writing the description for the viewers necessarily, you are going to be writing it for YouTube’s algorithms. The better YouTube understands what your video is about, the better they can show it to people searching for it.
This means you need to include the keywords you were researching at the beginning of your description, as YouTube will be using them to identify the content of your video. 1 or 2 keywords that best represent your video is enough. Don’t stuff the title with too many keywords or you’ll risk sounding like a robot.
But also use the description for practical uses too, if you have additional information such as supportive links, outline of the video’s content, a list of materials, step-by-step guide, or a recipe that you think your human viewers will find useful, you should input that in the description as well.
Step 5: Write Tags
Thank goodness we did the keyword research in Step 2, because coming up with tags is not as easy as it looks.
Pull 15 keywords from the list and keep it somewhere safe.
Note: The keywords you used in the title should be found in your tags, and since they are the most important ones, you should place them first.
Organize your keywords in the tag as such:
Have the specific keywords at the top, followed by more general keywords, and then branded ones:
Specific: How to make scrambled eggs
General: Scrambled eggs
Branded: Gordon Ramsay scrambled eggs
Part 2: Make The Best Darn Video Possible
It doesn’t matter how relevant your keywords are or how epic your title is, if you video sucks (i.e. your viewers click in and leave right away), YouTube will not show it in search.
Even if you haven’t created any videos yet, you can follow these next steps to ensure you are following the best practices to structure your video.
Step 6: Plan and Film the Hook
The first few seconds is where the largest percentage of your earned viewership will drop off. Odds are 20% of your viewers won’t even get past the first 10 seconds .
What you need is a hook, an intro that ensures this video is what they want to watch and let’s them know what they can expect.
Step 7: Film B-Roll
One static camera shot of you talking or cooking or giving a tutorial can cause your viewers to lose attention.
In order to keep your viewers interest, you will need b-roll, or supplemental footage you can cut to give you video more life.
While jump cuts (cuts made on a sequential clip of the same subject or in the same camera position) are fine, having additional footage to cut to will make your video feel more fluid.
So when you are filming your scrambled egg video, make sure you get some footage of you cracking the egg, scrambling it, and serving it on the plate.
Step 8: Encourage Viewers to Engage in Video
Liking, disliking, subscribing, and commenting on your video will all help your performance indirectly.
While YouTube wouldn’t rank your video higher simply because you have more likes subscribers, or comments, engagement from viewers help your video get discovered. If you get a like or comment from a YouTuber with a lot of subscribers, your video may be visible to those who are following that YouTuber for a while.
The best way to get engagement from your audience is to encourage them to like and subscribe or ask them a question or start a dialogue.
For example, in this scrambled egg video you are making, at the end you can ask, “So what do you think, is this better than Gordon Ramsay?”

Who knows, who will respond.
Step 9: Design a Thumbnail
You could have made a brilliant video, but if you have a poor quality thumbnail that is unattractive, then the overall performance of your video will suffer — and good SEO can only do so much after that.
Your viewers will absolutely judge your video by its cover so it’s important to put some thought into it and not solely rely on the three random thumbnail choices that YouTube picks for you.

Take a look at your competition. If they all look the same, do something different. Add text or a human face (preferably yours) to evoke emotion, as viewers are more likely to click into a video if they see an expressive image.
Don’t want to pay money for a photo editing software such as Photoshop?
You can use an online service called Canva or download GIMP , an open-source photo editor much like Photoshop, but far less powerful. These will help you get the job done as you are starting out.
Want to know more thumbnail maker? Check our picks of the best free YouTube thumbnail makers .
Part 3: Publishing With Attention to Optimization
Well done finishing the video! You are almost there… but not there yet.

Come on, keep going!
Step 10: Fill Out Your Videos Assets
The video is done, the thumbnail is designed, and you have all your title, description, and tags ready to go. This step is easy, upload the video, and fill out the assets, and give yourself a pat on the back.
Step 11: Add Transcripts
In addition to making your content accessible for people who don’t want to or can’t listen to the audio in your video, adding subtitles and closed captions will help YouTube understand the spoken content in your video.
While YouTube does have an automatic subtitle generator, it’s not reliable enough to be used for identifying the keywords you use in your video.
You can choose to write out the whole transcript of your video yourself, but if you are press on time, which of course you are, you can simply go and edit the automatic transcript already available in your video. By the way, you can also use some automatic transcription software.
Step 12: Add Video to Playlist
Finally the last thing you need to do for your video is to add it to a playlist. Even though it might be the first video in the playlist, it helps YouTube identify your video if you organize it in a playlist. As you accumulate more content, having videos in playlists makes content easier to find and keeps relevant videos together.
When viewers searches, having your videos in playlists increases the chance of it being discovered.
So if your first video is about scrambled eggs, maybe you next video can be about the awesome butter toasts.
I guess, you are on your way to making a pretty badass breakfast playlist. I personally can’t wait to see it!
If you treat SEO as an afterthought, only after your video is created, you are not using it to its full potential. If you follow these 12 steps during the course of your production, you will find that SEO doesn’t simply help your video perform at the end, but contributes in all the other phases of creating your video as well.
Besides considering YouTube SEO, you should make a good YouTube video as well. Filmora is a powerful video editing software that features lots of templates and effects. Get the free trial version below and have a try today.


Do you have any questions about SEO? Please leave us a comment below.
Shanoon Cox
Shanoon Cox is a writer and a lover of all things video.
Follow @Shanoon Cox
Shanoon Cox
Oct 26, 2023• Proven solutions
The joy of creating on YouTube is often dampened by the disappointment of underperforming videos. You have published your content and it’s not getting the views you had hoped.
Well, let’s change that!
In this guide, I’m going to walk you through YouTube SEO from the very start to the very end.
Nothing complicated. No paid programs or expensive apps needed. We are going back to basics and get your videos discovered.
Ready?
Let’s Go!
Part 1: Research Your Topic and Competitors
Come up with a video idea . Can’t come up with one? Let me help. I heard you can make a mean scrambled egg, why don’t you show the world how you do it?
Excellent! Let’s go with that idea.
Wait, don’t go making the video yet. First, we have to do some research. We need to know what videos already exist out there.
Step 1: Find Related Videos
Do a quick search on YouTube to see what videos already exist on your topic.
Uh oh… your video will be competing against celebrities like Gordon Ramsay and Jamie Oliver.
Okay, don’t panic! There is a fantastic quote, credited to bestselling author, Jon Acuff , that goes:
While researching your competition, you will feel overwhelmed, but remember, you are at the beginning, and Gordon Ramsay and Jamie Oliver are not even at their middle, they are way passed the finish line. You still have a long journey to go, so don’t get discouraged, get inspired!
Watch those videos and understand what they are all about.
Understand that people watch YouTube for 3 key reasons:
- To be entertained
- To learn something new
- To be inspired
A video that can hit all 3 marks is going to be positioned for success. Don’t fret too much about the competition, as long as your content is good, you will see improvement.
So if you think this scrambled egg idea can hit those 3 marks, then I encourage you to go to the next step. If you don’t, let’s regroup and brainstorm some more YouTube video ideas .
Step 2: Find Keywords
Now that we’ve decided that we are sticking with the video idea, we are ready to do some keyword research. Keywords are the words and phrases people type in the YouTube search bar to discover videos.
Come up with as many relevant keywords as you can. Start by entering a keyword into the YouTube search bar. This will tell you what are the most popular searches associated with that keyword:
Once you have an idea of what people are searching for related to your topic, you’ll want to find more relevant keywords. I like to use the free app, Ubersuggest to do that.
This app gives you a whole list of long-tail keywords, which are 3-4-word phrases which is specific to what your video is about.
Some you will use to dig deeper in and other you will deem irrelevant to your videos. A good way of determining the value of a keyword is by the stats the application shows.
How to Read Keyword Suggestions
Once you have a list of keywords, you will see some numbers on the right-hand side. Here is what each one is about:
- Search volume is the number used to identify the popularity of the keyword. The higher the number the more people are searching for it.
- CPC is the value accredited by YouTube, determining how much advertisers are paying to target audiences who search for that keyword and click on the link.
- Competition is the number used to qualify how many other content are using that keyword.
The two categories that matter most to us right now is Search Volume and Competition. We want keywords with high search volume and low competition rate.
In the example above, you can see that the keyword “avocado scrambled eggs” has a Search Volume of 1,000 and a competition rate of 0.0. This is a good keyword to target, if you can incorporate an avocado to your dish… which of course you can!
Step 3: Write Title
I know you might want to deal with the Title, Description, and Tags after you’ve filmed and edited your video. But if you want to apply a YouTube SEO-focused strategy, then these should be addressed before you even pick up a camera as it can greatly dictate the content you end up creating.
A good YouTube title sparks curiosity, evokes emotional reaction, and promises value to your viewers.
Of course you can title your video simply: Making Scrambled Eggs
But does it spark curiosity? Not really… most people can make scrambled eggs.
Does it evoke any emotion? Maybe hunger… but even then, not really…
Finally, does it promise value? Well, assuming that most people can at least crack an egg into a pan, then hardly.
Your scrambled egg is special! Your video is special! We need to evoke that in the title — and as long as you are not writing any clickbait and deliver on what the title suggest, you can do this.
So, how about this: Are My Amazing Scrambled Eggs Better Than Gordon Ramsay’s?
Hmmm… Well, is it? We know that the Gordon Ramsay’s video has almost 30M views. Many people have already tried cooking it, I’m sure. There is only one way to find out, by encouraging others to try it over Gordon’s.
You don’t need to go for a somewhat contentious title like this, but that’s the idea, you want something that gets people curious, make them feel a certain way, and in the end, make them better for having watched your video.
See how a good title can guide the rest of your video?
Step 4: Write Description
You aren’t going to be writing the description for the viewers necessarily, you are going to be writing it for YouTube’s algorithms. The better YouTube understands what your video is about, the better they can show it to people searching for it.
This means you need to include the keywords you were researching at the beginning of your description, as YouTube will be using them to identify the content of your video. 1 or 2 keywords that best represent your video is enough. Don’t stuff the title with too many keywords or you’ll risk sounding like a robot.
But also use the description for practical uses too, if you have additional information such as supportive links, outline of the video’s content, a list of materials, step-by-step guide, or a recipe that you think your human viewers will find useful, you should input that in the description as well.
Step 5: Write Tags
Thank goodness we did the keyword research in Step 2, because coming up with tags is not as easy as it looks.
Pull 15 keywords from the list and keep it somewhere safe.
Note: The keywords you used in the title should be found in your tags, and since they are the most important ones, you should place them first.
Organize your keywords in the tag as such:
Have the specific keywords at the top, followed by more general keywords, and then branded ones:
Specific: How to make scrambled eggs
General: Scrambled eggs
Branded: Gordon Ramsay scrambled eggs
Part 2: Make The Best Darn Video Possible
It doesn’t matter how relevant your keywords are or how epic your title is, if you video sucks (i.e. your viewers click in and leave right away), YouTube will not show it in search.
Even if you haven’t created any videos yet, you can follow these next steps to ensure you are following the best practices to structure your video.
Step 6: Plan and Film the Hook
The first few seconds is where the largest percentage of your earned viewership will drop off. Odds are 20% of your viewers won’t even get past the first 10 seconds .
What you need is a hook, an intro that ensures this video is what they want to watch and let’s them know what they can expect.
Step 7: Film B-Roll
One static camera shot of you talking or cooking or giving a tutorial can cause your viewers to lose attention.
In order to keep your viewers interest, you will need b-roll, or supplemental footage you can cut to give you video more life.
While jump cuts (cuts made on a sequential clip of the same subject or in the same camera position) are fine, having additional footage to cut to will make your video feel more fluid.
So when you are filming your scrambled egg video, make sure you get some footage of you cracking the egg, scrambling it, and serving it on the plate.
Step 8: Encourage Viewers to Engage in Video
Liking, disliking, subscribing, and commenting on your video will all help your performance indirectly.
While YouTube wouldn’t rank your video higher simply because you have more likes subscribers, or comments, engagement from viewers help your video get discovered. If you get a like or comment from a YouTuber with a lot of subscribers, your video may be visible to those who are following that YouTuber for a while.
The best way to get engagement from your audience is to encourage them to like and subscribe or ask them a question or start a dialogue.
For example, in this scrambled egg video you are making, at the end you can ask, “So what do you think, is this better than Gordon Ramsay?”
Who knows, who will respond.
Step 9: Design a Thumbnail
You could have made a brilliant video, but if you have a poor quality thumbnail that is unattractive, then the overall performance of your video will suffer — and good SEO can only do so much after that.
Your viewers will absolutely judge your video by its cover so it’s important to put some thought into it and not solely rely on the three random thumbnail choices that YouTube picks for you.
Take a look at your competition. If they all look the same, do something different. Add text or a human face (preferably yours) to evoke emotion, as viewers are more likely to click into a video if they see an expressive image.
Don’t want to pay money for a photo editing software such as Photoshop?
You can use an online service called Canva or download GIMP , an open-source photo editor much like Photoshop, but far less powerful. These will help you get the job done as you are starting out.
Want to know more thumbnail maker? Check our picks of the best free YouTube thumbnail makers .
Part 3: Publishing With Attention to Optimization
Well done finishing the video! You are almost there… but not there yet.
Come on, keep going!
Step 10: Fill Out Your Videos Assets
The video is done, the thumbnail is designed, and you have all your title, description, and tags ready to go. This step is easy, upload the video, and fill out the assets, and give yourself a pat on the back.
Step 11: Add Transcripts
In addition to making your content accessible for people who don’t want to or can’t listen to the audio in your video, adding subtitles and closed captions will help YouTube understand the spoken content in your video.
While YouTube does have an automatic subtitle generator, it’s not reliable enough to be used for identifying the keywords you use in your video.
You can choose to write out the whole transcript of your video yourself, but if you are press on time, which of course you are, you can simply go and edit the automatic transcript already available in your video. By the way, you can also use some automatic transcription software.
Step 12: Add Video to Playlist
Finally the last thing you need to do for your video is to add it to a playlist. Even though it might be the first video in the playlist, it helps YouTube identify your video if you organize it in a playlist. As you accumulate more content, having videos in playlists makes content easier to find and keeps relevant videos together.
When viewers searches, having your videos in playlists increases the chance of it being discovered.
So if your first video is about scrambled eggs, maybe you next video can be about the awesome butter toasts.
I guess, you are on your way to making a pretty badass breakfast playlist. I personally can’t wait to see it!
If you treat SEO as an afterthought, only after your video is created, you are not using it to its full potential. If you follow these 12 steps during the course of your production, you will find that SEO doesn’t simply help your video perform at the end, but contributes in all the other phases of creating your video as well.
Besides considering YouTube SEO, you should make a good YouTube video as well. Filmora is a powerful video editing software that features lots of templates and effects. Get the free trial version below and have a try today.
Do you have any questions about SEO? Please leave us a comment below.
Shanoon Cox
Shanoon Cox is a writer and a lover of all things video.
Follow @Shanoon Cox
Also read:
- Elevating Business & Personal Visibility with YouTube, Mobile Edition
- [New] Cultivate Creativity 20+ Inspiring YouTube Concepts
- [New] Diving Into YouTube Creation & Making It Monetary
- [New] Elevate Your Content Game Perfectly Tailored YouTube Shorts Thumbnails
- Unboxing Mastery in 20 Minutes or Less! Quick Guide Inside
- 2024 Approved Brighten Up Your Image Previews Introducing Luminous Frames
- Authentic Audience Boosting Legal Practices That Work
- Achieving Precise YouTube Content Extraction
- In 2024, Crafting an Engaging Online Presence The Complete Guide to YouTube Submissions
- [New] Cut Beyond Youtube Unveiling the Top 5 Video Editor Options
- [Updated] Dynamic Viewership Statistics Platforms
- How to Download Youtube Thumbnail in 3 Ways[Online/Win/Mac]
- 2024 Approved City Planning for Climate Action A Comprehensive Guide
- [Updated] Compre Written Guide on Incorporating Markup Features in YouTube
- 2024 Approved Co-Create Content to Maximize YouTube Follower Count
- [New] Captivating Videos Start Here These 7 Royalty-Free Audios
- 2024 Approved Becoming a Director Top Film Tips & Tricks on YouTube
- Strategic Endings Keeping Viewers Engaged on YT
- Must-See Top 5 YouTube Link Share Extensions
- Efficiently Convert YouTube to Desktop Format
- [New] Effortless Audio Downloads These 24 Tools Split YouTube Sounds
- Crafting the Perfect Close YouTube's Free End Screen Tools
- [Updated] Best Free YouTube to MP3 Converters You Should Know [Online/Win/Mac]
- [New] Become a Shorts Connoisseur Must-Know Facts
- Perfecting the Craft of YouTube Short Video Making
- In 2024, Charting the Financial Pathway of TSeries Within YouTube Market Space
- 2024 Approved Comprehensive List of 8 Prime YouTube-to-AVI Tools
- [New] Elevating Success Channel Ideas to Spark Momentum
- Essential Software to Rip YouTube Trailers
- In 2024, Digital Dream Teams 8 YouTube's Growth Phenoms
- The Angle Alchemist's Guide to Transforming Your Videos (YouTube Edition)
- In 2024, Achieve Professional-Level YouTube Transcription Without Spending
- Discover Your Top 10 Choice of Editors for YouTube Short Videos
- 2024 Approved Blitz 30-Second Guide to Fast Thumbnails
- 2024 Approved Effortless Earnings Channel Size No Longer a Challenge
- 2024 Approved Elevate Your Online Presence with Captivating Haul Videos
- Ace the Art of Online Fame Trending on YouTube
- [New] Cutting-Edge Video Tools Opt for Studio or Latest Beta Version
- New 2024 Approved Exciting Update Filmora X Compatible with ARM Architecture
- [New] Get Ahead in Call Capturing 20+ Techniques for Windows/Mac Users
- Instagram Reels Crafted by a True Creative Genius
- [New] Brandless Monitor Video Logger (Free Access) for 2024
- In 2024, Full Guide to Unlock Apple iPhone 11 Pro Max with iTunes | Dr.fone
- How to Check Distance and Radius on Google Maps For your Huawei P60 | Dr.fone
- Full Disclosure Ricoh Theta S Inside & Out
- New In 2024, Unlock FCP Xs Power Adding Effects in Just 3 Steps
- New Revolutionizing Voice Capture - The Best 8 Free Online Recorders Available for 2024
- 2024 Approved Efficient Strategies to Log FaceTime Discussions
- How to Share Location in Messenger On Lava Agni 2 5G? | Dr.fone
- In 2024, Top 4 Ways to Trace Vivo X90S Location | Dr.fone
- How to Track a Lost Motorola Moto G Stylus (2023) for Free? | Dr.fone
- In 2024, How to Unlock Apple iPhone 15 With an Apple Watch & What to Do if It Doesnt Work | Dr.fone
- [Updated] In 2024, Webcam Selection Guide The 10 Best Picks Unveiled
- [Updated] In 2024, Odin’s Children Ragnarok’s Reign
- Updated In 2024, How to Merge Videos in HandBrake? Expectation Vs. Reality
- [Updated] 2024 Approved Crafting Self-Narratives - 100 Unique Instagram Captions
- Tablet-Size Talent Leading iPadOS Art Programs
- 5 Techniques to Transfer Data from Realme C55 to iPhone 15/14/13/12 | Dr.fone
- Complete Visual Field Review with Cam
- In 2024, WebM Video Editing on a Budget Top 10 Free Editors
- How to retrieve erased messages from Xiaomi 14
- Top 15 Augmented Reality Games Like Pokémon GO To Play On Apple iPhone 6s Plus | Dr.fone
- Unbiased Review Sony Vegas vs Adobe Premiere Pro - Which One Is Right for You?
- [New] Comedy Crescendo Noteworthy Trends in TikTok Laughs for 2024
- [New] Intuitive Steps Setting up Snapchat macOS-Style for 2024
- Title: "In 2024, Capture Your Audience The Smartphone Guide to YouTube Thumbnails"
- Author: Steven
- Created at : 2024-05-25 19:34:40
- Updated at : 2024-05-26 19:34:40
- Link: https://youtube-clips.techidaily.com/in-2024-capture-your-audience-the-smartphone-guide-to-youtube-thumbnails/
- License: This work is licensed under CC BY-NC-SA 4.0.
