
"In 2024, Captivating Subscription Making an Animated Button for YouTube with Filmora"
Captivating Subscription: Making an Animated Button for YouTube with Filmora
How to Make Your YouTube Animated Subscribe Button Easily With Filmora

Richard Bennett
Mar 27, 2024• Proven solutions
The main goal of every content creator is to increase its audience to expand its reach and views. To do so, it’s essential to provide something unique and different to the viewer. Without providing them the content they are looking for, it is impossible to grow your channel and reach. Once your content is ready and you are getting many views, it is essential to make these potential viewers your permanent viewers. The animated subscribe button will help you achieve this goal. While your viewers are watching your videos, you must remind them about subscribing to your channel for receiving such incredible content in the future. Subscribe animation plays a vital role in converting your viewers into subscribers.
There are so many platforms on the internet from where you can get Youtube subscribe button animation free, and you can also purchase these subscribe png gifs. But creating your own animated subscribe button can make you stand out from the crowd and make your videos unique and exclusive. Because it enables you to design it the way you want according to your brand, so, let’s create your own subscribe animation using Wondershare Filmora .
Step-By-Step guide
Step 1: To get started,open Filmora X. On your upper left corner, click on the “Sample Colors,” select the Green color and drag it to Video Track into the timeline. We are using a Green background to easily remove it using the green screen feature in Filmora to use it in our future projects after exporting it, without creating it again. Adjust the duration of this track according to your requirement. In my case, I am trying to make an animated subscribe button of 5 seconds.
Step 2: Lock this track by clicking on the lock icon to work on subscribe animation without disturbing the background easily.
Step 3: Now it’s time to design the subscribe png gif. Go to the Sample colors again and drag the red color into the time above the green background.
Step 4: Double click on the red color in the timeline and adjust its size. Make it look like a subscribe button that is a rectangle and place it at the bottom center of the background. You can put it anywhere you want it to appear in your future videos.
Step 5: Now, let’s add Subscribe text into the button. Go to the Title and select any style that you like. “Basic 6” will work perfectly fine for this purpose. Drag and drop it into the timeline above all tracks.
Step 6: Double click on the Title on the timeline and edit it with “Subscribe” and place it under the red rectangle and click OK.
Step 7: We have put a cursor that can click on the animated subscribe button. You can use Google Search to find a transparent cursor. Make sure to save it in png format. Download it and import it into Filmora.
Step 8: Drag and drop the cursor into the timeline and place it above all the other three tracks to make it prominent. Adjust the size of the cursor place it on the Subscribe button where you want it to appear.
Step 9: Now, it’s time to animate the design using keyframes. First of all, let’s animate the red rectangle. Double click on the red color on the timeline. Go to the ‘Animation’ tab and then click ‘Customize.’ Move to the 1 second in the timeline and click ‘Add.’
Step 10: Now go back to the beginning in the timeline and adjust the scale to 0%. It will make the rectangle pop up when you play the clip.
Step 11: Text needs to be animated as well to match it with the rectangle. Double click on the text in the timeline and click ‘ADVANCED.’
Step 12: In this Advance text editor, go to the ‘Animation’ tab and select any animation that you like. On the timeline under the preview screen, adjusts the dark areas according to the time you set on the rectangle, which was 1 second. We want the text to appear on the screen in 1 second, like the rectangle. Also, adjust the ending time when you want the text to disappear again. We have set it on 4 seconds. Which means it will start to fade after 4 seconds.
Step 13: Now, to animate the mouse cursor, we will use the same process we used for a rectangle that is key framing. Double click on the cursor track on the timeline and move the time on your timeline to a point when you want the cursor to appear. Now add a key frame by clicking ‘Add’.
Step 14: Now jump back to a point in your timeline, when the cursor will start appearing from outside the screen. Move the cursor outside the screen from where you want it to start moving toward the subscribe animation.
Step 15: To animate the click of the cursor, move ahead a little bit into your timeline and scale down the cursor to around 70%. Move it a little further and scale it up to 100%.
Step 16: You can add the sound of mouse click to make it more realistic. You can find this sound anywhere on the internet. Download it and import it into Filmora. Now place it into the timeline where it can match the movement of the cursor.
Step 17: Now it’s time to make this subscribe animation button disappear. Move forward into the time to the end, at around 4 seconds. Double click on the red button in the timeline and add a key frame at its actual scale.
Step 18: After that, move further in the timeline to the end and make its scale 0. It will make it disappear.
Step 19: Do the same with the cursor. Double click on the cursor in the time and add a key frame at its actual position.
Step 20: Move ahead when you want it to disappear. Move the cursor out of the screen and click ‘OK’.
Step 21: Your Subscribe png gif is ready to be exported and used in your videos. Click on export and choose from various formats and options to choose from while exporting it.
You may also like: How to Get People to Subscribe Channel
Conclusion:Your own Animated Subscribe Button is ready to be used in your future videos and projects. This is a ready-to-use subscribe button that can be easily used using the green screen effect in Filmora. Just import the clip, remove the green screen, and you are good to go. You can also customize this Subscribe Animation using your channel and more. Keep experimenting with new things using Filmora.


Richard Bennett
Richard Bennett is a writer and a lover of all things video.
Follow @Richard Bennett
Richard Bennett
Mar 27, 2024• Proven solutions
The main goal of every content creator is to increase its audience to expand its reach and views. To do so, it’s essential to provide something unique and different to the viewer. Without providing them the content they are looking for, it is impossible to grow your channel and reach. Once your content is ready and you are getting many views, it is essential to make these potential viewers your permanent viewers. The animated subscribe button will help you achieve this goal. While your viewers are watching your videos, you must remind them about subscribing to your channel for receiving such incredible content in the future. Subscribe animation plays a vital role in converting your viewers into subscribers.
There are so many platforms on the internet from where you can get Youtube subscribe button animation free, and you can also purchase these subscribe png gifs. But creating your own animated subscribe button can make you stand out from the crowd and make your videos unique and exclusive. Because it enables you to design it the way you want according to your brand, so, let’s create your own subscribe animation using Wondershare Filmora .
Step-By-Step guide
Step 1: To get started,open Filmora X. On your upper left corner, click on the “Sample Colors,” select the Green color and drag it to Video Track into the timeline. We are using a Green background to easily remove it using the green screen feature in Filmora to use it in our future projects after exporting it, without creating it again. Adjust the duration of this track according to your requirement. In my case, I am trying to make an animated subscribe button of 5 seconds.
Step 2: Lock this track by clicking on the lock icon to work on subscribe animation without disturbing the background easily.
Step 3: Now it’s time to design the subscribe png gif. Go to the Sample colors again and drag the red color into the time above the green background.
Step 4: Double click on the red color in the timeline and adjust its size. Make it look like a subscribe button that is a rectangle and place it at the bottom center of the background. You can put it anywhere you want it to appear in your future videos.
Step 5: Now, let’s add Subscribe text into the button. Go to the Title and select any style that you like. “Basic 6” will work perfectly fine for this purpose. Drag and drop it into the timeline above all tracks.
Step 6: Double click on the Title on the timeline and edit it with “Subscribe” and place it under the red rectangle and click OK.
Step 7: We have put a cursor that can click on the animated subscribe button. You can use Google Search to find a transparent cursor. Make sure to save it in png format. Download it and import it into Filmora.
Step 8: Drag and drop the cursor into the timeline and place it above all the other three tracks to make it prominent. Adjust the size of the cursor place it on the Subscribe button where you want it to appear.
Step 9: Now, it’s time to animate the design using keyframes. First of all, let’s animate the red rectangle. Double click on the red color on the timeline. Go to the ‘Animation’ tab and then click ‘Customize.’ Move to the 1 second in the timeline and click ‘Add.’
Step 10: Now go back to the beginning in the timeline and adjust the scale to 0%. It will make the rectangle pop up when you play the clip.
Step 11: Text needs to be animated as well to match it with the rectangle. Double click on the text in the timeline and click ‘ADVANCED.’
Step 12: In this Advance text editor, go to the ‘Animation’ tab and select any animation that you like. On the timeline under the preview screen, adjusts the dark areas according to the time you set on the rectangle, which was 1 second. We want the text to appear on the screen in 1 second, like the rectangle. Also, adjust the ending time when you want the text to disappear again. We have set it on 4 seconds. Which means it will start to fade after 4 seconds.
Step 13: Now, to animate the mouse cursor, we will use the same process we used for a rectangle that is key framing. Double click on the cursor track on the timeline and move the time on your timeline to a point when you want the cursor to appear. Now add a key frame by clicking ‘Add’.
Step 14: Now jump back to a point in your timeline, when the cursor will start appearing from outside the screen. Move the cursor outside the screen from where you want it to start moving toward the subscribe animation.
Step 15: To animate the click of the cursor, move ahead a little bit into your timeline and scale down the cursor to around 70%. Move it a little further and scale it up to 100%.
Step 16: You can add the sound of mouse click to make it more realistic. You can find this sound anywhere on the internet. Download it and import it into Filmora. Now place it into the timeline where it can match the movement of the cursor.
Step 17: Now it’s time to make this subscribe animation button disappear. Move forward into the time to the end, at around 4 seconds. Double click on the red button in the timeline and add a key frame at its actual scale.
Step 18: After that, move further in the timeline to the end and make its scale 0. It will make it disappear.
Step 19: Do the same with the cursor. Double click on the cursor in the time and add a key frame at its actual position.
Step 20: Move ahead when you want it to disappear. Move the cursor out of the screen and click ‘OK’.
Step 21: Your Subscribe png gif is ready to be exported and used in your videos. Click on export and choose from various formats and options to choose from while exporting it.
You may also like: How to Get People to Subscribe Channel
Conclusion:Your own Animated Subscribe Button is ready to be used in your future videos and projects. This is a ready-to-use subscribe button that can be easily used using the green screen effect in Filmora. Just import the clip, remove the green screen, and you are good to go. You can also customize this Subscribe Animation using your channel and more. Keep experimenting with new things using Filmora.
Richard Bennett
Richard Bennett is a writer and a lover of all things video.
Follow @Richard Bennett
Pro Video Creators’ Guide to Ideal Laptops
The Best Laptops for Video Editing
Richard Bennett
Oct 26, 2023• Proven solutions
This article lists the 3 best laptops for video editing in 2018.
Whether you’re an industry professional or an avid YouTuber, you know how important it is to produce quality videos consistently.
The quality of the videos you create will depend on your creativity, the editing software you use, and the hardware that software is installed on. And as you probably know, it can be tough to work fast and get good results when your hardware or laptop isn’t strong enough to power your software properly and allow you to work at the pace you want.
The best laptops for video editing in 2018 have three things in common. First, they have top-of-the-line display technology for color accuracy, color depth, and clarity. Next, they have discrete (dedicated) Graphic Processing Units (GPUs) with accompanying RAM to enable them to handle video processing fast without compromising other system functions. And finally, they have Intel core i7 CPU processors and Solid-State Drives (SSD) for faster overall performance.
THE TOP 3 LAPTOPS FOR EDITING VIDEO IN 2018
The top 3 laptops below are quite impressive. They have the right mix of power and function that video editing requires.
1.MACBOOK PRO WITH TOUCH BAR
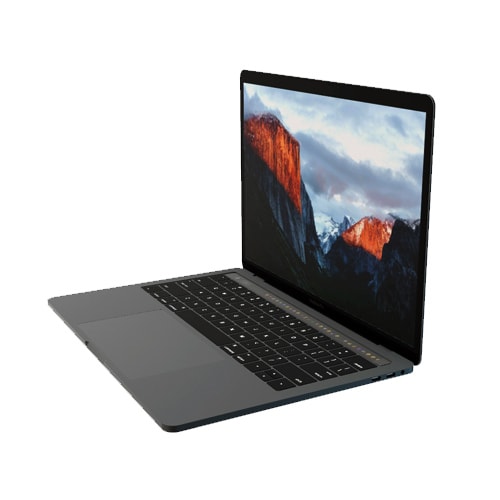
PRICE: $1500 - $1800
SYSTEM SPECS:
CPU: Intel Core i7 Processor
GRAPHICS: Radeon Pro 555 with 2GB memory – 560 with 4GB memory
RAM: 16GB
SCREEN: 15.4” Retina Display
RES: 2880 x 1800px
STORAGE: 128 – 256GB SSD
PROS
- OLED Touch Bar
- Thunderbolt 3 ports
- Large Trackpad
CONS:
- No other input ports available besides Thunderbolt 3
- Expensive
The MacBook Pro with Touch Bar is the best video editing laptop produced by Apple. It has a wide 15.4” screen with thin bezels, and its proprietary OLED Touch bar amps up its flexibility and functionality considerably. The Touch Bar is set-up to show different shortcuts for different apps. It works quite well with Photoshop and will show thumbnails, filter options, a color picker, and more while you’re editing videos or stills.
Working with large 4K video files is much easier with the MacBook Pro. It’s fitted with Thunderbolt 3 Ports which have the highest data and video bandwidth available for USB-C connections. With these Thunderbolt ports, you can also use high-speed and high-power peripherals without a hitch. This laptop also has an extra-wide touchpad or Trackpad (as Apple calls it) which expands your physical working surface while also making it easier to do detailed video editing.
Unfortunately, if you need a variety of ports like most videographers, working with the MacBook Pro could be a challenge as it only has Thunderbolt 3 ports. If this is the laptop you prefer, you’ll need to buy additional connection hardware to work with different input devices. And while this laptop impresses in many ways, it’s also quite expensive. There are certainly other laptops on the market which can give you similar performance at a lower cost.
2. DELL XPS 15
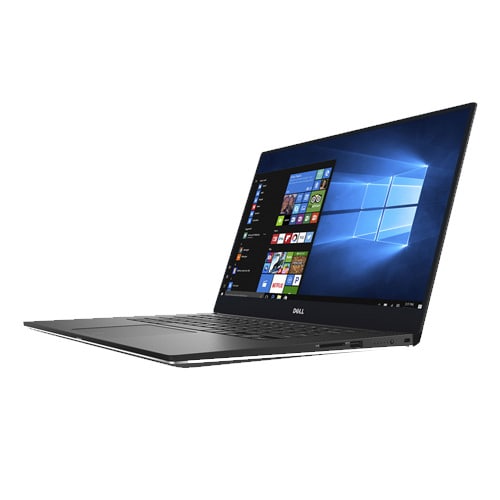
PRICE: $999 - $1300
SYSTEM SPECS:
CPU: Intel Core i7 Processor
GRAPHICS: NVIDIA GeForce GTX 1050
RAM: 8 - 16GB
SCREEN: 15.6”
RES: FHD - 4k UHD 3840 x 2160px
STORAGE: 256GB – 1TB SSD
PROS
- 4k InfinityEdge display
- Good battery life
- Has multiple input ports
CONS:
- Webcam is oddly positioned
The Dell XPS 15 is one laptop that hits the sweet spot for many videographers. It’s considered the closest competitor to the MacBook Pro reviewed above. In fact, many would argue that it tops the MacBook Pro when it comes to speed, color accuracy, and color depth. Its 15.6” screen has very thin bezels for minimal distraction and immersive work experience. At 4K resolution and displaying a wide range of the sRGB gamut, video editing with the Dell XPS 15 promises to be both smooth and enjoyable.
The Dell XPS 15 is certainly more affordable, while still delivering excellent graphics performance. It features an Intel i7 processor and the NVIDIA GeForce GTX 1050 graphics processor. This makes it remarkably fast for video editing, as well as energy-efficient. People who work with different input devices will also like that this laptop has legacy adapters (USB, HDMI, ethernet) alongside a USB type C port.
The biggest downside to the Dell XPS 15 laptop is its oddly positioned webcam. It feels awkward and can be an inconvenience to use since you’ll have to adjust your position significantly while making video calls or recording for your YouTube channel.
3. MICROSOFT SURFACE BOOK 2
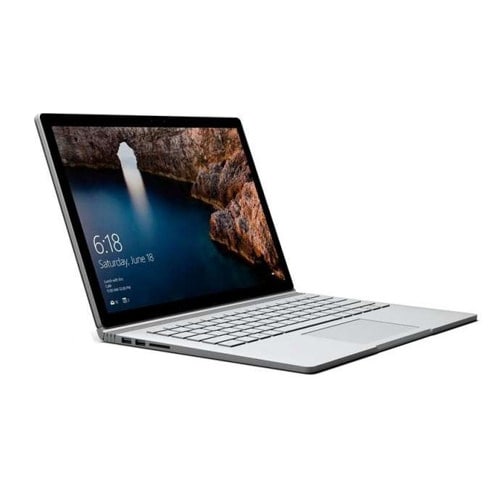
PRICE: $1499 - $2499
SYSTEM SPECS:
CPU: Intel Core i7 Processor
GRAPHICS: Intel HD 620 or Nvidia GTX 1050 / GTX 1060
RAM: 16GB
SCREEN: 15.0”
RES: 3240 x 2160px
STORAGE: 256GB, 512GB – 1TB SSD
PROS
- Detachable screen
- Has multiple input ports (USB Type-A, USB Type-C, SD card reader)
- Works with a Stylus
CONS:
- Expensive
- Fulcrum hinge
The Microsoft Surface Book 2 is a laptop and a tablet thanks to its detachable screen. At a resolution of 3240 x 2160px, its screen is nearly 4k and can handle Full HD and HD footage with ease. Add to this its capacity to show a considerable portion of the sRGB gamut and its easy-to-use stylus and you can see why this 2-in-1 combo from Microsoft is one of the top 3 laptops for video editing in 2018.
Surface Book 2 also has the right combination of power and storage capacity that video editing requires. It boasts a state-of-the-art NVIDIA graphics processor and an Intel i7 processor for a smooth workflow no matter the size or level of detail involved in your video editing project.
On the downside, this laptop is undoubtedly very expensive. Compared to the function and power you can get from the DELL XPS 15, it’s hard to justify paying nearly $2500 for the Surface Book 2. Its detachable screen, supported by a fulcrum hinge, also comes at a price. It makes the laptop a bit bulky at one end when it’s folded. This in turn can make day-to-day handling a bit more tricky than it has to be.
CONCLUSION
If you’re searching for a good laptop to help you improve the quality of your videos in 2018, look no further than these 3. They have all the power, function, and storage capacity you need to handle any project with ease. Just be mindful of your budget and consider which extras are worth the expense. Go for the MacBook Pro with Touch Bar if customizing your workflow is a priority. Opt for the Dell XPS 15 if you want the best combination of display quality and graphics processing. Finally, consider the Surface Book 2 if you need the flexibility of a 2-in-1 device.
What do you think is the best laptop for video editing?
Equip Your Laptop with the Best Video Editing Software
Richard Bennett
Richard Bennett is a writer and a lover of all things video.
Follow @Richard Bennett
Richard Bennett
Oct 26, 2023• Proven solutions
This article lists the 3 best laptops for video editing in 2018.
Whether you’re an industry professional or an avid YouTuber, you know how important it is to produce quality videos consistently.
The quality of the videos you create will depend on your creativity, the editing software you use, and the hardware that software is installed on. And as you probably know, it can be tough to work fast and get good results when your hardware or laptop isn’t strong enough to power your software properly and allow you to work at the pace you want.
The best laptops for video editing in 2018 have three things in common. First, they have top-of-the-line display technology for color accuracy, color depth, and clarity. Next, they have discrete (dedicated) Graphic Processing Units (GPUs) with accompanying RAM to enable them to handle video processing fast without compromising other system functions. And finally, they have Intel core i7 CPU processors and Solid-State Drives (SSD) for faster overall performance.
THE TOP 3 LAPTOPS FOR EDITING VIDEO IN 2018
The top 3 laptops below are quite impressive. They have the right mix of power and function that video editing requires.
1.MACBOOK PRO WITH TOUCH BAR
PRICE: $1500 - $1800
SYSTEM SPECS:
CPU: Intel Core i7 Processor
GRAPHICS: Radeon Pro 555 with 2GB memory – 560 with 4GB memory
RAM: 16GB
SCREEN: 15.4” Retina Display
RES: 2880 x 1800px
STORAGE: 128 – 256GB SSD
PROS
- OLED Touch Bar
- Thunderbolt 3 ports
- Large Trackpad
CONS:
- No other input ports available besides Thunderbolt 3
- Expensive
The MacBook Pro with Touch Bar is the best video editing laptop produced by Apple. It has a wide 15.4” screen with thin bezels, and its proprietary OLED Touch bar amps up its flexibility and functionality considerably. The Touch Bar is set-up to show different shortcuts for different apps. It works quite well with Photoshop and will show thumbnails, filter options, a color picker, and more while you’re editing videos or stills.
Working with large 4K video files is much easier with the MacBook Pro. It’s fitted with Thunderbolt 3 Ports which have the highest data and video bandwidth available for USB-C connections. With these Thunderbolt ports, you can also use high-speed and high-power peripherals without a hitch. This laptop also has an extra-wide touchpad or Trackpad (as Apple calls it) which expands your physical working surface while also making it easier to do detailed video editing.
Unfortunately, if you need a variety of ports like most videographers, working with the MacBook Pro could be a challenge as it only has Thunderbolt 3 ports. If this is the laptop you prefer, you’ll need to buy additional connection hardware to work with different input devices. And while this laptop impresses in many ways, it’s also quite expensive. There are certainly other laptops on the market which can give you similar performance at a lower cost.
2. DELL XPS 15
PRICE: $999 - $1300
SYSTEM SPECS:
CPU: Intel Core i7 Processor
GRAPHICS: NVIDIA GeForce GTX 1050
RAM: 8 - 16GB
SCREEN: 15.6”
RES: FHD - 4k UHD 3840 x 2160px
STORAGE: 256GB – 1TB SSD
PROS
- 4k InfinityEdge display
- Good battery life
- Has multiple input ports
CONS:
- Webcam is oddly positioned
The Dell XPS 15 is one laptop that hits the sweet spot for many videographers. It’s considered the closest competitor to the MacBook Pro reviewed above. In fact, many would argue that it tops the MacBook Pro when it comes to speed, color accuracy, and color depth. Its 15.6” screen has very thin bezels for minimal distraction and immersive work experience. At 4K resolution and displaying a wide range of the sRGB gamut, video editing with the Dell XPS 15 promises to be both smooth and enjoyable.
The Dell XPS 15 is certainly more affordable, while still delivering excellent graphics performance. It features an Intel i7 processor and the NVIDIA GeForce GTX 1050 graphics processor. This makes it remarkably fast for video editing, as well as energy-efficient. People who work with different input devices will also like that this laptop has legacy adapters (USB, HDMI, ethernet) alongside a USB type C port.
The biggest downside to the Dell XPS 15 laptop is its oddly positioned webcam. It feels awkward and can be an inconvenience to use since you’ll have to adjust your position significantly while making video calls or recording for your YouTube channel.
3. MICROSOFT SURFACE BOOK 2
PRICE: $1499 - $2499
SYSTEM SPECS:
CPU: Intel Core i7 Processor
GRAPHICS: Intel HD 620 or Nvidia GTX 1050 / GTX 1060
RAM: 16GB
SCREEN: 15.0”
RES: 3240 x 2160px
STORAGE: 256GB, 512GB – 1TB SSD
PROS
- Detachable screen
- Has multiple input ports (USB Type-A, USB Type-C, SD card reader)
- Works with a Stylus
CONS:
- Expensive
- Fulcrum hinge
The Microsoft Surface Book 2 is a laptop and a tablet thanks to its detachable screen. At a resolution of 3240 x 2160px, its screen is nearly 4k and can handle Full HD and HD footage with ease. Add to this its capacity to show a considerable portion of the sRGB gamut and its easy-to-use stylus and you can see why this 2-in-1 combo from Microsoft is one of the top 3 laptops for video editing in 2018.
Surface Book 2 also has the right combination of power and storage capacity that video editing requires. It boasts a state-of-the-art NVIDIA graphics processor and an Intel i7 processor for a smooth workflow no matter the size or level of detail involved in your video editing project.
On the downside, this laptop is undoubtedly very expensive. Compared to the function and power you can get from the DELL XPS 15, it’s hard to justify paying nearly $2500 for the Surface Book 2. Its detachable screen, supported by a fulcrum hinge, also comes at a price. It makes the laptop a bit bulky at one end when it’s folded. This in turn can make day-to-day handling a bit more tricky than it has to be.
CONCLUSION
If you’re searching for a good laptop to help you improve the quality of your videos in 2018, look no further than these 3. They have all the power, function, and storage capacity you need to handle any project with ease. Just be mindful of your budget and consider which extras are worth the expense. Go for the MacBook Pro with Touch Bar if customizing your workflow is a priority. Opt for the Dell XPS 15 if you want the best combination of display quality and graphics processing. Finally, consider the Surface Book 2 if you need the flexibility of a 2-in-1 device.
What do you think is the best laptop for video editing?
Equip Your Laptop with the Best Video Editing Software
Richard Bennett
Richard Bennett is a writer and a lover of all things video.
Follow @Richard Bennett
Also read:
- 2024 Approved Cutting-Edge Techniques for Excellent Sound, No Mic Included
- Building Brands Together A Guide to Selecting YouTube Teams
- Boost or Dial Down YouTube Audio with Devices for 2024
- The Best Free, Cloud-Based Video Editing Tools
- 2024 Approved Breakdown of Earnings How Much Does a Clicky Make?
- 2024 Approved Acoustic Mastery Secrets for Exceptional Audio Capture
- Premier 10 Sound Scaling Options PCs & Phones
- Copyright Rules for Screenshotting and Archiving YouTube Videos for 2024
- Brightening Up Your YouTube Pixels for 2024
- [New] Essential Strategies for Effective Content Management in Creator Studio
- Unleashing Your Channel's Potential Increase YouTube Views
- Sourav Joshi's Predictions on YouTube Profits in the New Year
- 2024 Approved Enchanting the Screen with Edit Mastery
- [New] B-Roll Builder Kit
- The Best Free Video Editing Software for YouTube (Top 8 Reviews)
- First-Time Streamers Unite Learn OBS & Broadcast to Youtube
- TikTok & YouTube Shorts Comparison for Individual Social Media Users
- Pro Video Enthusiasts Essential Laptop Models You Need
- [New] A Comprehensive Guide to Earnings From YouTube Short Videos
- A Comprehensive Look at Youtuber Snippets
- Digital Domain Your Playground for 1,000 Titles
- Reliable Methods to Elevate Your YouTube Presence Without Breaking Trust
- [New] Achieving YouTube Live Prominence with Pro-Level Tips
- Professional Insights Top 10 Capture Cards for YouTube Enthusiasts
- Unlock the Power of Referrals How to Build Effective YouTube Links
- Concealed Video Streaming Background YouTube Watch for 2024
- Skyrocketing Revenue Mastering Video Monetization Everywhere
- 2024 Approved A Deep Dive Into YouTube's Latest Monetization Policy
- Inspiring YouTube Mastery Key Content Strategies for Channels
- Video Content Battlefront Short Form Supremacy – YouTubes Vs. TikToks
- [New] Earn on YouTube Decoding Recent Policy Changes
- Crafting Captivating YouTube Thumbnails A Sizing Guide
- [New] 2024 Approved Which iPhone Video Editor Stands Tall? Cameo Vs. FilmoraGo
- [New] Effortlessly Access Your Most-Watched FB Movies Post-2023
- How to recover deleted contacts from Honor X7b.
- [New] Discovering the Secret to Instagram Voice Change
- In 2024, Full Guide to Catch 100 IV Pokémon Using a Map On Vivo X Flip | Dr.fone
- In 2024, How To Do Samsung Galaxy A05s Screen Sharing | Dr.fone
- Updated 2024 Approved Final Cut Pro Essentials Creating Engaging Video Slideshows From Your Favorite Moments
- In 2024, Conquering Cinematic Recording A Guide to Windows/macOS/iOS
- Undelete lost data from Vivo G2
- New Audit Findings on Sound Forges Integration and Workflow Efficiency for 2024
- Updated 2024 Approved Mastering the Art of Custom Ringtone Creation
- 2 Ways to Monitor Samsung Galaxy S23+ Activity | Dr.fone
- In 2024, Simple and Effective Ways to Change Your Country on YouTube App Of your Poco X5 Pro | Dr.fone
- [Updated] 2024 Approved Comparing Reels & Stories What's the Best Choice?
- In 2024, Top 5 Tracking Apps to Track Nokia C12 without Them Knowing | Dr.fone
- Can’t view HEVC H.265 content on Motorola G24 Power
- [Updated] Side-by-Side Display Logging for 2024
- [Updated] Capturing Magic in Motion A Guide to Hero5 Timelapses
- Title: "In 2024, Captivating Subscription Making an Animated Button for YouTube with Filmora"
- Author: Steven
- Created at : 2024-05-25 19:34:33
- Updated at : 2024-05-26 19:34:33
- Link: https://youtube-clips.techidaily.com/in-2024-captivating-subscription-making-an-animated-button-for-youtube-with-filmora/
- License: This work is licensed under CC BY-NC-SA 4.0.
