
:max_bytes(150000):strip_icc()/copilotpp03-763a146c397e4255b6dcb549c1073474.jpg)
In 2024, Breakdown of How YouTube Ad Revenue Works (CPM)
Breakdown of How YouTube Ad Revenue Works (CPM)
YouTube is a great way to make money online through sponsorship and selling merchandise and sponsorships. However, a big chunk of the creator generates their revenue from Google ads. The YouTube monetization rates defines how much you can make from the ads. In this article, we talk about YouTube monetization rates and what you need to start making money.
YouTububer Monetization Helper A cross-platform for creating visually appealing and engaging videos that will increase the chances of monetization on YouTube!
Free Download Free Download Learn More

Part 1. How Much Do YouTubers Make Per View?
Are you curious about how much YouTubers make per view? Most people are. The Influencer Marketing Hub estimates that the average YouTuber makes $0.018 per view. These rates vary from $0.10 to $0.30 per ad view depending on the type of video and location.

The YouTube monetization rates vary significantly because of various factors:
- The number of views a video receives
- The number of clicks an ad receives
- Ad blockers
- Ad Quality
- Video length
Part 2. How Much Do YouTubers Make Per 1,000 Views
A YouTube channel is a great way to generate revenye. Quality content attracts a large audience, enabling a way to generate ad revenue. Although it may be difficult to grow a YouTube channel, the revenue generated is worth. The youtube monetization rates determine the amount you can earn for every 1,000 views on your videos.
Allowing advertiser to run their ads on your channel through Google AdSense is an effective way of monetizing YouTube Content. The advertisers pay YouTube to display their products on the platform. YouTube then pays YouTubers for displaying the ads on their videos. Although the YouTube monetization rates may vary, overall revenue generated is usually substantial.
Each view will generate $0.10 to $0.30 or an average of $0.018. The YouTuber will be paid $18 on average for a video with 1,000 ad views. The amount paid depends on the CPM (Cost per Mille), which is the cost of advertising to 1,000 people. Brands will incur between $4 and $24 on YouTube to advertise on YouTube. However, the revenue generated by the Youtuber will be lower because not all the 1,000 views will be ad views.
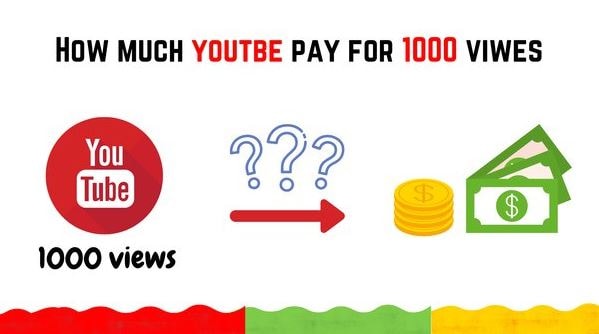
Most YouTubers report to earn around $5 to $7 from 1,000 views of their videos. Here is a breakdown of the earnings from this:
- Top talent on YouTube will likely earn $5 per 1,000
- Garnering 1 million views will earn the YouTuber $5,000
- Garnering 1 million views with 5 videos will earn the YouTuber $25,000
The figures above are just estimates. YouTubers often make more or less this amount.
Part 3. How Many Views Do YouTubers Need to Get Paid?
To get paid from revenues, you need to be eligible for the YouTube Partner Program (YPP). The following is the eligibility criteria.

The specific eligibility criteria include the following:
- Subscribers - At least 1,000
- YouTube Reach – At least 4,000 valid public watch hours in the past 12 months or at least 10M public Shorts views in the last 90 days
- YouTube Shorts Reach -
- Sign and agree to the terms and conditions
- Have an AdSense account
- Get reviewed and approved
Once approved for the YPP, you have the potential to start earning through ads. The revenue-sharing program allows you to earn income for the ads that show on your channel. Specifically, Google will pay you 68% of the revenue from the ads displayed with AdSense. For instance, a video that generates $1,000 from AdSense revenue will pay the YouTuber $680.
Part 4. The Top 6 Highest Paid YouTubers
YouTube creates a clear path for the birth of a new breed of celebrities. They have a huge following, and grow their wealth by sharing content with them. Let’s have a look at the top 6 paid YouTubers right now:
- Beast (Jimmy Donaldson) - $54 Million
- Jake Paul - $45 million
- Markiplier - $38 Million
- Rhett and Link - $30 million
- Unspeakable - $28.5 million
- Nastya - $28 million
1. Mr. Beast (Jimmy Donaldson) - $54 Million

Ranked first among the highest-paid YouTubers, Jimmy has the most popular channel. With more than 150 million subscribers, he creates videos about challenges, pranks, and giveaways. The videos have accumulated billions of views, contributing to his estimated net worth of over $100 million. Another important source of income is the Mr. Beast Burger app and menu that lets fans order MrBeast-banded meals from over 1,600 restaurants across the country.
2. Jake Paul - $45 million

Jake Paul is a renowned American professional boxer. Widely famous on social media, his YouTube is also one of the most highly ranked. He shares different kinds of videos from his boxing games. He also does pranks and reviews about different products.
3. Markiplier - $38 Million

Markiplier makes videos about playing games. The YouTube channel, which started in 2021 is renowned for moving merch. In addition to ad revenue, Markiplier records high sales of T-shirts, hoodies, and other items tied to the Unus Annus series.
4. Rhett and Link - $30 million

This YouTube channel started as the duo hosting a nerdy daily talk show called Good Mythical Morning. It quickly grew into an empire with brand extensions and spinoffs that boosted its views and earnings on YouTube.
5. Unspeakable - $28.5 million
Unspeakable talks about Minecraft in the channel. Nathan Graham posts videos of himself playing this and other games. He also posts other kinds of entertaining content such as filling a room with live alligators. His creativity has allowed him to collaborate with brands in making different ads and promotions.
6. Nastya - $28 million

Nastya immigrated from Russia with her parents. With over 88 million subscribers on her channel, she chronicles her life in prosaic installments. In 2021, she did a Spotter deal and added other brand extensions like merchandise and NFT collection that contributed added income.
Part 5. Edit Your Videos for Monetization with Wondershare Filmora
The amount of money a YouTuber earns depends on several factors. However, the amount can be increased by uploading quality videos. YouTube will quality and engaging content attract more audience, increasing the opportunities for revenue generation. Wondershare Filmora is one such software, that allows you to tell your story in a better way.
Free Download For Win 7 or later(64-bit)
Free Download For macOS 10.14 or later
With the integration of AI, Filmora now offers a wide range of editing features that you can use to automate editing. Instantly generate images, remove image background, and now. These features help create visually appealing and engaging videos that will increase the chances of monetization on YouTube. One of the AI features that stands out is Instant Mode.
Filmora Instant Mode
The Instant Mode helps beginners design slideshow videos with minimal effort. You probably have no video editing experience or a professional content creator with no time to make more videos. With Instant Mode, you can create a video within minutes. Let’s have a look at the steps involved:
Step 1 – Start Instant Mode on Filmora
After opening Filmora on your device, click on Instant Mode. This feature is on the left side of the screen.

Step 2 – Choose a Template
From the Instant Mode window, choose the video template you want to use. Click on it and play to preview the Video. Once satisfied, click om the Download Slideshow button to start editing your video.

Step 3 – Import Media Items
Click on the Import Your Media icon, and add all the media files you want to use for the video. Make sure to import more media files for better use, and press the Auto Create icon to move to the next step.

Step 4 – Implement Text Titles
From the top-left corner of the screen, click the “Titles” category. Then choose from the options available for the required title template.

Step 5 – Replace Needed Media Items
Review all the media items in the timeline, and replace any that you want with another option. The Replace icon allows you to seamlessly achieve this. You can also import new files to replace it with.

Step 6: Add Project to Timeline
Once you are satisfied with your slideshow video, click on the Timeline button. This will take you to Filmora’s editing environment where you can add effects and other elements to enhance the video.

Step 7 – Preview and Export Your Video
Click on the Play icon to preview the edited video. Then export it in MP4 format for quick upload to YouTube.

Other Useful Filmora Video Editing Features
- AI Portrait – Remove the background of your videos with high accuracy and choose over 70 portrait and sticker effects.
- AI Copywriting : Get inspiration for your video through AI-generated scripts, and automatically generate text during video editing.
- AI Image – Generate an image automatically by typing what you want. Choose from 3 resolutions and use the image directly for your video project
- Auto Reframe – Automatically resize your videos within minutes to use on both YouTube and Shorts.
- Auto Beat Sync – Automatically match the footage with music, giving your video a smooth flow with the music you choose.
Conclusion
Running a YouTube Channel is lucrative. Although it may take time to build a following, YouTube is a great platform for generating revenue. Most YouTubers have monetized their channels through the YPP program. The program allows you to earn revenue from the ads that show up in your videos. This means that a successful YouTube needs high-quality videos. We recommend Wondershare Filmora for editing your videos and improving their rate of engagement with the audience. This is a key step in building recurring revenue with YouTube monetization options.
Free Download Free Download Learn More
Part 1. How Much Do YouTubers Make Per View?
Are you curious about how much YouTubers make per view? Most people are. The Influencer Marketing Hub estimates that the average YouTuber makes $0.018 per view. These rates vary from $0.10 to $0.30 per ad view depending on the type of video and location.
The YouTube monetization rates vary significantly because of various factors:
- The number of views a video receives
- The number of clicks an ad receives
- Ad blockers
- Ad Quality
- Video length
Part 2. How Much Do YouTubers Make Per 1,000 Views
A YouTube channel is a great way to generate revenye. Quality content attracts a large audience, enabling a way to generate ad revenue. Although it may be difficult to grow a YouTube channel, the revenue generated is worth. The youtube monetization rates determine the amount you can earn for every 1,000 views on your videos.
Allowing advertiser to run their ads on your channel through Google AdSense is an effective way of monetizing YouTube Content. The advertisers pay YouTube to display their products on the platform. YouTube then pays YouTubers for displaying the ads on their videos. Although the YouTube monetization rates may vary, overall revenue generated is usually substantial.
Each view will generate $0.10 to $0.30 or an average of $0.018. The YouTuber will be paid $18 on average for a video with 1,000 ad views. The amount paid depends on the CPM (Cost per Mille), which is the cost of advertising to 1,000 people. Brands will incur between $4 and $24 on YouTube to advertise on YouTube. However, the revenue generated by the Youtuber will be lower because not all the 1,000 views will be ad views.
Most YouTubers report to earn around $5 to $7 from 1,000 views of their videos. Here is a breakdown of the earnings from this:
- Top talent on YouTube will likely earn $5 per 1,000
- Garnering 1 million views will earn the YouTuber $5,000
- Garnering 1 million views with 5 videos will earn the YouTuber $25,000
The figures above are just estimates. YouTubers often make more or less this amount.
Part 3. How Many Views Do YouTubers Need to Get Paid?
To get paid from revenues, you need to be eligible for the YouTube Partner Program (YPP). The following is the eligibility criteria.
The specific eligibility criteria include the following:
- Subscribers - At least 1,000
- YouTube Reach – At least 4,000 valid public watch hours in the past 12 months or at least 10M public Shorts views in the last 90 days
- YouTube Shorts Reach -
- Sign and agree to the terms and conditions
- Have an AdSense account
- Get reviewed and approved
Once approved for the YPP, you have the potential to start earning through ads. The revenue-sharing program allows you to earn income for the ads that show on your channel. Specifically, Google will pay you 68% of the revenue from the ads displayed with AdSense. For instance, a video that generates $1,000 from AdSense revenue will pay the YouTuber $680.
Part 4. The Top 6 Highest Paid YouTubers
YouTube creates a clear path for the birth of a new breed of celebrities. They have a huge following, and grow their wealth by sharing content with them. Let’s have a look at the top 6 paid YouTubers right now:
- Beast (Jimmy Donaldson) - $54 Million
- Jake Paul - $45 million
- Markiplier - $38 Million
- Rhett and Link - $30 million
- Unspeakable - $28.5 million
- Nastya - $28 million
1. Mr. Beast (Jimmy Donaldson) - $54 Million
Ranked first among the highest-paid YouTubers, Jimmy has the most popular channel. With more than 150 million subscribers, he creates videos about challenges, pranks, and giveaways. The videos have accumulated billions of views, contributing to his estimated net worth of over $100 million. Another important source of income is the Mr. Beast Burger app and menu that lets fans order MrBeast-banded meals from over 1,600 restaurants across the country.
2. Jake Paul - $45 million
Jake Paul is a renowned American professional boxer. Widely famous on social media, his YouTube is also one of the most highly ranked. He shares different kinds of videos from his boxing games. He also does pranks and reviews about different products.
3. Markiplier - $38 Million
Markiplier makes videos about playing games. The YouTube channel, which started in 2021 is renowned for moving merch. In addition to ad revenue, Markiplier records high sales of T-shirts, hoodies, and other items tied to the Unus Annus series.
4. Rhett and Link - $30 million
This YouTube channel started as the duo hosting a nerdy daily talk show called Good Mythical Morning. It quickly grew into an empire with brand extensions and spinoffs that boosted its views and earnings on YouTube.
5. Unspeakable - $28.5 million
Unspeakable talks about Minecraft in the channel. Nathan Graham posts videos of himself playing this and other games. He also posts other kinds of entertaining content such as filling a room with live alligators. His creativity has allowed him to collaborate with brands in making different ads and promotions.
6. Nastya - $28 million
Nastya immigrated from Russia with her parents. With over 88 million subscribers on her channel, she chronicles her life in prosaic installments. In 2021, she did a Spotter deal and added other brand extensions like merchandise and NFT collection that contributed added income.
Part 5. Edit Your Videos for Monetization with Wondershare Filmora
The amount of money a YouTuber earns depends on several factors. However, the amount can be increased by uploading quality videos. YouTube will quality and engaging content attract more audience, increasing the opportunities for revenue generation. Wondershare Filmora is one such software, that allows you to tell your story in a better way.
Free Download For Win 7 or later(64-bit)
Free Download For macOS 10.14 or later
With the integration of AI, Filmora now offers a wide range of editing features that you can use to automate editing. Instantly generate images, remove image background, and now. These features help create visually appealing and engaging videos that will increase the chances of monetization on YouTube. One of the AI features that stands out is Instant Mode.
Filmora Instant Mode
The Instant Mode helps beginners design slideshow videos with minimal effort. You probably have no video editing experience or a professional content creator with no time to make more videos. With Instant Mode, you can create a video within minutes. Let’s have a look at the steps involved:
Step 1 – Start Instant Mode on Filmora
After opening Filmora on your device, click on Instant Mode. This feature is on the left side of the screen.
Step 2 – Choose a Template
From the Instant Mode window, choose the video template you want to use. Click on it and play to preview the Video. Once satisfied, click om the Download Slideshow button to start editing your video.
Step 3 – Import Media Items
Click on the Import Your Media icon, and add all the media files you want to use for the video. Make sure to import more media files for better use, and press the Auto Create icon to move to the next step.
Step 4 – Implement Text Titles
From the top-left corner of the screen, click the “Titles” category. Then choose from the options available for the required title template.
Step 5 – Replace Needed Media Items
Review all the media items in the timeline, and replace any that you want with another option. The Replace icon allows you to seamlessly achieve this. You can also import new files to replace it with.
Step 6: Add Project to Timeline
Once you are satisfied with your slideshow video, click on the Timeline button. This will take you to Filmora’s editing environment where you can add effects and other elements to enhance the video.
Step 7 – Preview and Export Your Video
Click on the Play icon to preview the edited video. Then export it in MP4 format for quick upload to YouTube.
Other Useful Filmora Video Editing Features
- AI Portrait – Remove the background of your videos with high accuracy and choose over 70 portrait and sticker effects.
- AI Copywriting : Get inspiration for your video through AI-generated scripts, and automatically generate text during video editing.
- AI Image – Generate an image automatically by typing what you want. Choose from 3 resolutions and use the image directly for your video project
- Auto Reframe – Automatically resize your videos within minutes to use on both YouTube and Shorts.
- Auto Beat Sync – Automatically match the footage with music, giving your video a smooth flow with the music you choose.
Conclusion
Running a YouTube Channel is lucrative. Although it may take time to build a following, YouTube is a great platform for generating revenue. Most YouTubers have monetized their channels through the YPP program. The program allows you to earn revenue from the ads that show up in your videos. This means that a successful YouTube needs high-quality videos. We recommend Wondershare Filmora for editing your videos and improving their rate of engagement with the audience. This is a key step in building recurring revenue with YouTube monetization options.
Decoding the Visual Language of YouTube Thumbnails
The Ultimate Guide to YouTube Thumbnails that Get Views

Richard Bennett
Oct 26, 2023• Proven solutions
Search for any topic on YouTube and you’ll find thousands of videos. How do you decide which of them to watch? Thumbnails play a major role in what viewers decide to click on. They’re often more important than video titles.
Viewers click on thumbnails that both standout and feel relevant to their search. Your task when it comes to creating YouTube thumbnails is to make something that does both of those things while also maintaining your personal style.
- How to Make a YouTube Thumbnail
- How to Upload a YouTube Thumbnail
- YouTube Thumbnail Makers
- How to Make Thumbnails that Get Clicks (Without Clickbait!)
- Animated YouTube Thumbnails
Part 1: How to Make a YouTube Thumbnail
In order to create a custom video thumbnail, you’ll need a program to put it together in. You can use an image editing program like Photoshop if you have one, but if you don’t you can check out these free thumbnail makers.
Here are some examples of popular thumbnail styles.

1. The Classic Thumbnail (Photo or Screenshot)
A photo that shows what happens in your video – whether that means the finished ‘look’ from your makeup tutorial or you posing in front of the landmark you shot your travel vlog in front of – is a great way to let viewers know what to expect. While curiosity can be a big motive behind clicking on a video thumbnail (or anything online), when people have searched for a specific topic they want to be convinced that your video has what they’re looking for.
#1. Choose Your Photo
To start off, either choose a still frame from your video or take a photograph while you’re still set up from your video. A separate photograph is usually a better idea because your video editor might not be able to export a high-quality snapshot, and also because you’re able to choose your facial expression.
Aim to make this shot a close-up or medium close-up and make sure you’re either in the center of the screen or off to one side, as per the ‘rule of thirds’. Many cameras allow you to bring an optional grid up onto your viewfinder. This will divide your screen into three equal segments both vertically and horizontally. Try to make sure your eyes line up with the top line, and if you’re going to be off to one side then make sure you’re on one of the vertical lines. This will ensure your image is visually appealing.
If you want to add text later, it’s a good idea to be off to one side.
Including your face is important for most types of YouTube videos. People are attracted to eye contact and are more likely to click on thumbnails that feature a face. Gamers might choose to use a picture of a video game character instead and it will have the same effect.
Some situations where it isn’t essential to include your face include tech reviews, where viewers will be more interested in seeing the product, and cooking videos where people are looking to be tempted by a yummy food pic.
#2. Add Text and/or Images
This part isn’t essential – in some cases, a photo is enough – but a lot of the thumbnails for the videos ranked highest in YouTube’s search results include either a couple of words of text, a simple graphic (i.e. an emoji), or both.
In some cases you might use text to make it clear what type of video you’ve made, i.e. ‘review’ or ‘tutorial’. It’s best to keep any text you use brief, but you could get a bit more descriptive and write something like ‘fall makeup tutorial’. Three words is probably the most you can get away with. Remember that your text will be shrunk down with the rest of your image; you need to make it big enough to read easily once it’s shrunk, and that means you don’t have a ton of room for text.
You should also avoid fonts that are harder to read. Fonts with a lot of curves can be harder to read, and you want to make sure you choose a color that stands out from your background. Yellow might work against black, but it probably won’t work against the beige wall of your sunny bedroom. Sans serif fonts tend to be best.
Another tactic used in successful thumbnails is to add small graphics, like emojis or small images (i.e. pumpkins for a Halloween video), which are related to your video’s content. As with text, you don’t want to overload your thumbnail with images, but they’re a great way to add something eye-catching that’s a bit different from competing thumbnails.
2. The Emotional Laser (Background + Face Reacting)
One increasingly popular style of YouTube thumbnail is what we’re going to call the ‘Emotional Laser’. It’s bright (like, blindingly bright), it communicates a clear feeling, and it creates high expectations for how exciting the video’s content is going to be.
The three main elements of the Emotional Laser thumbnail are a background (usually bright), your face on the right wearing an over-pronounced expression, and either the thing your expression is in reaction to (i.e. food, a product, the topic of your video in text) or reinforcement of your emotion (i.e an emoji or question marks) on the left.


#1. Ham It Up (Take Your Reaction Photo)
Take a high-quality photograph of yourself conveying strong emotion. Generally, you want to look extremely excited, disgusted, angry, or shocked depending on the theme of the video.
If there’s an object you want to include in your thumbnail, like a product you’ll be talking about, then it’s a good idea to hold it for this photo. Hold it to one side of your head, turn towards it slightly (but not so much that the camera can only see the side of your face) and put on the expression that’s supposed to be a reaction to the object.
It can be a good idea to take this photo in front of a solid color so you can remove the background easily with chroma key.
#2. Choose Your Background
Your background might be scenery, a solid color, or even the room you filmed the video in. Light or bright colors are popular. Make sure there’s nothing that will distract from your expression. If your background is a room, or anything else where there could be things like pictures hanging, you may want to add a blur effect in the next step.
#3. Put It Together
In your thumbnail maker or a program like Photoshop, you’ll need to put your photo and your background together. This will work differently depending on what program you use. If your program has a chroma key tool and your reaction photo was taken against a solid color then you can make that solid color transparent.
What if I don’t have a separate background? If you don’t have a background you want to use, but you still want your reaction to stand out the same way it would if you did, then you can use your photo editor’s blur tool to turn the normal background of your photo into something you can pop-out from.
#4. Add Extras (Text, Emojis, etc.)
If instead of an object you plan to fill the other side of your thumbnail with text, question marks, emojis, or some other graphic element then now is the time to add it.
Part 2: How to Upload a YouTube Thumbnail
When you upload a new video to YouTube, you will see a Custom thumbnail option under Video thumbnails after your upload is complete.
If you want to add a custom thumbnail to a video that’s already up, that’s easy too.
- Go to your Video Manager in the Creator Studio.
- Find the video you want to change the thumbnail for and click Edit next to it.
- Click Custom thumbnail on the right of the preview screen.
- Upload your thumbnail and click Save changes.
Remember when you’re uploading custom thumbnails that you need to use a .JPG, .GIF, .BMP, or .PNG image with an aspect ratio of 16:9 and that your file size has to be under 2MB.
YouTube recommends that thumbnail images have a resolution of 1280x720px, and you cannot upload an image with a width of less than 640 pixels.
Make sure that all of your thumbnails adhere to YouTube’s Community guidelines. Anything sexually suggestive, violent, or otherwise graphic could result in your video being age-restricted.
Part 3: YouTube Thumbnail Makers
You don’t have to go out and buy a photo editor like Photoshop to make custom video thumbnails (although it’s a good thing to use if you already have it). Here are two free online programs you can use instead:
Canva is an intuitive option with templates for Thumbnails, Channel Art, and other social media graphics. There are stock photos and graphics provided, but not all of them are free (paid options cost $1 each). Canva’s templates do tend to include paid resources, so you may want to use them mostly for their layouts or as inspiration and replace everything they provide with your own images.
Generally, using Canva is as easy as dragging and dropping things where you want them. You’ll be able to set the dimensions for your project so the image you export is a perfect size. Adding text and changing the size, font, or color is easy too.
Adobe Spark also has templates for channel art, and it’s also very easy to use. The first time you use it helpful notes will pop up to guide you through the process. Using templates is especially simple because you just click on the elements in the pre-made thumbnail and replace them with your own photos/text.
You can make changes to the colors in your Spark thumbnail easily by selecting a new color scheme or filter. You can even toggle through layouts easily. When you choose a new layout, Spark will rearrange all the pieces of your current thumbnail to align with the new layout so you can quickly see what it looks like instead of having to rebuild.
Click to check more YouTube thumbnail makers
Part 4: How to Make Thumbnails That Get Clicks (Without Clickbait!)
Here are the top 10 best practices for creating effective YouTube thumbnails:
#1. Show What Your Video Is About
Being mysterious and clickbaity can get you views, if you’re already big. For small YouTubers, it pays off to be clear about your video’s topic. You want people to click who want to watch the actual content of your video. Even if you manage to get some clicks by being mysterious, you’ll probably end up with low viewer retention because people are clicking away when they realize your video isn’t what they were looking for. That will make YouTube’s algorithm rank your video lower, and then even fewer people will find it.
If your video is a product review, show the product in the thumbnail and maybe even write ‘review’ on it. If your video is a makeup tutorial, show your face with the finished makeup and maybe even include pictures of the products you used. People want to know what they’re clicking on before they click.
#2. Use a Consistent Layout
As you grow, you’ll want people to be able to see one of your thumbnails and instantly know it’s yours. Building a recognizable brand is about consistency. Try to stick with one basic layout for all of your videos. You can still customize every individual thumbnail by using different facial expressions and different graphics, but try to use similar backgrounds, fonts, and general layouts (i.e. you to the right of the thumbnails, text to the left) over and over.
#3. Use Your Face
Why should people want to watch your videos? If the answer is ‘because I can teach them to create delicious food’ or ‘because they want to learn about the latest iPhone’ then your thumbnail should include that food or that iPhone.
If part of the reason people want to watch your videos is you – your personality and your sense of humor – then you should be in your thumbnail.
Viewers who are on YouTube because they like seeing a creator’s personality like to feel the presence of that personality in the video thumbnail, and eye contact naturally draws attention and clicks.
#4. Add Small Graphics
Adding small graphics, like emojis or hearts, to your thumbnail can help you stand out in a couple different ways. First, if they’re being compared to thumbnails that are just screenshots from the video, your thumbnails will look a lot more polished. Second, they’ll add a splash of color which can draw eyes to your video in a search where other thumbnails are not using those same colors.
#5. Your Text Should Be Huge
Your thumbnail will end up being a fraction of the size it is while you’re creating it in your thumbnail maker, and that means that any text you use will end up being shrunk down. You could probably type a six-word sentence in a size 18 font and have it look fine while you’re making your thumbnail, but after you upload it there’s no way people will be able to read it at a glance.
Aim for a huge font size, and 3 words or less (so your thumbnail doesn’t end up looking crowded).
#6. Check Out The Competition
Type your video’s title or topic into the search engine on YouTube and look at the thumbnails for the videos that come up. These are your competition. You want to make a thumbnail that is similar enough to what comes up that viewers know it’s on the same topic, but different enough that it stands out.
Generally, if most of the thumbnails have the same layout, you’ll want to mimic that layout. Where you can break from the crowd is in the colors, fonts, and graphics you use.
Part 5: Animated YouTube Thumbnails
Whether or not you upload a custom thumbnail to YouTube, YouTube’s A.I will choose what it thinks are the 3 juiciest seconds of your video (you cannot choose for yourself) and play them as a GIF-like animation when people mouseover your video thumbnails.
As of now, this only works in the Google Chrome desktop browser. Videos have to be at least 30 seconds long to get moving thumbnails.
Alright, now that you know everything about YouTube thumbnails, go make one! Tell us in the comments what you’re going to do to make your video thumbnails stand out.
Touch Up YouTube Videos with Effects & Elements in Filmora
As one of the most widely used video editing software in YouTube video editing, Filmora provides lots of templates and effects with an intuitive interface. Download the free trial version and get started now.
Richard Bennett
Richard Bennett is a writer and a lover of all things video.
Follow @Richard Bennett
Richard Bennett
Oct 26, 2023• Proven solutions
Search for any topic on YouTube and you’ll find thousands of videos. How do you decide which of them to watch? Thumbnails play a major role in what viewers decide to click on. They’re often more important than video titles.
Viewers click on thumbnails that both standout and feel relevant to their search. Your task when it comes to creating YouTube thumbnails is to make something that does both of those things while also maintaining your personal style.
- How to Make a YouTube Thumbnail
- How to Upload a YouTube Thumbnail
- YouTube Thumbnail Makers
- How to Make Thumbnails that Get Clicks (Without Clickbait!)
- Animated YouTube Thumbnails
Part 1: How to Make a YouTube Thumbnail
In order to create a custom video thumbnail, you’ll need a program to put it together in. You can use an image editing program like Photoshop if you have one, but if you don’t you can check out these free thumbnail makers.
Here are some examples of popular thumbnail styles.
1. The Classic Thumbnail (Photo or Screenshot)
A photo that shows what happens in your video – whether that means the finished ‘look’ from your makeup tutorial or you posing in front of the landmark you shot your travel vlog in front of – is a great way to let viewers know what to expect. While curiosity can be a big motive behind clicking on a video thumbnail (or anything online), when people have searched for a specific topic they want to be convinced that your video has what they’re looking for.
#1. Choose Your Photo
To start off, either choose a still frame from your video or take a photograph while you’re still set up from your video. A separate photograph is usually a better idea because your video editor might not be able to export a high-quality snapshot, and also because you’re able to choose your facial expression.
Aim to make this shot a close-up or medium close-up and make sure you’re either in the center of the screen or off to one side, as per the ‘rule of thirds’. Many cameras allow you to bring an optional grid up onto your viewfinder. This will divide your screen into three equal segments both vertically and horizontally. Try to make sure your eyes line up with the top line, and if you’re going to be off to one side then make sure you’re on one of the vertical lines. This will ensure your image is visually appealing.
If you want to add text later, it’s a good idea to be off to one side.
Including your face is important for most types of YouTube videos. People are attracted to eye contact and are more likely to click on thumbnails that feature a face. Gamers might choose to use a picture of a video game character instead and it will have the same effect.
Some situations where it isn’t essential to include your face include tech reviews, where viewers will be more interested in seeing the product, and cooking videos where people are looking to be tempted by a yummy food pic.
#2. Add Text and/or Images
This part isn’t essential – in some cases, a photo is enough – but a lot of the thumbnails for the videos ranked highest in YouTube’s search results include either a couple of words of text, a simple graphic (i.e. an emoji), or both.
In some cases you might use text to make it clear what type of video you’ve made, i.e. ‘review’ or ‘tutorial’. It’s best to keep any text you use brief, but you could get a bit more descriptive and write something like ‘fall makeup tutorial’. Three words is probably the most you can get away with. Remember that your text will be shrunk down with the rest of your image; you need to make it big enough to read easily once it’s shrunk, and that means you don’t have a ton of room for text.
You should also avoid fonts that are harder to read. Fonts with a lot of curves can be harder to read, and you want to make sure you choose a color that stands out from your background. Yellow might work against black, but it probably won’t work against the beige wall of your sunny bedroom. Sans serif fonts tend to be best.
Another tactic used in successful thumbnails is to add small graphics, like emojis or small images (i.e. pumpkins for a Halloween video), which are related to your video’s content. As with text, you don’t want to overload your thumbnail with images, but they’re a great way to add something eye-catching that’s a bit different from competing thumbnails.
2. The Emotional Laser (Background + Face Reacting)
One increasingly popular style of YouTube thumbnail is what we’re going to call the ‘Emotional Laser’. It’s bright (like, blindingly bright), it communicates a clear feeling, and it creates high expectations for how exciting the video’s content is going to be.
The three main elements of the Emotional Laser thumbnail are a background (usually bright), your face on the right wearing an over-pronounced expression, and either the thing your expression is in reaction to (i.e. food, a product, the topic of your video in text) or reinforcement of your emotion (i.e an emoji or question marks) on the left.
#1. Ham It Up (Take Your Reaction Photo)
Take a high-quality photograph of yourself conveying strong emotion. Generally, you want to look extremely excited, disgusted, angry, or shocked depending on the theme of the video.
If there’s an object you want to include in your thumbnail, like a product you’ll be talking about, then it’s a good idea to hold it for this photo. Hold it to one side of your head, turn towards it slightly (but not so much that the camera can only see the side of your face) and put on the expression that’s supposed to be a reaction to the object.
It can be a good idea to take this photo in front of a solid color so you can remove the background easily with chroma key.
#2. Choose Your Background
Your background might be scenery, a solid color, or even the room you filmed the video in. Light or bright colors are popular. Make sure there’s nothing that will distract from your expression. If your background is a room, or anything else where there could be things like pictures hanging, you may want to add a blur effect in the next step.
#3. Put It Together
In your thumbnail maker or a program like Photoshop, you’ll need to put your photo and your background together. This will work differently depending on what program you use. If your program has a chroma key tool and your reaction photo was taken against a solid color then you can make that solid color transparent.
What if I don’t have a separate background? If you don’t have a background you want to use, but you still want your reaction to stand out the same way it would if you did, then you can use your photo editor’s blur tool to turn the normal background of your photo into something you can pop-out from.
#4. Add Extras (Text, Emojis, etc.)
If instead of an object you plan to fill the other side of your thumbnail with text, question marks, emojis, or some other graphic element then now is the time to add it.
Part 2: How to Upload a YouTube Thumbnail
When you upload a new video to YouTube, you will see a Custom thumbnail option under Video thumbnails after your upload is complete.
If you want to add a custom thumbnail to a video that’s already up, that’s easy too.
- Go to your Video Manager in the Creator Studio.
- Find the video you want to change the thumbnail for and click Edit next to it.
- Click Custom thumbnail on the right of the preview screen.
- Upload your thumbnail and click Save changes.
Remember when you’re uploading custom thumbnails that you need to use a .JPG, .GIF, .BMP, or .PNG image with an aspect ratio of 16:9 and that your file size has to be under 2MB.
YouTube recommends that thumbnail images have a resolution of 1280x720px, and you cannot upload an image with a width of less than 640 pixels.
Make sure that all of your thumbnails adhere to YouTube’s Community guidelines. Anything sexually suggestive, violent, or otherwise graphic could result in your video being age-restricted.
Part 3: YouTube Thumbnail Makers
You don’t have to go out and buy a photo editor like Photoshop to make custom video thumbnails (although it’s a good thing to use if you already have it). Here are two free online programs you can use instead:
Canva is an intuitive option with templates for Thumbnails, Channel Art, and other social media graphics. There are stock photos and graphics provided, but not all of them are free (paid options cost $1 each). Canva’s templates do tend to include paid resources, so you may want to use them mostly for their layouts or as inspiration and replace everything they provide with your own images.
Generally, using Canva is as easy as dragging and dropping things where you want them. You’ll be able to set the dimensions for your project so the image you export is a perfect size. Adding text and changing the size, font, or color is easy too.
Adobe Spark also has templates for channel art, and it’s also very easy to use. The first time you use it helpful notes will pop up to guide you through the process. Using templates is especially simple because you just click on the elements in the pre-made thumbnail and replace them with your own photos/text.
You can make changes to the colors in your Spark thumbnail easily by selecting a new color scheme or filter. You can even toggle through layouts easily. When you choose a new layout, Spark will rearrange all the pieces of your current thumbnail to align with the new layout so you can quickly see what it looks like instead of having to rebuild.
Click to check more YouTube thumbnail makers
Part 4: How to Make Thumbnails That Get Clicks (Without Clickbait!)
Here are the top 10 best practices for creating effective YouTube thumbnails:
#1. Show What Your Video Is About
Being mysterious and clickbaity can get you views, if you’re already big. For small YouTubers, it pays off to be clear about your video’s topic. You want people to click who want to watch the actual content of your video. Even if you manage to get some clicks by being mysterious, you’ll probably end up with low viewer retention because people are clicking away when they realize your video isn’t what they were looking for. That will make YouTube’s algorithm rank your video lower, and then even fewer people will find it.
If your video is a product review, show the product in the thumbnail and maybe even write ‘review’ on it. If your video is a makeup tutorial, show your face with the finished makeup and maybe even include pictures of the products you used. People want to know what they’re clicking on before they click.
#2. Use a Consistent Layout
As you grow, you’ll want people to be able to see one of your thumbnails and instantly know it’s yours. Building a recognizable brand is about consistency. Try to stick with one basic layout for all of your videos. You can still customize every individual thumbnail by using different facial expressions and different graphics, but try to use similar backgrounds, fonts, and general layouts (i.e. you to the right of the thumbnails, text to the left) over and over.
#3. Use Your Face
Why should people want to watch your videos? If the answer is ‘because I can teach them to create delicious food’ or ‘because they want to learn about the latest iPhone’ then your thumbnail should include that food or that iPhone.
If part of the reason people want to watch your videos is you – your personality and your sense of humor – then you should be in your thumbnail.
Viewers who are on YouTube because they like seeing a creator’s personality like to feel the presence of that personality in the video thumbnail, and eye contact naturally draws attention and clicks.
#4. Add Small Graphics
Adding small graphics, like emojis or hearts, to your thumbnail can help you stand out in a couple different ways. First, if they’re being compared to thumbnails that are just screenshots from the video, your thumbnails will look a lot more polished. Second, they’ll add a splash of color which can draw eyes to your video in a search where other thumbnails are not using those same colors.
#5. Your Text Should Be Huge
Your thumbnail will end up being a fraction of the size it is while you’re creating it in your thumbnail maker, and that means that any text you use will end up being shrunk down. You could probably type a six-word sentence in a size 18 font and have it look fine while you’re making your thumbnail, but after you upload it there’s no way people will be able to read it at a glance.
Aim for a huge font size, and 3 words or less (so your thumbnail doesn’t end up looking crowded).
#6. Check Out The Competition
Type your video’s title or topic into the search engine on YouTube and look at the thumbnails for the videos that come up. These are your competition. You want to make a thumbnail that is similar enough to what comes up that viewers know it’s on the same topic, but different enough that it stands out.
Generally, if most of the thumbnails have the same layout, you’ll want to mimic that layout. Where you can break from the crowd is in the colors, fonts, and graphics you use.
Part 5: Animated YouTube Thumbnails
Whether or not you upload a custom thumbnail to YouTube, YouTube’s A.I will choose what it thinks are the 3 juiciest seconds of your video (you cannot choose for yourself) and play them as a GIF-like animation when people mouseover your video thumbnails.
As of now, this only works in the Google Chrome desktop browser. Videos have to be at least 30 seconds long to get moving thumbnails.
Alright, now that you know everything about YouTube thumbnails, go make one! Tell us in the comments what you’re going to do to make your video thumbnails stand out.
Touch Up YouTube Videos with Effects & Elements in Filmora
As one of the most widely used video editing software in YouTube video editing, Filmora provides lots of templates and effects with an intuitive interface. Download the free trial version and get started now.
Richard Bennett
Richard Bennett is a writer and a lover of all things video.
Follow @Richard Bennett
Also read:
- In 2024, Captivating Startups Discovering the Best 15 Video Intros
- Learn YouTube Video Ad Building at No Cost
- 2024 Approved Dynamic Lighting Elevating Video Aesthetics
- Captivating Startups Discovering the Best 15 Video Intros for 2024
- How to View YouTube Statistics?
- [New] Continuous Viewing Setup Your YouTube Clips for TV Repetition
- [New] Access Short Videos Anywhere The Top 6 Free & Online YouTube Short Download Apps
- 2024 Approved Elevating Your YouTube Projects with Enhancements
- [New] Essential Tips for YouTube Short Fixes
- [New] Elevate Engagement - Discover These Top 12 Techniques for Video Success
- [New] Beyond the Buffering A Ranked List of Top 27 Video Streamers Excluding YouTube
- Maximize Views with These 14 Premier YouTube Gaming Videos
- Pioneering Vlogging Tech Our Ranking of Top 12 Video Cameras
- Understanding YouTube's Earnings Structure
- In 2024, Craft Professional Scenes - Access These Top 8 Free Green Screen Backdrops Sites
- [New] Boosting Income with Effective Youtube Short Strategies
- Decoding Monetization How Much Creators Earn Per Ad on YouTube?
- In 2024, Boosting Views with Customized Thumbnail Sizes on YouTube
- [Updated] Channel Upgrade How Reaching 500 Viewers Propelts Monetization
- Making a Mark with Effective YouTube Channel Graphics
- Your Secret to Popularity Choosing Best Thumbnail Fonts
- Updated 2024 Approved Top-Rated Digital Audio Level Equalizer
- [New] In 2024, Innovative Approaches for Cross-Social Media Broadcasting (FB/WhatsApp)
- 2024 Approved How to Animate - Adobe Animate Tutorias
- Fixes for Apps Keep Crashing on Poco X5 Pro | Dr.fone
- Things You Dont Know About Tecno Spark 20C Reset Code | Dr.fone
- New Step-by-Step An Essential Tutorial on Editing Your First Podcast for 2024
- Updated Budget-Friendly Audio File Modifier for Mac Users for 2024
- In 2024, Full Guide to Fix iToolab AnyGO Not Working On Apple iPhone 12 mini | Dr.fone
- In 2024, How to Mirror Apple iPhone 15 Plus to Other iPhone? | Dr.fone
- 2024 Approved Top 6 Best 8K Cameras
- [Updated] Top iOS Emulators Reviving Classic PSP Game Experiences - 2023 Guide for 2024
- A Perfect Guide To Remove or Disable Google Smart Lock On Realme 10T 5G
- Bring Pics Into Action Blur Technique for 2024
- [New] Essential Apps for Professional Video Editing on Android/PC for 2024
- Best 6 Mac Video Snaggers Compiled Here
- In 2024, How to Unlock Apple ID Activation Lock From iPhone SE (2022)?
- How to Unlock Poco M6 5G Bootloader Easily
- Updated Best MP4 Editor for Mavericks Unlock Professional Editing Features for 2024
- Title: In 2024, Breakdown of How YouTube Ad Revenue Works (CPM)
- Author: Steven
- Created at : 2024-05-25 19:33:35
- Updated at : 2024-05-26 19:33:35
- Link: https://youtube-clips.techidaily.com/in-2024-breakdown-of-how-youtube-ad-revenue-works-cpm/
- License: This work is licensed under CC BY-NC-SA 4.0.
