
:max_bytes(150000):strip_icc()/SoftwareandApps_GettyImages-1318174723_OscarWong_CROPPED-0f8969cb51804bae823c37f02a6cd3e8.jpg)
"In 2024, Boosting YouTube Visibility Mastering Titles & Tags"
Boosting YouTube Visibility: Mastering Titles & Tags
How to Optimize YouTube Tags/Title/Description for More Views

Richard Bennett
Mar 27, 2024• Proven solutions
Making awesome video content is just the first hurdle to overcome. Getting people to watch them is the next and a much bigger obstacle in your path. Just as a blogger must work hard to get people to read their blog, so a YouTuber needs to find ways to get more views on their videos.
For any piece of content on the internet, discoverability is key to exposure. After all, nobody will watch your video or read your blog if they can’t find it, right? A blogger would do this by lacing their content with SEO - search engine optimization. But how can a YouTuber do the same? The answer lies in something known as YouTube tags optimization. In this article, we will let you know how to add, edit and optimize YouTube tags easily for more views, and some tips on YouTube title and description.
Quick Jump Menu
- What are YouTube tags and why they are so important
- How to come up with YouTube tags and optimize them
- How to Tag YouTube and Add Title, Description
- How to Improve YouTube video Metadata: Tags, Title, Description
- Tips for Tagging YouTube and Writing Title, Description
Before we get started, I want to recommend the best video editing software for YouTubers - Wondershare Filmora , an easy to use while powerful video editor that allows you not only to cut, split, crop, resize, reverse your videos, but also offers you multiple video effects specially designed for Fashion, Beauty, Gaming, Travel, Education, etc. Check the video to know more fantastic features:
 Download Mac Version ](https://tools.techidaily.com/wondershare/filmora/download/ )
Part 1: What are YouTube tags and why they are so important
YouTube tags are used when you upload a video on YouTube. You need to specify the type of video. In other words, you need to describe your video with keywords. But you might think about why you need to add these words. YouTube can’t figure out what my videos are about? Unfortunately, YouTube can’t though its algorithm is much more advanced than before.
You must know the competition between videos is furious since 500 hours of video per minute are uploaded on YouTube . In this case, it is important to let the YouTube algorithm know your video by adding related tags to have a higher ranking. So the better tags we choose, the higher chance to rank in the top 1, which means you will get more views!
Using YouTube meta tags wisely can broaden your reach and help new people discover your content. However, don’t be tempted to insert irrelevant tags just because you know they are high traffic. You will be found out and penalized as a result. Just as you did with your description, research your keywords, place the most important ones first and use as many as you can.
What are the three YouTube tag types?
YouTube has three different types of tags and each of them has a specific purpose. The tags are-
Specific – The specific tag types are keywords-oriented. These keywords specifically pertain to the content of your video. In this tag type, the particular video is highlighted with the keyword tags. Often while typing the keywords in your mind, YouTube suggests phrases and keywords according to the content of your video. You may apply the suggestions and also add more general or common versions of the same keywords.
Compound – The compound tags are usually using more than two words. Many a time it is seen that users prefer tagging the complete title of the video. If you are using your video title as the compound tag, ensure that you do not include the prepositions like or, as, and, etc. This is because YouTube allows just 500 characters in the title and ignore the prepositions. It is always advised to use all the 500 characters YouTube has allowed without wasting the characters on prepositions as it will automatically be ignored.
Generic – The generic tags are the ones that describe the entire video in one or two words. These tags are used in all the videos of yours. These tags are used across your channel for all the videos you post. It is important to have such general constant tags.
Part 2: How to add YouTube tags and optimize them
The more relevant tags you add, the better it is. The best part is YouTube doesn’t restrict the number of tags but adding all is not possible and adding something irrelevant doesn’t make sense. So, your YouTube video tags must be the smart ones for more views. Educated tagging is what is required.
1. Brand-Specific Tags Addition - Every business wants their brand name to show up in the search results on YouTube and Google. Self-referencing your video or tagging your brand name in a number of variations is a smart way of letting others know your brand.
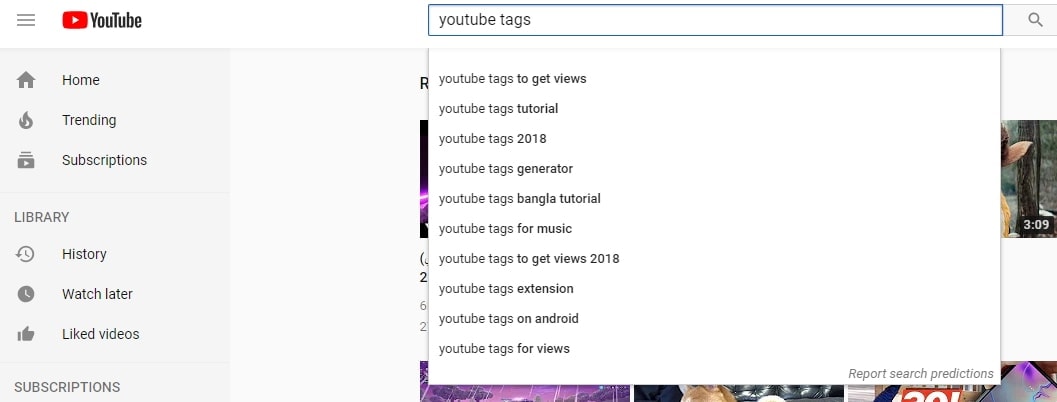
2. Using YouTube Auto Suggest – Play with the search option on YouTube and check out the YouTube suggestions when you search. Try to recognize the common videos that pop up while searching for something important and relevant to yours. Try searching for random keywords according to your YouTube search experience.
3. Use the YouTube Keyword Search Tool – Lastly, you may use the YouTube keyword suggestion tool. It helps you to extract the relevant keywords from the videos of your competitors and create suggestions according to the basic term provided by you.
4. Use Specific Tags - After using tools, you need to narrow down your tags specifically, like tags “learn 3D paper cutting”. The search volume may not be huge, but these kinds of tags can let YouTube know your video very well. Give it a try!
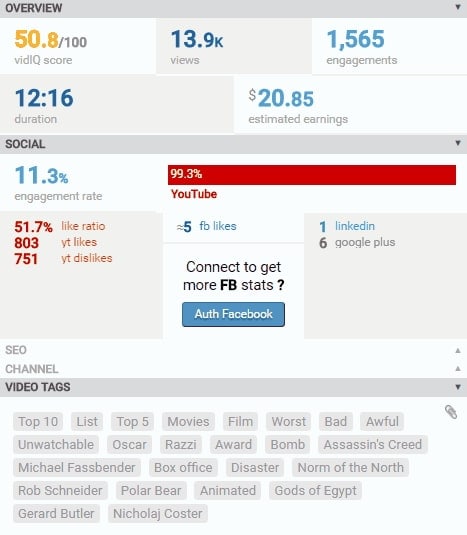
5. Check competitor’s Tags - When you check tags from other brands, it is not suggested to copy them all. What you need to do is find what you are missing and try to cover that area. However, only third-party tools can help you do that. In the market, VidIQ is highly used. It has a free version. Most of all data including tags can be found for higher views.
YouTube Tags Bonus Tips
Here you can learn some tips when optimizing tags. You can use singular and plural tags. Sometimes remember to add some misspelling tags because users tend to mistype some words, so it’s better to cover this kind of tag. You can get more information on misspelled words . More tips are listed below.
- Build on what you learned in your keyword research and use high traffic keywords as tags
- Use as many tags as possible, but without being spammy
- Build related playlists using particular tags
- Be generic; ‘big’, ‘funny’ and ‘sweet’ are fine, but ‘luscious’, ‘delightful’ and ‘splendid’ don’t make the best tags
- Put the most important tags first
- Mix single word tags with ‘long tail’ tags, e.g. ‘how to’
Part 3: How to Tag YouTube and Add Title, Description
For a New Video
- Step 1. The first thing you need to do is to sign in to your YouTube account .
- Step 2. Then click the Upload button that’s found on the top right corner of the window.

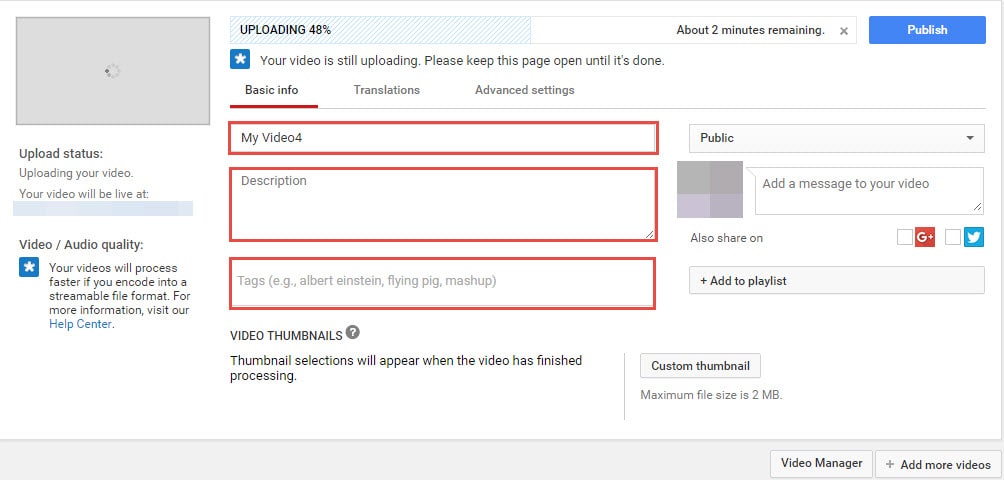
- Step 3. Then select the video that you want to upload. You will be asked to add a title, description, and tags.
- Step 4. After uploading, you can still edit the YouTube title, description, and tags.
For a Published Video
There are times when you want to change the title, description or tag of an already published video. The good news is that YouTube allows you to re-edit them whenever you want to.
- Step 1. Log into your YouTube account
- Step 2. Click the account name found at the top right-hand corner of the screen. Then you will have a dropdown menu. Select Video Manager to show a list of your uploaded videos.

- Step 3. Click the Edit button that’s found right next to the video that you want to modify. In the Video Information, you can now change the title, description or any of the tags. Click on the Save Changes button when you are done.
Part 4: How to Improve YouTube Video Title and Description
Metadata on YouTube is where both the viewers and the platform itself can find out what your video is all about. It helps people search for your video, helps YouTube to categorize it correctly and, when done well, can broaden the reach of your content. YouTube meta consists of three main parts: tags, title and description. Here’s how you can use each of these three elements to create powerful metadata for your video:
1. Title
YouTube titles play a big part in the ranking factors for search. That means you’ve got to think about what the people most likely to want to see your video will type into the search bar, as well as the words that accurately describe your video.
For example, if you have a clip of your cat Fluffy climbing a tree, calling your video ‘Fluffy climbs a tree’ is not the best idea. Nobody knows who Fluffy is; it could be your rabbit, dog, daughter or feather duster for all the YouTube community knows, and nobody is going to be searching for it.
A better title would be ‘cat climbs a tree, but you could even improve on that. How about ‘funny cat climbs a tree’, which would capture all those people looking for funny cat videos. Or, even better, ‘funny Persian cat climbs a tree’, also capturing those people who adore Persian cats.
You can see how building awesome YouTube titles can happen organically like this, but it’s also worth doing your homework too. We have collected a handful of YouTube Keyword tools for you to improve your YouTube meta, so check out the suggestions and work forwards from there.
Best practices
- Research your keywords and include high traffic keywords at the start of the title
- Keep titles under 70 characters
- Branding, episode number, and other non-essential info should be at the end of the title
- Review your YouTube titles from time to time and update with new keywords as search trends change
- Avoid clickbait titles or misleading titles as this will affect your view time and subsequently your ranking in search
2. Description
Your description is a much longer piece of YouTube meta, so you can really go to town with your YouTube keywords here. You’ve got up to 5,000 characters to fill in, and we strongly advise that you aim to use every single one. This really is a golden opportunity, not only to get people motivated to watch all of your video, but also to be indexed correctly through well researched YouTube keywords.
You may have noticed that, on the search page itself, only a small part of the description actually shows up; 120 characters of it to be precise. This doesn’t affect indexing, but it does mean you have to plan your YouTube description carefully to really hook people into clicking through from just the first sentence or two.
Best practices
- Make the first sentence or two compelling and captivating to get people to click
- Research the best YouTube keywords to use to ensure your video is correctly indexed
- At the end of your YouTube description, include a call to action to direct viewers on what to do next (subscribe, click through to the website, look at a product, watch more videos, etc.)
- If your video is long, consider placing time codes in your description to help users jump to their areas of interest
- Add links to products showcased, your social channels, or website as you wish
- Don’t forget to credit any music you’ve used here
Part 5: Tips for Tagging YouTube and Writing Title, Description
So, now we’ve got the basics down, let’s move on to some top tips for getting your metadata just right:
- 1. Do not spam
Irrelevant keywords will not do you any favors in the long run. Using a popular search term such as ‘funny cat’ when actually it’s a video of you unboxing your product will simply irritate your viewers. You’ll get more views, but for shorter durations, and that will hurt not only your ranking but also your reputation. The people you want to draw in with your YouTube meta should be those who are genuinely interested in your videos, as these are the people who will share, comment and interact with you.
- 2. Don’t put tags in the description
YouTube has given you a place to put your tags, and that’s not in the description area of your meta. Placing tags in the description area is known as tag stuffing and can lead to videos being removed or penalized.
- 3. Update regularly
YouTube meta is not a static thing. Trends change, search statistics fluctuate, and the needs of your viewers alter as time goes on. For this reason, you should look to update your meta from time to time, at least once every six months or so. Re-research your keywords and optimize for today’s trending search terms.
You May Also Like: YouTube SEO Complete Guide
Conclusion
Take some time to perfect your meta on YouTube and see how many more views it helps you get. Let us know if you have any other tips for developing powerful metadata, and how optimizing your meta has worked for you!
Download Mac Version ](https://tools.techidaily.com/wondershare/filmora/download/ )
Richard Bennett
Richard Bennett is a writer and a lover of all things video.
Follow @Richard Bennett
Richard Bennett
Mar 27, 2024• Proven solutions
Making awesome video content is just the first hurdle to overcome. Getting people to watch them is the next and a much bigger obstacle in your path. Just as a blogger must work hard to get people to read their blog, so a YouTuber needs to find ways to get more views on their videos.
For any piece of content on the internet, discoverability is key to exposure. After all, nobody will watch your video or read your blog if they can’t find it, right? A blogger would do this by lacing their content with SEO - search engine optimization. But how can a YouTuber do the same? The answer lies in something known as YouTube tags optimization. In this article, we will let you know how to add, edit and optimize YouTube tags easily for more views, and some tips on YouTube title and description.
Quick Jump Menu
- What are YouTube tags and why they are so important
- How to come up with YouTube tags and optimize them
- How to Tag YouTube and Add Title, Description
- How to Improve YouTube video Metadata: Tags, Title, Description
- Tips for Tagging YouTube and Writing Title, Description
Before we get started, I want to recommend the best video editing software for YouTubers - Wondershare Filmora , an easy to use while powerful video editor that allows you not only to cut, split, crop, resize, reverse your videos, but also offers you multiple video effects specially designed for Fashion, Beauty, Gaming, Travel, Education, etc. Check the video to know more fantastic features:
Download Mac Version ](https://tools.techidaily.com/wondershare/filmora/download/ )
Part 1: What are YouTube tags and why they are so important
YouTube tags are used when you upload a video on YouTube. You need to specify the type of video. In other words, you need to describe your video with keywords. But you might think about why you need to add these words. YouTube can’t figure out what my videos are about? Unfortunately, YouTube can’t though its algorithm is much more advanced than before.
You must know the competition between videos is furious since 500 hours of video per minute are uploaded on YouTube . In this case, it is important to let the YouTube algorithm know your video by adding related tags to have a higher ranking. So the better tags we choose, the higher chance to rank in the top 1, which means you will get more views!
Using YouTube meta tags wisely can broaden your reach and help new people discover your content. However, don’t be tempted to insert irrelevant tags just because you know they are high traffic. You will be found out and penalized as a result. Just as you did with your description, research your keywords, place the most important ones first and use as many as you can.
What are the three YouTube tag types?
YouTube has three different types of tags and each of them has a specific purpose. The tags are-
Specific – The specific tag types are keywords-oriented. These keywords specifically pertain to the content of your video. In this tag type, the particular video is highlighted with the keyword tags. Often while typing the keywords in your mind, YouTube suggests phrases and keywords according to the content of your video. You may apply the suggestions and also add more general or common versions of the same keywords.
Compound – The compound tags are usually using more than two words. Many a time it is seen that users prefer tagging the complete title of the video. If you are using your video title as the compound tag, ensure that you do not include the prepositions like or, as, and, etc. This is because YouTube allows just 500 characters in the title and ignore the prepositions. It is always advised to use all the 500 characters YouTube has allowed without wasting the characters on prepositions as it will automatically be ignored.
Generic – The generic tags are the ones that describe the entire video in one or two words. These tags are used in all the videos of yours. These tags are used across your channel for all the videos you post. It is important to have such general constant tags.
Part 2: How to add YouTube tags and optimize them
The more relevant tags you add, the better it is. The best part is YouTube doesn’t restrict the number of tags but adding all is not possible and adding something irrelevant doesn’t make sense. So, your YouTube video tags must be the smart ones for more views. Educated tagging is what is required.
1. Brand-Specific Tags Addition - Every business wants their brand name to show up in the search results on YouTube and Google. Self-referencing your video or tagging your brand name in a number of variations is a smart way of letting others know your brand.
2. Using YouTube Auto Suggest – Play with the search option on YouTube and check out the YouTube suggestions when you search. Try to recognize the common videos that pop up while searching for something important and relevant to yours. Try searching for random keywords according to your YouTube search experience.
3. Use the YouTube Keyword Search Tool – Lastly, you may use the YouTube keyword suggestion tool. It helps you to extract the relevant keywords from the videos of your competitors and create suggestions according to the basic term provided by you.
4. Use Specific Tags - After using tools, you need to narrow down your tags specifically, like tags “learn 3D paper cutting”. The search volume may not be huge, but these kinds of tags can let YouTube know your video very well. Give it a try!
5. Check competitor’s Tags - When you check tags from other brands, it is not suggested to copy them all. What you need to do is find what you are missing and try to cover that area. However, only third-party tools can help you do that. In the market, VidIQ is highly used. It has a free version. Most of all data including tags can be found for higher views.
YouTube Tags Bonus Tips
Here you can learn some tips when optimizing tags. You can use singular and plural tags. Sometimes remember to add some misspelling tags because users tend to mistype some words, so it’s better to cover this kind of tag. You can get more information on misspelled words . More tips are listed below.
- Build on what you learned in your keyword research and use high traffic keywords as tags
- Use as many tags as possible, but without being spammy
- Build related playlists using particular tags
- Be generic; ‘big’, ‘funny’ and ‘sweet’ are fine, but ‘luscious’, ‘delightful’ and ‘splendid’ don’t make the best tags
- Put the most important tags first
- Mix single word tags with ‘long tail’ tags, e.g. ‘how to’
Part 3: How to Tag YouTube and Add Title, Description
For a New Video
- Step 1. The first thing you need to do is to sign in to your YouTube account .
- Step 2. Then click the Upload button that’s found on the top right corner of the window.
- Step 3. Then select the video that you want to upload. You will be asked to add a title, description, and tags.
- Step 4. After uploading, you can still edit the YouTube title, description, and tags.
For a Published Video
There are times when you want to change the title, description or tag of an already published video. The good news is that YouTube allows you to re-edit them whenever you want to.
- Step 1. Log into your YouTube account
- Step 2. Click the account name found at the top right-hand corner of the screen. Then you will have a dropdown menu. Select Video Manager to show a list of your uploaded videos.
- Step 3. Click the Edit button that’s found right next to the video that you want to modify. In the Video Information, you can now change the title, description or any of the tags. Click on the Save Changes button when you are done.
Part 4: How to Improve YouTube Video Title and Description
Metadata on YouTube is where both the viewers and the platform itself can find out what your video is all about. It helps people search for your video, helps YouTube to categorize it correctly and, when done well, can broaden the reach of your content. YouTube meta consists of three main parts: tags, title and description. Here’s how you can use each of these three elements to create powerful metadata for your video:
1. Title
YouTube titles play a big part in the ranking factors for search. That means you’ve got to think about what the people most likely to want to see your video will type into the search bar, as well as the words that accurately describe your video.
For example, if you have a clip of your cat Fluffy climbing a tree, calling your video ‘Fluffy climbs a tree’ is not the best idea. Nobody knows who Fluffy is; it could be your rabbit, dog, daughter or feather duster for all the YouTube community knows, and nobody is going to be searching for it.
A better title would be ‘cat climbs a tree, but you could even improve on that. How about ‘funny cat climbs a tree’, which would capture all those people looking for funny cat videos. Or, even better, ‘funny Persian cat climbs a tree’, also capturing those people who adore Persian cats.
You can see how building awesome YouTube titles can happen organically like this, but it’s also worth doing your homework too. We have collected a handful of YouTube Keyword tools for you to improve your YouTube meta, so check out the suggestions and work forwards from there.
Best practices
- Research your keywords and include high traffic keywords at the start of the title
- Keep titles under 70 characters
- Branding, episode number, and other non-essential info should be at the end of the title
- Review your YouTube titles from time to time and update with new keywords as search trends change
- Avoid clickbait titles or misleading titles as this will affect your view time and subsequently your ranking in search
2. Description
Your description is a much longer piece of YouTube meta, so you can really go to town with your YouTube keywords here. You’ve got up to 5,000 characters to fill in, and we strongly advise that you aim to use every single one. This really is a golden opportunity, not only to get people motivated to watch all of your video, but also to be indexed correctly through well researched YouTube keywords.
You may have noticed that, on the search page itself, only a small part of the description actually shows up; 120 characters of it to be precise. This doesn’t affect indexing, but it does mean you have to plan your YouTube description carefully to really hook people into clicking through from just the first sentence or two.
Best practices
- Make the first sentence or two compelling and captivating to get people to click
- Research the best YouTube keywords to use to ensure your video is correctly indexed
- At the end of your YouTube description, include a call to action to direct viewers on what to do next (subscribe, click through to the website, look at a product, watch more videos, etc.)
- If your video is long, consider placing time codes in your description to help users jump to their areas of interest
- Add links to products showcased, your social channels, or website as you wish
- Don’t forget to credit any music you’ve used here
Part 5: Tips for Tagging YouTube and Writing Title, Description
So, now we’ve got the basics down, let’s move on to some top tips for getting your metadata just right:
- 1. Do not spam
Irrelevant keywords will not do you any favors in the long run. Using a popular search term such as ‘funny cat’ when actually it’s a video of you unboxing your product will simply irritate your viewers. You’ll get more views, but for shorter durations, and that will hurt not only your ranking but also your reputation. The people you want to draw in with your YouTube meta should be those who are genuinely interested in your videos, as these are the people who will share, comment and interact with you.
- 2. Don’t put tags in the description
YouTube has given you a place to put your tags, and that’s not in the description area of your meta. Placing tags in the description area is known as tag stuffing and can lead to videos being removed or penalized.
- 3. Update regularly
YouTube meta is not a static thing. Trends change, search statistics fluctuate, and the needs of your viewers alter as time goes on. For this reason, you should look to update your meta from time to time, at least once every six months or so. Re-research your keywords and optimize for today’s trending search terms.
You May Also Like: YouTube SEO Complete Guide
Conclusion
Take some time to perfect your meta on YouTube and see how many more views it helps you get. Let us know if you have any other tips for developing powerful metadata, and how optimizing your meta has worked for you!
Download Mac Version ](https://tools.techidaily.com/wondershare/filmora/download/ )
Richard Bennett
Richard Bennett is a writer and a lover of all things video.
Follow @Richard Bennett
Navigating the Digital Landscape: FREE Tools for YouTube Audio to Text
How to Transcribe a YouTube Video for FREE
Richard Bennett
Mar 27, 2024• Proven solutions
If you want to transcribe your videos to make the dialogs and speeches available in text format, you can use YouTube Transcribe feature that the streaming site offers for free. In this article, I’ll share with you a couple of methods to transcribe a YouTube video for free.
- Part 1: Transcribe YouTube Video Automatically for Free [2 Ways]
- Part 2: Transcribe YouTube Video to Text Online with Third-Party Service
- Part 3: Benefits of Transcribing YouTube Videos
- Part 4: YouTube Video Transcription FAQs
Part 1: How to Transcribe YouTube Video Automatically for Free [2 Ways]
Besides the basic video editing features on the YouTube platform, you can now quickly transcribe YouTube videos to the text as well. The good thing is, you can either use the automatic transcription feature that YouTube offers, or upload it manually while adjusting the timing as you go further.
Below are the two methods to transcribe your YouTube videos for free:
Method 1: Use the Automated Transcription Service on YouTube
As the name suggests, YouTube automatic transcription service works automatically. This means you don’t even have to click the ‘Transcribe’ button anymore to transcribe a YouTube video, and the website takes care of it on its own. All you need to do is, choose English as the language of the video when setting up subtitles. You can follow the instructions given below to do so:
Step 1 Upload a Video
Sign in to your YouTube account, click your profile picture from the top-right corner, and click YouTube Studio from the menu. Next, click CREATE from the upper-right corner, click Upload videos from the menu, and drag and drop a video from your computer to the Upload videos box that appears next.

Step 2 Select Transcription Language
On the Details page of the next box that appears, scroll down and click MORE OPTIONS, and select English in the Video language drop-down list under the Language, subtitles, and closed captions (CC) section.

Step 3 Publish the Video
Follow the on-screen instructions from this point to publish the video, and wait while YouTube automatically transcribes and adds the close captions to it.
Note: Depending on the duration of the clip, the time YouTube would take to transcribe may vary.
After YouTube has transcribed the video, you can download the transcription file in your preferred format. The instructions are given below explain how you can do so:
- Get to the Subtitles Window
While on the YouTube Studio page, click Subtitles from the left pane to go to the Channel subtitles page. And then click the video you want to modify.
- Get to Classic Studio
In the video subtitle page of the target video, hover mouse on the Published Automatic status under the Subtitles column, click the Options icon (with three vertical dots) that appears, and click Edit on Classic Studio.

- Download Transcription File
Click and open the Actions drop-down list from the top-left corner of the left pane, click your preferred transcription format including .vtt, .srt and .sbv from the list, and save the file on your local hard disk.

Method 2: Get YouTube Transcription when Watching
In addition, if you are watching any other video, you can make YouTube transcribe that for you as well. You can follow the instructions given below to get the YouTube video to text transcription:
Step 1: Play the Video
Go to the video on YouTube and start playing it. Make sure NOT to get to full-screen mode as doing so would hide the option to transcribe the clip.
Step 2: Enable Transcription
Click the More icon (with three horizontal dots) from under the bottom-right corner of the video player, and click Open transcript to see the video transcription in the Transcript pane that appears in the right.
Step 3: Manage Timestamps
Click the Options icon (with three vertical dots) from the top-right corner of the Transcript pane, and click Toggle timestamp to enable or disable the timestamps in the video transcription.
Limitations of Using YouTube Transcribe
Although YouTube’s automatic transcription is a decent feature that saves you a lot of time, since Google uses machine learning algorithms to convert the speech to text, the level of accuracy may vary depending on the accent of the speaker, and the clarity of the audio the video has. Also, even sometime you may not be satisfied with the end-results.
Alternatively, you can use Kapwing to transcribe a YouTube video and download the transcription file with the below step-by-step instructions:
Step 1: Add YouTube Video
Copy the URL of YouTube video you want to transcribe, go to https://www.kapwing.com/subtitles , paste the URL in the Paste a URL field, wait while Kapwing fetches the content of the video, and opens the Add subtitles to Video page.
Step 2: Transcribe the Video
Click Auto-generate from the right window, and follow the on-screen instructions to transcribe YouTube video to text.

Step 3: Download the Transcription File
Click Download SRT from the left pane, and follow the instructions from there to download the transcription file in *.srt format.

Pros
- Kapwing is free to use
- The auto-transcription process is quick and less tedious
- Kapwing also allows manual transcription and uploading of an existing *.srt file
Cons
- The auto-transcribed text might lack accuracy as the task is done by the speech-to-text tools that work in the background
You can follow the step-by-step instructions to transcribe a YouTube video and download the transcription file using Kapwing:
Step 1: Add YouTube Video
Copy the URL of YouTube video you want to transcribe, go to https://www.kapwing.com/subtitles , paste the URL in the Paste a URL field, wait while Kapwing fetches the content of the video, and opens the Add subtitles to Video page.
Step 2: Transcribe the Video
Click Auto-generate from the right window, and follow the on-screen instructions to transcribe YouTube video to text.
Step 3: Download the Transcription File
Click Download SRT from the left pane, and follow the instructions from there to download the transcription file in *.srt format.
Pros
- Kapwing is free to use
- The auto-transcription process is quick and less tedious
- Kapwing also allows manual transcription and uploading of an existing *.srt file
Cons
- The auto-transcribed text might lack accuracy as the task is done by the speech-to-text tools that work in the background
Part 3: Benefits of Transcribing YouTube Videos
You may need video transcriptions for several reasons, such as analyzing the summary of the entire speech in the video, extracting a single phrase or quote that was spoken in the clip, or making the video helpful even for those suffering from hearing impairment. When you transcribe a YouTube video, the transcript can be useful in many ways. Some of the most common benefits of transcribing a video include:
- Search Engine Optimization
When you add subtitles, the text can appear in Google search results when someone types a similar phrase in the search box. This helps get more views to your videos, thus giving your channel popularity, and you, monetary gains in the long run.
- Accent
If the speaker in the video is from a different region and is using an accent that you are not much comfortable with, you can turn on the subtitles and read the dialogs along with the video.
- Repurposing on Blogs
If you own a blog that you have embedded your video to, the transcription could be used to add text to it so the target audience can get a fair idea of what the video is all about. This is useful because many people prefer reading over watching.
YouTube Video Transcription FAQs
1. How to Transcribe YouTube Video to Text
Usually the transcription files have *.srt extension that are globally accepted and supported by almost all media players. However, there might be instances when you want to have the subtitles in plain text.
That said, to convert an SRT file to TXT, you can:
- Right-click the SRT file
- Go to Rename
- Replace srt with txt and press Enter
- Click OK on the confirmation box that appears next to convert SRT to TXT
After this, you can simply double-click the file, and read and modify the transcribed content as needed.
2. How to Edit and Upload Edited Transcript to YouTube
If you made any modifications to the transcript that was automatically generated by YouTube or any other third-party transcription tool, you can follow the steps given below to upload the new file to the YouTube video:
- Go to YouTube Studio and then to the Channel subtitles page as explained earlier
- Expand the Languages column of the target video
- Click the Options icon that appears under the Subtitles column when you hover mouse on to it
- Click Edit on Classic Studio
- On the next page, click Edit from the top-right corner

- Click to open the Actions drop-down list from the upper-left corner
- Click Upload a file
- Follow the on-screen instructions from there to upload the modified transcription file
- Click Save Changes from the top-right corner of the page when done
Conclusion
If you are looking for a quick and easy way of adding subtitles to your videos, letting YouTube transcribe for you could be a good approach. However, because these auto-generated transcriptions are created by machine learning algorithms, their accuracy cannot be counted on. Therefore, the best way to get the job done accurately is, let YouTube auto-transcribe your video, download the transcription file, make the necessary changes to it, and then upload the file back to the video.
Richard Bennett
Richard Bennett is a writer and a lover of all things video.
Follow @Richard Bennett
Richard Bennett
Mar 27, 2024• Proven solutions
If you want to transcribe your videos to make the dialogs and speeches available in text format, you can use YouTube Transcribe feature that the streaming site offers for free. In this article, I’ll share with you a couple of methods to transcribe a YouTube video for free.
- Part 1: Transcribe YouTube Video Automatically for Free [2 Ways]
- Part 2: Transcribe YouTube Video to Text Online with Third-Party Service
- Part 3: Benefits of Transcribing YouTube Videos
- Part 4: YouTube Video Transcription FAQs
Part 1: How to Transcribe YouTube Video Automatically for Free [2 Ways]
Besides the basic video editing features on the YouTube platform, you can now quickly transcribe YouTube videos to the text as well. The good thing is, you can either use the automatic transcription feature that YouTube offers, or upload it manually while adjusting the timing as you go further.
Below are the two methods to transcribe your YouTube videos for free:
Method 1: Use the Automated Transcription Service on YouTube
As the name suggests, YouTube automatic transcription service works automatically. This means you don’t even have to click the ‘Transcribe’ button anymore to transcribe a YouTube video, and the website takes care of it on its own. All you need to do is, choose English as the language of the video when setting up subtitles. You can follow the instructions given below to do so:
Step 1 Upload a Video
Sign in to your YouTube account, click your profile picture from the top-right corner, and click YouTube Studio from the menu. Next, click CREATE from the upper-right corner, click Upload videos from the menu, and drag and drop a video from your computer to the Upload videos box that appears next.
Step 2 Select Transcription Language
On the Details page of the next box that appears, scroll down and click MORE OPTIONS, and select English in the Video language drop-down list under the Language, subtitles, and closed captions (CC) section.
Step 3 Publish the Video
Follow the on-screen instructions from this point to publish the video, and wait while YouTube automatically transcribes and adds the close captions to it.
Note: Depending on the duration of the clip, the time YouTube would take to transcribe may vary.
After YouTube has transcribed the video, you can download the transcription file in your preferred format. The instructions are given below explain how you can do so:
- Get to the Subtitles Window
While on the YouTube Studio page, click Subtitles from the left pane to go to the Channel subtitles page. And then click the video you want to modify.
- Get to Classic Studio
In the video subtitle page of the target video, hover mouse on the Published Automatic status under the Subtitles column, click the Options icon (with three vertical dots) that appears, and click Edit on Classic Studio.
- Download Transcription File
Click and open the Actions drop-down list from the top-left corner of the left pane, click your preferred transcription format including .vtt, .srt and .sbv from the list, and save the file on your local hard disk.
Method 2: Get YouTube Transcription when Watching
In addition, if you are watching any other video, you can make YouTube transcribe that for you as well. You can follow the instructions given below to get the YouTube video to text transcription:
Step 1: Play the Video
Go to the video on YouTube and start playing it. Make sure NOT to get to full-screen mode as doing so would hide the option to transcribe the clip.
Step 2: Enable Transcription
Click the More icon (with three horizontal dots) from under the bottom-right corner of the video player, and click Open transcript to see the video transcription in the Transcript pane that appears in the right.
Step 3: Manage Timestamps
Click the Options icon (with three vertical dots) from the top-right corner of the Transcript pane, and click Toggle timestamp to enable or disable the timestamps in the video transcription.
Limitations of Using YouTube Transcribe
Although YouTube’s automatic transcription is a decent feature that saves you a lot of time, since Google uses machine learning algorithms to convert the speech to text, the level of accuracy may vary depending on the accent of the speaker, and the clarity of the audio the video has. Also, even sometime you may not be satisfied with the end-results.
Alternatively, you can use Kapwing to transcribe a YouTube video and download the transcription file with the below step-by-step instructions:
Step 1: Add YouTube Video
Copy the URL of YouTube video you want to transcribe, go to https://www.kapwing.com/subtitles , paste the URL in the Paste a URL field, wait while Kapwing fetches the content of the video, and opens the Add subtitles to Video page.
Step 2: Transcribe the Video
Click Auto-generate from the right window, and follow the on-screen instructions to transcribe YouTube video to text.
Step 3: Download the Transcription File
Click Download SRT from the left pane, and follow the instructions from there to download the transcription file in *.srt format.
Pros
- Kapwing is free to use
- The auto-transcription process is quick and less tedious
- Kapwing also allows manual transcription and uploading of an existing *.srt file
Cons
- The auto-transcribed text might lack accuracy as the task is done by the speech-to-text tools that work in the background
You can follow the step-by-step instructions to transcribe a YouTube video and download the transcription file using Kapwing:
Step 1: Add YouTube Video
Copy the URL of YouTube video you want to transcribe, go to https://www.kapwing.com/subtitles , paste the URL in the Paste a URL field, wait while Kapwing fetches the content of the video, and opens the Add subtitles to Video page.
Step 2: Transcribe the Video
Click Auto-generate from the right window, and follow the on-screen instructions to transcribe YouTube video to text.
Step 3: Download the Transcription File
Click Download SRT from the left pane, and follow the instructions from there to download the transcription file in *.srt format.
Pros
- Kapwing is free to use
- The auto-transcription process is quick and less tedious
- Kapwing also allows manual transcription and uploading of an existing *.srt file
Cons
- The auto-transcribed text might lack accuracy as the task is done by the speech-to-text tools that work in the background
Part 3: Benefits of Transcribing YouTube Videos
You may need video transcriptions for several reasons, such as analyzing the summary of the entire speech in the video, extracting a single phrase or quote that was spoken in the clip, or making the video helpful even for those suffering from hearing impairment. When you transcribe a YouTube video, the transcript can be useful in many ways. Some of the most common benefits of transcribing a video include:
- Search Engine Optimization
When you add subtitles, the text can appear in Google search results when someone types a similar phrase in the search box. This helps get more views to your videos, thus giving your channel popularity, and you, monetary gains in the long run.
- Accent
If the speaker in the video is from a different region and is using an accent that you are not much comfortable with, you can turn on the subtitles and read the dialogs along with the video.
- Repurposing on Blogs
If you own a blog that you have embedded your video to, the transcription could be used to add text to it so the target audience can get a fair idea of what the video is all about. This is useful because many people prefer reading over watching.
YouTube Video Transcription FAQs
1. How to Transcribe YouTube Video to Text
Usually the transcription files have *.srt extension that are globally accepted and supported by almost all media players. However, there might be instances when you want to have the subtitles in plain text.
That said, to convert an SRT file to TXT, you can:
- Right-click the SRT file
- Go to Rename
- Replace srt with txt and press Enter
- Click OK on the confirmation box that appears next to convert SRT to TXT
After this, you can simply double-click the file, and read and modify the transcribed content as needed.
2. How to Edit and Upload Edited Transcript to YouTube
If you made any modifications to the transcript that was automatically generated by YouTube or any other third-party transcription tool, you can follow the steps given below to upload the new file to the YouTube video:
- Go to YouTube Studio and then to the Channel subtitles page as explained earlier
- Expand the Languages column of the target video
- Click the Options icon that appears under the Subtitles column when you hover mouse on to it
- Click Edit on Classic Studio
- On the next page, click Edit from the top-right corner
- Click to open the Actions drop-down list from the upper-left corner
- Click Upload a file
- Follow the on-screen instructions from there to upload the modified transcription file
- Click Save Changes from the top-right corner of the page when done
Conclusion
If you are looking for a quick and easy way of adding subtitles to your videos, letting YouTube transcribe for you could be a good approach. However, because these auto-generated transcriptions are created by machine learning algorithms, their accuracy cannot be counted on. Therefore, the best way to get the job done accurately is, let YouTube auto-transcribe your video, download the transcription file, make the necessary changes to it, and then upload the file back to the video.
Richard Bennett
Richard Bennett is a writer and a lover of all things video.
Follow @Richard Bennett
Also read:
- Exclusive Access Prime Video Downloader Picks
- Cutting-Edge Techniques for Channel Management on YT Hub
- Ideal Video Intros Selecting From Top 15 YouTube Sets
- Mastering Hashtags to Hit $6K YouTube Growth
- 2024 Approved Essential FreeFire Hashtags to Skyrocket Video Views on YouTube
- [New] Best Screen Replayer for High-Impact YouTubing Experience
- Expert Tips for Streamlining YouTube Audio Into iMovie
- [Updated] A Guide to Crafting Effective YouTube Backlinks
- [New] Discovering Your Customized YouTube Playlist
- [Updated] 8 Pioneering Exercise Videos To Keep Your Viewers Active
- Monetize Like a Pro How to Use Youtube Studio on Any Device
- [New] Discovering 8 Prime Video Advancement Aids
- The Monetary Value of Each YouTube Brand Partnership?
- Outshine Others Expert Tips on Making YouTube Shorts Pop
- [Updated] Earning Streaming Strategies - 8 Beginners' Tips
- Compreranzo Il Background Ottenere Video Più Chiaro Su YouTube for 2024
- Navigating YouTube's Creative Commons for Content Sharing
- 2024 Approved Crafting Prime Valorant Video Thumbnails on YouTube
- 2024 Approved Building Brands Together A Guide to Selecting YouTube Teams
- [New] Discovering Where YouTube Video Management Happens
- The Essential Guide to Building YouTube Music Playlists
- In 2024, Channel Success Strategies A Comprehensive Guide to Spotlighting
- YouTube Studio Review Profits and Payments
- Driving View Counts Upward on YouTube 6 Proven Techniques for 2024
- Ace the Art of Online Fame Trending on YouTube
- In 2024, Enhancing YouTube Presence with Strategic Banners
- Bringing Heartwarmth to the Winter 5 Snug Cinematographic Tips
- Best Alternative Editors for YouTube Creators Seeking New Horizons for 2024
- YouTube Creator Studio Unleashing the Power of Your Channel
- [New] A Step-by-Step Guide to YouTube Stats Analysis via Social Blade Platform
- Double Delight Endless Looping of YouTube Videos for TVs
- Increase Viewership Swiftly - $5 Strategy Unveiled
- Swiftly Adjust Video Speeds A User's Guide to YouTube Features
- Perfecting Proportions Understanding YouTube Video Sizes
- Ace Your Youtube Livestreams Mastering Broadcast Techniques Using WireCast
- From Creation to Apple Your Podcast's Journey
- How to Screen Mirroring Lenovo ThinkPhone to PC? | Dr.fone
- In 2024, 9 Mind-Blowing Tricks to Hatch Eggs in Pokemon Go Without Walking On Vivo V27 Pro | Dr.fone
- How to Mirror PC Screen to Oppo Reno 9A Phones? | Dr.fone
- New 2024 Approved Elevate Your MP3 Experience Practical Tips for Everyday Listening
- [New] Dance Revolution TikTok Routines on a Mac Platform
- [Updated] 2024 Approved Exclusive List The Premier GB Emulators, Android
- New Brighten Up The Best Video Editing Apps This Year for 2024
- In 2024, Things You Should Know When Unlocking Total Wireless Of Apple iPhone 12 mini | Dr.fone
- 2024 Approved Capture and Craft Premium Coverings for iPhones/Android
- [New] 2024 Approved Transformative Discord Journey with These Essential Upgrades
- [New] Leveraging Edits to Captivate Audiences on Instagram
- In 2024, How to Change Location on TikTok to See More Content On your Realme C53 | Dr.fone
- [New] 2024 Approved How to Reset and Fix OBS Fullscreen Issue
- In 2024, Here are Some Pro Tips for Pokemon Go PvP Battles On Samsung Galaxy F34 5G | Dr.fone
- Leading Speech Gatherers in Educational Environments for 2024
- [New] From Zero to Hero How to Generate Fb Trends for 2024
- Updated In 2024, 28 Essential Video to GIF Converters for Social Media Enthusiasts
- [Updated] Unveiling Authentic Identity in FB Messages
- Updated In 2024, From Boring to Brilliant Best Video Dubbing Apps for Comedy & Fun
- [New] In 2024, Top 5 Alternatives to TikTok You Should Know [Updated ]
- In 2024, How to Access Your iPhone 14 Plus When You Forget the Passcode?
- In 2024, Mobile Communication Redefined Best 10 Secured, Free Video Call Apps to Keep You Covered on Devices
- In 2024, Here are Some of the Best Pokemon Discord Servers to Join On Tecno Spark 20 Pro | Dr.fone
- New Top 6 Mickey Mouse Voice Generators Providing Efficient Results for 2024
- In 2024, Android Unlock Code Sim Unlock Your Xiaomi Redmi Note 13 5G Phone and Remove Locked Screen
- [Updated] Chasing the Cause of Frozen Photobooth Videos
- Best Pokemons for PVP Matches in Pokemon Go For Vivo G2 | Dr.fone
- 2023 How to Create Successful Tiktok Videos on Desktop/Android/iPhone for 2024
- [Updated] In 2024, Unlocking Creativity Producing Original and Entertaining Reels on Facebook
- [New] In 2024, Cutting Edge Identifying Instagram Leavers
- In 2024, How To Pause Life360 Location Sharing For Oppo Find X7 Ultra | Dr.fone
- Updated Create Kinetice Typography Text Effect in Filmora
- In 2024, For People Wanting to Mock GPS on Tecno Camon 20 Premier 5G Devices | Dr.fone
- Title: "In 2024, Boosting YouTube Visibility Mastering Titles & Tags"
- Author: Steven
- Created at : 2024-05-25 19:33:25
- Updated at : 2024-05-26 19:33:25
- Link: https://youtube-clips.techidaily.com/in-2024-boosting-youtube-visibility-mastering-titles-and-tags/
- License: This work is licensed under CC BY-NC-SA 4.0.
