
:max_bytes(150000):strip_icc()/PS5-Slim-Wide-fe2f63e3b1cf443a81fed71f109aacd0.jpg)
"In 2024, Boosting Your Content Quality Essential Tips for YouTube Users"
Boosting Your Content Quality: Essential Tips for YouTube Users
How to Use YouTube Enhancements

Richard Bennett
Mar 27, 2024• Proven solutions
YouTube has integrated a free video editor to facilitate the work of YouTubers and allow them to process their videos prior to uploading. Although nobody can claim these features can live up to the sophisticated features of the professional video editors, YouTube enhancements are useful and cool which offer a simple way to improve the quality of the videos and do not require any technical knowledge on your behalf.
If you are looking for a more professional approach in video editing, you should try out Wondershare Filmora(for Windows and Mac) . This is an exceptionally versatile and powerful tool, which will allow you to gain full control over the videos you wish to edit. It is very easy to use, and it will open up a new world of potentials in video editing. There is a free trial that you can benefit from, so as to see if Filmora meets your criteria in full prior to your purchase.
 Download Mac Version ](https://tools.techidaily.com/wondershare/filmora/download/ )
- Part 1: How to Use YouTube Enhancements
- Part 2: How to Use Wondershare Filmora to Improve Video Qualtiy
How to Use YouTube Enhancements
First of all, you need to locate YouTube Enhancements. As soon as you have logged into your YouTube channel, you should go to the Video Manager. There you choose Edit and YouTube Enhancements, and you are ready to go. There are three distinctive categories that you can use, in order to edit your video. You can choose among Quick Fix, Filters, and Blurring Effects. As you can see, there are features that pretty much cover the basics in video editing under these categories.

Quick Fix promptly addresses issues that have to do with the contrast and saturation, as well as offers the ability to rotate or trim the video. There is nothing sophisticated there, but it is a really easy and practical solution for those who do not wish to waste time editing. It is cool that you can also stabilize your video or allow for Slow Motion or Timelapse effects. This is definitely an improvement for YouTube videos.

Filters feel a lot like those used on Instagram. They are neat and cool, of course, covering many of the demands for sophisticated editing. You can find filters like Lomo-ish, Old Fashioned, Heat Map, Cartoon, Cross Process, Festival and much more on YouTube Enhancements. You can also adjust the lighting and colors, so as to fine-tune your video.

Blurring Effects are perhaps the most advanced on YouTube Enhancements, and they provide the opportunity to maintain your privacy, by removing people’s distinctive details from the video and blurring them or putting mosaic on their face. With this tool, you can also blur objects on the video, which can increase your privacy even more. For instance, you can blur the plates of your car or your address. Last, there are some hilarious effects that you should check out.

Once you are done, there is an option to preview the video that you have edited. In this way, you will know if the editions that you have made are sufficient for you or not. Finally, you can choose either to save the video as a new file or revert to the original video. These options are welcome, as sometimes you just do not get what you have expected and you do not want to replace the video you have already uploaded.
How to Use Wondershare Filmora to improve YouTube videos
These are the steps that you need to follow, so as to proceed with high-quality video editing on Filmora:
- Open Wordershare Filmora
- Choose if you want 16:9 or 4:3 aspect ratio
- Tap Import so as to upload the files
- Drag and drop them, in order to place them in the right order

- Click Edit and adjust the settings (rotation, contrast, saturation, brightness, hue, auto de-noise and speed)

- Click OK, and you are done with the improvement of Video Quality
If you wish to fine-tune the images of the videos and place special filters, you can go ahead as follows:
- Tap the Effect button
- Drag the effect you want to use on the timeline (you can choose from a wide variety of effects, including Bokeh and Light Leaks, Old Film, etc.)

After having finished with the video editing process, you can preview the video and see if it is of acceptable quality standards. You can do that by clicking on the Play button. Then you can click on the Create button and save the video where you want, in the format of your choosing. It is also possible for you to burn the video on a DVD or share it online using YouTube or Facebook.

Download Mac Version ](https://tools.techidaily.com/wondershare/filmora/download/ )
Richard Bennett
Richard Bennett is a writer and a lover of all things video.
Follow @Richard Bennett
Richard Bennett
Mar 27, 2024• Proven solutions
YouTube has integrated a free video editor to facilitate the work of YouTubers and allow them to process their videos prior to uploading. Although nobody can claim these features can live up to the sophisticated features of the professional video editors, YouTube enhancements are useful and cool which offer a simple way to improve the quality of the videos and do not require any technical knowledge on your behalf.
If you are looking for a more professional approach in video editing, you should try out Wondershare Filmora(for Windows and Mac) . This is an exceptionally versatile and powerful tool, which will allow you to gain full control over the videos you wish to edit. It is very easy to use, and it will open up a new world of potentials in video editing. There is a free trial that you can benefit from, so as to see if Filmora meets your criteria in full prior to your purchase.
Download Mac Version ](https://tools.techidaily.com/wondershare/filmora/download/ )
- Part 1: How to Use YouTube Enhancements
- Part 2: How to Use Wondershare Filmora to Improve Video Qualtiy
How to Use YouTube Enhancements
First of all, you need to locate YouTube Enhancements. As soon as you have logged into your YouTube channel, you should go to the Video Manager. There you choose Edit and YouTube Enhancements, and you are ready to go. There are three distinctive categories that you can use, in order to edit your video. You can choose among Quick Fix, Filters, and Blurring Effects. As you can see, there are features that pretty much cover the basics in video editing under these categories.
Quick Fix promptly addresses issues that have to do with the contrast and saturation, as well as offers the ability to rotate or trim the video. There is nothing sophisticated there, but it is a really easy and practical solution for those who do not wish to waste time editing. It is cool that you can also stabilize your video or allow for Slow Motion or Timelapse effects. This is definitely an improvement for YouTube videos.
Filters feel a lot like those used on Instagram. They are neat and cool, of course, covering many of the demands for sophisticated editing. You can find filters like Lomo-ish, Old Fashioned, Heat Map, Cartoon, Cross Process, Festival and much more on YouTube Enhancements. You can also adjust the lighting and colors, so as to fine-tune your video.
Blurring Effects are perhaps the most advanced on YouTube Enhancements, and they provide the opportunity to maintain your privacy, by removing people’s distinctive details from the video and blurring them or putting mosaic on their face. With this tool, you can also blur objects on the video, which can increase your privacy even more. For instance, you can blur the plates of your car or your address. Last, there are some hilarious effects that you should check out.
Once you are done, there is an option to preview the video that you have edited. In this way, you will know if the editions that you have made are sufficient for you or not. Finally, you can choose either to save the video as a new file or revert to the original video. These options are welcome, as sometimes you just do not get what you have expected and you do not want to replace the video you have already uploaded.
How to Use Wondershare Filmora to improve YouTube videos
These are the steps that you need to follow, so as to proceed with high-quality video editing on Filmora:
- Open Wordershare Filmora
- Choose if you want 16:9 or 4:3 aspect ratio
- Tap Import so as to upload the files
- Drag and drop them, in order to place them in the right order
- Click Edit and adjust the settings (rotation, contrast, saturation, brightness, hue, auto de-noise and speed)
- Click OK, and you are done with the improvement of Video Quality
If you wish to fine-tune the images of the videos and place special filters, you can go ahead as follows:
- Tap the Effect button
- Drag the effect you want to use on the timeline (you can choose from a wide variety of effects, including Bokeh and Light Leaks, Old Film, etc.)
After having finished with the video editing process, you can preview the video and see if it is of acceptable quality standards. You can do that by clicking on the Play button. Then you can click on the Create button and save the video where you want, in the format of your choosing. It is also possible for you to burn the video on a DVD or share it online using YouTube or Facebook.
Download Mac Version ](https://tools.techidaily.com/wondershare/filmora/download/ )
Richard Bennett
Richard Bennett is a writer and a lover of all things video.
Follow @Richard Bennett
Ultimate Guide to Choosing a Top-Tier GIF Maker
10 Best YouTube To GIF Makers: How to Create GIF from YouTube Video?
Richard Bennett
Mar 27, 2024• Proven solutions
GIF (Graphic Interchange Format) is an image file format supporting both uniform and animated images. Before, GIF was a basic 8-bit colored image until PNG image format was introduced as a more feasible alternative. Today, you can find them being used on all the trending social media applications like WhatsApp, Instagram, Snapchat, Twitter, Facebook, and various others.
The good thing here is that you can make GIFs from YouTube videos or any of your favorite videos for that matter which you think can help express your sentiments or ideas in an enhanced manner. There is a huge market available of apps and web software that can help create GIFs from YouTube without much trouble.
In this short guide ahead, we’ve brought for you the best YouTube to GIF maker available in the digital market. Let’s go GIF-ing!
Part 1: Best Online YouTube to GIFs Makers
Here is our curated list of the best 11 YouTube to GIF Maker that you can use to make GIF from YouTube video.
1. GIFS
Gifs.com is one the best GIF maker site that makes crafting GIFs from YouTube videos incredibly easy and quick with no time. If you’re looking for some straight and simple video to gif converter to help you convert YouTube videos into GIFs, this is the smoothest editor that will do the job and craft interesting gifs for your blogging platforms.
All you have to do is enter the URL of the video you want to convert into a GIF. At this point, the site accepts Instagram, YouTube, Facebook, and Vine links. In addition to that, there is also an option that allows users to upload from the desktop computer.
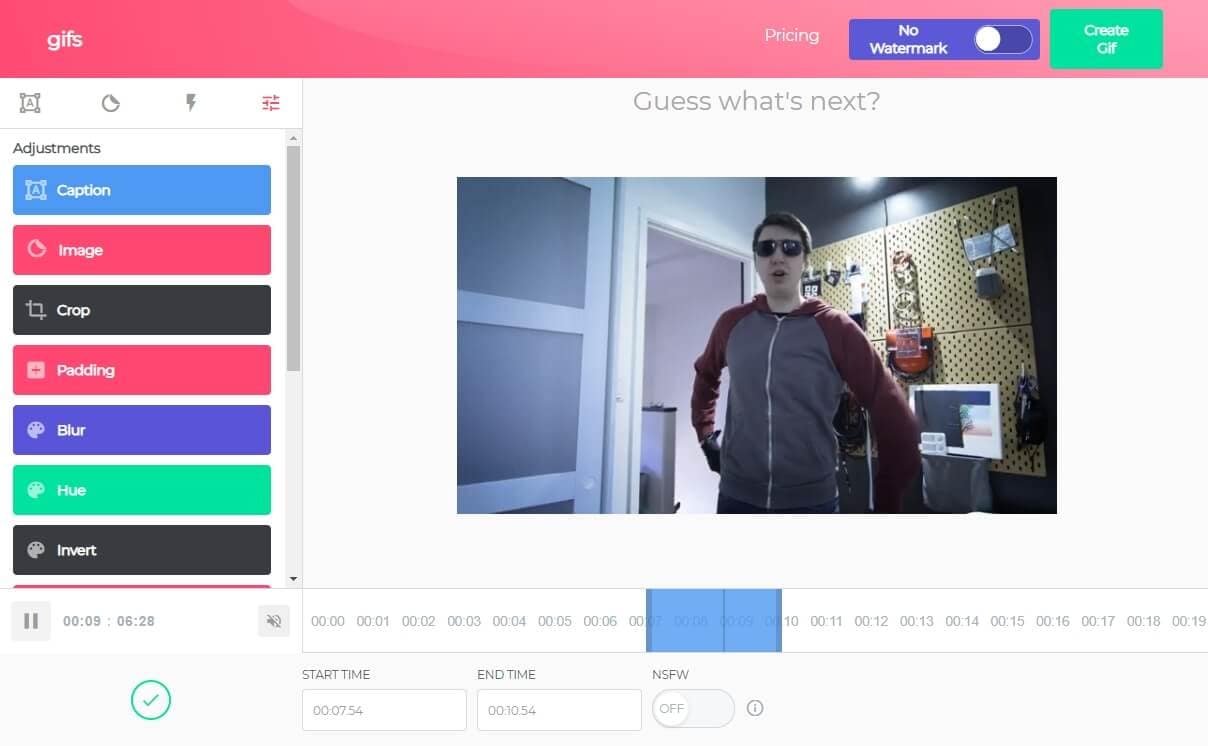
Once you’ve entered the YouTube video URL, it prompts a basic video editor wherein you select the frame and durations for your GIF. If you want to customize it further, you can add stickers, captions, and tools like blurring, cropping, and others.
Once you’re done exploring the filters and editing the GIF, you can directly share the URL on different platforms or just download it and store it on your device.
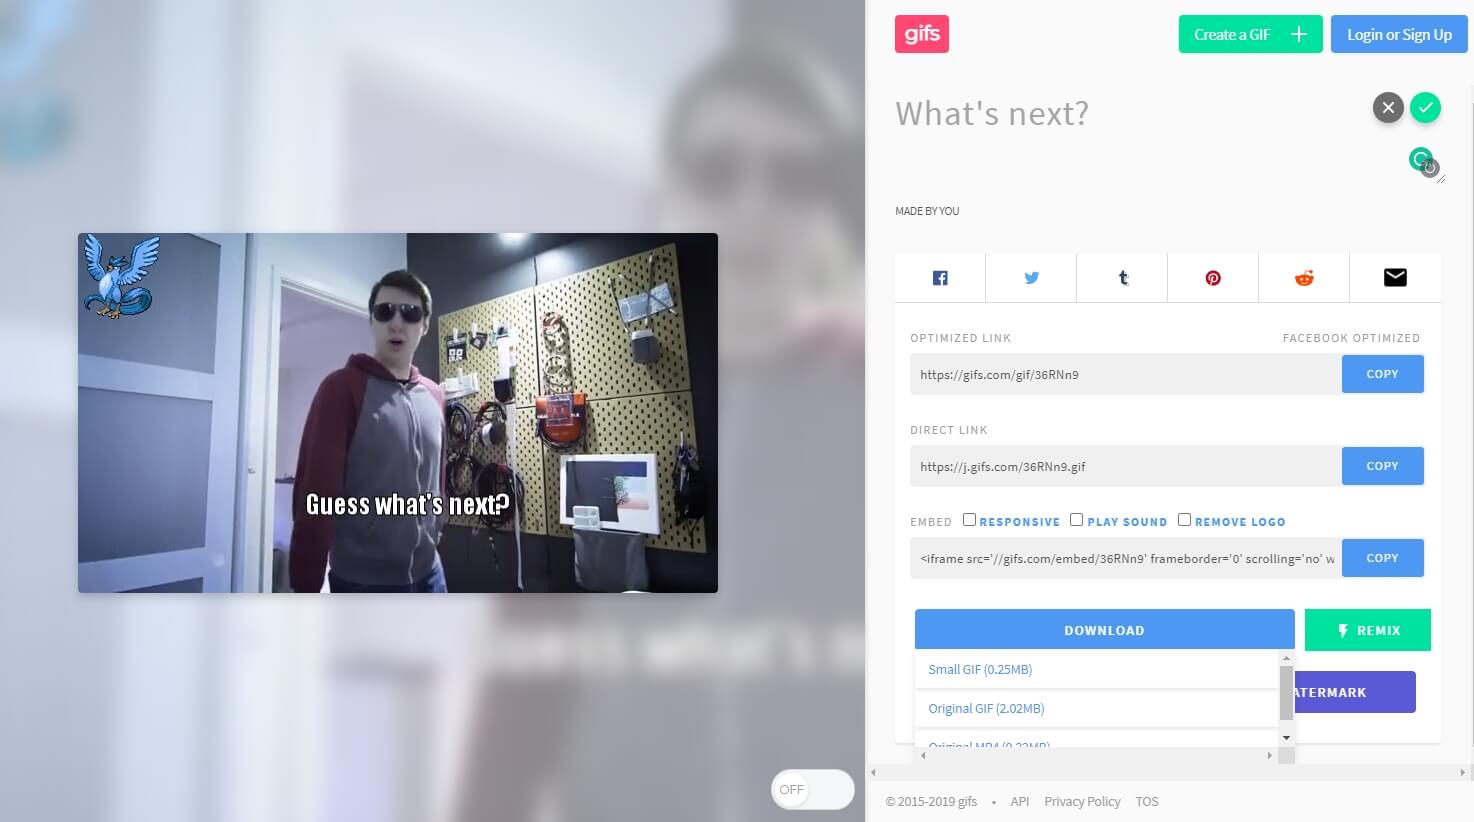
Note: If you want to remove the watermark and get full access to extra features, you may need to pay $1.99/month.
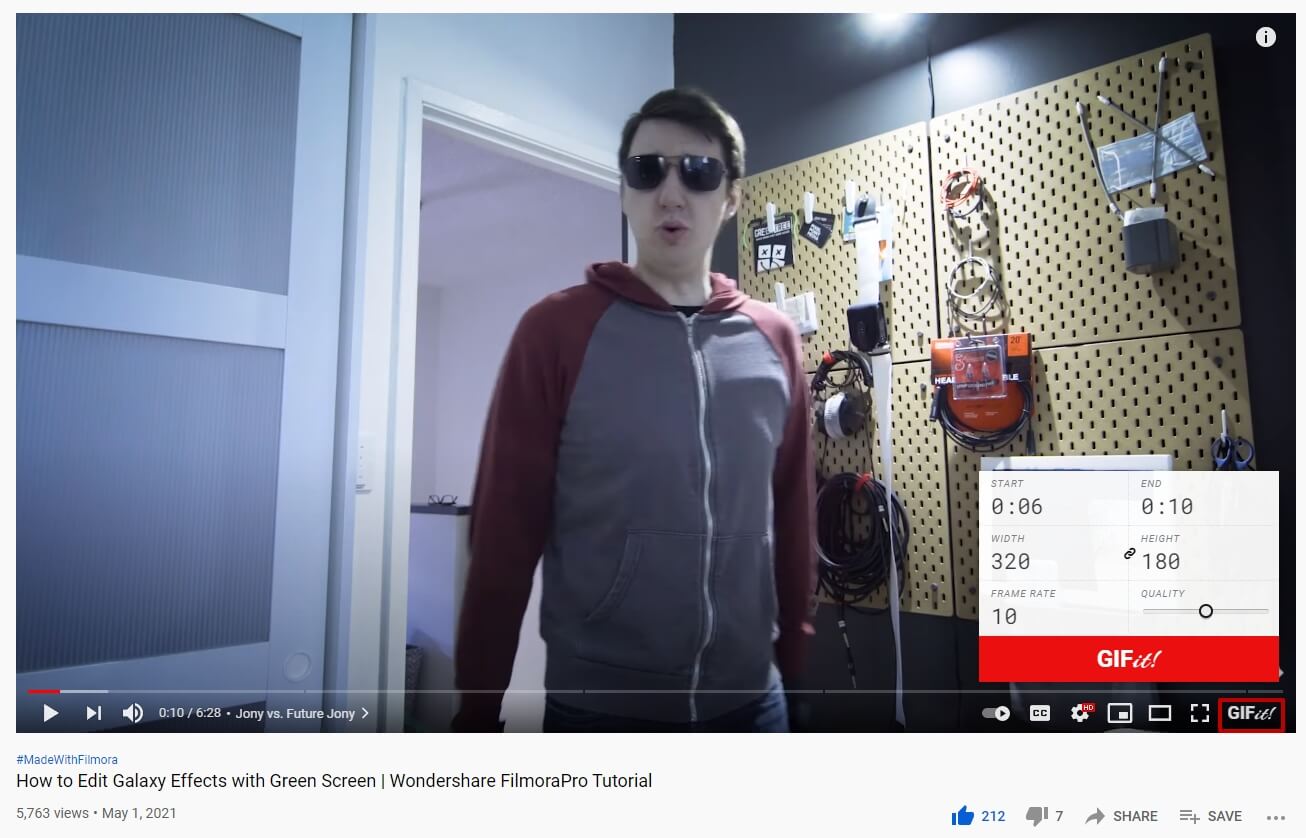
You can check the gif that I made from our YouTube video How to Edit Galaxy Effects with Green Screen | Wondershare FilmoraPro Tutorial on gifs.com here: https://gifs.com/gif/36RNn9 .
2. GIPHY
Giphy, as we all know, is the most used search engine for GIFs due to its limitless collection. Giphy here maintains its own GIF maker to create your customized GIFs effortlessly. The Giphy online GIF maker is quite simple and easy to use; it also has steadfast mobile applications for both Android and iOS devices.
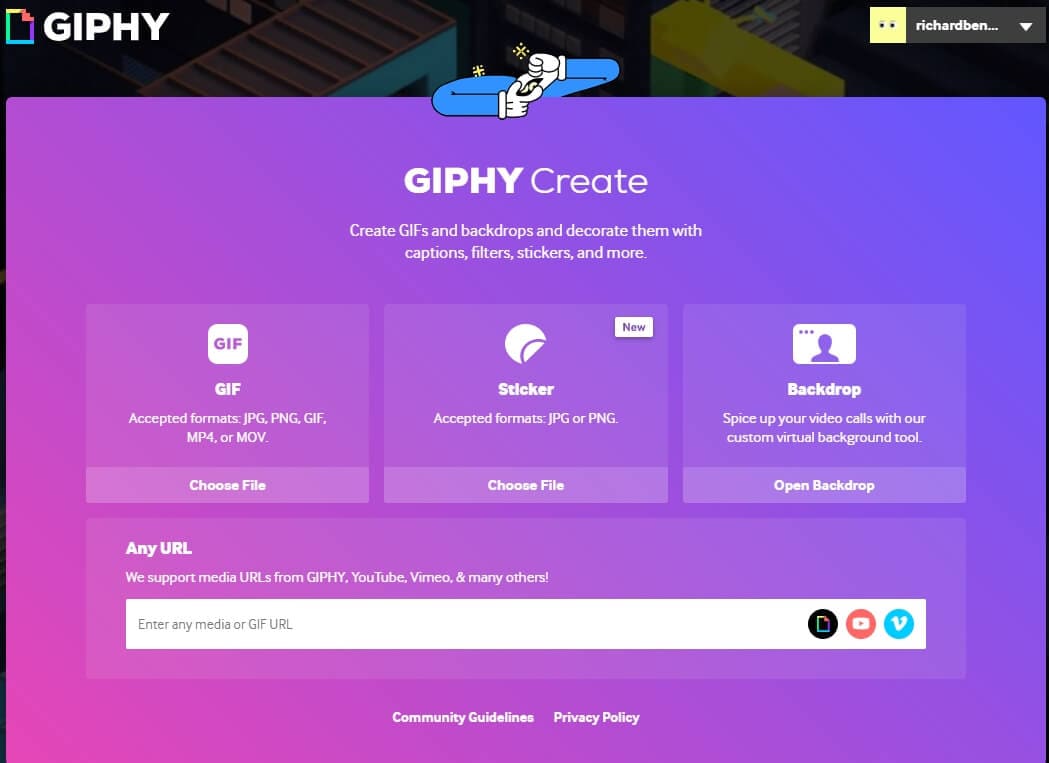
To begin converting YouTube videos into GIFs, click the Create button at the top and then you can either enter the URL or upload images/videos from local files. This GIF maker only accepts JPG, PNG, GIF, MP4, and MOV for people uploading images or videos.
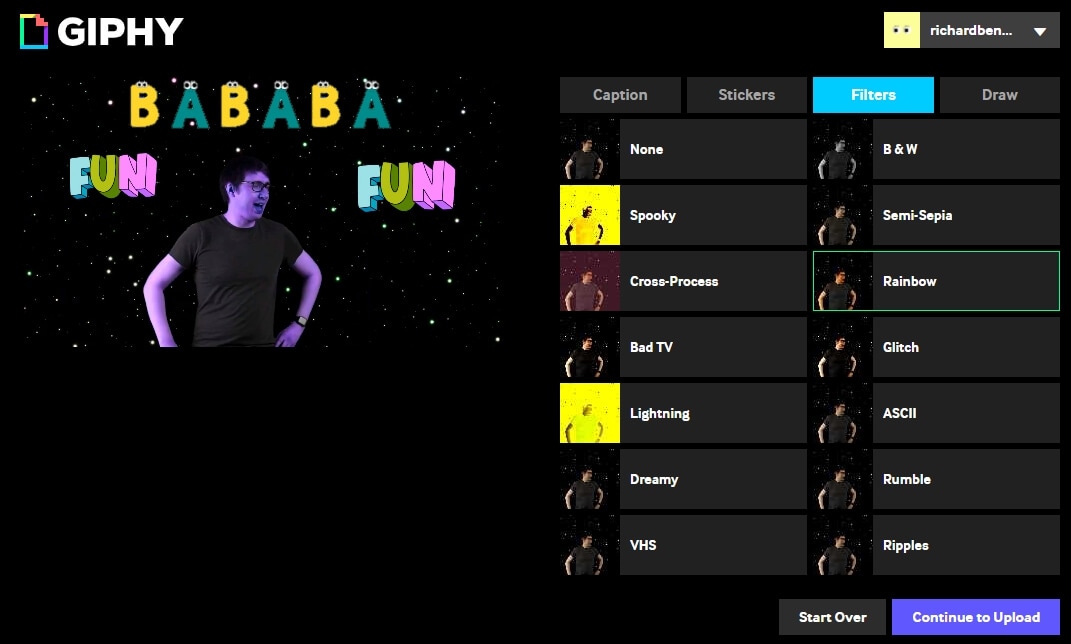
Then, trim the part from the video you want to convert into a GIF. Later, you can embellish your GIFs by adding filters, tags, text captions, and stickers to make them look eye-catching. If you’re looking for a clean and simple GIF maker, then Giphy GIF maker is the perfect choice for you.
Here is the gig that I made with Giphy: https://media.giphy.com/media/2Dtlp2MAXtoC0EyMsx/giphy.gif .
3. GIFit!
GIFit is a well-known online extension available on the Chrome Web Store for free that aids in making GIFs from YouTube videos. The GIFit extension has been recently updated to work with the new YouTube interface to help you craft Gifs smoothly. One thing to remember about GIFit is that with YouTube HTML5 mode only.
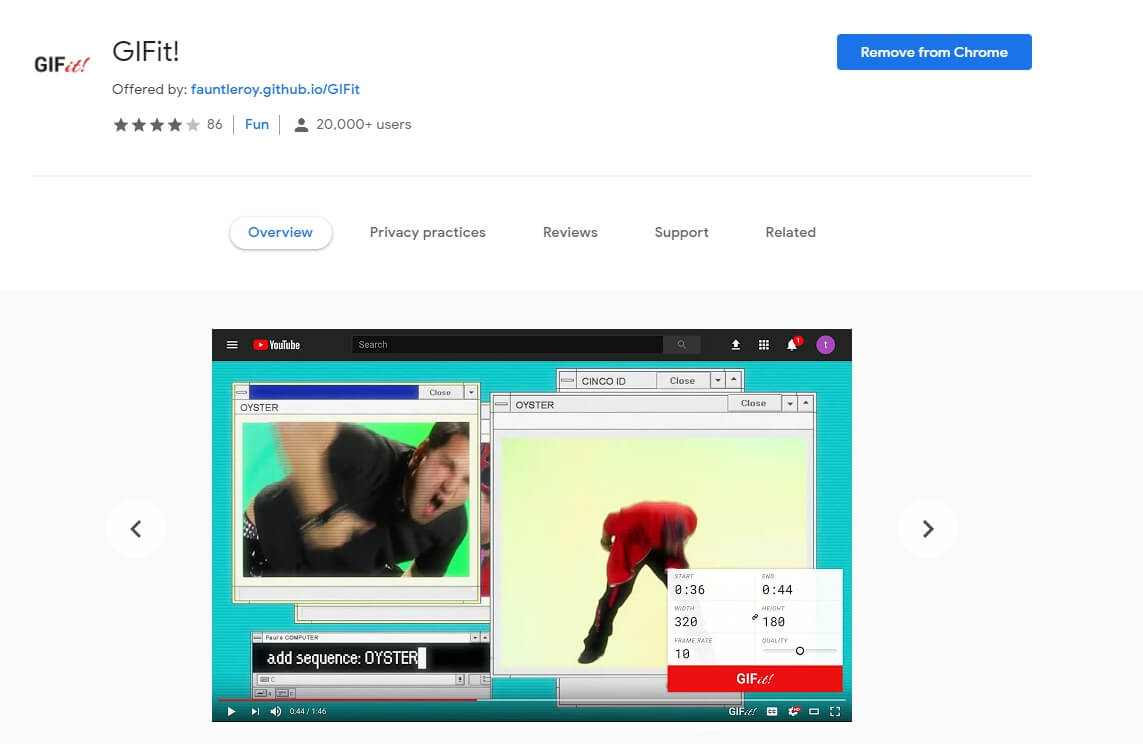
To use this Chrome extension, install it from the Chrome Web Store. Now, run the attachment and visit any video on YouTube that you would like to convert into GIF. Once decided, simply press on the GIFit icon in the YouTube toolbar. Then, edit according to your requirements and hit the red button with GIFit on it. After a few minutes, your GIF will be ready to be shared and saved. Currently, it offers convert YouTube to GIF feature only, so you can’t add stickers nor captions.
4. Make A GIF
Makeagif is an ideal online GIF maker for you that can convert videos into animated GIFs in no time. It allows you to create GIFs using local images, YouTube, Facebook, and Webcam. Makeagif even will enable you to develop new GIFs using the already existing ones.

The GIF maker also comes with a variety of free GIFs to download and add to your collection. Moreover, it allows you to edit existing GIFs by enhancing their quality, speed and adding filters to them. It offers functions that can enrich the standard of your GIFs.
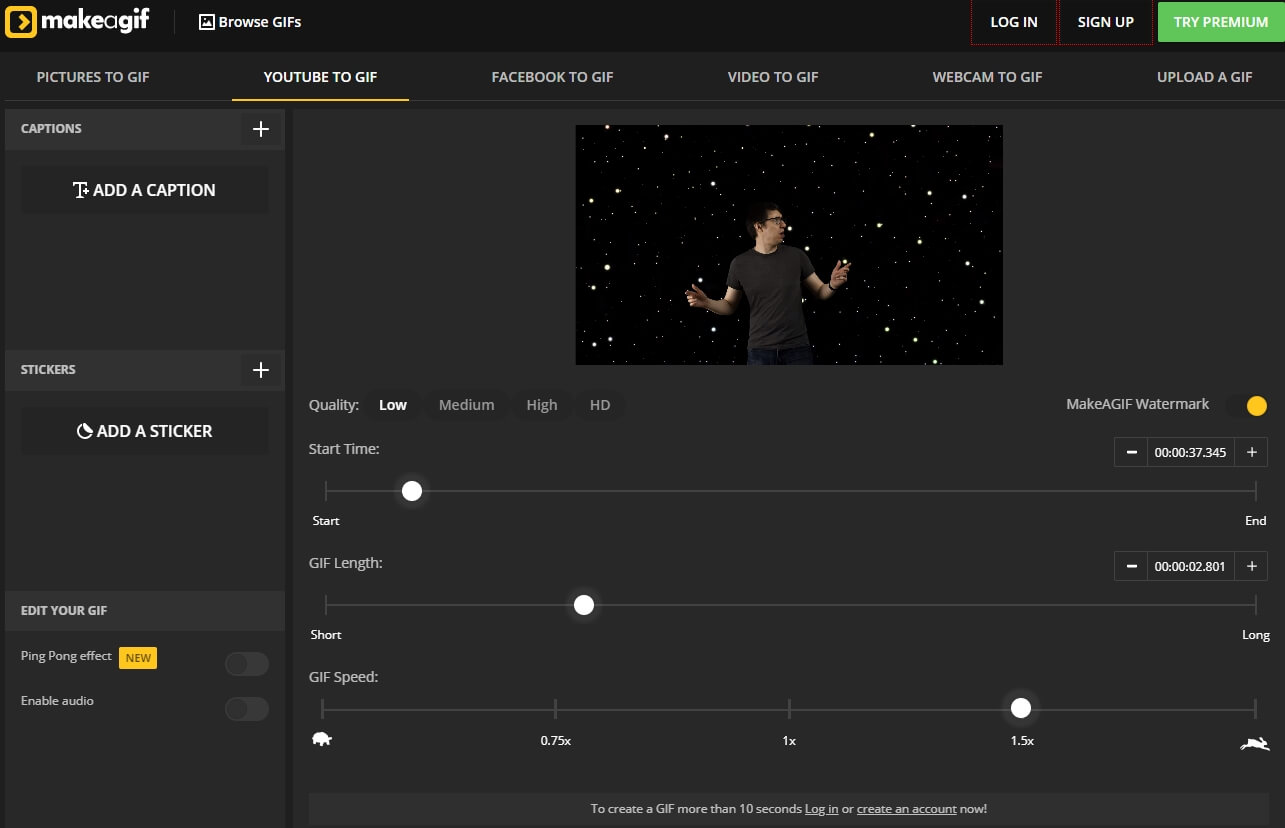
To create GIFs using this, first, create your account on the site. Next, select the ‘YouTube to GIF’ option from the drop-down menu, among other alternatives. Then, enter the link to the YouTube video that you wish to transfigure into GIF, after which you can tailor-make the gifs by adjusting the configuration settings, such as adding captions and sticker. Once done, simply download and share your newly crafted GIF.
5. Imgur
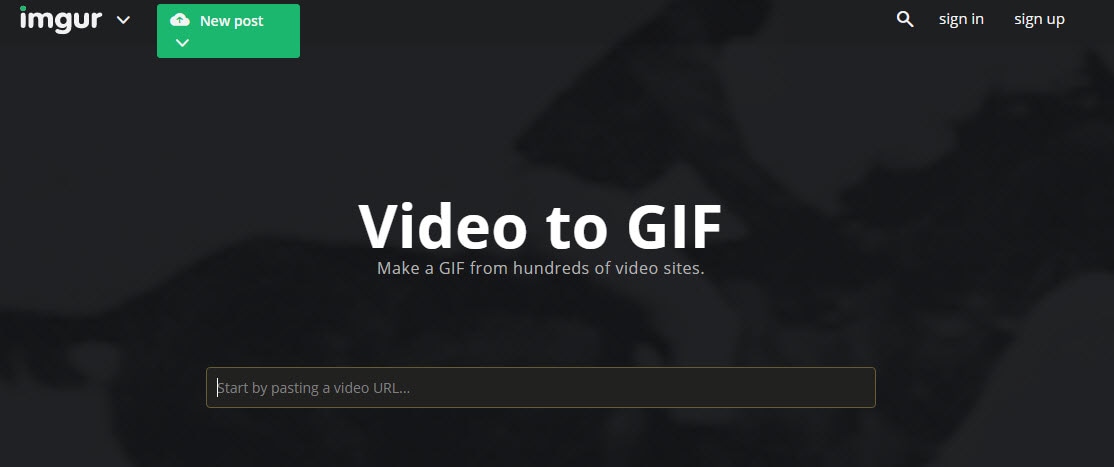
Imgur might not be the best application to be included in the list. But it is definitely an amazing site where you can go looking for all kinds of images, Gifs, memes, or other digital stories. Imgur’s wide collection of visuals can never disappoint you, no matter what you’re searching for, from funny to sad, inspiring to aspiring, everything can be discovered in this treasure.

Now, this might not be the best YouTube to gif maker, but it does have the potential to provide you with great ideas for GIF-making. Besides, you can download all the interesting GIfs from here and save them for future reference.
6. GiFRun
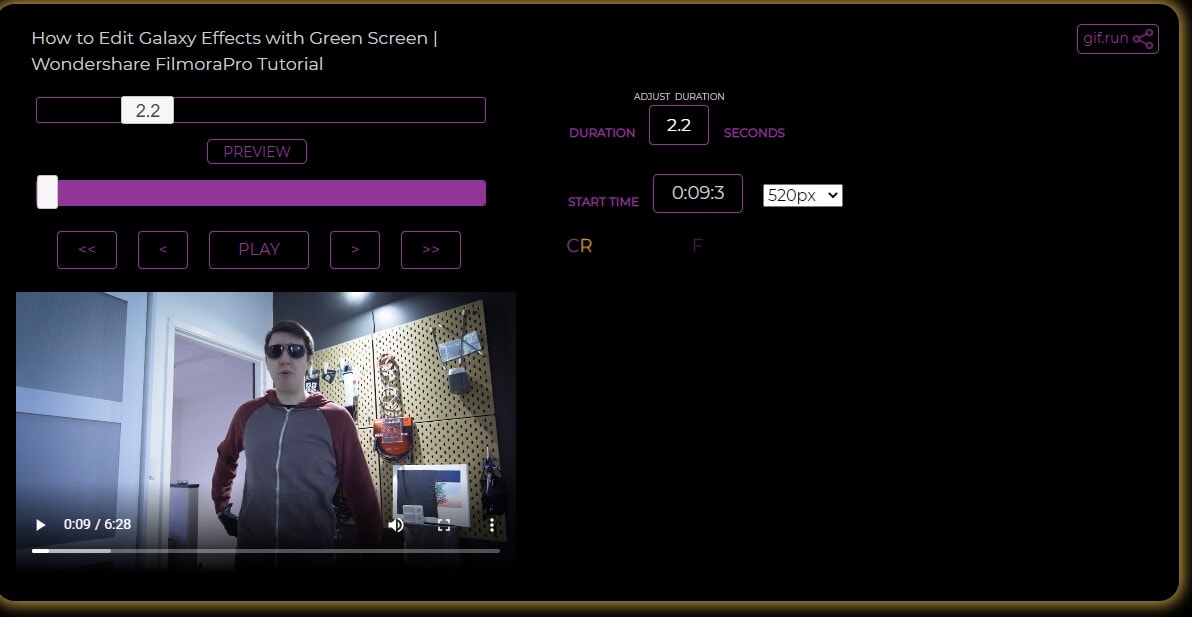
Are you worried about searching for a gif converter with no prior experience in editing? Don’t worry; this GiFRun Maker is the simplest online service that requires minimum to zero skill for creating GIFs. GifRun is an easy enough site to navigate through and produce quality GIFs for your blogging sites.
To convert a YouTube video to GIF, simply enter the link. After that, it will prompt you to the editing page, where you can set the start/end time, duration, and resolution for your gif. You can preview your edit before finalizing it, making necessary changes, and then downloading it on your device.
7. Free Gif Maker Me
Free Gif maker is one of the straightforward and easily manageable GIF-making applications. It offers YouTube to gif, reverse gif, and gif effects tools to enhance your GIF quality and make it effortless to create your own GIFs.
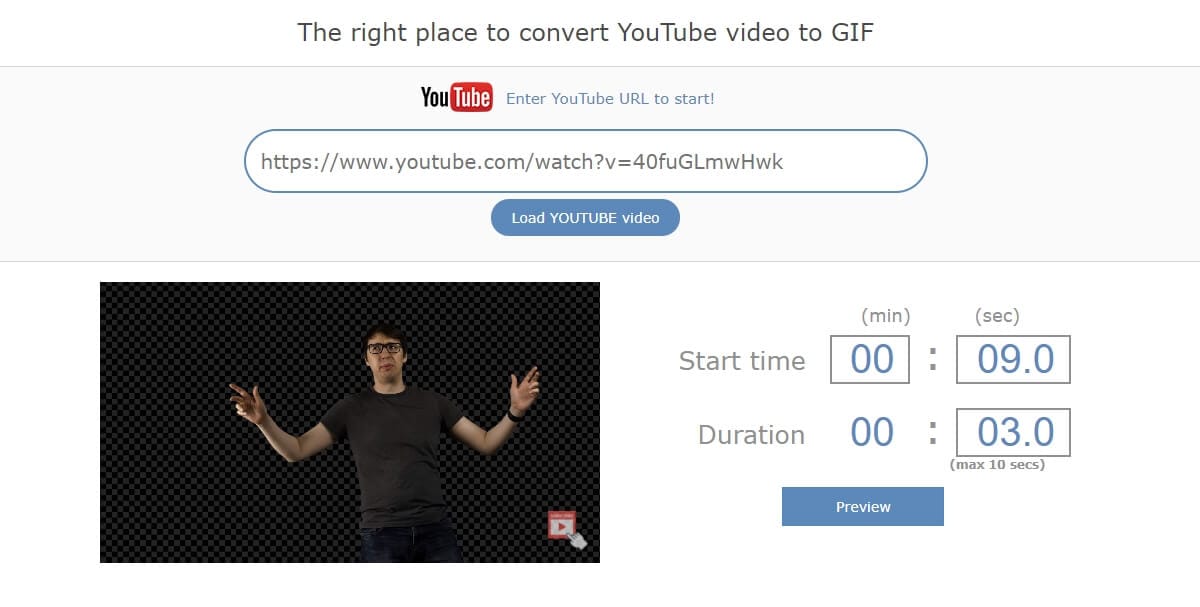
To make GIF from YT Video on free Gif Maker, copy the video link in the input text field in the middle of your screen and then tap on ‘Load YouTube Video.’ Within seconds you will be redirected to the video preview and GIF editing page. Now, set the duration, start time, resolution, output, and other details. Then, click on the ‘Make A GIF’ option and save it on your device once ready.
8. Imgflip
Another website is known for creating and sharing visual content on different social media channels. Imgflip allows you to make customized animations from YouTube and other digital platforms. The site is completely safe to use and produces good-quality memes and GIFs quickly without incurring a dime.
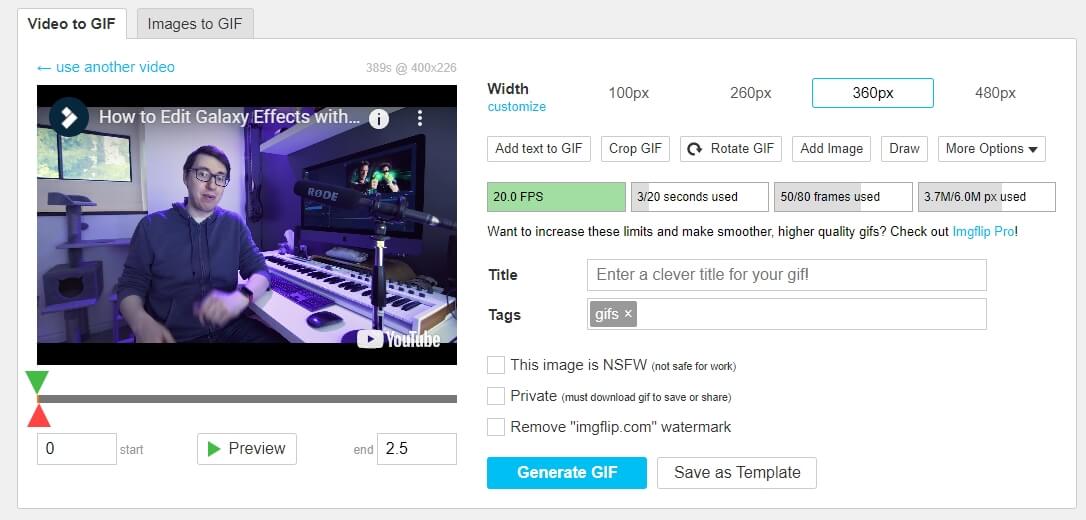
Imgflip supports all the popular video formats such as AVI, MP4, 3GP, OGG, FLV, MOV, and various other video formats. To produce a high-quality GIF, make sure your video is at least 480P or higher. More so, the Imgflip supports GIF with audio features of all the videos with audio that can only be accessed using the Imgflip Pro at a minimum price of $9.95/ month.
9. GIF Maker
GIF Maker is a pretty basic application that everyone can navigate with or without any expertise in the tech department. Along with GIF maker, it also has other tools such as GIF resizer, GIF compressor, and GIF cropper, all specifically designed tools to help you create riveting GIFs ever!
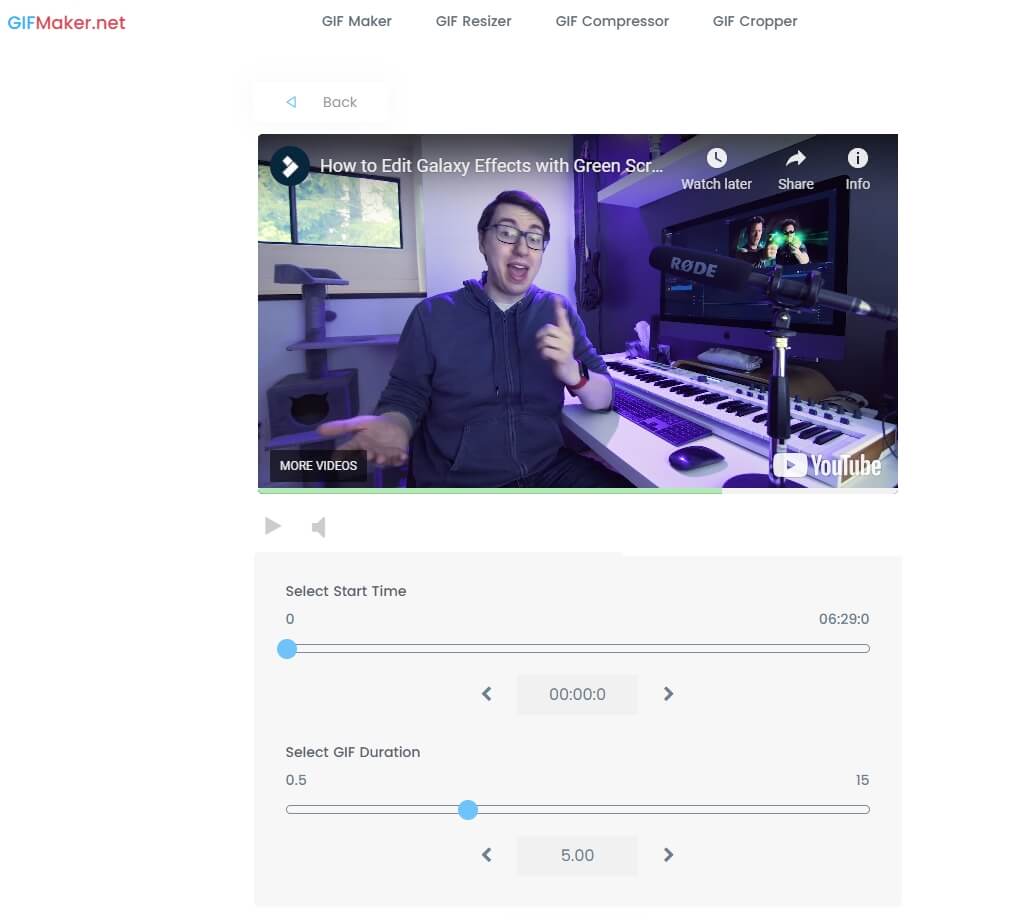
GIF Maker provides two options; one video to gif and second Images to gif that you can use as per their need. One simply is to enter the YT video link/upload video to the upload box. Next, alter the animation, filter, speed, duration, and set start and endpoint in the editor. You can upload files in all the popular formats and upload up to 25Mb image files and 30 Mb for animated GIFs.
Another point to remember while using this GIF Maker, it only supports YT videos that have not been copy-righted by the creator.
Part 2: Best YouTube to GIF Maker on Windows and Mac: Wondershare UniConverter
It happens so that you stumble upon a video that runs the hippocampus of your brain rigid with ingenious abstractions about converting the video into GIF to delineate those ideas through digital content on your blogs.
Now, you will require the best-quality GIF maker that is easy to navigate without any complications. Despite the plethora of GIF makers being available at hand, it could be a strenuous task to search for the ideal GIF maker for yourself.
Presently, Wondershare UniConverter is one of the best and easy-to-use YouTube to GIF makers for you. It is the handiest tool to help you accomplish your conversion, customization, compressing, and revamping goals like a professional with its effective editing features. Wondershare offers many benefits, from converting files in hundred different formats to crafting your one GIF out of videos along with other fundamental editing attributes.
How to User UniConverter Video to GIF Maker?
Step 1: Download and install the Wondershare Converter on your device. Now, run the app and launch the Wondershare GIF Maker by selecting the GIF Maker Icon on the toolbar.
Step 2: Click on the Video to GIF option before tapping on the Add File option to upload YT video for GIF conversion.
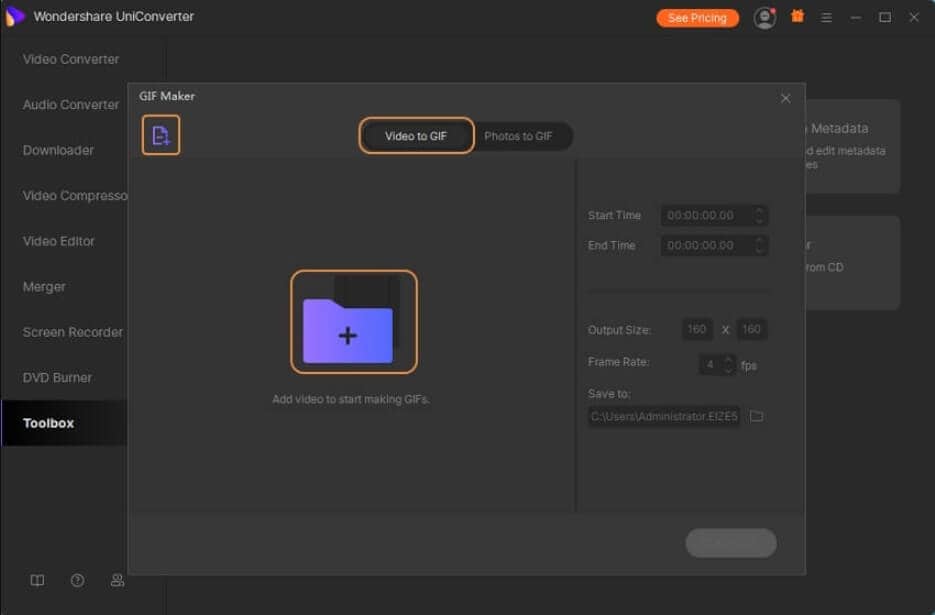
Step 3: Next, you can customize your uploaded video by setting the start and end time. In addition to that, you can enter the frame rate and output size according to your requirement.
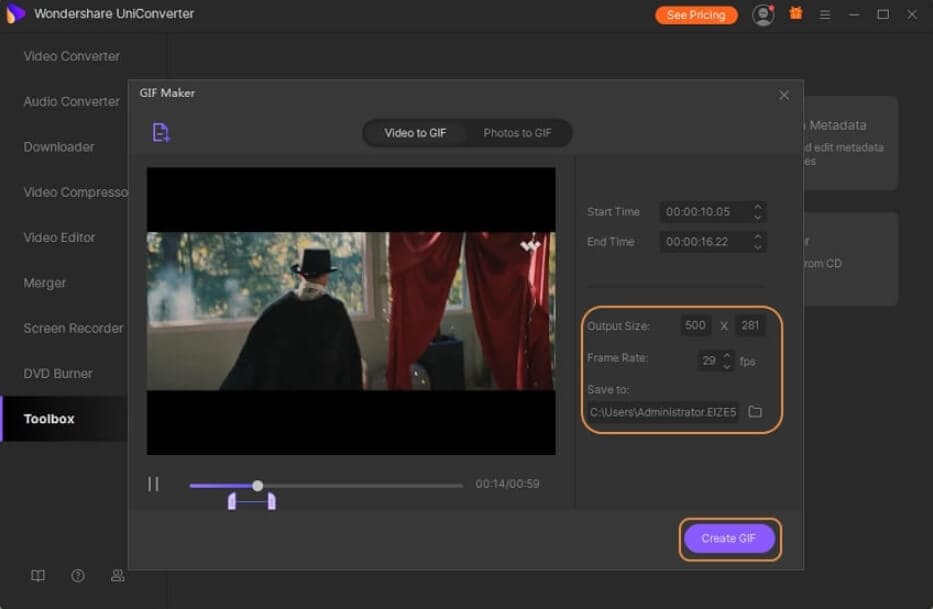
Step 4: Once finished with all the customization, convert the YouTube video into a GIF by tapping the Create GIF option.
Step 5: Ta-da! UniConverter will transform your YT video into a GIF within a minute or two. You can now export and share the GIF further.
That’s right, with five easy steps, you can convert all your favorite YouTube video into GIF with this YouTube to GIF maker.
Without any doubt, I can say that usage of GIFs during your regular texting and socialization can make your conversations more interesting. GIFs are the best shortcuts to express your mood, emotions, and humor without having to type much. No other digital medium provides an avenue that offers such proficiency in demonstrating your emotions, possibly the reason behind its escalating popularity.
With the help of this little guide, you can create gif from YouTube videos with a wave of your hand! I hope you’ve fun GIF-ing!
Richard Bennett
Richard Bennett is a writer and a lover of all things video.
Follow @Richard Bennett
Richard Bennett
Mar 27, 2024• Proven solutions
GIF (Graphic Interchange Format) is an image file format supporting both uniform and animated images. Before, GIF was a basic 8-bit colored image until PNG image format was introduced as a more feasible alternative. Today, you can find them being used on all the trending social media applications like WhatsApp, Instagram, Snapchat, Twitter, Facebook, and various others.
The good thing here is that you can make GIFs from YouTube videos or any of your favorite videos for that matter which you think can help express your sentiments or ideas in an enhanced manner. There is a huge market available of apps and web software that can help create GIFs from YouTube without much trouble.
In this short guide ahead, we’ve brought for you the best YouTube to GIF maker available in the digital market. Let’s go GIF-ing!
Part 1: Best Online YouTube to GIFs Makers
Here is our curated list of the best 11 YouTube to GIF Maker that you can use to make GIF from YouTube video.
1. GIFS
Gifs.com is one the best GIF maker site that makes crafting GIFs from YouTube videos incredibly easy and quick with no time. If you’re looking for some straight and simple video to gif converter to help you convert YouTube videos into GIFs, this is the smoothest editor that will do the job and craft interesting gifs for your blogging platforms.
All you have to do is enter the URL of the video you want to convert into a GIF. At this point, the site accepts Instagram, YouTube, Facebook, and Vine links. In addition to that, there is also an option that allows users to upload from the desktop computer.
Once you’ve entered the YouTube video URL, it prompts a basic video editor wherein you select the frame and durations for your GIF. If you want to customize it further, you can add stickers, captions, and tools like blurring, cropping, and others.
Once you’re done exploring the filters and editing the GIF, you can directly share the URL on different platforms or just download it and store it on your device.
Note: If you want to remove the watermark and get full access to extra features, you may need to pay $1.99/month.
You can check the gif that I made from our YouTube video How to Edit Galaxy Effects with Green Screen | Wondershare FilmoraPro Tutorial on gifs.com here: https://gifs.com/gif/36RNn9 .
2. GIPHY
Giphy, as we all know, is the most used search engine for GIFs due to its limitless collection. Giphy here maintains its own GIF maker to create your customized GIFs effortlessly. The Giphy online GIF maker is quite simple and easy to use; it also has steadfast mobile applications for both Android and iOS devices.
To begin converting YouTube videos into GIFs, click the Create button at the top and then you can either enter the URL or upload images/videos from local files. This GIF maker only accepts JPG, PNG, GIF, MP4, and MOV for people uploading images or videos.
Then, trim the part from the video you want to convert into a GIF. Later, you can embellish your GIFs by adding filters, tags, text captions, and stickers to make them look eye-catching. If you’re looking for a clean and simple GIF maker, then Giphy GIF maker is the perfect choice for you.
Here is the gig that I made with Giphy: https://media.giphy.com/media/2Dtlp2MAXtoC0EyMsx/giphy.gif .
3. GIFit!
GIFit is a well-known online extension available on the Chrome Web Store for free that aids in making GIFs from YouTube videos. The GIFit extension has been recently updated to work with the new YouTube interface to help you craft Gifs smoothly. One thing to remember about GIFit is that with YouTube HTML5 mode only.
To use this Chrome extension, install it from the Chrome Web Store. Now, run the attachment and visit any video on YouTube that you would like to convert into GIF. Once decided, simply press on the GIFit icon in the YouTube toolbar. Then, edit according to your requirements and hit the red button with GIFit on it. After a few minutes, your GIF will be ready to be shared and saved. Currently, it offers convert YouTube to GIF feature only, so you can’t add stickers nor captions.
4. Make A GIF
Makeagif is an ideal online GIF maker for you that can convert videos into animated GIFs in no time. It allows you to create GIFs using local images, YouTube, Facebook, and Webcam. Makeagif even will enable you to develop new GIFs using the already existing ones.
The GIF maker also comes with a variety of free GIFs to download and add to your collection. Moreover, it allows you to edit existing GIFs by enhancing their quality, speed and adding filters to them. It offers functions that can enrich the standard of your GIFs.
To create GIFs using this, first, create your account on the site. Next, select the ‘YouTube to GIF’ option from the drop-down menu, among other alternatives. Then, enter the link to the YouTube video that you wish to transfigure into GIF, after which you can tailor-make the gifs by adjusting the configuration settings, such as adding captions and sticker. Once done, simply download and share your newly crafted GIF.
5. Imgur
Imgur might not be the best application to be included in the list. But it is definitely an amazing site where you can go looking for all kinds of images, Gifs, memes, or other digital stories. Imgur’s wide collection of visuals can never disappoint you, no matter what you’re searching for, from funny to sad, inspiring to aspiring, everything can be discovered in this treasure.
Now, this might not be the best YouTube to gif maker, but it does have the potential to provide you with great ideas for GIF-making. Besides, you can download all the interesting GIfs from here and save them for future reference.
6. GiFRun
Are you worried about searching for a gif converter with no prior experience in editing? Don’t worry; this GiFRun Maker is the simplest online service that requires minimum to zero skill for creating GIFs. GifRun is an easy enough site to navigate through and produce quality GIFs for your blogging sites.
To convert a YouTube video to GIF, simply enter the link. After that, it will prompt you to the editing page, where you can set the start/end time, duration, and resolution for your gif. You can preview your edit before finalizing it, making necessary changes, and then downloading it on your device.
7. Free Gif Maker Me
Free Gif maker is one of the straightforward and easily manageable GIF-making applications. It offers YouTube to gif, reverse gif, and gif effects tools to enhance your GIF quality and make it effortless to create your own GIFs.
To make GIF from YT Video on free Gif Maker, copy the video link in the input text field in the middle of your screen and then tap on ‘Load YouTube Video.’ Within seconds you will be redirected to the video preview and GIF editing page. Now, set the duration, start time, resolution, output, and other details. Then, click on the ‘Make A GIF’ option and save it on your device once ready.
8. Imgflip
Another website is known for creating and sharing visual content on different social media channels. Imgflip allows you to make customized animations from YouTube and other digital platforms. The site is completely safe to use and produces good-quality memes and GIFs quickly without incurring a dime.
Imgflip supports all the popular video formats such as AVI, MP4, 3GP, OGG, FLV, MOV, and various other video formats. To produce a high-quality GIF, make sure your video is at least 480P or higher. More so, the Imgflip supports GIF with audio features of all the videos with audio that can only be accessed using the Imgflip Pro at a minimum price of $9.95/ month.
9. GIF Maker
GIF Maker is a pretty basic application that everyone can navigate with or without any expertise in the tech department. Along with GIF maker, it also has other tools such as GIF resizer, GIF compressor, and GIF cropper, all specifically designed tools to help you create riveting GIFs ever!
GIF Maker provides two options; one video to gif and second Images to gif that you can use as per their need. One simply is to enter the YT video link/upload video to the upload box. Next, alter the animation, filter, speed, duration, and set start and endpoint in the editor. You can upload files in all the popular formats and upload up to 25Mb image files and 30 Mb for animated GIFs.
Another point to remember while using this GIF Maker, it only supports YT videos that have not been copy-righted by the creator.
Part 2: Best YouTube to GIF Maker on Windows and Mac: Wondershare UniConverter
It happens so that you stumble upon a video that runs the hippocampus of your brain rigid with ingenious abstractions about converting the video into GIF to delineate those ideas through digital content on your blogs.
Now, you will require the best-quality GIF maker that is easy to navigate without any complications. Despite the plethora of GIF makers being available at hand, it could be a strenuous task to search for the ideal GIF maker for yourself.
Presently, Wondershare UniConverter is one of the best and easy-to-use YouTube to GIF makers for you. It is the handiest tool to help you accomplish your conversion, customization, compressing, and revamping goals like a professional with its effective editing features. Wondershare offers many benefits, from converting files in hundred different formats to crafting your one GIF out of videos along with other fundamental editing attributes.
How to User UniConverter Video to GIF Maker?
Step 1: Download and install the Wondershare Converter on your device. Now, run the app and launch the Wondershare GIF Maker by selecting the GIF Maker Icon on the toolbar.
Step 2: Click on the Video to GIF option before tapping on the Add File option to upload YT video for GIF conversion.
Step 3: Next, you can customize your uploaded video by setting the start and end time. In addition to that, you can enter the frame rate and output size according to your requirement.
Step 4: Once finished with all the customization, convert the YouTube video into a GIF by tapping the Create GIF option.
Step 5: Ta-da! UniConverter will transform your YT video into a GIF within a minute or two. You can now export and share the GIF further.
That’s right, with five easy steps, you can convert all your favorite YouTube video into GIF with this YouTube to GIF maker.
Without any doubt, I can say that usage of GIFs during your regular texting and socialization can make your conversations more interesting. GIFs are the best shortcuts to express your mood, emotions, and humor without having to type much. No other digital medium provides an avenue that offers such proficiency in demonstrating your emotions, possibly the reason behind its escalating popularity.
With the help of this little guide, you can create gif from YouTube videos with a wave of your hand! I hope you’ve fun GIF-ing!
Richard Bennett
Richard Bennett is a writer and a lover of all things video.
Follow @Richard Bennett
Also read:
- Leaders in Education Top 15 Sci-YT Innovators
- Delightful, No-Cost Access to YouTube's Nine Full-Length Yule Celebrations
- Directing Fundamentals A Comprehensive Online Course by YouTube Experts for 2024
- [New] 5 Tools for Cutting Edge Video Title & Tag Generation
- Top Picks 7 Best Live Streaming Apps to Upgrade Your YouTube Presence (iOS/Android)
- Boost Length on YouTube Entry Filming for 2024
- [New] Building Your Thriving YouTube Space for Gamers
- Quick, Captivating Content? Learn with Our YouTube Shorts Guide
- Transform Your YouTube Presence Mastering Featured Channel Spotlight Techniques
- Cross-Platform Engagement via YouTube + Twitch Broadcasts for 2024
- [Updated] Essential Thumbnail Strategies for Amplifying Viewership on YouTube
- [New] Elevating Your Content with Engaging Haul Creation
- Infographic Exploration Premier FIFA Videos
- [Updated] Crafting Impactful YouTube Channel Logo Tips
- [Updated] Enhancing Views with These Premium Tools for YouTube SEO
- Enhance Every Viewing Moment with These Top 6 Free Platforms for YouTube Short Downloads
- 2024 Approved 10 YouTube Storytelling Techniques That Work
- Complete Guide to Aspect Ratios About YouTube Videos/Shorts/Ads for 2024
- Verifying Ad Revenue for Channels
- [Updated] Enhance Call to Action Potential with GS Approach
- [New] Entering Income Territory with a Thousand Followers
- [New] Defeat Bot Intruders, Elevate Video Engagement
- In 2024, Boosting Views with Customized Thumbnail Sizes on YouTube
- [Updated] Elevate Views, Not Video Length Expert Guide to YT Desc Templates
- DIY YouTube Openers Technique One & Technique Two
- Assembling Channel Summaries That Attract for 2024
- 2024 Approved Captioning Techniques for Professional YouTube Content
- From Vision to Reality Taking Control of Your Lyric Videos with Lyric Video Maker
- Uncovered Top Mac Speech-to-Text Apps You Never Knew Existed Free & No Installation for 2024
- Updated Kapwing Essentials Adding Slow Motion Effects to Your Videos for 2024
- [New] In 2024, Directly Connect Tweeting with Videos on WhatsApp
- Updated In 2024, Mac Users, Rejoice! The Best Free Speech-to-Text Apps Without Downloads
- [New] 2024 Approved Ultimate Guide Unpacking the Secrets of Du Recorder
- [New] 2024 Approved In-Depth Guide OBS for Gamers
- In 2024, Fake Android Location without Rooting For Your Xiaomi Redmi A2 | Dr.fone
- [Updated] Rank the Best FB Video Downloaders - Here's How
- [New] 2024 Approved Ultimate Screener's Guide to 8 Choices
- [New] 2024 Approved ScreenCapture 101 with Spring's Latest Release
- Updated Experts Selection The Premier MP3 Snipper Software for Mac Devices, Updated
- Network Locked SIM Card Inserted On Your Samsung Galaxy F34 5G Phone? Unlock It Now
- How to Restore Contacts on iPhone 12 Pro Max (4 Methods) | Stellar
- Nokia G22 Stuck on Screen – Finding Solutions For Stuck on Boot | Dr.fone
- Expedited Ways for Curating Mac Images Together
- Best Video Editing Software for Windows 10 IMovie Equivalent
- 2024 Approved Take Screenshots on a Chromebook in Just Four Ways
- New Ken Burns Effect in Minutes Quick and Easy Tutorial for 2024
- A Comprehensive Analysis WhatsApp’s Vocal Communication
- In 2024, Top 5 Motorola Razr 40 Bypass FRP Tools for PC That Actually Work
- Updated The Virtuosos Choice A Ranked List of Available BGM Score Archives for 2024
- In 2024, Unleashing Potential in Your Recordings with Easy Voice Changes on Audacity
- Title: "In 2024, Boosting Your Content Quality Essential Tips for YouTube Users"
- Author: Steven
- Created at : 2024-05-25 19:33:18
- Updated at : 2024-05-26 19:33:18
- Link: https://youtube-clips.techidaily.com/in-2024-boosting-your-content-quality-essential-tips-for-youtube-users/
- License: This work is licensed under CC BY-NC-SA 4.0.
