
:max_bytes(150000):strip_icc()/Apple-iPad-Pro-Ultra-Retina-XDR-display-2-up-240507-320f9b524ad74986b75a0afb0bce8b4c.jpg)
In 2024, Best Livestream Capturing Gear for Online Content Makers
Best Livestream Capturing Gear for Online Content Makers
Best YouTube Livestreaming Screen Recorders

Richard Bennett
Oct 26, 2023• Proven solutions
The global pandemic has changed the way we live for the time being, and right now, we cannot attend events in the same way we did at the beginning of the year.
A growing number of cultural organizations, businesses, and influential YouTubers are turning towards YouTube’s Live feature because it provides a simple way of broadcasting different types of content in real-time. YouTube Live is by no means a new option, since the platform first introduced live streaming features in 2008, and some twelve years later, the feature has never been more popular.
However, the live streams you broadcast on YouTube are stored for just a brief period of time, which means you have to search for alternative methods of saving them. That’s why in this article we are going to take you through the best YouTube Live screen recorders you can use to capture the video content you are sharing with your followers.
Note: We resolutely oppose all forms of copyright-infringing downloads. This tutorial is only for downloading YouTube videos/audio materials from your own channel.
Top 10+ YouTube Live Screen Recorders
The maximum resolution in which you can record computer screen , audio recording options, or customization of the recording area are some of the most important features you need to consider while choosing a YouTube Live screen recorder.
We have selected some of the best YouTube Live screen recorders that enable you to do much more than just record live streams. So, let’s take a look at what they have to offer.
1. OBS Studio
Price: Free
Compatibility: Windows, Linux, macOS
The vast majority of live streams you can find on Twitch and YouTube are made with OBS Studio, but besides broadcasting videos, the software also gives you access to screencasting tools. This means that you can specify the area of the screen you want to record, choose the recording’s resolution and frame rate, or adjust the audio recording options.
OBS Studio is the best free, open-source screen recording program you can download. You shouldn’t use a software just because it’s free, but OBS Studio is also an extremely versatile tool. You can both record and stream in high definition and it comes with the ability to record either through your webcam or through your screen. It records directly through the graphics card , which means it can capture games even when in full-screen mode whereas a lot of other screen-recording software forces you to play games in windowed mode. The high quality can be seen easily in whatever you choose to broadcast.
OBS Studio allows you to record videos from a variety of sources, which makes it a perfect option for capturing the content you share through YouTube Live since you can select a browser window you want to capture in just a few clicks. What’s more, this open-source software is equipped with basic video editing tools, which enables you to preview the video you recorded before publishing it, apply transitions between cuts, or perform basic color correction.
Check the detailed guide to How to Record with OBS .
2. XSplit
Price: $24.95 for a three-month license
Compatibility: Windows
This is yet another broadcasting software that is equipped with powerful screen recording tools. Setting up a new screencasting session with XSplit is a simple and intuitive process that is not going to take much more than a few moments of your time.
All you need to do is define a workspace, then pick the preferred resolution and frame rate. The software allows you to capture screens in 4K resolution and at 60 fps, but it also offers a variety of resolution and frame rate options so that you can choose the one that best fits your needs. Furthermore, you can record the computer audio, which enables you to capture the live stream’s audio in excellent quality. Besides YouTube Live, XSplit can be used with Zoom , Skype, Google Hangouts, and numerous other live streaming and video calling apps.
3. Filmora
Price: Free, pricing plans start at $49.99/year
Compatibility: macOS, Windows


If you are looking for a screen recorder that is stacked with powerful video editing features, then Filmora is a great option for you. Customizing a YouTube Live or any other screencasting session with this video editing software is easy, and you can choose the resolution, frame rate, or even if you want to show mouse clicks in the recording.
Capturing the webcam feed and the computer’s screen simultaneously is also an option, while you can also decide whether or not you want to record audio from a microphone, computer audio, or both at the same time.
What’s more Filmora lets you set up the maximum duration of a screen recording and you start, pause, resume or stop a screen recording session by using hotkeys. Once you are done recording the live stream you shared on YouTube, you can edit the footage you created before uploading it to your YouTube channel.
4. Wondershare DemoCreator
Compatibility: Windows
Price: Start from $9.99
DemoCreator is a recorder that focuses its overall user experience. It is able to easily record high-quality videos at up to 120 FPS (60 FPS for Mac) and allows you to simultaneously record both your screen and webcam. This software is incredibly user friendly and makes for an easy experience for new streamers. The dual recording makes it great for gamers who are also looking to film their reactions.
5. CloudApp
Price: Free, $10 per month for an individual user
Compatibility: Windows, macOS, Linux, Chrome
Starting a new screen capturing session with the CloudApp requires you to just specify the portion of the screen you want to capture and hit the record button. Moreover, you can choose if you want to record with or without a webcam and you have the option to enable or disable the audio recording option.
However, you can only create 90-second screen recordings with the free version of the CloudApp and you cannot set resolution or frame rate of the recording. That’s why you need to upgrade to the Pro version if you want to use it to record live streams on YouTube. The Pro subscription model also grants you access to basic video editing tools and a variety of file sharing options. In addition, CloudApp lets you create and annotate still images and GIFs, which makes it a great option for digital marketers.
6. Techsmith Camtasia
Price: Free trial, $269.05 one-time fee
Compatibility: Windows, macOS
You don’t need years of video editing experience to start a new screen recording session in Camtasia. In fact, you just have to click on the Record button that is located in the software’s tool panel and then customize the settings.
Camtasia lets you choose if you want to record the full screen or just a selected portion of the screen or decide if you want to switch the webcam or the microphone off. You should make sure that the System Audio feature is enabled in order to record the sound of the live stream you’re sharing on YouTube. Pausing or stopping a screencasting session requires you to either click on the appropriate buttons or use the keyboard-based hotkeys. After you are done recording a live stream you can edit the footage using Camtasia’s video editing tools.
7. ScreenRec
Price: Free
Compatibility: Windows, macOS, Linux
Recording any live stream or TV show you play on your computer with ScreenRec is a straightforward process that can be completed in just a few clicks. Simply drag the mouse cursor over the area you want to record, then hit the Record button when you are ready and ScreenRec will start capturing the computer screen.
Once the screencasting session is completed you will get a sharable link that can be embedded to a website or used to save an MP4 file on your hard drive. Furthermore, ScreenRec is equipped with analytics tools that show you how many views your videos attracted or for how long each visitor watched them. All of these features make ScreenRec an excellent option for anyone who wants to record a live stream on YouTube or any other on-screen activity.
8. Flashback Express
Price: Free
Compatibility: Windows
Flashback Express is a simple screen recorder that lets you create high-res videos effortlessly. Setting up a new screencasting session requires you to just specify the area of the screen you want to record, choose whether or not you want to record the webcam feed and hit the Record button.
There are no restrictions in terms of the duration of screen recordings you can make with Flashback Express and the software doesn’t watermark the video you create.
However, you can only save the files in MP4, AVI, or WMW formats and you cannot adjust the video’s frame rate or resolution. What’s more, editing videos or applying effects with Flashback Express isn’t possible and you must upgrade to FlashBack Pro if you want to edit the live streams you broadcast on YouTube.
This piece of software is user friendly, but it doesn’t have as many features as other products on the market. Having said that, it is still an excellent tool that will help you live stream gameplay easily. Although it doesn’t come with built-in video editing software, it is possible to download another program to do this for you (i.e. Filmora). Flashback Express has the ability to record through your headset or microphone as well.
9. VLC
Price: Free
Compatibility: macOS, Linux, Windows
This is an iconic media player that became famous for its versatility and support for nearly all video file formats. Besides being one of the best media players ever created, VLC is also equipped with screen recording and video editing tools.
In order to start a new screencasting session, you will have to go to the Media menu and then select the Open Capture Device option. Once the new window pops up on the screen you should change the Capture Mode to Desktop and then adjust the frame rate in accordance with your needs.
Click on the Play button, and then hit the Record button after the screen recording window appears on the screen. You can only record the entire screen with VLC, since customizing the recording area isn’t an option, and all your files will be captured in the RAW format which means that you may have to resize them before you upload them to YouTube.
10. Screencast-o-matic
Price: Free, pricing options start at $1.65 per month
Compatibility: macOS, Windows
As its name suggests, this software product makes the screen recording process almost automatic. You can choose if you want to record an entire screen or just a window you selected. In addition, Screencast-o-matic lets you record the desktop and webcam footage at the same time, and you can even zoom in while the screencasting session is still in progress.
The free version of the software offers only a basic set of features that doesn’t include the option to record system audio. This means that you have to opt for one of the available subscription models if you want to record your live streams on YouTube with Screencast-o-matic. What’s more, you will be to create videos that are longer than 15 minutes, create recordings without watermarks or add music to your recordings if you opt for Deluxe or Premiere pricing options.
11. QuickTime Player
Price: Free
Compatibility: macOS, Windows
Mac users who want to record content that is broadcasted via YouTube Live can do so without having to install a third-party app. Apple ceased the support for the Windows-based version of QuickTime Player in 2016 and PC users can only capture their screens with this software if they have some of its earlier versions.
In order to start a new screen recording session in QuickTime Player, you just have to go to the File menu and select the New Screen Recording option. The Screen Recording window where you can choose if you want to record audio or show mouse click in the recording will pop up on the screen. QuickTime Player lets you choose if you want to capture the entire screen or just a portion of it, and you can click on the Record button to start a new screencasting session. In order to save a video file you created, you just have to go to the File menu and pick the Save option.
How to Record a YouTube Live Stream with Filmora
Recording a YouTube Live stream with Filmora is easy even if you never went through this process before. You can set up a new screencasting session in just a few easy steps that won’t take more than a few moments to complete. Here’s what you need to do:
Step 1: Launch Filmora and create a new project. Go to the Media tab once the video editor’s main window loads and click on the Record drop-down menu that is located next to the Import drop-down menu.
Choose the Record PC Screen option and then proceed to customize the settings for your screencasting session.

Step 2: Click on the Rectangular icon in the upper left corner of the Wondershare Filmora Scrn window and choose either Full Screen, Custom, or Target Window option, depending on how you want to record a YouTube Live stream to define the area of the screen that is going to be recorded.
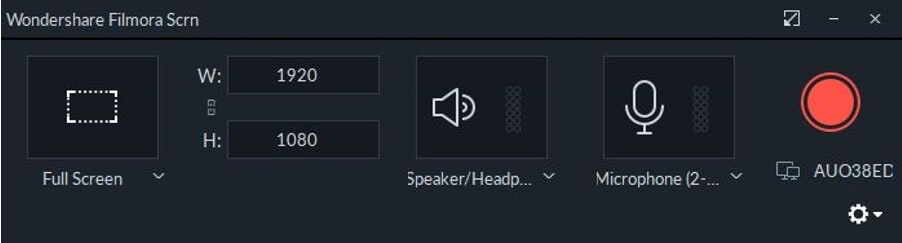
You can then proceed to insert the resolution your screen recording is going to have, and choose if you want to record system audio and sound from an external microphone.
Step 3: Click on the Gear icon below the Record button to gain access to additional settings, and then proceed to set the frame rate, adjust the video’s quality or activate the Show Mouse Clicks in Recording option.
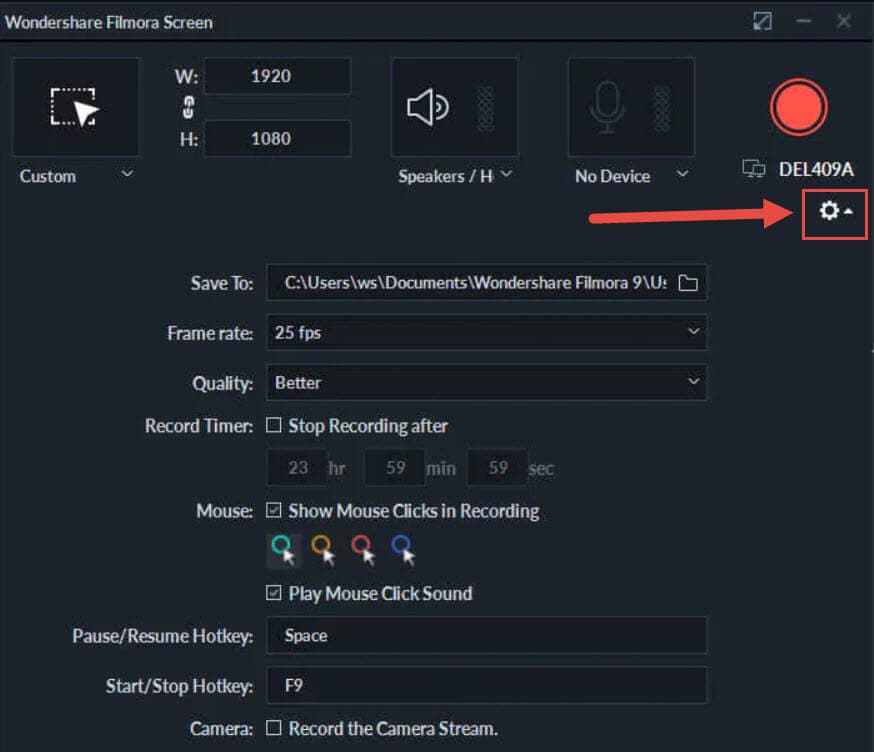
Make sure that the checkbox next to the Record the Camera Stream is marked if you want to record webcam feed and computer desktop at the same time.
Step 4: Press the red Record button in the upper right corner of the window and jump to the live stream. Once the broadcast is completed, you should click on the Stop button and use Filmora’s editing tools to remove all imperfections from the recording.
Filmora allows you to export all of your projects directly to your YouTube channel immediately after the rendering process is completed.
Frequently Asked Questions about YouTube Live Screen Recorders
1. Does YouTube Save Live Videos?
Stream Now, Mobile, Webcam, and Events streams can be stored automatically for 12 hours after they end. You can access all of your live streams by clicking on the Videos menu in the YouTube Studio and selecting the Live option and then change the Privacy setting in the Visibility menu.
2. How to use YouTube to Archive a Live Stream?
Once the live stream ends, you should go to the Dashboard and click on the Live feature, and then choose the Stream option. Check the Make Archive Unlisted When Complete checkbox and the live stream video will be saved accordingly.
Richard Bennett
Richard Bennett is a writer and a lover of all things video.
Follow @Richard Bennett
Richard Bennett
Oct 26, 2023• Proven solutions
The global pandemic has changed the way we live for the time being, and right now, we cannot attend events in the same way we did at the beginning of the year.
A growing number of cultural organizations, businesses, and influential YouTubers are turning towards YouTube’s Live feature because it provides a simple way of broadcasting different types of content in real-time. YouTube Live is by no means a new option, since the platform first introduced live streaming features in 2008, and some twelve years later, the feature has never been more popular.
However, the live streams you broadcast on YouTube are stored for just a brief period of time, which means you have to search for alternative methods of saving them. That’s why in this article we are going to take you through the best YouTube Live screen recorders you can use to capture the video content you are sharing with your followers.
Note: We resolutely oppose all forms of copyright-infringing downloads. This tutorial is only for downloading YouTube videos/audio materials from your own channel.
Top 10+ YouTube Live Screen Recorders
The maximum resolution in which you can record computer screen , audio recording options, or customization of the recording area are some of the most important features you need to consider while choosing a YouTube Live screen recorder.
We have selected some of the best YouTube Live screen recorders that enable you to do much more than just record live streams. So, let’s take a look at what they have to offer.
1. OBS Studio
Price: Free
Compatibility: Windows, Linux, macOS
The vast majority of live streams you can find on Twitch and YouTube are made with OBS Studio, but besides broadcasting videos, the software also gives you access to screencasting tools. This means that you can specify the area of the screen you want to record, choose the recording’s resolution and frame rate, or adjust the audio recording options.
OBS Studio is the best free, open-source screen recording program you can download. You shouldn’t use a software just because it’s free, but OBS Studio is also an extremely versatile tool. You can both record and stream in high definition and it comes with the ability to record either through your webcam or through your screen. It records directly through the graphics card , which means it can capture games even when in full-screen mode whereas a lot of other screen-recording software forces you to play games in windowed mode. The high quality can be seen easily in whatever you choose to broadcast.
OBS Studio allows you to record videos from a variety of sources, which makes it a perfect option for capturing the content you share through YouTube Live since you can select a browser window you want to capture in just a few clicks. What’s more, this open-source software is equipped with basic video editing tools, which enables you to preview the video you recorded before publishing it, apply transitions between cuts, or perform basic color correction.
Check the detailed guide to How to Record with OBS .
2. XSplit
Price: $24.95 for a three-month license
Compatibility: Windows
This is yet another broadcasting software that is equipped with powerful screen recording tools. Setting up a new screencasting session with XSplit is a simple and intuitive process that is not going to take much more than a few moments of your time.
All you need to do is define a workspace, then pick the preferred resolution and frame rate. The software allows you to capture screens in 4K resolution and at 60 fps, but it also offers a variety of resolution and frame rate options so that you can choose the one that best fits your needs. Furthermore, you can record the computer audio, which enables you to capture the live stream’s audio in excellent quality. Besides YouTube Live, XSplit can be used with Zoom , Skype, Google Hangouts, and numerous other live streaming and video calling apps.
3. Filmora
Price: Free, pricing plans start at $49.99/year
Compatibility: macOS, Windows
If you are looking for a screen recorder that is stacked with powerful video editing features, then Filmora is a great option for you. Customizing a YouTube Live or any other screencasting session with this video editing software is easy, and you can choose the resolution, frame rate, or even if you want to show mouse clicks in the recording.
Capturing the webcam feed and the computer’s screen simultaneously is also an option, while you can also decide whether or not you want to record audio from a microphone, computer audio, or both at the same time.
What’s more Filmora lets you set up the maximum duration of a screen recording and you start, pause, resume or stop a screen recording session by using hotkeys. Once you are done recording the live stream you shared on YouTube, you can edit the footage you created before uploading it to your YouTube channel.
4. Wondershare DemoCreator
Compatibility: Windows
Price: Start from $9.99
DemoCreator is a recorder that focuses its overall user experience. It is able to easily record high-quality videos at up to 120 FPS (60 FPS for Mac) and allows you to simultaneously record both your screen and webcam. This software is incredibly user friendly and makes for an easy experience for new streamers. The dual recording makes it great for gamers who are also looking to film their reactions.
5. CloudApp
Price: Free, $10 per month for an individual user
Compatibility: Windows, macOS, Linux, Chrome
Starting a new screen capturing session with the CloudApp requires you to just specify the portion of the screen you want to capture and hit the record button. Moreover, you can choose if you want to record with or without a webcam and you have the option to enable or disable the audio recording option.
However, you can only create 90-second screen recordings with the free version of the CloudApp and you cannot set resolution or frame rate of the recording. That’s why you need to upgrade to the Pro version if you want to use it to record live streams on YouTube. The Pro subscription model also grants you access to basic video editing tools and a variety of file sharing options. In addition, CloudApp lets you create and annotate still images and GIFs, which makes it a great option for digital marketers.
6. Techsmith Camtasia
Price: Free trial, $269.05 one-time fee
Compatibility: Windows, macOS
You don’t need years of video editing experience to start a new screen recording session in Camtasia. In fact, you just have to click on the Record button that is located in the software’s tool panel and then customize the settings.
Camtasia lets you choose if you want to record the full screen or just a selected portion of the screen or decide if you want to switch the webcam or the microphone off. You should make sure that the System Audio feature is enabled in order to record the sound of the live stream you’re sharing on YouTube. Pausing or stopping a screencasting session requires you to either click on the appropriate buttons or use the keyboard-based hotkeys. After you are done recording a live stream you can edit the footage using Camtasia’s video editing tools.
7. ScreenRec
Price: Free
Compatibility: Windows, macOS, Linux
Recording any live stream or TV show you play on your computer with ScreenRec is a straightforward process that can be completed in just a few clicks. Simply drag the mouse cursor over the area you want to record, then hit the Record button when you are ready and ScreenRec will start capturing the computer screen.
Once the screencasting session is completed you will get a sharable link that can be embedded to a website or used to save an MP4 file on your hard drive. Furthermore, ScreenRec is equipped with analytics tools that show you how many views your videos attracted or for how long each visitor watched them. All of these features make ScreenRec an excellent option for anyone who wants to record a live stream on YouTube or any other on-screen activity.
8. Flashback Express
Price: Free
Compatibility: Windows
Flashback Express is a simple screen recorder that lets you create high-res videos effortlessly. Setting up a new screencasting session requires you to just specify the area of the screen you want to record, choose whether or not you want to record the webcam feed and hit the Record button.
There are no restrictions in terms of the duration of screen recordings you can make with Flashback Express and the software doesn’t watermark the video you create.
However, you can only save the files in MP4, AVI, or WMW formats and you cannot adjust the video’s frame rate or resolution. What’s more, editing videos or applying effects with Flashback Express isn’t possible and you must upgrade to FlashBack Pro if you want to edit the live streams you broadcast on YouTube.
This piece of software is user friendly, but it doesn’t have as many features as other products on the market. Having said that, it is still an excellent tool that will help you live stream gameplay easily. Although it doesn’t come with built-in video editing software, it is possible to download another program to do this for you (i.e. Filmora). Flashback Express has the ability to record through your headset or microphone as well.
9. VLC
Price: Free
Compatibility: macOS, Linux, Windows
This is an iconic media player that became famous for its versatility and support for nearly all video file formats. Besides being one of the best media players ever created, VLC is also equipped with screen recording and video editing tools.
In order to start a new screencasting session, you will have to go to the Media menu and then select the Open Capture Device option. Once the new window pops up on the screen you should change the Capture Mode to Desktop and then adjust the frame rate in accordance with your needs.
Click on the Play button, and then hit the Record button after the screen recording window appears on the screen. You can only record the entire screen with VLC, since customizing the recording area isn’t an option, and all your files will be captured in the RAW format which means that you may have to resize them before you upload them to YouTube.
10. Screencast-o-matic
Price: Free, pricing options start at $1.65 per month
Compatibility: macOS, Windows
As its name suggests, this software product makes the screen recording process almost automatic. You can choose if you want to record an entire screen or just a window you selected. In addition, Screencast-o-matic lets you record the desktop and webcam footage at the same time, and you can even zoom in while the screencasting session is still in progress.
The free version of the software offers only a basic set of features that doesn’t include the option to record system audio. This means that you have to opt for one of the available subscription models if you want to record your live streams on YouTube with Screencast-o-matic. What’s more, you will be to create videos that are longer than 15 minutes, create recordings without watermarks or add music to your recordings if you opt for Deluxe or Premiere pricing options.
11. QuickTime Player
Price: Free
Compatibility: macOS, Windows
Mac users who want to record content that is broadcasted via YouTube Live can do so without having to install a third-party app. Apple ceased the support for the Windows-based version of QuickTime Player in 2016 and PC users can only capture their screens with this software if they have some of its earlier versions.
In order to start a new screen recording session in QuickTime Player, you just have to go to the File menu and select the New Screen Recording option. The Screen Recording window where you can choose if you want to record audio or show mouse click in the recording will pop up on the screen. QuickTime Player lets you choose if you want to capture the entire screen or just a portion of it, and you can click on the Record button to start a new screencasting session. In order to save a video file you created, you just have to go to the File menu and pick the Save option.
How to Record a YouTube Live Stream with Filmora
Recording a YouTube Live stream with Filmora is easy even if you never went through this process before. You can set up a new screencasting session in just a few easy steps that won’t take more than a few moments to complete. Here’s what you need to do:
Step 1: Launch Filmora and create a new project. Go to the Media tab once the video editor’s main window loads and click on the Record drop-down menu that is located next to the Import drop-down menu.
Choose the Record PC Screen option and then proceed to customize the settings for your screencasting session.
Step 2: Click on the Rectangular icon in the upper left corner of the Wondershare Filmora Scrn window and choose either Full Screen, Custom, or Target Window option, depending on how you want to record a YouTube Live stream to define the area of the screen that is going to be recorded.
You can then proceed to insert the resolution your screen recording is going to have, and choose if you want to record system audio and sound from an external microphone.
Step 3: Click on the Gear icon below the Record button to gain access to additional settings, and then proceed to set the frame rate, adjust the video’s quality or activate the Show Mouse Clicks in Recording option.
Make sure that the checkbox next to the Record the Camera Stream is marked if you want to record webcam feed and computer desktop at the same time.
Step 4: Press the red Record button in the upper right corner of the window and jump to the live stream. Once the broadcast is completed, you should click on the Stop button and use Filmora’s editing tools to remove all imperfections from the recording.
Filmora allows you to export all of your projects directly to your YouTube channel immediately after the rendering process is completed.
Frequently Asked Questions about YouTube Live Screen Recorders
1. Does YouTube Save Live Videos?
Stream Now, Mobile, Webcam, and Events streams can be stored automatically for 12 hours after they end. You can access all of your live streams by clicking on the Videos menu in the YouTube Studio and selecting the Live option and then change the Privacy setting in the Visibility menu.
2. How to use YouTube to Archive a Live Stream?
Once the live stream ends, you should go to the Dashboard and click on the Live feature, and then choose the Stream option. Check the Make Archive Unlisted When Complete checkbox and the live stream video will be saved accordingly.
Richard Bennett
Richard Bennett is a writer and a lover of all things video.
Follow @Richard Bennett
Unleash Creativity in YouTube Short Video Production
YouTube Shorts Ultimate Guide in 2024
Richard Bennett
Mar 27, 2024• Proven solutions
Since smartphones are cheap and easily available in the market today, and there is also a huge range of contents to view online, a majority of users prefer watching videos that are both short enough to convey the message within a few seconds, and can be seen on your phone’s screen with decent picture quality. Considering this, Google lately came up with a Tik Tok-style app calledYouTube shorts that can be accessed right from your Android or iPhone as long as you are using the YouTube app, and are signed in to your Google account.
That said, in the following sections you will learn everything about the YouTube Shorts app, and how it could help you gain more viewers for your YouTube channel.
- Part 1: What Is YouTube Shorts?
- Part 2: How to Make and Upload a YouTube Shorts Video with Shorts App?
- Part 3: Creating Vertical YouTube Shorts Video in Filmora [Step by Step Tutorial]
Part 1: What Is YouTube Shorts?
A short and quick answer to the question is, YouTube Shorts is a Tik Tok competitor developed by Google and can be accessed via the YouTube app on an Android or iOS device. In order to use the YouTube Shorts app, all you need to do is, sign in to your YouTube account on the YouTube app, and you are good to go.
1. YouTube Shorts Release History
At the time of this writing, YouTube Shorts is still in the Beta phase, and there is a lot more that the developers at Google have yet to explore and discover. However, for now, the fully functional variant of the program is available only for users in India on Android and iOS platforms.
2. YouTube Shorts Target Audience
A majority of people who can be called the target audience for YouTube Shorts are the artists and creators looking forward to getting noticed. Some of them could also be among those who wish to become an influencer, or get their YouTube channel more subscribers to be able to become eligible for YouTube Partnership Program.
And of course, the viewers and subscribers cannot be left alone when talking about the target audiences of YouTube Shorts as without them, there’s no point in creating short videos in the first place.
The type of contents that the viewers expect to see as YouTube Shorts could include:
- Entertainment – While movies are of longer duration, roasting the characters in it, or explaining some other stuff to the subscribers could be one of the things that could keep the viewers engaged
- Gaming – Some extraordinary gaming tips, tricks, and skills can be demonstrated in a short video
- How-To – A couple of brief how-to illustrations can yet be another attraction for DIY-loving viewers
- Science and Technology – A short introduction of upcoming gadgets or applications along with their usability can be explained within the timeframe of 60 seconds as well
In addition to the above, a few other categories could be People and Places, Music, Domestic and Wild Animals, Education, etc.
3. YouTube Shorts Content Requirements
While creating YouTube Shorts, there are certain guidelines that must be followed. These points include:
- YouTube Shorts videos must not be more than 60 seconds long
- The videos must be vertically shot, and must not be in the landscape orientation
- You can have multiple short videos clubbed together. However, the total length of the final video must not exceed 60 seconds in duration
- While posting YouTube Shorts videos, the title or the description must contain ‘#shorts’ in it
Certain things that you must keep in mind while creating YouTube Shorts include:
- YouTube Shorts cannot be monetized. However, they can serve as a good medium to attract and redirect the audiences to your main YouTube channel which may contain several videos that are eligible for monetization.
- The number of views and the total playtime of the YouTube Shorts videos DO affect your YouTube channel statistics
4. Where People Can Find YouTube Shorts
As mentioned earlier, YouTube Shorts can be accessed by launching the YouTube app on your Android or iOS device. You can use YouTube Shorts by clicking the + (Add) icon present at the bottom. Once the YouTube Shorts app is initialized, you can easily create and publish short videos by following the simple on-screen instructions.
Part 2: How to Make and Upload a YouTube Shorts Video with Shorts App?
You can follow the instructions given below to make and upload a YouTube Shorts video using the YouTube Shorts app:
Step 1: Record a Video with YouTube Shorts

Launch the YouTube app on your Android or iOS smart device (Samsung Galaxy Note 10+ is used here for demonstration), make sure that you are signed in to your Google account, tap the + (Add) button present at the bottom of the screen, tap Create a Short on the popup box that appears next, tap the Record button on the next window to start the recording. Once you are done, tap the Stop button to stop the recording.
Step 2: Edit the Video
Tap Music from the bottom of the screen to add background music to the video. The music that you can use in your short videos must be either created by you, or you should have permission to use them. However, the audio files that the Music library contains is made available by Google, is royalty-free, and can be used throughout the platform.

Likewise, you can tap Text to add captions as well. As for the text type, the app offers various formatting options such as alignment (left, center, and right), text highlighter, font changer, and even color selector. Further, the Speed and Timer icons at the top-right area allow you to manage the playback speed anywhere between 0.3x to 3x, and automatically stop the recording after the set time limit respectively. Once everything is set up, tap NEXT from the top-right corner to proceed to the next step.
Step 3: Pick Target Audience Type
On the Add details window, tap Select audience, and on the Select audience window, tap to select the appropriate radio button to define whether the video is suitable for kids. Tap the Back button once the target audience is selected.

Step 4: Add Details and Upload the Video
Enter a title for the video in the Title field. Make sure to include #shorts to help YouTube understand that you are preparing a YouTube Shorts video. Next, tap UPLOAD from the upper-right corner of the screen to submit the video for review. Once YouTube reviews the recording and finds it appropriate, it will be published on the portal, and will be visible throughout and even under the Shorts category of the main page.

Part 3: How to Create a Vertical YouTube Shorts Video in Filmora?
The YouTube Shorts app is pretty convenient to access and use alright. However, it doesn’t allow you to fine edit the videos. The app doesn’t even have many filtering options such as Effects, Elements, etc. to make your videos more engaging.
With that said, you can always use an efficient third-party program like Wondershare Filmora to create professionally-looking YouTube Shorts videos to attract your viewers.
When talking about Wondershare Filmora, it is a production and post-production app available for both Windows and Mac computers, and gives tough competition to some of the globally accepted similar programs like Adobe Premiere Pro, Final Cut Pro X, etc. Furthermore, Filmora has its own built-in screen, webcam, and voice recording features that can be used to prepare interactive videos, game walkthroughs, and voiceovers as needed.
For Win 7 or later (64-bit)
 Secure Download
For macOS 10.12 or later
Secure Download
The following step-by-step guide teaches you how to use Wondershare Filmora to create a vertical YouTube Shorts video:
Note: Before proceeding to the instructions, make sure that you have already recorded a vertical video using your cellphone, and that it has been transferred to your PC.
Step 1: Add the Video to Timeline
Launch Wondershare Filmora on your Windows or Mac PC (a Windows 10 computer is used here for demonstration), go to File > New Project, and click 9:16 (Portrait). Click anywhere inside the Media box, and select and import the source vertical video from your PC to Filmora.
Next, hover the mouse over the clip in the Media box, click the + button that appears at the bottom-right corner of the thumbnail, and in the resolution confirmation box that comes up next, click the button under the Match to Media section to add the video in the correct orientation to the Timeline at the bottom.
Step 2: Edit the Video
Select the clip in the Timeline, and use the Split, Crop, Speed, etc. buttons above the Timeline itself to remove the unwanted portions from the clip, manage its playback speed, and do other fine-tuning tasks.

You can even click the Edit button, and use the available editing features like Motion Tracking and Stabilization to add text or objects to a moving body in the video and stabilize the clip if the camera shook during the recording session respectively. Click OK to save the changes when done.

Note: To be able to remain compliant with the YouTube Shorts policies, make sure that the video length is no longer than 60 seconds.
Step 3: Beautify the Video

Click Titles from the standard toolbox at the top, choose your preferred text category from the list in the left, hover the mouse over a decent preset in the right window, and click the + button at the bottom-right corner of the thumbnail to add the preset on top of the media track in the Timeline. Next, you can double-click the preset track in the Timeline to modify the text and make granular modifications to it as needed. Click OK to save the changes.
Similarly, you can select the Effects and Elements tools to add effects and elements to the video as needed. To add background music, you can go to the Audio tool, and pick your preferred preset from the available options. A custom music can be added by going to the Media tool, and importing an audio file from your PC using the method explained in Step 1.

After this, optionally, you can go to Split Screen from the standard toolbar at the top, and use your preferred Split Screen preset to club multiple video clips into one screen. In Filmora, you can add as many as 6 screens in a video.
For Win 7 or later (64-bit)
Secure Download
For macOS 10.12 or later
Secure Download
Step 4: Render the Final Output
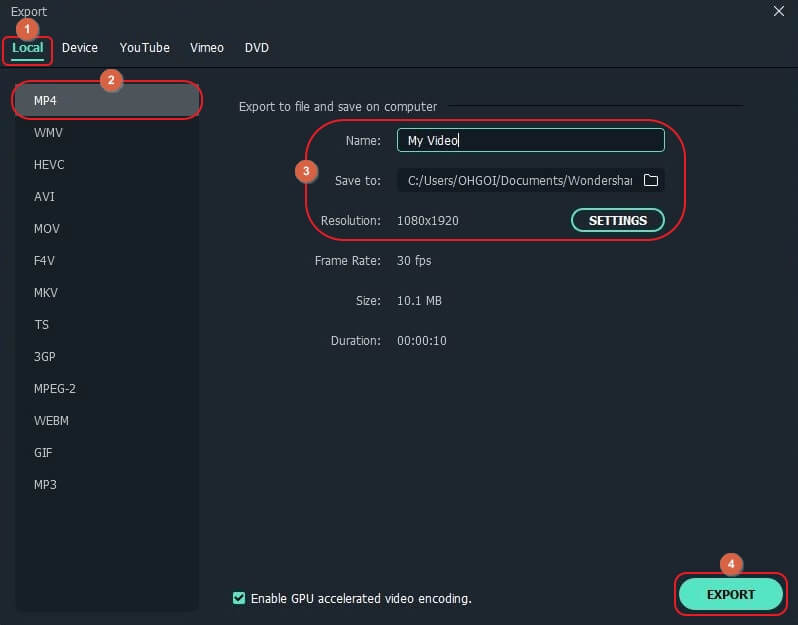
Once everything is set up, click EXPORT from the top of the window, go to the Local tab on the Export window, select MP4 from the formats list in the left, give a name and configure other settings from the available options in the right, and click EXPORT from the bottom-right corner to create a YouTube Shorts video. Once the clip is generated, you can upload the video to YouTube using #Shorts in the title or description to publish the video under the YouTube Shorts section.
FAQs About YouTube Shorts
- Where to download the YouTube Shorts app?
The YouTube Shorts app is already present in the YouTube app that your Android or iOS smartphone has. All you need to do to access it is, sign in to your Google account, tap the + button at the bottom, and tap Create a Short in the popup box that comes up.
- What if YouTube Shorts is not showing on my YouTube app?
Make sure that your YouTube app is updated to its latest version. If the app is already updated, and YouTube Shorts is still unavailable, the chances are that Google hasn’t rolled the app in your region. Since YouTube Shorts is still in its Beta phase, only the region of India can use all the functions of the app at the time of this writing. In such a case, you are suggested to wait until the YouTube Shorts app is made available for your location.
- What’s the YouTube Shorts video duration?
A YouTube Shorts video can be of only up to 60 seconds.
- What’s the YouTube Shorts size limitation?
YouTube hasn’t provided any information related to this as of now. However, you can rest assure that a 60 seconds long video file wouldn’t be too large for YouTube to handle.
- How many subs do you need to access Shorts?
YouTube Shorts is available for everyone regardless of the number of subscribers the channel has.
- Can you make money on Shorts?
Unfortunately, NO. Although you cannot monetize the recordings published as YouTube Shorts, they can be a good source to drive subscribers to your main YouTube channel that may have the videos that can be monetized.
Richard Bennett
Richard Bennett is a writer and a lover of all things video.
Follow @Richard Bennett
Richard Bennett
Mar 27, 2024• Proven solutions
Since smartphones are cheap and easily available in the market today, and there is also a huge range of contents to view online, a majority of users prefer watching videos that are both short enough to convey the message within a few seconds, and can be seen on your phone’s screen with decent picture quality. Considering this, Google lately came up with a Tik Tok-style app calledYouTube shorts that can be accessed right from your Android or iPhone as long as you are using the YouTube app, and are signed in to your Google account.
That said, in the following sections you will learn everything about the YouTube Shorts app, and how it could help you gain more viewers for your YouTube channel.
- Part 1: What Is YouTube Shorts?
- Part 2: How to Make and Upload a YouTube Shorts Video with Shorts App?
- Part 3: Creating Vertical YouTube Shorts Video in Filmora [Step by Step Tutorial]
Part 1: What Is YouTube Shorts?
A short and quick answer to the question is, YouTube Shorts is a Tik Tok competitor developed by Google and can be accessed via the YouTube app on an Android or iOS device. In order to use the YouTube Shorts app, all you need to do is, sign in to your YouTube account on the YouTube app, and you are good to go.
1. YouTube Shorts Release History
At the time of this writing, YouTube Shorts is still in the Beta phase, and there is a lot more that the developers at Google have yet to explore and discover. However, for now, the fully functional variant of the program is available only for users in India on Android and iOS platforms.
2. YouTube Shorts Target Audience
A majority of people who can be called the target audience for YouTube Shorts are the artists and creators looking forward to getting noticed. Some of them could also be among those who wish to become an influencer, or get their YouTube channel more subscribers to be able to become eligible for YouTube Partnership Program.
And of course, the viewers and subscribers cannot be left alone when talking about the target audiences of YouTube Shorts as without them, there’s no point in creating short videos in the first place.
The type of contents that the viewers expect to see as YouTube Shorts could include:
- Entertainment – While movies are of longer duration, roasting the characters in it, or explaining some other stuff to the subscribers could be one of the things that could keep the viewers engaged
- Gaming – Some extraordinary gaming tips, tricks, and skills can be demonstrated in a short video
- How-To – A couple of brief how-to illustrations can yet be another attraction for DIY-loving viewers
- Science and Technology – A short introduction of upcoming gadgets or applications along with their usability can be explained within the timeframe of 60 seconds as well
In addition to the above, a few other categories could be People and Places, Music, Domestic and Wild Animals, Education, etc.
3. YouTube Shorts Content Requirements
While creating YouTube Shorts, there are certain guidelines that must be followed. These points include:
- YouTube Shorts videos must not be more than 60 seconds long
- The videos must be vertically shot, and must not be in the landscape orientation
- You can have multiple short videos clubbed together. However, the total length of the final video must not exceed 60 seconds in duration
- While posting YouTube Shorts videos, the title or the description must contain ‘#shorts’ in it
Certain things that you must keep in mind while creating YouTube Shorts include:
- YouTube Shorts cannot be monetized. However, they can serve as a good medium to attract and redirect the audiences to your main YouTube channel which may contain several videos that are eligible for monetization.
- The number of views and the total playtime of the YouTube Shorts videos DO affect your YouTube channel statistics
4. Where People Can Find YouTube Shorts
As mentioned earlier, YouTube Shorts can be accessed by launching the YouTube app on your Android or iOS device. You can use YouTube Shorts by clicking the + (Add) icon present at the bottom. Once the YouTube Shorts app is initialized, you can easily create and publish short videos by following the simple on-screen instructions.
Part 2: How to Make and Upload a YouTube Shorts Video with Shorts App?
You can follow the instructions given below to make and upload a YouTube Shorts video using the YouTube Shorts app:
Step 1: Record a Video with YouTube Shorts
Launch the YouTube app on your Android or iOS smart device (Samsung Galaxy Note 10+ is used here for demonstration), make sure that you are signed in to your Google account, tap the + (Add) button present at the bottom of the screen, tap Create a Short on the popup box that appears next, tap the Record button on the next window to start the recording. Once you are done, tap the Stop button to stop the recording.
Step 2: Edit the Video
Tap Music from the bottom of the screen to add background music to the video. The music that you can use in your short videos must be either created by you, or you should have permission to use them. However, the audio files that the Music library contains is made available by Google, is royalty-free, and can be used throughout the platform.
Likewise, you can tap Text to add captions as well. As for the text type, the app offers various formatting options such as alignment (left, center, and right), text highlighter, font changer, and even color selector. Further, the Speed and Timer icons at the top-right area allow you to manage the playback speed anywhere between 0.3x to 3x, and automatically stop the recording after the set time limit respectively. Once everything is set up, tap NEXT from the top-right corner to proceed to the next step.
Step 3: Pick Target Audience Type
On the Add details window, tap Select audience, and on the Select audience window, tap to select the appropriate radio button to define whether the video is suitable for kids. Tap the Back button once the target audience is selected.
Step 4: Add Details and Upload the Video
Enter a title for the video in the Title field. Make sure to include #shorts to help YouTube understand that you are preparing a YouTube Shorts video. Next, tap UPLOAD from the upper-right corner of the screen to submit the video for review. Once YouTube reviews the recording and finds it appropriate, it will be published on the portal, and will be visible throughout and even under the Shorts category of the main page.
Part 3: How to Create a Vertical YouTube Shorts Video in Filmora?
The YouTube Shorts app is pretty convenient to access and use alright. However, it doesn’t allow you to fine edit the videos. The app doesn’t even have many filtering options such as Effects, Elements, etc. to make your videos more engaging.
With that said, you can always use an efficient third-party program like Wondershare Filmora to create professionally-looking YouTube Shorts videos to attract your viewers.
When talking about Wondershare Filmora, it is a production and post-production app available for both Windows and Mac computers, and gives tough competition to some of the globally accepted similar programs like Adobe Premiere Pro, Final Cut Pro X, etc. Furthermore, Filmora has its own built-in screen, webcam, and voice recording features that can be used to prepare interactive videos, game walkthroughs, and voiceovers as needed.
For Win 7 or later (64-bit)
Secure Download
For macOS 10.12 or later
Secure Download
The following step-by-step guide teaches you how to use Wondershare Filmora to create a vertical YouTube Shorts video:
Note: Before proceeding to the instructions, make sure that you have already recorded a vertical video using your cellphone, and that it has been transferred to your PC.
Step 1: Add the Video to Timeline
Launch Wondershare Filmora on your Windows or Mac PC (a Windows 10 computer is used here for demonstration), go to File > New Project, and click 9:16 (Portrait). Click anywhere inside the Media box, and select and import the source vertical video from your PC to Filmora.
Next, hover the mouse over the clip in the Media box, click the + button that appears at the bottom-right corner of the thumbnail, and in the resolution confirmation box that comes up next, click the button under the Match to Media section to add the video in the correct orientation to the Timeline at the bottom.
Step 2: Edit the Video
Select the clip in the Timeline, and use the Split, Crop, Speed, etc. buttons above the Timeline itself to remove the unwanted portions from the clip, manage its playback speed, and do other fine-tuning tasks.
You can even click the Edit button, and use the available editing features like Motion Tracking and Stabilization to add text or objects to a moving body in the video and stabilize the clip if the camera shook during the recording session respectively. Click OK to save the changes when done.
Note: To be able to remain compliant with the YouTube Shorts policies, make sure that the video length is no longer than 60 seconds.
Step 3: Beautify the Video
Click Titles from the standard toolbox at the top, choose your preferred text category from the list in the left, hover the mouse over a decent preset in the right window, and click the + button at the bottom-right corner of the thumbnail to add the preset on top of the media track in the Timeline. Next, you can double-click the preset track in the Timeline to modify the text and make granular modifications to it as needed. Click OK to save the changes.
Similarly, you can select the Effects and Elements tools to add effects and elements to the video as needed. To add background music, you can go to the Audio tool, and pick your preferred preset from the available options. A custom music can be added by going to the Media tool, and importing an audio file from your PC using the method explained in Step 1.
After this, optionally, you can go to Split Screen from the standard toolbar at the top, and use your preferred Split Screen preset to club multiple video clips into one screen. In Filmora, you can add as many as 6 screens in a video.
For Win 7 or later (64-bit)
Secure Download
For macOS 10.12 or later
Secure Download
Step 4: Render the Final Output
Once everything is set up, click EXPORT from the top of the window, go to the Local tab on the Export window, select MP4 from the formats list in the left, give a name and configure other settings from the available options in the right, and click EXPORT from the bottom-right corner to create a YouTube Shorts video. Once the clip is generated, you can upload the video to YouTube using #Shorts in the title or description to publish the video under the YouTube Shorts section.
FAQs About YouTube Shorts
- Where to download the YouTube Shorts app?
The YouTube Shorts app is already present in the YouTube app that your Android or iOS smartphone has. All you need to do to access it is, sign in to your Google account, tap the + button at the bottom, and tap Create a Short in the popup box that comes up.
- What if YouTube Shorts is not showing on my YouTube app?
Make sure that your YouTube app is updated to its latest version. If the app is already updated, and YouTube Shorts is still unavailable, the chances are that Google hasn’t rolled the app in your region. Since YouTube Shorts is still in its Beta phase, only the region of India can use all the functions of the app at the time of this writing. In such a case, you are suggested to wait until the YouTube Shorts app is made available for your location.
- What’s the YouTube Shorts video duration?
A YouTube Shorts video can be of only up to 60 seconds.
- What’s the YouTube Shorts size limitation?
YouTube hasn’t provided any information related to this as of now. However, you can rest assure that a 60 seconds long video file wouldn’t be too large for YouTube to handle.
- How many subs do you need to access Shorts?
YouTube Shorts is available for everyone regardless of the number of subscribers the channel has.
- Can you make money on Shorts?
Unfortunately, NO. Although you cannot monetize the recordings published as YouTube Shorts, they can be a good source to drive subscribers to your main YouTube channel that may have the videos that can be monetized.
Richard Bennett
Richard Bennett is a writer and a lover of all things video.
Follow @Richard Bennett
Also read:
- 2024 Approved Amplifying Audio and Visual Quality in Your YouTube Videos
- Maximizing Monetization Unlocking Partnerships Without Limits
- Proven PC Strategies Elevating Video Quality and Engagement on YouTube
- [Updated] Enrich Your Viewing Experience with These Leading Top 6 Tools to Download YouTubes' Short Videos
- [Updated] Elite Alternative Edits Skip Youtube, Not Just Content
- Dimensions for YTB Shorts, Ins, Fb and Other Apps
- 2024 Approved Audio Extraction Made Easy YouTube Music on Your Mac
- 2024 Approved Create, Captivate Independent Animation Innovations
- [New] Break It Down Streamlining Video Length with Efficient Chapter Breaks on YouTube
- 2024 Approved Enhance Visibility, Amplify Impact (Video SEO)
- Beyond Tube The Premier Spots for Online Video Sharing
- [Updated] Boosting Your Content Visibility with YouTube's Spotlight Channels
- How To Create an Awesome Valorant Thumbnail for YouTube Videos
- [Updated] Charting Success with These Top 15 YouTube Introduction Techniques
- How to Design YouTube Introductory Videos Two Pathways
- In 2024, Enhancing Video Visibility with Strategic YouTube Links
- [New] How to Blur the Background in Teams Meeting? [Desktop & Mobile]
- [Updated] 2024 Approved Boost Your Brand with Snapchat's Business Features
- Android Unlock Code Sim Unlock Your Google Pixel 8 Phone and Remove Locked Screen
- Updated 8 Top Motion Graphics Online Tools for Your Inspiration for 2024
- 2024 Approved Update Expert Picks for the Top 2D Animation Software
- In 2024, How Do You Get Sun Stone Evolutions in Pokémon For Vivo V30? | Dr.fone
- How To Track IMEI Number Of Samsung Galaxy XCover 6 Pro Tactical Edition Through Google Earth?
- [Updated] In 2024, Overcome TikTok Issues with These Simple Fixes (Android & iPhone)
- Updated In 2024, Get the Perfect Fit Twitter Video Aspect Ratio and Dimensions
- [Updated] Spotting the Top 10 Covert Instagram Story Spectators
- Title: In 2024, Best Livestream Capturing Gear for Online Content Makers
- Author: Steven
- Created at : 2024-05-25 19:32:11
- Updated at : 2024-05-26 19:32:11
- Link: https://youtube-clips.techidaily.com/in-2024-best-livestream-capturing-gear-for-online-content-makers/
- License: This work is licensed under CC BY-NC-SA 4.0.
