
:max_bytes(150000):strip_icc()/apple-tv-4k-8ff89d451bf44fea81d11459802846c5.jpg)
In 2024, Best Camera Lenses for YouTube
Top HD Lenses for YouTube Creators
Best Camera Lenses for YouTube

Richard Bennett
Mar 27, 2024• Proven solutions
A DSLR is the ideal camera for some vlogs, and using a DSLR means you get to customize the look of your vlog by choosing the perfect lens. Choosing the best camera lens for your YouTube channel can be tricky because there are so many options. This article will walk you through some of them, and make two recommendations of great vlogging lenses. If you already have a good understanding of how camera lenses work then feel free to scroll down to the lens recs.
Part 1. Understanding Lenses: Zoom lens, Fixed lens, aperture, f-stop
There are two main categories of camera lenses: ‘zoom’ – lenses that allow you to zoom in and out – and ‘fixed’. If your lenses are tools then zoom lenses are Swiss army knives; they are very versatile. Fixed lenses, also called prime lenses, have more specific purposes. Do you need a tool that can do a lot of things, or a tool that is perfect for one specific job? Sometimes it is useful to have access to both.
We have explained the differences between Fixed lens and Zoom lens and advantages of using each lens, check this article: Zoom Lens vs. Fixed Lenses: Which one is best for YouTuber? for the detailed information.
Before we get into the recommendations here is a little background information on lenses in general:
Beginner’s Guide to Aperture and F-Stops
In order to be able to select the lens you’ll be using to record your YouTube videos, you first need to understand a few very basic concepts, such as aperture or f-stops.
1.What is a lens’s aperture?
The aperture of your lens is the hole through which light reaches your camera’s sensor, or the film if you are using a film camera. The wider your aperture is the more light you are letting into your camera. In low light it is better to have a wide aperture, and when you are working with a lot of light it is better to have a narrow aperture so your footage is not overexposed.
Aperture is simply an opening in the lens that lets the light through. If you want to increase the amount of the light that is reaching the camera’s sensor you need to open up the aperture blades that are located in the lens. The f-values like f/1.2 or f/1.8 indicate that the aperture is wide open and that the camera is receiving the maximum amount of light a lens you’re using can provide.
2.What is an ‘f-stop’?
Light passes through your lens’s aperture on its way to your camera’s sensor, and the f-stop of your lens relates to the amount of light it lets in. The lower your f-stop, the wider your aperture, and the more light you are letting into your camera. The more light you let into your camera the easier it is to achieve a blurred background. A lot of vloggers love blurring their backgrounds because it is a quick way to disguising the rooms they are shooting in.
F-stops are written like ‘f/1.8’ or ‘f/4’ on your lens. For more information on f-stops and blurring your background read “The Best Bokeh Lens - How to Get the Blurred Background for YouTube Videos” and watch Tasha’s video.
F-stops or f-numbers indicate how open the aperture is, so for example if your camera is displaying f/32 value it means that your camera is letting very little light to get through to the camera’s sensor. The f-number depends on a few other parameters such as shutter speed, exposure or ISO values. Large apertures provide a shallow depth of field which creates a smooth and artistic background blur, while a small aperture enables you to keep both the background and the foreground of your shot in focus.
Part 2: Types of Camera Lenses
The visual aspect of a video may not be the only thing you’ll have to dedicate special attention to while recording your YouTube video, but it is surely one of the most important factors of the video production process. A lens you are using will largely contribute to the aesthetics of the video. That’s why you need to know which type of lens will deliver the best results when shooting different types of scenes. Here are some of the most common types of lenses you’ll encounter.
Standard lenses
These lenses are featured in almost all camera kits, so the chances are that if you have a DSLR camera you already have a standard, mid-range lens. These lenses commonly have a fixed 50mm focal length, although zoom lenses with focal lengths in the range between 35mm and 75mm are also considered standard. You can use them to capture medium shots, single or multiple figure shots, and in some cases establishing shots, because they offer enough versatility to cover a multitude of different scenes. Standard lenses often have large apertures, which makes them quite useful if you often shoot videos under light conditions you can’t control.
Macro lenses
Details, product shots or any other subject that can be filmed from close proximity looks better if they are recorded with macro lenses. The high contrast and sharpness these lenses provide allow you to create stunning close-ups of all hosts, guests or actors in your YouTube videos. What’s more, if you are presenting a new product to your audience you can use the macro lens to make some captivating shots that will attract more audience. Zoom lenses can also be used for macro photography and video, although prime macro lenses produce better results.
Telephoto lenses
The subjects of your videos don’t always have to be in your immediate surroundings, because telephoto lenses let you capture scenes that are several miles away from you. Wildlife or sports videographers frequently use telephoto lenses because they don’t have another way of getting close to their subjects. However, telephoto lenses with 70-300mm focal length can also be used to take stunning portraits or close up shots. The biggest downside of telephoto lenses is their weight because the lenses with higher focal lengths can weigh up to 10lbs, which makes them a bit inconvenient to always carry with you.
Wide-angle lenses
Recording videos of vast open spaces, breathtaking vistas or beautiful city views is much easier if you have a wide-angle lens. The short focal length allows the lens to have a wider field of view which covers more space than standard or telephoto lenses. Wide-angle lenses also have lower apertures than lenses with longer focal lengths which results in images that have a shallow depth of field. Ultra-wide lenses like fisheye distort the view so the videos recorded with these lenses often suffer from the lack of realism.
Specialist lenses
YouTubers who are working on demanding projects can try to solve their troubles by using a specialist lens. Soft-focus lenses can help you take better portraits while tilt-shift lenses allow you to control the perspective. However, it is hard to imagine a scenario in which you’ll need a specialist lense if you are just starting out since even experienced videographers only use special lenses when they have absolutely no better way to record a scene.
Part 3: Recommended Best Camera Lenses for Shooting YouTube Videos
Here are a couple great lenses that might be good fits for you and your YouTube channel. The thing that makes them both ideal for vlogging is that they have low enough f-stops to blur out your background.
| Camera Lens | Type | Price | Aperture | Focal Length |
|---|---|---|---|---|
| Canon EF-S 10-18mm f/4.5-5.6 IS STM Lens | Wide angle | $279 | f/4.5-5.6 | 10 -18mm |
| Rokinon 8mm f/3.5 | Fisheye | $249 | f/3.5 | 8mm |
| Canon 50mm f/1.8 STM Lens | Prime | $125 | f/1.8 | 50mm |
| Canon EF 135mm f/2L USM Lens | Telephoto | $999 | f/2 | 135mm |
| Tamron SP AF 17-50mm f/2.8 | Standard Zoom | $299 | f/2.8 | 17 -50mm |
| Sony 30mm f/3.5 Macro | Macro | $278 | f/3.5 | 30mm |
1.Canon EF-S 10-18mm f/4.5-5.6 IS STM Lens
Canon released this lens in 2014 and shortly after it has gained the reputation of one of the most reliable wide to ultra-wide lenses for Canon cameras. Like most STM lenses, it offers incredibly fast autofocus technology that makes it a great choice for fast-paced action videos. The lens is equipped with an image stabilization system which guarantees that your videos are going to remain sharp even if the camera wasn’t perfectly still while you were recording. Somewhat smaller aperture range makes this lens poor choice for low light scenes, although you can get decent results if you manage to keep the camera still.
2. Rokinon 8mm Ultra Wide f/3.5 Fisheye Lens
Outdoor videos look much cooler when they are recorded with a wide-angle lens because the wider field of view enables you to capture more space in a shot. Fisheye lenses were made popular by GoPro cameras because they make the videos look more fun while producing high image quality. Rokinon 8mm lens allows you to adjust focus and aperture manually so you can fine-tune your shot before hitting the record button. To make things even better this model is compatible with a wide range of cameras including Pentax, Canon or Nikon DSLRs. It has a relatively fast aperture that enables it to deliver solid performances under low light conditions.
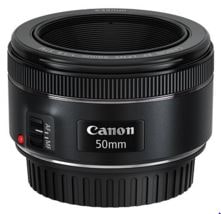
3.Canon EF 50mm f/1.8 STM Lens
The EF 50mm is a fixed lens with an f-stop of 1.8, which means it is great for blurring your background and performs well even in poorer lighting conditions. This is a really great lens for an opinion or beauty vlog, where you do not need to move around. You can stay put right where the focus is sharpest and stand out by blurring everything behind you. If you tend to reuse the same sets then you do not really need a zoom feature. If your shooting conditions rarely change then it is just as easy to use a reliable fixed lens like the EF 50mm since you will not need to be rethinking your set up and adjusting.
If you are looking for an inexpensive prime lens that lets you create sharp videos with shallow depth of field, you should look no further. This model is one of three Canon’s 50mm prime lenses, although the 50mm f/1.4 USM and 50mm f/1.2 ‘L’ USM models are much more expensive. You can use it to record a lot of different types of YouTube videos, like product reviews or makeup tutorials. The 50 mm f/1.8 STM lens doesn’t have image stabilization technology so you should try to be as still as you can possibly be when shooting handheld videos in order to avoid recording footage that has a lot of camera shakes.
4.Canon EF 135mm f/2L USM Lens
Recording moving objects from a distance requires you to have a lens that allows you to smoothly track their movements while keeping the subject in focus. The Canon EF 135mm f2/L USM lens is perhaps one of the best telephoto lenses on the market because it uses L glass that is widely accepted as the best in the industry. The Canon’s telephoto lens is compatible with ASP-C and Full Frame EF mount cameras. Keep in mind that this is also a prime lens and you can’t increase or decrease its focal length, but even so, it is a perfect choice for documentary-style videos.
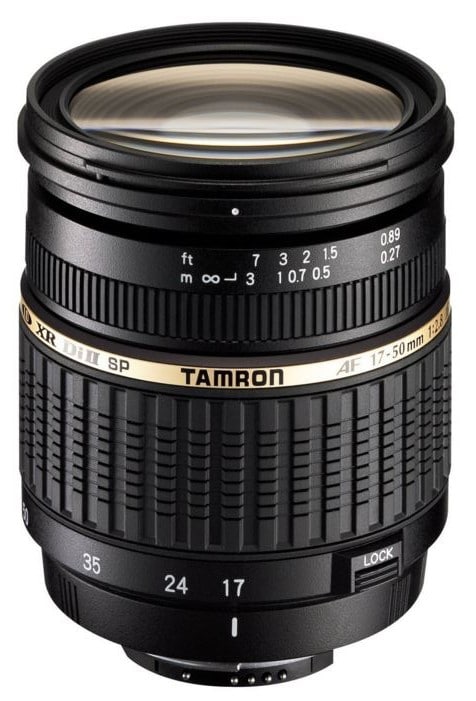
5.Tamron SP AF 17-50mm f/2.8 XR Di II LD Aspherical (IF) Lens
The Tamron’s standard zoom lens offers good value at a very reasonable price. The maximum aperture is f/2.8, while the minimum aperture value this lens supports is f/32, which means that its users can easily experiment with different depths of field. The lens is compatible with most Canon cameras so if you have a camera from another manufacturer you may have to use the lens adapter in order to mount it onto your camera. Like most standard zoom lenses, Tamron SP AF model is highly versatile and you can use it to record a wide range of different scenes.
A lot of zoom lenses do not have wide enough apertures to create blurred backgrounds, but this Tamron lens is an exception at f/2.8. This low f-stop also means that it performs better in poor lighting conditions than a lot of other zoom lenses. If your shooting conditions change a lot – if you often change locations, for example – then it will be good to have a sturdy, well-built, zoom lens like the AF 17-mm that can be quickly adapted to new angles and distances.
6.Sony 30mm f/3.5 Macro
All Sony’s APS-C format E mount cameras are compatible with this multi-purpose lens. When mounted the 30mm lens provides a 45mm focal length equivalent, which means that you can use it to take macro shots of products or to record medium or close-up shots. This is a prime lens, so changing the focal length isn’t really an option, but the 1:1 life-size magnification, as well as the 0.9-inch working distance, allow you to get close to the subjects in the video. The aperture range is between f/3.5 and f/22 which means that you can choose how shallow the depth of field in your shot should be.
If you are using a 4k camera to shoot your YouTube video, check out best camera lens for 4k professional production.
Richard Bennett
Richard Bennett is a writer and a lover of all things video.
Follow @Richard Bennett
Richard Bennett
Mar 27, 2024• Proven solutions
A DSLR is the ideal camera for some vlogs, and using a DSLR means you get to customize the look of your vlog by choosing the perfect lens. Choosing the best camera lens for your YouTube channel can be tricky because there are so many options. This article will walk you through some of them, and make two recommendations of great vlogging lenses. If you already have a good understanding of how camera lenses work then feel free to scroll down to the lens recs.
Part 1. Understanding Lenses: Zoom lens, Fixed lens, aperture, f-stop
There are two main categories of camera lenses: ‘zoom’ – lenses that allow you to zoom in and out – and ‘fixed’. If your lenses are tools then zoom lenses are Swiss army knives; they are very versatile. Fixed lenses, also called prime lenses, have more specific purposes. Do you need a tool that can do a lot of things, or a tool that is perfect for one specific job? Sometimes it is useful to have access to both.
We have explained the differences between Fixed lens and Zoom lens and advantages of using each lens, check this article: Zoom Lens vs. Fixed Lenses: Which one is best for YouTuber? for the detailed information.
Before we get into the recommendations here is a little background information on lenses in general:
Beginner’s Guide to Aperture and F-Stops
In order to be able to select the lens you’ll be using to record your YouTube videos, you first need to understand a few very basic concepts, such as aperture or f-stops.
1.What is a lens’s aperture?
The aperture of your lens is the hole through which light reaches your camera’s sensor, or the film if you are using a film camera. The wider your aperture is the more light you are letting into your camera. In low light it is better to have a wide aperture, and when you are working with a lot of light it is better to have a narrow aperture so your footage is not overexposed.
Aperture is simply an opening in the lens that lets the light through. If you want to increase the amount of the light that is reaching the camera’s sensor you need to open up the aperture blades that are located in the lens. The f-values like f/1.2 or f/1.8 indicate that the aperture is wide open and that the camera is receiving the maximum amount of light a lens you’re using can provide.
2.What is an ‘f-stop’?
Light passes through your lens’s aperture on its way to your camera’s sensor, and the f-stop of your lens relates to the amount of light it lets in. The lower your f-stop, the wider your aperture, and the more light you are letting into your camera. The more light you let into your camera the easier it is to achieve a blurred background. A lot of vloggers love blurring their backgrounds because it is a quick way to disguising the rooms they are shooting in.
F-stops are written like ‘f/1.8’ or ‘f/4’ on your lens. For more information on f-stops and blurring your background read “The Best Bokeh Lens - How to Get the Blurred Background for YouTube Videos” and watch Tasha’s video.
F-stops or f-numbers indicate how open the aperture is, so for example if your camera is displaying f/32 value it means that your camera is letting very little light to get through to the camera’s sensor. The f-number depends on a few other parameters such as shutter speed, exposure or ISO values. Large apertures provide a shallow depth of field which creates a smooth and artistic background blur, while a small aperture enables you to keep both the background and the foreground of your shot in focus.
Part 2: Types of Camera Lenses
The visual aspect of a video may not be the only thing you’ll have to dedicate special attention to while recording your YouTube video, but it is surely one of the most important factors of the video production process. A lens you are using will largely contribute to the aesthetics of the video. That’s why you need to know which type of lens will deliver the best results when shooting different types of scenes. Here are some of the most common types of lenses you’ll encounter.
Standard lenses
These lenses are featured in almost all camera kits, so the chances are that if you have a DSLR camera you already have a standard, mid-range lens. These lenses commonly have a fixed 50mm focal length, although zoom lenses with focal lengths in the range between 35mm and 75mm are also considered standard. You can use them to capture medium shots, single or multiple figure shots, and in some cases establishing shots, because they offer enough versatility to cover a multitude of different scenes. Standard lenses often have large apertures, which makes them quite useful if you often shoot videos under light conditions you can’t control.
Macro lenses
Details, product shots or any other subject that can be filmed from close proximity looks better if they are recorded with macro lenses. The high contrast and sharpness these lenses provide allow you to create stunning close-ups of all hosts, guests or actors in your YouTube videos. What’s more, if you are presenting a new product to your audience you can use the macro lens to make some captivating shots that will attract more audience. Zoom lenses can also be used for macro photography and video, although prime macro lenses produce better results.
Telephoto lenses
The subjects of your videos don’t always have to be in your immediate surroundings, because telephoto lenses let you capture scenes that are several miles away from you. Wildlife or sports videographers frequently use telephoto lenses because they don’t have another way of getting close to their subjects. However, telephoto lenses with 70-300mm focal length can also be used to take stunning portraits or close up shots. The biggest downside of telephoto lenses is their weight because the lenses with higher focal lengths can weigh up to 10lbs, which makes them a bit inconvenient to always carry with you.
Wide-angle lenses
Recording videos of vast open spaces, breathtaking vistas or beautiful city views is much easier if you have a wide-angle lens. The short focal length allows the lens to have a wider field of view which covers more space than standard or telephoto lenses. Wide-angle lenses also have lower apertures than lenses with longer focal lengths which results in images that have a shallow depth of field. Ultra-wide lenses like fisheye distort the view so the videos recorded with these lenses often suffer from the lack of realism.
Specialist lenses
YouTubers who are working on demanding projects can try to solve their troubles by using a specialist lens. Soft-focus lenses can help you take better portraits while tilt-shift lenses allow you to control the perspective. However, it is hard to imagine a scenario in which you’ll need a specialist lense if you are just starting out since even experienced videographers only use special lenses when they have absolutely no better way to record a scene.
Part 3: Recommended Best Camera Lenses for Shooting YouTube Videos
Here are a couple great lenses that might be good fits for you and your YouTube channel. The thing that makes them both ideal for vlogging is that they have low enough f-stops to blur out your background.
| Camera Lens | Type | Price | Aperture | Focal Length |
|---|---|---|---|---|
| Canon EF-S 10-18mm f/4.5-5.6 IS STM Lens | Wide angle | $279 | f/4.5-5.6 | 10 -18mm |
| Rokinon 8mm f/3.5 | Fisheye | $249 | f/3.5 | 8mm |
| Canon 50mm f/1.8 STM Lens | Prime | $125 | f/1.8 | 50mm |
| Canon EF 135mm f/2L USM Lens | Telephoto | $999 | f/2 | 135mm |
| Tamron SP AF 17-50mm f/2.8 | Standard Zoom | $299 | f/2.8 | 17 -50mm |
| Sony 30mm f/3.5 Macro | Macro | $278 | f/3.5 | 30mm |
1.Canon EF-S 10-18mm f/4.5-5.6 IS STM Lens
Canon released this lens in 2014 and shortly after it has gained the reputation of one of the most reliable wide to ultra-wide lenses for Canon cameras. Like most STM lenses, it offers incredibly fast autofocus technology that makes it a great choice for fast-paced action videos. The lens is equipped with an image stabilization system which guarantees that your videos are going to remain sharp even if the camera wasn’t perfectly still while you were recording. Somewhat smaller aperture range makes this lens poor choice for low light scenes, although you can get decent results if you manage to keep the camera still.
2. Rokinon 8mm Ultra Wide f/3.5 Fisheye Lens
Outdoor videos look much cooler when they are recorded with a wide-angle lens because the wider field of view enables you to capture more space in a shot. Fisheye lenses were made popular by GoPro cameras because they make the videos look more fun while producing high image quality. Rokinon 8mm lens allows you to adjust focus and aperture manually so you can fine-tune your shot before hitting the record button. To make things even better this model is compatible with a wide range of cameras including Pentax, Canon or Nikon DSLRs. It has a relatively fast aperture that enables it to deliver solid performances under low light conditions.
3.Canon EF 50mm f/1.8 STM Lens
The EF 50mm is a fixed lens with an f-stop of 1.8, which means it is great for blurring your background and performs well even in poorer lighting conditions. This is a really great lens for an opinion or beauty vlog, where you do not need to move around. You can stay put right where the focus is sharpest and stand out by blurring everything behind you. If you tend to reuse the same sets then you do not really need a zoom feature. If your shooting conditions rarely change then it is just as easy to use a reliable fixed lens like the EF 50mm since you will not need to be rethinking your set up and adjusting.
If you are looking for an inexpensive prime lens that lets you create sharp videos with shallow depth of field, you should look no further. This model is one of three Canon’s 50mm prime lenses, although the 50mm f/1.4 USM and 50mm f/1.2 ‘L’ USM models are much more expensive. You can use it to record a lot of different types of YouTube videos, like product reviews or makeup tutorials. The 50 mm f/1.8 STM lens doesn’t have image stabilization technology so you should try to be as still as you can possibly be when shooting handheld videos in order to avoid recording footage that has a lot of camera shakes.
4.Canon EF 135mm f/2L USM Lens
Recording moving objects from a distance requires you to have a lens that allows you to smoothly track their movements while keeping the subject in focus. The Canon EF 135mm f2/L USM lens is perhaps one of the best telephoto lenses on the market because it uses L glass that is widely accepted as the best in the industry. The Canon’s telephoto lens is compatible with ASP-C and Full Frame EF mount cameras. Keep in mind that this is also a prime lens and you can’t increase or decrease its focal length, but even so, it is a perfect choice for documentary-style videos.
5.Tamron SP AF 17-50mm f/2.8 XR Di II LD Aspherical (IF) Lens
The Tamron’s standard zoom lens offers good value at a very reasonable price. The maximum aperture is f/2.8, while the minimum aperture value this lens supports is f/32, which means that its users can easily experiment with different depths of field. The lens is compatible with most Canon cameras so if you have a camera from another manufacturer you may have to use the lens adapter in order to mount it onto your camera. Like most standard zoom lenses, Tamron SP AF model is highly versatile and you can use it to record a wide range of different scenes.
A lot of zoom lenses do not have wide enough apertures to create blurred backgrounds, but this Tamron lens is an exception at f/2.8. This low f-stop also means that it performs better in poor lighting conditions than a lot of other zoom lenses. If your shooting conditions change a lot – if you often change locations, for example – then it will be good to have a sturdy, well-built, zoom lens like the AF 17-mm that can be quickly adapted to new angles and distances.
6.Sony 30mm f/3.5 Macro
All Sony’s APS-C format E mount cameras are compatible with this multi-purpose lens. When mounted the 30mm lens provides a 45mm focal length equivalent, which means that you can use it to take macro shots of products or to record medium or close-up shots. This is a prime lens, so changing the focal length isn’t really an option, but the 1:1 life-size magnification, as well as the 0.9-inch working distance, allow you to get close to the subjects in the video. The aperture range is between f/3.5 and f/22 which means that you can choose how shallow the depth of field in your shot should be.
If you are using a 4k camera to shoot your YouTube video, check out best camera lens for 4k professional production.
Richard Bennett
Richard Bennett is a writer and a lover of all things video.
Follow @Richard Bennett
Demystifying YouTube’s Video Editing Power
Do you want to convert video clips into intriguing movies? If yes, then you should download and install an advanced movie maker on your computer and creatively compile your video clips and photos. Movie Makers have multiple features such as transition overlays, timeline narration, audio options, and animations. This guide is about YouTube movie makers and how you can get started with this application.
What Is YouTube Movie Maker?
YouTube Movie Maker is a video editing program. It enables video editors to create videos for their YouTube channel. Furthermore, you can upload and manage your videos on YouTube using this software. You can perform all these tasks with a single interface. Creating videos using YouTube movie makers is entertaining as it includes interesting tools to express creative instinct. Furthermore, the moviemaker YouTube uploading process is also simpler than ever. Here are some features of YouTube movie maker:
1. Video Creation
YouTube movie maker is a simple-to-use video editing tool with wide-ranging features. You can add multiple images, video clips, audio, and icons and align them on the timeline. Beginners can use Movie Wizard to understand the platform interface and develop video editing skills.

3. Publishing
This tool has standard and special features. Using YouTube movie maker, you can upload videos on your YouTube channel and attract more audience with your content. This video editing tool makes it easy for YouTube content creators to publish their content on the platform. Furthermore, you can save the content on your computer and publish it later on.
3. Boost Productivity
Video editors such as YouTube movie maker improve productivity for video editors. With convenient features and tools, content creators can create more videos with efficiency and increase their content reach.
YouTube Movie Maker Tutorial
YouTube Movie Maker download process is simple. To download and install the application follow these steps:
Step 1: Visit MakeYouTubeVideo.com and choose the download option.
Step 2: This tool is compatible with every Windows version, so you don’t have to worry about compatibility.

Step 3: While downloading the application you need to evaluate the plans.
Step 4: The Platinum version of YouTube Movie Maker will cost $399. With this plan, you will get high-quality transition effects and audio materials.
Step 5: After choosing the plan, you have to enter the payment options and download the tool.
Step 6: A setup file will download to your computer.
Step 7: You need to open that file and run the installation process.
Here are some tips to use YouTube Movie Maker:
Step 1: When you open the application a clear interface will appear with easy-to-use options.

Step 2: From the left panel, you can browse through your computer storage and import content
Step 3: Also, you can drag and drop the media on your workspace.

Step 4: Align the content on different channels and add music.
Step 5: Once you align the content as required, you can publish the video on YouTube from the button on the bottom right.
4 Best Alternatives for YouTube Movie Maker
A plethora of video editing tools are available on the internet. Whether you are a marketing manager or a film producer, you would need a movie marker to boost your productivity and become a professional video content creator. If you want an alternate option for YouTube movie maker, you can check this list:
1. Wondershare Filmora
Filmora is one of the best video editing tools out there. Other than Filmora, Wondershare also offers Filmora (a video editing tool for mobile), and FilmStock with wide-ranging video effects and unique soundtracks. Filmora offers a simple and intuitive interface with lots of exciting overlays, filters, transitions, and motion elements. Since Filmora has a dedicated films tock, users can easily download royalty-free music and video clips. Some basic features of Filmora are:
- Noise removal
- Speed control
- GIF support
- 4K editing support
- Frame by frame preview
- Color tuning

For Win 7 or later (64-bit)
For macOS 10.12 or later
Only a few video editing tools offer 4K and GIF support, and Filmora is one of them. Filmora enables video editors to include engaging titles on their videos. This video editor offers a super easy and flexible interface to video editors so they can drag and drop relevant clips, select interesting music, and choose a striking theme.
The interface is clean, uncluttered, and organized with easy-to-access features. It includes basic as well as advanced features to enhance video quality and add outstanding effects. There are vast numbers of effects and transitions to make your video smooth and engaging. Color matching and motion tracker tools will completely change your video quality.
2. Nero Video
Nero Video is a cheap yet effective tool for YouTubers. This tool comes with a wide array of effects and tricks to create outstanding content. This tool is perfect for beginners because of its simple editing tools. Nero Video offers the finest functionalities and speed to video editors so they can create more engaging content and publish it on their YouTube channel. Some features of Nero Video are:
- Keyframe animation tools
- Movie templates
- Wide range of templates
- 4K support

4. InVideo
InVideo is different than other platforms as content creators can create interesting videos on the cloud using this tool. This means that you don’t have to download InVideo software. Instead, you can just log into your account and start editing. Furthermore, the tool is stocked with many frames, stickers, features, tricks, and transitions. This software is suitable for beginner as well as professional users. With more than 4000 templates, anyone can create a video on this platform. InVideo doesn’t irritate its users with a watermark, even if you are using the free version of this application. Here are some features of using the InVideo editing tool:
- No watermark
- More than 4000 templates
- More than 8Mn and iStock videos and images
- Intelligent frames
- Automate voice-overs
- Multiple layers
- Power transitions

5. Clipchamp Create
Clipchamp Create is a free video editing tool with wide-ranging transitional effects, and an export option without a watermark. Watermarks only appear when you use stock videos and images in your video. Premium and Business plans are available in this software that offer access to a vast stock library. Using stock library, you can download and add high-resolution images and videos to your project. The tool is incredibly handy as it offers you unique options webcam recorder, video converter, and video compressor. Clipchamp also offers the following features:
- Camera recorder
- Stock library
- Text to speech
- Brand kit
- Trimming videos

Closing Word
Now that you have notable information about the YouTube movie maker tool, you can easily download and install it on your computer. Many YouTube content creators find this application basic. If you want a more advanced tool, you can check the list of alternative movie makers and download the one that offers the best features.
3. Publishing
This tool has standard and special features. Using YouTube movie maker, you can upload videos on your YouTube channel and attract more audience with your content. This video editing tool makes it easy for YouTube content creators to publish their content on the platform. Furthermore, you can save the content on your computer and publish it later on.
3. Boost Productivity
Video editors such as YouTube movie maker improve productivity for video editors. With convenient features and tools, content creators can create more videos with efficiency and increase their content reach.
YouTube Movie Maker Tutorial
YouTube Movie Maker download process is simple. To download and install the application follow these steps:
Step 1: Visit MakeYouTubeVideo.com and choose the download option.
Step 2: This tool is compatible with every Windows version, so you don’t have to worry about compatibility.
Step 3: While downloading the application you need to evaluate the plans.
Step 4: The Platinum version of YouTube Movie Maker will cost $399. With this plan, you will get high-quality transition effects and audio materials.
Step 5: After choosing the plan, you have to enter the payment options and download the tool.
Step 6: A setup file will download to your computer.
Step 7: You need to open that file and run the installation process.
Here are some tips to use YouTube Movie Maker:
Step 1: When you open the application a clear interface will appear with easy-to-use options.
Step 2: From the left panel, you can browse through your computer storage and import content
Step 3: Also, you can drag and drop the media on your workspace.
Step 4: Align the content on different channels and add music.
Step 5: Once you align the content as required, you can publish the video on YouTube from the button on the bottom right.
4 Best Alternatives for YouTube Movie Maker
A plethora of video editing tools are available on the internet. Whether you are a marketing manager or a film producer, you would need a movie marker to boost your productivity and become a professional video content creator. If you want an alternate option for YouTube movie maker, you can check this list:
1. Wondershare Filmora
Filmora is one of the best video editing tools out there. Other than Filmora, Wondershare also offers Filmora (a video editing tool for mobile), and FilmStock with wide-ranging video effects and unique soundtracks. Filmora offers a simple and intuitive interface with lots of exciting overlays, filters, transitions, and motion elements. Since Filmora has a dedicated films tock, users can easily download royalty-free music and video clips. Some basic features of Filmora are:
- Noise removal
- Speed control
- GIF support
- 4K editing support
- Frame by frame preview
- Color tuning
For Win 7 or later (64-bit)
For macOS 10.12 or later
Only a few video editing tools offer 4K and GIF support, and Filmora is one of them. Filmora enables video editors to include engaging titles on their videos. This video editor offers a super easy and flexible interface to video editors so they can drag and drop relevant clips, select interesting music, and choose a striking theme.
The interface is clean, uncluttered, and organized with easy-to-access features. It includes basic as well as advanced features to enhance video quality and add outstanding effects. There are vast numbers of effects and transitions to make your video smooth and engaging. Color matching and motion tracker tools will completely change your video quality.
2. Nero Video
Nero Video is a cheap yet effective tool for YouTubers. This tool comes with a wide array of effects and tricks to create outstanding content. This tool is perfect for beginners because of its simple editing tools. Nero Video offers the finest functionalities and speed to video editors so they can create more engaging content and publish it on their YouTube channel. Some features of Nero Video are:
- Keyframe animation tools
- Movie templates
- Wide range of templates
- 4K support
4. InVideo
InVideo is different than other platforms as content creators can create interesting videos on the cloud using this tool. This means that you don’t have to download InVideo software. Instead, you can just log into your account and start editing. Furthermore, the tool is stocked with many frames, stickers, features, tricks, and transitions. This software is suitable for beginner as well as professional users. With more than 4000 templates, anyone can create a video on this platform. InVideo doesn’t irritate its users with a watermark, even if you are using the free version of this application. Here are some features of using the InVideo editing tool:
- No watermark
- More than 4000 templates
- More than 8Mn and iStock videos and images
- Intelligent frames
- Automate voice-overs
- Multiple layers
- Power transitions
5. Clipchamp Create
Clipchamp Create is a free video editing tool with wide-ranging transitional effects, and an export option without a watermark. Watermarks only appear when you use stock videos and images in your video. Premium and Business plans are available in this software that offer access to a vast stock library. Using stock library, you can download and add high-resolution images and videos to your project. The tool is incredibly handy as it offers you unique options webcam recorder, video converter, and video compressor. Clipchamp also offers the following features:
- Camera recorder
- Stock library
- Text to speech
- Brand kit
- Trimming videos
Closing Word
Now that you have notable information about the YouTube movie maker tool, you can easily download and install it on your computer. Many YouTube content creators find this application basic. If you want a more advanced tool, you can check the list of alternative movie makers and download the one that offers the best features.
Also read:
- [Updated] Cognitive Cornerstones Essential Educational Content YT
- [Updated] A Practical Approach to Creating Captivating YouTube Shorts Templates
- [Updated] Budget-Friendly Video Recorder Sets Top 11 Picks
- In 2024, Beginner's Bonanza Affordable, Profitable Channel Options
- Get Content Ready Faster With This List of Easy Editors
- Transforming Life Experiences Into Engaging YT Videos
- From Phone Ideas to Online Presence Simple YouTube Channel Creation Tips
- In 2024, Android & iOS The Best Sound Distortion Tools
- In 2024, Channeling Creativity Get Green Screen Tips From YouTube
- In 2024, Creative Channel Titling Techniques for Growth
- 2024 Approved Behind the Screen A Strategic Approach for Secret YouTube Videos
- Navigating the Chart-Toppers' Playbook
- [Updated] Boost Your Channel Top 14 Gaming Vids for YouTube Success
- [Updated] Channel Conversion Secrets YT Vs IGTV
- [New] Apple's Mobile Posting Playbook for YouTube Success
- Starter Mic Solutions for YouTube Starters
- [New] Building Your First Channel Essential Video Gear List
- YouTube Taping Permissibility Concerns
- Diving Deep Into Youtube Launching and Earning Your Way
- 2024 Approved Amplifying Impact YouTube Visibility Techniques
- 2024 Approved Boost Engagement on YouTube by Adding Emojis
- [New] 5 Amazing Free YouTube Intro Makers Ranked
- Perfecting Your YouTube Video Blueprint
- Hit the Floor with Optimal Posting Hours
- In 2024, Delving Into Past Our Top 10 Picks of History Channels Online
- [Updated] Curbing Common Mishaps YouTube Short Edition
- [Updated] DIY YouTube Trailer Production via Filmora Software
- 2024 Approved Elevating Video Revenue YouTube's Path
- Essential Guide to Writing Click-Worthy Youtube Titles for 2024
- [New] Efface Thin Borders for a Seamless YouTube Experience
- Ultimate Mic for Digital Content Makers
- Amplifying Your YouTube Presence Through Consistent Content Release for 2024
- In 2024, Balancing Acts The Power of Alternate Perspectives in Crafting Engaging Reaction Videos on YouTube (2 POV Method)
- [New] Crafting Standout YouTube Thumbnails with Ease
- In 2024, Boost Your Video's Impact with GS and YT Conversion
- Professional Footage with Top-Tier Stabilizers
- The Benefits of TubeBuddy | Manage Your YouTube Channel
- Diverse Vlogging Content Suggestions for 2024
- Digital Dome Streamlining Your Song Posts on YouTube for 2024
- [Updated] Best Practices for Designing an Engaging YouTube Teaser
- [Updated] 2024 Approved Mastering Conversations and Sharing in Facebook World
- [Updated] Slicing Sequences Smoothly Effective Ways to Trim Vimeo Video Lengths
- New 2024 Approved 5 Must Try Ways to Add and Send GIF in Text Message on Android
- New 2024 Approved Steps to Create Gold Text Effects After Effects
- New Start Here Beginner-Friendly Video Editing Tools for 2024
- [Updated] Unleash Productivity Learn to Screen Record on Mac Using Just Keys
- In 2024, 6 Proven Ways to Unlock Vivo X90S Phone When You Forget the Password
- 2024 Approved Maximize Views Sharing Your Twitch Stream on FB
- How To Use Allshare Cast To Turn On Screen Mirroring On Vivo X100 Pro | Dr.fone
- Capturing the World in Full Circle - Expert's 360 Cams Review, 2023
- How Can I Catch the Regional Pokémon without Traveling On Realme Narzo 60x 5G | Dr.fone
- [New] In 2024, The Ultimate Choice Quick, Accurate Screen Reports
- [Updated] 2024 Approved Swiftly Switch From Video to Vivid GIFs with TikTok Tools
- [New] Best Practices for RL Video Editing and Post-Processing
- In 2024, New Guide How To Check iCloud Activation Lock Status On Your Apple iPhone 12 mini
- Key Approaches to Microphone & Computer Speaker Documentation
- Navigating the Landscape of High-Quality Sound Editing - The TwistedWave Experience
- In 2024, Clearing the Air Understanding Digital Audio Workstations
- [New] Tweeting Tunes Converting Videos Into Melodic GIFs
- 2024 Approved Mac Users' Guide The 5 Most Acclaimed Sniping Apps
- How To Transfer Data From iPhone 6 To Android? | Dr.fone
- In 2024, Complete Tutorial to Use VPNa to Fake GPS Location On Honor X7b | Dr.fone
- QuickScreenCapture Mastery for Everyday Use for 2024
- In 2024, New Guide How To Check iCloud Activation Lock Status On Your iPhone SE (2020)
- [New] Audio Alchemy Made Accessible Discover Free Transformation Techniques for Sound
- Updated In 2024, From Fast to Slow Mastering Slow-Motion Video Creation on Kapwing
- [New] Integrating Facebook Livestream Into Your Roku Setup for 2024
- [Updated] Best Free Public Domain PUBG Screen Shots
- The Easiest Methods to Hard Reset Xiaomi 14 Pro | Dr.fone
- [New] Maximizing Reach Twitch Streams via Facebook
- Title: In 2024, Best Camera Lenses for YouTube
- Author: Steven
- Created at : 2024-05-25 19:32:06
- Updated at : 2024-05-26 19:32:06
- Link: https://youtube-clips.techidaily.com/in-2024-best-camera-lenses-for-youtube/
- License: This work is licensed under CC BY-NC-SA 4.0.
