"In 2024, Beginner's Guide Capturing YouTube Videos as Screencasts Without Payment"
Beginner’s Guide: Capturing YouTube Videos as Screencasts Without Payment
How To Record Screencast From YouTube For Free

Max Wales
Mar 27, 2024• Proven solutions
Screencasting is a simple task anyone can do it with ease. All that you need to do is download a software program, press the record button and soon all movements on your device screen video will be recorded. Crazy video gamers do the same thing to share their interesting game videos on YouTube channels.
There is a wide range of software tools that can assists you with screencasting needs. Even YouTube itself has the ability to capture device screens without the need for additional software tool. If you are interested to know how it can be done, simply go through the details below.
Note: We resolutely oppose all forms of copyright-infringing downloads. This tutorial is only for downloading YouTube videos/audio materials from your own channel.
![]()

The All-in-One Screen Recorder & Video Editor
- Record desktop screen, voiceover, and webcam simultaneously
- Edit recorded clips quickly with a wide range of professional tools
- Built-in plentiful templates and effects
- Export to MP4, MOV, MKV, GIF and multiple formats
For Win 7 or later (64-bit)
For macOS 10.12 or later
 Secure Download
Recording Screencast Video with YouTube
Step 1: Open YouTube on your computer and sign by using your Google Account. On the top left corner, you will find the Upload button, press it and go to live streaming section and choose events from the drop-down menu. When you are doing this for the very first time, YouTube will ask your phone number to verify the streaming process. You can also click here to get to the Livestreaming page directly.
Step 2: On the create an event page, add a title for your screencast video; set privacy terms and then hit “Go Live Now” option.

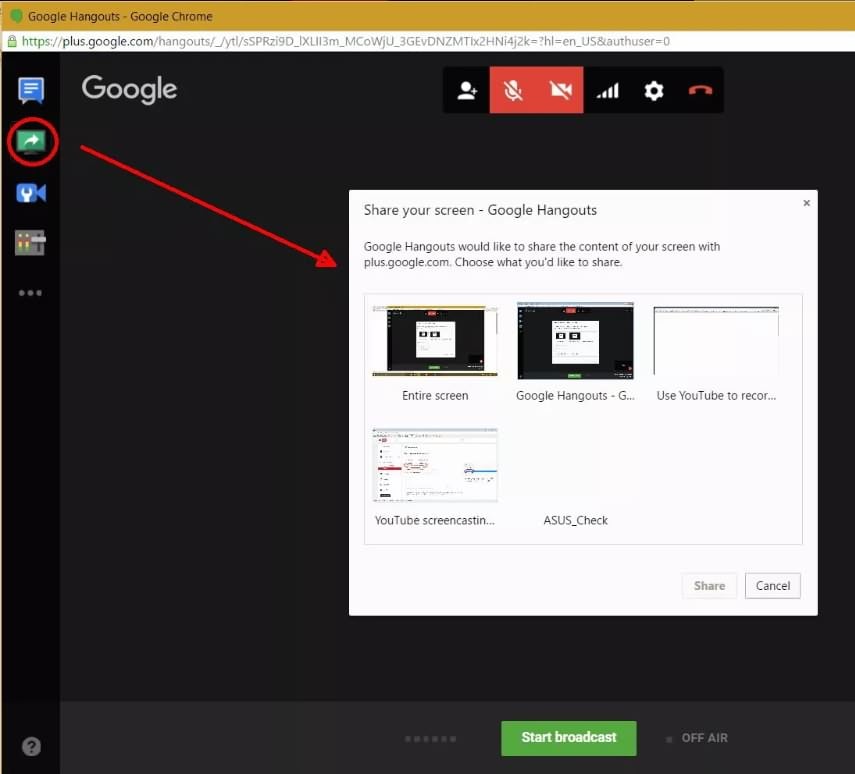
Step 3: The Hangout on Air page will get opened. It will allow you to select-deselect webcam recording as well as mic recording.
Step 4: Hit the screen share button from the left toolbox and choose the desktop window that you wish to record. Now press start the Broadcast button to start screen recording. Note that it is a private session that cannot be watched by anyone else.
Step 5: When your video is ready to go to YouTube video dashboard and choose your recent screencast video. Download it to Google Drive and share it with the world.
A better way to record Screencast and Upload to YouTube
For those who are interested in capturing screencast with high-quality videos and need an easy to use the built-in editor to customize these videos; it is good to look for some dedicated screencast tools. Experts recommend using Wondershare Filmora due to its advanced features and interactive software platform.


Top Features
- Filmora is one of the most interactive software tools that works perfectly on Windows and Mac platforms.
- It supports more than 50 media file formats.
- Filmora allows users to record with Webcam and PC simultaneously.
- It is possible to record audio from mic input and internal computer audio as well.
- With Filmora users can record high paced videos at 120fps.
- Add markers to important frames during recording.
There are so many benefits of using Filmora for YouTube screencast video recordings. The biggest trouble with YouTube based recording is that when you try it for the very first time, YouTube will take 24 hours to verify your account for the live streaming. But by using Filmora, you can do this task instantly at any hour of the day. Another great news is that Fillmore Scrn comes with a built-in video editor that allows users to customize videos with ease. Once your videos are ready, you can share them directly to social media platforms including YouTube, Facebook, Twitch, and Vimeo etc.
Let’s watch the video below to check how to record your screen with Filmora and upload the recorded video to YouTube.
Conclusion
With all impressive features, there is no doubt to say that Filmora can serve your screencasting needs in the best possible manner. Whether you are a crazy gamer interested to share your adventure videos with the world or want to create useful tutorials for your audience, Filmora is your best companion for all your needs.
Max Wales
Max Wales is a writer and a lover of all things video.
Follow @Max Wales
Max Wales
Mar 27, 2024• Proven solutions
Screencasting is a simple task anyone can do it with ease. All that you need to do is download a software program, press the record button and soon all movements on your device screen video will be recorded. Crazy video gamers do the same thing to share their interesting game videos on YouTube channels.
There is a wide range of software tools that can assists you with screencasting needs. Even YouTube itself has the ability to capture device screens without the need for additional software tool. If you are interested to know how it can be done, simply go through the details below.
Note: We resolutely oppose all forms of copyright-infringing downloads. This tutorial is only for downloading YouTube videos/audio materials from your own channel.
![]()
The All-in-One Screen Recorder & Video Editor
- Record desktop screen, voiceover, and webcam simultaneously
- Edit recorded clips quickly with a wide range of professional tools
- Built-in plentiful templates and effects
- Export to MP4, MOV, MKV, GIF and multiple formats
For Win 7 or later (64-bit)
For macOS 10.12 or later
Secure Download
Recording Screencast Video with YouTube
Step 1: Open YouTube on your computer and sign by using your Google Account. On the top left corner, you will find the Upload button, press it and go to live streaming section and choose events from the drop-down menu. When you are doing this for the very first time, YouTube will ask your phone number to verify the streaming process. You can also click here to get to the Livestreaming page directly.
Step 2: On the create an event page, add a title for your screencast video; set privacy terms and then hit “Go Live Now” option.
Step 3: The Hangout on Air page will get opened. It will allow you to select-deselect webcam recording as well as mic recording.
Step 4: Hit the screen share button from the left toolbox and choose the desktop window that you wish to record. Now press start the Broadcast button to start screen recording. Note that it is a private session that cannot be watched by anyone else.
Step 5: When your video is ready to go to YouTube video dashboard and choose your recent screencast video. Download it to Google Drive and share it with the world.
A better way to record Screencast and Upload to YouTube
For those who are interested in capturing screencast with high-quality videos and need an easy to use the built-in editor to customize these videos; it is good to look for some dedicated screencast tools. Experts recommend using Wondershare Filmora due to its advanced features and interactive software platform.
Top Features
- Filmora is one of the most interactive software tools that works perfectly on Windows and Mac platforms.
- It supports more than 50 media file formats.
- Filmora allows users to record with Webcam and PC simultaneously.
- It is possible to record audio from mic input and internal computer audio as well.
- With Filmora users can record high paced videos at 120fps.
- Add markers to important frames during recording.
There are so many benefits of using Filmora for YouTube screencast video recordings. The biggest trouble with YouTube based recording is that when you try it for the very first time, YouTube will take 24 hours to verify your account for the live streaming. But by using Filmora, you can do this task instantly at any hour of the day. Another great news is that Fillmore Scrn comes with a built-in video editor that allows users to customize videos with ease. Once your videos are ready, you can share them directly to social media platforms including YouTube, Facebook, Twitch, and Vimeo etc.
Let’s watch the video below to check how to record your screen with Filmora and upload the recorded video to YouTube.
Conclusion
With all impressive features, there is no doubt to say that Filmora can serve your screencasting needs in the best possible manner. Whether you are a crazy gamer interested to share your adventure videos with the world or want to create useful tutorials for your audience, Filmora is your best companion for all your needs.
Max Wales
Max Wales is a writer and a lover of all things video.
Follow @Max Wales
Enhancing YouTube Video Screens: Without Barriers
How to Remove Black Bars from YouTube Videos

Richard Bennett
Mar 27, 2024• Proven solutions
The black bars appear because the video uploaded by the users may include horizontal black bars at the bottom and top of the video player to fit an aspect ratio of 4:3. The YouTube video player has an aspect ratio of 16:9, so it adds vertical black bars to fit according to the dimension. And in this guide, we will help you get rid of this trouble and remove annoying black bars from YouTube videos.
- Part 1: Removing the black bars before uploading
- Part 2: Removing the black bars from uploaded YouTube videos
Remove the black bars before uploading
You can make use of the following software to remove the black bars from your videos.
1. Wondershare Filmora
Filmora supports a large format of videos hence one of the widely used. Follow these steps to remove the black bars:
- Import the video or drag and drop it in Wondershare Flimora.
- Select the video with black bars and right click on it.
- Click on “crop and zoom” which will open the crop window.
- Set your desired frameset (16:9, 4:3 or customized aspect ratio) and see your video in the preview pane.
- Save the new video without the black bars by clicking on “Export”.
Download Mac Version ](https://tools.techidaily.com/wondershare/filmora/download/ )
2. Sony Vegas Pro
One of the most popular and sought after video editing tool, Sony Vegas Pro can help removing the black bars very simply:
- Open the video.
- You will see the video in preview and a timeline beneath, right click on the video clip on the timeline.
- Click on properties, a new window will pop-up, click on disable resample and make sure that “maintain aspect ratio” is unchecked.
- Your video will be without the black bars. Save the video.
3. Windows Live Movie Maker
This inbuilt tool in Windows for video editing can be used to remove the black bars from your YouTube videos.
- Drop and drag the video to windows live movie maker.
- Select the video and you will see a couple of options to set aspect ratio.
- Click on the desired one and the black bars will be removed.
- You can save the video in different formats.
4. Final Cut Pro
Final Cut pro offers you a whole lot of video editing options that includes removal of black bars. Right aspect ratio ensures there are no unpleasant black bars on either side of the video. To get them removed with the help of Final Cut Pro:
- Import the video with black bars.
- Select the video and change its aspect ratio. (Either stretch it or crop it).
- Save the video after it has been corrected.
Removing the black bars from uploaded YouTube videos
It is very simple to remove black bars from existing YouTube videos or while uploading a video. Click on the Edit button next to the video, and add the most suited instruction in the Tag bar below:

yt:crop=16:9
This tag zooms in on the video because of which the contents at the borders (black bars in this case) do not appear anymore.
yt:stretch=16:9
This tag stretches the video in the aspect ratio of 16:9. It is used to view the video in wide-screen format.
yt:stretch=4:3
if your video is appearing in wide-screen format, but you want it to display in 720 x 480 pixels, apply this tag. It scales down the video 4:3 aspect.
Try any of the above software to remove black bars from existing YouTube videos or the new videos and make it pleasant to viewers.
Richard Bennett
Richard Bennett is a writer and a lover of all things video.
Follow @Richard Bennett
Richard Bennett
Mar 27, 2024• Proven solutions
The black bars appear because the video uploaded by the users may include horizontal black bars at the bottom and top of the video player to fit an aspect ratio of 4:3. The YouTube video player has an aspect ratio of 16:9, so it adds vertical black bars to fit according to the dimension. And in this guide, we will help you get rid of this trouble and remove annoying black bars from YouTube videos.
- Part 1: Removing the black bars before uploading
- Part 2: Removing the black bars from uploaded YouTube videos
Remove the black bars before uploading
You can make use of the following software to remove the black bars from your videos.
1. Wondershare Filmora
Filmora supports a large format of videos hence one of the widely used. Follow these steps to remove the black bars:
- Import the video or drag and drop it in Wondershare Flimora.
- Select the video with black bars and right click on it.
- Click on “crop and zoom” which will open the crop window.
- Set your desired frameset (16:9, 4:3 or customized aspect ratio) and see your video in the preview pane.
- Save the new video without the black bars by clicking on “Export”.
Download Mac Version ](https://tools.techidaily.com/wondershare/filmora/download/ )
2. Sony Vegas Pro
One of the most popular and sought after video editing tool, Sony Vegas Pro can help removing the black bars very simply:
- Open the video.
- You will see the video in preview and a timeline beneath, right click on the video clip on the timeline.
- Click on properties, a new window will pop-up, click on disable resample and make sure that “maintain aspect ratio” is unchecked.
- Your video will be without the black bars. Save the video.
3. Windows Live Movie Maker
This inbuilt tool in Windows for video editing can be used to remove the black bars from your YouTube videos.
- Drop and drag the video to windows live movie maker.
- Select the video and you will see a couple of options to set aspect ratio.
- Click on the desired one and the black bars will be removed.
- You can save the video in different formats.
4. Final Cut Pro
Final Cut pro offers you a whole lot of video editing options that includes removal of black bars. Right aspect ratio ensures there are no unpleasant black bars on either side of the video. To get them removed with the help of Final Cut Pro:
- Import the video with black bars.
- Select the video and change its aspect ratio. (Either stretch it or crop it).
- Save the video after it has been corrected.
Removing the black bars from uploaded YouTube videos
It is very simple to remove black bars from existing YouTube videos or while uploading a video. Click on the Edit button next to the video, and add the most suited instruction in the Tag bar below:
yt:crop=16:9
This tag zooms in on the video because of which the contents at the borders (black bars in this case) do not appear anymore.
yt:stretch=16:9
This tag stretches the video in the aspect ratio of 16:9. It is used to view the video in wide-screen format.
yt:stretch=4:3
if your video is appearing in wide-screen format, but you want it to display in 720 x 480 pixels, apply this tag. It scales down the video 4:3 aspect.
Try any of the above software to remove black bars from existing YouTube videos or the new videos and make it pleasant to viewers.
Richard Bennett
Richard Bennett is a writer and a lover of all things video.
Follow @Richard Bennett
Also read:
- [New] Pinnacle of Picture Perfection – #10 Screens for 2024
- [Updated] Engineering Engaging Media Excerpts
- 2024 Approved Minute Drama Framework Plan
- A Guide to Gathering Gold From Guided Goods' Gazes Online for 2024
- Download Educational Videos From CreativeLive as MP4 with Easy Converter
- Early-Stage YouTube Wisdom Sidestep These 8 Common Mistakes for 2024
- Essential Guide to Enhancing Video Content on Instagram for 2024
- Everyday Wisdom in Spanish: The Best 17 Sayings
- How To Choose Vocations from the Hand - With 66 Illustrations and Charts | Free Book
- In 2024, AJay The Creative Content Creator's Profitable Venture on YouTube
- In 2024, Elevate Storytelling - Free Soundtrack Options Available
- In 2024, How To Change Your Apple ID on Apple iPhone 11 With or Without Password
- Insights Into Crafting Responses to YouTube Comments
- Mobile Filmmaker’s Secrets Creating Viral Thumbnails for YouTube
- Turning Tides Creative Methods to Flip Your YouTube Video
- Title: In 2024, Beginner's Guide Capturing YouTube Videos as Screencasts Without Payment
- Author: Steven
- Created at : 2025-01-16 16:08:12
- Updated at : 2025-01-22 16:26:08
- Link: https://youtube-clips.techidaily.com/in-2024-beginners-guide-capturing-youtube-videos-as-screencasts-without-payment/
- License: This work is licensed under CC BY-NC-SA 4.0.