
:max_bytes(150000):strip_icc()/GettyImages-174750928-58a48cc35f9b58819cc45552-5bd8c2274cedfd00264695bd.jpg)
"In 2024, Become a Livestream King The Best Webcams for YouTube Stars"
Become a Livestream King: The Best Webcams for YouTube Stars
Best Webcams for YouTube Livestreaming

Max Wales
Mar 27, 2024• Proven solutions
Broadcasting videos in real time on social media can be a great way to share some of the best moments of your life with your friends or to reach new customers for the products your company offers. YouTube is the world’s biggest video sharing platform that already allows its users to stream live videos through third-party applications such as Wirecast Play or OBS. Less than a month ago, YouTube has finally made possible live streaming directly from a computer’s webcam. The option is currently only available on Chrome browsers, but the company claims that more browsers will start offering this feature soon.
In this article, we are going to provide you with all the information you’ll need to create seamless live streams using a webcam and introduce you to some of the best webcam models in 2021.
Best webcams for YouTube Livestreaming in 2021
The quality of the video recording you intend to broadcast live is essential for the success of your live streams. Most built-in laptop webcams produce low-quality videos, and for that reason using an external webcam that captures high-resolution videos can help you create live streams that attract a lot of attention from YouTube’s community.
How to choose the right webcam for live streaming on YouTube?
Compatability: Even the best webcams on the market are completely useless if they are not compatible with your computer. Finding a webcam that works with a PC or a Mac shouldn’t be too difficult because both Windows and iOS platforms offer support for a wide range of models.
Video Resolution: YouTubers that just want to produce simple live streams don’t have to pay a lot of attention to the video resolution, because their videos don’t show too many details. Vloggers and gamers, on the other hand, should consider using webcams that produce 4K or HD footage since lower-priced options have a hard time realistically depicting colors. The quality of the video output a webcam produces can increase its price significantly, so there’s no reason investing in it if you don’t have the intention of utilizing its features to the fullest.
Sound Quality: Besides the video features, you should also look into the webcam’s audio options, because no one wants to watch a video with a terrible sound. Buying an external microphone is probably the best solution to this issue, but if you can’t afford one, then purchasing a webcam with decent audio recording features is the second best option.
Adjustable Location: Although the angle from which you are recording a stream may not seem important, poorly framed live streams are more likely to go unnoticed. A webcam that is easily adjustable can grant you the freedom of choosing your shots on every live stream you share online and it will enable you to control each and every detail in the video.
![]()

The All-in-One Screen Recorder & Video Editor
- Record desktop screen, voiceover, and webcam simultaneously
- Edit recorded clips quickly with a wide range of professional tools
- Built-in plentiful templates and effects
- Export to MP4, MOV, MKV, GIF and multiple formats
For Win 7 or later (64-bit)
For macOS 10.12 or later
 Secure Download
4 Best Webcams for YouTube Live streaming in 2021
There are thousands of different webcams you can use to record a live stream, but the models featured below are some of the very best currently available on the market.
1. Logitech 4K Pro webcam
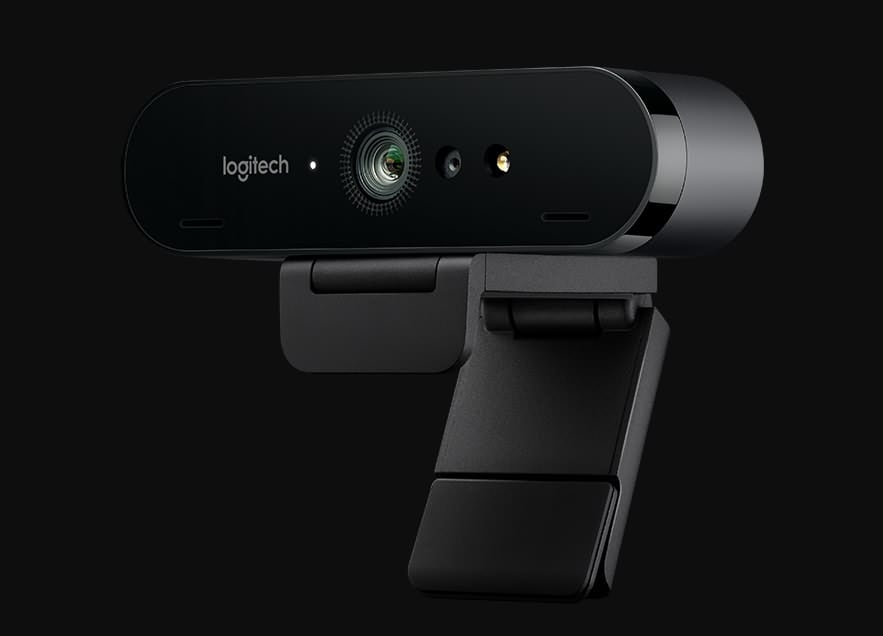
OS: Windows, macOS, Chrome OS
Price: $199
This is currently the only webcam on the market that supports 4K video recording, which makes it a forerunner of innovation and change. Besides the 4K option, the webcam’s features include a 5X digital zoom, infrared facial recognition and the amazing Right Light with HDR option that helps users record videos even under difficult light conditions.
The webcam can perform basic functions, like Skype calls, without the aid of third-party apps, which means that you can use it to create live streams on YouTube even if you don’t have a broadcasting software. The webcam’s stand is designed to fit almost any surface, so mounting the Logitech 4K Pro webcam to a laptop or monitor is quick and simple. The background replacement feature this Logitech’s webcam model offers can be quite useful if you want to use a different background in your YouTube live stream.
Pros:
- Produces incredibly clear and sharp images
- Superb background replacement options
- Expansive field of view
Cons:
- Poor audio recording options
- Internal software is basic
- A limited number of programs can capture 4K footage
2. Logitech HD Pro C920
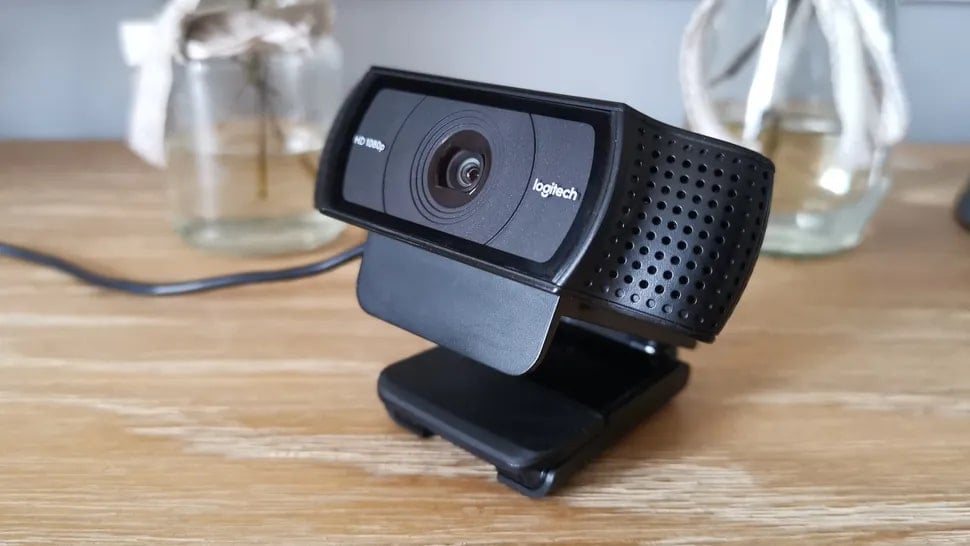
OS: macOS, Windows
Price: $99,99
Vloggers and all other YouTubers who care about video resolution will love using this webcam. Besides being capable of producing crystal clear videos in 1080p or HD 720 resolution at 30 or 60 fps, Logitech HD Pro C922 is also optimized for live streaming, which makes it a perfect webcam for live streaming on YouTube and all other video sharing platforms.
The webcam is equipped with two omnidirectional microphones that can record clear audio, but they pick up background noises easily, so using an external microphone for your live stream is still a much better option. The automatic low-light correction feature is designed to detect flickering lights in a video or increase visibility when streaming from a dimmed location. A foldable stand makes mounting the webcam easy, and you can also use a tripod if you want to record a live stream from an unusual perspective.
Pros:
- Produces 1080p and 720p resolution videos at 30 and 60 fps
- Allows users to integrate live images into their live streams
- Very easy to use
Cons
- Below average audio recording features
- Pricey
- Works only with OBS and XSplit broadcasting software
3. Logitech C922 Pro Stream webcam
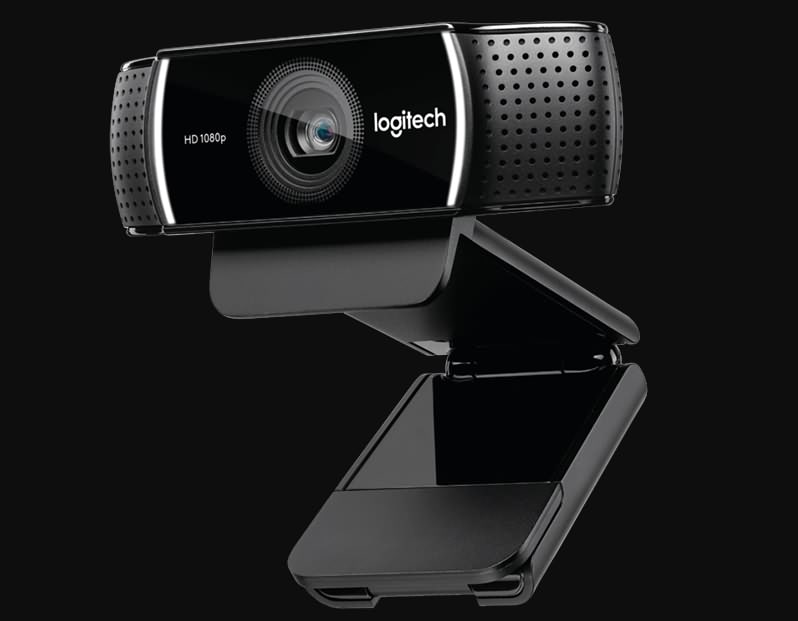
OS: Windows, macOS, Xbox, Chrome OS, Android 5.0 or above
Price: $99,99
Professional streamers, who want to capture impeccable live streams, should look no further. Logitech C922 Pro Stream webcam is the premier option for anyone who wants to be regarded as a professional streamer. This Logitech’s webcam lets you capture live streams in 1080p at 30 fps or 720p at 60 fps, while also providing the background removal feature for live streams on Twitch and YouTube. The video compression ensures that your live streams don’t take up too much of your network’s resources.
The webcam’s microphones enable users to record clear audio and reduce the need to use an external mic on every live stream you make. The Logitech C922 Pro Stream webcam delivers stunning performances in low light conditions, and it also has a 78-degree field of view lens. The webcam’s mounting options are somewhat limited, which can have a negative effect on the visual appeal of your YouTube live streams.
Pros:
- Offers a solid support for audio recording
- Delivers stunning picture quality
- Compatible with a wide range of operating systems
Cons:
- Limited mounting options
- Not plug-and-play friendly on Mac devices
- More expensive than webcams with similar capabilities
4. Microsoft LifeCam Studio
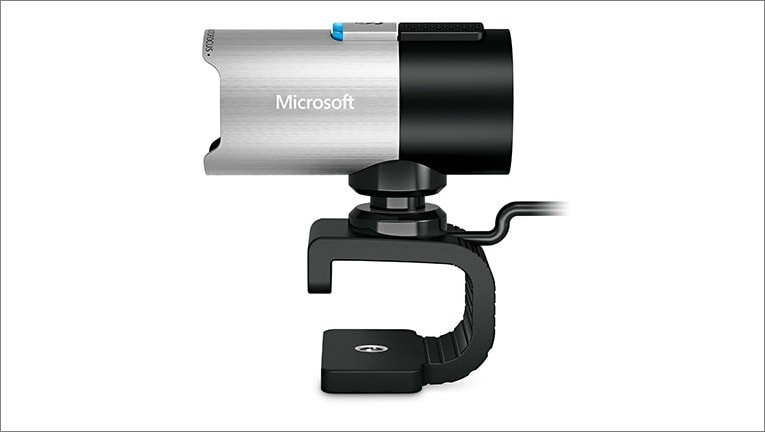
OS: Windows
Price: $99,95
The high-precision glass element lens this webcam features produces clear and sharp images. The Microsoft LifeCam Studio webcam has a 1080p HD sensor and it offers 720p HD video chat option. In addition to these remarkable features, the webcam is also equipped with TrueColor technology with face tracking that automatically adjusts the camera’s exposure to the environment and ensures that your live streams are always bright and colorful.
The Microsoft LifeCam Studio has a wide angle lens and an autofocus feature that guarantees that all live streams are always in focus. The webcam is Skype certified which means that it performs best when used with this software. Audio recording features exceed all expectations since the webcam can record natural audio recordings with no background noises. However, the limited compatibility narrows down the spectrum of its potential users.
Pros:
- Excellent video recording features.
- Crystal clear audio
- Great mounting options
Cons:
- Available only on Windows OS
- Demanding system requirements
- Not optimized for live streaming.
How to live stream from a webcam on YouTube in 2020
Although producing your own live stream on YouTube is easy, there are still a few steps you will have to take before you can start streaming from the webcam on your computer. If you don’t have a YouTube channel, you must make one, in order to be able to create your first live steam.
Step 1
Go to youtube.com/webcam , then complete the channel verification process and make sure that your channel doesn’t have any live streaming restrictions in the last 90 days. Head over to your channel, click on the Create a Video or Post icon in the upper right corner of the web page and select the GoLive option.
Afterward, you should give Chrome permission to access your webcam and the microphone you intend on using to record audio.
Step 2
Immediately after, the platform will ask you to give a title to your stream and it will let you choose whether or not you want the stream to be public or unlisted. It may be a good idea to create a few unlisted streams before you go public if you are still trying to figure out how this feature works.
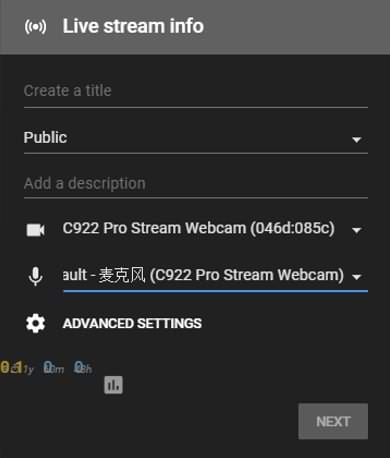
Proceed to select the camera and the microphone you intend to use to record the live stream, and you can also click on the Advanced Settings icon if you want to disable chat during the session or to specify that the live stream includes paid promotions.
Step 3
Once you’ve finished fine-tuning the advanced settings, you should click on the Next button. The platform will offer you to take or upload a thumbnail for your live stream.
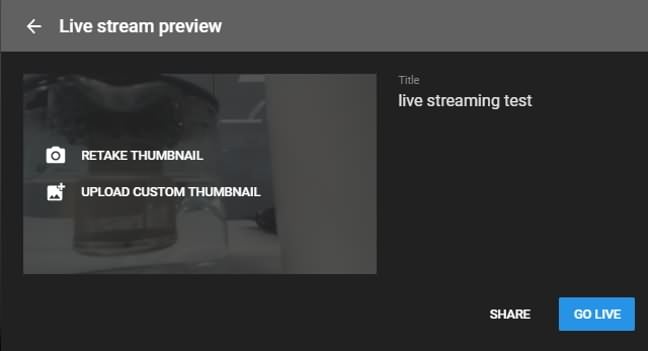
Clicking on the Share icon will enable you to share a live stream on social media, copy the link or access the embed code. Using the Share option is a great way to check if your live stream is functioning properly and to make sure that you are all set to begin the streaming session.
Step 4
Start your live stream by hitting the Go Live button. During the stream, you’ll be able to see and reply to comments people posted, the duration of the stream as well as the number of people following your live stream. If you haven’t shared your live stream before you started a new session you can do so while you are live. Click on the End Stream button to finish your webcam live stream on YouTube.
Step 5
After each live streaming session, YouTube will display some important statistics like the total and average watch time for the particular stream, the number of new subscribers or the number of playbacks of your live stream. The stream will be available for review in YouTube’s Creator Studio in the Events menu.
Max Wales
Max Wales is a writer and a lover of all things video.
Follow @Max Wales
Max Wales
Mar 27, 2024• Proven solutions
Broadcasting videos in real time on social media can be a great way to share some of the best moments of your life with your friends or to reach new customers for the products your company offers. YouTube is the world’s biggest video sharing platform that already allows its users to stream live videos through third-party applications such as Wirecast Play or OBS. Less than a month ago, YouTube has finally made possible live streaming directly from a computer’s webcam. The option is currently only available on Chrome browsers, but the company claims that more browsers will start offering this feature soon.
In this article, we are going to provide you with all the information you’ll need to create seamless live streams using a webcam and introduce you to some of the best webcam models in 2021.
Best webcams for YouTube Livestreaming in 2021
The quality of the video recording you intend to broadcast live is essential for the success of your live streams. Most built-in laptop webcams produce low-quality videos, and for that reason using an external webcam that captures high-resolution videos can help you create live streams that attract a lot of attention from YouTube’s community.
How to choose the right webcam for live streaming on YouTube?
Compatability: Even the best webcams on the market are completely useless if they are not compatible with your computer. Finding a webcam that works with a PC or a Mac shouldn’t be too difficult because both Windows and iOS platforms offer support for a wide range of models.
Video Resolution: YouTubers that just want to produce simple live streams don’t have to pay a lot of attention to the video resolution, because their videos don’t show too many details. Vloggers and gamers, on the other hand, should consider using webcams that produce 4K or HD footage since lower-priced options have a hard time realistically depicting colors. The quality of the video output a webcam produces can increase its price significantly, so there’s no reason investing in it if you don’t have the intention of utilizing its features to the fullest.
Sound Quality: Besides the video features, you should also look into the webcam’s audio options, because no one wants to watch a video with a terrible sound. Buying an external microphone is probably the best solution to this issue, but if you can’t afford one, then purchasing a webcam with decent audio recording features is the second best option.
Adjustable Location: Although the angle from which you are recording a stream may not seem important, poorly framed live streams are more likely to go unnoticed. A webcam that is easily adjustable can grant you the freedom of choosing your shots on every live stream you share online and it will enable you to control each and every detail in the video.
![]()
The All-in-One Screen Recorder & Video Editor
- Record desktop screen, voiceover, and webcam simultaneously
- Edit recorded clips quickly with a wide range of professional tools
- Built-in plentiful templates and effects
- Export to MP4, MOV, MKV, GIF and multiple formats
For Win 7 or later (64-bit)
For macOS 10.12 or later
Secure Download
4 Best Webcams for YouTube Live streaming in 2021
There are thousands of different webcams you can use to record a live stream, but the models featured below are some of the very best currently available on the market.
1. Logitech 4K Pro webcam
OS: Windows, macOS, Chrome OS
Price: $199
This is currently the only webcam on the market that supports 4K video recording, which makes it a forerunner of innovation and change. Besides the 4K option, the webcam’s features include a 5X digital zoom, infrared facial recognition and the amazing Right Light with HDR option that helps users record videos even under difficult light conditions.
The webcam can perform basic functions, like Skype calls, without the aid of third-party apps, which means that you can use it to create live streams on YouTube even if you don’t have a broadcasting software. The webcam’s stand is designed to fit almost any surface, so mounting the Logitech 4K Pro webcam to a laptop or monitor is quick and simple. The background replacement feature this Logitech’s webcam model offers can be quite useful if you want to use a different background in your YouTube live stream.
Pros:
- Produces incredibly clear and sharp images
- Superb background replacement options
- Expansive field of view
Cons:
- Poor audio recording options
- Internal software is basic
- A limited number of programs can capture 4K footage
2. Logitech HD Pro C920
OS: macOS, Windows
Price: $99,99
Vloggers and all other YouTubers who care about video resolution will love using this webcam. Besides being capable of producing crystal clear videos in 1080p or HD 720 resolution at 30 or 60 fps, Logitech HD Pro C922 is also optimized for live streaming, which makes it a perfect webcam for live streaming on YouTube and all other video sharing platforms.
The webcam is equipped with two omnidirectional microphones that can record clear audio, but they pick up background noises easily, so using an external microphone for your live stream is still a much better option. The automatic low-light correction feature is designed to detect flickering lights in a video or increase visibility when streaming from a dimmed location. A foldable stand makes mounting the webcam easy, and you can also use a tripod if you want to record a live stream from an unusual perspective.
Pros:
- Produces 1080p and 720p resolution videos at 30 and 60 fps
- Allows users to integrate live images into their live streams
- Very easy to use
Cons
- Below average audio recording features
- Pricey
- Works only with OBS and XSplit broadcasting software
3. Logitech C922 Pro Stream webcam
OS: Windows, macOS, Xbox, Chrome OS, Android 5.0 or above
Price: $99,99
Professional streamers, who want to capture impeccable live streams, should look no further. Logitech C922 Pro Stream webcam is the premier option for anyone who wants to be regarded as a professional streamer. This Logitech’s webcam lets you capture live streams in 1080p at 30 fps or 720p at 60 fps, while also providing the background removal feature for live streams on Twitch and YouTube. The video compression ensures that your live streams don’t take up too much of your network’s resources.
The webcam’s microphones enable users to record clear audio and reduce the need to use an external mic on every live stream you make. The Logitech C922 Pro Stream webcam delivers stunning performances in low light conditions, and it also has a 78-degree field of view lens. The webcam’s mounting options are somewhat limited, which can have a negative effect on the visual appeal of your YouTube live streams.
Pros:
- Offers a solid support for audio recording
- Delivers stunning picture quality
- Compatible with a wide range of operating systems
Cons:
- Limited mounting options
- Not plug-and-play friendly on Mac devices
- More expensive than webcams with similar capabilities
4. Microsoft LifeCam Studio
OS: Windows
Price: $99,95
The high-precision glass element lens this webcam features produces clear and sharp images. The Microsoft LifeCam Studio webcam has a 1080p HD sensor and it offers 720p HD video chat option. In addition to these remarkable features, the webcam is also equipped with TrueColor technology with face tracking that automatically adjusts the camera’s exposure to the environment and ensures that your live streams are always bright and colorful.
The Microsoft LifeCam Studio has a wide angle lens and an autofocus feature that guarantees that all live streams are always in focus. The webcam is Skype certified which means that it performs best when used with this software. Audio recording features exceed all expectations since the webcam can record natural audio recordings with no background noises. However, the limited compatibility narrows down the spectrum of its potential users.
Pros:
- Excellent video recording features.
- Crystal clear audio
- Great mounting options
Cons:
- Available only on Windows OS
- Demanding system requirements
- Not optimized for live streaming.
How to live stream from a webcam on YouTube in 2020
Although producing your own live stream on YouTube is easy, there are still a few steps you will have to take before you can start streaming from the webcam on your computer. If you don’t have a YouTube channel, you must make one, in order to be able to create your first live steam.
Step 1
Go to youtube.com/webcam , then complete the channel verification process and make sure that your channel doesn’t have any live streaming restrictions in the last 90 days. Head over to your channel, click on the Create a Video or Post icon in the upper right corner of the web page and select the GoLive option.
Afterward, you should give Chrome permission to access your webcam and the microphone you intend on using to record audio.
Step 2
Immediately after, the platform will ask you to give a title to your stream and it will let you choose whether or not you want the stream to be public or unlisted. It may be a good idea to create a few unlisted streams before you go public if you are still trying to figure out how this feature works.
Proceed to select the camera and the microphone you intend to use to record the live stream, and you can also click on the Advanced Settings icon if you want to disable chat during the session or to specify that the live stream includes paid promotions.
Step 3
Once you’ve finished fine-tuning the advanced settings, you should click on the Next button. The platform will offer you to take or upload a thumbnail for your live stream.
Clicking on the Share icon will enable you to share a live stream on social media, copy the link or access the embed code. Using the Share option is a great way to check if your live stream is functioning properly and to make sure that you are all set to begin the streaming session.
Step 4
Start your live stream by hitting the Go Live button. During the stream, you’ll be able to see and reply to comments people posted, the duration of the stream as well as the number of people following your live stream. If you haven’t shared your live stream before you started a new session you can do so while you are live. Click on the End Stream button to finish your webcam live stream on YouTube.
Step 5
After each live streaming session, YouTube will display some important statistics like the total and average watch time for the particular stream, the number of new subscribers or the number of playbacks of your live stream. The stream will be available for review in YouTube’s Creator Studio in the Events menu.
Max Wales
Max Wales is a writer and a lover of all things video.
Follow @Max Wales
Epicurean Epiphanies: Filming Feast Creation
How to Make a Cooking Video in Steps - an Ultimate Guide

Richard Bennett
Mar 27, 2024• Proven solutions
Cooking and food-oriented videos are among the most outreaching and popular categories of content to publish online, notably, on YouTube, Facebook, or Instagram. So if you are a cooking aficionado, you have excellent potential to gain positive attention and a loyal audience. But to create engaging videos, you’d need a lot more than excellent culinary skills. This article aims to enlighten aspiring food and recipe vloggers about the essentials of video making straight out of the oven, to create enriched content that’s professional, neat, and viral-worthy.
- Part 1: What to Prepare Before Making a Recipe Video?
- Part 2: Make a Cooking Video with Filmora: a Step-by-Step Guide
- Part 3: Tips to Make Your Cooking Videos Stand Out
- Part 4: How to Promote Your Cooking Channel on YouTube?
What to Prepare Before Making a Recipe Video
While you would know best about the prep work needed for the recipes, the prep work for making a video starts with a plan. What goes into the plan?
Brainstorm this equation - Main Content + Duration + Light + Sound + Camera + Camera Angle, Shots & Transition.
The main content is how you picture the finished video. Ask yourself - Do you want an intro gig? Are you going to talk in the video or show only hands and the cooking with a piece of background music? How do you wish to present the ingredients? Would there be additional tips? At what platform are you going to publish your content? How long should be your clippings? Consider all these questions to chalk out a basic framework of your video
The camera is a pivotal element. Whether it is a smartphone or a hi-fidelity digital camera, it is worthwhile to familiarise the best positions and light orientations and the capacity of the device to produce the best quality picture.
How is your sound going to be like? If you are going to talk in the video, it is recommended that you use a microphone. Or else, you can also use background sound. But to mix sound with the video, you’d need an excellent sound editing tool.
Finally, comes the editing and finishing part. Eventually, you’ll need purposive video-editing software to help you work out the video transitions, sound, and visual effects.Choose a toolkit that is easy to learn and that you can get comfortable with so that the job of video editing doesn’t take the focus away from the main task of cooking.

Now, once you have all the essential ingredients to create your video, start practicing. Remember that it is the most natural thing for the first videos to appear amateurish or inept. And that is part of the plan. Don’t be disheartened and keep going.
Make a Cooking Video with Filmora: a Step-by-Step Guide
As one of the easiest-to-use video editing tools, the full-featured Filmora is the right choice considering it can fit most of your needs. Moreover, you’d be delighted to know that the software also has a series of features and functions and even tutorial videos dedicated to cooking videos.


Step 1: Filming the Video
Whether you are going to present a traditional cook-with-me style video or feature the contemporary “jump-cut” style focusing on speedy short videos, you need to prepare all the equipment and ingredients to suit the frame by frame shots. Consider spills, drops, overcooking, etc. as part of the process, so keep adequate substitutes to continue with your project unwaveringly. If you are using a phone, keep it fully charged up. And have a plan beforehand about what you should do when you get an urgent call while shooting. Also, consider doing a site investigation of the shooting spot for any fragile items, pointy corners, slippery areas, curious pets, etc. to avoid trips and falls in the middle of the filming, especially when working with a cameraman who’s following your movement. If you are using a tripod, and floor-standing lights, remember to secure the equipment with plenty of adhesive tapes, lest they bump into an expensive trip or fall.
Step 2: mport Your Video In Filmora
You need to sync the device that you used to film the video with the computer that has Filmora installed. It may be a phone or a camcorder. Once the devices are synced, you should launch the Filmora software and go the “Media” button at the top right toolbar. There you will find the “Import” button. You will get a pop-up message asking you to choose the type of device. Select the right one, and your video will be imported in the Filmora interface.
Step 3: Edit Video Pace: Time-Lapse, Jump Cut, Slow Motion
To create crisp, fast-paced videos, you don’t have to gobble up the content eyeing at the duration. Think smart when you have the resources of a tool like Filmora. Here are the three best features that help you create fast-paced yet well-defined recipes.
Time-Lapse: The time-lapse feature allows you to adjust the speed of the video from slow-motion to 10x faster. To use this, double click on a specific clip in your imported video and open the custom speed settings. Use the adjusting meter beside speed to make your clip as fast or slow as you want. You may use the same feature to introduce the slow-motion effects in certain areas of the video.
Now, when you are using either the fast-forward or slow-motion effects, it is best to have stable video footage with consistent lighting and a static background. There are also the options of Reverse Speed that can play the clip backward, as in flash-back. The Ripple edit feature allows you to cut short a long clip seamlessly.
Jump Cut: The Jump Cut is about snipping unwanted areas in the clip. It may sound like the Ripple edit mentioned above, but the ripple edit is more functional for cutting short a continuous video so that the viewer won’t realize the snip. For the Jump Cut, it doesn’t have to be a constant clip. You can get to the next frame or scene with an abracadabra move.
To use Jump Cut, place the cursor over the starting of the clip that you want to cut, and right-click on it and select “Split” (the “scissors” feature on the toolbar does the same thing). To make this look neat, preview the portion of the clip once again and delete the cuts between two clips with the same right-click.
Step 4: Understanding Transitions on Filmora
Transitions make your video more interactive and help you segregate the video from frame-to-frame with effects like dissolve, fade, flash, etc. there are numerous transition options available within the Filmora suit.
The best way to do this drag and drop the clips on the timeline is to trim parts of the clip to shorten it. Once you have all the clips in place, go to the “Transitions” options at the top toolbar to apply it on the end or start of each clip.
Step 5: Audio, Playback & Sound Edits
There are plenty of options that you can remove background noise, add voiceover, add music, and detach audio from video. Refer to the Audios section from your toolbar.
Step 6: Save to Drive/ Emport/ Publish
Once you are satisfied with your content, then go to Export. Choose the format of the video, MOV, MP4, MPG, etc. and whether you wish to publish directly or save to drive.
Tips to Make Your Cooking Videos Stand Out
- Lighting is your best friend. Invest in some quality spotlights or use the best of daylight.
- Mind your video duration. Short and Simple videos get the most views, but your content should not look incomplete. It is not a fact that long and elaborate videos do not get a place on the table; it is all about the relevance of your content. So don’t stop till you get enough.
- If you appear in the video, keep yourself always look good.
- Keep your video titles relevant and prominent, so that people looking for it can readily find it.
- Have a scrumptious custom thumbnail.
How to Promote Your Cooking Channel on YouTube
- Create an inventory before publishing videos. YouTube vlogging is valued for consistency. If you have a list of 10, 15, 20 videos, then you can have enough time in hand to film your next videos.
- Have a consistent style to create brand recognition. Do you think branding is not for Vlogs? Well, I suppose you might be wrong. Branding is for anyone who uses it.
- Share the link of your YouTube videos on other platforms like Twitter and Facebook.
- Encourage your viewers to comment on the video.
- Explore the different YouTube SEO strategies and use the accurate keywords in your video descriptions with hashtags.
With prior planning and practicing, you are bent on developing more confident moves and camera angles. Once you have that, follow this step by step guide to gain speed and prowess and also enjoy the whole adventure.
Richard Bennett
Richard Bennett is a writer and a lover of all things video.
Follow @Richard Bennett
Richard Bennett
Mar 27, 2024• Proven solutions
Cooking and food-oriented videos are among the most outreaching and popular categories of content to publish online, notably, on YouTube, Facebook, or Instagram. So if you are a cooking aficionado, you have excellent potential to gain positive attention and a loyal audience. But to create engaging videos, you’d need a lot more than excellent culinary skills. This article aims to enlighten aspiring food and recipe vloggers about the essentials of video making straight out of the oven, to create enriched content that’s professional, neat, and viral-worthy.
- Part 1: What to Prepare Before Making a Recipe Video?
- Part 2: Make a Cooking Video with Filmora: a Step-by-Step Guide
- Part 3: Tips to Make Your Cooking Videos Stand Out
- Part 4: How to Promote Your Cooking Channel on YouTube?
What to Prepare Before Making a Recipe Video
While you would know best about the prep work needed for the recipes, the prep work for making a video starts with a plan. What goes into the plan?
Brainstorm this equation - Main Content + Duration + Light + Sound + Camera + Camera Angle, Shots & Transition.
The main content is how you picture the finished video. Ask yourself - Do you want an intro gig? Are you going to talk in the video or show only hands and the cooking with a piece of background music? How do you wish to present the ingredients? Would there be additional tips? At what platform are you going to publish your content? How long should be your clippings? Consider all these questions to chalk out a basic framework of your video
The camera is a pivotal element. Whether it is a smartphone or a hi-fidelity digital camera, it is worthwhile to familiarise the best positions and light orientations and the capacity of the device to produce the best quality picture.
How is your sound going to be like? If you are going to talk in the video, it is recommended that you use a microphone. Or else, you can also use background sound. But to mix sound with the video, you’d need an excellent sound editing tool.
Finally, comes the editing and finishing part. Eventually, you’ll need purposive video-editing software to help you work out the video transitions, sound, and visual effects.Choose a toolkit that is easy to learn and that you can get comfortable with so that the job of video editing doesn’t take the focus away from the main task of cooking.
Now, once you have all the essential ingredients to create your video, start practicing. Remember that it is the most natural thing for the first videos to appear amateurish or inept. And that is part of the plan. Don’t be disheartened and keep going.
Make a Cooking Video with Filmora: a Step-by-Step Guide
As one of the easiest-to-use video editing tools, the full-featured Filmora is the right choice considering it can fit most of your needs. Moreover, you’d be delighted to know that the software also has a series of features and functions and even tutorial videos dedicated to cooking videos.
Step 1: Filming the Video
Whether you are going to present a traditional cook-with-me style video or feature the contemporary “jump-cut” style focusing on speedy short videos, you need to prepare all the equipment and ingredients to suit the frame by frame shots. Consider spills, drops, overcooking, etc. as part of the process, so keep adequate substitutes to continue with your project unwaveringly. If you are using a phone, keep it fully charged up. And have a plan beforehand about what you should do when you get an urgent call while shooting. Also, consider doing a site investigation of the shooting spot for any fragile items, pointy corners, slippery areas, curious pets, etc. to avoid trips and falls in the middle of the filming, especially when working with a cameraman who’s following your movement. If you are using a tripod, and floor-standing lights, remember to secure the equipment with plenty of adhesive tapes, lest they bump into an expensive trip or fall.
Step 2: mport Your Video In Filmora
You need to sync the device that you used to film the video with the computer that has Filmora installed. It may be a phone or a camcorder. Once the devices are synced, you should launch the Filmora software and go the “Media” button at the top right toolbar. There you will find the “Import” button. You will get a pop-up message asking you to choose the type of device. Select the right one, and your video will be imported in the Filmora interface.
Step 3: Edit Video Pace: Time-Lapse, Jump Cut, Slow Motion
To create crisp, fast-paced videos, you don’t have to gobble up the content eyeing at the duration. Think smart when you have the resources of a tool like Filmora. Here are the three best features that help you create fast-paced yet well-defined recipes.
Time-Lapse: The time-lapse feature allows you to adjust the speed of the video from slow-motion to 10x faster. To use this, double click on a specific clip in your imported video and open the custom speed settings. Use the adjusting meter beside speed to make your clip as fast or slow as you want. You may use the same feature to introduce the slow-motion effects in certain areas of the video.
Now, when you are using either the fast-forward or slow-motion effects, it is best to have stable video footage with consistent lighting and a static background. There are also the options of Reverse Speed that can play the clip backward, as in flash-back. The Ripple edit feature allows you to cut short a long clip seamlessly.
Jump Cut: The Jump Cut is about snipping unwanted areas in the clip. It may sound like the Ripple edit mentioned above, but the ripple edit is more functional for cutting short a continuous video so that the viewer won’t realize the snip. For the Jump Cut, it doesn’t have to be a constant clip. You can get to the next frame or scene with an abracadabra move.
To use Jump Cut, place the cursor over the starting of the clip that you want to cut, and right-click on it and select “Split” (the “scissors” feature on the toolbar does the same thing). To make this look neat, preview the portion of the clip once again and delete the cuts between two clips with the same right-click.
Step 4: Understanding Transitions on Filmora
Transitions make your video more interactive and help you segregate the video from frame-to-frame with effects like dissolve, fade, flash, etc. there are numerous transition options available within the Filmora suit.
The best way to do this drag and drop the clips on the timeline is to trim parts of the clip to shorten it. Once you have all the clips in place, go to the “Transitions” options at the top toolbar to apply it on the end or start of each clip.
Step 5: Audio, Playback & Sound Edits
There are plenty of options that you can remove background noise, add voiceover, add music, and detach audio from video. Refer to the Audios section from your toolbar.
Step 6: Save to Drive/ Emport/ Publish
Once you are satisfied with your content, then go to Export. Choose the format of the video, MOV, MP4, MPG, etc. and whether you wish to publish directly or save to drive.
Tips to Make Your Cooking Videos Stand Out
- Lighting is your best friend. Invest in some quality spotlights or use the best of daylight.
- Mind your video duration. Short and Simple videos get the most views, but your content should not look incomplete. It is not a fact that long and elaborate videos do not get a place on the table; it is all about the relevance of your content. So don’t stop till you get enough.
- If you appear in the video, keep yourself always look good.
- Keep your video titles relevant and prominent, so that people looking for it can readily find it.
- Have a scrumptious custom thumbnail.
How to Promote Your Cooking Channel on YouTube
- Create an inventory before publishing videos. YouTube vlogging is valued for consistency. If you have a list of 10, 15, 20 videos, then you can have enough time in hand to film your next videos.
- Have a consistent style to create brand recognition. Do you think branding is not for Vlogs? Well, I suppose you might be wrong. Branding is for anyone who uses it.
- Share the link of your YouTube videos on other platforms like Twitter and Facebook.
- Encourage your viewers to comment on the video.
- Explore the different YouTube SEO strategies and use the accurate keywords in your video descriptions with hashtags.
With prior planning and practicing, you are bent on developing more confident moves and camera angles. Once you have that, follow this step by step guide to gain speed and prowess and also enjoy the whole adventure.
Richard Bennett
Richard Bennett is a writer and a lover of all things video.
Follow @Richard Bennett
Also read:
- [New] Assessing Your Video Streaming Needs To Subscribe or Not to Subscribe?
- In 2024, Avoid Ad Dollars – Boost Your View Count for Free
- [New] Best Free YouTube to MP3 Converters You Should Know [Online/Win/Mac]
- [Updated] Broadcast Easily 3 Steps to Post MP3 on YouTube
- 2024 Approved Breaking the Monotony Innovative YT Playlist Shuffling
- 2024 Approved Discreet YouTube Playback on Mobile Devices
- [New] Android and iOS Top ASMR Audio Picks
- Essential Choice 10 FREE YouTube Subtitle Extractors
- Commanding YouTube Realm Through Strategic Creator Studio Utilization for 2024
- [New] Elite 7 DSLR Options Superior for Professional Videography
- 2024 Approved Accolades Across Platforms for Video Creators
- [New] ASMR Knowledge Beyond What You See
- [New] Elevate Traffic Ethical Practices for Amplifying Content Views
- Unlocking Creativity in YouTube Video Splitting
- [New] A Deep Dive Into YouTube Content Ownership Laws
- Which Video-Sharing Giant Suits Your Content Best? - IGTV or YouTube Analysis
- [Updated] Building an Auto-Subscribe Direct Link for Youtube
- In 2024, Building a Successful YouTube Channel Sidestep These 8 Frequent Faux Pas
- Fast-Track To 1,000 Subscribers in Youtube Landscape
- 2024 Approved Enhancing Content Strategy with Targeted Tagging
- Elevate Your Youtube Profitability Anywhere, Anytime for 2024
- [Updated] Efficient Video Categorization with Tags
- 2024 Approved Downloading the Latest Tracks A Guide to Free Extractors for PC Users
- 5 Inspirational Winter Bgs to Heat Your Videos
- How to Fix YouTube Video Black Screen
- In 2024, Crafting Perfect Thumbnails for Higher Clickthrough Rates
- [New] Cut to Perfection A Detailed Guide on YouTube Short Video Making
- Average Income for Popular YouTube Creators
- Affordable Action Cam Tech - Maximizing Your Money's Worth for 2024
- In 2024, Top 15 Apps To Hack WiFi Password On Realme GT 5 Pro
- New Chromebook Video Editing Made Easy Free Software Solutions for 2024
- [Updated] Cutting Edge Techniques Recording in Adobe Presenter for 2024
- In 2024, Here are Some Pro Tips for Pokemon Go PvP Battles On Oppo Reno 8T 5G | Dr.fone
- Updated 2024 Approved How to Do Masking in After Effects Alternative Provided
- In 2024, Is GSM Flasher ADB Legit? Full Review To Bypass Your Samsung Galaxy S24 Ultra Phone FRP Lock
- [Updated] In 2024, Techniques to Broadcast YouTube Media on Facebook Platforms
- In 2024, Top IMEI Unlokers for iPhone 6 Plus and Android Phones
- How to Adapt Posting Techniques After Instagram’s Revisions
- [New] How to Use IGTV Hashtags to Get More Followers for 2024
- In 2024, How to jailbreak iCloud locked Apple iPhone XS
- In 2024, Unlock Innovative TikTok Edits with Leading Windows Tools
- In 2024, Android Unlock Code Sim Unlock Your Realme C67 4G Phone and Remove Locked Screen
- In 2024, How to Reset a Locked Vivo Y100t Phone
- Easy Guide to Oppo Reno 10 Pro 5G FRP Bypass With Best Methods
- [New] In 2024, Leading Custom Font Apps - Perfect for Discord Chat Rooms
- [New] In 2024, Maintain Anonymity in FB Narratives
- [New] Document Total Screen Content
- In 2024, Pokémon Go Cooldown Chart On Nokia C32 | Dr.fone
- Title: "In 2024, Become a Livestream King The Best Webcams for YouTube Stars"
- Author: Steven
- Created at : 2024-05-25 19:31:32
- Updated at : 2024-05-26 19:31:32
- Link: https://youtube-clips.techidaily.com/in-2024-become-a-livestream-king-the-best-webcams-for-youtube-stars/
- License: This work is licensed under CC BY-NC-SA 4.0.
