
"In 2024, Audio Clarity 10 Pro Tips for High-Quality Recordings"
Audio Clarity: 10 Pro Tips for High-Quality Recordings
10 Recording Tips for Recording Audio with High Quality

Richard Bennett
Oct 26, 2023• Proven solutions
Getting the best sound for your recording is not as simplistic as buying an expensive microphone. There are many different things you can do to record your audio more clearly. Here are 10 recording tips to record high-quality audio.
1. Silence everything you don’t want your microphone to record
2. Put your mobile phone in airplane mode
3. Minimize echo
4. Block wind from reaching your microphone
5. Upgrade your microphone
6. Adjust your levels
7. Start with a sound cue if you’re planning to do some syncing in post
8. Get close to the sound
9. ADR
10. Record Ambient Sound
Bonus Tip-Record Your Audio with Wondershare Filmora
Wondershare Filmora has great recording features that enable you to record screen , voiceover, and webcam. Just connect the recording device to your computer, and start the recording in Wondershare Filmora and you will get high-quality audio. And you can also easily pick a song from the royalty-free music library on Wondershare Filmora. These audio features on Filmora are rare and very simple to use, you only need to click a few times and your video will have a new sound and background song.


1. Silence everything you don’t want your microphone to record
When you’re recording audio, you have to be more aware of the subtle sounds that drone on in your background. These sounds may include humming from machines with fans, buzzing from lights, and jingling from your pet’s collar. Observe your recording space and find ways to silence everything that you don’t want in your audio recording.
2. Put your mobile phone in airplane mode
Although it may be quite obvious to turn your phone’s ring tone off when you’re recording, it may not be as obvious to put your phone in airplane mode. When phones receive calls or perform searches as part of their background processes, they emit signals that can get picked up by your recording system. Avoid ruining good takes with unwanted sounds of phone signals by putting your phones in airplane mode.
3. Minimize echo
If you are recording yourself talk or sing, make sure to set up your recording space in a way where the sound projected from your voice bounces minimally off the walls and back to your microphone. Bare walls and hardwood floors will cause a lot of bouncing. Make use of materials that will absorb your sound rather than bounce it, like a thick rug or a comforter. If you want your voice to echo, that’s something you should do in post-production.
4. Block wind from reaching your microphone
Although it might not sound so loud and distracting to the naked ear, wind sounds terribly loud through a microphone recording and can cause your audio to clip (distortion of waveform due to output of sound exceeding maximum capacity or 0 dB point). This includes the “wind” that comes out of your mouth when you pronounce words starting with the letter “p.” Use pop filters, windscreens, and deadcats to block wind from reaching your microphone.
5. Upgrade your microphone
As much as you try to control all the noise in your surroundings, your greatest recording limitation will come from the hardware that you use. Improve your recordings by plugging in an external microphone into your camera’s microphone jack or record audio completely separately with a professional microphone.
Need help with deciding on a microphone to buy? Check out our recommended list of microphones.
6. Adjust your levels
Before pressing the record button, see how loudly your microphone picks up the sound you wish to record. Adjust your levels (sensitivity of your microphone) until the sound sits in between -6 dBs and -12dBs. This range gives the source of your sound some room to get louder without the recorded audio getting clipped. When you first listen to audio recorded within this range, it may sound very quiet. No need to worry though because you can increase the volume later in editing.
7. Start with a sound cue if you’re planning to do some syncing in post
If you’re recording separate audio that you plan to sync to your video later in editing, start your recording with a short and loud sound cue like a clap or a high pitched “beep” tone. Later, when you’re editing, it’ll be much easier for you to find the section where your video and additional audio match.
8. Get close to the sound
Unless you’re aiming to record ambient sound, bring your microphone close to the source of sound you are wanting to record. The closer your microphone is to the source of sound, the lower your sensitivity setting can be on your microphone. As a result of lowering your levels, sounds you are not meaning to record will also sound fainter.
9. ADR
When you need to record a scene in a loud setting where you have very little control over the noise, record additional vocals later and replace the original vocals through a process called automated dialogue replacement.
10. Record Ambient Sound
Remember to record ambient sound or “room tone.” You can use these recordings to fill in the blanks if you run out of audio and also smooth out parts of your audio where you hear pops, clicks, and other unwanted noise.
Richard Bennett
Richard Bennett is a writer and a lover of all things video.
Follow @Richard Bennett
Richard Bennett
Oct 26, 2023• Proven solutions
Getting the best sound for your recording is not as simplistic as buying an expensive microphone. There are many different things you can do to record your audio more clearly. Here are 10 recording tips to record high-quality audio.
1. Silence everything you don’t want your microphone to record
2. Put your mobile phone in airplane mode
3. Minimize echo
4. Block wind from reaching your microphone
5. Upgrade your microphone
6. Adjust your levels
7. Start with a sound cue if you’re planning to do some syncing in post
8. Get close to the sound
9. ADR
10. Record Ambient Sound
Bonus Tip-Record Your Audio with Wondershare Filmora
Wondershare Filmora has great recording features that enable you to record screen , voiceover, and webcam. Just connect the recording device to your computer, and start the recording in Wondershare Filmora and you will get high-quality audio. And you can also easily pick a song from the royalty-free music library on Wondershare Filmora. These audio features on Filmora are rare and very simple to use, you only need to click a few times and your video will have a new sound and background song.
1. Silence everything you don’t want your microphone to record
When you’re recording audio, you have to be more aware of the subtle sounds that drone on in your background. These sounds may include humming from machines with fans, buzzing from lights, and jingling from your pet’s collar. Observe your recording space and find ways to silence everything that you don’t want in your audio recording.
2. Put your mobile phone in airplane mode
Although it may be quite obvious to turn your phone’s ring tone off when you’re recording, it may not be as obvious to put your phone in airplane mode. When phones receive calls or perform searches as part of their background processes, they emit signals that can get picked up by your recording system. Avoid ruining good takes with unwanted sounds of phone signals by putting your phones in airplane mode.
3. Minimize echo
If you are recording yourself talk or sing, make sure to set up your recording space in a way where the sound projected from your voice bounces minimally off the walls and back to your microphone. Bare walls and hardwood floors will cause a lot of bouncing. Make use of materials that will absorb your sound rather than bounce it, like a thick rug or a comforter. If you want your voice to echo, that’s something you should do in post-production.
4. Block wind from reaching your microphone
Although it might not sound so loud and distracting to the naked ear, wind sounds terribly loud through a microphone recording and can cause your audio to clip (distortion of waveform due to output of sound exceeding maximum capacity or 0 dB point). This includes the “wind” that comes out of your mouth when you pronounce words starting with the letter “p.” Use pop filters, windscreens, and deadcats to block wind from reaching your microphone.
5. Upgrade your microphone
As much as you try to control all the noise in your surroundings, your greatest recording limitation will come from the hardware that you use. Improve your recordings by plugging in an external microphone into your camera’s microphone jack or record audio completely separately with a professional microphone.
Need help with deciding on a microphone to buy? Check out our recommended list of microphones.
6. Adjust your levels
Before pressing the record button, see how loudly your microphone picks up the sound you wish to record. Adjust your levels (sensitivity of your microphone) until the sound sits in between -6 dBs and -12dBs. This range gives the source of your sound some room to get louder without the recorded audio getting clipped. When you first listen to audio recorded within this range, it may sound very quiet. No need to worry though because you can increase the volume later in editing.
7. Start with a sound cue if you’re planning to do some syncing in post
If you’re recording separate audio that you plan to sync to your video later in editing, start your recording with a short and loud sound cue like a clap or a high pitched “beep” tone. Later, when you’re editing, it’ll be much easier for you to find the section where your video and additional audio match.
8. Get close to the sound
Unless you’re aiming to record ambient sound, bring your microphone close to the source of sound you are wanting to record. The closer your microphone is to the source of sound, the lower your sensitivity setting can be on your microphone. As a result of lowering your levels, sounds you are not meaning to record will also sound fainter.
9. ADR
When you need to record a scene in a loud setting where you have very little control over the noise, record additional vocals later and replace the original vocals through a process called automated dialogue replacement.
10. Record Ambient Sound
Remember to record ambient sound or “room tone.” You can use these recordings to fill in the blanks if you run out of audio and also smooth out parts of your audio where you hear pops, clicks, and other unwanted noise.
Richard Bennett
Richard Bennett is a writer and a lover of all things video.
Follow @Richard Bennett
Amplify Online Impact Through Savvy Templates Design
YouTube Shorts are short, 60-second videos that can be shared across all social media platforms. They’re a great way to quickly and easily share your message with your audience. As a result, many creators are turning to YouTube Shorts Templates to help them create professional-looking videos that stand out.
YouTube Shorts Templates can create a wide variety of videos, from product demos and how-tos to vlogs and comedy skits. They can help you create polished and engaging videos without the need for expensive equipment or a lot of editing experience.

This article will explore everything you need to know about YouTube Shorts Templates, including how to use them, tips for creating great videos, and examples of how other creators use them to boost their views and reach.
Overview of YouTube Shorts
YouTube Shorts is a new feature launched by YouTube in September 2020, which allows users to create short, 15-second videos that can be shared across all social media platforms. According to the statistics of EarthWeb , YouTube Shorts has seen tremendous growth in popularity since its launch, with billions of views every day.
According to YouTube, in the U.S. alone, the watch time for Shorts has grown over 4x since November 2020, and by December 2021, daily active users of Shorts exceeded 200M. As per YouTube’s official blog, In India, Shorts watch time has grown by over 20x since its launch, and by the end of 2021, India had over 150M daily active users.
In addition to the strong growth in views and engagement, YouTube Shorts has also become a powerful tool for creators to reach new audiences and grow their channels.
According to a study by Influencer Marketing Hub, YouTube Shorts have a higher engagement rate than traditional YouTube videos, with Shorts receiving an average of 3x more comments and likes than regular videos. The study also shows that Shorts videos have a higher completion rate of 60% compared to traditional videos with 40%.
As a result of the popularity of YouTube Shorts, many creators are now turning to YouTube Shorts Templates to help them create professional-looking videos that stand out. YouTube Shorts Templates can create a wide variety of videos, from product demos and how-tos to vlogs and comedy skits. They can help you create polished and engaging videos without the need for expensive equipment or a lot of editing experience.
How To Get Profit from Short Videos
There are a few ways to monetize your YouTube Shorts videos and turn them into a source of profit. One way is through YouTube’s built-in monetization options, such as displaying ads on your videos, sponsorships, and affiliate marketing. Another way is to use your Shorts videos’ popularity to promote your products or services.
You can also use YouTube Shorts to drive traffic to your website, where you can sell products or services. Collaborating with brands and promoting their products in your videos can also be a great way to monetize your content. It’s important to remember that building a sizable audience and creating high-quality content is key to monetizing your YouTube Shorts.
Benefits of Using Templates to Create YouTube Shorts
There are several benefits to using templates to create YouTube Shorts, including:

- Time-saving: Templates provide a pre-designed structure for your video, which saves you time and effort in creating a polished and professional-looking video.
- Consistency: Templates can help you maintain a consistent look and feel for your videos, which helps to build your brand and make your videos easily recognizable.
- Cost-effective: Templates can be cost-effective, eliminating the need for expensive equipment or editing software.
- Increased engagement: Templates can help you create engaging videos that capture your audience’s attention and increase the likelihood of them watching and engaging with your content.
- Access to a wider audience: Templates can help increase your views and reach, which can help you grow your channel and reach a wider audience.
- Easy to use: Templates are easy to use, even if you have yet to gain any prior video editing experience.
Using templates allows you to quickly create high-quality, professional-looking videos while also saving money and reaching a wider audience.
How to Make YouTube Shorts Using a Video Editor With Templates
Creating YouTube Shorts using a video editor with templates is a great way to save time and effort while still producing polished, professional-looking videos. One great video editor that can be used for this purpose is Filmora. Filmora has desktop and mobile versions, so you can create YouTube Shorts using any device.
Video Templates Feature of Filmora
With Wondershare Filmora , users can access a variety of templates for YouTube Shorts, which can be easily customized to fit the style and theme of their videos. These templates include various themes such as travel, vlogs, product demos, and more.
Wondershare Filmora also provides a wide range of editing tools, such as text, music, and effects, to help users create engaging and visually appealing videos. Filmora’s templates are an easy and efficient way to create visually appealing and engaging YouTube Shorts that stand out from the rest.
Free Download For Win 7 or later(64-bit)
Free Download For macOS 10.14 or later
Step-by-Step Guide to Create YouTube Shorts With Templates Using Filmora for Desktop
Creating professional-looking YouTube Shorts can be time-consuming and daunting, especially if you have limited experience with video editing. However, using a video editor like Filmora, you can easily create high-quality YouTube Shorts using templates. This step-by-step guide will show you how to use Filmora’s video templates feature to create visually appealing YouTube Shorts on your desktop.
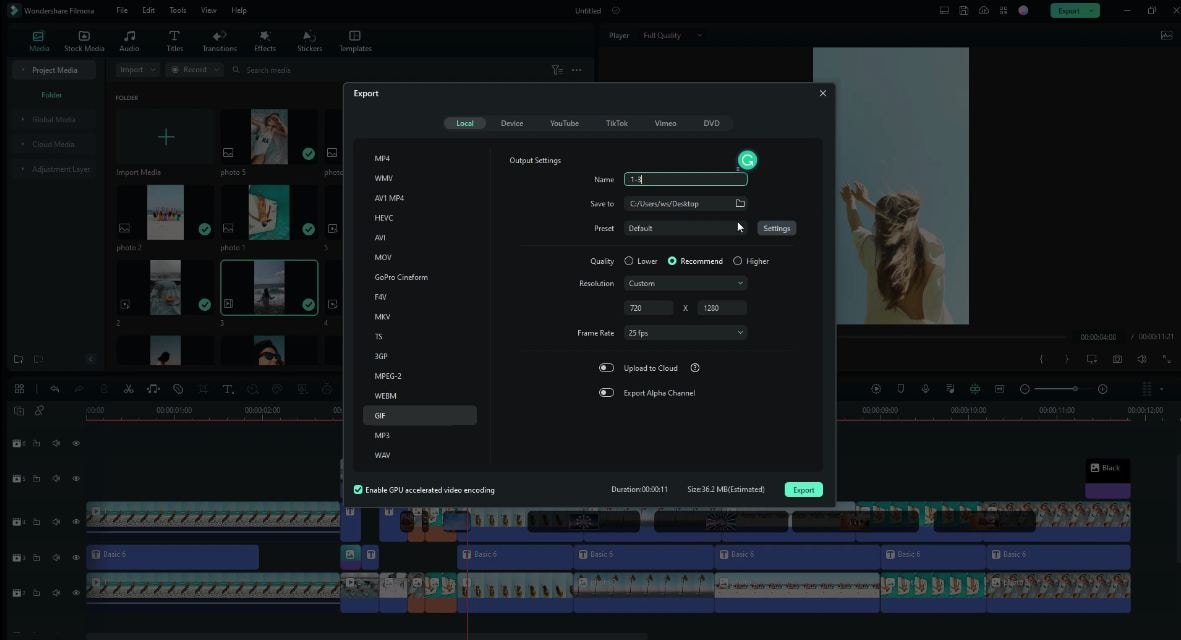
Step 1. Start Wondershare Filmora on your computer. On the “Templates” tab, you will find a variety of component templates to choose from.

Step 2. Select the template you want to use and place it on the timeline point.

Step 3. Add your videos, pictures, and audio files to the designated placeholders in the template to replace the sample ones.

Step 4. Trim, edit the clip or add other effects, texts and stickers as you like.

Step 5. Click the “Export“ button on the upper part to save your clip.
When creating YouTube Shorts, it is important to remember that these videos are vertical. You can easily find vertical video templates in Filmora’s template library. So select the one that best fits your needs and style.
Step-by-Step Guide to Use YouTube Shorts Video Templates With Filmora for Mobile
Creating professional-looking YouTube Shorts on mobile devices is now more accessible than ever. This step-by-step guide will show you how to use Filmora’s video templates feature to create visually appealing YouTube Shorts on your mobile device.
Step 1. Install the Filmora app on your device, then open it.

Step 2. Tap the “Template“ button on the screen’s bottom right.

Step 3. Select the template you wish to use.
Step 4. Press the “Make Video“ button to download the chosen template.

Step 5. Add the necessary footage to edit the template, then tap “Next.”

Step 6. You can preview the video and make any necessary changes.

Step 7. Tap the “Export“ button to save the completed video.

If you want to learn more about using Filmora’s video templates feature to create YouTube Shorts on your mobile device, we recommend watching this video tutorial:
YouTube Shorts Video Template Resources in Filmora
Filmora offers a wide variety of video templates that can be used to create YouTube Shorts. These templates include various themes such as an event, sports, fashion, lifestyle, and more. These templates can be found in Filmora’s library, making it easy for users to find the perfect template for their YouTube Short.
1. Event YouTube Shorts Template

Event YouTube Shorts Templates are an interactive way for creators to showcase their events dynamically and engagingly. These templates come with pre-designed elements such as animations, backgrounds, and text styles that are perfect for highlighting the key moments and creating excitement among the audience. It’s an effective way to make the event more engaging and interactive for the audience.
2. Sports YouTube Shorts Video Template
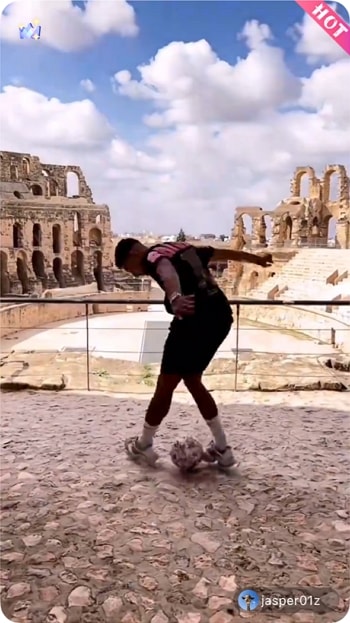
Sports YouTube Shorts video templates are pre-designed, customizable video templates for creating short, engaging sports-related content for YouTube’s Shorts feature. These templates often include scoreboards, team logos, and highlights footage and can be easily customized with your text, images, and videos. They are ideal for sports teams, athletes, and content creators looking to quickly and easily create professional-looking videos.
3. Fashion YouTube Shorts Template
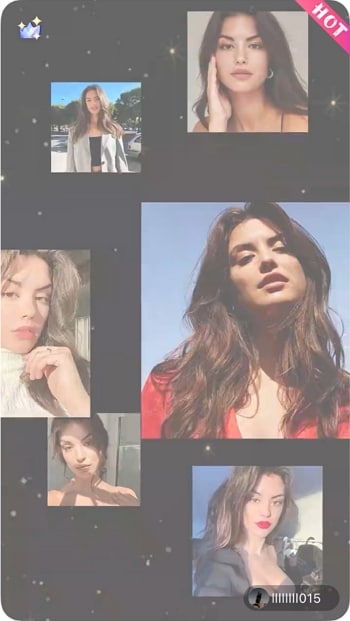
Fashion YouTube Shorts templates are pre-designed video templates that can be used to create visually appealing and engaging content for fashion-related YouTube Shorts. These templates often include elements such as fashion models, clothing and accessory displays, and trendy backgrounds and can be easily customized to suit the creator’s specific needs and aesthetic. They can be used to create various types of videos, including fashion lookbooks, product reviews, and styling tutorials.
4. Life Style Shorts Template

Lifestyle YouTube Shorts templates often include elements such as different lifestyle scenes, like traveling, cooking, home decor, and DIY projects, and can be easily customized to suit the creator’s specific needs and aesthetic. They can create various videos, including travel vlogs, recipe videos, and DIY tutorials.
Conclusion
YouTube Shorts are a great way to connect with your audience and promote your brand. Using a video editor like Filmora, you can easily create high-quality YouTube Shorts using templates. Filmora offers various video templates that can be used to create YouTube Shorts, including templates for events, sports, fashion, and lifestyle.
Filmora templates are fully customizable, meaning you can change the text, images, and colors to match your brand. These templates can be found in Filmora’s library, making it easy for users to find the perfect template for their YouTube Short. With the help of Filmora, you can easily create professional-looking YouTube Shorts that stand out and capture your audience’s attention.
Free Download For macOS 10.14 or later
Step-by-Step Guide to Create YouTube Shorts With Templates Using Filmora for Desktop
Creating professional-looking YouTube Shorts can be time-consuming and daunting, especially if you have limited experience with video editing. However, using a video editor like Filmora, you can easily create high-quality YouTube Shorts using templates. This step-by-step guide will show you how to use Filmora’s video templates feature to create visually appealing YouTube Shorts on your desktop.
Step 1. Start Wondershare Filmora on your computer. On the “Templates” tab, you will find a variety of component templates to choose from.
Step 2. Select the template you want to use and place it on the timeline point.
Step 3. Add your videos, pictures, and audio files to the designated placeholders in the template to replace the sample ones.
Step 4. Trim, edit the clip or add other effects, texts and stickers as you like.
Step 5. Click the “Export“ button on the upper part to save your clip.
When creating YouTube Shorts, it is important to remember that these videos are vertical. You can easily find vertical video templates in Filmora’s template library. So select the one that best fits your needs and style.
Step-by-Step Guide to Use YouTube Shorts Video Templates With Filmora for Mobile
Creating professional-looking YouTube Shorts on mobile devices is now more accessible than ever. This step-by-step guide will show you how to use Filmora’s video templates feature to create visually appealing YouTube Shorts on your mobile device.
Step 1. Install the Filmora app on your device, then open it.
Step 2. Tap the “Template“ button on the screen’s bottom right.
Step 3. Select the template you wish to use.
Step 4. Press the “Make Video“ button to download the chosen template.
Step 5. Add the necessary footage to edit the template, then tap “Next.”
Step 6. You can preview the video and make any necessary changes.
Step 7. Tap the “Export“ button to save the completed video.
If you want to learn more about using Filmora’s video templates feature to create YouTube Shorts on your mobile device, we recommend watching this video tutorial:
YouTube Shorts Video Template Resources in Filmora
Filmora offers a wide variety of video templates that can be used to create YouTube Shorts. These templates include various themes such as an event, sports, fashion, lifestyle, and more. These templates can be found in Filmora’s library, making it easy for users to find the perfect template for their YouTube Short.
1. Event YouTube Shorts Template
Event YouTube Shorts Templates are an interactive way for creators to showcase their events dynamically and engagingly. These templates come with pre-designed elements such as animations, backgrounds, and text styles that are perfect for highlighting the key moments and creating excitement among the audience. It’s an effective way to make the event more engaging and interactive for the audience.
2. Sports YouTube Shorts Video Template
Sports YouTube Shorts video templates are pre-designed, customizable video templates for creating short, engaging sports-related content for YouTube’s Shorts feature. These templates often include scoreboards, team logos, and highlights footage and can be easily customized with your text, images, and videos. They are ideal for sports teams, athletes, and content creators looking to quickly and easily create professional-looking videos.
3. Fashion YouTube Shorts Template
Fashion YouTube Shorts templates are pre-designed video templates that can be used to create visually appealing and engaging content for fashion-related YouTube Shorts. These templates often include elements such as fashion models, clothing and accessory displays, and trendy backgrounds and can be easily customized to suit the creator’s specific needs and aesthetic. They can be used to create various types of videos, including fashion lookbooks, product reviews, and styling tutorials.
4. Life Style Shorts Template
Lifestyle YouTube Shorts templates often include elements such as different lifestyle scenes, like traveling, cooking, home decor, and DIY projects, and can be easily customized to suit the creator’s specific needs and aesthetic. They can create various videos, including travel vlogs, recipe videos, and DIY tutorials.
Conclusion
YouTube Shorts are a great way to connect with your audience and promote your brand. Using a video editor like Filmora, you can easily create high-quality YouTube Shorts using templates. Filmora offers various video templates that can be used to create YouTube Shorts, including templates for events, sports, fashion, and lifestyle.
Filmora templates are fully customizable, meaning you can change the text, images, and colors to match your brand. These templates can be found in Filmora’s library, making it easy for users to find the perfect template for their YouTube Short. With the help of Filmora, you can easily create professional-looking YouTube Shorts that stand out and capture your audience’s attention.
Also read:
- Achieving Broadcast Excellence Your Guide to YouTube's Live 360 Videos
- Advanced Techniques for High-Quality YouTube Content
- Assessment of Vidma's Impact on Modern Screen Recorders for 2024
- Best Camera for Videos Mirrorless Vs. DSLR Showdown for 2024
- Boost Views and Engagement Top-Rated Online Keyword Generators for 2024
- Choosing the Right Lights & Cameras for YouTube Videos for 2024
- Comparing Social Platforms Facebook LIVE Vs. YouTube Live & Twitter Periscope
- In 2024, How to Unlock iPhone 13 Pro Passcode without Computer? | Dr.fone
- In 2024, Pioneering Audio Enhancement for Compelling Visual Stories
- Masterclass Conquering One-Device Livestream Challenges
- The Most Useful Tips for Pokemon Go Ultra League On Honor X9a | Dr.fone
- Tom's Computing Wisdom: Top Picks for Your Next Tech Investment
- Top 5 Meilleures Applications De Visionnage Video 4K Ultra HD Compatibles Avec PC Et MAC : Téléchargement & Avis
- What Legendaries Are In Pokemon Platinum On Oppo Reno 8T? | Dr.fone
- Title: In 2024, Audio Clarity 10 Pro Tips for High-Quality Recordings
- Author: Steven
- Created at : 2025-01-15 16:11:41
- Updated at : 2025-01-22 16:44:09
- Link: https://youtube-clips.techidaily.com/in-2024-audio-clarity-10-pro-tips-for-high-quality-recordings/
- License: This work is licensed under CC BY-NC-SA 4.0.