
:max_bytes(150000):strip_icc()/copilotpp03-763a146c397e4255b6dcb549c1073474.jpg)
"How YouTube Manages Content Post-Upload"
How YouTube Manages Content Post-Upload
How Does YouTube Work After a Video Is Uploaded

Richard Bennett
Mar 27, 2024• Proven solutions
You use YouTube to watch videos, post your own content, and build up a following. That is how YouTube works for you. This article is about how YouTube works technically. There are a lot of steps which occur between you clicking ‘upload’ and a viewer clicking ‘play’. Understanding this process can be useful to YouTubers because it can help shed light on where problems may be occurring when you have issues uploading or watching videos. Generally when there is a problem it is on your end and there are multiple simple things you can do to fix it.
This article will explain what goes on behind the scenes when you upload a video, where that video really goes, and what happens when somebody clicks play.
How Does YouTube Work
1. What Happens When You Upload?
When you upload a video your computer or device packages it into IP packets. Packets are fragments of information containing both data from your video and the address you are sending it to, in this case YouTube. The packets are encoded into radio signals which are sent through a wifi or cellular network. Your video travels through switches and routers on the internet until they reach YouTube’s servers. Your video is then reassembled and stored.
If uploading takes a long time for you it probably has nothing to do with YouTube; there is a lot that needs to happen for your video to even get there. How long the upload process takes depends on a number of factors including how many devices share your internet connection, how strong your wifi signal is, and the age of your router. If your uploads are taking too long consider compressing your videos before you upload them. You can also try uploading from your college campus or public libraries as institutions like these tend to have fast internet speeds.
2. Where is Your Video Stored?

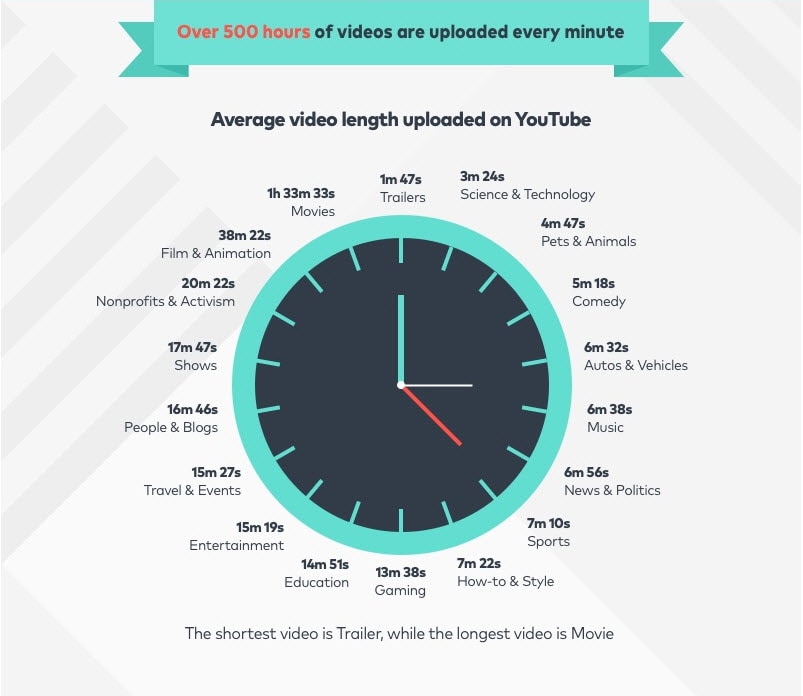
As it is owned by Google YouTube uses Google’s ‘Bigtable’, a compressed data storage system which allows it to store the 500+ hours of video uploaded to its servers every minute. Bigtable is software, though, not hardware. YouTube and Google both have massive amounts of data and it needs to be physically housed somewhere.
Google has Modular Data Centers all over the world where it keeps its servers. These centers could cost as much as $600 million dollars each and consume huge amounts of electricity. There are six of them in the United States, three in Europe, two in Asia, and one is South America.
3. What Happens When Someone Watches Your Video?
When a viewer clicks on your video their computer sends an encoded request through the internet to YouTube’s servers. After YouTube receives the play request it chooses which format to play the video in based on the viewer’s browser. Your video is again turned into packets, which are again sent as radio signals over the internet to your viewer. Your viewer’s computer or device reforms the packets into your video and their browser plays it.
If videos take a long time to load for you then there are a few things you can do to speed them up. First, consider changing the channel of your wifi router. Most people stay on the channel their router was set to when they first got it and so there is a good chance you and your neighbors are all on the same channel. This causes your networks to interfere with each other. You can also delete the temporary files on your computer. Besides helping you stream video faster this will free up storage space. Another thing you can do is make sure there are as few devices connected to your network as possible while you are watching videos. Besides mobile phones and laptops you may have appliances, like coffee machines and refrigerators, which are wifi enabled. Disconnect them temporarily and it will help your videos to load faster.
Richard Bennett
Richard Bennett is a writer and a lover of all things video.
Follow @Richard Bennett
Richard Bennett
Mar 27, 2024• Proven solutions
You use YouTube to watch videos, post your own content, and build up a following. That is how YouTube works for you. This article is about how YouTube works technically. There are a lot of steps which occur between you clicking ‘upload’ and a viewer clicking ‘play’. Understanding this process can be useful to YouTubers because it can help shed light on where problems may be occurring when you have issues uploading or watching videos. Generally when there is a problem it is on your end and there are multiple simple things you can do to fix it.
This article will explain what goes on behind the scenes when you upload a video, where that video really goes, and what happens when somebody clicks play.
How Does YouTube Work
1. What Happens When You Upload?
When you upload a video your computer or device packages it into IP packets. Packets are fragments of information containing both data from your video and the address you are sending it to, in this case YouTube. The packets are encoded into radio signals which are sent through a wifi or cellular network. Your video travels through switches and routers on the internet until they reach YouTube’s servers. Your video is then reassembled and stored.
If uploading takes a long time for you it probably has nothing to do with YouTube; there is a lot that needs to happen for your video to even get there. How long the upload process takes depends on a number of factors including how many devices share your internet connection, how strong your wifi signal is, and the age of your router. If your uploads are taking too long consider compressing your videos before you upload them. You can also try uploading from your college campus or public libraries as institutions like these tend to have fast internet speeds.
2. Where is Your Video Stored?
As it is owned by Google YouTube uses Google’s ‘Bigtable’, a compressed data storage system which allows it to store the 500+ hours of video uploaded to its servers every minute. Bigtable is software, though, not hardware. YouTube and Google both have massive amounts of data and it needs to be physically housed somewhere.
Google has Modular Data Centers all over the world where it keeps its servers. These centers could cost as much as $600 million dollars each and consume huge amounts of electricity. There are six of them in the United States, three in Europe, two in Asia, and one is South America.
3. What Happens When Someone Watches Your Video?
When a viewer clicks on your video their computer sends an encoded request through the internet to YouTube’s servers. After YouTube receives the play request it chooses which format to play the video in based on the viewer’s browser. Your video is again turned into packets, which are again sent as radio signals over the internet to your viewer. Your viewer’s computer or device reforms the packets into your video and their browser plays it.
If videos take a long time to load for you then there are a few things you can do to speed them up. First, consider changing the channel of your wifi router. Most people stay on the channel their router was set to when they first got it and so there is a good chance you and your neighbors are all on the same channel. This causes your networks to interfere with each other. You can also delete the temporary files on your computer. Besides helping you stream video faster this will free up storage space. Another thing you can do is make sure there are as few devices connected to your network as possible while you are watching videos. Besides mobile phones and laptops you may have appliances, like coffee machines and refrigerators, which are wifi enabled. Disconnect them temporarily and it will help your videos to load faster.
Richard Bennett
Richard Bennett is a writer and a lover of all things video.
Follow @Richard Bennett
Infusing Energy Into Video Summaries: Neon Thumbnail Edges
Your YouTube video, or any other clip published on any forum, gets a larger number of hits if it has an attractive thumbnail. And, the fact is, a thumbnail becomes 10x more attractive when the main character that the image has have a neon border around it.
With that said, in the following sections, you will learn a couple of methods on how to add a YouTube thumbnail border around the main characters and/or objects that are significant to the clip.
In this article
01 Add Glowing Neon Border to YouTube Thumbnail with Filmora
02 Add a Glowing Neon Border in YouTube Thumbnail with Canva
03 Outline a Person in a YouTube Thumbnail with Photoshop
Part 1: How to Add Neon Border to YouTube Thumbnail for Free with Filmora
Being one of the most versatile and intuitive post-production tools available in the market today, Wondershare Filmora X allows you to add a neon border to a YouTube thumbnail quite conveniently. You can learn how to get this done on Windows or Mac by following the steps given below.
For Win 7 or later (64-bit)
For macOS 10.12 or later
Step 1: Define Project Settings and Add Image to the Timeline
Launch Wondershare Filmora X on your PC (a MacBook Pro M1 is used here), ensure that the project aspect ratio is set to 16:9 (Widescreen) on the splash screen, and click New Project. On the main interface, click the Preview quality and display settings icon from the upper-right area of the Timeline, click Change Project Aspect Ratio, click to select 1280 x 720 (HD) from the Resolution menu of the Project Settings box, and click OK to save the custom project settings.

Then select My Media from the menu bar if not already selected, click Project Media from the navigation pane, and click Import from the Media box to select and import the image of the main character or object that you want to use in the thumbnail.

Now, drag the image from the Media box to the Timeline at the bottom.

Step 2: Clear Image Background, Add Border, and Add Custom Background
Go to Effects from the menu bar, click to select the Default tab and then AI Portrait from the navigation pane, and click and drag the Human Segmentation preset from the right box, and place it over the image track in the Timeline.

Double-click the image layer, scroll down the upper-left box to the Video Effects section, and use the Edge Thickness and Edge Feather sliders to adjust the character’s edges to make them as realistic as possible. Click OK when done.

Next, click and drag the Human Border preset over the image track in the Timeline, and follow the same procedure to customize the border. This will give the character a neon border effect.

Now, use the method explained earlier to import a custom image for the background, and drag and place it under the previous track in the Timeline.

If you are running the latest version of Filmora, you will find there are some neon light effects available under AI Portrait as well.

Step 3: Add Titles to Thumbnail
Go to Titles from the menu bar, click to select the Default tab and then Lower 3rds from the navigation pane, and click and drag your preferred lower-third preset from the right window to a separate layer in the Timeline. Double-click the lower-third layer, and use the available options in the upper-left window to change the text, its color, etc., and drag the textbox to place it to your preferred position on the image as well. Click OK to save the changes.
Next, click to select Titles from the navigation pane, and drag your preferred title from the right window to the upper-most track in the Timeline. Now use the method explained earlier to edit the text, its color, position, etc. to make it look professional.

For more tips and tricks for creating YouTube thumbnail, you can check this You Tube thumbnail creating guide.
Step 4: Get the Neon Border Thumbnail
Click the Snapshot (Camera) icon from the upper-right area of the Timeline, go to My Media from the menu bar, right-click the thumbnail of the screenshot you captured, and click Reveal in Finder (on Mac) or Reveal in Explorer (on Windows) to get to the folder the YouTube thumbnail border is saved in.

Part 2: How to Add a Glowing Neon Border in Your YouTube Thumbnail with Canva
Canva is another intuitive editing program that works on the web interface rather than having you download and install an app on your PC. You can add a neon border for YouTube thumbnails using Canva by following the instructions given below:
Step 1: Define Project Settings and Add a Background
After signing in to your Canva account, click Create a design from the top-right corner of the page, click Custom size from the bottom, define 1280 and 720 in the Width and Height fields on the box that appears respectively, and click Create new design.

Now, click to select Background from the navigation bar on the left (if the Background tool is not visible, click More and then choose Background from the expanded list), and click to select a background from the images available in the center pane.

Step 2: Upload an Image and Add Effects
Click Uploads from the navigation bar, click the More icon from the right of the Upload media button present at the top of the center pane, choose your preferred method to upload the image (with the transparent background) that you want to use, upload the image, and drag it from the center pane to the Canvas.
Note: You can use any of the tools available online to remove the background from your image for free.

To add a YouTube thumbnail border, make sure that the image that you added to the Canvas is selected, click the Duplicate icon from the upper-right area, and use the scaling handles of the copy of the image to increase its size a bit. Reposition the image back to its original location as well.
Then, click Edit image from the upper-left corner of the Canvas, click Duotone from the Edit image pane at the center, if need be, click See all, choose your preferred duotone effect to apply on the image, choose your preferred highlight and shadow colors from the box that appears next, and click Back from the top of the pane.

Next, click See all next to the Adjust section from the center pane, and drag the Blur slider to the right to increase the blur effect on the image.

Step 3: Position the Layers
While keeping the duplicate image selected, click the Position button from the upper-right area of the Canvas, and click Background to send the second image behind the first one to get the neon border effect for the photo.

Part 3: How to Outline a Person in a YouTube Thumbnail with Photoshop
Because YouTube thumbnails are nothing but static images, creating YouTube thumbnail border with Adobe Photoshop is comparatively easier. The process of doing this is given below:
Step 1: Define Document Preferences and Import an Image
Launch Adobe Photoshop on your PC, click Create new, and on the New Document customization box, define the width and height values to 1280 and 720 pixels respectively. Select Transparent from the Background Contents menu as well if not already selected. Click Create from the bottom to create a new Photoshop document with the specified document settings. Next, open the folder that contains the source image, drag the photo to Photoshop, and press Enter to place the photo.

Step 2: Remove Background from the Image
Make sure that the image layer is selected in the Layers panel on the right, go to Select from the menu bar at the top, and click Subject. From the bottom of the Layers panel, click the Add a mask icon to get rid of the background, leaving only the human on the Canvas.

Step 3: Add a Custom Background and an Outline Around the Subject
Use the method explained earlier to import a background image of your choice to Photoshop. Drag the background image layer to the bottom in the Layers panel. Double-click the masked layer, click to select Stroke from the left pane of the Layer Style box, and use the options available on the right to manage the size, color, position, etc. of the stroke that has been added around the human subject. Click OK when done, and then export the image normally to use it as a YouTube thumbnail border.

Summary
It is important to know that the default resolution of a YouTube thumbnail is 1280 x 720 pixels that is usually written and referred to as 720p. While adding a YouTube thumbnail border, it is also imperative to have a good sense of color combination and fonts. Furthermore, a decent tool like Wondershare Filmora X must be used to add an appealing neon border around the main subject in the thumbnail image easily and quickly.
02 Add a Glowing Neon Border in YouTube Thumbnail with Canva
03 Outline a Person in a YouTube Thumbnail with Photoshop
Part 1: How to Add Neon Border to YouTube Thumbnail for Free with Filmora
Being one of the most versatile and intuitive post-production tools available in the market today, Wondershare Filmora X allows you to add a neon border to a YouTube thumbnail quite conveniently. You can learn how to get this done on Windows or Mac by following the steps given below.
For Win 7 or later (64-bit)
For macOS 10.12 or later
Step 1: Define Project Settings and Add Image to the Timeline
Launch Wondershare Filmora X on your PC (a MacBook Pro M1 is used here), ensure that the project aspect ratio is set to 16:9 (Widescreen) on the splash screen, and click New Project. On the main interface, click the Preview quality and display settings icon from the upper-right area of the Timeline, click Change Project Aspect Ratio, click to select 1280 x 720 (HD) from the Resolution menu of the Project Settings box, and click OK to save the custom project settings.
Then select My Media from the menu bar if not already selected, click Project Media from the navigation pane, and click Import from the Media box to select and import the image of the main character or object that you want to use in the thumbnail.
Now, drag the image from the Media box to the Timeline at the bottom.
Step 2: Clear Image Background, Add Border, and Add Custom Background
Go to Effects from the menu bar, click to select the Default tab and then AI Portrait from the navigation pane, and click and drag the Human Segmentation preset from the right box, and place it over the image track in the Timeline.
Double-click the image layer, scroll down the upper-left box to the Video Effects section, and use the Edge Thickness and Edge Feather sliders to adjust the character’s edges to make them as realistic as possible. Click OK when done.
Next, click and drag the Human Border preset over the image track in the Timeline, and follow the same procedure to customize the border. This will give the character a neon border effect.
Now, use the method explained earlier to import a custom image for the background, and drag and place it under the previous track in the Timeline.
If you are running the latest version of Filmora, you will find there are some neon light effects available under AI Portrait as well.
Step 3: Add Titles to Thumbnail
Go to Titles from the menu bar, click to select the Default tab and then Lower 3rds from the navigation pane, and click and drag your preferred lower-third preset from the right window to a separate layer in the Timeline. Double-click the lower-third layer, and use the available options in the upper-left window to change the text, its color, etc., and drag the textbox to place it to your preferred position on the image as well. Click OK to save the changes.
Next, click to select Titles from the navigation pane, and drag your preferred title from the right window to the upper-most track in the Timeline. Now use the method explained earlier to edit the text, its color, position, etc. to make it look professional.
For more tips and tricks for creating YouTube thumbnail, you can check this You Tube thumbnail creating guide.
Step 4: Get the Neon Border Thumbnail
Click the Snapshot (Camera) icon from the upper-right area of the Timeline, go to My Media from the menu bar, right-click the thumbnail of the screenshot you captured, and click Reveal in Finder (on Mac) or Reveal in Explorer (on Windows) to get to the folder the YouTube thumbnail border is saved in.
Part 2: How to Add a Glowing Neon Border in Your YouTube Thumbnail with Canva
Canva is another intuitive editing program that works on the web interface rather than having you download and install an app on your PC. You can add a neon border for YouTube thumbnails using Canva by following the instructions given below:
Step 1: Define Project Settings and Add a Background
After signing in to your Canva account, click Create a design from the top-right corner of the page, click Custom size from the bottom, define 1280 and 720 in the Width and Height fields on the box that appears respectively, and click Create new design.
Now, click to select Background from the navigation bar on the left (if the Background tool is not visible, click More and then choose Background from the expanded list), and click to select a background from the images available in the center pane.
Step 2: Upload an Image and Add Effects
Click Uploads from the navigation bar, click the More icon from the right of the Upload media button present at the top of the center pane, choose your preferred method to upload the image (with the transparent background) that you want to use, upload the image, and drag it from the center pane to the Canvas.
Note: You can use any of the tools available online to remove the background from your image for free.
To add a YouTube thumbnail border, make sure that the image that you added to the Canvas is selected, click the Duplicate icon from the upper-right area, and use the scaling handles of the copy of the image to increase its size a bit. Reposition the image back to its original location as well.
Then, click Edit image from the upper-left corner of the Canvas, click Duotone from the Edit image pane at the center, if need be, click See all, choose your preferred duotone effect to apply on the image, choose your preferred highlight and shadow colors from the box that appears next, and click Back from the top of the pane.
Next, click See all next to the Adjust section from the center pane, and drag the Blur slider to the right to increase the blur effect on the image.
Step 3: Position the Layers
While keeping the duplicate image selected, click the Position button from the upper-right area of the Canvas, and click Background to send the second image behind the first one to get the neon border effect for the photo.
Part 3: How to Outline a Person in a YouTube Thumbnail with Photoshop
Because YouTube thumbnails are nothing but static images, creating YouTube thumbnail border with Adobe Photoshop is comparatively easier. The process of doing this is given below:
Step 1: Define Document Preferences and Import an Image
Launch Adobe Photoshop on your PC, click Create new, and on the New Document customization box, define the width and height values to 1280 and 720 pixels respectively. Select Transparent from the Background Contents menu as well if not already selected. Click Create from the bottom to create a new Photoshop document with the specified document settings. Next, open the folder that contains the source image, drag the photo to Photoshop, and press Enter to place the photo.
Step 2: Remove Background from the Image
Make sure that the image layer is selected in the Layers panel on the right, go to Select from the menu bar at the top, and click Subject. From the bottom of the Layers panel, click the Add a mask icon to get rid of the background, leaving only the human on the Canvas.
Step 3: Add a Custom Background and an Outline Around the Subject
Use the method explained earlier to import a background image of your choice to Photoshop. Drag the background image layer to the bottom in the Layers panel. Double-click the masked layer, click to select Stroke from the left pane of the Layer Style box, and use the options available on the right to manage the size, color, position, etc. of the stroke that has been added around the human subject. Click OK when done, and then export the image normally to use it as a YouTube thumbnail border.
Summary
It is important to know that the default resolution of a YouTube thumbnail is 1280 x 720 pixels that is usually written and referred to as 720p. While adding a YouTube thumbnail border, it is also imperative to have a good sense of color combination and fonts. Furthermore, a decent tool like Wondershare Filmora X must be used to add an appealing neon border around the main subject in the thumbnail image easily and quickly.
Also read:
- Ignite a Sensation How to Have Your Video Go Viral
- [New] Enhancing Social Reach YouTube Videos on Facebook Sites
- Propel Your Digital Presence Past the Thousand Mark
- Dynamic Discussions for Regular Streaming
- The Ultimate Guide Undoing Your YT Playback Sequence
- Focus on the Essentials The Compreenas for Removing Youtube Channels
- Copyright Rules for Screenshotting and Archiving YouTube Videos
- Text Gymnastics Ingenious Techniques for Animated Bounces
- [Updated] Chronicles of Time Student-Approved Historical YT Content
- [Updated] Curbing Common Mishaps YouTube Short Edition
- Crafting the Perfect End Screen - YouTube Template Guidebook for 2024
- Tech Tips Swiftly Sending Videos as Shorts on Digital Platforms
- [Updated] Analyzing the Influence of Financial Investment on YouTube Success Stories
- 2024 Approved Enhancing Your Stream's Visibility by Sharing via YouTube
- Essential Steps for Online Gamers' Banner Use
- [Updated] Best YouTube Video Reaction Ideas
- [Updated] Cutting Through Complexity Twitch Content on YouSocial Media Giant
- Essential Tips for Incorporating Dynamic Cards in YouTube Videos
- [New] DIY Filmmaking for YouTube Personalities
- Masterclass in YouTube Video Previews and Trailers
- Income Growth in Gaming Videos
- [Updated] Behind-the-Scenes Insights Deciphering What 'Unlisted' Means for YouTube Users
- Effortless Music Playlist Creation for YouTube, Anywhere (Web/Mobile)
- Seamless Creation at Your Fingertips Selecting Android's Top Editors
- Direct to YouTube Stepwise Process of Mobile & Desktop Video Posting
- Unlocking Financial Success Through Youtube's Viewer Count
- In 2024, Audience Engagement Where to Captivate Viewers
- Essential Audio Tools Free, Superior DJ Templates Online for 2024
- [Updated] Effortless Subscriber Acquisition for Enhanced Viewership
- In 2024, Vimeo vs YouTube Differences Between Vimeo and YouTube
- Becoming a Lyric Video Pro A Lyric Video Maker's Journey for 2024
- Seamless Online Video Capture Hub
- Reel Your Audience In Creating Dynamic Reaction Content on YouTube (2 POV Technique)
- [Updated] In 2024, Efficiently Transforming TikTok Videos Into GIF Format
- In 2024, How to Track a Lost Realme Narzo N53 for Free? | Dr.fone
- [Updated] Installing Social Media Adding Snapchat to Your Mac
- In 2024, 4 Most-Known Ways to Find Someone on Tinder For Lava Blaze Pro 5G by Name | Dr.fone
- How to Fake GPS on Android without Mock Location For your Oppo A1x 5G | Dr.fone
- 3uTools Virtual Location Not Working On Xiaomi Redmi 13C 5G? Fix Now | Dr.fone
- How to Change Spotify Location After Moving to Another Country On Xiaomi Redmi Note 13 5G | Dr.fone
- [New] 2024 Approved Exploring iSpring's Screencap Capabilities
- Updated Inside Clubhouse Dissecting Its Core Ethos, Features, and Significance in the Modern Era
- In 2024, How to Unlock Motorola Edge 2023 Phone with Broken Screen
- The Ultimate Guide to Nubia Red Magic 8S Pro Pattern Lock Screen Everything You Need to Know
- [Updated] StreamlinedProcess for YouCamWebRecord
- In 2024, Pokemon Go Error 12 Failed to Detect Location On Apple iPhone SE? | Dr.fone
- 2024 Approved Download and Launch An Easy Path with VRecord
- Two Ways to Track My Boyfriends OnePlus Ace 2V without Him Knowing | Dr.fone
- First Steps to Enhanced GoPro Experience
- [New] Master Video Cropping for Unique Instagram Visuals for 2024
- [Updated] VisualCapture Pro X - Windows Enthusiasts for 2024
- Updated In 2024, How to Convert SRT to DOCX
- In 2024, Master the Art of Storytelling with Impactful Snap Campaigns
- Title: "How YouTube Manages Content Post-Upload"
- Author: Steven
- Created at : 2024-05-25 19:27:21
- Updated at : 2024-05-26 19:27:21
- Link: https://youtube-clips.techidaily.com/how-youtube-manages-content-post-upload/
- License: This work is licensed under CC BY-NC-SA 4.0.
