
:max_bytes(150000):strip_icc():format(webp)/social-media-text-588a94263df78caebc620f05.jpg)
How to Embed YouTube in Your GSlides Presentation
How to Embed YouTube in Your GSlides Presentation
Create High-Quality Video - Wondershare Filmora
An easy and powerful YouTube video editor
Numerous video and audio effects to choose from
Detailed tutorials provided by the official channel
Google Slide presentation is a powerful tool for creators to keep their audience engaged. This online platform lets you create and demonstrate your ideas. It will capture your viewers’ attention from the very beginning. It also doesn’t matter whatever learning style you engage. Adding YouTube videos to Google Slide will appeal to all levels of individuals.
More so, it is the best way to provide a break for both the audience and the creator. You can break Google Slide presentations with videos to offer some break. Viewers and the presenter get a breather in the process. The presenter can take a short break from speaking while the video plays. Let’s now dive into how to embed a YouTube video in Google Slides.

In this article
01 Why should we add a video to Google Slides?
02 How to add a YouTube video to Google Slide
03 How to choose the right video for your Slides?
Why should we add a video to Google Slides?
There is a great impact of adding video to Google Slides.
For attention
Videos will automatically awaken you, especially if your thoughts have started to sway during a presentation. A video has a direct way of showing creativity. The audience automatically connects the dots between the video and the presentation lines alike.
To stimulate discussion
A picture is worth a thousand words. There is a way that an added video will help the audience connect to the day’s topic. It will bring up several ideas and stir up discussion with the presenter.
Easy following
With videos embedded in Google Slide, viewers will find it easy to understand and digest. Videos automatically eliminate boredom and make any topic interesting.
How to add a YouTube video to Google Slide
Use these two methods to add a YouTube video to Google Slides. Via the Search and Direct link.
Method 1. Embed YouTube video to Google Slide by search and selection
Google has owned YouTube since the year 2006. You can, therefore, integrate Google’s products with YouTube easily.
Step 1. First, go to the slide where you want to embed your video.
Step 2. Then choose the “Insert” option from the menu bar and hit the “Video” option.

Step 3. It would be best if you now viewed the “YouTube” search bar to type in the video you want to embed. You can use keywords to search for the video in question and view instant search results.
Step 4. Then select the video you want to embed, and you’ll see it appear on the “Slide.”

Step 5. Format your video. Remember that the entire video will be embedded. You don’t necessarily need the whole video. It is time to select just a brief but relevant clip from the video to use. Then position your video to the right point using the axes from the exact starting point to the finished part you want the video to appear in.
Method 2. Embed YouTube video to Google Slide by direct link
You can engage this method if you want to include the entire video.
Step 1. Get the URL of the specific YouTube video that you want to use.

Step 2. Then go to your browser’s “Address bar” to copy the YouTube link.
Step 3. Next, open the “Presentation” slide to put your video to.
Step 4. Choose the “Insert” tab from the menu bar.
Step 5. Then hit on the “Video” option from the drop-down menu that appears.
Step 6. A new window will open automatically. Choose the “By URL” tab.
Step 7. Then paste the YouTube video URL in the “Paste YouTube URL Here” bar section.

Step 8. Wait for the video file to load and press the “Select” option. The video will immediately appear in the presentation slide. Just drag and drop the video in your preferred position.
Note: You can do a few edits inside the application. Set the timer when your video should start and when to stop. You can also adjust the video player size.
How to choose the right video for your Slides?
Not all videos will make an impact on your Google Slide. You need to use the best shot that adds value to your presentation. These guidelines will help you to settle on the best video.
Be Professional – choose the best video for your presentation. Remember that the video is part of the presentation and carries more weight. Settling for quality video will bring out the professionalism in you.
Relevant – how do you know that what you are showing your audience corresponds to the presentation piece? Ensure that the video you add has something to do with the Google Slide presentation topic. The two should naturally flow to make it easy to understand the whole concept.
Precise – your presentation is not about the video. The ideal length should not exceed 60 seconds. The longer the video, the greater the chance for your audience to lose track along the way.
Know every footage you are working with – this will help you pick the best shots for your presentation. So, learn every aspect of the video before settling down to use it.
Add new content – even though one content may suit several presentations, don’t rely on the same piece each time. Your audience will want to feel something fresh each time you are presenting. So, compose different videos for different scenarios to make that big impact.
Create an eye-catching video for your Slides with Filmora
The video quality matters when it comes to creating your Slides. The best video creator – Filmora – works in simple steps to give you an eye-catching video. It will create videos for all scenarios like marketing, tutorial, gaming, etc.
Key features of Filmora
- It offers you advanced video effects like filters, motion elements, etc
- You can multiply your fun with multiple screens with the Split Screen feature
- Easily change backgrounds using the Green Screen feature
- The speed control lets you fast forward or slow down a special moment
- Import your video clips to social media platforms
- You can also adjust the audio of your tracks using the Audio Mixer feature
Follow this guide to create a video for your slide with Filmora
Step 1. Launch Filmora
First, begin by downloading and installing Filmora on your computer device. Once installed, launch it and allow it to run. You can either create a new project or open an existing project to work on.
Step 2. Create a new project
Here, click on the “New Project” tab on the app’s welcome screen. The editor should load immediately. Then proceed to register the product. Just hit on the “Register” tab.
Step 3. Import video
Check the upper left corner of your screen to see the “Import” tab. Click on it and choose the “Import Media Files” option. Next, navigate to the location of your computer’s local list to select the clip or video you want to edit. Then, hit the “Import” button to add the video to the timeline for editing.
Step 4. Edit video
Drag and drop the raw footage to Filmora’s timeline to begin editing. Here, you can trim, add other video clips, merge, and add effects as you wish. Likewise, you can add opening titles, subtitles, and end credits to your video. More so, this tool offers different templates to use. Just drag and drop the templates you wish to use to a specific location on the timeline.
Step 5. Preview your file
Last but not least, you can preview your files. Click on the “Play” tab to start previewing your video clips. The main essence of this part is to allow you to make the necessary changes to your clips if there is a need.
Step 6. Export and Share
With Filmora, you can export your file to various social media platforms. But first, go to the “Output window” and select the video file format to use. This software supports several output formats to apply to any platform and device. Just click on the “Format” tab and choose the file format to use. Then also change the resolution and other parameters like frame rate and channel of your video in the “Settings” section. Finally, share your video to your YouTube channel and get ready to add the video to the Google Slide presentation.
For Win 7 or later (64-bit)
For macOS 10.12 or later
Conclusion
● You now know how to put a YouTube video in Google Slides the simple way. You can search for your YouTube videos or directly use the URL link. Whatever the case, remember that it’s the quality of your video that carries more weight. Thanks to the availability of third-party apps that you can use to create and improve the quality of your videos.
● Filmora is at your service to create high-resolution videos that you can export in any format to your YouTube channel. The tool is intuitive, and it won’t matter whether you haven’t tried it before. It is a perfect choice for both professionals and first-time users.
Google Slide presentation is a powerful tool for creators to keep their audience engaged. This online platform lets you create and demonstrate your ideas. It will capture your viewers’ attention from the very beginning. It also doesn’t matter whatever learning style you engage. Adding YouTube videos to Google Slide will appeal to all levels of individuals.
More so, it is the best way to provide a break for both the audience and the creator. You can break Google Slide presentations with videos to offer some break. Viewers and the presenter get a breather in the process. The presenter can take a short break from speaking while the video plays. Let’s now dive into how to embed a YouTube video in Google Slides.
In this article
01 Why should we add a video to Google Slides?
02 How to add a YouTube video to Google Slide
03 How to choose the right video for your Slides?
Why should we add a video to Google Slides?
There is a great impact of adding video to Google Slides.
For attention
Videos will automatically awaken you, especially if your thoughts have started to sway during a presentation. A video has a direct way of showing creativity. The audience automatically connects the dots between the video and the presentation lines alike.
To stimulate discussion
A picture is worth a thousand words. There is a way that an added video will help the audience connect to the day’s topic. It will bring up several ideas and stir up discussion with the presenter.
Easy following
With videos embedded in Google Slide, viewers will find it easy to understand and digest. Videos automatically eliminate boredom and make any topic interesting.
How to add a YouTube video to Google Slide
Use these two methods to add a YouTube video to Google Slides. Via the Search and Direct link.
Method 1. Embed YouTube video to Google Slide by search and selection
Google has owned YouTube since the year 2006. You can, therefore, integrate Google’s products with YouTube easily.
Step 1. First, go to the slide where you want to embed your video.
Step 2. Then choose the “Insert” option from the menu bar and hit the “Video” option.
Step 3. It would be best if you now viewed the “YouTube” search bar to type in the video you want to embed. You can use keywords to search for the video in question and view instant search results.
Step 4. Then select the video you want to embed, and you’ll see it appear on the “Slide.”
Step 5. Format your video. Remember that the entire video will be embedded. You don’t necessarily need the whole video. It is time to select just a brief but relevant clip from the video to use. Then position your video to the right point using the axes from the exact starting point to the finished part you want the video to appear in.
Method 2. Embed YouTube video to Google Slide by direct link
You can engage this method if you want to include the entire video.
Step 1. Get the URL of the specific YouTube video that you want to use.
Step 2. Then go to your browser’s “Address bar” to copy the YouTube link.
Step 3. Next, open the “Presentation” slide to put your video to.
Step 4. Choose the “Insert” tab from the menu bar.
Step 5. Then hit on the “Video” option from the drop-down menu that appears.
Step 6. A new window will open automatically. Choose the “By URL” tab.
Step 7. Then paste the YouTube video URL in the “Paste YouTube URL Here” bar section.
Step 8. Wait for the video file to load and press the “Select” option. The video will immediately appear in the presentation slide. Just drag and drop the video in your preferred position.
Note: You can do a few edits inside the application. Set the timer when your video should start and when to stop. You can also adjust the video player size.
How to choose the right video for your Slides?
Not all videos will make an impact on your Google Slide. You need to use the best shot that adds value to your presentation. These guidelines will help you to settle on the best video.
Be Professional – choose the best video for your presentation. Remember that the video is part of the presentation and carries more weight. Settling for quality video will bring out the professionalism in you.
Relevant – how do you know that what you are showing your audience corresponds to the presentation piece? Ensure that the video you add has something to do with the Google Slide presentation topic. The two should naturally flow to make it easy to understand the whole concept.
Precise – your presentation is not about the video. The ideal length should not exceed 60 seconds. The longer the video, the greater the chance for your audience to lose track along the way.
Know every footage you are working with – this will help you pick the best shots for your presentation. So, learn every aspect of the video before settling down to use it.
Add new content – even though one content may suit several presentations, don’t rely on the same piece each time. Your audience will want to feel something fresh each time you are presenting. So, compose different videos for different scenarios to make that big impact.
Create an eye-catching video for your Slides with Filmora
The video quality matters when it comes to creating your Slides. The best video creator – Filmora – works in simple steps to give you an eye-catching video. It will create videos for all scenarios like marketing, tutorial, gaming, etc.
Key features of Filmora
- It offers you advanced video effects like filters, motion elements, etc
- You can multiply your fun with multiple screens with the Split Screen feature
- Easily change backgrounds using the Green Screen feature
- The speed control lets you fast forward or slow down a special moment
- Import your video clips to social media platforms
- You can also adjust the audio of your tracks using the Audio Mixer feature
Follow this guide to create a video for your slide with Filmora
Step 1. Launch Filmora
First, begin by downloading and installing Filmora on your computer device. Once installed, launch it and allow it to run. You can either create a new project or open an existing project to work on.
Step 2. Create a new project
Here, click on the “New Project” tab on the app’s welcome screen. The editor should load immediately. Then proceed to register the product. Just hit on the “Register” tab.
Step 3. Import video
Check the upper left corner of your screen to see the “Import” tab. Click on it and choose the “Import Media Files” option. Next, navigate to the location of your computer’s local list to select the clip or video you want to edit. Then, hit the “Import” button to add the video to the timeline for editing.
Step 4. Edit video
Drag and drop the raw footage to Filmora’s timeline to begin editing. Here, you can trim, add other video clips, merge, and add effects as you wish. Likewise, you can add opening titles, subtitles, and end credits to your video. More so, this tool offers different templates to use. Just drag and drop the templates you wish to use to a specific location on the timeline.
Step 5. Preview your file
Last but not least, you can preview your files. Click on the “Play” tab to start previewing your video clips. The main essence of this part is to allow you to make the necessary changes to your clips if there is a need.
Step 6. Export and Share
With Filmora, you can export your file to various social media platforms. But first, go to the “Output window” and select the video file format to use. This software supports several output formats to apply to any platform and device. Just click on the “Format” tab and choose the file format to use. Then also change the resolution and other parameters like frame rate and channel of your video in the “Settings” section. Finally, share your video to your YouTube channel and get ready to add the video to the Google Slide presentation.
For Win 7 or later (64-bit)
For macOS 10.12 or later
Conclusion
● You now know how to put a YouTube video in Google Slides the simple way. You can search for your YouTube videos or directly use the URL link. Whatever the case, remember that it’s the quality of your video that carries more weight. Thanks to the availability of third-party apps that you can use to create and improve the quality of your videos.
● Filmora is at your service to create high-resolution videos that you can export in any format to your YouTube channel. The tool is intuitive, and it won’t matter whether you haven’t tried it before. It is a perfect choice for both professionals and first-time users.
The Ultimate Virtual Reality Experience Playlist
Versatile YouTube Video Editor - Filmora
An easy yet powerful editor
Numerous effects to choose from
Detailed tutorials provided by the official channel
The pandemic in 2020 was a significant event that disrupted everyone globally. Video calls and virtual events became the run-to for most workers. This caused a lot of people to embrace the idea of virtualization.
Viewers needed new ways to experience performances and shows. Then, new virtual reality (VR) headsets entered the market, making people amazed as they did the best of what an average standalone headset could do. VR videos give real-like visual effects that will amaze and make you feel in the same surrounding as in the video background. And with the arrival of futuristic VR video Youtubers, creative videos are coming all around. Through this article, let’s look over the best YouTube VR Videos and understand how YouTube VR 360 videos differ from each other.
In this article
01 What is a VR video on YouTube?
02 10 Best VR Videos on YouTube for 2021
03 Where to Watch VR Videos besides YouTube?
04 Choose High-Quality VR Headsets
Part 1: What is a VR video on YouTube?
Firstly, it is essential to understand a VR Video on YouTube and how it differs from 360 videos?
VR Videos YouTube – For VR Videos with the YouTube mobile app, you can watch VR videos alongside cardboard. You will have an immersive feeling while watching this as you feel present in the scene actions while having your field of vision covered with a viewing device.
Though both YouTube VR and 360 give an immersive viewing experience with 360-degree coverage, still YouTube 360 videos reflect live actions with modified cameras accessible through 360-degree video-compatible devices. YouTube 360 videos are also viewable on devices such as smartphones, computers, etc., that are compatible. However, here, video progression is not under viewers’ control.
On the other hand, VR videos with VR headsets give options to control the viewing experience, such as interacting, running, walk with the video from the viewer’s end.
Part 2: 10 Best VR Videos on YouTube for 2021
You must be eager to start your voyage to VR YouTube videos. So let’s move ahead with the below-mentioned options that cover the ten best YouTuber VR Videos.
1. 360° VR GALACTUS EVENT | The End of season Fortnite Event
The production of VR videos from the 360 worlds games is becoming a live event model, making video creators keep these incredible experiences with this end-of-season Fortnite event.
2. Around the Planet in 2 Minutes
This video offers viewers a glimpse of other travel videos on the channel while leading them to various locations worldwide.
3. Ascension by David Blaine (YouTube 360 Video)
This version of the YouTube 360 video gives viewers a view of it from the first-person point of view. This video broke YouTube records with its 22+million views within a short while.
4. Beautifully Broken by Warren Haynes and Danny Louis
In this video, Warren Haynes and Danny Louis mirrored the constraints of the moment implicitly, taking their craft outdoors.
5. China, One week before Coronavirus Lockdown
This experience gives one the view of different structures like plants, people, and nature at large.
6. The Dawn of Art; AVirtual Journey inside Chauvet Cave
This animated tour is being narrated into a cave by Daisy Ridley. The video is known for holding the best figurative cave painting in the world kept for 36,000 years.
7. Guardians of the Kingdom
This video exposes the relationship between whales and humans by the incidences between two mothers; a human and a whale.
8. HowVolcanoes Affect Earth’s Climate over Millions of Years
Here, viewers get to see how volcanoes spew carbon dioxide and other gases into the air, changing the earth’s climate through that.
9. Inside NYC’s Skinniest Supertall Skyscraper
In this video, the viewers see the views of the central park and the iconic US metropolis.
10. Lockdown Around the World | National Geographic
This video is from National Geographic. It exposes a view of crowded cities in an unprecedented period like the lockdown.
Part 3: Where to Watch VR Videos besides YouTube?
You may wonder whether there are other platforms where you can watch VR videos.
The good news is: Yes! Besides YouTube, we have platforms where viewers can watch VR videos and have an immersive experience. Read on to know them.
1. Vimeo 360
This platform allows users to upload, play, and even share their VR videos with their friends on apps like Facebook and YouTube.
2. Oculus Gear VR store
Users can watch their YouTube VR Oculus videos on this platform with apps like Samsung XR, Skybox VR video player, etc. They are also allowed to download games apps.
3. Steam Powered
Steam Powered is known for VR titles and gets support from good VR headsets.
Part 4: Choose High-Quality VR Headsets
There are quite a good number of VR Headsets, but we have the option of choosing a high-quality VR headset that should be able to deliver a wonderful experience. This is what every user wants. Let’s take a good look at a few of them.
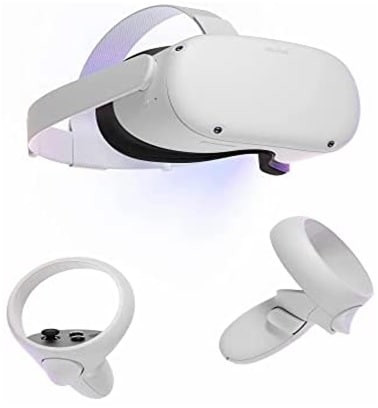
1. Oculus Quest 2
This VR headset is top-notch. Its impressive flexibility, backed by its shocking price, will make one not want to look elsewhere.
No need to worry about screen-door effects as the headset possesses a high per-eye resolution—smooth 90Hz refreshing rate just like the Rift CV1 Oculus. Based on the Qualcomm Snapdragon chipset, XR2 resulted in excellent standalone performance. It’s also capable of linking up with gaming PC for desktop experiences.
2. PlayStation VR
A lot of VR games have come out on PlayStation VR. The PlayStation VR gives PS4 users an excellent and quality experience. However, it doesn’t have the highest resolution displays and cannot go for wild, room-scale tracking.
It has a 960 x 1,080 per-eye resolution and offers a 120Hz refresh rate for quality experiences. Its 100-degree field of view, motion controllers, and separate camera are suitable for unlocking immersive gameplay. A fantastic thing about it is that although it was for the PS4 and PS4 Pro, Sony ensured it’ll also run on the PS5.

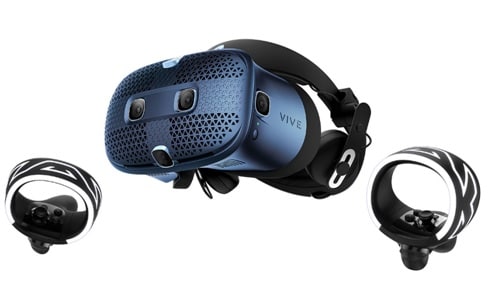
3. HTC Vive Cosmos
The HTC Vive Cosmos is the latest HTC headset in town. Overall combined 2,880 x 1,700 resolution provides optimally sharp resolution for the eyes that is 1,440 x 1,700.
This headset has an easy-to-wear halo-style headband and attached headphones for spatial audio. It’s a highly versatile headset that allows users to switch which version of the Cosmos they’re using by simply swapping out the faceplate, controllers, and any tracking base station.
Part 5: FAQs about VR Videos
Let’s take a look at some questions by VR viewers.
Who is the Most Popular VR YouTuber?
‘Nathie’ is the most popular VR YouTuber today. He is a Netherland-based content creator whose niche is VR technology. His channel has stupendous 600k subscribers.
Is VR Bad for Your Eyes?
According to research, there is evidence that wearing VR Headsets can cause the eyesight to deteriorate, causing eye strain, discomfort, and making the vision blur.
What is the Future of VR?
VR is known for giving immersive experiences in various aspects of life and career. Education, Sports events, technology, and lots more are fields where VR is in use with artificial intelligence.
Over time, it has been a lifesaver, being helpful to many in various locations worldwide and has been even more accessible than it used to be. The future of VR holds more opportunities for us as it evolves daily.
So, the end is not coming to it anytime soon.
Conclusion
In the world today, everyone has the opportunity to experience technology at its best through VR, and the good thing is that its rapid evolvement is an assurance that it’s not ending soon. Every man and business needs VR to grow as its opportunities are massive. Whether with YouTube VR Oculus or any other platform, getting the real essence of visualization creates a big difference.
The future holds more great ways and opportunities to make things easy for us with VR. Thus, through the article, you will get to know many YouTube 360 videos and VR Videos YouTube platforms so that entertainment does not end with simple videos but goes beyond expectations.
The pandemic in 2020 was a significant event that disrupted everyone globally. Video calls and virtual events became the run-to for most workers. This caused a lot of people to embrace the idea of virtualization.
Viewers needed new ways to experience performances and shows. Then, new virtual reality (VR) headsets entered the market, making people amazed as they did the best of what an average standalone headset could do. VR videos give real-like visual effects that will amaze and make you feel in the same surrounding as in the video background. And with the arrival of futuristic VR video Youtubers, creative videos are coming all around. Through this article, let’s look over the best YouTube VR Videos and understand how YouTube VR 360 videos differ from each other.
In this article
01 What is a VR video on YouTube?
02 10 Best VR Videos on YouTube for 2021
03 Where to Watch VR Videos besides YouTube?
04 Choose High-Quality VR Headsets
Part 1: What is a VR video on YouTube?
Firstly, it is essential to understand a VR Video on YouTube and how it differs from 360 videos?
VR Videos YouTube – For VR Videos with the YouTube mobile app, you can watch VR videos alongside cardboard. You will have an immersive feeling while watching this as you feel present in the scene actions while having your field of vision covered with a viewing device.
Though both YouTube VR and 360 give an immersive viewing experience with 360-degree coverage, still YouTube 360 videos reflect live actions with modified cameras accessible through 360-degree video-compatible devices. YouTube 360 videos are also viewable on devices such as smartphones, computers, etc., that are compatible. However, here, video progression is not under viewers’ control.
On the other hand, VR videos with VR headsets give options to control the viewing experience, such as interacting, running, walk with the video from the viewer’s end.
Part 2: 10 Best VR Videos on YouTube for 2021
You must be eager to start your voyage to VR YouTube videos. So let’s move ahead with the below-mentioned options that cover the ten best YouTuber VR Videos.
1. 360° VR GALACTUS EVENT | The End of season Fortnite Event
The production of VR videos from the 360 worlds games is becoming a live event model, making video creators keep these incredible experiences with this end-of-season Fortnite event.
2. Around the Planet in 2 Minutes
This video offers viewers a glimpse of other travel videos on the channel while leading them to various locations worldwide.
3. Ascension by David Blaine (YouTube 360 Video)
This version of the YouTube 360 video gives viewers a view of it from the first-person point of view. This video broke YouTube records with its 22+million views within a short while.
4. Beautifully Broken by Warren Haynes and Danny Louis
In this video, Warren Haynes and Danny Louis mirrored the constraints of the moment implicitly, taking their craft outdoors.
5. China, One week before Coronavirus Lockdown
This experience gives one the view of different structures like plants, people, and nature at large.
6. The Dawn of Art; AVirtual Journey inside Chauvet Cave
This animated tour is being narrated into a cave by Daisy Ridley. The video is known for holding the best figurative cave painting in the world kept for 36,000 years.
7. Guardians of the Kingdom
This video exposes the relationship between whales and humans by the incidences between two mothers; a human and a whale.
8. HowVolcanoes Affect Earth’s Climate over Millions of Years
Here, viewers get to see how volcanoes spew carbon dioxide and other gases into the air, changing the earth’s climate through that.
9. Inside NYC’s Skinniest Supertall Skyscraper
In this video, the viewers see the views of the central park and the iconic US metropolis.
10. Lockdown Around the World | National Geographic
This video is from National Geographic. It exposes a view of crowded cities in an unprecedented period like the lockdown.
Part 3: Where to Watch VR Videos besides YouTube?
You may wonder whether there are other platforms where you can watch VR videos.
The good news is: Yes! Besides YouTube, we have platforms where viewers can watch VR videos and have an immersive experience. Read on to know them.
1. Vimeo 360
This platform allows users to upload, play, and even share their VR videos with their friends on apps like Facebook and YouTube.
2. Oculus Gear VR store
Users can watch their YouTube VR Oculus videos on this platform with apps like Samsung XR, Skybox VR video player, etc. They are also allowed to download games apps.
3. Steam Powered
Steam Powered is known for VR titles and gets support from good VR headsets.
Part 4: Choose High-Quality VR Headsets
There are quite a good number of VR Headsets, but we have the option of choosing a high-quality VR headset that should be able to deliver a wonderful experience. This is what every user wants. Let’s take a good look at a few of them.
1. Oculus Quest 2
This VR headset is top-notch. Its impressive flexibility, backed by its shocking price, will make one not want to look elsewhere.
No need to worry about screen-door effects as the headset possesses a high per-eye resolution—smooth 90Hz refreshing rate just like the Rift CV1 Oculus. Based on the Qualcomm Snapdragon chipset, XR2 resulted in excellent standalone performance. It’s also capable of linking up with gaming PC for desktop experiences.
2. PlayStation VR
A lot of VR games have come out on PlayStation VR. The PlayStation VR gives PS4 users an excellent and quality experience. However, it doesn’t have the highest resolution displays and cannot go for wild, room-scale tracking.
It has a 960 x 1,080 per-eye resolution and offers a 120Hz refresh rate for quality experiences. Its 100-degree field of view, motion controllers, and separate camera are suitable for unlocking immersive gameplay. A fantastic thing about it is that although it was for the PS4 and PS4 Pro, Sony ensured it’ll also run on the PS5.
3. HTC Vive Cosmos
The HTC Vive Cosmos is the latest HTC headset in town. Overall combined 2,880 x 1,700 resolution provides optimally sharp resolution for the eyes that is 1,440 x 1,700.
This headset has an easy-to-wear halo-style headband and attached headphones for spatial audio. It’s a highly versatile headset that allows users to switch which version of the Cosmos they’re using by simply swapping out the faceplate, controllers, and any tracking base station.
Part 5: FAQs about VR Videos
Let’s take a look at some questions by VR viewers.
Who is the Most Popular VR YouTuber?
‘Nathie’ is the most popular VR YouTuber today. He is a Netherland-based content creator whose niche is VR technology. His channel has stupendous 600k subscribers.
Is VR Bad for Your Eyes?
According to research, there is evidence that wearing VR Headsets can cause the eyesight to deteriorate, causing eye strain, discomfort, and making the vision blur.
What is the Future of VR?
VR is known for giving immersive experiences in various aspects of life and career. Education, Sports events, technology, and lots more are fields where VR is in use with artificial intelligence.
Over time, it has been a lifesaver, being helpful to many in various locations worldwide and has been even more accessible than it used to be. The future of VR holds more opportunities for us as it evolves daily.
So, the end is not coming to it anytime soon.
Conclusion
In the world today, everyone has the opportunity to experience technology at its best through VR, and the good thing is that its rapid evolvement is an assurance that it’s not ending soon. Every man and business needs VR to grow as its opportunities are massive. Whether with YouTube VR Oculus or any other platform, getting the real essence of visualization creates a big difference.
The future holds more great ways and opportunities to make things easy for us with VR. Thus, through the article, you will get to know many YouTube 360 videos and VR Videos YouTube platforms so that entertainment does not end with simple videos but goes beyond expectations.
Also read:
- [Updated] Epic Watchlist Select Free Films to Stream on YouTube
- [New] Does Artificial Engagement Damage YouTube Reputation?
- Achieving Success in Your YouTube Endeavours A Step-by-Step Blueprint for 2024
- Premier ASMR Videography Choices
- In 2024, Creating Impact with High-Converting YouTube Advertising Banners
- Essential iOS Video Editor Apps Top 10 Best to Know
- Defeat Bot Intruders, Elevate Video Engagement for 2024
- In 2024, Creating Customized URLs for Channel Subscribers
- In 2024, Channel Success Story Turning Budget Into Brands
- Elevating Your Channel A Gamers' Blueprint for Success
- Securing the Perfect Upload of Ultra HD Videos on YouTube Platform
- Top 10 Inspirational HR Journeys Unveiled
- Monetizing Content Understanding YouTube's CPM
- Adapting Your Favorite Songs From Spotify to YouTube Music Service
- In 2024, Best Screen Reporter Toolkit for YouTube Streamers
- Breaking Down Barriers Adding Chapters to Create Cohesive YouTube Lessons for 2024
- Free Templates for Dynamic YouTube Channel Closures
- 2024 Approved Budget-Friendly Vlogging Cameras Unveiled Our Picks
- [Updated] Breaking Into the Digital Realm The WireCast Approach for YouTube Streamers
- The Ultimate Selection for Captivating YouTube Content Starts
- In 2024, Elevate Your Banner Game Mastering Visual Branding Techniques
- 2024 Approved Crafting Perfect YouTube Short Content Lessons
- Creating Compelling Channel Names Simplified
- [Updated] Authentic Audience Boosting Legal Practices That Work
- From Visionary to Victory Channel Command School
- 2024 Approved Elevate Your Video's Discoverability - Mastering Tags
- [New] Discovering Your Customized YouTube Playlist
- 2024 Approved Consistent Volume Calibration The Ultimate Guide to Fast Audio Tuning
- 8 Solutions to Solve YouTube App Crashing on Nubia Red Magic 8S Pro | Dr.fone
- [Updated] 2024 Approved 8 Strategies Livestreaming Webinars Without Costs
- [Updated] Mastering Amazing IG Video Creation
- [New] Android's Elite Selection of Collage Apps
- How to Unlock a Network Locked Oppo Reno 11 5G Phone?
- How To Activate and Use Life360 Ghost Mode On Apple iPhone 14 Pro | Dr.fone
- Updated In 2024, Adobe Audition Reimagined The Essential Features for Audio Enthusiasts and Professionals
- Masterclass Transition to Mixer Broadcast on macOS
- In 2024, Troubleshooting Error Connecting to the Apple ID Server On Apple iPhone XS
- Title: How to Embed YouTube in Your GSlides Presentation
- Author: Steven
- Created at : 2024-05-25 19:26:18
- Updated at : 2024-05-26 19:26:18
- Link: https://youtube-clips.techidaily.com/how-to-embed-youtube-in-your-gslides-presentation/
- License: This work is licensed under CC BY-NC-SA 4.0.
