
:max_bytes(150000):strip_icc()/PS5-Slim-Wide-fe2f63e3b1cf443a81fed71f109aacd0.jpg)
"How to Create a Killer Unboxing Video A Complete Guide"
How to Create a Killer Unboxing Video: A Complete Guide
Versatile Video Editor - Wondershare Filmora
An easy yet powerful editor
Numerous effects to choose from
Detailed tutorials provided by the official channel
Unboxing videos are a bizarre trend. However, these videos are getting the highest traction, and more videos are getting onboard about various products.
And, if you haven’t already checked one, an unboxing video is what it sounds like. At its core, “unboxing” is the procedure of recording the moment when a particular product is removed and opened from the packaging sold in.
Again, you’re probably thinking:
‘Why would anybody gaze at other folks opening their product packaging?’
More than 90,000 people type ‘unboxing’ into YouTube each month, and that’s quite interesting as well as strange. Also, these are just a few of the insane statistics about the eCommerce trend of unboxing videos.
In this article, you’ll see the science behind such unboxing videos and learn how to create an attractive one by taking inspiration from others.
So whether you’re not sure why we admire unboxing videos or you wish to know how to use them to your benefit, you’re in the right place!
In this article
02 5 Best YouTube Unboxing Channels
03 How to Create a Killer Unboxing Video
Part 1: What is an Unboxing Video?
Within the unboxing videos, people open boxes and narrate their actions. Unboxing videos are incredibly famous with kids, grabbing up tons of millions of subscribers as well as millions of views. Such videos are also usually great for kids to watch (with a few caveats). But the matter of the subject of some unboxing videos is not age-appropriate. And, there are niche-specific videos as well on different channels.
Are unboxers paid by the companies whose services or products they consider opening on YouTube? Companies don’t generally pay the YouTuber directly for featuring their products in a video. When an unboxer becomes super popular (with subscribers and tens of millions of views), companies may send the products for free, but not always. Sometimes hosts disclose this, sometimes not. However, companies do sponsor highly famous and influential YouTubers in other areas. For instance, they may pay the YouTuber to make a personal appearance at a toy store or convention.
Part 2: 5 Best YouTube Unboxing Channels
There are considerable merits to offering your customers a branded and personalized unboxing experience.
Even if you decide to get your products featured in a YouTuber’s unboxing videos, you can help promote your brand and improve brand awareness. So which is the perfect or ideal YouTube channel for unboxing videos for you to try to get featured on? The answer is: “It depends!”
Not every YouTuber is the best for every eCommerce business—and a YouTube channel simply being huge and influential doesn’t make it relevant for your brand. So it’s essential to consider brand suitability while trying looking for a YouTuber to create unboxing videos.
This means considering whether they use harsh language or if their target audience has some overlap with your target audience.
Keeping it in mind, here are some of the top YouTube unboxing channels for inspiration:
1. Unbox Therapy
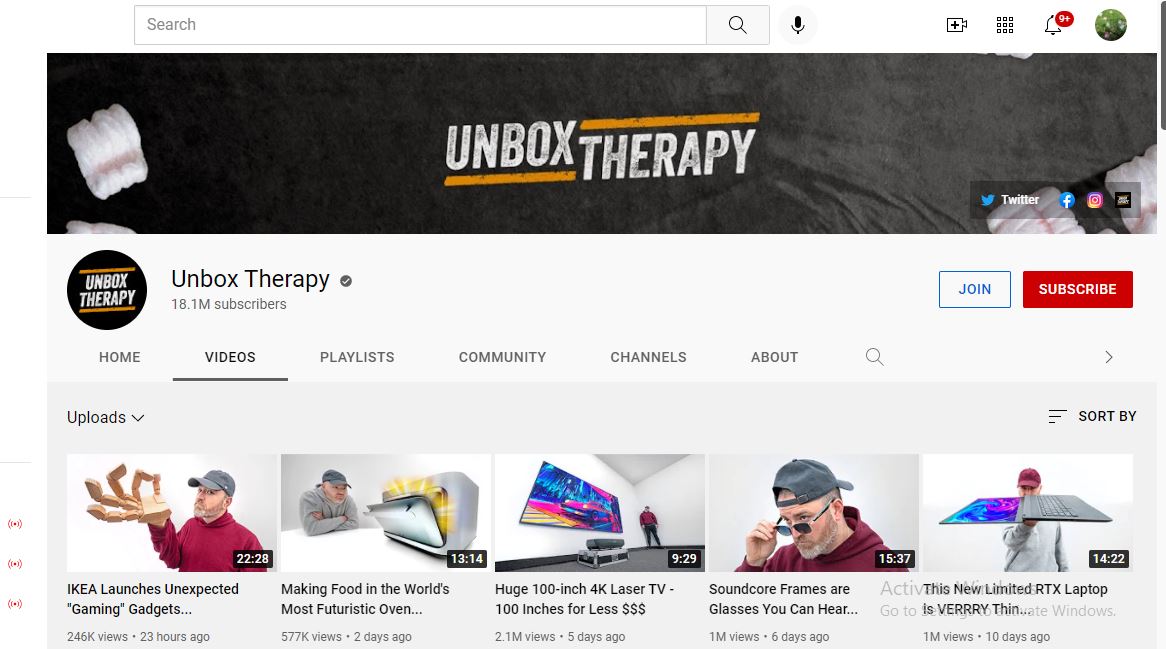
With around 17 million-plus subscribers, Unbox Therapy is a great channel with a ten-year history of sharing various videos presenting the hottest and most excellent products on the planet. According to their YouTube stats, tech gadgets are a regular feature on the channel, and they have amassed four billion-plus views.
2. Ryan’s World
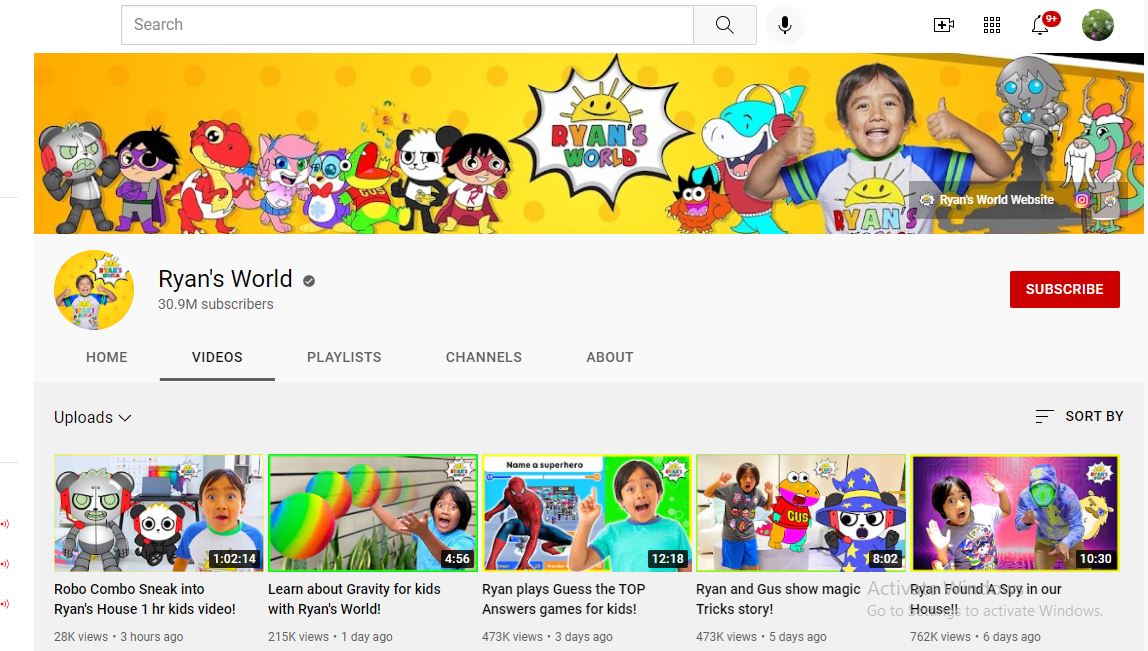
This titan of teeny the unboxing video world is one of the immensely paid YouTubers for a reason. This channel features fun animation and unboxing videos, simple science experiments for kids, and other educational content. Those interested in doing the best unboxing videos for a younger audience could learn a lot from this platform.
3. Tech Unboxing
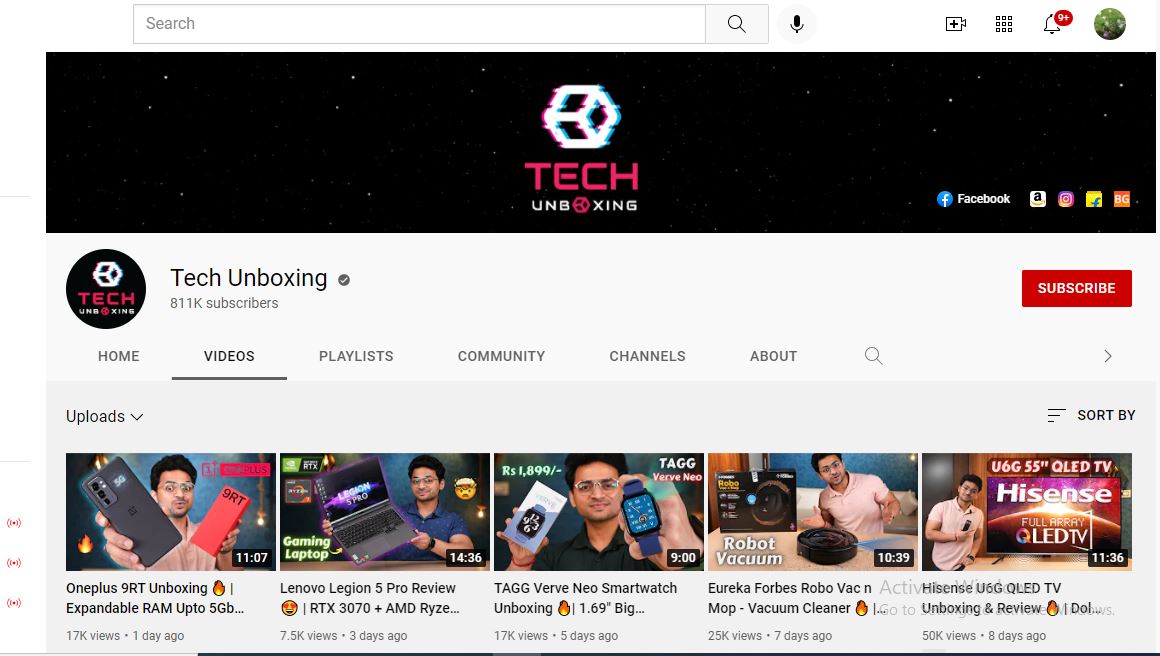
At 700k plus subscribers, Tech Unboxing may not be the most significant content creator on this list, but it’s no slouch. The channel mentions everything about the high-tech gadgets and isn’t afraid to brag about the products reviewed. The track also hosts frequent giveaways of tech products and unboxing videos that the host likes that other tech enthusiasts may look at it with fun.
4. Dr. DeBox
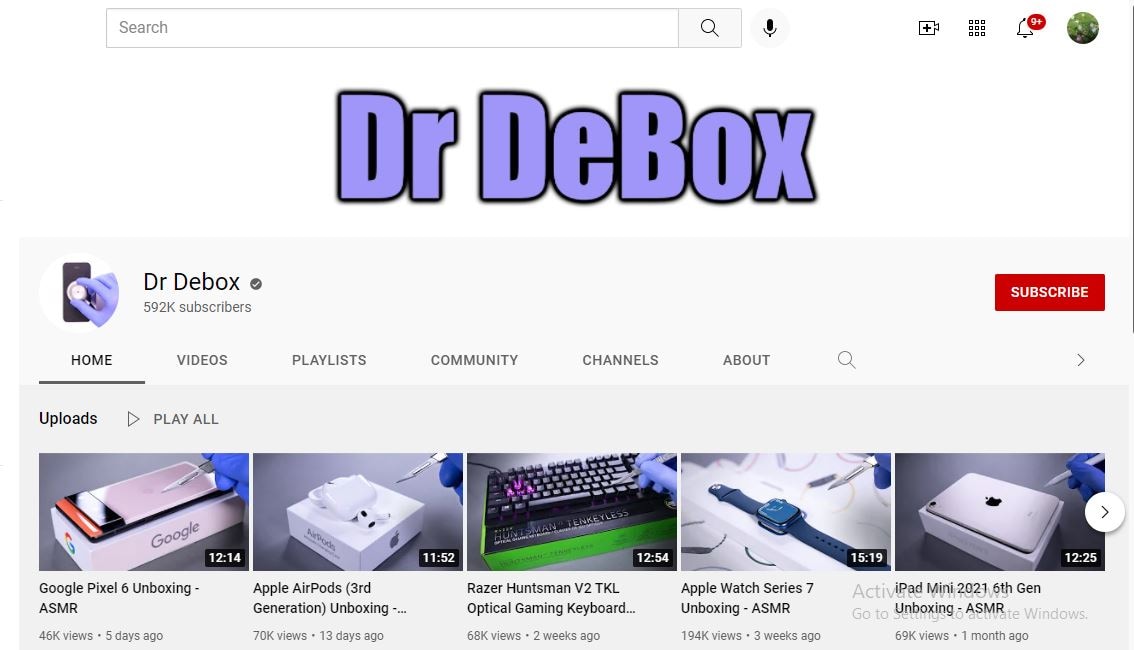
DrDebox looks at tech, gadgets, and other products ordered from online sites and offers viewers rundowns of their functions and how they operate. With 590k plus subscribers and billions of video views, DrDebox has a prominent audience and presence on YouTube that can help improve awareness for the products he reviews.
5. UNBOXING Fashion & Sports
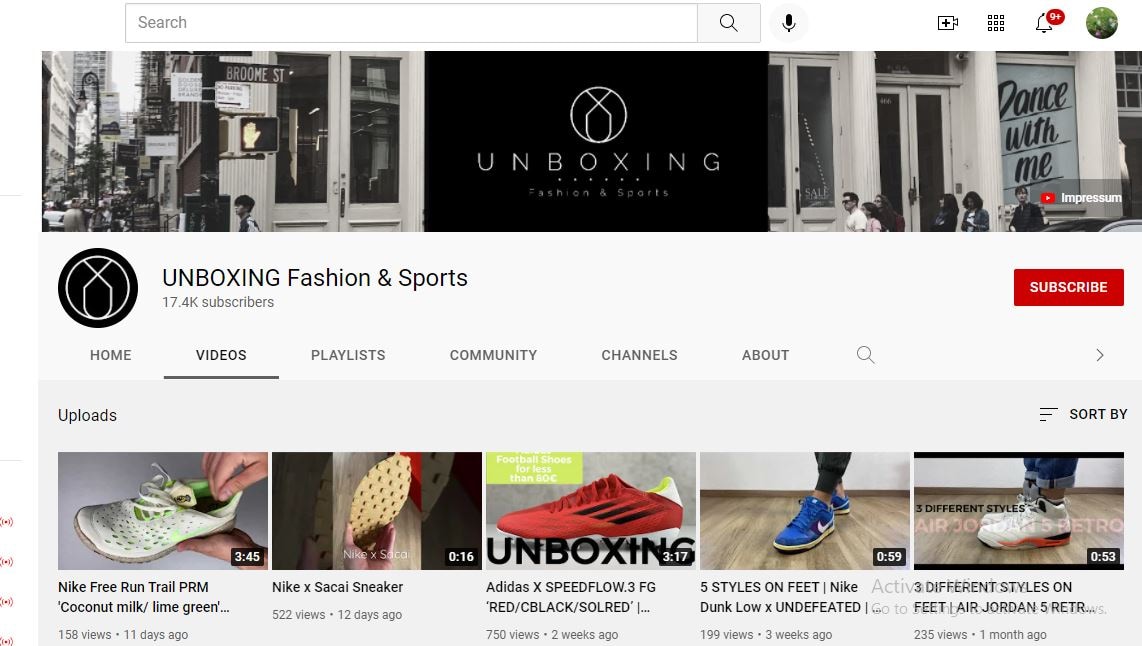
Unboxing Fashion & Sports is a channel specializing in well unboxing videos for a range of sports and fashion apparel (frequently shoe brands like Nike or Adidas). Its content generally features a close-up of the reviewer taking products out of the box and moving them around. At the same time, text highlights relevant product features—all set to catchy music without being disturbing. With 17k plus subscribers and a strong focus on sports apparel, this YouTuber knows how to attract a target market.
Part 3: How to Create a Killer Unboxing Video
Firstly, you have to take note of the following points to create the best unboxing videos.
1. Select an Unboxing Niche
2. Practice Speaking Clearly and Slowly
3. Use the Best Unboxing Set-Up
4. Make Sure to Timely Unbox the Products
5. Don’t Delay the Unboxing in Your Video
6. Show the Product in Use
One of the prominent factors about unboxing videos is that anyone can make them. You don’t need to be uniquely talented but go with the products that have broad appeal. Once you create such videos, you can share them on your social media networks or personal website.
Do you want to create your creative unboxing videos for others to find? Do you like to introduce your customers to your products in your own YouTube Channel, so you have total control over the content and messaging of each video?
Here is a step by step guide to help you revamp the creation of your unboxing video:
1. Use a Good Camera & Video Editing Software
While you probably don’t require that high-tech camera that professional Hollywood filmmakers would consider shooting or filming 8k+ ultra-HD movies, you need a good camera that can capture HD footage (preferably at least 1080p). This allows providing your unboxing videos just enough of a professional look to not deactivate or disable the interest of potential viewers.
In addition to a camera, ensure that you have a stand or a decent tripod for it. This way, you don’t have to hold onto your camera by yourself (or have an assistant hold it) while you’re filming. In addition, this minimizes camera shake, which assists in making easy-to-watch videos.
On the other hand, video editing software is a must for taking all of your video compiling and recording into a cohesive video that will be attractive for viewers to watch. There are tons of accessible video editing tools to choose from and some paid options that may have helpful features. However, our favorite pick is Wondershare Filmora due to its beginner-friendly yet professional editing elements. Let us know what you can’t do with this software! It’s a combination of professionalism and reliability you can consider for all your video editing needs.
The hottest feature of Wondershare Filmora for making attractive unboxing videos is audio ducking. With this feature, you can effectively lower the background vocals while adding your voiceovers. And, that’s extremely valuable in making these kinds of videos.
Wondershare Filmora
Get started easily with Filmora’s powerful performance, intuitive interface, and countless effects!
Try It Free Try It Free Try It Free Learn More >

2. Prepare Your Stage/Photo Lightbox
If you look at some famous unboxing channels listed above, you’ll notice that much of their content is shot in a well-framed space where there isn’t much in the background to disturb them from the product being viewed.
Often, this is a “photo lightbox” or an empty table (a small container with a smooth white backdrop that enhances lighting while reducing shadows for making photos look greater). Lightboxes can also be helpful when you’re taking snapshots of your products to put up on your eCommerce website, so it’s a great idea to make (or buy) one that can fit your products.
3. Practice Making Videos
Before uploading videos to YouTube, take some time to practice making your unboxing videos using random items or already-opened products. This way, you can work upon setting up your stage and camera, keeping the product within an aim, narrating your unboxing video, editing footage to reduce the “dead air” where nothing is being done or said, and more!
When you’re over making your first test video, play it back and look for issues like excessive “ums, ahs,” or things that are out of focus and other sentence fillers. Don’t worry if your first video isn’t that great—that’s what practice (and your video editing software) are for!
4. Don’t Waste Your Viewers’ Time
If you want to make the best unboxing videos, ensure that you get to the “unboxing” section quite instantly! As indicated by the Expert Voice: “remember that you compete for viewers’ attention with lots of other video content. Keep your introductions brief and quickly get to the unboxing.” If you take too much time to get to the section of unboxing video, you risk losing your audience’s interest and them going away from your content before you can introduce your product.
5. Compile Things Up Once in a While
If you unbox your products, you might instantly run out of content ideas to make. You may look up your YouTube channel losing traction without the new content. So, try to compile things up once in a while—as the Ryan’s World channel discussed earlier.
Creating other kinds of content, such as how-to videos and advice videos for specific products, product updates, and simple news, or even short promotional bits, can help keep your publishing frequency top-notch.
Just remember: everything you publish or post should still be related to your brand and your channel’s core content!
6. Promote Your YouTube Video or Channel on Social Media
There are specific odds that your eCommerce business is active on other social media channels, such as LinkedIn, Facebook, Twitter, etc. Taking benefit of your audience on other social media platforms to promote your YouTube channel can assist you promptly earning some easy subscribers and allow you better promote your products for the current followers.
Part 4: FAQs about Unboxing Videos
1 - What should be included in the unboxing video?
As discussed earlier, you can include products related to your channel’s niche in your unboxing videos.
2 - How long should an unboxing video be?
Time will vary depending on the actual unboxing product, but try to keep it below 5 minutes.
3 - Can you monetize unboxing videos?
No. Text-based commentary isn’t acceptable for monetization. It must be vocal, and for you to show your face as well would be even better.
Conclusion
Unboxing videos are a bang on that; hate them or love them, they are here to stay. Whether you’re a brand owner, a consumer, or both, you’ve probably considered one or two while purposelessly browsing.
You can use the above tips or strategies to create a compelling unboxing experience for small brands to get the most out of a best unboxing video.
What are some of your favorite unboxing videos? Comment down below!
Unboxing videos are a bizarre trend. However, these videos are getting the highest traction, and more videos are getting onboard about various products.
And, if you haven’t already checked one, an unboxing video is what it sounds like. At its core, “unboxing” is the procedure of recording the moment when a particular product is removed and opened from the packaging sold in.
Again, you’re probably thinking:
‘Why would anybody gaze at other folks opening their product packaging?’
More than 90,000 people type ‘unboxing’ into YouTube each month, and that’s quite interesting as well as strange. Also, these are just a few of the insane statistics about the eCommerce trend of unboxing videos.
In this article, you’ll see the science behind such unboxing videos and learn how to create an attractive one by taking inspiration from others.
So whether you’re not sure why we admire unboxing videos or you wish to know how to use them to your benefit, you’re in the right place!
In this article
02 5 Best YouTube Unboxing Channels
03 How to Create a Killer Unboxing Video
Part 1: What is an Unboxing Video?
Within the unboxing videos, people open boxes and narrate their actions. Unboxing videos are incredibly famous with kids, grabbing up tons of millions of subscribers as well as millions of views. Such videos are also usually great for kids to watch (with a few caveats). But the matter of the subject of some unboxing videos is not age-appropriate. And, there are niche-specific videos as well on different channels.
Are unboxers paid by the companies whose services or products they consider opening on YouTube? Companies don’t generally pay the YouTuber directly for featuring their products in a video. When an unboxer becomes super popular (with subscribers and tens of millions of views), companies may send the products for free, but not always. Sometimes hosts disclose this, sometimes not. However, companies do sponsor highly famous and influential YouTubers in other areas. For instance, they may pay the YouTuber to make a personal appearance at a toy store or convention.
Part 2: 5 Best YouTube Unboxing Channels
There are considerable merits to offering your customers a branded and personalized unboxing experience.
Even if you decide to get your products featured in a YouTuber’s unboxing videos, you can help promote your brand and improve brand awareness. So which is the perfect or ideal YouTube channel for unboxing videos for you to try to get featured on? The answer is: “It depends!”
Not every YouTuber is the best for every eCommerce business—and a YouTube channel simply being huge and influential doesn’t make it relevant for your brand. So it’s essential to consider brand suitability while trying looking for a YouTuber to create unboxing videos.
This means considering whether they use harsh language or if their target audience has some overlap with your target audience.
Keeping it in mind, here are some of the top YouTube unboxing channels for inspiration:
1. Unbox Therapy
With around 17 million-plus subscribers, Unbox Therapy is a great channel with a ten-year history of sharing various videos presenting the hottest and most excellent products on the planet. According to their YouTube stats, tech gadgets are a regular feature on the channel, and they have amassed four billion-plus views.
2. Ryan’s World
This titan of teeny the unboxing video world is one of the immensely paid YouTubers for a reason. This channel features fun animation and unboxing videos, simple science experiments for kids, and other educational content. Those interested in doing the best unboxing videos for a younger audience could learn a lot from this platform.
3. Tech Unboxing
At 700k plus subscribers, Tech Unboxing may not be the most significant content creator on this list, but it’s no slouch. The channel mentions everything about the high-tech gadgets and isn’t afraid to brag about the products reviewed. The track also hosts frequent giveaways of tech products and unboxing videos that the host likes that other tech enthusiasts may look at it with fun.
4. Dr. DeBox
DrDebox looks at tech, gadgets, and other products ordered from online sites and offers viewers rundowns of their functions and how they operate. With 590k plus subscribers and billions of video views, DrDebox has a prominent audience and presence on YouTube that can help improve awareness for the products he reviews.
5. UNBOXING Fashion & Sports
Unboxing Fashion & Sports is a channel specializing in well unboxing videos for a range of sports and fashion apparel (frequently shoe brands like Nike or Adidas). Its content generally features a close-up of the reviewer taking products out of the box and moving them around. At the same time, text highlights relevant product features—all set to catchy music without being disturbing. With 17k plus subscribers and a strong focus on sports apparel, this YouTuber knows how to attract a target market.
Part 3: How to Create a Killer Unboxing Video
Firstly, you have to take note of the following points to create the best unboxing videos.
1. Select an Unboxing Niche
2. Practice Speaking Clearly and Slowly
3. Use the Best Unboxing Set-Up
4. Make Sure to Timely Unbox the Products
5. Don’t Delay the Unboxing in Your Video
6. Show the Product in Use
One of the prominent factors about unboxing videos is that anyone can make them. You don’t need to be uniquely talented but go with the products that have broad appeal. Once you create such videos, you can share them on your social media networks or personal website.
Do you want to create your creative unboxing videos for others to find? Do you like to introduce your customers to your products in your own YouTube Channel, so you have total control over the content and messaging of each video?
Here is a step by step guide to help you revamp the creation of your unboxing video:
1. Use a Good Camera & Video Editing Software
While you probably don’t require that high-tech camera that professional Hollywood filmmakers would consider shooting or filming 8k+ ultra-HD movies, you need a good camera that can capture HD footage (preferably at least 1080p). This allows providing your unboxing videos just enough of a professional look to not deactivate or disable the interest of potential viewers.
In addition to a camera, ensure that you have a stand or a decent tripod for it. This way, you don’t have to hold onto your camera by yourself (or have an assistant hold it) while you’re filming. In addition, this minimizes camera shake, which assists in making easy-to-watch videos.
On the other hand, video editing software is a must for taking all of your video compiling and recording into a cohesive video that will be attractive for viewers to watch. There are tons of accessible video editing tools to choose from and some paid options that may have helpful features. However, our favorite pick is Wondershare Filmora due to its beginner-friendly yet professional editing elements. Let us know what you can’t do with this software! It’s a combination of professionalism and reliability you can consider for all your video editing needs.
The hottest feature of Wondershare Filmora for making attractive unboxing videos is audio ducking. With this feature, you can effectively lower the background vocals while adding your voiceovers. And, that’s extremely valuable in making these kinds of videos.
Wondershare Filmora
Get started easily with Filmora’s powerful performance, intuitive interface, and countless effects!
Try It Free Try It Free Try It Free Learn More >
2. Prepare Your Stage/Photo Lightbox
If you look at some famous unboxing channels listed above, you’ll notice that much of their content is shot in a well-framed space where there isn’t much in the background to disturb them from the product being viewed.
Often, this is a “photo lightbox” or an empty table (a small container with a smooth white backdrop that enhances lighting while reducing shadows for making photos look greater). Lightboxes can also be helpful when you’re taking snapshots of your products to put up on your eCommerce website, so it’s a great idea to make (or buy) one that can fit your products.
3. Practice Making Videos
Before uploading videos to YouTube, take some time to practice making your unboxing videos using random items or already-opened products. This way, you can work upon setting up your stage and camera, keeping the product within an aim, narrating your unboxing video, editing footage to reduce the “dead air” where nothing is being done or said, and more!
When you’re over making your first test video, play it back and look for issues like excessive “ums, ahs,” or things that are out of focus and other sentence fillers. Don’t worry if your first video isn’t that great—that’s what practice (and your video editing software) are for!
4. Don’t Waste Your Viewers’ Time
If you want to make the best unboxing videos, ensure that you get to the “unboxing” section quite instantly! As indicated by the Expert Voice: “remember that you compete for viewers’ attention with lots of other video content. Keep your introductions brief and quickly get to the unboxing.” If you take too much time to get to the section of unboxing video, you risk losing your audience’s interest and them going away from your content before you can introduce your product.
5. Compile Things Up Once in a While
If you unbox your products, you might instantly run out of content ideas to make. You may look up your YouTube channel losing traction without the new content. So, try to compile things up once in a while—as the Ryan’s World channel discussed earlier.
Creating other kinds of content, such as how-to videos and advice videos for specific products, product updates, and simple news, or even short promotional bits, can help keep your publishing frequency top-notch.
Just remember: everything you publish or post should still be related to your brand and your channel’s core content!
6. Promote Your YouTube Video or Channel on Social Media
There are specific odds that your eCommerce business is active on other social media channels, such as LinkedIn, Facebook, Twitter, etc. Taking benefit of your audience on other social media platforms to promote your YouTube channel can assist you promptly earning some easy subscribers and allow you better promote your products for the current followers.
Part 4: FAQs about Unboxing Videos
1 - What should be included in the unboxing video?
As discussed earlier, you can include products related to your channel’s niche in your unboxing videos.
2 - How long should an unboxing video be?
Time will vary depending on the actual unboxing product, but try to keep it below 5 minutes.
3 - Can you monetize unboxing videos?
No. Text-based commentary isn’t acceptable for monetization. It must be vocal, and for you to show your face as well would be even better.
Conclusion
Unboxing videos are a bang on that; hate them or love them, they are here to stay. Whether you’re a brand owner, a consumer, or both, you’ve probably considered one or two while purposelessly browsing.
You can use the above tips or strategies to create a compelling unboxing experience for small brands to get the most out of a best unboxing video.
What are some of your favorite unboxing videos? Comment down below!
Avoid the Quake: Optimal Tripod Placement for Stellar Vlogs
How To Use a Tripod for Vlogging

Richard Bennett
Mar 27, 2024• Proven solutions
As you grow into a serious vlogger, a tripod will become an essential piece of equipment. You can get by for a long time setting your camera up on a stack of books, or an upside-down laundry hamper, but not forever. While these setups are great for a beginner, an intermediate vlogger will start to find them limiting. Even if you are an amazingly creative person who can create any camera setup without a tripod there will come a point where you will decide your creative energy is better spent on your video content.
This article will explain how to use a tripod and then introduce you to four different types.
Part 1: How To Set a Tripod for Vlogging
1. Setting Up Your Tripod
Step 1 – Pull out all three legs of your tripod and make sure it is standing stably. There will be tensioners on the legs which you can release in order to adjust your height. Once your legs are extended to the height you want continue adjusting them until your tripod is level. Some tripods have a built in bubble level, but if yours does not you can use a separate bubble level or make a guestimate.
Make sure when you are setting up your tripod that you point one of its legs towards your subject. This will give you room to stand behind your camera, in-between the other two legs. If you have one leg pointed directly behind your camera then you may trip over it. Or, you may knock over and damage your camera.
Step 2 – On the top of your tripod there will be a plate with a small hole and a screw. Remove this plate using either a clip or lever, depending on your tripod. Once your plate is detached screw it into the bottom of your camera. It should be tight, but not too tight or you risk damaging your camera.
Step 3 – Attach your plate, which now has your camera mounted to it, back onto your tripod.
Your tripod comes with a ‘head’. Your tripod’s head is what your camera is mounted on top of. There are several different types of tripod heads and mounts which are all useful for different things.
Ball Heads and Pan/Tilt Heads are the two most common types of tripod heads. Ball Heads allow you to adjust your camera’s position quite a bit before you start shooting. They are not good for adding in camera movements while you are filming, however, because you need to lock them in place. Pan/Tilt heads are great for creating camera movement. Most Pan/Tilt heads have a handle which you can use to make a smooth panning motion.
Part 2: Why Do You Need a Tripod: Benefits of Using Tripod
Why can’t you just hold a camera in your hand while shooting vlog entries for your YouTube channel? Honestly, you can, but the camera may shake a lot and your footage might end up being unusable. Putting a camera on a tripod reduces the probability of camera shake to the minimum and that is just the tip of the iceberg.
A huge amount of vlogs can be described as sit down videos, in which the host of the video sits in front of a camera and talks to the audience. Holding a camera while talking or trying to present a product to the viewers is next to impossible, so in order to avoid having to deal with a camera, you can simply put it on a tripod, find the best angle, and push the record button.
On the go videos, are recorded at exterior locations, and a lot of YouTubers choose to shoot these types of videos handheld, but this approach makes it difficult to maintain the same shot composition for long. A Monopod, Gorillapod or just a simple selfie stick can make your job much easier because they stabilize the camera. In addition, shooting smooth panning shots without a tripod is as difficult as it sounds.
Part 3: A Few Things You’ll Need to Consider Before You Buy a Tripod
There are thousands of different tripod models you can use for vlogging, but which model you’re going to choose depends mostly on the type of vlog you want to make. If you are planning on shooting all of your videos in the studio-like conditions, then portability isn’t such an important feature, while quite the opposite is true if you intend on filming all of your footage on outdoor locations.
However, there are certain traits you have to consider when choosing a tripod you’re going to use while recording your vlog entries.
Sturdiness: There is absolutely no point in spending money on a tripod that breaks easily. Although if your plan is to shoot vlogs at home or in a studio, then buying a cheaper plastic tripod isn’t such a bad option, since the clamps and joints won’t have to endure a lot of wear and tear. Consider buying a more durable tripod if you are going to be traveling a lot while working on your vlogs.
The Type of Camera: A number of factors can contribute to the weight of a camera, including battery grips or lenses, so before you buy a tripod make sure that it can support the weight of the camera you want to use to record your videos.
The Maximum Height: Most vloggers don’t really have to worry about how tall their tripod is, because they are not on their feet in any of the shots featured in the video. Vloggers working on DIY videos, cooking tutorials or any other type of vlog that involves movement and action should pay attention to this trait.
Photo or Video Tripods: Do you want to take beautiful panning shots? If the answer is yes then you should get a video tripod that enables you to move the camera smoothly in any direction. Photo tripods are a great option for static shots that don’t involve a lot of camera movement.
Mobility: The heavier a tripod is, the more stability it can provide, but carrying a tripod that weighs over 10 pounds to shoot sports or adventure vlogs can be a tiring endeavor. Although portability is a factor, it shouldn’t prevent you from buying a high-quality tripod that will ensure your footage is perfectly smooth and stable.
Part 4: 4 Types of Tripods
Full-Sized Tripods: are very sturdy, and as a result can be fairly heavy. Although you can take them a lot of places they are not convenient to carry for extended periods of time. They are the most reliable way to ensure you have absolutely no camera shake.
Compact Tripods: appear to be the same size as Full-Sized tripods, but they are actually much lighter. You can get the same height with a Compact Tripod as a Full-Sized tripod and it will be much easier to travel with. However, Compact Tripods are not as stable. If you are shooting for an extended period of time you may need to weigh your Compact Tripod down with sandbags to keep it steady.
Gorillapods: have flexible legs which can be wrapped around posts, fences, or anything else you may want to mount your camera on. They are also lightweight enough that you can carry them around while you shoot. If you bend it right you can essentially use your Gorillapod as a heavy-duty selfie-stick for your camera.
Table-Top Tripods: are very small and easy to travel with. You can leave one in your camera bag or your glove box. Table-Top Tripods are meant to be set up on top of desks or other stable surfaces and may not be ideal for heavier cameras.
Part 5: The 5 Best Tripods For YouTube Vlogging
Even if you know everything there is to know about tripods, the selection process can be daunting. That’s why we’ve shortlisted the top 5 tripods on the market, in an effort to make finding the right tripod for your vlog videos as quick an easy as it can possibly be. Let’s have a look.
1. CamRah Smartphone Tripod
Price: $24.99

An increasing number of Smartphones features powerful cameras that can record videos at high resolutions. Unfortunately, most iPhones and Android devices are lightweight, which makes it difficult to hold them perfectly still while shooting a video. CamRah Smartphone Tripod offers a perfect solution to this problem because it is easy to pack and you can carry it wherever you go, without needing the extra space.
It weighs just 0.6lbs and it is 10.8 inches tall. The tripod has a maximum load of 11lbs which means that besides Smartphones, you can also mount action cameras, webcams, or even smaller DSLR cameras onto it. The flexible legs made from high-density foam offer stability even when the CamRah Tripod is placed on an uneven surface.
Pros:
- Easily portable
- Affordable
- Jaws technology provides an extra strong grip of the camera
Cons:
- The tripod’s legs can’t be extended
- Can’t be used with professional cameras
2. Manfrotto Mini Travel Tripod
Price: $34.99

Yet another great option for shooting vlogs with a Smartphone. The Manfrotto Mini Travel Tripod kit is also an excellent choice for all vloggers who shoot their videos with compact cameras. The tripod weighs just 0.51lbs and it is 5.31 inches tall, which makes it a perfect travel companion. However, it can’t support cameras heavier than 2.2lbs, so you have to carefully choose the camera you want to put on this tripod.
The tripod’s rotatable head features a lock button that enables you to fix the camera at a certain position and to shoot a video from an angle you selected. You can’t extend the legs on this tripod so shooting high angle shots is not an option.
Pros:
- Small and durable
- Allows you to mount almost any Smartphone model
- Compatible with compact cameras
Cons:
- Limits your shot selection
- Tripod’s legs can’t be extended
3. Joby Gorilla Pod
Price: $22.50

This tripod is a superstar in the vlogging community because it is flexible, easy to set up and it fits into a pocket. Joby Gorilla Pod’s legs are segmented, so you can freely choose an angle from which you want to shoot, without having to worry about the camera’s stability. You can use this tripod on flat and uneven surfaces equally effectively.
Joby Gorilla weighs just 1lbs and its maximum height 11.6 inches, which makes it perfectly suited for talking heads videos. Using this tripod while you are on the go is also an option if you have a camera that weighs less than 3lbs.
Pros:
- Highly adjustable
- Sturdy and Lightweight
- Made from stainless steel
Cons:
- Can’t be used for panning shots
- Legs can be extended for just one inch
4. Manfrotto Compact Action Tripod
Price: $64.49
If you love shooting your vlogs at night or if you simply want a tripod you can use in the studio an outdoor conditions, then Manfrotto’s Compact Action Tripod is one the best options you have at your disposal. The ergonomic head features a mounting plate that is easy to use and which provides a perfect grip of a camera.
This tripod is designed to be used with consumer-level DSLR cameras, but you can use it to shoot videos with almost all types of cameras. The Compact Action Tripod has a maximum height of 51.57 inches, and it can’t hold cameras heavier than 3.30lbs.
Pros:
- Suitable for both photography and video
- Great for outdoor use
- Allows you to take a wide variety of shots
Cons:
- Can’t support a lot of weight
- Not perfectly suited for professional-level cameras
5. Magnus VT-4000 Fluid Head Tripod
Price: $159.95
Experienced vloggers who record their videos with professional cameras, will enjoy using the Magnus VT-4000 Fluid Head Tripod. The 59-inch tall tripod can support as much as 8.8lbs of weight, and it is designed to help you create perfectly stable shots. The superb panning and tilting option enable you to move your camera freely while recording smooth shots, free of camera shakes.
The quick release mounting plate is compatible with a wide range of cameras, so you can experiment and work with several different cameras while using the same tripod. You can hardly make a mistake if you choose to buy this tripod because you’ll be able to use it to record vlogs at interior and exterior locations.
Pros:
- Easily adjustable to any surface
- Perfect for high angle shots
- Heavy-duty locks
Cons:
- Weighs 7.9lbs
- Not the best choice for action and adventure vlogs
Richard Bennett
Richard Bennett is a writer and a lover of all things video.
Follow @Richard Bennett
Richard Bennett
Mar 27, 2024• Proven solutions
As you grow into a serious vlogger, a tripod will become an essential piece of equipment. You can get by for a long time setting your camera up on a stack of books, or an upside-down laundry hamper, but not forever. While these setups are great for a beginner, an intermediate vlogger will start to find them limiting. Even if you are an amazingly creative person who can create any camera setup without a tripod there will come a point where you will decide your creative energy is better spent on your video content.
This article will explain how to use a tripod and then introduce you to four different types.
Part 1: How To Set a Tripod for Vlogging
1. Setting Up Your Tripod
Step 1 – Pull out all three legs of your tripod and make sure it is standing stably. There will be tensioners on the legs which you can release in order to adjust your height. Once your legs are extended to the height you want continue adjusting them until your tripod is level. Some tripods have a built in bubble level, but if yours does not you can use a separate bubble level or make a guestimate.
Make sure when you are setting up your tripod that you point one of its legs towards your subject. This will give you room to stand behind your camera, in-between the other two legs. If you have one leg pointed directly behind your camera then you may trip over it. Or, you may knock over and damage your camera.
Step 2 – On the top of your tripod there will be a plate with a small hole and a screw. Remove this plate using either a clip or lever, depending on your tripod. Once your plate is detached screw it into the bottom of your camera. It should be tight, but not too tight or you risk damaging your camera.
Step 3 – Attach your plate, which now has your camera mounted to it, back onto your tripod.
Your tripod comes with a ‘head’. Your tripod’s head is what your camera is mounted on top of. There are several different types of tripod heads and mounts which are all useful for different things.
Ball Heads and Pan/Tilt Heads are the two most common types of tripod heads. Ball Heads allow you to adjust your camera’s position quite a bit before you start shooting. They are not good for adding in camera movements while you are filming, however, because you need to lock them in place. Pan/Tilt heads are great for creating camera movement. Most Pan/Tilt heads have a handle which you can use to make a smooth panning motion.
Part 2: Why Do You Need a Tripod: Benefits of Using Tripod
Why can’t you just hold a camera in your hand while shooting vlog entries for your YouTube channel? Honestly, you can, but the camera may shake a lot and your footage might end up being unusable. Putting a camera on a tripod reduces the probability of camera shake to the minimum and that is just the tip of the iceberg.
A huge amount of vlogs can be described as sit down videos, in which the host of the video sits in front of a camera and talks to the audience. Holding a camera while talking or trying to present a product to the viewers is next to impossible, so in order to avoid having to deal with a camera, you can simply put it on a tripod, find the best angle, and push the record button.
On the go videos, are recorded at exterior locations, and a lot of YouTubers choose to shoot these types of videos handheld, but this approach makes it difficult to maintain the same shot composition for long. A Monopod, Gorillapod or just a simple selfie stick can make your job much easier because they stabilize the camera. In addition, shooting smooth panning shots without a tripod is as difficult as it sounds.
Part 3: A Few Things You’ll Need to Consider Before You Buy a Tripod
There are thousands of different tripod models you can use for vlogging, but which model you’re going to choose depends mostly on the type of vlog you want to make. If you are planning on shooting all of your videos in the studio-like conditions, then portability isn’t such an important feature, while quite the opposite is true if you intend on filming all of your footage on outdoor locations.
However, there are certain traits you have to consider when choosing a tripod you’re going to use while recording your vlog entries.
Sturdiness: There is absolutely no point in spending money on a tripod that breaks easily. Although if your plan is to shoot vlogs at home or in a studio, then buying a cheaper plastic tripod isn’t such a bad option, since the clamps and joints won’t have to endure a lot of wear and tear. Consider buying a more durable tripod if you are going to be traveling a lot while working on your vlogs.
The Type of Camera: A number of factors can contribute to the weight of a camera, including battery grips or lenses, so before you buy a tripod make sure that it can support the weight of the camera you want to use to record your videos.
The Maximum Height: Most vloggers don’t really have to worry about how tall their tripod is, because they are not on their feet in any of the shots featured in the video. Vloggers working on DIY videos, cooking tutorials or any other type of vlog that involves movement and action should pay attention to this trait.
Photo or Video Tripods: Do you want to take beautiful panning shots? If the answer is yes then you should get a video tripod that enables you to move the camera smoothly in any direction. Photo tripods are a great option for static shots that don’t involve a lot of camera movement.
Mobility: The heavier a tripod is, the more stability it can provide, but carrying a tripod that weighs over 10 pounds to shoot sports or adventure vlogs can be a tiring endeavor. Although portability is a factor, it shouldn’t prevent you from buying a high-quality tripod that will ensure your footage is perfectly smooth and stable.
Part 4: 4 Types of Tripods
Full-Sized Tripods: are very sturdy, and as a result can be fairly heavy. Although you can take them a lot of places they are not convenient to carry for extended periods of time. They are the most reliable way to ensure you have absolutely no camera shake.
Compact Tripods: appear to be the same size as Full-Sized tripods, but they are actually much lighter. You can get the same height with a Compact Tripod as a Full-Sized tripod and it will be much easier to travel with. However, Compact Tripods are not as stable. If you are shooting for an extended period of time you may need to weigh your Compact Tripod down with sandbags to keep it steady.
Gorillapods: have flexible legs which can be wrapped around posts, fences, or anything else you may want to mount your camera on. They are also lightweight enough that you can carry them around while you shoot. If you bend it right you can essentially use your Gorillapod as a heavy-duty selfie-stick for your camera.
Table-Top Tripods: are very small and easy to travel with. You can leave one in your camera bag or your glove box. Table-Top Tripods are meant to be set up on top of desks or other stable surfaces and may not be ideal for heavier cameras.
Part 5: The 5 Best Tripods For YouTube Vlogging
Even if you know everything there is to know about tripods, the selection process can be daunting. That’s why we’ve shortlisted the top 5 tripods on the market, in an effort to make finding the right tripod for your vlog videos as quick an easy as it can possibly be. Let’s have a look.
1. CamRah Smartphone Tripod
Price: $24.99
An increasing number of Smartphones features powerful cameras that can record videos at high resolutions. Unfortunately, most iPhones and Android devices are lightweight, which makes it difficult to hold them perfectly still while shooting a video. CamRah Smartphone Tripod offers a perfect solution to this problem because it is easy to pack and you can carry it wherever you go, without needing the extra space.
It weighs just 0.6lbs and it is 10.8 inches tall. The tripod has a maximum load of 11lbs which means that besides Smartphones, you can also mount action cameras, webcams, or even smaller DSLR cameras onto it. The flexible legs made from high-density foam offer stability even when the CamRah Tripod is placed on an uneven surface.
Pros:
- Easily portable
- Affordable
- Jaws technology provides an extra strong grip of the camera
Cons:
- The tripod’s legs can’t be extended
- Can’t be used with professional cameras
2. Manfrotto Mini Travel Tripod
Price: $34.99
Yet another great option for shooting vlogs with a Smartphone. The Manfrotto Mini Travel Tripod kit is also an excellent choice for all vloggers who shoot their videos with compact cameras. The tripod weighs just 0.51lbs and it is 5.31 inches tall, which makes it a perfect travel companion. However, it can’t support cameras heavier than 2.2lbs, so you have to carefully choose the camera you want to put on this tripod.
The tripod’s rotatable head features a lock button that enables you to fix the camera at a certain position and to shoot a video from an angle you selected. You can’t extend the legs on this tripod so shooting high angle shots is not an option.
Pros:
- Small and durable
- Allows you to mount almost any Smartphone model
- Compatible with compact cameras
Cons:
- Limits your shot selection
- Tripod’s legs can’t be extended
3. Joby Gorilla Pod
Price: $22.50
This tripod is a superstar in the vlogging community because it is flexible, easy to set up and it fits into a pocket. Joby Gorilla Pod’s legs are segmented, so you can freely choose an angle from which you want to shoot, without having to worry about the camera’s stability. You can use this tripod on flat and uneven surfaces equally effectively.
Joby Gorilla weighs just 1lbs and its maximum height 11.6 inches, which makes it perfectly suited for talking heads videos. Using this tripod while you are on the go is also an option if you have a camera that weighs less than 3lbs.
Pros:
- Highly adjustable
- Sturdy and Lightweight
- Made from stainless steel
Cons:
- Can’t be used for panning shots
- Legs can be extended for just one inch
4. Manfrotto Compact Action Tripod
Price: $64.49
If you love shooting your vlogs at night or if you simply want a tripod you can use in the studio an outdoor conditions, then Manfrotto’s Compact Action Tripod is one the best options you have at your disposal. The ergonomic head features a mounting plate that is easy to use and which provides a perfect grip of a camera.
This tripod is designed to be used with consumer-level DSLR cameras, but you can use it to shoot videos with almost all types of cameras. The Compact Action Tripod has a maximum height of 51.57 inches, and it can’t hold cameras heavier than 3.30lbs.
Pros:
- Suitable for both photography and video
- Great for outdoor use
- Allows you to take a wide variety of shots
Cons:
- Can’t support a lot of weight
- Not perfectly suited for professional-level cameras
5. Magnus VT-4000 Fluid Head Tripod
Price: $159.95
Experienced vloggers who record their videos with professional cameras, will enjoy using the Magnus VT-4000 Fluid Head Tripod. The 59-inch tall tripod can support as much as 8.8lbs of weight, and it is designed to help you create perfectly stable shots. The superb panning and tilting option enable you to move your camera freely while recording smooth shots, free of camera shakes.
The quick release mounting plate is compatible with a wide range of cameras, so you can experiment and work with several different cameras while using the same tripod. You can hardly make a mistake if you choose to buy this tripod because you’ll be able to use it to record vlogs at interior and exterior locations.
Pros:
- Easily adjustable to any surface
- Perfect for high angle shots
- Heavy-duty locks
Cons:
- Weighs 7.9lbs
- Not the best choice for action and adventure vlogs
Richard Bennett
Richard Bennett is a writer and a lover of all things video.
Follow @Richard Bennett
Also read:
- Step-by-Step Approach to Measuring YT Popularity & Revenue
- In 2024, Best Camera for Videos Mirrorless Vs. DSLR Showdown
- Flawless Free Download of YouTube Video Covers - No Hurdles
- Upload MP3 Quickly Step-by-Step to YouTube Broadcasting
- Charting 8 Most Swiftly Increasing Video Platforms for 2024
- [Updated] Audience’ Market Leaders in YouTube's Short Clips Downloads
- [Updated] Essential Tools for Android & iOS Users Seeking Playlist Extractors
- 2024 Approved DIY YouTube Openers Technique One & Technique Two
- [Updated] Dimensions for YouTube Shorts, Facebook, Instagram and Other Social Apps
- [Updated] Cut the Boring, Watch These 15 Hilarious YouTube Bites
- [Updated] Creating Memorable Beginnings IMovie Tips for YouTube Videos
- YouTube Followers Surge Top Tips for Channel Expansion
- Controlling YouTube's Playback Speed - Mobile and PC
- The Filmmaker's Ally Unlocking YouTube Studio Editor Secrets
- Reel In Riches A Guide to Earning on YouTube Shorts
- In 2024, Efficient Keyword Utilization Discover the Best 7 Online Video Tag Extractors Reviewed
- [New] Comparative Assessment YouTube Vs. DailyMention
- In 2024, Dynamic Duo Shots Perfecting YouTube Video Splitting
- Maximizing Production Value Choosing Top-Tier YouTube Tools
- How to Convert YouTube to IGTV Videos? [3 Ways]
- [New] Channel Upgrade How Reaching 500 Viewers Propelts Monetization
- Snippet Supremacy Essential Hashes for Accelerated Viewership Growth
- [New] Essential Tools Free Online Youtuber Starters
- 2024 Approved How to Convert YouTube to MP4 Safely?
- [Updated] Achieve More Views Tailoring and Scaling YouTube Images
- 2024 Approved Craft Proficient Content for Short-Form Video Best Edits Reviewed
- 2024 Approved A Vlogger's Guide To Camera Lenses
- [Updated] Are Scalping Subscribers a Viable Strategy?
- [Updated] Engage Audiences on All Sides Live 360-Degree Video Broadcasting for YouTube
- In 2024, A Review of YouTube's Integration with iPhone & Android Devices
- [New] Assessing Your Video Streaming Needs To Subscribe or Not to Subscribe?
- Culinary Connoisseurs Must-Watch Food Content
- Elevate Video Performance Following the Path of Stars for 2024
- Procure Visual Gold From Leading 4 Video Content Creators
- Avoiding Content ID Alerts Strategies on YouTube
- Font Powerhouses for Captivating YouTube Thumbnails
- In 2024, Cross-Platform Content Excellence The Full Guide on Linked YouTube + TikTok Accounts
- Mastering YouTube Legalities A Comprehensive Overview
- 2024 Approved Comprehensive List of 8 Prime YouTube-to-AVI Tools
- Seamless Sound Shift Best 10 YouTube Audio Converters
- Video Editing Simplified The Best Hacks for New Creators
- 2024 Approved Creating Heartfelt YouTube Journeys
- 2024 Approved Culinary Callings Innovative Naming for Foodie Channels
- In 2024, Creating a Viral YouTube Sensation Simplified Action Plan
- How to Analyze Your and Competitor’s YouTube Video
- How to Unlock iPhone 7 Plus without Passcode or Face ID | Dr.fone
- In 2024, The Ultimate User-Friendly Guide to Starting an Effective Group Chat on Skype Across Multiple Platforms.
- In 2024, Pattern Locks Are Unsafe Secure Your Samsung Phone Now with These Tips
- In 2024, How to Bypass Android Lock Screen Using Emergency Call On Infinix Smart 8 Plus?
- Leading GB Emulators for Android Gamers for 2024
- [New] Best Drone Buys - The Top 5 Pro Picks
- In 2024, Complete Tutorial to Use GPS Joystick to Fake GPS Location On Samsung Galaxy A25 5G | Dr.fone
- How To Restore Missing Messages Files from Narzo 60 Pro 5G
- [New] 2024 Approved Stepwise Strategies to Record Flawless Screens with Adobe Captive
- [Updated] 2024 Approved Next-Level Gameplay Capturing Applications
- New In 2024, 12 Animated Slideshow PowerPoint Templates
- [New] 2024 Approved High-Quality Sound Capture Top 10 for Spotify Lovers
- Conquer Screen Capture In-Depth Windows PC Guide for Live TV Recording
- [Updated] Fantasy Villas with Oriental Elegance, MC Edition
- In 2024, Step-by-Step Tutorial How To Bypass Tecno Pova 5 FRP
- 2024 Approved Top Free Video Smoothers for PC and Mac
- In 2024, Safe Purchase High-Quality TikTok Followers
- Easy Guide to Tecno Spark 20 FRP Bypass With Best Methods
- Transforming Your TikTok Presence A Detailed Walkthrough
- In 2024, Unpacking Apps - The AZ Screenshotter Approach
- In 2024, How to Unlock iCloud lock from your Apple iPhone 11 Pro and iPad?
- Updated Unveiling the Science of Digital Voice Mimicry A Dual-Method Approach
- In 2024, How to Copy Contacts from Apple iPhone 6s Plus to SIM? | Dr.fone
- Planning to Use a Pokemon Go Joystick on Sony Xperia 1 V? | Dr.fone
- The Best 8 VPN Hardware Devices Reviewed On Nubia Red Magic 9 Pro+ | Dr.fone
- New In 2024, Unlock the Top 12 Audio Converters A Comprehensive Guide
- [New] Mastering The Art Becoming a Verified Discord Partner for 2024
- In 2024, Tips and Tricks for Apple ID Locked Issue From iPhone XR
- Full Solutions to Fix Error Code 920 In Google Play on Oppo Reno 11F 5G | Dr.fone
- [New] In 2024, Discover Font Powerhouses to Dominate Your TikTok Content in '23
- In 2024, How to Remove a Previously Synced Google Account from Your Realme GT Neo 5 SE
- Title: "How to Create a Killer Unboxing Video A Complete Guide"
- Author: Steven
- Created at : 2024-05-25 19:25:57
- Updated at : 2024-05-26 19:25:57
- Link: https://youtube-clips.techidaily.com/how-to-create-a-killer-unboxing-video-a-complete-guide/
- License: This work is licensed under CC BY-NC-SA 4.0.
