
:max_bytes(150000):strip_icc()/samsung-soundbar-c1b91ce1db6644d09b8b7684262cb8b1.jpg)
"Gamers’ Sound Selection Top 5 Noise-Canceling Earbuds"
Gamers’ Sound Selection: Top 5 Noise-Canceling Earbuds
Top 5 Gaming Headsets for YouTube in 2024

Richard Bennett
Feb 20, 2024• Proven solutions
Need a gaming headset? The number of gamers is growing every day, and that means more and more people are looking for content from experienced gamers on YouTube and Twitch. To produce great YouTube gaming videos, you’ll need a lot of gaming knowledge and a few pieces of high-quality equipment, including a good headset. Without a headset, it might be hard to keep track of in-game audio cues while entertaining your audience.
Most hardware manufacturers are actively targeting the gaming market, releasing specialized headset models for 2024. Here is a quick overview of the five best candidates for the title of the best gaming headset for 2024:
2. Audio Technica ATH-ADG1 Open Air High Fidelity Headset
3. Logitec Surround Sound Gaming Headset G430
4. Razer Kraken 7.1 Chroma Gaming Headset
5. HyperX Cloud II Gaming Headset
1. Razer Man O’ War 7.1
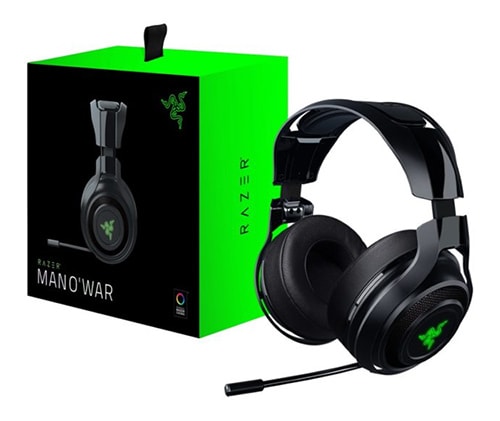
Price: $222.48
Compatible with: PC, Mac (with USB), PlayStation, Xbox
This wireless headset has an impressive surround sound engine that allows for an immersive gaming experience and convincing positional audio. The headset features a modern ergonomic design with earcups that fit very tightly and completely seal off the outside world. Razer Man O’War looks bulky, but it weighs just over 330 grams and uses an analog 3.5 mm connector.
The microphone boom extends from the left ear cup and can be easily adjusted or retracted. Most importantly, microphone controls are very sophisticated allowing for in-game switching between channels without disruption. When used for talking, the microphone will ensure absolute clarity, which comes handy for those who broadcast their games on YouTube.
Pros:
- Wireless setup for maximum freedom
- Minimizes ambient noise with cushion-like ear cups
- Lightweight and comfortable to wear
- Fully retractable, high-quality MEMS microphone
- Long-lasting batteries – up to 14 hours
Cons:
- Occasional loss of connectivity
- Slightly expensive for a plastic build
2. Audio Technica ATH-ADG1 Open Air High Fidelity Headset
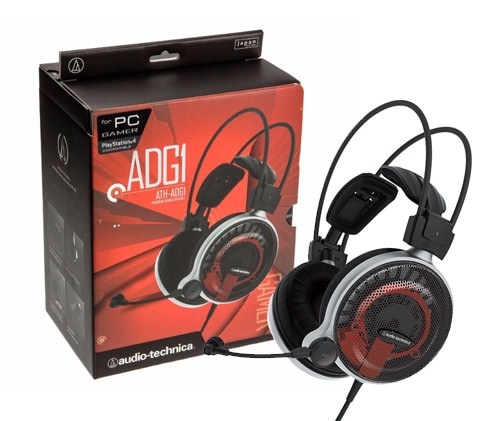
Price: $299
Compatible with: PC, PS4, iPad, iPhone, Xbox (with adapter)
For a gaming headset, this model boasts a really impressive audio quality. This characteristic is a huge strength, especially when coupled with its broad compatibility and innovative design. The structure of this headset is unique, with an open-air setup that allows for the circulation of air under the set, which is useful during long gaming sessions. This comes at a price since the isolation against ambient noise is less than perfect and the feeling might be a bit awkward until you get used to it.
As for the microphone, it is permanently attached to the left side of the headset with a flexible stem, so it can be easily adjusted to the desired position. This implies that ATH-ADG1 was made specifically for those who need to communicate while receiving the high-quality audio feed, such as gaming streamers.
Pros:
- Extremely light and uniquely built for comfort
- Top-notch audio quality above its class
- Innovative, self-adjusting frame
- Comfortable ear cups
Cons:
- Analog headset, so the quality depends on the connected device
- Specialized product with a narrow range of applications
- Fragile build that can easily be damaged
- Very expensive
3. Logitec Surround Sound Gaming Headset G430
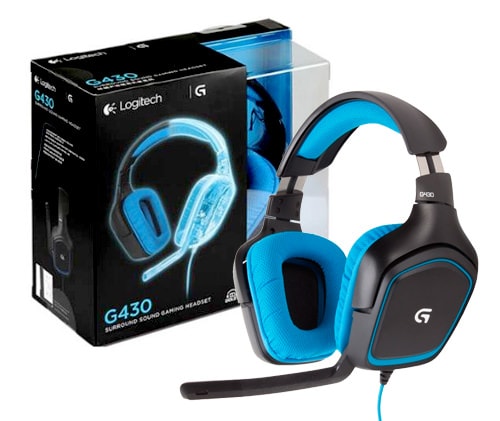
Price: $79.99
Compatible with: PC, PS4
Logitec is well known for producing high-quality peripherals, and this model lives up to that standard despite its affordable price. Its most touted feature is the surround sound system, which is not common in this price range. This allows for very realistic in-game audio, particularly because the headset has an excellent bass channel. In addition to solid audio performance, the Logitec gaming headset is characterized by low weight rotating ear cups with a protective cloth and vibrant coloring.
A standard 3.5 mm connector is used for the microphone, which is conveniently positioned and capable of clearly capturing speech while blocking out other sounds. Unfortunately, the microphone can’t be easily manipulated and doesn’t offer the option to be muted automatically, although a manual switch is available to turn it off. For a budget gaming headset, that’s a fair compromise.
Pros:
- Realistic, immersive sound
- Smart design optimized to decrease weight
- The Durable cloth covering the ear cups
- Surround effect on a cheap gaming headset
- Excellent price-to-quality ratio
Cons:
- Lack of programmable commands
- Poor protection against ambient noise
- Less than impressive visually
4. Razer Kraken 7.1 Chroma Gaming Headset
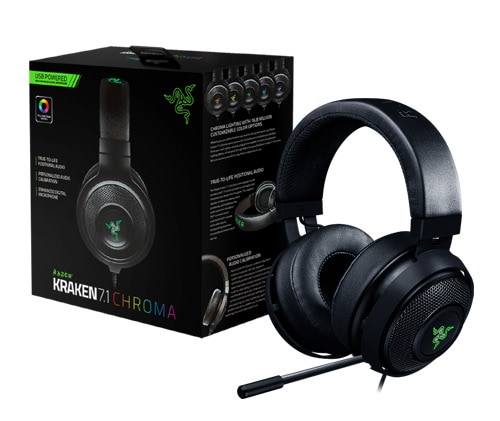
Price: $96.77
Compatible with : PC, PS4
If you are looking for the best gaming headset with a microphone, this is a very b candidate. It is pretty affordable compared to the other Razer headset on this list (the Man O’ War), but it is equally robust when it comes to performance, including high-quality surround audio. This is a rather large headset with thick ear cups decorated with a glowing logo of the brand, but its size is not a problem since Kraken is very comfortable even when worn continually for hours.
Kraken’s fully retractable and flexible microphone can be hidden under the left cup when not in use, giving this model a bit of versatility. It picks up your voice even when it’s bent sideways, so YouTube professionals won’t have to worry about the exact positioning while engaged in a fierce battle. It’s also possible to use a toggle switch to mute the microphone quickly.
Pros:
- Excellent audio for its price range
- Surround audio contributes to the more complete gaming experience
- Completely isolates any ambient sounds
- Flexible mic that can be moved out of the way
- Access to Synapse 2.0 software
Cons:
- USB only, no 3.5 mm jacks
- Lack of preset settings for gaming
- A sensitive microphone that sometimes picks up unwanted sounds
5. HyperX Cloud II Gaming Headset
Price: $99.88
Compatible with: PC, Mac, Xbox, PS4, Mobile
Well designed, packed with advanced features and moderately priced, this gaming headset offers a lot of value to the YouTube crowd. It comes with optional surround audio that can be plugged in via sound card, or disconnected when this effect is not needed. The headset was originally designed to work perfectly on the Xbox, but it retains compatibility with most desktops, laptops, and consoles.
The detachable microphone is very solid and particularly effective in filtering noise and eliminating echo. It can be easily moved into any position or removed altogether when the headset is used for any purpose other than game streaming.
Pros:
- b and elegant aluminum frame
- Advanced audio control box
- Virtual 7.1 surround audio
- Interchangeable ear pads
- Premium look and feel at an affordable price
Cons:
- Inconveniently positioned mute switch
- Relatively short cord limiting movement
Best Video Editing Software for Gamers- Wondershare Filmora9
No doubt gamers would need a lot of effects and overlays to edit a live stream video to show the best effects on the game screen. High bass music syncing with the scene is very important for a game video. The sky is the limit to add effects and background to the game videos with Wondershare Filmora9 as it’s the best video editor for professionals and newcomers who are interested in gaming and pursuing a YouTube channel. Filmora9 provides you with a green screen, PIP, scene detection, play video in reverse, add voice over, royalty-free music, overlays, and transitions that you can use to make a gaming video like a pro.


Richard Bennett
Richard Bennett is a writer and a lover of all things video.
Follow @Richard Bennett
Richard Bennett
Feb 20, 2024• Proven solutions
Need a gaming headset? The number of gamers is growing every day, and that means more and more people are looking for content from experienced gamers on YouTube and Twitch. To produce great YouTube gaming videos, you’ll need a lot of gaming knowledge and a few pieces of high-quality equipment, including a good headset. Without a headset, it might be hard to keep track of in-game audio cues while entertaining your audience.
Most hardware manufacturers are actively targeting the gaming market, releasing specialized headset models for 2024. Here is a quick overview of the five best candidates for the title of the best gaming headset for 2024:
2. Audio Technica ATH-ADG1 Open Air High Fidelity Headset
3. Logitec Surround Sound Gaming Headset G430
4. Razer Kraken 7.1 Chroma Gaming Headset
5. HyperX Cloud II Gaming Headset
1. Razer Man O’ War 7.1
Price: $222.48
Compatible with: PC, Mac (with USB), PlayStation, Xbox
This wireless headset has an impressive surround sound engine that allows for an immersive gaming experience and convincing positional audio. The headset features a modern ergonomic design with earcups that fit very tightly and completely seal off the outside world. Razer Man O’War looks bulky, but it weighs just over 330 grams and uses an analog 3.5 mm connector.
The microphone boom extends from the left ear cup and can be easily adjusted or retracted. Most importantly, microphone controls are very sophisticated allowing for in-game switching between channels without disruption. When used for talking, the microphone will ensure absolute clarity, which comes handy for those who broadcast their games on YouTube.
Pros:
- Wireless setup for maximum freedom
- Minimizes ambient noise with cushion-like ear cups
- Lightweight and comfortable to wear
- Fully retractable, high-quality MEMS microphone
- Long-lasting batteries – up to 14 hours
Cons:
- Occasional loss of connectivity
- Slightly expensive for a plastic build
2. Audio Technica ATH-ADG1 Open Air High Fidelity Headset
Price: $299
Compatible with: PC, PS4, iPad, iPhone, Xbox (with adapter)
For a gaming headset, this model boasts a really impressive audio quality. This characteristic is a huge strength, especially when coupled with its broad compatibility and innovative design. The structure of this headset is unique, with an open-air setup that allows for the circulation of air under the set, which is useful during long gaming sessions. This comes at a price since the isolation against ambient noise is less than perfect and the feeling might be a bit awkward until you get used to it.
As for the microphone, it is permanently attached to the left side of the headset with a flexible stem, so it can be easily adjusted to the desired position. This implies that ATH-ADG1 was made specifically for those who need to communicate while receiving the high-quality audio feed, such as gaming streamers.
Pros:
- Extremely light and uniquely built for comfort
- Top-notch audio quality above its class
- Innovative, self-adjusting frame
- Comfortable ear cups
Cons:
- Analog headset, so the quality depends on the connected device
- Specialized product with a narrow range of applications
- Fragile build that can easily be damaged
- Very expensive
3. Logitec Surround Sound Gaming Headset G430
Price: $79.99
Compatible with: PC, PS4
Logitec is well known for producing high-quality peripherals, and this model lives up to that standard despite its affordable price. Its most touted feature is the surround sound system, which is not common in this price range. This allows for very realistic in-game audio, particularly because the headset has an excellent bass channel. In addition to solid audio performance, the Logitec gaming headset is characterized by low weight rotating ear cups with a protective cloth and vibrant coloring.
A standard 3.5 mm connector is used for the microphone, which is conveniently positioned and capable of clearly capturing speech while blocking out other sounds. Unfortunately, the microphone can’t be easily manipulated and doesn’t offer the option to be muted automatically, although a manual switch is available to turn it off. For a budget gaming headset, that’s a fair compromise.
Pros:
- Realistic, immersive sound
- Smart design optimized to decrease weight
- The Durable cloth covering the ear cups
- Surround effect on a cheap gaming headset
- Excellent price-to-quality ratio
Cons:
- Lack of programmable commands
- Poor protection against ambient noise
- Less than impressive visually
4. Razer Kraken 7.1 Chroma Gaming Headset
Price: $96.77
Compatible with : PC, PS4
If you are looking for the best gaming headset with a microphone, this is a very b candidate. It is pretty affordable compared to the other Razer headset on this list (the Man O’ War), but it is equally robust when it comes to performance, including high-quality surround audio. This is a rather large headset with thick ear cups decorated with a glowing logo of the brand, but its size is not a problem since Kraken is very comfortable even when worn continually for hours.
Kraken’s fully retractable and flexible microphone can be hidden under the left cup when not in use, giving this model a bit of versatility. It picks up your voice even when it’s bent sideways, so YouTube professionals won’t have to worry about the exact positioning while engaged in a fierce battle. It’s also possible to use a toggle switch to mute the microphone quickly.
Pros:
- Excellent audio for its price range
- Surround audio contributes to the more complete gaming experience
- Completely isolates any ambient sounds
- Flexible mic that can be moved out of the way
- Access to Synapse 2.0 software
Cons:
- USB only, no 3.5 mm jacks
- Lack of preset settings for gaming
- A sensitive microphone that sometimes picks up unwanted sounds
5. HyperX Cloud II Gaming Headset
Price: $99.88
Compatible with: PC, Mac, Xbox, PS4, Mobile
Well designed, packed with advanced features and moderately priced, this gaming headset offers a lot of value to the YouTube crowd. It comes with optional surround audio that can be plugged in via sound card, or disconnected when this effect is not needed. The headset was originally designed to work perfectly on the Xbox, but it retains compatibility with most desktops, laptops, and consoles.
The detachable microphone is very solid and particularly effective in filtering noise and eliminating echo. It can be easily moved into any position or removed altogether when the headset is used for any purpose other than game streaming.
Pros:
- b and elegant aluminum frame
- Advanced audio control box
- Virtual 7.1 surround audio
- Interchangeable ear pads
- Premium look and feel at an affordable price
Cons:
- Inconveniently positioned mute switch
- Relatively short cord limiting movement
Best Video Editing Software for Gamers- Wondershare Filmora9
No doubt gamers would need a lot of effects and overlays to edit a live stream video to show the best effects on the game screen. High bass music syncing with the scene is very important for a game video. The sky is the limit to add effects and background to the game videos with Wondershare Filmora9 as it’s the best video editor for professionals and newcomers who are interested in gaming and pursuing a YouTube channel. Filmora9 provides you with a green screen, PIP, scene detection, play video in reverse, add voice over, royalty-free music, overlays, and transitions that you can use to make a gaming video like a pro.
Richard Bennett
Richard Bennett is a writer and a lover of all things video.
Follow @Richard Bennett
Tips for Effortless Upload of High Definition Videos to Youtube
Create High-Quality Video - Wondershare Filmora
An easy and powerful YouTube video editor
Numerous video and audio effects to choose from
Detailed tutorials provided by the official channel
Many people have a strong desire to make videos. Whether you make videos for a living or as a pastime, it doesn’t matter. When you make a fantastic film that you’re pleased with, you want to show it off to your friends and family. YouTube, the most popular site for sharing videos on various themes, is one of the most incredible places to start.
YouTube is fantastic for sharing videos, but it can be harsh on artists due to the high bar for content and video quality. If you want to succeed as a YouTuber, you must create videos that are informative and high-resolution. This is critical since your viewers may wish to watch your movies on a computer screen or a 4K smart TV.
If you’ve decided to make videos in 4K resolution, you’ll find information on recommended encoding settings, how to upload a video to YouTube, potential problems, and more below.
In this article
01 What Is The Distinction Between Various Resolutions?
02 Why Would You Want To Upload A 4k Video?
03 What Is The Best Way To Upload A 4k Video To Youtube?
04 Tips On How To Make Sure The Video You’re Uploading Is Of High Quality
What Is The Distinction Between Various Resolutions?
The number of pixels on a screen is referred to as resolution. Low resolution indicates fewer pixels and typically less space, whereas high resolution means more pixels and generally greater space and detail. You probably have a poor resolution if you’re using a standard laptop or an old screen.
When watching a video on a larger screen, the resolution significantly impacts your viewing experience. Whether it’s a live stream or an on-demand movie, the correct resolution is crucial to reaching a wider audience, and this is where iPhones and iPads appear to have an advantage. Let’s take a closer look at each of these resolution types and their associated pixel sizes.
1. SD RESOLUTION (STANDARD DEFINITION)
Previously, resolutions were separated into SD (Standard Definition) and HD (High Definition) categories. SD was defined as a video with a resolution of less than 720p. However, as television and computer monitor display resolutions improved over time, a video was less likely to be shot in Standard Definition.
The following are the most common standard video resolutions:
- 640 × 360 pixels (or 360p)
- 640 × 480 pixels (or 480p)
2. RESOLUTION: 720P HD (HIGH DEFINITION)
The lowest video resolution is 720p, which is commonly referred to as ‘HD.’ 720p (1280 x 720 pixels) is a resolution recognized for modest web content, even though most videos require at least 1080p. Because most computer monitors are now in HD, the recommended practice for web and streaming is to choose a resolution higher than 720p.
The resolution of HD videos is usually: 1280 x 720 pixels (or 720p)
3. 1080P FULL HD RESOLUTION
1080p resolutions, also known as ‘Full HD,’ have become the industry standard for a clear HD video that doesn’t take up a lot of storage space. It’s also worth noting that this is the standard screen resolution for all smartphones.
The resolution of full HD videos is usually: 1920 x 1080 pixels (or 1080p)
4. 2K RESOLUTION WITH QHD (QUAD HIGH DEFINITION)
Quad HD resolution, or QHD for short, is widely found on high-end smartphones and gaming monitors. The resolution of 1440p is four times that of HD Ready (or 720p HD). Many high-end smartphones have a Quad HD+ resolution (296 x 1440 pixels), which is ideal for 1440p. Another common screen resolution is 2K, which allows for larger displays and reframing without sacrificing quality or image editing.
The resolution of QHD and 2K videos is:
- 2560 x 1440 pixels in QHD (or 1440p)
- 2048 x 1080 pixels in 2K (or 1080p)
5. 4K (OR UHD/ULTRA-HIGH-DEFINITION) RESOLUTION
This sort of resolution, often known as 4Kor UHD (Ultra High Definition), has a pixel size of 3840 x 2160 pixels. It has a similar appearance to 2K, but it provides video artists more room to edit and zoom in. For vivid color, graphics, or dramatic viewing, both 2K and 4K resolutions are available. Unless you wish to tweak colors or trim in closer, there aren’t enough visible distinctions between 2K and 4K. So, it matters when you want to change a certain detail, but it doesn’t matter when someone else is looking at it.
The resolution of 4K videos is: 3840 x 2160 (or 2160p / simply 4K) is a resolution of 3840 x 2160 pixels.
Why Would You Want To Upload A 4k Video?
YouTube is the second-largest social media site, with approximately 1.9 billion monthly active users. YouTube is where you want to be to access this large audience and promote your brand, with one billion hours of video watched every day on the platform.
However, for your target audience to watch your videos, you must ensure excellent video quality. Poorly shot or edited films may alienate your viewers, especially when there are billions of other videos to choose from on the site.
- 4k is the most satisfactory resolution for uploading to YouTube. Although not every viewer can watch videos in 4k, it ensures that your visitors get the best possible experience.
- Traditional Full HD (1920 x 1080) TVs feature four times as many pixels as 4K TVs. Because of the higher pixel density, the picture quality of 4K TVs is more colorful and detailed, even on TV displays of the same size. This distinction is most noticeable on large-screen televisions.
- Even if you recorded in 1080p and upscaled to 4K, you should post in 4K to YouTube for the finest image quality. Recording in 1080p, editing in 1080p, exporting in 4k, and YouTube viewing is sharper in 1080p.
- With 4K, you get stunning visuals with a resolution of 38402160, which is four times that of Full-HD. That’s why visuals appear crisp and lifelike, even on large-screen TVs rather than pixelated. Down-converted 4K to Full-HD photographs have superior quality and resolution than images shot in Full-HD from the start.
What Is The Best Way To Upload A 4k Video To Youtube?
The YouTube upload process is not complicated, but it does need several steps. You can finally post your video once it has been prepared and converted to MP4 format.
Follow the steps below to post your video to YouTube:
1. Go to YouTube.com in your browser.
2. Log in to your account and click the “Create” symbol, which looks like a camera with a plus sign, in the right corner of the menu bar.
3. Select “Upload video” from the drop-down menu.

4. Drag and drop your video file into the upload box, or select your file from the “Select File” menu and click “Open.”
5. Make a note of the title and description while YouTube is processing your video.

6. Select a video thumbnail from the options or upload your own and select your “Audience” from the drop-down menu. To manage age restriction settings.
7. Select “More Options” to add searchable keywords to your video, manage subtitles and comments, and more.
8. Select if you want to add promotions to your video by clicking “Next.”
9. Finally, click “Next” and wait for the video to be processed entirely before publishing it.
10. You can also automatically set it to publish at a later date.
Tips On How To Make Sure The Video You’re Uploading Is Of High Quality
The following are five tips for amateur and top newbie YouTubers who want to improve their videos.
1. Cut Your Video Into Clips And Organize It
While it may appear to be the simplest solution to perform an entire video at once, this might make the process tedious or even damage your video if you are interrupted or make a speech error. Smaller video segments are easier to edit and blend into a single, well-formatted video.
2. Youtube Video Export
You can also modify your videos in various formats to your heart’s content before exporting them to YouTube and publishing them. Although uploading and exporting may take some time, the quality of your video will significantly increase, and the time and work you put in will be evident.
3. Change Up Your Shots
Rather than keeping your camera fixed, try varied angles while shooting. This may not work for all of your videos, but it is critical to keep your viewers engaged while they watch them, especially if you want them to stay until the finish and come back for more. Unless you’re talking about anything incredibly essential, sitting and listening to someone talk for more than 10 minutes without the camera moving will quickly become dull or old.
4. Transitions And Effects
When editing a video with numerous parts, the use of effects and transitions can considerably impact the overall quality of the video. Filmora is far more sophisticated than Windows Movie Maker and iMovie on Mac. It also allows you to create a professional-looking YouTube video with hundreds of presets such as filters, overlays, components, transitions, and blending several layers of effects and audio to enhance your YouTube tale.
Wondershare Filmii is one of the greatest choices for Windows for beginners who wish to create video footage with templates automatically. Smart video templates, trendy filters and overlays, fun stickers and motion components, and, most importantly, advanced editing capabilities are all available.
For Win 7 or later (64-bit)
For macOS 10.12 or later
Conclusion
● This is pretty much everything we’ve gathered to assist you in uploading 4K videos to YouTube. Do not become worried. Your 4K video will be in low resolution when you first publish it. This is due to YouTube’s high-resolution processing requiring time. It could take a few hours for your video to be available in 4K mode.
● The duration, format, frame rate, and resolution of your video all affect the processing time for high-definition videos. If you don’t want your video to be seen unless it has a high-quality option, upload it as unlisted and then publish it once 4K resolution is available.
Many people have a strong desire to make videos. Whether you make videos for a living or as a pastime, it doesn’t matter. When you make a fantastic film that you’re pleased with, you want to show it off to your friends and family. YouTube, the most popular site for sharing videos on various themes, is one of the most incredible places to start.
YouTube is fantastic for sharing videos, but it can be harsh on artists due to the high bar for content and video quality. If you want to succeed as a YouTuber, you must create videos that are informative and high-resolution. This is critical since your viewers may wish to watch your movies on a computer screen or a 4K smart TV.
If you’ve decided to make videos in 4K resolution, you’ll find information on recommended encoding settings, how to upload a video to YouTube, potential problems, and more below.
In this article
01 What Is The Distinction Between Various Resolutions?
02 Why Would You Want To Upload A 4k Video?
03 What Is The Best Way To Upload A 4k Video To Youtube?
04 Tips On How To Make Sure The Video You’re Uploading Is Of High Quality
What Is The Distinction Between Various Resolutions?
The number of pixels on a screen is referred to as resolution. Low resolution indicates fewer pixels and typically less space, whereas high resolution means more pixels and generally greater space and detail. You probably have a poor resolution if you’re using a standard laptop or an old screen.
When watching a video on a larger screen, the resolution significantly impacts your viewing experience. Whether it’s a live stream or an on-demand movie, the correct resolution is crucial to reaching a wider audience, and this is where iPhones and iPads appear to have an advantage. Let’s take a closer look at each of these resolution types and their associated pixel sizes.
1. SD RESOLUTION (STANDARD DEFINITION)
Previously, resolutions were separated into SD (Standard Definition) and HD (High Definition) categories. SD was defined as a video with a resolution of less than 720p. However, as television and computer monitor display resolutions improved over time, a video was less likely to be shot in Standard Definition.
The following are the most common standard video resolutions:
- 640 × 360 pixels (or 360p)
- 640 × 480 pixels (or 480p)
2. RESOLUTION: 720P HD (HIGH DEFINITION)
The lowest video resolution is 720p, which is commonly referred to as ‘HD.’ 720p (1280 x 720 pixels) is a resolution recognized for modest web content, even though most videos require at least 1080p. Because most computer monitors are now in HD, the recommended practice for web and streaming is to choose a resolution higher than 720p.
The resolution of HD videos is usually: 1280 x 720 pixels (or 720p)
3. 1080P FULL HD RESOLUTION
1080p resolutions, also known as ‘Full HD,’ have become the industry standard for a clear HD video that doesn’t take up a lot of storage space. It’s also worth noting that this is the standard screen resolution for all smartphones.
The resolution of full HD videos is usually: 1920 x 1080 pixels (or 1080p)
4. 2K RESOLUTION WITH QHD (QUAD HIGH DEFINITION)
Quad HD resolution, or QHD for short, is widely found on high-end smartphones and gaming monitors. The resolution of 1440p is four times that of HD Ready (or 720p HD). Many high-end smartphones have a Quad HD+ resolution (296 x 1440 pixels), which is ideal for 1440p. Another common screen resolution is 2K, which allows for larger displays and reframing without sacrificing quality or image editing.
The resolution of QHD and 2K videos is:
- 2560 x 1440 pixels in QHD (or 1440p)
- 2048 x 1080 pixels in 2K (or 1080p)
5. 4K (OR UHD/ULTRA-HIGH-DEFINITION) RESOLUTION
This sort of resolution, often known as 4Kor UHD (Ultra High Definition), has a pixel size of 3840 x 2160 pixels. It has a similar appearance to 2K, but it provides video artists more room to edit and zoom in. For vivid color, graphics, or dramatic viewing, both 2K and 4K resolutions are available. Unless you wish to tweak colors or trim in closer, there aren’t enough visible distinctions between 2K and 4K. So, it matters when you want to change a certain detail, but it doesn’t matter when someone else is looking at it.
The resolution of 4K videos is: 3840 x 2160 (or 2160p / simply 4K) is a resolution of 3840 x 2160 pixels.
Why Would You Want To Upload A 4k Video?
YouTube is the second-largest social media site, with approximately 1.9 billion monthly active users. YouTube is where you want to be to access this large audience and promote your brand, with one billion hours of video watched every day on the platform.
However, for your target audience to watch your videos, you must ensure excellent video quality. Poorly shot or edited films may alienate your viewers, especially when there are billions of other videos to choose from on the site.
- 4k is the most satisfactory resolution for uploading to YouTube. Although not every viewer can watch videos in 4k, it ensures that your visitors get the best possible experience.
- Traditional Full HD (1920 x 1080) TVs feature four times as many pixels as 4K TVs. Because of the higher pixel density, the picture quality of 4K TVs is more colorful and detailed, even on TV displays of the same size. This distinction is most noticeable on large-screen televisions.
- Even if you recorded in 1080p and upscaled to 4K, you should post in 4K to YouTube for the finest image quality. Recording in 1080p, editing in 1080p, exporting in 4k, and YouTube viewing is sharper in 1080p.
- With 4K, you get stunning visuals with a resolution of 38402160, which is four times that of Full-HD. That’s why visuals appear crisp and lifelike, even on large-screen TVs rather than pixelated. Down-converted 4K to Full-HD photographs have superior quality and resolution than images shot in Full-HD from the start.
What Is The Best Way To Upload A 4k Video To Youtube?
The YouTube upload process is not complicated, but it does need several steps. You can finally post your video once it has been prepared and converted to MP4 format.
Follow the steps below to post your video to YouTube:
1. Go to YouTube.com in your browser.
2. Log in to your account and click the “Create” symbol, which looks like a camera with a plus sign, in the right corner of the menu bar.
3. Select “Upload video” from the drop-down menu.
4. Drag and drop your video file into the upload box, or select your file from the “Select File” menu and click “Open.”
5. Make a note of the title and description while YouTube is processing your video.
6. Select a video thumbnail from the options or upload your own and select your “Audience” from the drop-down menu. To manage age restriction settings.
7. Select “More Options” to add searchable keywords to your video, manage subtitles and comments, and more.
8. Select if you want to add promotions to your video by clicking “Next.”
9. Finally, click “Next” and wait for the video to be processed entirely before publishing it.
10. You can also automatically set it to publish at a later date.
Tips On How To Make Sure The Video You’re Uploading Is Of High Quality
The following are five tips for amateur and top newbie YouTubers who want to improve their videos.
1. Cut Your Video Into Clips And Organize It
While it may appear to be the simplest solution to perform an entire video at once, this might make the process tedious or even damage your video if you are interrupted or make a speech error. Smaller video segments are easier to edit and blend into a single, well-formatted video.
2. Youtube Video Export
You can also modify your videos in various formats to your heart’s content before exporting them to YouTube and publishing them. Although uploading and exporting may take some time, the quality of your video will significantly increase, and the time and work you put in will be evident.
3. Change Up Your Shots
Rather than keeping your camera fixed, try varied angles while shooting. This may not work for all of your videos, but it is critical to keep your viewers engaged while they watch them, especially if you want them to stay until the finish and come back for more. Unless you’re talking about anything incredibly essential, sitting and listening to someone talk for more than 10 minutes without the camera moving will quickly become dull or old.
4. Transitions And Effects
When editing a video with numerous parts, the use of effects and transitions can considerably impact the overall quality of the video. Filmora is far more sophisticated than Windows Movie Maker and iMovie on Mac. It also allows you to create a professional-looking YouTube video with hundreds of presets such as filters, overlays, components, transitions, and blending several layers of effects and audio to enhance your YouTube tale.
Wondershare Filmii is one of the greatest choices for Windows for beginners who wish to create video footage with templates automatically. Smart video templates, trendy filters and overlays, fun stickers and motion components, and, most importantly, advanced editing capabilities are all available.
For Win 7 or later (64-bit)
For macOS 10.12 or later
Conclusion
● This is pretty much everything we’ve gathered to assist you in uploading 4K videos to YouTube. Do not become worried. Your 4K video will be in low resolution when you first publish it. This is due to YouTube’s high-resolution processing requiring time. It could take a few hours for your video to be available in 4K mode.
● The duration, format, frame rate, and resolution of your video all affect the processing time for high-definition videos. If you don’t want your video to be seen unless it has a high-quality option, upload it as unlisted and then publish it once 4K resolution is available.
Also read:
- Climbing the YouTube Search Rankings Key SEO Strategies Unveiled
- Creating Professional Edits Using YouTube Studio Editor
- Growth Hurdle Cleared 500 Subscribers Win
- [Updated] Charting the Financial Pathway of TSeries Within YouTube Market Space
- [Updated] Discovering Income Monetization Through YouTube Sponsored Videos?
- YouTube SEO Guide How to Improve Search Rankings For Your YouTube Videos
- Deciphering How TSeries Benefits From YouTube
- In 2024, Elite Creator Hub Professional PC Cutting and Tunes
- In 2024, Efficiency in Conversion A Compact List of the Top 10 Video Transformers
- Brief Beatcasts Role of the Melody for 2024
- [New] Cutting-Edge Tools to Snatch and Save Videos Flawlessly
- [Updated] Elevate Video Production The Audio Edition on YouTube
- Virtual Vanguard Over a Hundred Games Galore
- Skyrocket Traffic with the Top 12 YouTube Growth Methods
- [Updated] Elevate Your Sub4sub Skills Start With These Key Guidelines
- In 2024, Beyond Basic The Advanced Techniques of YouTube Counts
- [New] Elevate Views A Guide to Best YouTube Hash Tags
- 2024 Approved Beginning Creator's Guide Top 8 Free YouTube Tutorials
- [New] Confirming YouTube Pro-Rated Earnings
- Is It Legal to Record YouTube?
- Dissecting Digital Dynamics Comparative Channel Analysis
- In 2024, Constructing Inquiry Curtain Closers
- [Updated] Boost Your Channel Top 14 Gaming Vids for YouTube Success
- [New] Creator Payment Frequency on YouTube Platform
- In 2024, Breaking Through YouTube's Walls Using Advanced Creator Studio Skills
- Your Daily Dose of Anime Magic From 15 Top Web Sources
- 2024 Approved Developing a Streamlined Subscription Web Address
- [Updated] Android, iOS & PC-Friendly YouTube Downloader Apps Reviewed
- Ephemeral Film Sculptor
- Choosing Your Best GIF Creator A Comparative Analysis
- In 2024, 5 Leading Apps to Create Professional YouTube Intros
- 2024 Approved Elevating Your Vlogs A List of the Top 12 Professional Cameras
- Your Guide to the Premier 10 YouTube Platforms for Journalism
- Revealing the Invisible An Organized Exploration of YouTube's Secrets
- Breakdown of Earnings How Much Does a Clicky Make, In 2024
- 2024 Approved Avoiding Files, Enjoying Animated GIFs YouTube Video Mastery
- Streamlining Audio & Visual Conversion From YT Shorts to Mp4
- [Updated] Direct Conversion Convert & Upload MP3 Songs on YouTube
- In 2024, Audience Engagement Where to Captivate Viewers
- Directing Content Destination From iMovie Files To YouTube Platform
- Diversify Earnings Multiplying Revenue with Mobile Video Content
- 2024 Approved Elevate Video Rankings Proven YouTube SEO Solutions
- Best 10 Sound Boosting Software PC, Mac & Mobile
- Expert Strategies to Maximize Income with Video Ads on Youtube
- Direct YouTube Stream of Google Meet - Step-by-Step Instructions for 2024
- [Updated] 2024 Approved Maximize Your Impact Top 10 Insta Tools for Post Management
- Updated How to Create Your Own Avatar Free for 2024
- What Does Jailbreaking iPhone 15 i Do? Get Answers here | Dr.fone
- 2024 Approved Simplify MacBook Screen Capture for Beginners
- Updated The Future of Clear Communication Integrating AI to Combat Noise
- Does Realme Narzo 60 5G Have Find My Friends? | Dr.fone
- [Updated] Vibrant Visibility 30+ Biographical Concepts for Increased Viewers on the Filmora TikTok Platform
- [New] Launching Lens Captured Content Examination and Replacements
- In 2024, How to Bypass iCloud Lock on iPhone SE (2020)
- 2024 Approved Quotable Moments 50+ Top TikTok Inspirational Lyrics
- How to restore wiped messages on Samsung Galaxy Z Flip 5
- Can I recover permanently deleted photos from Honor Magic 6 Pro
- Why does the pokemon go battle league not available On Apple iPhone 13 Pro | Dr.fone
- New The Ultimate Guide to Creating Breathtaking Slideshow Videos for 2024
- 2024 Approved Instagram Video Promotion Mastery Craft Your Winning Market Plan
- [New] Artistic Auto-Trims Best 6 Mac OS Big Sur Video Editors Reviewed
- In 2024, Detailed guide of ispoofer for pogo installation On Poco M6 Pro 5G | Dr.fone
- Xiaomi 13T Pro Camera Not Working Unexpected Error? Fix It Now | Dr.fone
- How to Bypass Android Lock Screen Using Emergency Call On Oppo A58 4G?
- [Updated] 2024 Approved Instagram Peak Hours Explained Maximizing Engagement
- Essential Tools for Mobile Movie Making
- In 2024, Can I Bypass a Forgotten Phone Password Of Realme V30T?
- 2024 Approved Capturing the Spirit 2023'S Most Shared Tweets
- Updated The Innovators Guide to Non-Intrusive Audio Modulation in Modern Videos
- Simplifying Live Broadcasts with Efficient OBS Tips
- [Updated] 2024 Approved Mobile Magic Instagram Covers IPhone + Android
- 2 Ways to Monitor Apple iPhone 6s Activity | Dr.fone
- [Updated] 2024 Approved Livestreaming Tools Evaluation Which Bets on Performance?
- Title: "Gamers’ Sound Selection Top 5 Noise-Canceling Earbuds"
- Author: Steven
- Created at : 2024-05-25 19:24:02
- Updated at : 2024-05-26 19:24:02
- Link: https://youtube-clips.techidaily.com/gamers-sound-selection-top-5-noise-canceling-earbuds/
- License: This work is licensed under CC BY-NC-SA 4.0.
