
:max_bytes(150000):strip_icc()/AI_Choreograph_GettyImagesPlus-1473211827_CROPPED-137fc9eef04a43a79554344a6f11d1b7.jpg)
"From Capture to Share Essential Steps for High-Resolution Video on Youtube"
From Capture to Share: Essential Steps for High-Resolution Video on Youtube
Create High-Quality Video - Wondershare Filmora
An easy and powerful YouTube video editor
Numerous video and audio effects to choose from
Detailed tutorials provided by the official channel
Many people have a strong desire to make videos. Whether you make videos for a living or as a pastime, it doesn’t matter. When you make a fantastic film that you’re pleased with, you want to show it off to your friends and family. YouTube, the most popular site for sharing videos on various themes, is one of the most incredible places to start.
YouTube is fantastic for sharing videos, but it can be harsh on artists due to the high bar for content and video quality. If you want to succeed as a YouTuber, you must create videos that are informative and high-resolution. This is critical since your viewers may wish to watch your movies on a computer screen or a 4K smart TV.
If you’ve decided to make videos in 4K resolution, you’ll find information on recommended encoding settings, how to upload a video to YouTube, potential problems, and more below.
In this article
01 What Is The Distinction Between Various Resolutions?
02 Why Would You Want To Upload A 4k Video?
03 What Is The Best Way To Upload A 4k Video To Youtube?
04 Tips On How To Make Sure The Video You’re Uploading Is Of High Quality
What Is The Distinction Between Various Resolutions?
The number of pixels on a screen is referred to as resolution. Low resolution indicates fewer pixels and typically less space, whereas high resolution means more pixels and generally greater space and detail. You probably have a poor resolution if you’re using a standard laptop or an old screen.
When watching a video on a larger screen, the resolution significantly impacts your viewing experience. Whether it’s a live stream or an on-demand movie, the correct resolution is crucial to reaching a wider audience, and this is where iPhones and iPads appear to have an advantage. Let’s take a closer look at each of these resolution types and their associated pixel sizes.
1. SD RESOLUTION (STANDARD DEFINITION)
Previously, resolutions were separated into SD (Standard Definition) and HD (High Definition) categories. SD was defined as a video with a resolution of less than 720p. However, as television and computer monitor display resolutions improved over time, a video was less likely to be shot in Standard Definition.
The following are the most common standard video resolutions:
- 640 × 360 pixels (or 360p)
- 640 × 480 pixels (or 480p)
2. RESOLUTION: 720P HD (HIGH DEFINITION)
The lowest video resolution is 720p, which is commonly referred to as ‘HD.’ 720p (1280 x 720 pixels) is a resolution recognized for modest web content, even though most videos require at least 1080p. Because most computer monitors are now in HD, the recommended practice for web and streaming is to choose a resolution higher than 720p.
The resolution of HD videos is usually: 1280 x 720 pixels (or 720p)
3. 1080P FULL HD RESOLUTION
1080p resolutions, also known as ‘Full HD,’ have become the industry standard for a clear HD video that doesn’t take up a lot of storage space. It’s also worth noting that this is the standard screen resolution for all smartphones.
The resolution of full HD videos is usually: 1920 x 1080 pixels (or 1080p)
4. 2K RESOLUTION WITH QHD (QUAD HIGH DEFINITION)
Quad HD resolution, or QHD for short, is widely found on high-end smartphones and gaming monitors. The resolution of 1440p is four times that of HD Ready (or 720p HD). Many high-end smartphones have a Quad HD+ resolution (296 x 1440 pixels), which is ideal for 1440p. Another common screen resolution is 2K, which allows for larger displays and reframing without sacrificing quality or image editing.
The resolution of QHD and 2K videos is:
- 2560 x 1440 pixels in QHD (or 1440p)
- 2048 x 1080 pixels in 2K (or 1080p)
5. 4K (OR UHD/ULTRA-HIGH-DEFINITION) RESOLUTION
This sort of resolution, often known as 4Kor UHD (Ultra High Definition), has a pixel size of 3840 x 2160 pixels. It has a similar appearance to 2K, but it provides video artists more room to edit and zoom in. For vivid color, graphics, or dramatic viewing, both 2K and 4K resolutions are available. Unless you wish to tweak colors or trim in closer, there aren’t enough visible distinctions between 2K and 4K. So, it matters when you want to change a certain detail, but it doesn’t matter when someone else is looking at it.
The resolution of 4K videos is: 3840 x 2160 (or 2160p / simply 4K) is a resolution of 3840 x 2160 pixels.
Why Would You Want To Upload A 4k Video?
YouTube is the second-largest social media site, with approximately 1.9 billion monthly active users. YouTube is where you want to be to access this large audience and promote your brand, with one billion hours of video watched every day on the platform.
However, for your target audience to watch your videos, you must ensure excellent video quality. Poorly shot or edited films may alienate your viewers, especially when there are billions of other videos to choose from on the site.
- 4k is the most satisfactory resolution for uploading to YouTube. Although not every viewer can watch videos in 4k, it ensures that your visitors get the best possible experience.
- Traditional Full HD (1920 x 1080) TVs feature four times as many pixels as 4K TVs. Because of the higher pixel density, the picture quality of 4K TVs is more colorful and detailed, even on TV displays of the same size. This distinction is most noticeable on large-screen televisions.
- Even if you recorded in 1080p and upscaled to 4K, you should post in 4K to YouTube for the finest image quality. Recording in 1080p, editing in 1080p, exporting in 4k, and YouTube viewing is sharper in 1080p.
- With 4K, you get stunning visuals with a resolution of 38402160, which is four times that of Full-HD. That’s why visuals appear crisp and lifelike, even on large-screen TVs rather than pixelated. Down-converted 4K to Full-HD photographs have superior quality and resolution than images shot in Full-HD from the start.
What Is The Best Way To Upload A 4k Video To Youtube?
The YouTube upload process is not complicated, but it does need several steps. You can finally post your video once it has been prepared and converted to MP4 format.
Follow the steps below to post your video to YouTube:
1. Go to YouTube.com in your browser.
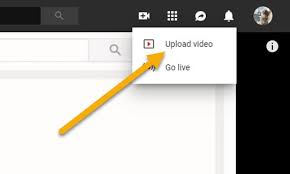
2. Log in to your account and click the “Create” symbol, which looks like a camera with a plus sign, in the right corner of the menu bar.
3. Select “Upload video” from the drop-down menu.
4. Drag and drop your video file into the upload box, or select your file from the “Select File” menu and click “Open.”
5. Make a note of the title and description while YouTube is processing your video.

6. Select a video thumbnail from the options or upload your own and select your “Audience” from the drop-down menu. To manage age restriction settings.
7. Select “More Options” to add searchable keywords to your video, manage subtitles and comments, and more.
8. Select if you want to add promotions to your video by clicking “Next.”
9. Finally, click “Next” and wait for the video to be processed entirely before publishing it.
10. You can also automatically set it to publish at a later date.
Tips On How To Make Sure The Video You’re Uploading Is Of High Quality
The following are five tips for amateur and top newbie YouTubers who want to improve their videos.
1. Cut Your Video Into Clips And Organize It
While it may appear to be the simplest solution to perform an entire video at once, this might make the process tedious or even damage your video if you are interrupted or make a speech error. Smaller video segments are easier to edit and blend into a single, well-formatted video.
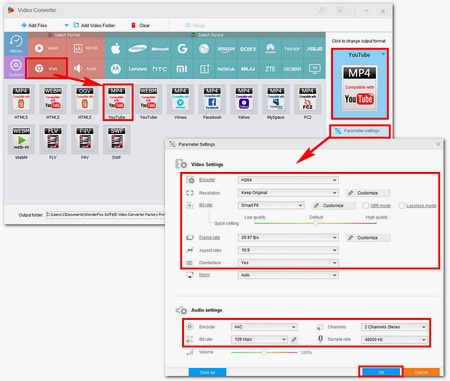
2. Youtube Video Export
You can also modify your videos in various formats to your heart’s content before exporting them to YouTube and publishing them. Although uploading and exporting may take some time, the quality of your video will significantly increase, and the time and work you put in will be evident.
3. Change Up Your Shots
Rather than keeping your camera fixed, try varied angles while shooting. This may not work for all of your videos, but it is critical to keep your viewers engaged while they watch them, especially if you want them to stay until the finish and come back for more. Unless you’re talking about anything incredibly essential, sitting and listening to someone talk for more than 10 minutes without the camera moving will quickly become dull or old.
4. Transitions And Effects
When editing a video with numerous parts, the use of effects and transitions can considerably impact the overall quality of the video. Filmora is far more sophisticated than Windows Movie Maker and iMovie on Mac. It also allows you to create a professional-looking YouTube video with hundreds of presets such as filters, overlays, components, transitions, and blending several layers of effects and audio to enhance your YouTube tale.
Wondershare Filmii is one of the greatest choices for Windows for beginners who wish to create video footage with templates automatically. Smart video templates, trendy filters and overlays, fun stickers and motion components, and, most importantly, advanced editing capabilities are all available.
For Win 7 or later (64-bit)
For macOS 10.12 or later
Conclusion
● This is pretty much everything we’ve gathered to assist you in uploading 4K videos to YouTube. Do not become worried. Your 4K video will be in low resolution when you first publish it. This is due to YouTube’s high-resolution processing requiring time. It could take a few hours for your video to be available in 4K mode.
● The duration, format, frame rate, and resolution of your video all affect the processing time for high-definition videos. If you don’t want your video to be seen unless it has a high-quality option, upload it as unlisted and then publish it once 4K resolution is available.
Many people have a strong desire to make videos. Whether you make videos for a living or as a pastime, it doesn’t matter. When you make a fantastic film that you’re pleased with, you want to show it off to your friends and family. YouTube, the most popular site for sharing videos on various themes, is one of the most incredible places to start.
YouTube is fantastic for sharing videos, but it can be harsh on artists due to the high bar for content and video quality. If you want to succeed as a YouTuber, you must create videos that are informative and high-resolution. This is critical since your viewers may wish to watch your movies on a computer screen or a 4K smart TV.
If you’ve decided to make videos in 4K resolution, you’ll find information on recommended encoding settings, how to upload a video to YouTube, potential problems, and more below.
In this article
01 What Is The Distinction Between Various Resolutions?
02 Why Would You Want To Upload A 4k Video?
03 What Is The Best Way To Upload A 4k Video To Youtube?
04 Tips On How To Make Sure The Video You’re Uploading Is Of High Quality
What Is The Distinction Between Various Resolutions?
The number of pixels on a screen is referred to as resolution. Low resolution indicates fewer pixels and typically less space, whereas high resolution means more pixels and generally greater space and detail. You probably have a poor resolution if you’re using a standard laptop or an old screen.
When watching a video on a larger screen, the resolution significantly impacts your viewing experience. Whether it’s a live stream or an on-demand movie, the correct resolution is crucial to reaching a wider audience, and this is where iPhones and iPads appear to have an advantage. Let’s take a closer look at each of these resolution types and their associated pixel sizes.
1. SD RESOLUTION (STANDARD DEFINITION)
Previously, resolutions were separated into SD (Standard Definition) and HD (High Definition) categories. SD was defined as a video with a resolution of less than 720p. However, as television and computer monitor display resolutions improved over time, a video was less likely to be shot in Standard Definition.
The following are the most common standard video resolutions:
- 640 × 360 pixels (or 360p)
- 640 × 480 pixels (or 480p)
2. RESOLUTION: 720P HD (HIGH DEFINITION)
The lowest video resolution is 720p, which is commonly referred to as ‘HD.’ 720p (1280 x 720 pixels) is a resolution recognized for modest web content, even though most videos require at least 1080p. Because most computer monitors are now in HD, the recommended practice for web and streaming is to choose a resolution higher than 720p.
The resolution of HD videos is usually: 1280 x 720 pixels (or 720p)
3. 1080P FULL HD RESOLUTION
1080p resolutions, also known as ‘Full HD,’ have become the industry standard for a clear HD video that doesn’t take up a lot of storage space. It’s also worth noting that this is the standard screen resolution for all smartphones.
The resolution of full HD videos is usually: 1920 x 1080 pixels (or 1080p)
4. 2K RESOLUTION WITH QHD (QUAD HIGH DEFINITION)
Quad HD resolution, or QHD for short, is widely found on high-end smartphones and gaming monitors. The resolution of 1440p is four times that of HD Ready (or 720p HD). Many high-end smartphones have a Quad HD+ resolution (296 x 1440 pixels), which is ideal for 1440p. Another common screen resolution is 2K, which allows for larger displays and reframing without sacrificing quality or image editing.
The resolution of QHD and 2K videos is:
- 2560 x 1440 pixels in QHD (or 1440p)
- 2048 x 1080 pixels in 2K (or 1080p)
5. 4K (OR UHD/ULTRA-HIGH-DEFINITION) RESOLUTION
This sort of resolution, often known as 4Kor UHD (Ultra High Definition), has a pixel size of 3840 x 2160 pixels. It has a similar appearance to 2K, but it provides video artists more room to edit and zoom in. For vivid color, graphics, or dramatic viewing, both 2K and 4K resolutions are available. Unless you wish to tweak colors or trim in closer, there aren’t enough visible distinctions between 2K and 4K. So, it matters when you want to change a certain detail, but it doesn’t matter when someone else is looking at it.
The resolution of 4K videos is: 3840 x 2160 (or 2160p / simply 4K) is a resolution of 3840 x 2160 pixels.
Why Would You Want To Upload A 4k Video?
YouTube is the second-largest social media site, with approximately 1.9 billion monthly active users. YouTube is where you want to be to access this large audience and promote your brand, with one billion hours of video watched every day on the platform.
However, for your target audience to watch your videos, you must ensure excellent video quality. Poorly shot or edited films may alienate your viewers, especially when there are billions of other videos to choose from on the site.
- 4k is the most satisfactory resolution for uploading to YouTube. Although not every viewer can watch videos in 4k, it ensures that your visitors get the best possible experience.
- Traditional Full HD (1920 x 1080) TVs feature four times as many pixels as 4K TVs. Because of the higher pixel density, the picture quality of 4K TVs is more colorful and detailed, even on TV displays of the same size. This distinction is most noticeable on large-screen televisions.
- Even if you recorded in 1080p and upscaled to 4K, you should post in 4K to YouTube for the finest image quality. Recording in 1080p, editing in 1080p, exporting in 4k, and YouTube viewing is sharper in 1080p.
- With 4K, you get stunning visuals with a resolution of 38402160, which is four times that of Full-HD. That’s why visuals appear crisp and lifelike, even on large-screen TVs rather than pixelated. Down-converted 4K to Full-HD photographs have superior quality and resolution than images shot in Full-HD from the start.
What Is The Best Way To Upload A 4k Video To Youtube?
The YouTube upload process is not complicated, but it does need several steps. You can finally post your video once it has been prepared and converted to MP4 format.
Follow the steps below to post your video to YouTube:
1. Go to YouTube.com in your browser.
2. Log in to your account and click the “Create” symbol, which looks like a camera with a plus sign, in the right corner of the menu bar.
3. Select “Upload video” from the drop-down menu.
4. Drag and drop your video file into the upload box, or select your file from the “Select File” menu and click “Open.”
5. Make a note of the title and description while YouTube is processing your video.
6. Select a video thumbnail from the options or upload your own and select your “Audience” from the drop-down menu. To manage age restriction settings.
7. Select “More Options” to add searchable keywords to your video, manage subtitles and comments, and more.
8. Select if you want to add promotions to your video by clicking “Next.”
9. Finally, click “Next” and wait for the video to be processed entirely before publishing it.
10. You can also automatically set it to publish at a later date.
Tips On How To Make Sure The Video You’re Uploading Is Of High Quality
The following are five tips for amateur and top newbie YouTubers who want to improve their videos.
1. Cut Your Video Into Clips And Organize It
While it may appear to be the simplest solution to perform an entire video at once, this might make the process tedious or even damage your video if you are interrupted or make a speech error. Smaller video segments are easier to edit and blend into a single, well-formatted video.
2. Youtube Video Export
You can also modify your videos in various formats to your heart’s content before exporting them to YouTube and publishing them. Although uploading and exporting may take some time, the quality of your video will significantly increase, and the time and work you put in will be evident.
3. Change Up Your Shots
Rather than keeping your camera fixed, try varied angles while shooting. This may not work for all of your videos, but it is critical to keep your viewers engaged while they watch them, especially if you want them to stay until the finish and come back for more. Unless you’re talking about anything incredibly essential, sitting and listening to someone talk for more than 10 minutes without the camera moving will quickly become dull or old.
4. Transitions And Effects
When editing a video with numerous parts, the use of effects and transitions can considerably impact the overall quality of the video. Filmora is far more sophisticated than Windows Movie Maker and iMovie on Mac. It also allows you to create a professional-looking YouTube video with hundreds of presets such as filters, overlays, components, transitions, and blending several layers of effects and audio to enhance your YouTube tale.
Wondershare Filmii is one of the greatest choices for Windows for beginners who wish to create video footage with templates automatically. Smart video templates, trendy filters and overlays, fun stickers and motion components, and, most importantly, advanced editing capabilities are all available.
For Win 7 or later (64-bit)
For macOS 10.12 or later
Conclusion
● This is pretty much everything we’ve gathered to assist you in uploading 4K videos to YouTube. Do not become worried. Your 4K video will be in low resolution when you first publish it. This is due to YouTube’s high-resolution processing requiring time. It could take a few hours for your video to be available in 4K mode.
● The duration, format, frame rate, and resolution of your video all affect the processing time for high-definition videos. If you don’t want your video to be seen unless it has a high-quality option, upload it as unlisted and then publish it once 4K resolution is available.
Thriving Despite YouTube’s Rigorous Copyright Strike System
YouTube Copyright Claims and How to Deal with a Strike?

Richard Bennett
Nov 01, 2022• Proven solutions
YouTube copyright rules might not always seem fair, but they are in place for a reason. If your YouTube videos get flagged for copyright issues relating to the background music or film clips it can be frustrating, especially if you receive a copyright notice for using royalty-free music you have a license for. Rather than feeling as though your creativity is being restrained, read this article to better understand the reasons copyright issues come up and what can be done to resolve them. Disputing copyright claims is something that any YouTuber can do.
- What is a Content ID Claim and Why Have I Received One
- Dealing With a Copyright Claim on Your YouTube Video
Part 1: What is a Content ID Claim and Why Have I Received One?
YouTube copyright issues often come up as a result of content ID claims. This will prompt Google support to deliver a copyright notice to your account. Content ID claims are generally made against content that contains material that should not be available on YouTube. Claims are often issued if you don’t own the music, movie clips, TV clips, express rights to showcase cut scenes in video games, or other copyrighted media.
If you happen to see that a video has been muted or taken down you can visit the copyright notices section of your video manager to learn more. In this section you will learn more about what will be done as a result of the content ID claim.
Generally, a content ID claim does not put a YouTube channel in any kind of trouble. What usually happens is that the video is removed, you lose the ability to earn ad revenue from it, or the sound is muted so the copyrighted music no longer plays.
In some cases, the owner of the copyrighted content (usually musical artists) may choose to allow you to keep your video up in exchange for running their ads.
Part 2: Dealing With a Copyright Claim on Your YouTube Video
If you have received copyright claims there are ways that you can get your content put back up in its original condition.
First, you could purchase the rights to use the copyrighted media after your video has been flagged or try getting express permission from the content creator to use aspects of their content in your own original video.
Sometimes, your videos may be flagged even though you’ve already purchased the license for the copyrighted music, images or clips you are using.
YouTube’s robots automatically scan through the database of audio and visual content that is put up by copyright owners. Any video that has been uploaded to YouTube with this copyrighted content will receive a third-party copyright notice. Because flagging happens automatically it often affects creators who have licenses for the royalty-free music, or other copyrighted material, they are using.
The good news is that this same level of protection will ensure that your own original content can also be protected from reuse if you register it.
In order to dispute a copyright claim on your video the first thing that you will need is some proof that you have purchased the rights to the music or other content that is being reused in your video. If you have a direct link to the online license agreement this can help with the dispute process. Purchasing a license online for royalty-free music or other content is usually fairly simple and with a PDF license certificate you can quickly dispute copyright content ID claims.
You can upload your license document to the file sharing system Dropbox to make the content public for YouTube admins to check over. Heading over to your video manager on YouTube and sending a message link with the dispute and link to your license will make sure that your explanation is heard. Sending the license, written permission, or a link to the legal license will result in YouTube reinstating your video.
Most of the time the only information that you need to use is where the license was purchased as well as the link to where the copyright license document can be accessed.
After submitting your dispute YouTube admins will often take a few business days to get back to you with an answer. There is no risk involved in disputing a copyright claim; your video has already been flagged. In the worst case scenario, your video will remain flagged.
Usually with the help of an official license or direct permission from the content creator you can file a dispute with YouTube and receive an answer. If the dispute process is successful your video will be reinstated to the original uploaded version without blocked sound or content.
Richard Bennett
Richard Bennett is a writer and a lover of all things video.
Follow @Richard Bennett
Richard Bennett
Nov 01, 2022• Proven solutions
YouTube copyright rules might not always seem fair, but they are in place for a reason. If your YouTube videos get flagged for copyright issues relating to the background music or film clips it can be frustrating, especially if you receive a copyright notice for using royalty-free music you have a license for. Rather than feeling as though your creativity is being restrained, read this article to better understand the reasons copyright issues come up and what can be done to resolve them. Disputing copyright claims is something that any YouTuber can do.
- What is a Content ID Claim and Why Have I Received One
- Dealing With a Copyright Claim on Your YouTube Video
Part 1: What is a Content ID Claim and Why Have I Received One?
YouTube copyright issues often come up as a result of content ID claims. This will prompt Google support to deliver a copyright notice to your account. Content ID claims are generally made against content that contains material that should not be available on YouTube. Claims are often issued if you don’t own the music, movie clips, TV clips, express rights to showcase cut scenes in video games, or other copyrighted media.
If you happen to see that a video has been muted or taken down you can visit the copyright notices section of your video manager to learn more. In this section you will learn more about what will be done as a result of the content ID claim.
Generally, a content ID claim does not put a YouTube channel in any kind of trouble. What usually happens is that the video is removed, you lose the ability to earn ad revenue from it, or the sound is muted so the copyrighted music no longer plays.
In some cases, the owner of the copyrighted content (usually musical artists) may choose to allow you to keep your video up in exchange for running their ads.
Part 2: Dealing With a Copyright Claim on Your YouTube Video
If you have received copyright claims there are ways that you can get your content put back up in its original condition.
First, you could purchase the rights to use the copyrighted media after your video has been flagged or try getting express permission from the content creator to use aspects of their content in your own original video.
Sometimes, your videos may be flagged even though you’ve already purchased the license for the copyrighted music, images or clips you are using.
YouTube’s robots automatically scan through the database of audio and visual content that is put up by copyright owners. Any video that has been uploaded to YouTube with this copyrighted content will receive a third-party copyright notice. Because flagging happens automatically it often affects creators who have licenses for the royalty-free music, or other copyrighted material, they are using.
The good news is that this same level of protection will ensure that your own original content can also be protected from reuse if you register it.
In order to dispute a copyright claim on your video the first thing that you will need is some proof that you have purchased the rights to the music or other content that is being reused in your video. If you have a direct link to the online license agreement this can help with the dispute process. Purchasing a license online for royalty-free music or other content is usually fairly simple and with a PDF license certificate you can quickly dispute copyright content ID claims.
You can upload your license document to the file sharing system Dropbox to make the content public for YouTube admins to check over. Heading over to your video manager on YouTube and sending a message link with the dispute and link to your license will make sure that your explanation is heard. Sending the license, written permission, or a link to the legal license will result in YouTube reinstating your video.
Most of the time the only information that you need to use is where the license was purchased as well as the link to where the copyright license document can be accessed.
After submitting your dispute YouTube admins will often take a few business days to get back to you with an answer. There is no risk involved in disputing a copyright claim; your video has already been flagged. In the worst case scenario, your video will remain flagged.
Usually with the help of an official license or direct permission from the content creator you can file a dispute with YouTube and receive an answer. If the dispute process is successful your video will be reinstated to the original uploaded version without blocked sound or content.
Richard Bennett
Richard Bennett is a writer and a lover of all things video.
Follow @Richard Bennett
Also read:
- [New] Chart-Toppers Top 10 YouTube Personalities in Views
- Essential Audio Tools Free, Superior DJ Templates Online
- From Zero to Hero in YouTubing Equipment Essentials
- 2024 Approved Eradicated Muted Video Entries (Shorts)
- Secrets to Featuring on YouTube A Comprehensive Walkthrough
- [Updated] Cutting Through the Clutter How to Stream Top-Notch Upside-Down Content on Youtube
- [Updated] Concluding Your Channel on YouTube - Expert Guides & Templates
- In 2024, Epic Entertainment A Rundown of Hilarious YouTuber Hits
- Enriched TV Experience Seamlessly Looping Online Content for 2024
- Top 10 No-Cost YouTube SBD Tools
- [Updated] Elevate Engagement - YouTube SEO Must-Haves
- 2024 Approved Boosting Revenue with YouTube Short Videos – A Complete Plan
- Creators Uniting for Marvel's Digital Future for 2024
- [Updated] 8 Tips on How to Vlog Confidently Like Popular YouTubers
- Elevate Your YouTube Presentations with iMovie Editing Skills
- In 2024, Best 7 High-Motion DSLRs for Dynamic Live Content Creation
- 2024 Approved Enhancing Your Video Impact A Compreranble Plan for YouTube Success
- [Updated] Essential Vids Summary Uncovered
- Illuminating Success Brightening Up Your YouTube Videos
- Demystifying YouTube's SEO A Keyword Research Guide
- [Updated] Broadcast Easily 3 Steps to Post MP3 on YouTube
- 2024 Approved Enhance Engagement with Effective YT Summary Writing
- Cutting-Edge 8 Content Creators Skyrocketing Growth for 2024
- Mastery Guide to YouTube SEO Title, Tagging & Description Tactics
- 2024 Approved 10 Ultimate Immersive VR Video Hits
- Deciphering YouTube's Shorts Funding Mechanism for 2024
- Elevate Your Content Game with These 5 Proven YouTube Marketing Hacks
- Prime 7 Cameras Elevating Virtual Event Coverage and Vlogging
- Optimized Introduction Video Tips The Best 16 to Increase Views
- 2024 Approved Elevate Video Engagement Top 7 Free Thumbnail Design Tools
- [New] Earning in the E-Commerce Arena via Engaging Reviews
- Effortlessly Create Engaging YouTube Thumbnails for 2024
- [Updated] 24/7 Real-Time Follower Analysis
- Mastering Video Content Insights Into Effective Keywords
- The Hidden Value in Uninterrupted YouTube Watching Is It Worth the Investment?
- Learn More Top Education Streams Online
- YouTube Taping Permissibility Concerns
- Boost Click-Through Rates Adding Allure with Artistic Backdrops for Thumbnails for 2024
- In 2024, Echoing Ethos with Closing Credits
- Aspect Ratios Unveiled Your Guide to Stellar YT Images
- In 2024, Refining Your TikTok End Screen Elements
- New In 2024, The Art of Audio Conversion Turning Text Into Engaging MP3s
- Advanced Techniques in Logitech Webcam Video Recording for 2024
- In 2024, Unlock Your Xiaomi 14s Potential The Top 20 Lock Screen Apps You Need to Try
- Updated 2024 Approved From Widescreen to Vertical The Easy Way to Repurpose Your Videos
- 2024 Approved Xbox Game Recording Techniques for Gamers
- [New] Instagram Insight Triumph in Transparency with 3 Techniques
- Jest Journal Celebrating Funniest TikTok Talents
- In 2024, Facebook Story Viewer View Facebook Stories Anonymously
- Guide How To Unbrick a Bricked Tecno Phantom V Flip Phone | Dr.fone
- Polishing Job Experience Descriptions
- [New] Advanced Privacy Crafting Hidden Details PS
- Updated The Best Boxing Streaming Websites for the Latest Match Coverage for 2024
- [New] Azure Speech-to-Text A Quick Overview for Developers
- [New] In 2024, Cinematic Chronicles Reviewing High-Fidelity Recorders
- The Untold Elements of Instagram Story Engagement
- A Guide to Use Distortion Effect in Premeiere Pro
- Maximizing Engagement with Strategic Editing on Instagram Videos for 2024
- Compiling a Comprehensive Guide to Cost-Free VST Tools Available
- [Updated] Advanced Computers at Your Fingertips
- [Updated] Effective Ways for Home-Based Podcasting
- Innovating Your Gaming Experience Capturing PS3 Playthroughs
- Streamline Your Tweets with Correct Videography (Aspect Ratio) for 2024
- New Unlocking Vocal Transformations in Audacity Through Autotune Use
- Android Safe Mode - How to Turn off Safe Mode on Realme Narzo N53? | Dr.fone
- Title: "From Capture to Share Essential Steps for High-Resolution Video on Youtube"
- Author: Steven
- Created at : 2024-05-25 19:22:33
- Updated at : 2024-05-26 19:22:33
- Link: https://youtube-clips.techidaily.com/from-capture-to-share-essential-steps-for-high-resolution-video-on-youtube/
- License: This work is licensed under CC BY-NC-SA 4.0.
