"Fortnite Thumbnail Blitz A 30-Second Guide"
Fortnite Thumbnail Blitz: A 30-Second Guide
How to Make Fortnite Thumbnail for Free and Easy in 2024

Ollie Mattison
Mar 27, 2024• Proven solutions
To grow a Youtube channel, you need to focus on several different factors and elements. Having an attractive and eye-catching thumbnail is one of those top factors that contribute to the growth of your channel. No matter how good your content is, if you cannot attract users to click on your videos, it will not benefit your channel. In this article, we are going to show you how you can make a Fortnite thumbnail in few simple steps using Filmora X. If you are a content creator and love to make Fortnite videos, then this article will be very helpful for you.
Filmora has recently introduced a new feature named AI Portrait that uses Artificial Intelligence to remove the background from a portrait or image. This feature doesn’t require any green screen to do that. Filmora also contains a wide range of elements and titles that help you enhance the Thumbnail and make look stunning and eye-catching.
Step 01: To start making a Fortnite thumbnail, it is important to have a screenshot of your gameplay. We can make a perfect screenshot using Fortnite Replay Mode. If you have recently played a Fortnite match, you can access its replay under the Career tab. Under the Career tab select Replays.

Step 02: If you are using a console, the game will only store 10 recent gameplays, but if you are using a PC, it will store 100 recent gameplays in this section. From all these gameplays, select the one that you want to use for the Thumbnail. Once you choose gameplay, you can control everything in it. The angle, speed, and camera mode.

Step 03: For creating a perfect thumbnail, select “Drone Free Camera” mode from the camera mode located on the bottom right corner of the screen. It will allow us to change the angle the way we want. Choose an angle of your choice and take the screenshot.

Step 04: Open Filmora X, make sure to select the 16:9 screen ratio. Import the screenshot using the import button.

Step 05: Drag and drop the screenshot into the timeline.

Step 06: Now, let’s separate the background and character. Go to the Effects, then AI Portrait, select Human Segmentation, and drop it into the screenshot.

Step 07: Filmora will ask you to purchase it, but you can now hit “Try it” to use it.

Step 08: It will remove the background of the screenshot.

Step 09: To add a background, go to the media and navigate to “Sample Color.” Drag a color of your choice and drop it below the screenshot.

Step 10: To add titles in the Thumbnail, go to the Titles tab. Here you can find several categories of titles. Find your preferred title and drop it above all the layers. You can choose titles, lower thirds, and other texts depending upon your need and requirement.

Step 11: We can make this Fortnite Thumbnail look more attractive by adding elements such as stickers and icons. Filmora contains a wide range of stickers. To access them, navigate to the Elements tab. Here you can find so many categories of elements. Choose any elements according to your need and drop them in the timeline above all other layers. If you cannot find a suitable sticker, you can download one from the internet and use it by importing it into Filmora.

Step 12: Once you are satisfied with the final results, you can take the screenshot of the Thumbnail using the Snapshot icon located below the preview panel. It will create a screenshot in the media panel of Filmora.

Step 13: To access the directory where this screenshot is saved, right-click on the screenshot and click on “Reveal in Explorer.” It will open the folder that contains all the screenshots you take through Filmora. Your Fortnite Thumbnail is ready to be used on your Youtube videos.

Conclusion
With Filmora, there are no limits. You can use your imagination to create amazing Fortnite thumbnails or thumbnails for other purposes. This article is just a demo teaching you how you use Filmora X to develop free and astounding thumbnails. Explore other options and elements of Filmora to take your thumbnails to another level.
Ollie Mattison
Ollie Mattison is a writer and a lover of all things video.
Follow @Ollie Mattison
Ollie Mattison
Mar 27, 2024• Proven solutions
To grow a Youtube channel, you need to focus on several different factors and elements. Having an attractive and eye-catching thumbnail is one of those top factors that contribute to the growth of your channel. No matter how good your content is, if you cannot attract users to click on your videos, it will not benefit your channel. In this article, we are going to show you how you can make a Fortnite thumbnail in few simple steps using Filmora X. If you are a content creator and love to make Fortnite videos, then this article will be very helpful for you.
Filmora has recently introduced a new feature named AI Portrait that uses Artificial Intelligence to remove the background from a portrait or image. This feature doesn’t require any green screen to do that. Filmora also contains a wide range of elements and titles that help you enhance the Thumbnail and make look stunning and eye-catching.
Step 01: To start making a Fortnite thumbnail, it is important to have a screenshot of your gameplay. We can make a perfect screenshot using Fortnite Replay Mode. If you have recently played a Fortnite match, you can access its replay under the Career tab. Under the Career tab select Replays.
Step 02: If you are using a console, the game will only store 10 recent gameplays, but if you are using a PC, it will store 100 recent gameplays in this section. From all these gameplays, select the one that you want to use for the Thumbnail. Once you choose gameplay, you can control everything in it. The angle, speed, and camera mode.
Step 03: For creating a perfect thumbnail, select “Drone Free Camera” mode from the camera mode located on the bottom right corner of the screen. It will allow us to change the angle the way we want. Choose an angle of your choice and take the screenshot.
Step 04: Open Filmora X, make sure to select the 16:9 screen ratio. Import the screenshot using the import button.
Step 05: Drag and drop the screenshot into the timeline.
Step 06: Now, let’s separate the background and character. Go to the Effects, then AI Portrait, select Human Segmentation, and drop it into the screenshot.
Step 07: Filmora will ask you to purchase it, but you can now hit “Try it” to use it.
Step 08: It will remove the background of the screenshot.
Step 09: To add a background, go to the media and navigate to “Sample Color.” Drag a color of your choice and drop it below the screenshot.
Step 10: To add titles in the Thumbnail, go to the Titles tab. Here you can find several categories of titles. Find your preferred title and drop it above all the layers. You can choose titles, lower thirds, and other texts depending upon your need and requirement.
Step 11: We can make this Fortnite Thumbnail look more attractive by adding elements such as stickers and icons. Filmora contains a wide range of stickers. To access them, navigate to the Elements tab. Here you can find so many categories of elements. Choose any elements according to your need and drop them in the timeline above all other layers. If you cannot find a suitable sticker, you can download one from the internet and use it by importing it into Filmora.
Step 12: Once you are satisfied with the final results, you can take the screenshot of the Thumbnail using the Snapshot icon located below the preview panel. It will create a screenshot in the media panel of Filmora.
Step 13: To access the directory where this screenshot is saved, right-click on the screenshot and click on “Reveal in Explorer.” It will open the folder that contains all the screenshots you take through Filmora. Your Fortnite Thumbnail is ready to be used on your Youtube videos.
Conclusion
With Filmora, there are no limits. You can use your imagination to create amazing Fortnite thumbnails or thumbnails for other purposes. This article is just a demo teaching you how you use Filmora X to develop free and astounding thumbnails. Explore other options and elements of Filmora to take your thumbnails to another level.
Ollie Mattison
Ollie Mattison is a writer and a lover of all things video.
Follow @Ollie Mattison
Earn Big on YouTube Shorts: Tips for Profitable Content Creation
YouTube Shorts have grown in popularity since the launch of the platform in 2021. At first, they offered a way for creators to share their content in a vertical format. However, YouTube Shorts monetization is also a great way for creators to earn money. When you monetize YouTube shorts, you increase the potential of earning more income on the platform. In this article, we explore what entails monetized YouTube shorts and how to increase your YT shorts earnings.
YouTube Shorts Monetization A cross-platform offers useful features for making your YouTube videos stand out to earn more revenue!
Free Download Free Download Learn More

Part 1. YouTube Shorts Monetization: Eligibility Criteria
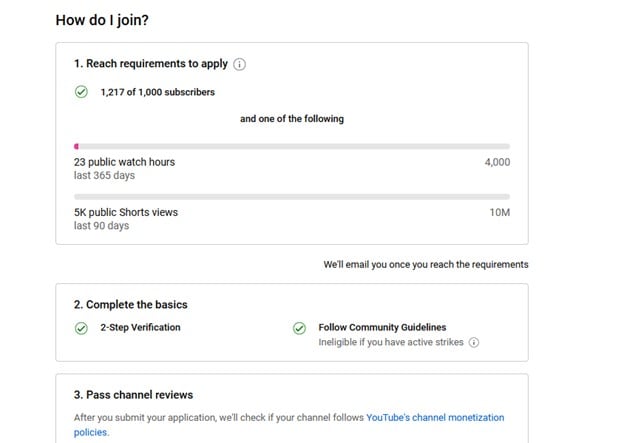
With short monetization options, you can monetize your short-firm content by joining the YouTube Partner Program (YPP). Being a member of this program gives you access to all tools for making money on YouTube. This includes the ability to place ads on your videos or make money directly from your audience through fan funding.
Eligibility Requirements for Monetizing Shorts
The easiest way to monetize Shorts on YouTube is to access the fan-funding program. This program gives you access to special tools that you can use to generate revenue by interacting with views. This is a great option for creators who primarily make short-form videos. The requirements for this option are as follows:
- At least 500 subscribers to your channels
- At least 3 public video uploads in the last 90 days
- At least 3,000 public watch hours in the last 365 days, or
- At least 3 million public Shorts views in the last 90 days

Eligibility for Monetizing Shorts and Videos
The other way you can monetize shorts is by accessing ad revenue and fan-funding. With this option, you will generate income from ads that appear between Shorts in addition to interacting with viewers. This is a great option for creators who make long and short videos. The requirements for this include:
- At least 1,000 subscribers to your channels
- At least 4,000 public watch hours in the last 365 days, or
- At least 10 million valid public Shorts views in the last 90 days
Additional Guidelines for Creators
Once you meet the eligibility criteria, you will be required to follow certain guidelines or policies to continue earning. The additional guidelines include:
- Follow YouTube’s Advertiser-Friendly Content Guidelines
- Make sure your channel does not have active Community Guidelines Strikes
- Live in a region where the program is available
- Avoid uploading another creator’s content by transforming the content or adding a new perspective to it
- Avoid using unedited clips from TV shows or movies that you don’t have rights to
- Don’t pay for fake or automated views
- Turn on 2-Step verification for your Google Account
- Have an active AdSense account
- Have access to advanced YouTube features by verifying your identity
Part 2. Monetizing YouTube Shorts: Step-by-Step Guide
Can you monetize YouTube shorts? Yes, in more than one way. The easiest is through the ad-revenue sharing model. Follow these steps to become part of the YPP and start monetizing your Shorts on YouTube:
Step 1Sign in to YouTube

Step 2Select YouTube Studio
In the top right of the YouTube page, click on your profile picture. From the pop-up menu that appears, select YouTube Studio.

Step 3In the left menu, Click on Earn

Step 4
If you are eligible for the YPP, you will see an Apply Click on it to go to the next step. If you are not yet eligible, click the Get Notified button to be notified once your channel becomes eligible. That’s when you will have the opportunity to finish the application process.
Step 5
Click Start to review and accept YouTube’s Base terms.

Step 6
Link your existing AdSense account if you have one. If not. Click Start to set up a new one.

Step 7
Wait for YouTube to review and approve your application. The process will normally take a month. Once you are approved for the YPP, go to the Earn section in YouTube Studio. Then accept the Shorts Monetization Module. This will allow you to access ads and other money-making tools on YouTube.

The instructions shared above are for applying for the YPP using a computer or desktop. You will still follow the same steps when using a mobile device, but you will do so using the YouTube Studio app.
The money-making feature monetizes Shorts in exciting ways. To start monetizing with Super Thanks fan funding, click Supers on the Earn tab in YouTube Studio. Then click Get Started, and follow the presented prompts. The same process is applicable for Channel Memberships, and other fan-funding options.
Part 3. YouTube Shorts Monetization: A Realistic Look at Earnings Potential
Monetizing YouTube Shorts has the potential to make decent earnings. Although the amount is not as much as a long-form videos, it is a great way of making money on YouTube quickly. Most YouTube Shorts creators agree that the revenue per thousand views (RPM) for short-form content is currently around $0.05 - $0.07. This means that for a million Shorts views, you will make $50 - $70.
Factors That Influence Earnings
The amount of money you make on YouTube Shorts is not fixed. It will depend on several factors, including the revenue channel and your interactions with viewers
- Ad revenue: A higher view count on Shorts increases ad revenue from the ads that are between Shorts on the platform.
- Viewer engagement: Viewer engagement brings in additional revenue through features like Super Thanks.
- Number of monetized Shorts: Monetizing most of your short-form videos will increase the revenue generated.
- Shopping Revenue: How well you promote your products and the set price point of the products will determine the shopping revenue generated.
Examples of Creators Who Have Earned from Shorts
The revenue-sharing program is the easiest way for creators to earn money on YouTube. Since monetizing their Shorts, these creators earned some decent bonus amounts:
- Hassan Khadair (2.1 million subscribers) - Earned $872.14 in ads from 22 million Shorts views
- Riley Lemon (84,000 subscribers) - Earned $76.23 in ads from 1.9 million Shorts views
- James Seo (573,000 subscribers) - Earned $445.09 in ads from 10.3 million Shorts views
- Matthew King (212,000 subscribers) - Earned $163.73 in ads from 4.2 million Shorts views
Part 4. Editing YouTube Shorts with WonderShare to Boost Revenue Potential
The best way to reap big from Shorts YouTube monetization is to make quality videos that will go viral easily. Videos that generate more views will earn you more revenue and increase the number of subscribers within a short time. With Wondershare Filmora, making such videos is easy. The video editing software offers useful features for making your videos stand out. From jaw-dropping sports videos to cinema-like production, the choice of options is endless.
Free Download For Win 7 or later(64-bit)
Free Download For macOS 10.14 or later
The choice of Filmora features you use on your editing projects will depend on your goals. Here are a few favorites to get you started:
1. Auto Reframe
Before uploading a short-form video on YouTube, you want to make sure it is of the right resolution. The Auto Reframe feature on Filmora allows you to instantly resize your videos while keeping all the important details. You only need to record one video for all platforms, and edit to fit with auto reframe.
2. Text to Speech
Narration is an important aspect of YouTube Shorts. You can tell what is happening in the clip in the simplest way for your audience to understand. The Text to Speech (TTS) feature on Filmora allows you to convert your text files to voice-over. This makes your Shorts video more entertaining and enriched with more elements.
3. AI Portrait
Just like other vertical social media videos, Shorts require some bit of personalization. You may want to add a bit of elements or filters. The AI Portrait feature automatically removes background with high accuracy to further enhance your videos. It also comes with over 70 portrait and sticker effects to bring out the mood you are going after. Automatically recognize the faces of your subjects and add AR stickers on the go.
Conclusion
YouTube Shorts have become immensely popular. They tend to have a higher ROI and receive more engagement compared to long-form video content. This makes vertical short-form videos more important and lucrative for content creators. When it comes to YouTube short video monetization, posting quality videos is the key ingredient. We recommend using Wondershare FIlmora to edit your videos. This will make sure they are more entertaining and keep more people engaged.
Free Download Free Download Learn More
Part 1. YouTube Shorts Monetization: Eligibility Criteria
With short monetization options, you can monetize your short-firm content by joining the YouTube Partner Program (YPP). Being a member of this program gives you access to all tools for making money on YouTube. This includes the ability to place ads on your videos or make money directly from your audience through fan funding.
Eligibility Requirements for Monetizing Shorts
The easiest way to monetize Shorts on YouTube is to access the fan-funding program. This program gives you access to special tools that you can use to generate revenue by interacting with views. This is a great option for creators who primarily make short-form videos. The requirements for this option are as follows:
- At least 500 subscribers to your channels
- At least 3 public video uploads in the last 90 days
- At least 3,000 public watch hours in the last 365 days, or
- At least 3 million public Shorts views in the last 90 days
Eligibility for Monetizing Shorts and Videos
The other way you can monetize shorts is by accessing ad revenue and fan-funding. With this option, you will generate income from ads that appear between Shorts in addition to interacting with viewers. This is a great option for creators who make long and short videos. The requirements for this include:
- At least 1,000 subscribers to your channels
- At least 4,000 public watch hours in the last 365 days, or
- At least 10 million valid public Shorts views in the last 90 days
Additional Guidelines for Creators
Once you meet the eligibility criteria, you will be required to follow certain guidelines or policies to continue earning. The additional guidelines include:
- Follow YouTube’s Advertiser-Friendly Content Guidelines
- Make sure your channel does not have active Community Guidelines Strikes
- Live in a region where the program is available
- Avoid uploading another creator’s content by transforming the content or adding a new perspective to it
- Avoid using unedited clips from TV shows or movies that you don’t have rights to
- Don’t pay for fake or automated views
- Turn on 2-Step verification for your Google Account
- Have an active AdSense account
- Have access to advanced YouTube features by verifying your identity
Part 2. Monetizing YouTube Shorts: Step-by-Step Guide
Can you monetize YouTube shorts? Yes, in more than one way. The easiest is through the ad-revenue sharing model. Follow these steps to become part of the YPP and start monetizing your Shorts on YouTube:
Step 1Sign in to YouTube
Step 2Select YouTube Studio
In the top right of the YouTube page, click on your profile picture. From the pop-up menu that appears, select YouTube Studio.
Step 3In the left menu, Click on Earn
Step 4
If you are eligible for the YPP, you will see an Apply Click on it to go to the next step. If you are not yet eligible, click the Get Notified button to be notified once your channel becomes eligible. That’s when you will have the opportunity to finish the application process.
Step 5
Click Start to review and accept YouTube’s Base terms.
Step 6
Link your existing AdSense account if you have one. If not. Click Start to set up a new one.
Step 7
Wait for YouTube to review and approve your application. The process will normally take a month. Once you are approved for the YPP, go to the Earn section in YouTube Studio. Then accept the Shorts Monetization Module. This will allow you to access ads and other money-making tools on YouTube.
The instructions shared above are for applying for the YPP using a computer or desktop. You will still follow the same steps when using a mobile device, but you will do so using the YouTube Studio app.
The money-making feature monetizes Shorts in exciting ways. To start monetizing with Super Thanks fan funding, click Supers on the Earn tab in YouTube Studio. Then click Get Started, and follow the presented prompts. The same process is applicable for Channel Memberships, and other fan-funding options.
Part 3. YouTube Shorts Monetization: A Realistic Look at Earnings Potential
Monetizing YouTube Shorts has the potential to make decent earnings. Although the amount is not as much as a long-form videos, it is a great way of making money on YouTube quickly. Most YouTube Shorts creators agree that the revenue per thousand views (RPM) for short-form content is currently around $0.05 - $0.07. This means that for a million Shorts views, you will make $50 - $70.
Factors That Influence Earnings
The amount of money you make on YouTube Shorts is not fixed. It will depend on several factors, including the revenue channel and your interactions with viewers
- Ad revenue: A higher view count on Shorts increases ad revenue from the ads that are between Shorts on the platform.
- Viewer engagement: Viewer engagement brings in additional revenue through features like Super Thanks.
- Number of monetized Shorts: Monetizing most of your short-form videos will increase the revenue generated.
- Shopping Revenue: How well you promote your products and the set price point of the products will determine the shopping revenue generated.
Examples of Creators Who Have Earned from Shorts
The revenue-sharing program is the easiest way for creators to earn money on YouTube. Since monetizing their Shorts, these creators earned some decent bonus amounts:
- Hassan Khadair (2.1 million subscribers) - Earned $872.14 in ads from 22 million Shorts views
- Riley Lemon (84,000 subscribers) - Earned $76.23 in ads from 1.9 million Shorts views
- James Seo (573,000 subscribers) - Earned $445.09 in ads from 10.3 million Shorts views
- Matthew King (212,000 subscribers) - Earned $163.73 in ads from 4.2 million Shorts views
Part 4. Editing YouTube Shorts with WonderShare to Boost Revenue Potential
The best way to reap big from Shorts YouTube monetization is to make quality videos that will go viral easily. Videos that generate more views will earn you more revenue and increase the number of subscribers within a short time. With Wondershare Filmora, making such videos is easy. The video editing software offers useful features for making your videos stand out. From jaw-dropping sports videos to cinema-like production, the choice of options is endless.
Free Download For Win 7 or later(64-bit)
Free Download For macOS 10.14 or later
The choice of Filmora features you use on your editing projects will depend on your goals. Here are a few favorites to get you started:
1. Auto Reframe
Before uploading a short-form video on YouTube, you want to make sure it is of the right resolution. The Auto Reframe feature on Filmora allows you to instantly resize your videos while keeping all the important details. You only need to record one video for all platforms, and edit to fit with auto reframe.
2. Text to Speech
Narration is an important aspect of YouTube Shorts. You can tell what is happening in the clip in the simplest way for your audience to understand. The Text to Speech (TTS) feature on Filmora allows you to convert your text files to voice-over. This makes your Shorts video more entertaining and enriched with more elements.
3. AI Portrait
Just like other vertical social media videos, Shorts require some bit of personalization. You may want to add a bit of elements or filters. The AI Portrait feature automatically removes background with high accuracy to further enhance your videos. It also comes with over 70 portrait and sticker effects to bring out the mood you are going after. Automatically recognize the faces of your subjects and add AR stickers on the go.
Conclusion
YouTube Shorts have become immensely popular. They tend to have a higher ROI and receive more engagement compared to long-form video content. This makes vertical short-form videos more important and lucrative for content creators. When it comes to YouTube short video monetization, posting quality videos is the key ingredient. We recommend using Wondershare FIlmora to edit your videos. This will make sure they are more entertaining and keep more people engaged.
Also read:
- [New] The Future of Android Gaming? It's All in KineMaster Review for 2024
- [Updated] Ace Your Youtube Finances Secrets for Profits at the 500-Subscriber Milestone
- [Updated] Affordable Wonders in Virtual Reality Headsets From China
- 2024 Approved Efficient Solutions for YouTube Short Snags
- In 2024, Cutting Edge Techniques Pushing Boundaries in YouTube Cinematography
- In 2024, Rediscovering Removed YouTube Video Easy Access Explained
- Jest Journeys Charting 7 Comedic Paths to Viral Videos
- Mobile & Desktop Techniques for YouTube Short Video Submission
- Resound the Villainy: Troubleshooting Steps When 'Evil Genius 2' Lacks Volume
- Title: Fortnite Thumbnail Blitz A 30-Second Guide
- Author: Steven
- Created at : 2025-01-21 16:48:01
- Updated at : 2025-01-22 16:38:49
- Link: https://youtube-clips.techidaily.com/fortnite-thumbnail-blitz-a-30-second-guide/
- License: This work is licensed under CC BY-NC-SA 4.0.