
:max_bytes(150000):strip_icc():format(webp)/GettyImages-155096051-5b1bf60d43a1030036cfac94.jpg)
"Fonts That Make a Difference Your 20 Best Choices"
Fonts That Make a Difference: Your 20 Best Choices
YouTube has grown in popularity since it was developed and launched. You can watch YouTube videos for educational purposes, entertainment, or catch up with your favorite content creators. Thumbnails are a massive element of what makes a YouTube video successful. You can incorporate numerous fonts into your thumbnails, leaving you feeling stuck on which is the best option.
This article will discuss the 20 best YouTube thumbnail fonts to make your videos amazing.

- Bebas Neue - Popular YouTube Thumbnail Font
- Impact - YouTube Thumbnail Font for Strong Sense
- Montserrat - Good Font for YouTube Thumbnail
- Alfa Slab - YouTube Thumbnail Text Font With a Futuristic Vibe
- Againts - Best Font for YouTube Thumbnail
- Dancing Script - YouTube Thumbnail Font With a Sweat Vibe
- Oswald
- Arial Negrata - Print Font for YouTube Thumbnails
- BlackOpsOne - Best YouTube Thumbnail Font for Gaming Videos
- Beauty and the Beast
- Chucklesome
- Caribold
- Bernhard - Serious YouTube Thumbnail Font
- Dustin Font Quartet
- The Tide - Chunky-Letter Font for YouTube Thumbnails
- Badaboom BB
- River Drive
- Traveler Note
- Free Love Script
- Config Rounded
20 Best Fonts for YouTube Thumbnails To Bring Traffic to Your Videos
Your thumbnail is the first thing your audience will see as they browse on YouTube. Since you only have a few seconds to make a good first impression, it would be wise to make the most out of it.
YouTube thumbnails capture the viewer’s attention and spark their interest. The more eye-catching your thumbnail is, the more likely they will click on your video. If you take your time to make good thumbnails for your YouTube videos, you will undoubtedly increase your channel’s traffic and expand your reach.
Recent research reveals that YouTube thumbnails with text and numbers get more clicks than thumbnails with plain images. Therefore, choosing a great font to accompany your thumbnail would be wise and make it more visually appealing. Stick around for the fun part of the article, where we discuss twenty best fonts for your YouTube thumbnails.
1. Bebas Neue - Popular YouTube Thumbnail Font
The first YouTube thumbnail font on our list is a popular one known as Bebas Neue. You can use this font for your videos and thumbnails regardless of what content you post. The elegant yet sublime design makes it a perfect choice for you if you are just starting out or have yet to explore other options.

2. Impact - YouTube Thumbnail Font for Strong Sense
If you want a straightforward font for your thumbnail, look no further than Impact. Its strong sense makes it the best font for YouTube thumbnails. Even though it is versatile for any content, it is most frequently used on reaction videos, pranks, or reviews.

3. Montserrat - Good Font for YouTube Thumbnail
The letters in the Montserrat video are very simple, with the slightest shadowing and outline. This font is pretty versatile, and you can use it to make thumbnails for laid-back content or more serious and factual videos.

4. Alfa Slab - YouTube Thumbnail Text Font With a Futuristic Vibe
The Alfa slab font has a futuristic vibe to it, making it the perfect choice for content about new innovations or the future of technology. The blocky yet simple letters are easy to read and don’t take away from the main message or the background.

5. Againts - Best Font for YouTube Thumbnail
Suppose you post lots of travel content, share videos of you lounging on the best, or sample a new restaurant. The Againts font has a unique outdoor vibe that makes your videos pop and makes your audience anticipate where you will travel next.
6. Dancing Script - YouTube Thumbnail Font With a Sweat Vibe
The Dancing Script font is a must-have in your arsenal if you wouldn’t want your videos to be too serious. The slanted letters also give your thumbnail a feminine touch, making it great for fashion vlogs or videos about life hacks for ladies.

7. Oswald
The letters in this Oswald font are encapsulated in a dark grey rectangle, making them stand out and easy to read. You could use this font with other backgrounds in your thumbnail to highlight keywords you wouldn’t want your audience to miss as they scroll through YouTube.

8. Arial Negrata - Print Font for YouTube Thumbnails
We couldn’t forget to mention Arial Negrata, which has a beautiful print font and complementary sub-fonts. You can easily vary the fonts’ sizes for emphasis and to capture the interest of your audience.

9. BlackOpsOne - Best YouTube Thumbnail Font for Gaming Videos
Are you tired of the boring print fonts and girly cursive text? If you answer yes, you should check out the BlackOpsOne font, which is unlike anything you have ever seen. This font is perfect for gaming videos or content that involves long streams.

10. Beauty and the Beast
If you are a streamer, gamer, or like to post life hack videos on YouTube, you are probably looking for some good fonts for YouTube thumbnails to make your video less serious. The Beauty and the Beast font is very whimsical, giving your thumbnail a playful feel.

11. Chucklesome
You will immediately recognize this font if you grew up watching many cartoons and reading comic books. Chucklesome is another font with the best font color for YouTube thumbnails, making it an excellent choice if your YouTube channel is about games, movies, or comic books. The artsy typeface, bold letters, and bright colors can capture your audience’s attention from a mile away.

12. Caribold
As the name suggests, the Caribold font for YouTube thumbnails is very bold, and the letters almost jump out of the screen at you. The borders, outline, and shadows emphasize the font, making it hard to miss. You can use this font to create thumbnails for “How To” videos.

13. Bernhard - Serious YouTube Thumbnail Font
Depending on the content you post, you might want to discard the whimsical feel and give your thumbnail a more serious vibe. The Bernhard font is technically an enlarged script font that makes your videos and thumbnails look fresh and elegant. You can use this font for historical or factual videos.

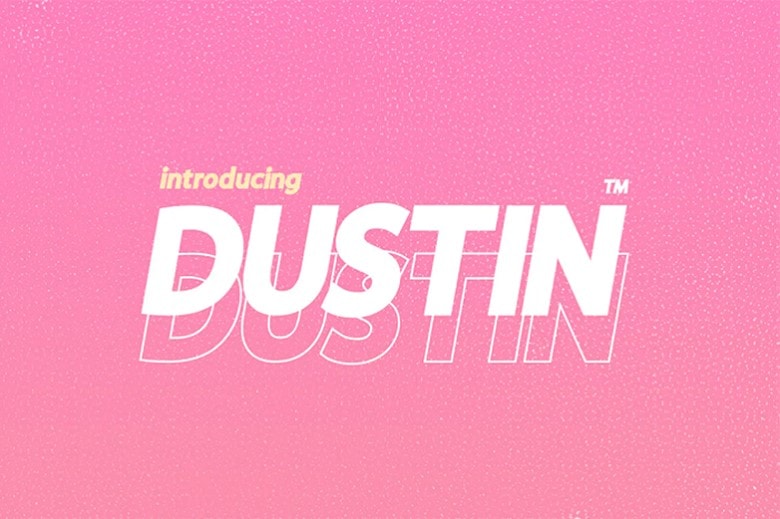
14. Dustin Font Quartet
It is not uncommon for thumbnails to draw inspiration from other brands. The Dustin font is an excellent example of such a font, which is similar to the Supreme brand logo. This font is pretty versatile as it comes in a pack of four fonts, making you spoilt for choice!
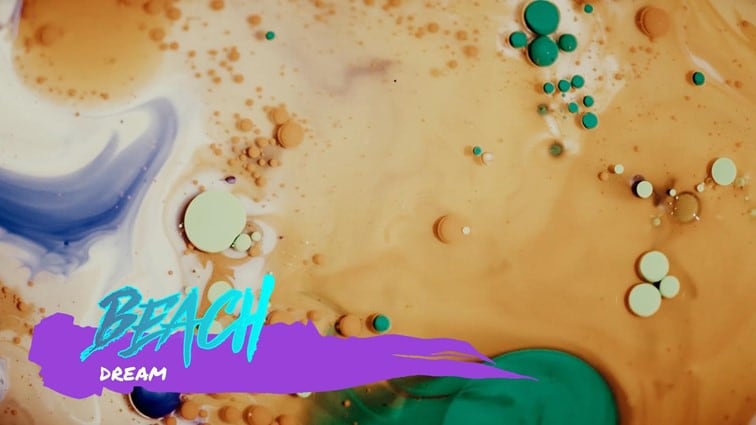
15. The Tide - Chunky-Letter Font for YouTube Thumbnails
The Tide thumbnail font gives a relaxing beach vibe that would be great if you love posting laid-back content. This font also comes with chunky letters, which are easy to read and grab the attention of anyone scrolling through the platform.

16. Badaboom BB
The best font for YouTube thumbnail is Badaboom BB font, which has vibrant colors and unique letters. The red and yellow colors are an absolute showstopper and a must-have if you want your audience to notice you. This font style is excellent for gaming and streaming YouTube videos, where you just want your audience to have a good time.

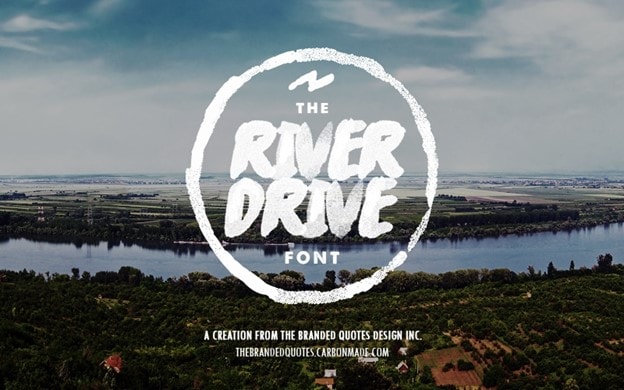
17. River Drive
When inserting text into a thumbnail, you must balance the visual elements to ensure the letters don’t overshadow the image. The River Drive font allows you to create bold yet legible text without removing the stunning photo in the background.
18. Traveler Note
Adventure and travel channels help us know what it’s like to visit a place, even though we haven’t left our couches. The Traveler Note font brings life and cheer to your travel vlogs as you continue introducing us to different parts of the world.

19. Free Love Script
Perhaps your YouTube is missing that feminine touch to tie everything together. The curvy lettering in the Free Love Script is perfect for lifestyle videos or fashion vlogs, which could use a bit of femininity to drive the message home.

20. Config Rounded
If your channel is professional or you post informative content about finances, business, and other important topics, the best YouTube thumbnail font for you is the Config rounded font. It looks pretty modern and works well with any background.

Generate Cool YouTube Thumbnail Texts With Wondershare Filmora
If you have been making YouTube videos for a while now, then you must be familiar with Wondershare Filmora , a top-tier video editing tool. If not, we will discuss some of the features that make it a great editing tool in a short while. You can also use this platform to create and design the perfect thumbnail for your YouTube video.
Free Download For Win 7 or later(64-bit)
Free Download For macOS 10.14 or later

The title editing feature on this platform allows you to add creative text to your video and customize it as you see fit. You can also use Wondershare Filmora to make a title with customizable parameters. For instance, you can edit the text titles using three different fill types: color fill, gradient fill, and image fill.
Wondershare Filmora is an excellent tool to help bring your thumbnails alive and reel the masses in to view more videos from your channel. You cannot possibly exhaust the 107 animation styles, 12 types of shadow effects, and more than ten borders that make your text stand out from the rest. If you are unhappy with your current font, you can choose from over 30 categories of titles till you find one that tickles your fancy.
We couldn’t forget to mention the 3D titles feature with Wondershare Filmora. Gone are the days when creators would use 2D titles to introduce their videos to their audience. Even though not many content creators use 3D titles, you can be among the few that do and gain a competitive advantage. Ensure you peruse through the various categories and find one that speaks to you and fits the kind of content you create.
Below is a step-by-step guide on how to edit YouTube thumbnail text fonts.
Step1 Launch Wondershare Filmora on your device and select “New Project.”

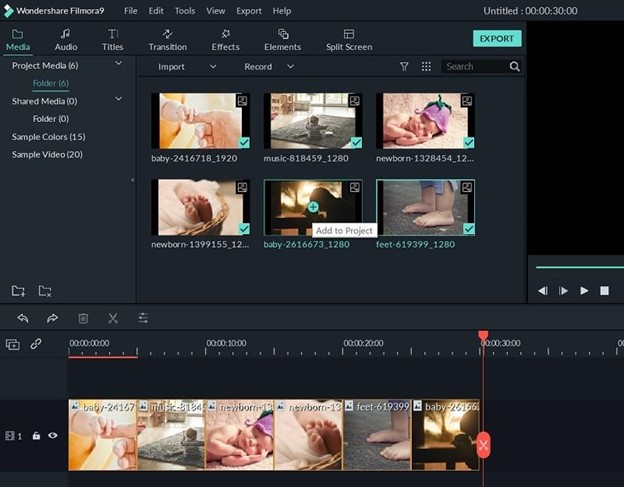
Step2 Click on the icon shown below to import media from your device.

Step3 Drag and drop your photos as shown below to create your YouTube Thumbnail on the platform.
Step4 Add titles to customize the texts in your Thumbnail.

Step5 In the Titles panel, you can customize the font. Filmora offers hundreds of fonts for your choosing.

Step6 Select a still frame to be your thumbnail. Click the camera icon on the right side to take a snapshot.

Step7 The snapshot will appear on the Media panel. Right click the snapshot, and select “Reveal in Explorer” to locate it in your local drive. Then you can use it as your YouTube Thumbnail.

You don’t need to search for fonts on the Internet when Wondershare Filmora offers downloadable fonts. If you are interested in installing fonts in Filmora, watch this video to learn how.
Conclusion
As you generate thumbnails for your YouTube videos, it would be wise to ensure you make them full-sized. The ideal dimension for a YouTube thumbnail should be 1280*720. Since most of your viewers use their mobile phones to watch YouTube videos, it would help to ensure the thumbnail looks the same on your laptop and your mobile device.
A hazy or pixelated thumbnail could discourage the viewer from clicking on your video. We hope you have found a font you like and will incorporate it into your next YouTube video.
20 Best Fonts for YouTube Thumbnails To Bring Traffic to Your Videos
Your thumbnail is the first thing your audience will see as they browse on YouTube. Since you only have a few seconds to make a good first impression, it would be wise to make the most out of it.
YouTube thumbnails capture the viewer’s attention and spark their interest. The more eye-catching your thumbnail is, the more likely they will click on your video. If you take your time to make good thumbnails for your YouTube videos, you will undoubtedly increase your channel’s traffic and expand your reach.
Recent research reveals that YouTube thumbnails with text and numbers get more clicks than thumbnails with plain images. Therefore, choosing a great font to accompany your thumbnail would be wise and make it more visually appealing. Stick around for the fun part of the article, where we discuss twenty best fonts for your YouTube thumbnails.
1. Bebas Neue - Popular YouTube Thumbnail Font
The first YouTube thumbnail font on our list is a popular one known as Bebas Neue. You can use this font for your videos and thumbnails regardless of what content you post. The elegant yet sublime design makes it a perfect choice for you if you are just starting out or have yet to explore other options.
2. Impact - YouTube Thumbnail Font for Strong Sense
If you want a straightforward font for your thumbnail, look no further than Impact. Its strong sense makes it the best font for YouTube thumbnails. Even though it is versatile for any content, it is most frequently used on reaction videos, pranks, or reviews.
3. Montserrat - Good Font for YouTube Thumbnail
The letters in the Montserrat video are very simple, with the slightest shadowing and outline. This font is pretty versatile, and you can use it to make thumbnails for laid-back content or more serious and factual videos.
4. Alfa Slab - YouTube Thumbnail Text Font With a Futuristic Vibe
The Alfa slab font has a futuristic vibe to it, making it the perfect choice for content about new innovations or the future of technology. The blocky yet simple letters are easy to read and don’t take away from the main message or the background.
5. Againts - Best Font for YouTube Thumbnail
Suppose you post lots of travel content, share videos of you lounging on the best, or sample a new restaurant. The Againts font has a unique outdoor vibe that makes your videos pop and makes your audience anticipate where you will travel next.
6. Dancing Script - YouTube Thumbnail Font With a Sweat Vibe
The Dancing Script font is a must-have in your arsenal if you wouldn’t want your videos to be too serious. The slanted letters also give your thumbnail a feminine touch, making it great for fashion vlogs or videos about life hacks for ladies.
7. Oswald
The letters in this Oswald font are encapsulated in a dark grey rectangle, making them stand out and easy to read. You could use this font with other backgrounds in your thumbnail to highlight keywords you wouldn’t want your audience to miss as they scroll through YouTube.
8. Arial Negrata - Print Font for YouTube Thumbnails
We couldn’t forget to mention Arial Negrata, which has a beautiful print font and complementary sub-fonts. You can easily vary the fonts’ sizes for emphasis and to capture the interest of your audience.
9. BlackOpsOne - Best YouTube Thumbnail Font for Gaming Videos
Are you tired of the boring print fonts and girly cursive text? If you answer yes, you should check out the BlackOpsOne font, which is unlike anything you have ever seen. This font is perfect for gaming videos or content that involves long streams.
10. Beauty and the Beast
If you are a streamer, gamer, or like to post life hack videos on YouTube, you are probably looking for some good fonts for YouTube thumbnails to make your video less serious. The Beauty and the Beast font is very whimsical, giving your thumbnail a playful feel.
11. Chucklesome
You will immediately recognize this font if you grew up watching many cartoons and reading comic books. Chucklesome is another font with the best font color for YouTube thumbnails, making it an excellent choice if your YouTube channel is about games, movies, or comic books. The artsy typeface, bold letters, and bright colors can capture your audience’s attention from a mile away.
12. Caribold
As the name suggests, the Caribold font for YouTube thumbnails is very bold, and the letters almost jump out of the screen at you. The borders, outline, and shadows emphasize the font, making it hard to miss. You can use this font to create thumbnails for “How To” videos.
13. Bernhard - Serious YouTube Thumbnail Font
Depending on the content you post, you might want to discard the whimsical feel and give your thumbnail a more serious vibe. The Bernhard font is technically an enlarged script font that makes your videos and thumbnails look fresh and elegant. You can use this font for historical or factual videos.
14. Dustin Font Quartet
It is not uncommon for thumbnails to draw inspiration from other brands. The Dustin font is an excellent example of such a font, which is similar to the Supreme brand logo. This font is pretty versatile as it comes in a pack of four fonts, making you spoilt for choice!
15. The Tide - Chunky-Letter Font for YouTube Thumbnails
The Tide thumbnail font gives a relaxing beach vibe that would be great if you love posting laid-back content. This font also comes with chunky letters, which are easy to read and grab the attention of anyone scrolling through the platform.
16. Badaboom BB
The best font for YouTube thumbnail is Badaboom BB font, which has vibrant colors and unique letters. The red and yellow colors are an absolute showstopper and a must-have if you want your audience to notice you. This font style is excellent for gaming and streaming YouTube videos, where you just want your audience to have a good time.
17. River Drive
When inserting text into a thumbnail, you must balance the visual elements to ensure the letters don’t overshadow the image. The River Drive font allows you to create bold yet legible text without removing the stunning photo in the background.
18. Traveler Note
Adventure and travel channels help us know what it’s like to visit a place, even though we haven’t left our couches. The Traveler Note font brings life and cheer to your travel vlogs as you continue introducing us to different parts of the world.
19. Free Love Script
Perhaps your YouTube is missing that feminine touch to tie everything together. The curvy lettering in the Free Love Script is perfect for lifestyle videos or fashion vlogs, which could use a bit of femininity to drive the message home.
20. Config Rounded
If your channel is professional or you post informative content about finances, business, and other important topics, the best YouTube thumbnail font for you is the Config rounded font. It looks pretty modern and works well with any background.
Generate Cool YouTube Thumbnail Texts With Wondershare Filmora
If you have been making YouTube videos for a while now, then you must be familiar with Wondershare Filmora , a top-tier video editing tool. If not, we will discuss some of the features that make it a great editing tool in a short while. You can also use this platform to create and design the perfect thumbnail for your YouTube video.
Free Download For Win 7 or later(64-bit)
Free Download For macOS 10.14 or later
The title editing feature on this platform allows you to add creative text to your video and customize it as you see fit. You can also use Wondershare Filmora to make a title with customizable parameters. For instance, you can edit the text titles using three different fill types: color fill, gradient fill, and image fill.
Wondershare Filmora is an excellent tool to help bring your thumbnails alive and reel the masses in to view more videos from your channel. You cannot possibly exhaust the 107 animation styles, 12 types of shadow effects, and more than ten borders that make your text stand out from the rest. If you are unhappy with your current font, you can choose from over 30 categories of titles till you find one that tickles your fancy.
We couldn’t forget to mention the 3D titles feature with Wondershare Filmora. Gone are the days when creators would use 2D titles to introduce their videos to their audience. Even though not many content creators use 3D titles, you can be among the few that do and gain a competitive advantage. Ensure you peruse through the various categories and find one that speaks to you and fits the kind of content you create.
Below is a step-by-step guide on how to edit YouTube thumbnail text fonts.
Step1 Launch Wondershare Filmora on your device and select “New Project.”
Step2 Click on the icon shown below to import media from your device.
Step3 Drag and drop your photos as shown below to create your YouTube Thumbnail on the platform.
Step4 Add titles to customize the texts in your Thumbnail.
Step5 In the Titles panel, you can customize the font. Filmora offers hundreds of fonts for your choosing.
Step6 Select a still frame to be your thumbnail. Click the camera icon on the right side to take a snapshot.
Step7 The snapshot will appear on the Media panel. Right click the snapshot, and select “Reveal in Explorer” to locate it in your local drive. Then you can use it as your YouTube Thumbnail.
You don’t need to search for fonts on the Internet when Wondershare Filmora offers downloadable fonts. If you are interested in installing fonts in Filmora, watch this video to learn how.
Conclusion
As you generate thumbnails for your YouTube videos, it would be wise to ensure you make them full-sized. The ideal dimension for a YouTube thumbnail should be 1280*720. Since most of your viewers use their mobile phones to watch YouTube videos, it would help to ensure the thumbnail looks the same on your laptop and your mobile device.
A hazy or pixelated thumbnail could discourage the viewer from clicking on your video. We hope you have found a font you like and will incorporate it into your next YouTube video.
Ace the Art of YouTube Reactions - 3 Innovative Approaches Unveiled
How to Make a YouTube Reaction Video?

Richard Bennett
Mar 27, 2024• Proven solutions
Sharing ideas and opinions on virtually any topic you can think of with millions of people around the world is arguably one of the greatest benefits YouTube gives to content creators. Even so, building your channel exclusively around reaction videos may prove to be difficult, but this doesn’t mean that you can’t use this type of video to comment on what other YouTubers are saying.
The process of making a YouTube reaction video is not overly technical, although you will have to decide which video editing technique you are going to use to make a reaction video. That is why in this article we are going to take a look at different ways to make a YouTube reaction video.
- Method 1: Making Reaction Videos with PIP feature in Filmora
- Method 2: Create YouTube Reaction Video with Split Screen Templates
- Method 3: Make A Reaction Video for YouTube with AI Portrait
How to Make a Reaction Video for Your YouTube Channel? [3 Ways]
Using the footage without the consent of the copyright owner is punishable by the law, which means that you can only include the footage in a reaction video if you have the owner’s consent. Consequently, the selection of videos you can comment on is going to be limited, since it is entirely up to the creator of the video if they are going to give you permission to use their footage in your reaction video.
You can use the following video editing techniques, once you have access to the video you would like to comment on.
Method 1: Making a reaction video with the Picture-in-Picture feature in Filmora
Video editing software, like Filmora , can also be used to create YouTube reaction videos, but you must have all the footage you would like to include in that video before you can start putting it together.
The first step is to create a new project in Filmora and then import the media assets into the editor. Besides video clips, you can also add music, pictures, or create opening titles and end credits for your reaction video.


Place the video you’re reacting to on a video track on the timeline and then add the video of your reaction to the timeline that is directly above the one to which you added the first video clip. Click on the top video in the preview window and use the handles that are positioned around the edges of the video to adjust its size.
If you would like to change the on-screen position of the overlay clip, you should simply click on it and drag it to the new location within the preview window.

Filmora offers more than sixty motion effects, hundreds of transitions, and visual effects that can make your reaction video more visually appealing to the audience.

Moreover, Filmora video editing software offers a variety of blending modes, and it lets you control the opacity of the overlay video so that you can make it more transparent. Whether or not you are going to use these options depends on the footage you’re working with and the demands of a particular project.
Pros of using the Picture in Picture feature to make reaction videos in Filmora: You can place and adjust the videos with more customizable options. Get more tips about Making a PIP video in Filmora .
Method 2: Create several reaction windows with the Split Screen feature
Besides the Picture-in-Picture option, Filmora also enables you to play two or more videos simultaneously with Split Screen templates. Drag and drop the template you want to use in your reaction video to the timeline and click on the Enable Split Screen Animation tick box if you want to use the template without animations.

Afterward, you should drag the video clips from the Media tab and drop them onto the section of the preview window where you want them to be located. Keep in mind that you cannot add more than six videos to a split-screen template.

All videos you add to a split-screen template can be edited, and you just have to click on them if you want to adjust their sizes, enhance colors, mute their audio tracks or add a new audio file to the template.
Check the details about How to make a split-screen video step by step.
Pros of using Split-screen template to make reaction video in Filmora: various templates for creating stylish video side by side easily.
Method 3: Create A YouTube Reaction Video with AI Portrait
With the human segmentation effect in AI Portrait, you can now blend the reaction video in a more natural way. The human segmentation effect will isolate people from the background, you can use any background in the video.
Note: You can use this feature after version after V 10.5 for Windows, and V 10.4 for Mac. Click the button below to get the latest version of Filmora on your desktop.
Step 1: Import the videos to the media library, and then drag the background video to the first video track, and the reaction video to the track above.

Step 2: Go to the Effects tab at the top, and click the AI Portrait category, and then you will see many effects such as Human Segmentation, Human Pixelate, Human Noise, and lighting flash. Here, drag and drop the Human segmentation effect to the reaction video.

Step 3: Select the reaction video in the timeline, and then adjust its size and position by dragging it on the preview window. See, the reaction video is fine blended with the background video.

Step 4: That’s the basic editing of making a reaction video. You can also add the neon or flashing effect to the video. If everything goes well, click Export and save the video.

You can find out more details about using the AI Portrait effect to make a reaction video .
How to Avoid Copyright Infringements While Making a YouTube Reaction Video
All videos you can find on YouTube are protected by intellectual property regulations, and you can’t use them without the copyright owner’s permission. The only way to avoid being absolutely sure that your reaction video isn’t violating the law is to contact the video creator and ask for permission to use their intellectual property. However, most YouTubers are reluctant to let others download and edit their videos unless they already have a large fan base.
In case you’re granted permission to comment on a video, you have nothing to worry about. However, if you don’t get the permission you’re all the money the reaction video generates will go to the copyright owner or you will be forced to delete the video from your channel. There are still a few things you can do, even if you don’t get permission to use the video you would like to comment on.
Muting the video’s audio or altering its pitch will make it more difficult for YouTube’s bots to detect copyright infringement, although this method may not always work. In addition, you can play a video for up to thirty seconds, then comment on that segment, and then play another segment of that video.
There is no way of saying whether any of these editing tricks are going to help you avoid a copyright claim, and you should only use them if you have no other option.
Conclusion
Anyone can master the technical aspects of making a reaction video, but the topics you react to need to be related to the general topic your channel covers. What’s more, the idea of your reaction video has to be relevant for your audience if you want to attract their attention. Which video editing techniques are you using to make a YouTube reaction video?
Download Mac Version ](https://tools.techidaily.com/wondershare/filmora/download/ )
Richard Bennett
Richard Bennett is a writer and a lover of all things video.
Follow @Richard Bennett
Richard Bennett
Mar 27, 2024• Proven solutions
Sharing ideas and opinions on virtually any topic you can think of with millions of people around the world is arguably one of the greatest benefits YouTube gives to content creators. Even so, building your channel exclusively around reaction videos may prove to be difficult, but this doesn’t mean that you can’t use this type of video to comment on what other YouTubers are saying.
The process of making a YouTube reaction video is not overly technical, although you will have to decide which video editing technique you are going to use to make a reaction video. That is why in this article we are going to take a look at different ways to make a YouTube reaction video.
- Method 1: Making Reaction Videos with PIP feature in Filmora
- Method 2: Create YouTube Reaction Video with Split Screen Templates
- Method 3: Make A Reaction Video for YouTube with AI Portrait
How to Make a Reaction Video for Your YouTube Channel? [3 Ways]
Using the footage without the consent of the copyright owner is punishable by the law, which means that you can only include the footage in a reaction video if you have the owner’s consent. Consequently, the selection of videos you can comment on is going to be limited, since it is entirely up to the creator of the video if they are going to give you permission to use their footage in your reaction video.
You can use the following video editing techniques, once you have access to the video you would like to comment on.
Method 1: Making a reaction video with the Picture-in-Picture feature in Filmora
Video editing software, like Filmora , can also be used to create YouTube reaction videos, but you must have all the footage you would like to include in that video before you can start putting it together.
The first step is to create a new project in Filmora and then import the media assets into the editor. Besides video clips, you can also add music, pictures, or create opening titles and end credits for your reaction video.
Place the video you’re reacting to on a video track on the timeline and then add the video of your reaction to the timeline that is directly above the one to which you added the first video clip. Click on the top video in the preview window and use the handles that are positioned around the edges of the video to adjust its size.
If you would like to change the on-screen position of the overlay clip, you should simply click on it and drag it to the new location within the preview window.
Filmora offers more than sixty motion effects, hundreds of transitions, and visual effects that can make your reaction video more visually appealing to the audience.
Moreover, Filmora video editing software offers a variety of blending modes, and it lets you control the opacity of the overlay video so that you can make it more transparent. Whether or not you are going to use these options depends on the footage you’re working with and the demands of a particular project.
Pros of using the Picture in Picture feature to make reaction videos in Filmora: You can place and adjust the videos with more customizable options. Get more tips about Making a PIP video in Filmora .
Method 2: Create several reaction windows with the Split Screen feature
Besides the Picture-in-Picture option, Filmora also enables you to play two or more videos simultaneously with Split Screen templates. Drag and drop the template you want to use in your reaction video to the timeline and click on the Enable Split Screen Animation tick box if you want to use the template without animations.
Afterward, you should drag the video clips from the Media tab and drop them onto the section of the preview window where you want them to be located. Keep in mind that you cannot add more than six videos to a split-screen template.
All videos you add to a split-screen template can be edited, and you just have to click on them if you want to adjust their sizes, enhance colors, mute their audio tracks or add a new audio file to the template.
Check the details about How to make a split-screen video step by step.
Pros of using Split-screen template to make reaction video in Filmora: various templates for creating stylish video side by side easily.
Method 3: Create A YouTube Reaction Video with AI Portrait
With the human segmentation effect in AI Portrait, you can now blend the reaction video in a more natural way. The human segmentation effect will isolate people from the background, you can use any background in the video.
Note: You can use this feature after version after V 10.5 for Windows, and V 10.4 for Mac. Click the button below to get the latest version of Filmora on your desktop.
Step 1: Import the videos to the media library, and then drag the background video to the first video track, and the reaction video to the track above.
Step 2: Go to the Effects tab at the top, and click the AI Portrait category, and then you will see many effects such as Human Segmentation, Human Pixelate, Human Noise, and lighting flash. Here, drag and drop the Human segmentation effect to the reaction video.
Step 3: Select the reaction video in the timeline, and then adjust its size and position by dragging it on the preview window. See, the reaction video is fine blended with the background video.
Step 4: That’s the basic editing of making a reaction video. You can also add the neon or flashing effect to the video. If everything goes well, click Export and save the video.
You can find out more details about using the AI Portrait effect to make a reaction video .
How to Avoid Copyright Infringements While Making a YouTube Reaction Video
All videos you can find on YouTube are protected by intellectual property regulations, and you can’t use them without the copyright owner’s permission. The only way to avoid being absolutely sure that your reaction video isn’t violating the law is to contact the video creator and ask for permission to use their intellectual property. However, most YouTubers are reluctant to let others download and edit their videos unless they already have a large fan base.
In case you’re granted permission to comment on a video, you have nothing to worry about. However, if you don’t get the permission you’re all the money the reaction video generates will go to the copyright owner or you will be forced to delete the video from your channel. There are still a few things you can do, even if you don’t get permission to use the video you would like to comment on.
Muting the video’s audio or altering its pitch will make it more difficult for YouTube’s bots to detect copyright infringement, although this method may not always work. In addition, you can play a video for up to thirty seconds, then comment on that segment, and then play another segment of that video.
There is no way of saying whether any of these editing tricks are going to help you avoid a copyright claim, and you should only use them if you have no other option.
Conclusion
Anyone can master the technical aspects of making a reaction video, but the topics you react to need to be related to the general topic your channel covers. What’s more, the idea of your reaction video has to be relevant for your audience if you want to attract their attention. Which video editing techniques are you using to make a YouTube reaction video?
Download Mac Version ](https://tools.techidaily.com/wondershare/filmora/download/ )
Richard Bennett
Richard Bennett is a writer and a lover of all things video.
Follow @Richard Bennett
Also read:
- [New] Cut to Perfection Top Video Editors for YouTubers
- In 2024, 1 Choice Easy Online Video Text Conversion
- 2024 Approved Building a Haul Vlog Empire Key Strategies
- [New] Decoding the Art of Engaging in YouTube Short Forms
- Unlock Higher Views Ideal Video Post Times
- [New] Behind the Scenes IPhone Video Loops Unveiled
- [New] Erase the Obvious Techniques for Masked YouTube Content
- [New] Best Soundshapers for Content Makers on YouTube
- [New] Epic Audio Essentials Top 10 for Trending YT Shorts
- [New] Champion Toolkit 10 Budget-Friendly Caption Extractors
- Skyrocketing Your YouTube Business The FameBit Approach to Sponsorships
- In 2024, Comprehensive List of Top 9 Free Video Channel Branding Aids
- Gain an Edge - Access These Top 8 Sites for FREE Eco-Screen Backdrops and Clips
- Driving View Counts Upward on YouTube 6 Proven Techniques for 2024
- Youtube Newbie's Guide to Channels and Cashflow Creation
- Dance Dictates Selecting Perfect Audio-Visuals
- Narrating Your Journey Channeling Authenticity Online
- Proven Techniques for Amplifying Your Impact on YouTube Shorts
- YouTube’s Payment System A Monthly Breakdown
- Award-Winning Musicians on YouTube You Must See for 2024
- [New] Dial in the Ideal Aspect Ratio for Stunning YouTube Videos
- [New] Elevate Your Content YouTube Video Editing Secrets Revealed
- Step-by-Step Guide for YouTube Video Editing Pros and Amateurs Alike
- Audit Your Channel's Financial Success
- Quality Upgrade Switch Codecs to AV1 for YouTube Viewing
- [Updated] Best 10 Volume Magnifiers for Windows/MacOS
- [New] Best YouTube to MP3 Converters Free Download [Online/Win/Mac]
- 15 YouTube Financial Experts You Can Trust
- [New] Catch a Wider Net via Concurrent Streams to Youtube + Twitch
- Perfect Size Crafting Engaging Thumbnails
- In 2024, Auditing for Accuracy YouTube Monetization Compliance
- [New] Best 8 Mirrorless Cameras to Elevate Your Vlogging Game
- Secure Your Content's Identity Adding Logo and Watermark to Videos
- In 2024, Dive Into Maker's Earnings Exploring YouTube Shorts Revenue Structure
- In 2024, Architects Crafting Fantasy Realms for Marvel
- Budding Creators Set Up a Profitable YouTube Chanel for 2024
- Channel Your Creativity Convert YouTube Clips Into Dynamic Gifs
- [New] Cultivate Creativity 20+ Inspiring YouTube Concepts
- [New] Alternative Cinema Choices for Every Fan
- 2024 Approved Essential Media Makers' Software Linux Edition
- Best YouTube Video Reverser Online [+Howtos]
- In 2024, Boost Engagement Advanced YouTube Tag Strategies Revealed
- 2024 Approved Downloading the Latest Tracks A Guide to Free Extractors for PC Users
- [New] Crafting Engaging Unboxing Vids Step-by-Step
- [New] Elite Stabilization Solutions for Video Creators
- Stream with Style Hacks to Keep Your Daily Video Game Engaging
- Quick and Easy Channels Personalize Your YouTube URL Now
- In 2024, 3-Part Blueprint to Monitor and Maximize Your YouTube Profits
- Smartphone Strategies Launching Successful YouTubers From the Start
- [New] In 2024, The Complete Hulu Recording Manual for PC, Mac & Mobile Users
- [New] Revamped Recording, Reimagined Screens - The Sprout Way
- [Updated] Expert Tips for Zoom Engagement Building Stronger Remote Relationships
- Updated 2024 Approved SkypePersona Transforming Your Digital Presence with Customized Vocal Features
- In 2024, Best Under $100 HD Cams for Adventure and Action
- [New] 2024 Approved Mastering the Art of Laptop Video Capturing
- [New] 2024 Approved Boost Engagement Sharing Streams From Twitch on FB
- In 2024, 5 Ways to Track Vivo V30 Pro without App | Dr.fone
- [New] Types of Facebook Video Aspect Ratios & How to Adjust It for 2024
- Updated 2024 Approved The Best of Windows Video Editing Top 6 Tools to Try
- How to Easily Convert SRT to VTT for 2024
- Downloading FB Content The Ultimate Guide - TOP 5 List
- [Updated] Complete Guide to Recording Live TV on Your Windows PC for 2024
- The Ultimate List of iOS Tools for Erasing Intrusive Images
- [New] Essential 9 Mic Recorder Selections for Online Use in '23 for 2024
- 2024 Approved Learning Leaders Expert Picks of 10 Best Classroom Recorders
- [New] 2024 Approved Endless Escapades Top 10 Best Freeware Online RPGs
- In 2024, RhythmReview Music and Dialogue Analysis
- 2024 Approved The Great Debate Final Cut Pro vs LumaFusion for Video Editing
- [Updated] 2024 Approved Expert Techniques for Effective TikTok Videos (PC/MAC)
- New Find Wolf Howling Sound Effect
- [Updated] Unleash Photos on Instagram with Ease – Follow This Guide
- [New] Harmony Haven Gather, Download & Dissect Audio
- Delving Deep Into Gestural Interfaces
- Boost Your Brand Accrue 1K IG Friends/Monthly
- 2024 Approved The Sound of Silence Enhancing Video Quality with Premiere Pros Easy Audio Filters
- How to Transfer Photos from Xiaomi Redmi Note 12 Pro 5G to Laptop Without USB | Dr.fone
- Streamline Your PC Audio with Simple Techniques
- [Updated] In 2024, Expert Tips for Instagram Green Screen Shoots
- Gmail Not Working on Realme 12 5G 7 Common Problems & Fixes | Dr.fone
- Extracting Stills for Windows 11 Video Projects
- [Updated] The Visual Editor's Journey Cropping Content for Instagram Standout
- Title: "Fonts That Make a Difference Your 20 Best Choices"
- Author: Steven
- Created at : 2024-05-25 19:21:46
- Updated at : 2024-05-26 19:21:46
- Link: https://youtube-clips.techidaily.com/fonts-that-make-a-difference-your-20-best-choices/
- License: This work is licensed under CC BY-NC-SA 4.0.
