"First-Timer's Manual for Cool, Mac-Crafted YouTube Clips"
First-Timer’s Manual for Cool, Mac-Crafted YouTube Clips
How do Beginners Make a Cool Video for YouTube on Mac

Shanoon Cox
Dec 14, 2023• Proven solutions
To get the right video editors to cut a video for YouTube on your Mac can be a bit of a problem for beginners. It is understandable that there will be a learning curve if you just want to get tons of subscribers on your channel – who doesn’t? Ultimately, in getting a standard video that will attract and sustain the interest of the viewers, you will need to employ certain strategies that will enhance your credibility.
Let’s tell each other the truth, no one wants to watch a video that is not aesthetically appealing even if it is a close friend. So, if you have got the relevant content and the video to pull traffic to your channel, what you will need is editing software that will help you make the correct adjustments to your video
Nobody wants a random viewer to comment “This video is a little bit tacky, touch-up properly”, that will definitely leave a sting. As such, understand the best technique that works for you as well as the software that meets your needs based on the current level of expertise. It is okay for you to grow.

Five Video Cutting Skills Youtubers Must Have
As much as the enthusiasm is brewing to get on your mac and upload the video you just shot, there are certain elements you need to implement to make a cool video for YouTube. Beginners sometimes feel their content is the best, the excitement of posting their very first series can be overwhelming. Sometimes, it blocks off other ideas for making the video better.
However, having amazing content dies not to exclude the need for the right editing technique. Here are five methods for editing your YouTube videos:
1.Control the video duration
The length of a particular scene can have different meanings depending on how long or short it is in a video. This means the duration can impact the message you are trying to pass across to your viewers, hence it is important to know what places to accelerate and cut in the video.
You can have a system where each part of the content is labeled in their order of importance such as A, B, C. This means from the most important to the least important. Consequently, you will be able to sieve through the content and make the appropriate changes while editing the video.
![]()
2.Customize the intro and end of the video
It is possible to grab the attention of the viewer in the intro and even more likely to lose someone once the opening montage comes in. Creating an intro that is captivating and appealing to drag the audience to your video is an important technique for editing your videos. Also, the end of the video, from the signing out to the closing montage has to appeal to the audience. You will be surprised by the number of people that love seeing end credits if the closing montage is good. Customize the intro and the end of the video so the audience is tuned all through.
You May Like: Best YouTube Banner Size and Channel Art Dimension (The Ultimate Guide)
You May Like: How to Add Logo or Watermark to YouTube Video
3.Use Cool transitions or filters
If there is anything the audience love to see, it is the way you move from different points in the vudeo. The ability to use transition that does not affect their attention but leaves them wanting more is very key. Use fanciful transitions that do noy hurt the eyes and allows for easy comprehension.
4.Match the cuts
Whatever you cut has to match the next phase of the video. You do not want to leave the audience behind as they will wonder how the last scene correlates with a new one. You need to ensure that all cuts match the next scenes.
5.Cutaway shots
This is very good in providing the audience context. You can take shots of the room or item that you are trying to discuss in your video. If people keep staring at a particular thing for long, they get bored, cutaway shots keep the excitement alive for the audience.
What Editing Software can Meet Your Needs?
As a beginner, it is important to use software that is easily adaptable to your needs. If you want to make a cool video for you be on your mac, getting software that allows you to be creative without confusion is key. Here are two software for making cool YouTube videos for your Mac;
Filmora X
This is one of the simplest yet powerful tools that is lightweight and apt for your Mac. One of the perks of using the Filmora X is the feature that allows you to upload the video directly to YouTube, saving you any extended hassles.


There are also 400+ transition effects as well as a stylish text editor that is fun to use. There is also a built-in music and sound effect feature that enables you to select sounds to match the video you are editing. This is if you do not have the music you want for the video already.
Other pros of Filmora are:
• It has fast rendering sped for your video
• The lifetime price is affordable.
However, there are some disadvantages to the usage of Filmora X, which are:
• The free version contains the Filmora X watermark
• The color grading tool is limited.
Blender
If you are looking for software for the model, game creating, and animation then opting for Blender will be a good fit. You can trim videos, insert filters, and add as many videos as you want.
Pros
- The 3D graphics make it suitable for editing YouTube videos.
- Composting system and node-based material
- It supports your Mac.
Cons:
- It could be slow when running
- Some think it might be a bit complicated.
Although there is other editing software for your Mac, Filmora X simplifies the whole process. If you are looking for quality wrapped in affordability and convenience, then Filmora X will be right for you. Start editing and enjoy the ride!
Learn More: YouTuber Skillshare: Essential Video Cutting Skills For YouTubers
Shanoon Cox
Shanoon Cox is a writer and a lover of all things video.
Follow @Shanoon Cox
Shanoon Cox
Dec 14, 2023• Proven solutions
To get the right video editors to cut a video for YouTube on your Mac can be a bit of a problem for beginners. It is understandable that there will be a learning curve if you just want to get tons of subscribers on your channel – who doesn’t? Ultimately, in getting a standard video that will attract and sustain the interest of the viewers, you will need to employ certain strategies that will enhance your credibility.
Let’s tell each other the truth, no one wants to watch a video that is not aesthetically appealing even if it is a close friend. So, if you have got the relevant content and the video to pull traffic to your channel, what you will need is editing software that will help you make the correct adjustments to your video
Nobody wants a random viewer to comment “This video is a little bit tacky, touch-up properly”, that will definitely leave a sting. As such, understand the best technique that works for you as well as the software that meets your needs based on the current level of expertise. It is okay for you to grow.
Five Video Cutting Skills Youtubers Must Have
As much as the enthusiasm is brewing to get on your mac and upload the video you just shot, there are certain elements you need to implement to make a cool video for YouTube. Beginners sometimes feel their content is the best, the excitement of posting their very first series can be overwhelming. Sometimes, it blocks off other ideas for making the video better.
However, having amazing content dies not to exclude the need for the right editing technique. Here are five methods for editing your YouTube videos:
1.Control the video duration
The length of a particular scene can have different meanings depending on how long or short it is in a video. This means the duration can impact the message you are trying to pass across to your viewers, hence it is important to know what places to accelerate and cut in the video.
You can have a system where each part of the content is labeled in their order of importance such as A, B, C. This means from the most important to the least important. Consequently, you will be able to sieve through the content and make the appropriate changes while editing the video.
![]()
2.Customize the intro and end of the video
It is possible to grab the attention of the viewer in the intro and even more likely to lose someone once the opening montage comes in. Creating an intro that is captivating and appealing to drag the audience to your video is an important technique for editing your videos. Also, the end of the video, from the signing out to the closing montage has to appeal to the audience. You will be surprised by the number of people that love seeing end credits if the closing montage is good. Customize the intro and the end of the video so the audience is tuned all through.
You May Like: Best YouTube Banner Size and Channel Art Dimension (The Ultimate Guide)
You May Like: How to Add Logo or Watermark to YouTube Video
3.Use Cool transitions or filters
If there is anything the audience love to see, it is the way you move from different points in the vudeo. The ability to use transition that does not affect their attention but leaves them wanting more is very key. Use fanciful transitions that do noy hurt the eyes and allows for easy comprehension.
4.Match the cuts
Whatever you cut has to match the next phase of the video. You do not want to leave the audience behind as they will wonder how the last scene correlates with a new one. You need to ensure that all cuts match the next scenes.
5.Cutaway shots
This is very good in providing the audience context. You can take shots of the room or item that you are trying to discuss in your video. If people keep staring at a particular thing for long, they get bored, cutaway shots keep the excitement alive for the audience.
What Editing Software can Meet Your Needs?
As a beginner, it is important to use software that is easily adaptable to your needs. If you want to make a cool video for you be on your mac, getting software that allows you to be creative without confusion is key. Here are two software for making cool YouTube videos for your Mac;
Filmora X
This is one of the simplest yet powerful tools that is lightweight and apt for your Mac. One of the perks of using the Filmora X is the feature that allows you to upload the video directly to YouTube, saving you any extended hassles.
There are also 400+ transition effects as well as a stylish text editor that is fun to use. There is also a built-in music and sound effect feature that enables you to select sounds to match the video you are editing. This is if you do not have the music you want for the video already.
Other pros of Filmora are:
• It has fast rendering sped for your video
• The lifetime price is affordable.
However, there are some disadvantages to the usage of Filmora X, which are:
• The free version contains the Filmora X watermark
• The color grading tool is limited.
Blender
If you are looking for software for the model, game creating, and animation then opting for Blender will be a good fit. You can trim videos, insert filters, and add as many videos as you want.
Pros
- The 3D graphics make it suitable for editing YouTube videos.
- Composting system and node-based material
- It supports your Mac.
Cons:
- It could be slow when running
- Some think it might be a bit complicated.
Although there is other editing software for your Mac, Filmora X simplifies the whole process. If you are looking for quality wrapped in affordability and convenience, then Filmora X will be right for you. Start editing and enjoy the ride!
Learn More: YouTuber Skillshare: Essential Video Cutting Skills For YouTubers
Shanoon Cox
Shanoon Cox is a writer and a lover of all things video.
Follow @Shanoon Cox
Create Captivating YT Thumbnails Fast
How to Make a Thumbnail for Your YouTube Free Easily
Shanoon Cox
Mar 27, 2024• Proven solutions
Youtube is one of the widely and most used video-sharing platforms all around the world. Being such a huge platform, billions of users upload different videos every second, making it a very competitive platform. Getting your videos noticed and clicked by others requires so many factors to be considered. One of the main factors that increase the chances of your videos being connected and seen by others is an attractive thumbnail. It is the first and the most important factor that helps the viewers decide what to watch and ignore. According to an estimate, among all the best-performing videos on Youtube, 90% have custom thumbnails. So, if you are looking forward to increasing the number of clicks on your videos, having a custom thumbnail is one of the most important things to consider. There are multiple ways to make a thumbnail for Youtube, but most are paid and difficult to use. In this article, we will discuss a hack to make a thumbnail for your Youtube free.
You might be interested in:
How to make a thumbnail for Youtube using AI Portrait
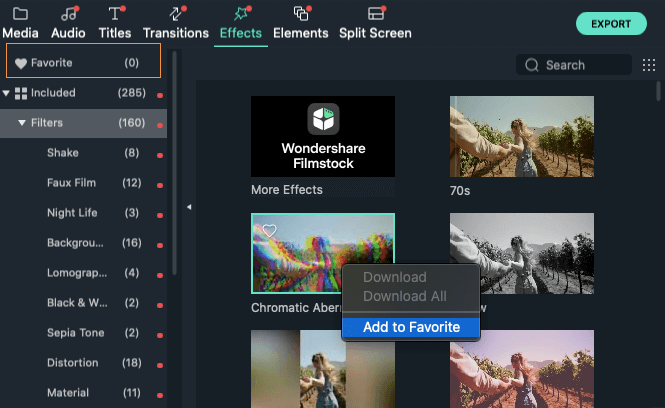
With time, Filmora brings new and advanced features for its users to equip them with all the necessary tools required for effective and efficient video editing. One of its latest features is AI Portrait. This feature has several uses and benefits. This feature is designed for Gamers, Vlogger, and other related genres to help them make their videos stand out from the crowd and gain more clicks and views. AI Portrait contains several effects that help you make the human element of the video separate from the background and make it more obvious. We can also use the AI Portrait effects to make beautiful and attractive thumbnails for your Youtube. Follow these steps to create a stunning thumbnail for your Youtube videos.
Step 01: Open Filmora X. If it is not already installed on your computer, download and install its latest version from here .

Step 02: Make sure that the aspect ratio of your project is 16:9. To do that, click on a screen-shaped icon below the preview screen and select “Change Project Aspect Ratio.”

Step 03: Change the Aspect Ratio to 16:9 if it is not set to it already. 16:9 aspect ratio is the standard size of Youtube thumbnails that represents the best possible results.

Step 04: Choose a background of your choice for your thumbnail. You can choose a background from the sample colors provided by Filmora.
Step 05: If you want to use your custom background, you can import it into the Filmora by clicking import or dragging and dropping it in the media section.

Step 06: Import your video the same way into the media folder of Filmora and drag it into the timeline and place it above your background.

Step 07: Select your footage, go to the Effects tab and click on AI Portraits. It will open up all the effects related to AI Portraits. These AI Portrait features help you separate the human from a background without using a green screen or anything else.

Step 08: Double click on any of these effects to see how they will look like on your footage.

Step 09: To make a thumbnail for your Youtube, we have to remove the background of your footage first. To do that we have to apply Human Segmentation to the footage first. It will separate the human from the footage. Drag and drop the Human Segmentation effect into the footage in the timeline. Once you drop it into the footage, it will ask you to purchase this feature to export the footage. Since we are not trying to export the footage, we are only creating a thumbnail, click on “Try It”. Once the background is removed, you can add other effects as well. Drag and drop the “Human Border” into the footage. It creates an outline around the human in your footage.

Step 10: The effect will be applied to the footage. Now the background has been removed from the footage and ready to be used on your custom background. You can adjust the human accordingly where it looks perfect.

Step 11: Now it is time to add a title into your thumbnail to highlight what the video is all about. Go to the Titles, and select lower thirds. You can also select any of the titles types which best suits your needs. Drop the title into the timeline above the footage and adjust it accordingly. Now double click on the header to edit and rename it.
Step 12: Once you are satisfied with the final results, click on the Camera icon below the preview screen or press “Ctrl+Alt+S” to take the screenshot.

Conclusion
This is how your Youtube thumbnail will look like after applying all the above-mentioned effects and settings.
This article on making a thumbnail for your Youtube is just an idea for you, and you can use your creativity to create amazing thumbnails using other features of Filmora. These cool thumbnails will help you attract more viewers and click, which will ultimately help you grow your Youtube Channel. Unlike all other articles and tutorials that show you how to make a thumbnail for Youtube, this method is free and doesn’t need any technical skills to be implemented.
Shanoon Cox
Shanoon Cox is a writer and a lover of all things video.
Follow @Shanoon Cox
Shanoon Cox
Mar 27, 2024• Proven solutions
Youtube is one of the widely and most used video-sharing platforms all around the world. Being such a huge platform, billions of users upload different videos every second, making it a very competitive platform. Getting your videos noticed and clicked by others requires so many factors to be considered. One of the main factors that increase the chances of your videos being connected and seen by others is an attractive thumbnail. It is the first and the most important factor that helps the viewers decide what to watch and ignore. According to an estimate, among all the best-performing videos on Youtube, 90% have custom thumbnails. So, if you are looking forward to increasing the number of clicks on your videos, having a custom thumbnail is one of the most important things to consider. There are multiple ways to make a thumbnail for Youtube, but most are paid and difficult to use. In this article, we will discuss a hack to make a thumbnail for your Youtube free.
You might be interested in:
How to make a thumbnail for Youtube using AI Portrait
With time, Filmora brings new and advanced features for its users to equip them with all the necessary tools required for effective and efficient video editing. One of its latest features is AI Portrait. This feature has several uses and benefits. This feature is designed for Gamers, Vlogger, and other related genres to help them make their videos stand out from the crowd and gain more clicks and views. AI Portrait contains several effects that help you make the human element of the video separate from the background and make it more obvious. We can also use the AI Portrait effects to make beautiful and attractive thumbnails for your Youtube. Follow these steps to create a stunning thumbnail for your Youtube videos.
Step 01: Open Filmora X. If it is not already installed on your computer, download and install its latest version from here .
Step 02: Make sure that the aspect ratio of your project is 16:9. To do that, click on a screen-shaped icon below the preview screen and select “Change Project Aspect Ratio.”
Step 03: Change the Aspect Ratio to 16:9 if it is not set to it already. 16:9 aspect ratio is the standard size of Youtube thumbnails that represents the best possible results.
Step 04: Choose a background of your choice for your thumbnail. You can choose a background from the sample colors provided by Filmora.
Step 05: If you want to use your custom background, you can import it into the Filmora by clicking import or dragging and dropping it in the media section.
Step 06: Import your video the same way into the media folder of Filmora and drag it into the timeline and place it above your background.
Step 07: Select your footage, go to the Effects tab and click on AI Portraits. It will open up all the effects related to AI Portraits. These AI Portrait features help you separate the human from a background without using a green screen or anything else.
Step 08: Double click on any of these effects to see how they will look like on your footage.
Step 09: To make a thumbnail for your Youtube, we have to remove the background of your footage first. To do that we have to apply Human Segmentation to the footage first. It will separate the human from the footage. Drag and drop the Human Segmentation effect into the footage in the timeline. Once you drop it into the footage, it will ask you to purchase this feature to export the footage. Since we are not trying to export the footage, we are only creating a thumbnail, click on “Try It”. Once the background is removed, you can add other effects as well. Drag and drop the “Human Border” into the footage. It creates an outline around the human in your footage.
Step 10: The effect will be applied to the footage. Now the background has been removed from the footage and ready to be used on your custom background. You can adjust the human accordingly where it looks perfect.
Step 11: Now it is time to add a title into your thumbnail to highlight what the video is all about. Go to the Titles, and select lower thirds. You can also select any of the titles types which best suits your needs. Drop the title into the timeline above the footage and adjust it accordingly. Now double click on the header to edit and rename it.
Step 12: Once you are satisfied with the final results, click on the Camera icon below the preview screen or press “Ctrl+Alt+S” to take the screenshot.
Conclusion
This is how your Youtube thumbnail will look like after applying all the above-mentioned effects and settings.
This article on making a thumbnail for your Youtube is just an idea for you, and you can use your creativity to create amazing thumbnails using other features of Filmora. These cool thumbnails will help you attract more viewers and click, which will ultimately help you grow your Youtube Channel. Unlike all other articles and tutorials that show you how to make a thumbnail for Youtube, this method is free and doesn’t need any technical skills to be implemented.
Shanoon Cox
Shanoon Cox is a writer and a lover of all things video.
Follow @Shanoon Cox
Also read:
- [New] Craft Compelling Videos Utilize No-Cost Templates & Samples
- [New] Crafting an Impactful Online Presence with Perfect YT Dimensions
- [New] Discover 7 Unforgettable Marriage Videos on Vimeo
- [Updated] In 2024, The Influential Edge Mastering Sponsorship and Promotion on Social Media
- How To Unlock Any Vivo Y02T Phone Password Using Emergency Call
- How To Use Allshare Cast To Turn On Screen Mirroring On Oppo Reno 9A | Dr.fone
- In 2024, Deciphering YouTube's Subscriber Code
- In 2024, Digital Detox Ignoring Negativity on YouTube
- In 2024, Expert Review of Advanced Parrot AR Drone
- Nvidia Driver Updates: Unlock Your Computer's Potential Immediately!
- Strategizing for Successful YouTube Ad Sponsorships with FameBit
- Swift, Simplified Steps Mastering Iphone Screen Recordings for 2024
- The Unpredictable Consequences of Unquestioned AI
- What Exactly Is DuckDuckGo and How Secure Is It Really?
- YouTube Channels for Filmmakers to Learn Filmmaking Tips
- Title: First-Timer's Manual for Cool, Mac-Crafted YouTube Clips
- Author: Steven
- Created at : 2025-01-21 16:37:20
- Updated at : 2025-01-22 16:38:12
- Link: https://youtube-clips.techidaily.com/first-timers-manual-for-cool-mac-crafted-youtube-clips/
- License: This work is licensed under CC BY-NC-SA 4.0.