
:max_bytes(150000):strip_icc()/1-fda3dfcb691444eebe2921baebecd372.jpg)
"Expertise in Action Leading Youtube Text-to-Video Devices"
Expertise in Action: Leading Youtube Text-to-Video Devices
Have you ever wondered why there is a need to transcribe YouTube videos? Well, let us enlighten you! Turning content from YouTube to text is essential for numerous content creators as it allows them to gain more views. Recent studies have shown that around 33% of the audience watching YouTube videos do not necessarily watch them in English. So, by converting them to text, translation becomes a whole lot easier and subtitles can be generated more efficiently.
In this article, we will explore the procedure through how one can convert a YouTube video to text, and learn about numerous effective online YouTube video to text software.
In this article
01 How to Convert YouTube Video to Texts by Copy/Paste YouTube Transcript
02 Best YouTube Video to Text Converters Online
Part 1: How to Convert YouTube Video to Texts by Copy/Paste YouTube Transcript
When people think “Get the transcript from YouTube” they believe it is going to be a daunting and lengthy procedure. Well, let us tell you that it is certainly not! All you have to do is follow the steps outlined below to transcribe YouTube video to text - that too through the YouTube player itself.
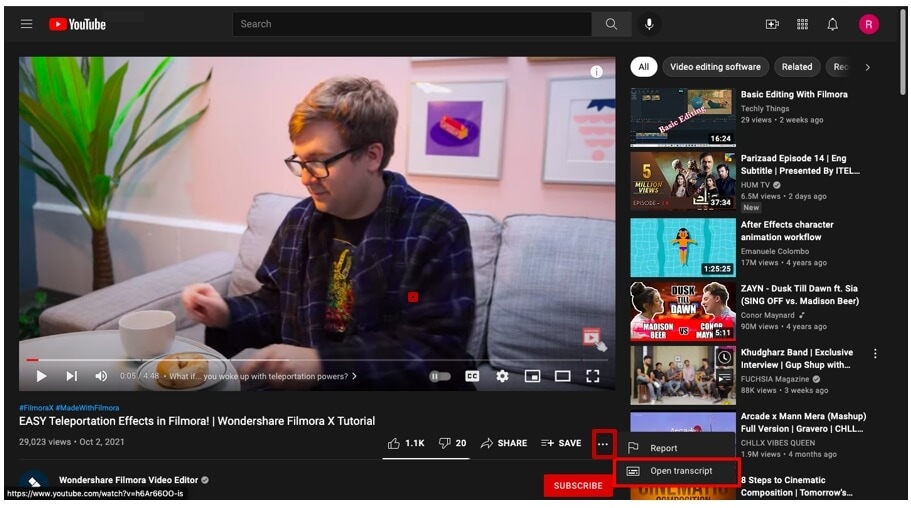
First what you have to do is open YouTube and select any video for which you require the transcript. Once you have selected the video, wait for it to load and then click the three dots located beneath the video, as shown in the image below.
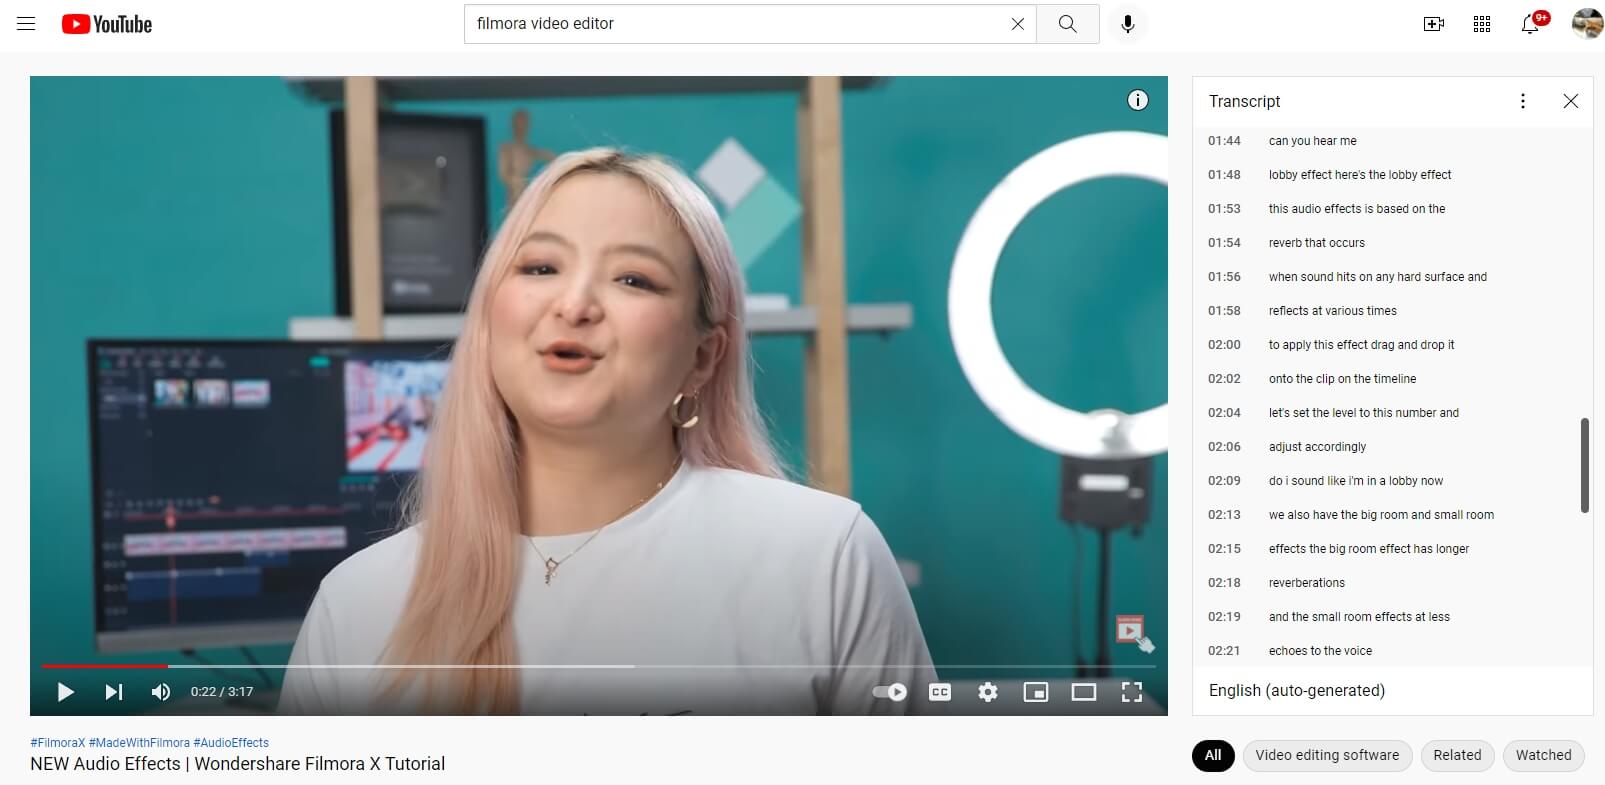
Following that, a menu will appear, just select the “Open Transcript” option and the transcription will open on the top right side of your screen.
Simply select the entire transcript using your mouse, then copy and paste it into a new Word Document or Google Document. If you don’t need the timestamps, you can click the three-dot icon to toggle timestamps off.

By following the steps outlined above, you can convert a YouTube video to text in less than five seconds!
Part 2: Best YouTube Video to Text Converters Online
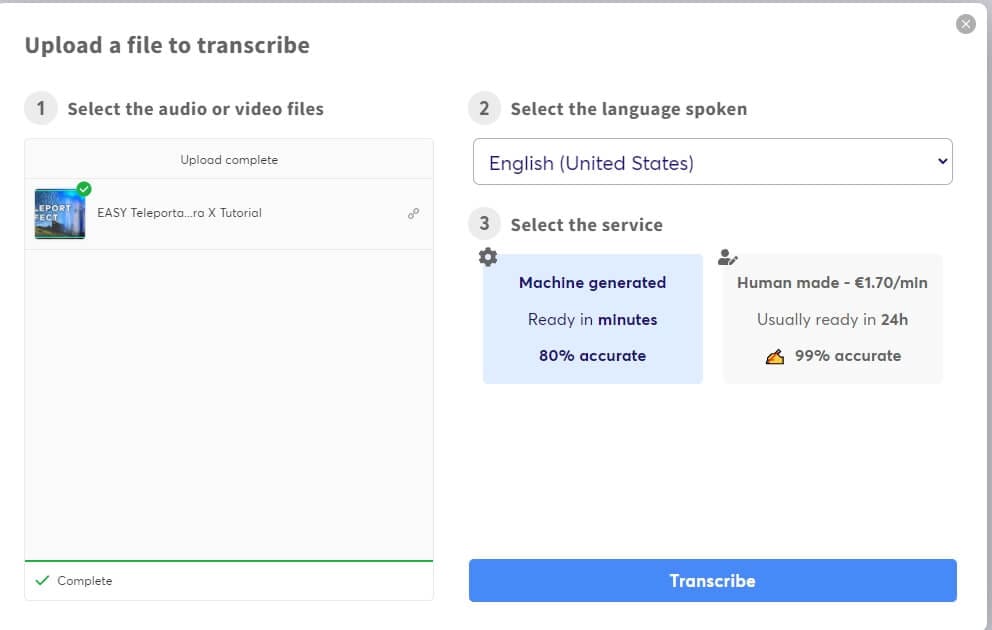
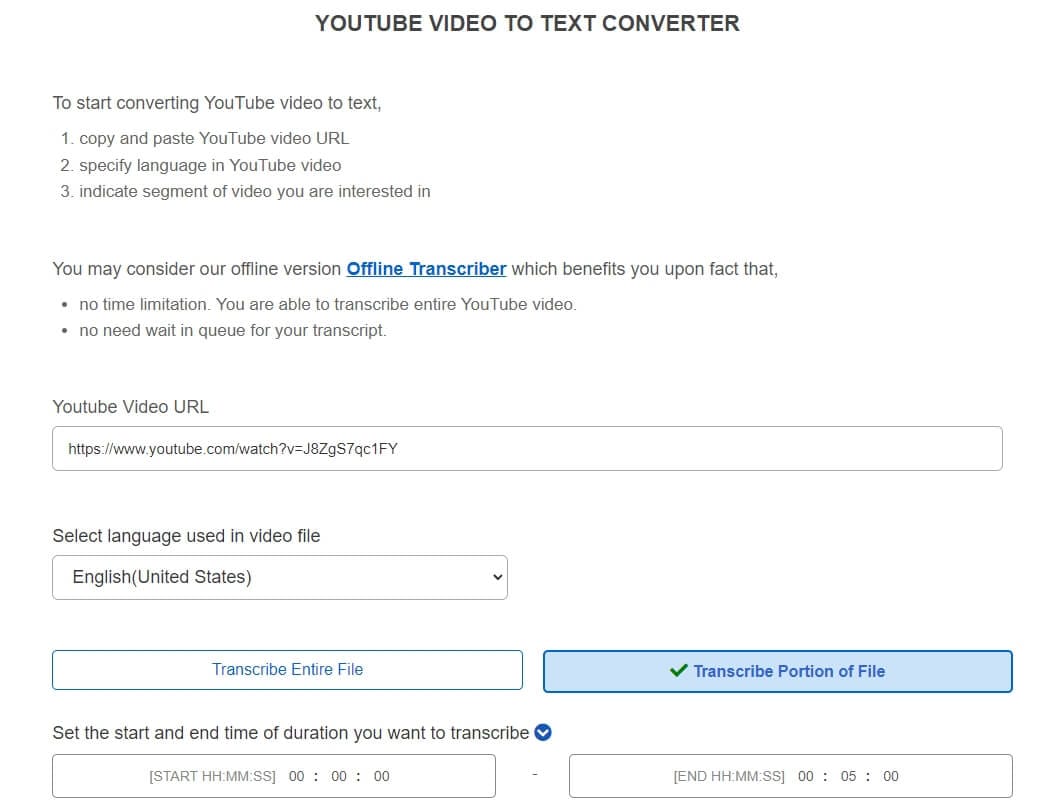
Aside from the basic method of getting the transcription from YouTube itself, many individuals make use of effective YouTube video to text converter online free. This allows them to get the complete video into text, small parts of the video to text, as well as options to convert the text into multiple languages. Below are some of the best software to convert YouTube video to text online.
1. Inqscribe
This high-quality cross-platform tool allows users to transcribe audio and video files into text . Whether it is a meeting recording or a YouTube video - you can convert them all to text. Making use of this free online software is extremely easy, all one has to do is just upload their file and click the process. Then the system will automatically transcribe the video into a text document for you. The software is uni code so all file formats are supported such as txt, XML, HTML, WebVTT, and more. The only drawback of this online software is that video files that are larger than a certain limit cannot be accepted.
2. Sonix
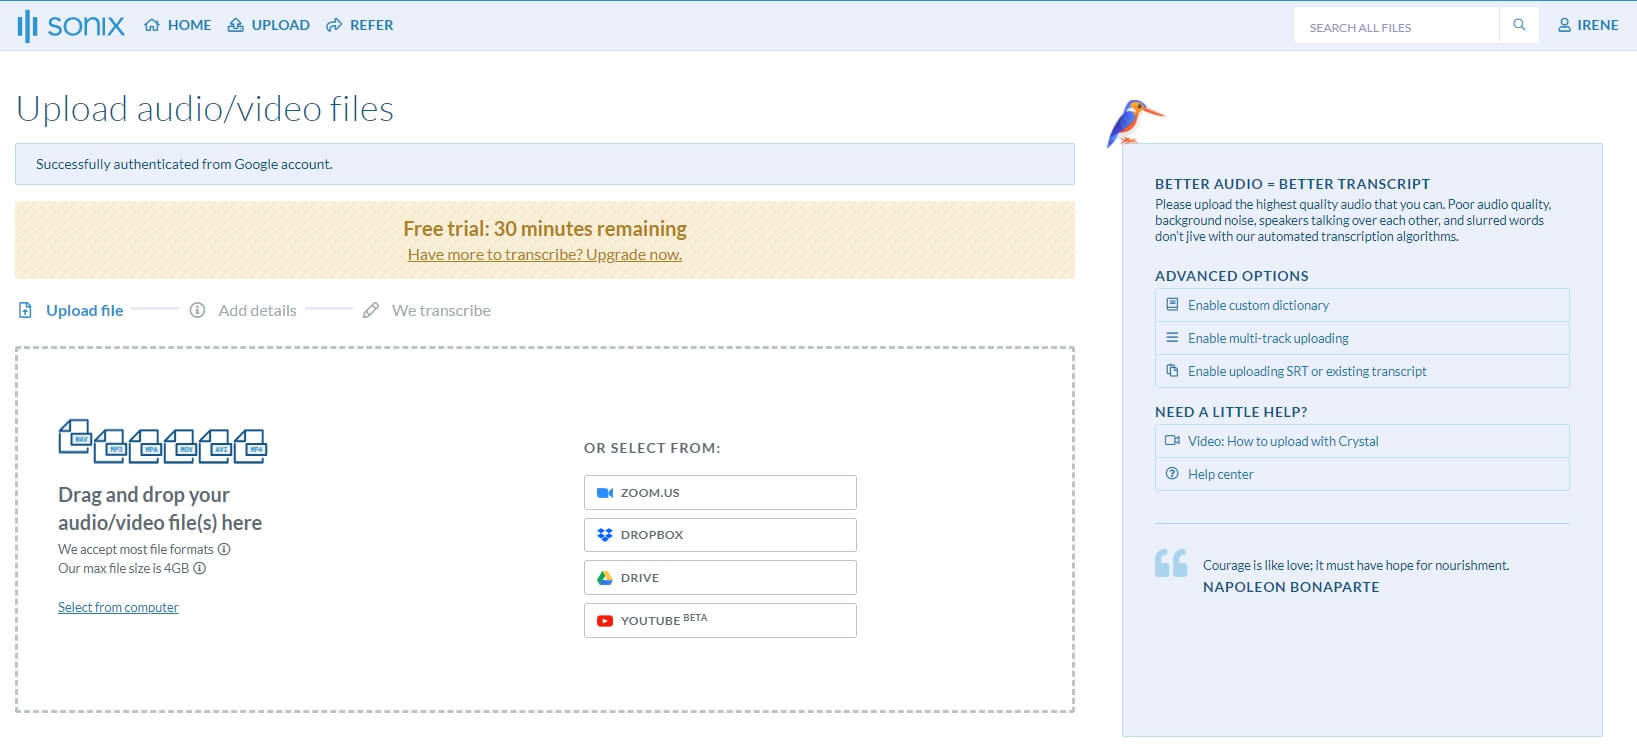
For individuals who have premium quality audio transcription, a tool by the name of Sonix is the right choice for you. This tool enables users to turn all types of YouTube videos into text. All they have to do is simply download the YouTube video they need to transcribe and then upload it to the online interface. From there, this software uses its comprehensive text reader to convert the video to text. This platform supports more than 40 different language choice inputs and outputs. Users are allowed to transcribe up to five videos for free, then they must pay a subscription fee.
3. Otter
This video-to-text converter works best in real-time. Simply play the audio of a YouTube video and let Otter do its magic. In real-time it will convert audio into text. Moreover, if you would like to only convert some parts of the audio to text, that is possible with this tool as well.
All you need to do is play the audio accordingly and the text will automatically generate itself. The AVI (Ambient Voice Intelligence) of this tool allows it to accurately understand what the audio is saying to transcribe the video. While many do find this tool handy, learning how to use it can be a tiny bit tedious and confusing.
Note: Currently, Otter doesn’t support uploading YouTube video link, you may need to download the YouTube video first and then upload it from desktop.
4. oTranscribe
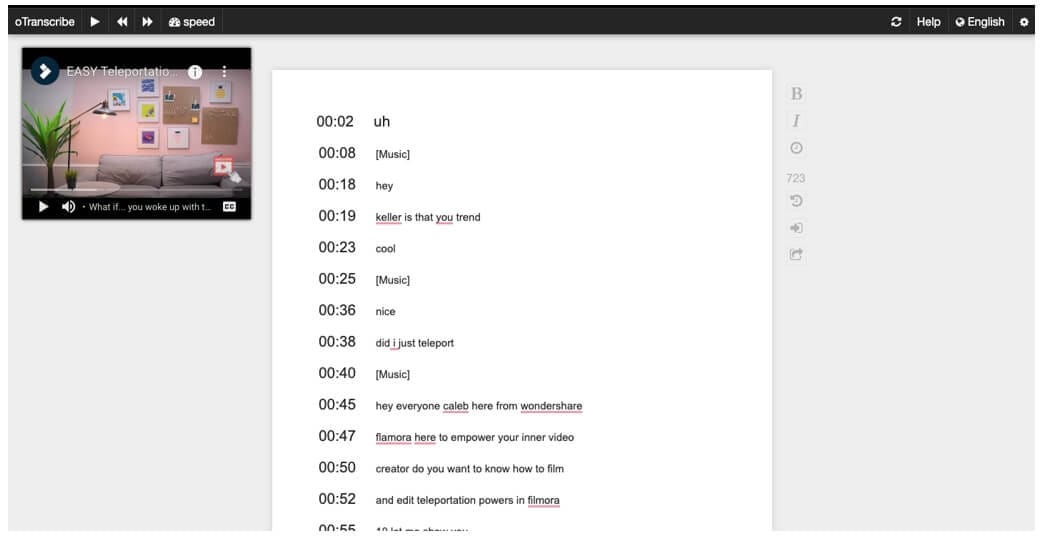
This online transcription tool is extremely easy and convenient to use - and it is entirely free! All you need to do is head on over to its homepage and drop a link to the YouTube video that you would like to transcribe. Then from there, you can access the video and text all at the same time, without having to switch between videos.
The best part is that you can record and translate text according to your need, cut and miss parts that you do not require. This tool supports all file formats which just adds to convince. The only challenge is that it will only accept videos and translate them into English.
5. Go Transcribe
If you are looking to convert any sort of video format to text, then Go Transcribe might just be the tool that you require. This tool makes use of the latest voice technology to convert videos to text - and gives you the output in the form of an SRT, PDF, or DOC, which are all editable. All you need to do is upload the video in one of the formats below,
- 3PG
- FLV
- AVI
- MOV
- MPG
- MPEG
Then simply click the processing options and your video will be generated into a text file within minutes. However, this software may require a subscription fee.
files. Moreover, the output format is PDF which individuals cannot edit unless they convert the PDF to a TXT file online using different software.
6. Trint
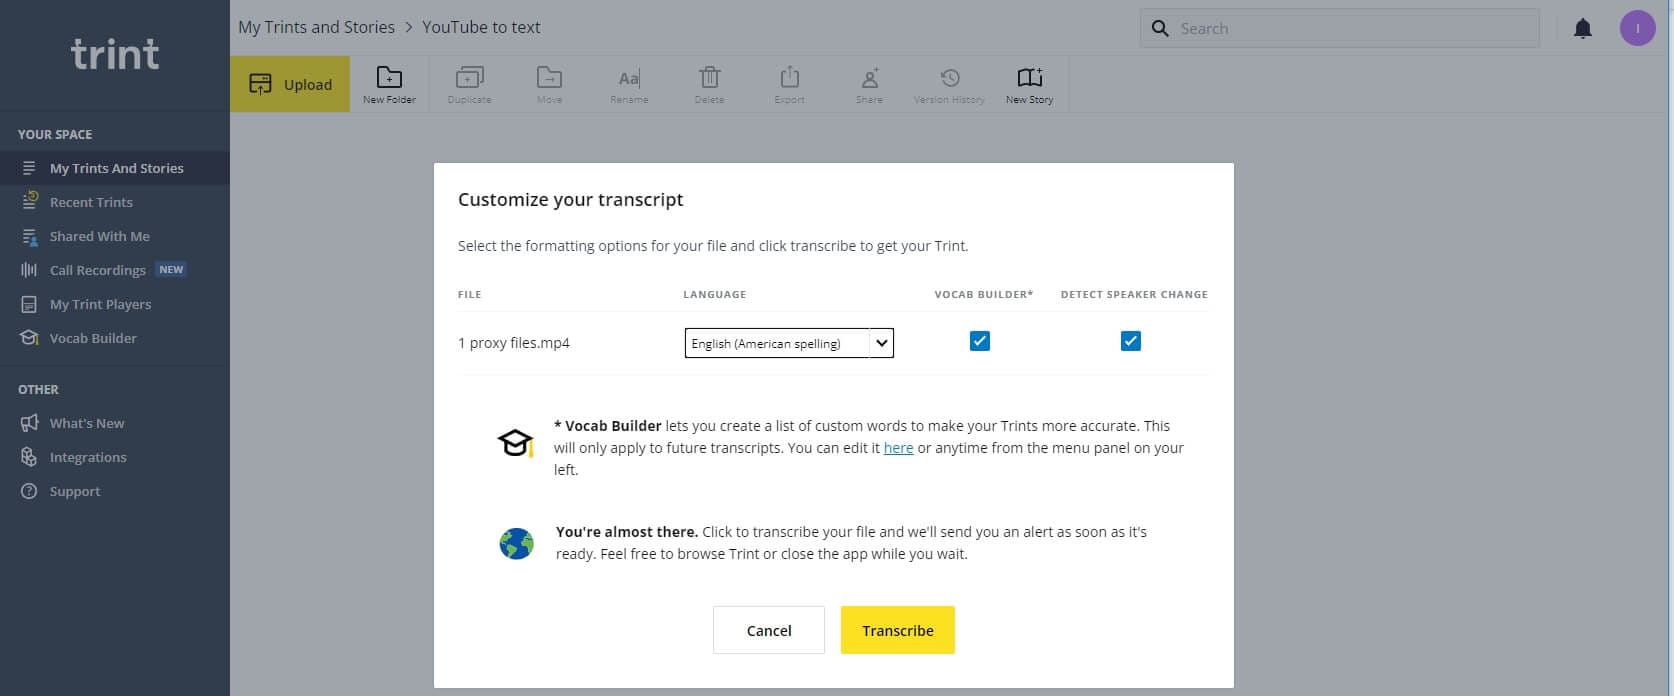
Turn your speech to text through magic - or in other words, through state-of-the-art technology. Trint is an online transcription tool that allows individuals to turn video files into text. People can download and upload numerous video files at once and turn them into text documents.
This is an extremely handy tool to have considering it comes with numerous options such as editing the text, only inducing certain parts of the video in the text, and so much more. This tool only has one shortcoming, it only accepts English language videos.
7. Happy Scribe
If you are wondering how, you will convert YouTube video to text, then we have just the answer for you. Make use of Happy Scribe to automatically transcribe all sorts of audio and video into comprehensive and readable text. You can get numerous features and options in this tool such as advanced grammatical functions as well as timestamps.
If your videos are in different languages, do not worry because Happy Scribe has more than 60 language formats. However, to make use of added features, individuals will need to pay for the tool and upgrade to the pro version.
8. 360Converter
360Converter, as its name suggests is a video to text converter which individuals can use online and offline. All you need to do is download and then upload the YouTube video that you would like to transcribe and the tool will automatically generate the text for you. The supported video formats include 3GP, MP4, MOV, AVI, and many more. This tool uses advanced technology to get accurate language and grammatical transcriptions, so everything is word to word - the exact same as the video. While this tool is extremely user-friendly, many state that it takes a while to process videos to text.
Key Takeaways!
Technology has come a long way which is why we now have numerous options available online to help us convert YouTube videos to text in less than 5-10 minutes. All you have to do is upload the file and let the tool do its magic! You can transcribe in different languages, segments, and so much more now!
Transform Long Videos into Short Ones Instantly
Turn long videos into viral clips. Effortlessly transform lengthy videos into engaging, shareable clips.

02 Best YouTube Video to Text Converters Online
Part 1: How to Convert YouTube Video to Texts by Copy/Paste YouTube Transcript
When people think “Get the transcript from YouTube” they believe it is going to be a daunting and lengthy procedure. Well, let us tell you that it is certainly not! All you have to do is follow the steps outlined below to transcribe YouTube video to text - that too through the YouTube player itself.
First what you have to do is open YouTube and select any video for which you require the transcript. Once you have selected the video, wait for it to load and then click the three dots located beneath the video, as shown in the image below.
Following that, a menu will appear, just select the “Open Transcript” option and the transcription will open on the top right side of your screen.
Simply select the entire transcript using your mouse, then copy and paste it into a new Word Document or Google Document. If you don’t need the timestamps, you can click the three-dot icon to toggle timestamps off.
By following the steps outlined above, you can convert a YouTube video to text in less than five seconds!
Part 2: Best YouTube Video to Text Converters Online
Aside from the basic method of getting the transcription from YouTube itself, many individuals make use of effective YouTube video to text converter online free. This allows them to get the complete video into text, small parts of the video to text, as well as options to convert the text into multiple languages. Below are some of the best software to convert YouTube video to text online.
1. Inqscribe
This high-quality cross-platform tool allows users to transcribe audio and video files into text . Whether it is a meeting recording or a YouTube video - you can convert them all to text. Making use of this free online software is extremely easy, all one has to do is just upload their file and click the process. Then the system will automatically transcribe the video into a text document for you. The software is uni code so all file formats are supported such as txt, XML, HTML, WebVTT, and more. The only drawback of this online software is that video files that are larger than a certain limit cannot be accepted.
2. Sonix
For individuals who have premium quality audio transcription, a tool by the name of Sonix is the right choice for you. This tool enables users to turn all types of YouTube videos into text. All they have to do is simply download the YouTube video they need to transcribe and then upload it to the online interface. From there, this software uses its comprehensive text reader to convert the video to text. This platform supports more than 40 different language choice inputs and outputs. Users are allowed to transcribe up to five videos for free, then they must pay a subscription fee.
3. Otter
This video-to-text converter works best in real-time. Simply play the audio of a YouTube video and let Otter do its magic. In real-time it will convert audio into text. Moreover, if you would like to only convert some parts of the audio to text, that is possible with this tool as well.
All you need to do is play the audio accordingly and the text will automatically generate itself. The AVI (Ambient Voice Intelligence) of this tool allows it to accurately understand what the audio is saying to transcribe the video. While many do find this tool handy, learning how to use it can be a tiny bit tedious and confusing.
Note: Currently, Otter doesn’t support uploading YouTube video link, you may need to download the YouTube video first and then upload it from desktop.
4. oTranscribe
This online transcription tool is extremely easy and convenient to use - and it is entirely free! All you need to do is head on over to its homepage and drop a link to the YouTube video that you would like to transcribe. Then from there, you can access the video and text all at the same time, without having to switch between videos.
The best part is that you can record and translate text according to your need, cut and miss parts that you do not require. This tool supports all file formats which just adds to convince. The only challenge is that it will only accept videos and translate them into English.
5. Go Transcribe
If you are looking to convert any sort of video format to text, then Go Transcribe might just be the tool that you require. This tool makes use of the latest voice technology to convert videos to text - and gives you the output in the form of an SRT, PDF, or DOC, which are all editable. All you need to do is upload the video in one of the formats below,
- 3PG
- FLV
- AVI
- MOV
- MPG
- MPEG
Then simply click the processing options and your video will be generated into a text file within minutes. However, this software may require a subscription fee.
files. Moreover, the output format is PDF which individuals cannot edit unless they convert the PDF to a TXT file online using different software.
6. Trint
Turn your speech to text through magic - or in other words, through state-of-the-art technology. Trint is an online transcription tool that allows individuals to turn video files into text. People can download and upload numerous video files at once and turn them into text documents.
This is an extremely handy tool to have considering it comes with numerous options such as editing the text, only inducing certain parts of the video in the text, and so much more. This tool only has one shortcoming, it only accepts English language videos.
7. Happy Scribe
If you are wondering how, you will convert YouTube video to text, then we have just the answer for you. Make use of Happy Scribe to automatically transcribe all sorts of audio and video into comprehensive and readable text. You can get numerous features and options in this tool such as advanced grammatical functions as well as timestamps.
If your videos are in different languages, do not worry because Happy Scribe has more than 60 language formats. However, to make use of added features, individuals will need to pay for the tool and upgrade to the pro version.
8. 360Converter
360Converter, as its name suggests is a video to text converter which individuals can use online and offline. All you need to do is download and then upload the YouTube video that you would like to transcribe and the tool will automatically generate the text for you. The supported video formats include 3GP, MP4, MOV, AVI, and many more. This tool uses advanced technology to get accurate language and grammatical transcriptions, so everything is word to word - the exact same as the video. While this tool is extremely user-friendly, many state that it takes a while to process videos to text.
Key Takeaways!
Technology has come a long way which is why we now have numerous options available online to help us convert YouTube videos to text in less than 5-10 minutes. All you have to do is upload the file and let the tool do its magic! You can transcribe in different languages, segments, and so much more now!
Transform Long Videos into Short Ones Instantly
Turn long videos into viral clips. Effortlessly transform lengthy videos into engaging, shareable clips.
Ultimate Editing Software Listings
The Best Video Editors for YouTube

Richard Bennett
Oct 26, 2023• Proven solutions
Check out our most updated post on this topic: Top 10 Video Editors for YouTube in 2018.
Part 1: Filmora

Filmora ’s intuitive interface was designed to make video editing a fast and simple process. The less effort you have to put into the technical side of editing, the more energy you can devote to being creative.
In the main screen of Filmora, you are never more than a couple clicks away from any basic, advanced, or creative feature you want to use. The built-in music library, a wide selection of text and title options, filters, overlays, animated elements, and split-screen options can all be accessed from a clearly labeled toolbar above the timeline.
Besides fun things like filters, Filmora also has powerful tools like advanced color grading and an audio equalizer. Either of these features can be accessed in two clicks from the main editing screen. With your audio or video clip selected, simply click the editing icon and then either Advanced (for expanded color editing options) or Customize (for the audio equalizer).
Even features like picture-in-picture (PIP) and green screen are easy to use in Filmora. The PIP tracks are right under the main video track in your timeline. Although there is only one when you start a project, you can have up to ten. These PIP tracks can be used to layer photos and videos over top of each other. One of the most popular uses for the PIP track is facecam videos. After you drag your facecam footage into the PIP track, you can easily shrink it and move it to the corner of your main video.
The green screen has its own designated icon on the main toolbar. Simply select a clip or image in one of your PIP tracks and click it to access the feature.
Filmora is always adding new features to make editing even easier for online video creators. A few of the other tools included in Filmora are speed control, text customization, tilt-shift, ripple delete, and an audio mixer.


Part 2: Video Editing Software Comparisons
Here is a ‘top 4’ list of other popular video editors. The list will discuss their best features and how they measure up to Filmora.
Section 1: PC Video Editors
Here are two of the most popular editing programs for Windows computers:
Windows Movie Maker

Image source: intowindows
PC users can download Windows Movie Maker for free, which has made it a popular choice among video creators that are just starting out. Movie Maker has different timeline tracks for things like videos and music, and it is very easy to trim or cut up all of your media clips. The ability to sharpen some of your blurrier images, speed control, and a simple title generator, and some basic transitions are some of the program’s more noteworthy features.
Movie Maker does not come close to matching Filmora’s range of features, but it is easy to use. It could be a good option for video creators who have no room in their budget for paid software. Videos made in Movie Maker will be simple, but that is all some people need.
Vegas Movie Studio
Vegas Movie Studio, which used to be Sony Vegas, is a big step up from Movie Maker. While editing your clips, you can adjust their brightness, contrast, and color balance. On the audio side of things, Vegas has a great audio restoration tool you can use to get rid of unwanted background noises.
Although it does not have filters, overlays, and animated elements like Filmora, Vegas does have some very modern-looking titles and transition effects.
The biggest advantage that Filmora has over Vegas is that it is a lot easier to use. Vegas has some great features, but accessing and using them is not something you can just jump into doing. Filmora is so intuitive that most users can just open it up and start applying effects.
Vegas is very reasonably priced at $49.95 USD, but it is only $10 more for the ease and effect variety of Filmora.
Section 2: Mac Video Editors
Here are two of the most popular video editors for the Mac OS:
iMovie
iMovie comes free with Mac computers, and it is a huge step up from Windows Movie Maker. It has some really nice audio editing tools, like an equalizer and the ability to set fade in and fade out times (which Filmora also has). When you are editing video clips, iMovie provides you with a stabilization tool, speed controls, and even some filters and overlays. There are text and title options available as well, although they are very basic.
The main difference between Filmora and iMovie is variety. Filmora has a huge range of titles in different styles; iMovie has everyday fonts with all the traditional credit/title animations. iMovie has close to the same amount of features as Filmora, but there is always less variety in those features, and they tend to feel dated.
The main difference between iMovie and every other editor on this list is the layout. The timeline is located in the top left portion of the screen, not stretched across the bottom, and the clips/sounds do not sit in different tracks. The iMovie interface is not actually very complicated, but it will be an adjustment for anybody used to a more traditional editing experience.
Final Cut Pro X
Final Cut Pro is Apple’s attempt at a professional-grade editing program. It is much more advanced than iMovie and offers 64-bit architecture and background rendering. Background rendering means that your imported clips are prepared for playback before you actually move them into your timeline, making the editing process a lot faster.
Final Cut Pro also boasts a huge selection of editing tools.
Like iMovie, Final Cut Pro does not use a traditional timeline. This will make it easier to learn for users upgrading from iMovie, but potentially more difficult for users coming from any other program. Final Cut Pro would be competition for Adobe Premiere if it were available on anything except the latest Mac OS.
Final Cut Pro X costs $300, making it a significant investment.
Section 3: Online Video Editors
WeVideo
WeVideo is a fairly simple cloud-based video editor. Its most useful feature is that it gives your team the ability to edit collaboratively. Multiple editors can upload footage and create their own edits of the project.
WeVideo has all of the most basic editing features – the abilities to trim clips, add transitions, and give your project a soundtrack. Other than the potential for collaboration, though, it has nothing that free programs like iMovie, and even Windows Movie Maker, do not have.
There are a few different pricing options for WeVideo. You can use it for free, but your storage space and the number of features you have access to will be very limited. Your videos will also be watermarked. Also, both the free and $19 packages limit your video resolution to 720p. You will need to pay at least $39 for 1080p, and it will cost you $69 to get rid of all the storage limits.
If you are going to pay $69 for video editing software, you are much better off using Filmora.
Section 4: The Pro-Choice
Adobe Premiere
Adobe Premiere is a professional editing software. In terms of functionality, it has every program on this list, including Filmora, beat. It has very powerful video and audio editing tools, and the program can be customized to suit the needs of particular projects.
Because it is designed for professionals and veteran editors, Premiere is far from a simple program. If you have not edited a video before, or are used to a simpler program, it will take you a long time to become good at using Premiere (it might be a good idea to find an online course).
It does have a few features designed to save time, such as an automatic audio syncing tool and the ability to apply changes you have made to one clip across multiple other clips. The Premiere is probably the best program for professional video editors, but Filmora’s ease of use gives it an edge with amateur video creators.
Conclusion
Filmora is the best video editing software for YouTubers and other online video creators. Windows Movie Maker and iMovie are decent basic programs for creators on a budget, and Premiere is an excellent program for professionals, but if your goal is to create awesome videos for YouTube, then Filmora is the best tool for the job.
If you want to find a video editing solution that empowers your imagination and creativity yet takes less effort, please try this robust and user-friendly video editing software Wondershare Filmora. It provides special effects, stock photo & video, sound library, etc., which will definitely enhance your productivity and helps to make money by making videos much accessible.
Richard Bennett
Richard Bennett is a writer and a lover of all things video.
Follow @Richard Bennett
Richard Bennett
Oct 26, 2023• Proven solutions
Check out our most updated post on this topic: Top 10 Video Editors for YouTube in 2018.
Part 1: Filmora
Filmora ’s intuitive interface was designed to make video editing a fast and simple process. The less effort you have to put into the technical side of editing, the more energy you can devote to being creative.
In the main screen of Filmora, you are never more than a couple clicks away from any basic, advanced, or creative feature you want to use. The built-in music library, a wide selection of text and title options, filters, overlays, animated elements, and split-screen options can all be accessed from a clearly labeled toolbar above the timeline.
Besides fun things like filters, Filmora also has powerful tools like advanced color grading and an audio equalizer. Either of these features can be accessed in two clicks from the main editing screen. With your audio or video clip selected, simply click the editing icon and then either Advanced (for expanded color editing options) or Customize (for the audio equalizer).
Even features like picture-in-picture (PIP) and green screen are easy to use in Filmora. The PIP tracks are right under the main video track in your timeline. Although there is only one when you start a project, you can have up to ten. These PIP tracks can be used to layer photos and videos over top of each other. One of the most popular uses for the PIP track is facecam videos. After you drag your facecam footage into the PIP track, you can easily shrink it and move it to the corner of your main video.
The green screen has its own designated icon on the main toolbar. Simply select a clip or image in one of your PIP tracks and click it to access the feature.
Filmora is always adding new features to make editing even easier for online video creators. A few of the other tools included in Filmora are speed control, text customization, tilt-shift, ripple delete, and an audio mixer.
Part 2: Video Editing Software Comparisons
Here is a ‘top 4’ list of other popular video editors. The list will discuss their best features and how they measure up to Filmora.
Section 1: PC Video Editors
Here are two of the most popular editing programs for Windows computers:
Windows Movie Maker
Image source: intowindows
PC users can download Windows Movie Maker for free, which has made it a popular choice among video creators that are just starting out. Movie Maker has different timeline tracks for things like videos and music, and it is very easy to trim or cut up all of your media clips. The ability to sharpen some of your blurrier images, speed control, and a simple title generator, and some basic transitions are some of the program’s more noteworthy features.
Movie Maker does not come close to matching Filmora’s range of features, but it is easy to use. It could be a good option for video creators who have no room in their budget for paid software. Videos made in Movie Maker will be simple, but that is all some people need.
Vegas Movie Studio
Vegas Movie Studio, which used to be Sony Vegas, is a big step up from Movie Maker. While editing your clips, you can adjust their brightness, contrast, and color balance. On the audio side of things, Vegas has a great audio restoration tool you can use to get rid of unwanted background noises.
Although it does not have filters, overlays, and animated elements like Filmora, Vegas does have some very modern-looking titles and transition effects.
The biggest advantage that Filmora has over Vegas is that it is a lot easier to use. Vegas has some great features, but accessing and using them is not something you can just jump into doing. Filmora is so intuitive that most users can just open it up and start applying effects.
Vegas is very reasonably priced at $49.95 USD, but it is only $10 more for the ease and effect variety of Filmora.
Section 2: Mac Video Editors
Here are two of the most popular video editors for the Mac OS:
iMovie
iMovie comes free with Mac computers, and it is a huge step up from Windows Movie Maker. It has some really nice audio editing tools, like an equalizer and the ability to set fade in and fade out times (which Filmora also has). When you are editing video clips, iMovie provides you with a stabilization tool, speed controls, and even some filters and overlays. There are text and title options available as well, although they are very basic.
The main difference between Filmora and iMovie is variety. Filmora has a huge range of titles in different styles; iMovie has everyday fonts with all the traditional credit/title animations. iMovie has close to the same amount of features as Filmora, but there is always less variety in those features, and they tend to feel dated.
The main difference between iMovie and every other editor on this list is the layout. The timeline is located in the top left portion of the screen, not stretched across the bottom, and the clips/sounds do not sit in different tracks. The iMovie interface is not actually very complicated, but it will be an adjustment for anybody used to a more traditional editing experience.
Final Cut Pro X
Final Cut Pro is Apple’s attempt at a professional-grade editing program. It is much more advanced than iMovie and offers 64-bit architecture and background rendering. Background rendering means that your imported clips are prepared for playback before you actually move them into your timeline, making the editing process a lot faster.
Final Cut Pro also boasts a huge selection of editing tools.
Like iMovie, Final Cut Pro does not use a traditional timeline. This will make it easier to learn for users upgrading from iMovie, but potentially more difficult for users coming from any other program. Final Cut Pro would be competition for Adobe Premiere if it were available on anything except the latest Mac OS.
Final Cut Pro X costs $300, making it a significant investment.
Section 3: Online Video Editors
WeVideo
WeVideo is a fairly simple cloud-based video editor. Its most useful feature is that it gives your team the ability to edit collaboratively. Multiple editors can upload footage and create their own edits of the project.
WeVideo has all of the most basic editing features – the abilities to trim clips, add transitions, and give your project a soundtrack. Other than the potential for collaboration, though, it has nothing that free programs like iMovie, and even Windows Movie Maker, do not have.
There are a few different pricing options for WeVideo. You can use it for free, but your storage space and the number of features you have access to will be very limited. Your videos will also be watermarked. Also, both the free and $19 packages limit your video resolution to 720p. You will need to pay at least $39 for 1080p, and it will cost you $69 to get rid of all the storage limits.
If you are going to pay $69 for video editing software, you are much better off using Filmora.
Section 4: The Pro-Choice
Adobe Premiere
Adobe Premiere is a professional editing software. In terms of functionality, it has every program on this list, including Filmora, beat. It has very powerful video and audio editing tools, and the program can be customized to suit the needs of particular projects.
Because it is designed for professionals and veteran editors, Premiere is far from a simple program. If you have not edited a video before, or are used to a simpler program, it will take you a long time to become good at using Premiere (it might be a good idea to find an online course).
It does have a few features designed to save time, such as an automatic audio syncing tool and the ability to apply changes you have made to one clip across multiple other clips. The Premiere is probably the best program for professional video editors, but Filmora’s ease of use gives it an edge with amateur video creators.
Conclusion
Filmora is the best video editing software for YouTubers and other online video creators. Windows Movie Maker and iMovie are decent basic programs for creators on a budget, and Premiere is an excellent program for professionals, but if your goal is to create awesome videos for YouTube, then Filmora is the best tool for the job.
If you want to find a video editing solution that empowers your imagination and creativity yet takes less effort, please try this robust and user-friendly video editing software Wondershare Filmora. It provides special effects, stock photo & video, sound library, etc., which will definitely enhance your productivity and helps to make money by making videos much accessible.
Richard Bennett
Richard Bennett is a writer and a lover of all things video.
Follow @Richard Bennett
Also read:
- [Updated] 9 Powerful Applications for Saving YouTube Content on Android
- [New] Enhancing Your YouTube Reach with FameBit Ad Sponsorships
- The Essentials for Transforming Your Google Meet Into Youtube Live
- [New] Directing Twitch Viewers Seamlessly to YouTube Channel
- [Updated] Building Connections Through Collaborative Playlists
- In 2024, Cooking Crusaders YouTube Stars Serving Up Deliciousness
- Unique Video Monikers Brainstorming Insights
- Next-Level Shooting Lens Selections for Online Creators
- Simply Save Your Streamed Content with These Premium Tools
- 2024 Approved Boost Your Gaming Presence with These Top 14 Video Ideas
- Future Pioneers 8 Rapidly Expanding Video Ventures
- [New] Essential Choices Top 10 Best Video Editing Software (Free, 2023)
- Elevate Play Button Visuals Vivid Neon Lines Added
- YouTube to WebM Top-Tier Conversion Applications Reviewed
- Behind-the-Camera Glory Spotlight on Top 10 Female YouTubers for 2024
- Does Artificial Engagement Damage YouTube Reputation for 2024
- [New] Dynamic Website Content Incorporating YouTube Playlists
- Converting Live Streamed YouTubes Into Animated GIF Formats
- [Updated] 5 Streamlined Methods for Mac Cam Recording
- 2024 Approved Amazon's Hottest TikTok Products - Essentials
- In 2024, How to use Pokemon Go Joystick on OnePlus Ace 2? | Dr.fone
- Updated In 2024, Trimming MP4 Content A Focus on Solo Soundtrack
- In 2024, Pokémon Go Cooldown Chart On Itel P55T | Dr.fone
- Hard Reset OnePlus Ace 3 in 3 Efficient Ways | Dr.fone
- [Updated] Screen Recording Simplified Review Insights for 2024
- [Updated] 2024 Approved Relax & Rhythm Discover 20 Country Songs That Promote Dance and Calm on TikTok
- Top 10 Professional 360 Degree Cameras -2023 Update
- Foundations of Frame and Frequency in Visual Media
- [Updated] In 2024, PS3 Gaming Reimagined Best Emulators of the Year
- Title: "Expertise in Action Leading Youtube Text-to-Video Devices"
- Author: Steven
- Created at : 2024-05-25 19:20:14
- Updated at : 2024-05-26 19:20:14
- Link: https://youtube-clips.techidaily.com/expertise-in-action-leading-youtube-text-to-video-devices/
- License: This work is licensed under CC BY-NC-SA 4.0.
