
Expert Tips for Removing Persistent Youtube Channels (Mobile/PC)
Expert Tips for Removing Persistent Youtube Channels (Mobile/PC)
How to Block YouTube Channels on Computer and Mobile Phones

Richard Bennett
Mar 27, 2024• Proven solutions
Anyone spending any time online recently might have come across something they regard as deplorable. YouTube consumes more than half of the internet’s users with its whopping 2 billion active monthly users. For all that might seem good on the humongous video sharing platform some of the most divisive of all human interactions happen on YouTube.
Now the question arises on how you can safeguard yourself and your family from the bad and inadequate content and how to block YouTube channels that create the toxic material.
In this article, we’ll go through how you can block YouTube channels and content creators that you consider will have bad effects on your mental health. You will learn:
- Part 1: How to block YouTube channels on a computer (Mac & Windows)
- Part 2: How to block YouTube channels on Mobile Phones (Android & iPhone)
- Part 3: How to block content on YouTube Kids
Part 1: How to block YouTube channels on a computer (Mac & Windows)
Blocking will prevent the user from trolling and bullying you or your channel subscribers. This will effectively prevent them to comment and interact with your video content. However, there is no way for you to prevent the bullies from watching your content you can at least prevent them from damaging your reputation, badmouthing, and inciting your active subscribers.
The process of blocking YouTube channels on a computer system is fairly simple and will only require a minute if you know the name of the user you want to block. Follow the steps below:
- 1. Log in to your YouTube account and look out for the account you want to block.
- 2. When you’re in the account head over to the About section. You can find it in the toolbar beneath the channel art or banner.
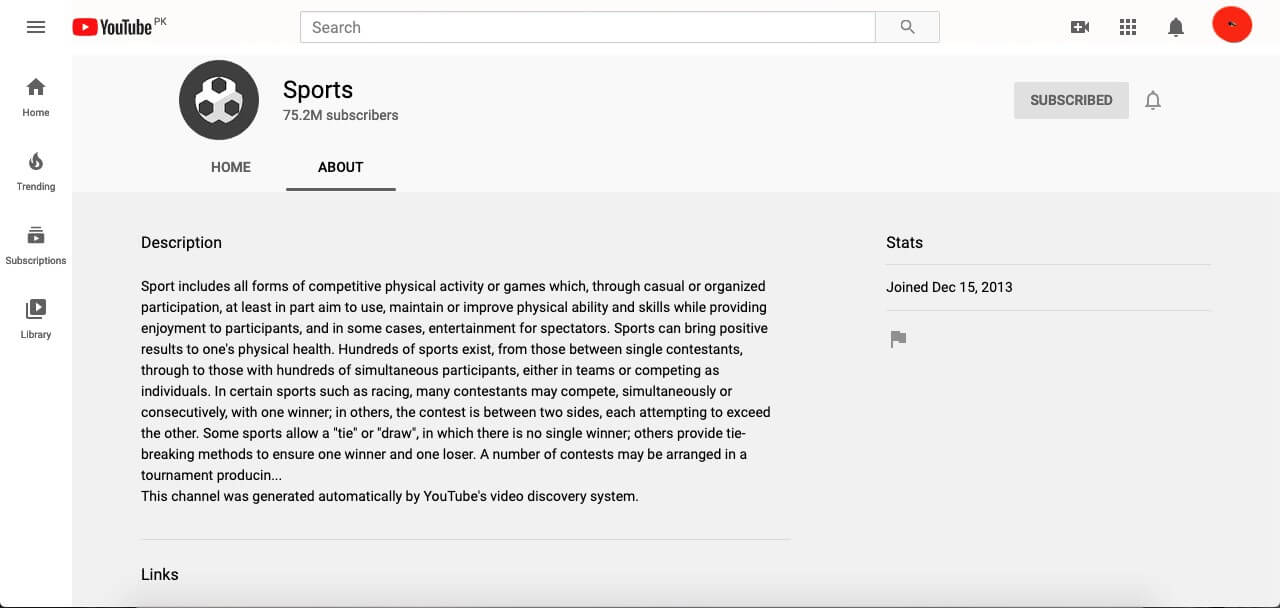
- 3. On the right-hand side right under the Stats, you will find a flag icon. Press the icon and it will show a drop-down menu, select Block user.
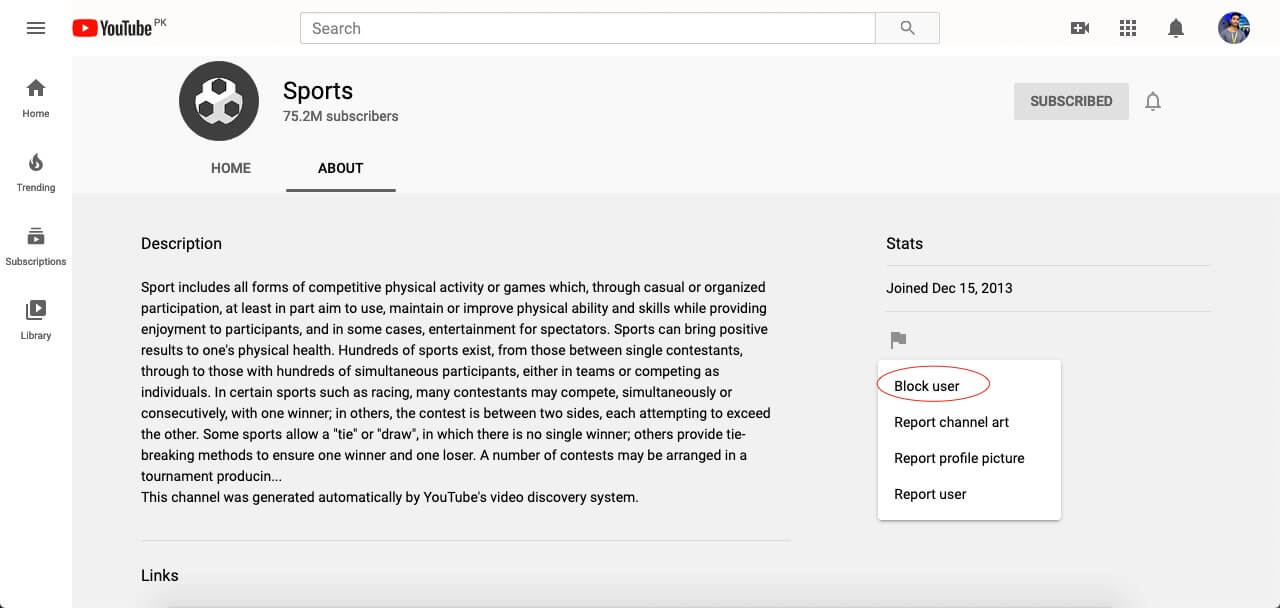
- 4. You will be prompted to confirm your selection, click Submit to confirm.

Part 2: How to block YouTube channels on Mobile Phones (Android & iPhone)
One can also block YouTube channels on mobile devices in the same manner as you would do it on the desktop computer. It will do the same effect and prevent bullying users from interacting with your content.
- 1. Sign in to your YouTube account on either YouTube’s Android or iPhone app.
- 2. Look around for the account or user you want to block.
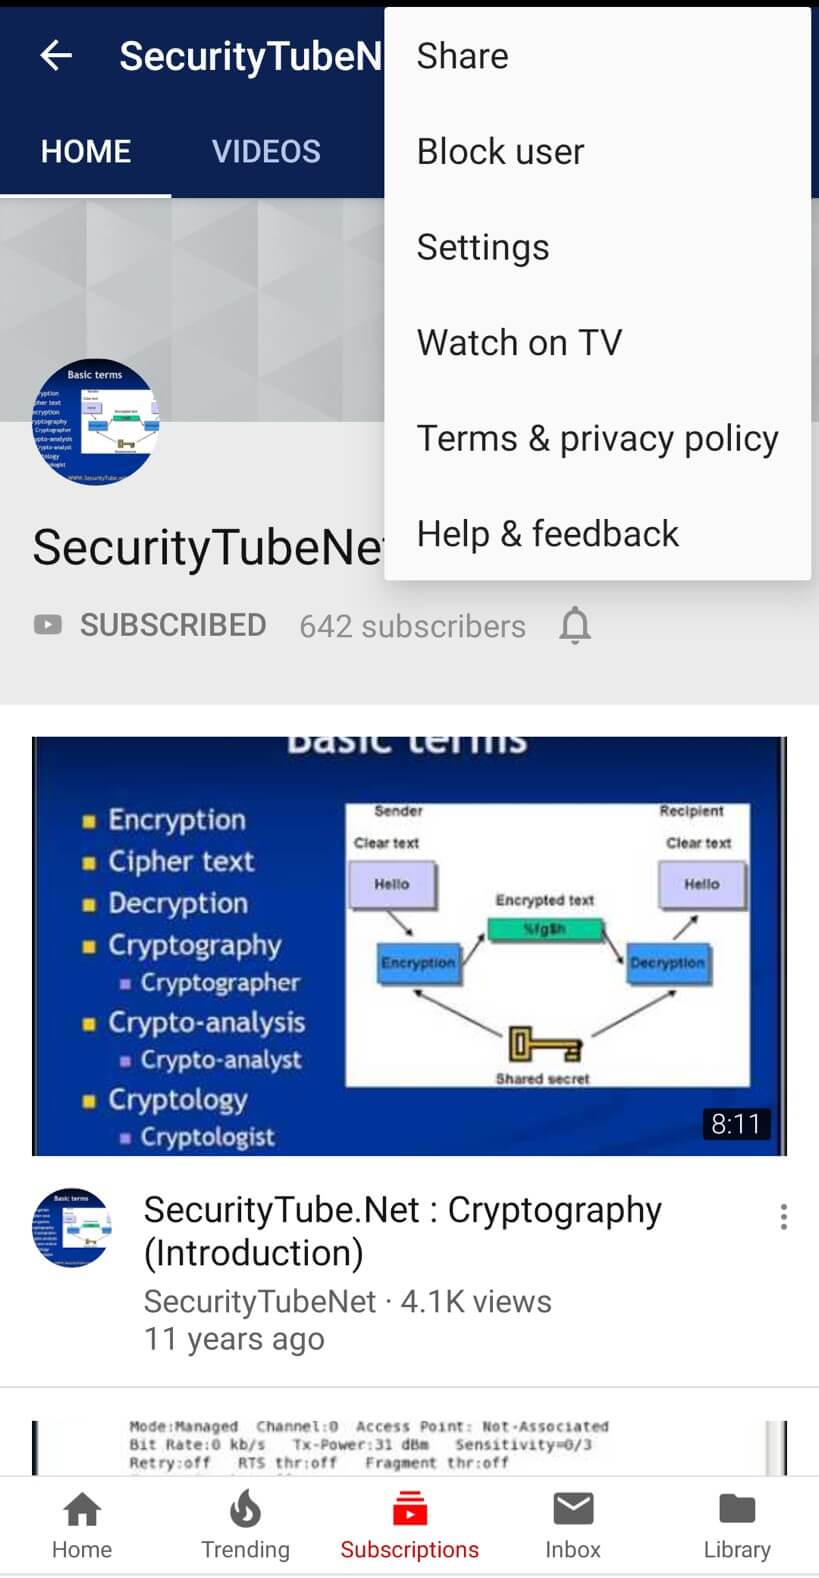
- 3. Open a particular account that you intend to block and go to their main account page.

- 4. When you’re on the account page, open the menu at the top-right corner of the screen and tap Block user.
Part 3: Block content on YouTube kids
YouTube Kids is the alternative version of YouTube’s video service dedicated and designed for kids. It’s entirely for children with all the content curated for kids’ education, family-friendly videos, and channels surrounding kid’s liking. The interface features colorful large images, and icons with five categories to explore from.
The app filters all the content allowing only safe content and parental control to watch their children’s online activity. The app prevents commenting and any kind of cyber bullying-related issues. YouTube Kids need to be set up by an adult with singing into the app with their Google credentials. Parents can sign in and block channels or videos they don’t see fit for their children. Let us see how to block YouTube channels on YouTube kids.
- 1. Open the YouTube Kids app and tap on I’m a parent to set up the app.

- 2. Sign in with your preferred Google account.

- 3. Here you’ll see a button Send Parental Consent Email, press it.
- 4. You’ll get an activation code on your email address.
- 5. Come back to the application and enter the code.
Now as you’re signed in as a parent you can block channels and specific content.
I. Block on Home screen
- 1. On the Home screen press the dotted menu next to the video

- 2. In the menu list, you will see Block this video, tap it.
- 3. You’ll be asked to enter the numbers written on the screen or a custom passcode.

II. Block from Watch Page
- 1. On the Watch Page tap the dotted More option at the top right corner of the video.

- 2. Press the Block option.
- 3. A dialog box will appear with two options, Block this video for blocking only this particular video or Block this channel to block the entire channel associated with the video.

- 4. Select any of the two options and then press Block again.
- 5. Enter the numbers you calculate from the presented numbers or a custom passcode.

Conclusion
Every minute more than 300 hours of video content is uploaded on to the YouTube databases while 5 billion videos are watched every day. This only shows the metrics a content creator and a user have to deal with. Content creators need to protect themselves from the unending trolls and scams that hit every other channel and affect its userbase. While kids and sensitive portions of the human population have to maintain a safe distance from damaging and provoking content that circulates on the platform. To safeguard both ends of the platform I made this guide to streamline the process of how to block YouTube channels and videos from affecting your happy life.
Richard Bennett
Richard Bennett is a writer and a lover of all things video.
Follow @Richard Bennett
Richard Bennett
Mar 27, 2024• Proven solutions
Anyone spending any time online recently might have come across something they regard as deplorable. YouTube consumes more than half of the internet’s users with its whopping 2 billion active monthly users. For all that might seem good on the humongous video sharing platform some of the most divisive of all human interactions happen on YouTube.
Now the question arises on how you can safeguard yourself and your family from the bad and inadequate content and how to block YouTube channels that create the toxic material.
In this article, we’ll go through how you can block YouTube channels and content creators that you consider will have bad effects on your mental health. You will learn:
- Part 1: How to block YouTube channels on a computer (Mac & Windows)
- Part 2: How to block YouTube channels on Mobile Phones (Android & iPhone)
- Part 3: How to block content on YouTube Kids
Part 1: How to block YouTube channels on a computer (Mac & Windows)
Blocking will prevent the user from trolling and bullying you or your channel subscribers. This will effectively prevent them to comment and interact with your video content. However, there is no way for you to prevent the bullies from watching your content you can at least prevent them from damaging your reputation, badmouthing, and inciting your active subscribers.
The process of blocking YouTube channels on a computer system is fairly simple and will only require a minute if you know the name of the user you want to block. Follow the steps below:
- 1. Log in to your YouTube account and look out for the account you want to block.
- 2. When you’re in the account head over to the About section. You can find it in the toolbar beneath the channel art or banner.
- 3. On the right-hand side right under the Stats, you will find a flag icon. Press the icon and it will show a drop-down menu, select Block user.
- 4. You will be prompted to confirm your selection, click Submit to confirm.
Part 2: How to block YouTube channels on Mobile Phones (Android & iPhone)
One can also block YouTube channels on mobile devices in the same manner as you would do it on the desktop computer. It will do the same effect and prevent bullying users from interacting with your content.
- 1. Sign in to your YouTube account on either YouTube’s Android or iPhone app.
- 2. Look around for the account or user you want to block.
- 3. Open a particular account that you intend to block and go to their main account page.
- 4. When you’re on the account page, open the menu at the top-right corner of the screen and tap Block user.
Part 3: Block content on YouTube kids
YouTube Kids is the alternative version of YouTube’s video service dedicated and designed for kids. It’s entirely for children with all the content curated for kids’ education, family-friendly videos, and channels surrounding kid’s liking. The interface features colorful large images, and icons with five categories to explore from.
The app filters all the content allowing only safe content and parental control to watch their children’s online activity. The app prevents commenting and any kind of cyber bullying-related issues. YouTube Kids need to be set up by an adult with singing into the app with their Google credentials. Parents can sign in and block channels or videos they don’t see fit for their children. Let us see how to block YouTube channels on YouTube kids.
- 1. Open the YouTube Kids app and tap on I’m a parent to set up the app.
- 2. Sign in with your preferred Google account.
- 3. Here you’ll see a button Send Parental Consent Email, press it.
- 4. You’ll get an activation code on your email address.
- 5. Come back to the application and enter the code.
Now as you’re signed in as a parent you can block channels and specific content.
I. Block on Home screen
- 1. On the Home screen press the dotted menu next to the video
- 2. In the menu list, you will see Block this video, tap it.
- 3. You’ll be asked to enter the numbers written on the screen or a custom passcode.
II. Block from Watch Page
- 1. On the Watch Page tap the dotted More option at the top right corner of the video.
- 2. Press the Block option.
- 3. A dialog box will appear with two options, Block this video for blocking only this particular video or Block this channel to block the entire channel associated with the video.
- 4. Select any of the two options and then press Block again.
- 5. Enter the numbers you calculate from the presented numbers or a custom passcode.
Conclusion
Every minute more than 300 hours of video content is uploaded on to the YouTube databases while 5 billion videos are watched every day. This only shows the metrics a content creator and a user have to deal with. Content creators need to protect themselves from the unending trolls and scams that hit every other channel and affect its userbase. While kids and sensitive portions of the human population have to maintain a safe distance from damaging and provoking content that circulates on the platform. To safeguard both ends of the platform I made this guide to streamline the process of how to block YouTube channels and videos from affecting your happy life.
Richard Bennett
Richard Bennett is a writer and a lover of all things video.
Follow @Richard Bennett
The Ultimate Checklist for Post-Editing & Uploading Your 360 Vids on YouTube
360 Video Editors: How to Upload 360 Video to YouTube
Richard Bennett
Mar 27, 2024• Proven solutions
360 degree videos have become incredibly popular on the Internet. Not only do they give people a complete look at a scene, but they also allow for a lot of artistic freedom. Those who are using VR-capable devices can get an even more immersive experience. It is why many content creators want to learn about the best 360 video editor they can use on their computers.
Here is a look at the 5 best 360 video converter and editor programs that you can use on your Windows or Mac computer.
Part 1: 5 Best 360 Video Editor for You
1. Movavi
Movavi is an affordable 360 degree video editor that makes it easy for you to create, edit and share these videos online. You can even add filters, titles and transitions to your videos, while soundtrack addition is also possible.
You can use the preview window in the program to see how your video will look if it is published as is. Plus you can use the software with both Windows and Mac, depending on the version that you download.
Pros:
- Works with all mainstream video formats
- Features support for 4K videos
- Includes color adjustment and picture in picture, even in 360 videos
- Speed adjustment capabilities

2. Premiere Pro
Adobe Premiere Pro CC is seen by many as the leading product that you can get if you want to edit high quality videos, including 360 degree content.
Any type of video format will be compatible. You should have no issues editing different segments of the content that you are creating, as Premiere Pro CC is known for having very efficient workflow screens.
Pros:
- Tools to adjust color, audio and graphics
- Works seamlessly with other Adobe apps
- Possible to create and edit content on the go using smartphones

3. After Effects
If you are attempting to add many unique graphics and transitions to your videos, then you will want to use Adobe After Effects. Most would recommend that be combined with Premiere Pro to get the best experience.
After Effects is ideal for adding introductions, end credits, transitions and other effects to the content that you have produced. You can use it to take the videos that you have created to the next level.
Pros:
- Support for movie titles, introductions, transitions and end credits
- Possible to animate logos and characters
- Works with Adobe Premiere Pro

4. Final Cut Pro X
Mac users who want to use their laptop or desktop to edit 360 videos will be happy to know that it is supported in Final Cut Pro X. It is one of the fastest and most powerful programs to use on a Mac, as it is completely optimized for the operating system and hardware.
It is possible to edit and playback 360 videos using a VR headset. It allows creators to not only put in great videos and edit them, but also see how they look after various adjustments.
Pros:
- Advanced color grading options
- Full HDR and 4K support
- View files with VR headset
- Optimized for Macs
- Includes free trial
Cons:
- Little bit expensive

5. Molanis VR
Molanis VR is ideal for anyone who wants to create 360 video that will look incredible when viewed through VR glasses. It is one of the most flexible software options, as it is inexpensive and includes many great features.
IT is possible to trim, cut and fade, include text and images, add effects and make other changes to videos on the fly. The software is intuitive to use, which is great for beginners who have not edited much in the past.
Pros:
- Support for 4K videos
- Options to add text, images and effects to videos
- Can manage color, correct horizon and stabilize 360 videos
- Includes a tree trial
Cons:
- Not as many tutorials on how to use the software compared to bigger brands

Part 2: How to Upload 360 Degree Videos to YouTube
It is possible to add 360 degree videos onto YouTube . Using YouTube to promote such content is sensible, as it is one of the largest streaming video platforms in the world. These videos can be seen on any of the major browsers and on certain mobile devices. But they must be uploaded from a desktop.
YouTube 360 Video Specification
The first step of the process is to create a video that YouTube will approve as a 360 submission. Such a video should be either 24, 25, 30, 48, 50, or 60 frames per second. Do not go any higher or it will not be approved.
It is also a good idea to have videos that are between 7168x3584 and 8192x4096 in resolution. Any lower and the quality of the video will not be good enough to provide a pleasant viewing experience to the audience.
How to Upload to YouTube
Now that you have your video edited, you are a step closer to uploading it onto YouTube. But there are some steps that you must follow . These include downloading the 360 Video Metadata app on your Mac or Windows device.
Then you will choose the file, check the Spherical box and save it. Make sure that 3D top-bottom is not checked when you save the file. The file should be created in the folder where the original was located. Now you can upload that file to YouTube.
Read More to Get : YouTube Video Dimensions/Size: Guide for Upload Settings
Conclusion
If you want to upload 360 video to YouTube or some other platform, using a 360 video editor is the way to go. The best 360 video converter and editor program will let you take the raw footage that you have shot and turn it into a stunning video that anyone can enjoy.
Richard Bennett
Richard Bennett is a writer and a lover of all things video.
Follow @Richard Bennett
Richard Bennett
Mar 27, 2024• Proven solutions
360 degree videos have become incredibly popular on the Internet. Not only do they give people a complete look at a scene, but they also allow for a lot of artistic freedom. Those who are using VR-capable devices can get an even more immersive experience. It is why many content creators want to learn about the best 360 video editor they can use on their computers.
Here is a look at the 5 best 360 video converter and editor programs that you can use on your Windows or Mac computer.
Part 1: 5 Best 360 Video Editor for You
1. Movavi
Movavi is an affordable 360 degree video editor that makes it easy for you to create, edit and share these videos online. You can even add filters, titles and transitions to your videos, while soundtrack addition is also possible.
You can use the preview window in the program to see how your video will look if it is published as is. Plus you can use the software with both Windows and Mac, depending on the version that you download.
Pros:
- Works with all mainstream video formats
- Features support for 4K videos
- Includes color adjustment and picture in picture, even in 360 videos
- Speed adjustment capabilities
2. Premiere Pro
Adobe Premiere Pro CC is seen by many as the leading product that you can get if you want to edit high quality videos, including 360 degree content.
Any type of video format will be compatible. You should have no issues editing different segments of the content that you are creating, as Premiere Pro CC is known for having very efficient workflow screens.
Pros:
- Tools to adjust color, audio and graphics
- Works seamlessly with other Adobe apps
- Possible to create and edit content on the go using smartphones
3. After Effects
If you are attempting to add many unique graphics and transitions to your videos, then you will want to use Adobe After Effects. Most would recommend that be combined with Premiere Pro to get the best experience.
After Effects is ideal for adding introductions, end credits, transitions and other effects to the content that you have produced. You can use it to take the videos that you have created to the next level.
Pros:
- Support for movie titles, introductions, transitions and end credits
- Possible to animate logos and characters
- Works with Adobe Premiere Pro
4. Final Cut Pro X
Mac users who want to use their laptop or desktop to edit 360 videos will be happy to know that it is supported in Final Cut Pro X. It is one of the fastest and most powerful programs to use on a Mac, as it is completely optimized for the operating system and hardware.
It is possible to edit and playback 360 videos using a VR headset. It allows creators to not only put in great videos and edit them, but also see how they look after various adjustments.
Pros:
- Advanced color grading options
- Full HDR and 4K support
- View files with VR headset
- Optimized for Macs
- Includes free trial
Cons:
- Little bit expensive
5. Molanis VR
Molanis VR is ideal for anyone who wants to create 360 video that will look incredible when viewed through VR glasses. It is one of the most flexible software options, as it is inexpensive and includes many great features.
IT is possible to trim, cut and fade, include text and images, add effects and make other changes to videos on the fly. The software is intuitive to use, which is great for beginners who have not edited much in the past.
Pros:
- Support for 4K videos
- Options to add text, images and effects to videos
- Can manage color, correct horizon and stabilize 360 videos
- Includes a tree trial
Cons:
- Not as many tutorials on how to use the software compared to bigger brands
Part 2: How to Upload 360 Degree Videos to YouTube
It is possible to add 360 degree videos onto YouTube . Using YouTube to promote such content is sensible, as it is one of the largest streaming video platforms in the world. These videos can be seen on any of the major browsers and on certain mobile devices. But they must be uploaded from a desktop.
YouTube 360 Video Specification
The first step of the process is to create a video that YouTube will approve as a 360 submission. Such a video should be either 24, 25, 30, 48, 50, or 60 frames per second. Do not go any higher or it will not be approved.
It is also a good idea to have videos that are between 7168x3584 and 8192x4096 in resolution. Any lower and the quality of the video will not be good enough to provide a pleasant viewing experience to the audience.
How to Upload to YouTube
Now that you have your video edited, you are a step closer to uploading it onto YouTube. But there are some steps that you must follow . These include downloading the 360 Video Metadata app on your Mac or Windows device.
Then you will choose the file, check the Spherical box and save it. Make sure that 3D top-bottom is not checked when you save the file. The file should be created in the folder where the original was located. Now you can upload that file to YouTube.
Read More to Get : YouTube Video Dimensions/Size: Guide for Upload Settings
Conclusion
If you want to upload 360 video to YouTube or some other platform, using a 360 video editor is the way to go. The best 360 video converter and editor program will let you take the raw footage that you have shot and turn it into a stunning video that anyone can enjoy.
Richard Bennett
Richard Bennett is a writer and a lover of all things video.
Follow @Richard Bennett
Also read:
- [New] Video Wizardry Your Guide to the Top 10 Editing Hacks
- [Updated] Academic Avenue Leading Educators on YouTube
- [Updated] Conveniently Remove Downloaded YouTube Media for Lightweight Devices
- [Updated] Deconstructing the Legal Framework of Youtube & CC Licenses
- [Updated] Top 11 Insider Secrets for Windows 11 Mastery
- Common Issues Solved: Restoring Sound on a Quiet iPhone
- Complete Tutorial: Restoring Unrecoverable Lost Files on Windows Operating Systems (7, 10, 11)
- High-Speed Windows Photoviewer for 2024
- In 2024, For Beginners Best Film and Point-Shoot Cameras Reviewed
- In 2024, Zero-Price Strategies for Solo Frame Analysis in Videos
- Making Compelling Media Previews for Channels
- NextGen Codec Battle Is AV1 Trumping VP9 Quality?
- Setting Up Your YouTube Studio Essential Equipment List
- The Changing Tide of YouTube Earnings
- YouTube Earning Blueprint Achieving Bank Balances
- Title: Expert Tips for Removing Persistent Youtube Channels (Mobile/PC)
- Author: Steven
- Created at : 2025-01-15 16:10:14
- Updated at : 2025-01-22 16:45:24
- Link: https://youtube-clips.techidaily.com/expert-tips-for-removing-persistent-youtube-channels-mobilepc/
- License: This work is licensed under CC BY-NC-SA 4.0.