
Expert Advice on Free Youtube Events without Extra Cost
Expert Advice on Free Youtube Events without Extra Cost
How to Host a Webinar on YouTube for Free 
Max Wales
Mar 27, 2024• Proven solutions
Promoting products, offering educational content or in-depth tutorials on virtually any subject through webinars will enable you to reach new audiences and offer your services on a worldwide market. There are thousands of webinar software products and online platforms, but most of them are quite expensive and they require you to have a considerable amount of experience with the process of setting up and recording webinars.
An alternative solution is available if your budget is tight, but you’d still like to produce a great webinar. We are going to take you through all the steps you’ll need to take if you’d like to host a webinar for free and help you spread the word about the products and services you’re offering.
![]()

The All-in-One Screen Recorder & Video Editor
- Record desktop screen, voiceover, and webcam simultaneously
- Edit recorded clips quickly with a wide range of professional tools
- Built-in plentiful templates and effects
- Export to MP4, MOV, MKV, GIF and multiple formats
For Win 7 or later (64-bit)
For macOS 10.12 or later  Secure Download
Hosting a Webinar for Free
The world’s largest video sharing platform also features broadcasting options that enable its users to schedule events and thus host webinars free of charge. Previously known as the Google Hangouts on Air, the YouTube Live feature is fairly simple to set up, but before you start your first webinar you will need to choose a landing page and a chatbox. If you already have a website you can simply copy and paste the embed link and create a landing page for your webinar, or you can use landing pages software products such as LeadPages or Unbounce if you don’t have your own online domain. For setting up chatboxes for your webinars we recommend using Chatroll or RumbleTalk platforms, although you’ll have to pay a fee if you choose to chat with your audience using these computer programs. So here’s how you can host your first webinar on YouTube for free.
Step 1. Create a YouTube Event
If you don’t already have an account on YouTube, you’ll have to create one before you can schedule your first live event. After making sure that you are logged in to your YouTube account head over to the Creator Studio, and click on the Live Streaming tab. Select the New Live Event option and proceed to insert the basic information about the event such as the title, date when the event should take place, tags or a short description of the webinar you’re planning.
The Advanced Settings tab will enable you the access to options that will allow you to assign the license and the owner of the webinar. You can also choose the language, set the location or select the category of the event.
Step 2. Copy the Embed Code and Paste it To Your Webinar’s Landing Page
When you adjust all the settings for your upcoming event, you should click on the Share button. This action will grant you access to the video’s embed link, so you can just copy it to your website, or to the landing page you’ve created with the appropriate software.
Step 3. Add the Chatbox to The Webinar’s Landing Page
Communicating with the audience during the webinar is important, and for that reason, embedding the chatbox link on the webinar’s landing page is a crucial step that will allow you to interact with the participants of your webinar. Chatbox platforms for live events such as Chatroll or RumbleTalk offer amazing features, but they cannot be used for free, which means that you’ll have to invest a certain amount of money in order to include a chatbox in your webinar.
Step 4. Publish the Webinar’s Landing Page and Get the URL
Making the event public a week or a few days before it takes place will provide you with enough time to promote it. Include the webinar’s landing page URL in the promotional social media posts and make sure to send out invites for your webinar to your friends and colleagues. Email marketing methods can help you get a larger number of attendees, which is the reason why investing time in the promotion of your webinar can prove to be extremely beneficial.
Step 5. Start your Webinar
Hit the Go Live Now button, when you are ready to start your first webinar and enjoy sharing your skills and knowledge with your audience. Even though YouTube offers a simple way to host webinars for free, it lacks the advanced options that enable you to use the prerecorded footage, keep track of the webinar’s analytics or create virtual whiteboards and polls.
Read More to Get : 10 Best Free Video Hosting Sites for Private/Business Online

Max Wales
Max Wales is a writer and a lover of all things video.
Follow @Max Wales
Max Wales
Mar 27, 2024• Proven solutions
Promoting products, offering educational content or in-depth tutorials on virtually any subject through webinars will enable you to reach new audiences and offer your services on a worldwide market. There are thousands of webinar software products and online platforms, but most of them are quite expensive and they require you to have a considerable amount of experience with the process of setting up and recording webinars.
An alternative solution is available if your budget is tight, but you’d still like to produce a great webinar. We are going to take you through all the steps you’ll need to take if you’d like to host a webinar for free and help you spread the word about the products and services you’re offering.
![]()
The All-in-One Screen Recorder & Video Editor
- Record desktop screen, voiceover, and webcam simultaneously
- Edit recorded clips quickly with a wide range of professional tools
- Built-in plentiful templates and effects
- Export to MP4, MOV, MKV, GIF and multiple formats
For Win 7 or later (64-bit)
For macOS 10.12 or later Secure Download
Hosting a Webinar for Free
The world’s largest video sharing platform also features broadcasting options that enable its users to schedule events and thus host webinars free of charge. Previously known as the Google Hangouts on Air, the YouTube Live feature is fairly simple to set up, but before you start your first webinar you will need to choose a landing page and a chatbox. If you already have a website you can simply copy and paste the embed link and create a landing page for your webinar, or you can use landing pages software products such as LeadPages or Unbounce if you don’t have your own online domain. For setting up chatboxes for your webinars we recommend using Chatroll or RumbleTalk platforms, although you’ll have to pay a fee if you choose to chat with your audience using these computer programs. So here’s how you can host your first webinar on YouTube for free.
Step 1. Create a YouTube Event
If you don’t already have an account on YouTube, you’ll have to create one before you can schedule your first live event. After making sure that you are logged in to your YouTube account head over to the Creator Studio, and click on the Live Streaming tab. Select the New Live Event option and proceed to insert the basic information about the event such as the title, date when the event should take place, tags or a short description of the webinar you’re planning.
The Advanced Settings tab will enable you the access to options that will allow you to assign the license and the owner of the webinar. You can also choose the language, set the location or select the category of the event.
Step 2. Copy the Embed Code and Paste it To Your Webinar’s Landing Page
When you adjust all the settings for your upcoming event, you should click on the Share button. This action will grant you access to the video’s embed link, so you can just copy it to your website, or to the landing page you’ve created with the appropriate software.
Step 3. Add the Chatbox to The Webinar’s Landing Page
Communicating with the audience during the webinar is important, and for that reason, embedding the chatbox link on the webinar’s landing page is a crucial step that will allow you to interact with the participants of your webinar. Chatbox platforms for live events such as Chatroll or RumbleTalk offer amazing features, but they cannot be used for free, which means that you’ll have to invest a certain amount of money in order to include a chatbox in your webinar.
Step 4. Publish the Webinar’s Landing Page and Get the URL
Making the event public a week or a few days before it takes place will provide you with enough time to promote it. Include the webinar’s landing page URL in the promotional social media posts and make sure to send out invites for your webinar to your friends and colleagues. Email marketing methods can help you get a larger number of attendees, which is the reason why investing time in the promotion of your webinar can prove to be extremely beneficial.
Step 5. Start your Webinar
Hit the Go Live Now button, when you are ready to start your first webinar and enjoy sharing your skills and knowledge with your audience. Even though YouTube offers a simple way to host webinars for free, it lacks the advanced options that enable you to use the prerecorded footage, keep track of the webinar’s analytics or create virtual whiteboards and polls.
Read More to Get : 10 Best Free Video Hosting Sites for Private/Business Online
Max Wales
Max Wales is a writer and a lover of all things video.
Follow @Max Wales
Achieving Professional-Level Youtube Streams Using WireCast
How to live stream to youtube with wirecast?

Richard Bennett
Mar 27, 2024• Proven solutions
Are you trying to use wirecast to stream to youtube? You are in the right place, here is our step by step guide to go live on youtube with wirecast.
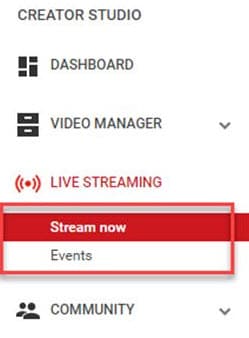
Step 1: First of all you need to login to your YouTube Creator Studio and then select Live Streaming option from available options on your screen.
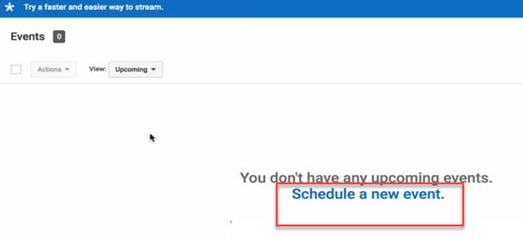
Step 2: Once you enter into the live streaming option then your application will ask you to schedule a new event; follow this option.
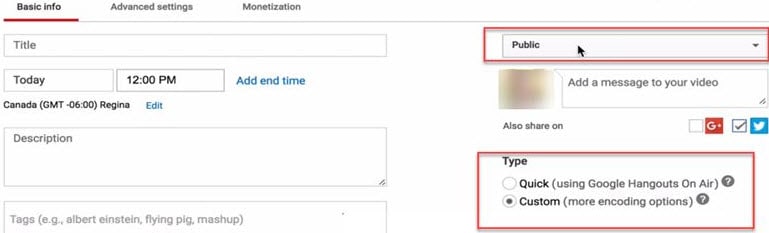
Step 3: Now you need to enter few basic details about your video that you are going to live stream. Do not forget to choose custom option under the Type category available on bottom right side of screen.
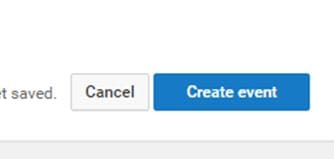
Step 4: It is time to hit the create event option.
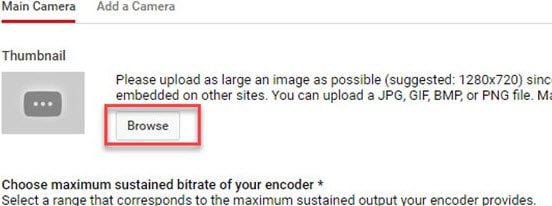
Step 5: Your system will now take you to the camera settings; here you need to enter your thumbnail. It can be done directly by using browse option.
Step 6: Now you need to select ‘basic ingestion’ option and secondly select ‘other encoders’ option from second set of information.

Step 7: Once you have completed above settings then you need to save all the changes and then move to the live control room on your screen.
Step 8: Open the wirecast software tool on your device and then simply move to the output settings. Hit the authenticate option, it will soon ask you to enter the YouTube login detail.
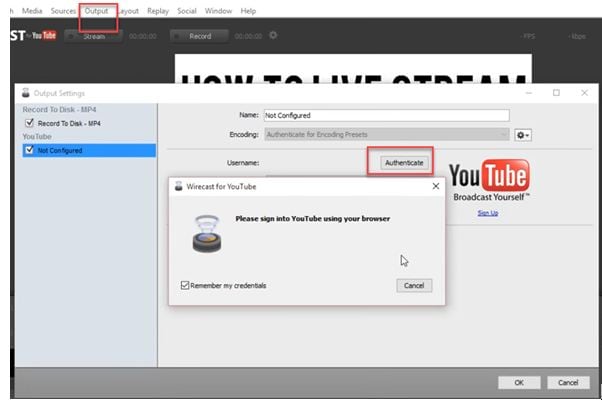
Step 9: As soon as you sign in with your account using browser, then your settings will be ready on screen. Simply hit Ok.
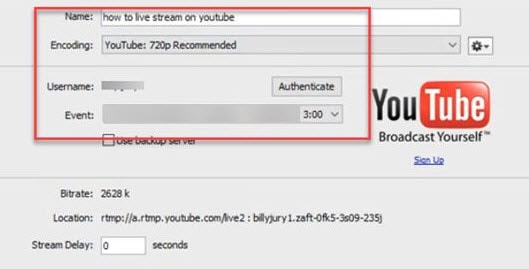
Step 10: It is time to make your video source or content ready for streaming. You need to hit on the stream button that is available on top portion of screen.

Step 11: Now simply move to the YouTube event page and start streaming your content.
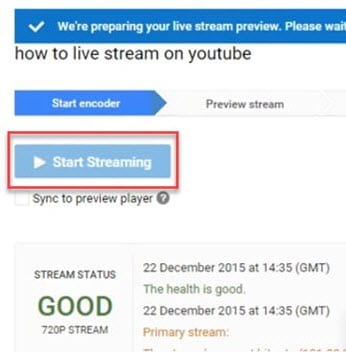
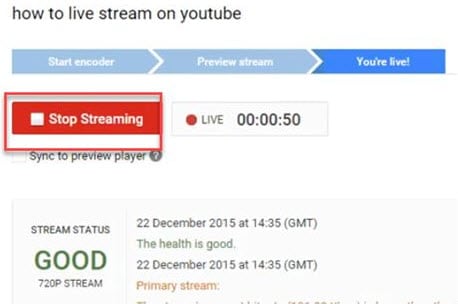
Step 12: Once you content for streaming is finished then click the stop streaming button that appears in red color on screen. You will also get information about duration of your video that is going live.
Step 13: When your streaming process ends then video will be saved to video manager. You can view it easily at later stage.
Richard Bennett
Richard Bennett is a writer and a lover of all things video.
Follow @Richard Bennett
Richard Bennett
Mar 27, 2024• Proven solutions
Are you trying to use wirecast to stream to youtube? You are in the right place, here is our step by step guide to go live on youtube with wirecast.
Step 1: First of all you need to login to your YouTube Creator Studio and then select Live Streaming option from available options on your screen.
Step 2: Once you enter into the live streaming option then your application will ask you to schedule a new event; follow this option.
Step 3: Now you need to enter few basic details about your video that you are going to live stream. Do not forget to choose custom option under the Type category available on bottom right side of screen.
Step 4: It is time to hit the create event option.
Step 5: Your system will now take you to the camera settings; here you need to enter your thumbnail. It can be done directly by using browse option.
Step 6: Now you need to select ‘basic ingestion’ option and secondly select ‘other encoders’ option from second set of information.
Step 7: Once you have completed above settings then you need to save all the changes and then move to the live control room on your screen.
Step 8: Open the wirecast software tool on your device and then simply move to the output settings. Hit the authenticate option, it will soon ask you to enter the YouTube login detail.
Step 9: As soon as you sign in with your account using browser, then your settings will be ready on screen. Simply hit Ok.
Step 10: It is time to make your video source or content ready for streaming. You need to hit on the stream button that is available on top portion of screen.
Step 11: Now simply move to the YouTube event page and start streaming your content.
Step 12: Once you content for streaming is finished then click the stop streaming button that appears in red color on screen. You will also get information about duration of your video that is going live.
Step 13: When your streaming process ends then video will be saved to video manager. You can view it easily at later stage.
Richard Bennett
Richard Bennett is a writer and a lover of all things video.
Follow @Richard Bennett
Also read:
- [New] Coping with YouTube Copyright Claims A Step-by-Step Guide
- [New] Picsart Guide Discreetly Mask Faces
- [New] The Illustrator's Toolkit Making Text Pop in 3D
- [Updated] Climb the Popularity Ladder Essential YouTube SEO Practices Uncovered
- [Updated] Enhancing Your YouTube Content with Right Camera Gear for 2024
- In 2024, Avoiding Blur on Instagram with Smart Zooms
- In 2024, Easy YouTube File Transfer Techniques
- In 2024, Is Fake GPS Location Spoofer a Good Choice On OnePlus Ace 2? | Dr.fone
- In 2024, Total Environmental Immersion in Media Creation
- Reactivate Your Device's Inactive Wireless Network Capability - Easy Fixes Inside
- Savory Streamers The Crème De La Cuisine
- Social Media Blend Adding YouTube Content to Stories
- Streamlining Your FreeFire YouTube Experience
- Title: Expert Advice on Free Youtube Events without Extra Cost
- Author: Steven
- Created at : 2025-01-20 16:29:04
- Updated at : 2025-01-22 16:40:57
- Link: https://youtube-clips.techidaily.com/expert-advice-on-free-youtube-events-without-extra-cost/
- License: This work is licensed under CC BY-NC-SA 4.0.