:max_bytes(150000):strip_icc()/how-to-play-subway-surfers-3583994550e74c3f81fc162b40548cc2.jpg)
Enhancing Your Game Time with YouTube Live Broadcasts
Enhancing Your Game Time with YouTube Live Broadcasts
How to Live Stream on YouTube Gaming?

Richard Bennett
Mar 27, 2024• Proven solutions
1. Live Stream on YouTube Gaming with OBS
You need to follow these simple Step s to use OBS for YouTube Live Streaming:
**Step 1:**First of all you need to login to your YouTube account. You might be aware of the fact that same YouTube account is used for YouTube gaming needs.
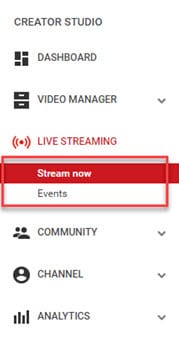
**Step 2:**Once entered inside your account then you need to visit the Go live streaming options and then from drop down menu simply choose Stream Now option.
**Step 3:**It is time to fill the details on screen; put impressive words for your live stream description so that it can grab attention of more viewers. Then select category as ‘Gaming’.

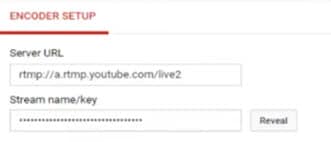
**Step 4:**Now you need to copy the stream key.
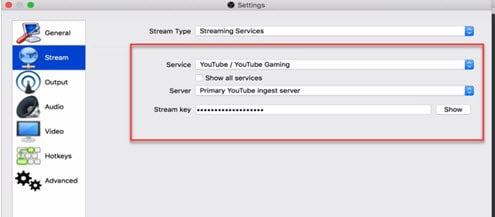
**Step 5:**Now open your OBS tool and then select YouTube as your active game streaming service. Users here need to paste that copied streaming key of Step 5 into the space provided on OBS settings page.
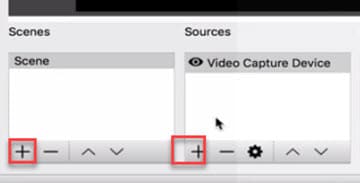
**Step 6:**It is time to make your desktop a video source.
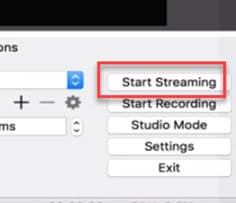
**Step 7:**Once all these settings are completed then you need to hit the start streaming option.
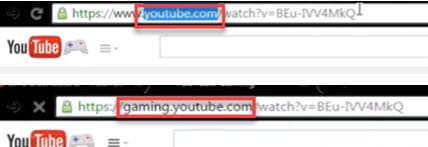
**Step 8:**The service may take few seconds to bring your live on YouTube and after this small duration you will be connected to your channel with your streamed content. Then change your url from youtube.com to gaming.youtube.com
**Step 9:**You are all set to be live on your YouTube gaming profile.
2. Live Stream on YouTube with Elgato Game Capture HD
A: Basic Settings for Elgato Game Capture HD
The Step s below will help you to get ready for streaming with all basic settings that are required by Elgato Game Capture HD tool.
**Step 1:**First of all, you need to open your browser, search for Elgato Game Capture HD software on its official website and then download it for your system. Get it installed.
**Step 2:**Once installation process is complete then launch your software.
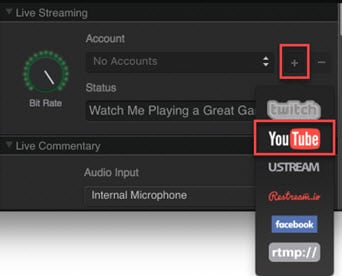
**Step 3:**Now you need to hit the add button on screen and select YouTube from drop down menu.
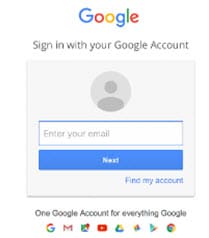
Step 4: It is time to sign in with your Google Account.
**Step 5:**After sign up process, allow the Elgato Game Capture tool to make connection with your YouTube account.

**Step 6:**Soon you will be able to access you account from Elgato platform.

**Step 7:**It is time to make adjustments for streaming settings.
B: Test your Bandwidth and make adjustments for Stream settings
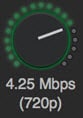
It is essential to check speed of your internet connection during live streaming because if it goes slow then your content will become annoying to viewers and it will decay the reputation of your channel. So prefer to use following Step s to complete the basic settings and to test your internet connection.
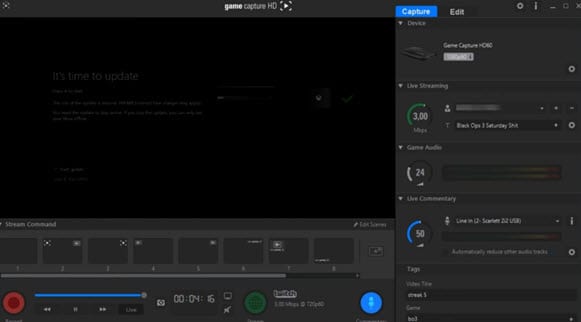
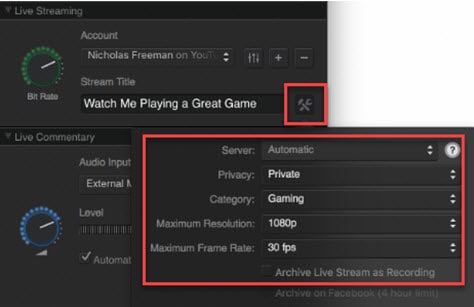
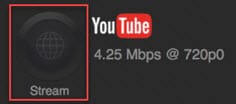
**Step 1:**Open your browser and then visit the speedtest.net platform. You can also use other similar kind of websites to ensure the speed of your internet. Note that you will find a Bit Rate dial in the live streaming section, here you can make adjustments for bit rates to bring it to desired level.
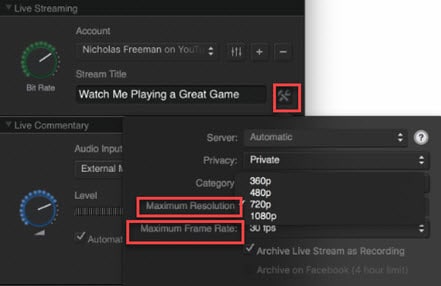
**Step 2:**It is also possible to make customized settings for frame rate and resolution as per need of your stream content.
**Step 3:**One can also prefer to archive his streaming.
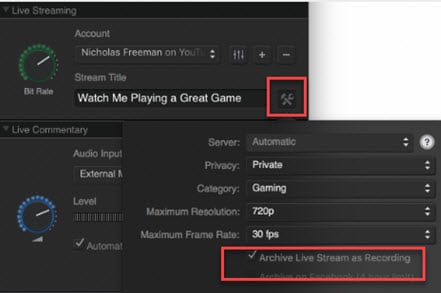
**Step 4:**As soon as you have completed all above settings then you need to hit the stream button on screen.
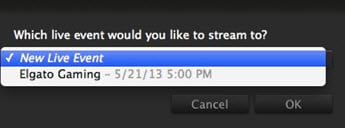
**Step 5:**Soon your software will ask you to select the event that you want to stream, choose your desired event and then press Ok. Soon you will be live on YouTube.
Richard Bennett
Richard Bennett is a writer and a lover of all things video.
Follow @Richard Bennett
Richard Bennett
Mar 27, 2024• Proven solutions
1. Live Stream on YouTube Gaming with OBS
You need to follow these simple Step s to use OBS for YouTube Live Streaming:
**Step 1:**First of all you need to login to your YouTube account. You might be aware of the fact that same YouTube account is used for YouTube gaming needs.
**Step 2:**Once entered inside your account then you need to visit the Go live streaming options and then from drop down menu simply choose Stream Now option.
**Step 3:**It is time to fill the details on screen; put impressive words for your live stream description so that it can grab attention of more viewers. Then select category as ‘Gaming’.
**Step 4:**Now you need to copy the stream key.
**Step 5:**Now open your OBS tool and then select YouTube as your active game streaming service. Users here need to paste that copied streaming key of Step 5 into the space provided on OBS settings page.
**Step 6:**It is time to make your desktop a video source.
**Step 7:**Once all these settings are completed then you need to hit the start streaming option.
**Step 8:**The service may take few seconds to bring your live on YouTube and after this small duration you will be connected to your channel with your streamed content. Then change your url from youtube.com to gaming.youtube.com
**Step 9:**You are all set to be live on your YouTube gaming profile.
2. Live Stream on YouTube with Elgato Game Capture HD
A: Basic Settings for Elgato Game Capture HD
The Step s below will help you to get ready for streaming with all basic settings that are required by Elgato Game Capture HD tool.
**Step 1:**First of all, you need to open your browser, search for Elgato Game Capture HD software on its official website and then download it for your system. Get it installed.
**Step 2:**Once installation process is complete then launch your software.
**Step 3:**Now you need to hit the add button on screen and select YouTube from drop down menu.
Step 4: It is time to sign in with your Google Account.
**Step 5:**After sign up process, allow the Elgato Game Capture tool to make connection with your YouTube account.
**Step 6:**Soon you will be able to access you account from Elgato platform.
**Step 7:**It is time to make adjustments for streaming settings.
B: Test your Bandwidth and make adjustments for Stream settings
It is essential to check speed of your internet connection during live streaming because if it goes slow then your content will become annoying to viewers and it will decay the reputation of your channel. So prefer to use following Step s to complete the basic settings and to test your internet connection.
**Step 1:**Open your browser and then visit the speedtest.net platform. You can also use other similar kind of websites to ensure the speed of your internet. Note that you will find a Bit Rate dial in the live streaming section, here you can make adjustments for bit rates to bring it to desired level.
**Step 2:**It is also possible to make customized settings for frame rate and resolution as per need of your stream content.
**Step 3:**One can also prefer to archive his streaming.
**Step 4:**As soon as you have completed all above settings then you need to hit the stream button on screen.
**Step 5:**Soon your software will ask you to select the event that you want to stream, choose your desired event and then press Ok. Soon you will be live on YouTube.
Richard Bennett
Richard Bennett is a writer and a lover of all things video.
Follow @Richard Bennett
Perfect Your Video Subtitles on YouTube
How To Add Captions to YouTube Videos
Richard Bennett
Mar 27, 2024• Proven solutions
By captioning your YouTube videos you help to make them accessible to more potential viewers. Subtitles are useful to viewers who have hearing impairments, whose first language is different from yours, or who are unable to watch your video with sound. Closed captioning can also be useful for you as a YouTuber because it helps with your SEO, or search engine optimization. Practicing better SEO can get your videos ranked higher in search results. Google and YouTube both index subtitles and transcripts much like they do your video’s description, unless you use automated captions.
This article will first explain how you can turn on subtitles for the videos you watch and then walk you through adding captions to your own videos.
How To Turn On Captions on YouTube
In order for you to be able to view subtitles for a YouTube video the uploader of the video will need to have added them, unless you change your account settings to display automatic captions.

To toggle subtitles on and off click on the Closed Captioning icon in the bottom right of your video player.
If the creator of the video has not added captions then you can enable automatic captions by going into your Account Settings and selecting Playback. Check the box next to Always Show Captions, and then check Show Automatic Captions by Speech Recognition. These captions may be flawed, but you will still be able to see the more accurate user submitted captions on videos that have them. The Always Show Captions feature may be useful not only to the hearing impaired, but to users who do not speak the same language as the video producer.
If you want to change the language of the subtitles click on the settings icon (the one that looks like a gear) next to the closed captioning icon and choose your language next to Subtitles/CC . If the language you want is not there select Auto-Translate and then pick a language. Google Translate will be used to generate subtitles in your chosen language.
Adding YouTube Captions in 4 Steps
1. Go to Video Manager in your Creator Studio and then look at your videos. Decide which one you want to add captions to.
2. Click on the drop-down menu next to the video you want to add captions to and choose Subtitles and CC.
3. Select Add New Subtitles or CC.
4. Choose whether to create your captions, upload a file that has them, transcribe your video, use automatic captioning, or use captioning software.
Create Subtitles or Closed Captions will allow you to create your subtitles on YouTube.
Upload A File allows you to upload a pre-made subtitle file from your computer. Supported file types include SubRip (.srt) and SubViewer (.sbv). You cannot use a word or PDF document for your subtitles.
Transcribe and Set Timings is where you can type a transcript of your video and set timings to sync it to your video. This differs from Create Subtitles or Closed Captions in that your transcript is all typed in to one text field.
Use Automatic Captioning will automatically use speech recognition technology to create captions. You can edit these auto-generated captions later if there are mistakes.
Use Captioning Software or Services is what you choose if you want to use a program or service to create the subtitles for your video.
The easiest way to add subtitles to your videos is to use Automatic Captioning. However, Automatic Captioning is imperfect and may result in your viewers getting a sloppy, skewed, interpretation of your video. Automatic captions are also not indexed by YouTube and Google the way subtitles you create or upload are. This means that they will not have any value to your SEO strategy. If you do not input your own captions or transcript you are missing out on an opportunity for better search engine rankings. Automatic Captions are great if you do not have time to input subtitles and need a temporary solution, though.
Richard Bennett
Richard Bennett is a writer and a lover of all things video.
Follow @Richard Bennett
Richard Bennett
Mar 27, 2024• Proven solutions
By captioning your YouTube videos you help to make them accessible to more potential viewers. Subtitles are useful to viewers who have hearing impairments, whose first language is different from yours, or who are unable to watch your video with sound. Closed captioning can also be useful for you as a YouTuber because it helps with your SEO, or search engine optimization. Practicing better SEO can get your videos ranked higher in search results. Google and YouTube both index subtitles and transcripts much like they do your video’s description, unless you use automated captions.
This article will first explain how you can turn on subtitles for the videos you watch and then walk you through adding captions to your own videos.
How To Turn On Captions on YouTube
In order for you to be able to view subtitles for a YouTube video the uploader of the video will need to have added them, unless you change your account settings to display automatic captions.
To toggle subtitles on and off click on the Closed Captioning icon in the bottom right of your video player.
If the creator of the video has not added captions then you can enable automatic captions by going into your Account Settings and selecting Playback. Check the box next to Always Show Captions, and then check Show Automatic Captions by Speech Recognition. These captions may be flawed, but you will still be able to see the more accurate user submitted captions on videos that have them. The Always Show Captions feature may be useful not only to the hearing impaired, but to users who do not speak the same language as the video producer.
If you want to change the language of the subtitles click on the settings icon (the one that looks like a gear) next to the closed captioning icon and choose your language next to Subtitles/CC . If the language you want is not there select Auto-Translate and then pick a language. Google Translate will be used to generate subtitles in your chosen language.
Adding YouTube Captions in 4 Steps
1. Go to Video Manager in your Creator Studio and then look at your videos. Decide which one you want to add captions to.
2. Click on the drop-down menu next to the video you want to add captions to and choose Subtitles and CC.
3. Select Add New Subtitles or CC.
4. Choose whether to create your captions, upload a file that has them, transcribe your video, use automatic captioning, or use captioning software.
Create Subtitles or Closed Captions will allow you to create your subtitles on YouTube.
Upload A File allows you to upload a pre-made subtitle file from your computer. Supported file types include SubRip (.srt) and SubViewer (.sbv). You cannot use a word or PDF document for your subtitles.
Transcribe and Set Timings is where you can type a transcript of your video and set timings to sync it to your video. This differs from Create Subtitles or Closed Captions in that your transcript is all typed in to one text field.
Use Automatic Captioning will automatically use speech recognition technology to create captions. You can edit these auto-generated captions later if there are mistakes.
Use Captioning Software or Services is what you choose if you want to use a program or service to create the subtitles for your video.
The easiest way to add subtitles to your videos is to use Automatic Captioning. However, Automatic Captioning is imperfect and may result in your viewers getting a sloppy, skewed, interpretation of your video. Automatic captions are also not indexed by YouTube and Google the way subtitles you create or upload are. This means that they will not have any value to your SEO strategy. If you do not input your own captions or transcript you are missing out on an opportunity for better search engine rankings. Automatic Captions are great if you do not have time to input subtitles and need a temporary solution, though.
Richard Bennett
Richard Bennett is a writer and a lover of all things video.
Follow @Richard Bennett
Also read:
- [New] Build Your Brand's Success on Top Business YouTube Channels
- [New] In 2024, Innovative Listening Techniques for Students with Macs
- [Updated] In 2024, Maximizing Impact Using YouTube Analytics for Content Strategy
- [Updated] In 2024, The Ultimate Guide to Blending Multiple Exposures Into a Single HDR in Lightroom
- 9 Solutions to Fix Realme 12+ 5G System Crash Issue | Dr.fone
- Engage Enthusiastically, Earn Enticingly The Entrepreneurial Editor’s Handbook for 2024
- In 2024, 7 Comedy YouTube Video Ideas That Only Funny People Are Allowed to Try
- In 2024, From Filmless to Film-Rich Digitizing Yesteryears' Images
- Quality Guffaws Uncover the Top 15 YouTube Comedy Talents
- Stop WoT Blitz From Crashing: Ultimate Troubleshooting Techniques Revealed
- Title: Enhancing Your Game Time with YouTube Live Broadcasts
- Author: Steven
- Created at : 2025-01-29 02:10:39
- Updated at : 2025-01-30 01:08:55
- Link: https://youtube-clips.techidaily.com/enhancing-your-game-time-with-youtube-live-broadcasts/
- License: This work is licensed under CC BY-NC-SA 4.0.