
"Enhancing Visibility Popularize Your YouTube Short Videos"
Enhancing Visibility: Popularize Your YouTube Short Videos
How to Get More Views with YouTube Shorts

Richard Bennett
Mar 27, 2024• Proven solutions
One of the biggest challenges that people face while using YouTube Shorts is how to get more views. Many new users wonder what and how should they prepare a video that is both 15-to-60 seconds long, and at the same time, it is engaging enough to make the audience view them with excitement.
With that said, the following sections discuss some best practices, and share a couple of tips to increase views on your YouTube Shorts videos.
- Part 1: Get More Views by Adding Shorts Video to the ‘Featured’ Section
- Part 2: Create Attractive Thumbnail for YouTube Shorts to Get More Views
- Part 3: Optimize YouTube Shorts to Get More Views
- Part 4: How to Analyze YouTube Shorts Performance
Part 1: Get More Views by Adding Shorts Video to the ‘Featured’ Section
Comparatively different from other videos, the ones that are added under the ‘Featured’ section are recommended to the audience throughout the YouTube platform on the basis of the algorithms that automatically determine which clips should be liked beach viewer individually.
![]()
A cross-platform for making videos anywhere for all creators

Why your video editing isn’t good enough? How about some creative inspo?
- 100 Million+ Users
- 150+ Countries and Regions
- 4 Million+ Social Media Followers
- 5 Million+ Stock Media for Use
* Secure Download

To elaborate, generally, YouTube suggests you a video as per your viewing history, browsing statistics, and other such information that the streaming media giant collects over time. On the other hand, the ‘Featured’ videos are suggested according to what YouTube ‘thinks’ might be of your interest, or could be somehow useful to you.
Therefore, when any clip is added as a ‘Featured’ video, YouTube suggests it to more viewers as compared to those that are published under the ‘Recommended’ category.
Note: Although there is a lot more to cover under the ‘Featured’ videos and channels section such as branding, advertisements, etc., such topics are beyond the scope of this piece.
Adding YouTube Shorts videos to the ‘Featured’ section is fairly simple, and the instructions given below explain how this can be done:
Note: It is assumed that you already have a couple of shorts video published on YouTube.
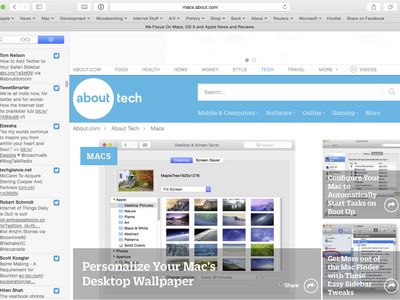
Step 1: Get to YouTube Studio Customization Section
Go to YouTube on your PC’s web browser, sign in to your Google account, click Your videos from the navigation bar in the left, and click Customization from the left bar when the Studio page opens up.
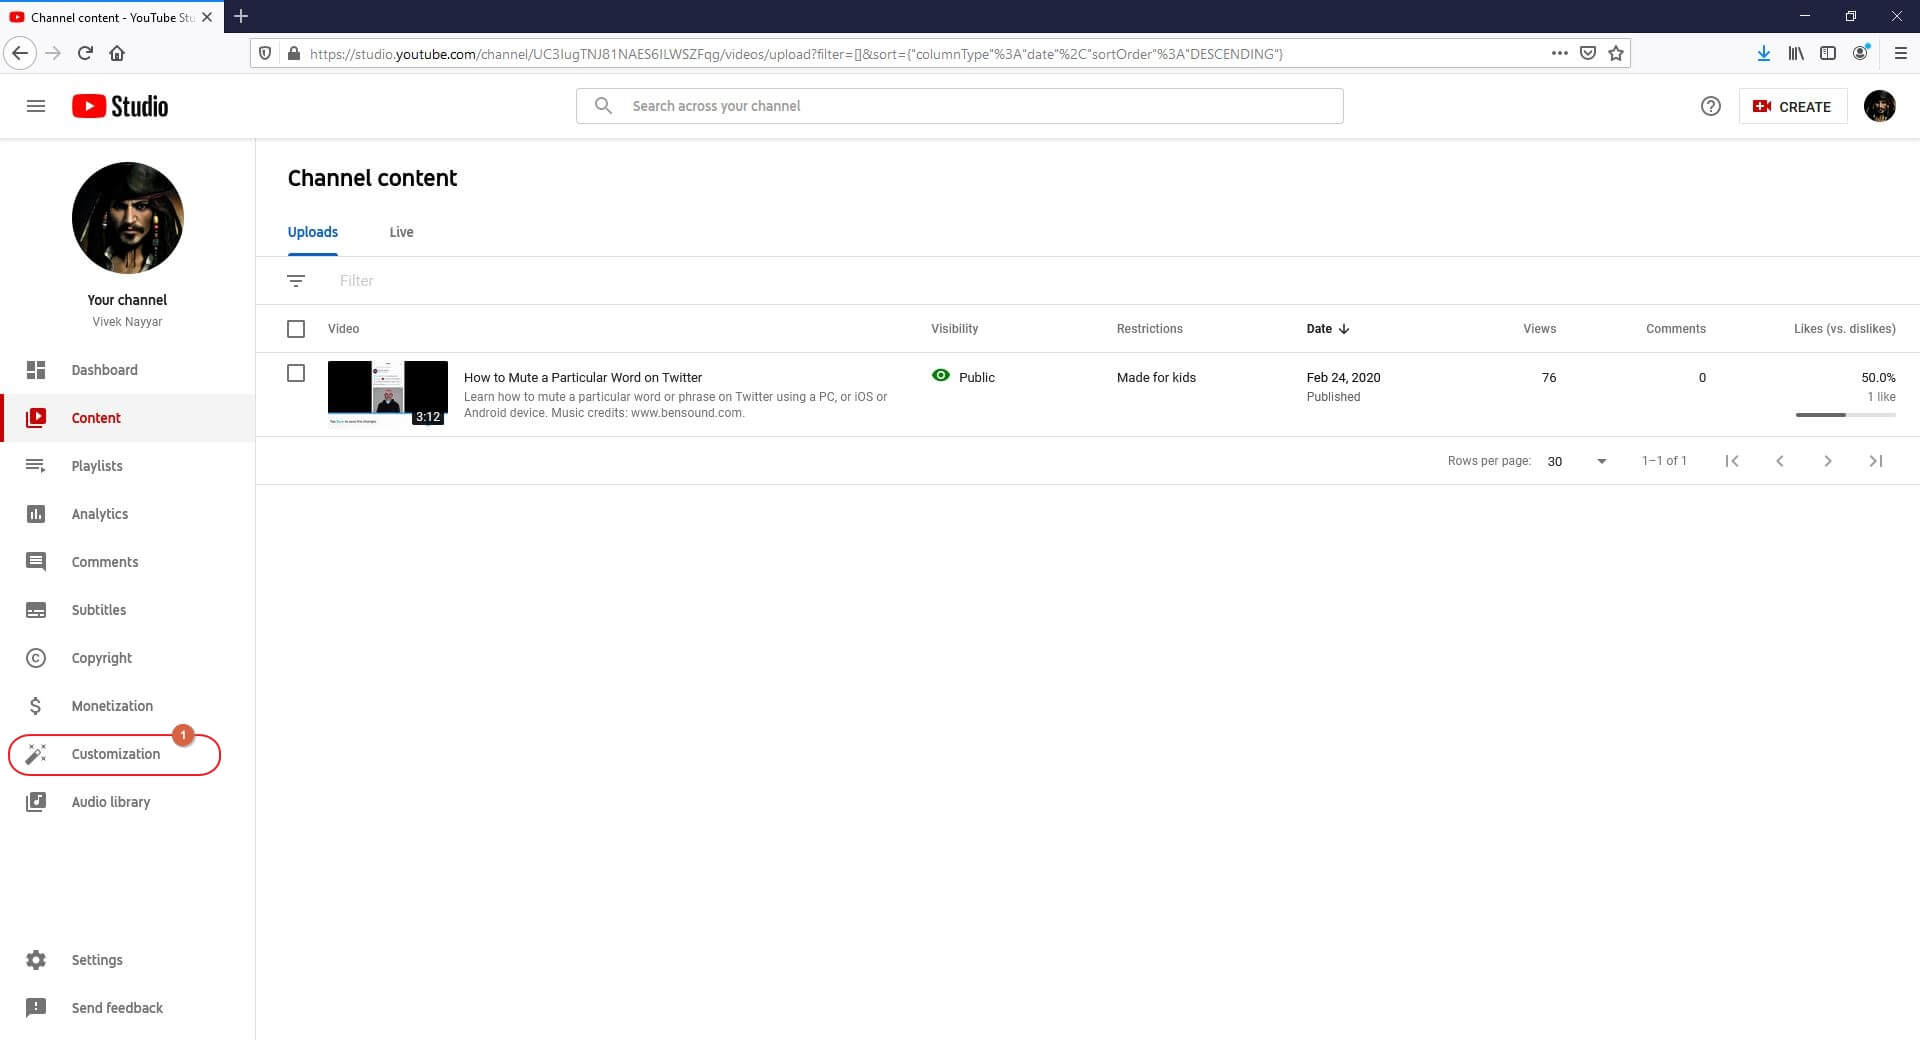
Step 2: Add YouTube Shorts
Click ADD SECTION from the Layout tab in the right window, and click Short videos from the list that appears next to add the YouTube Shorts category.
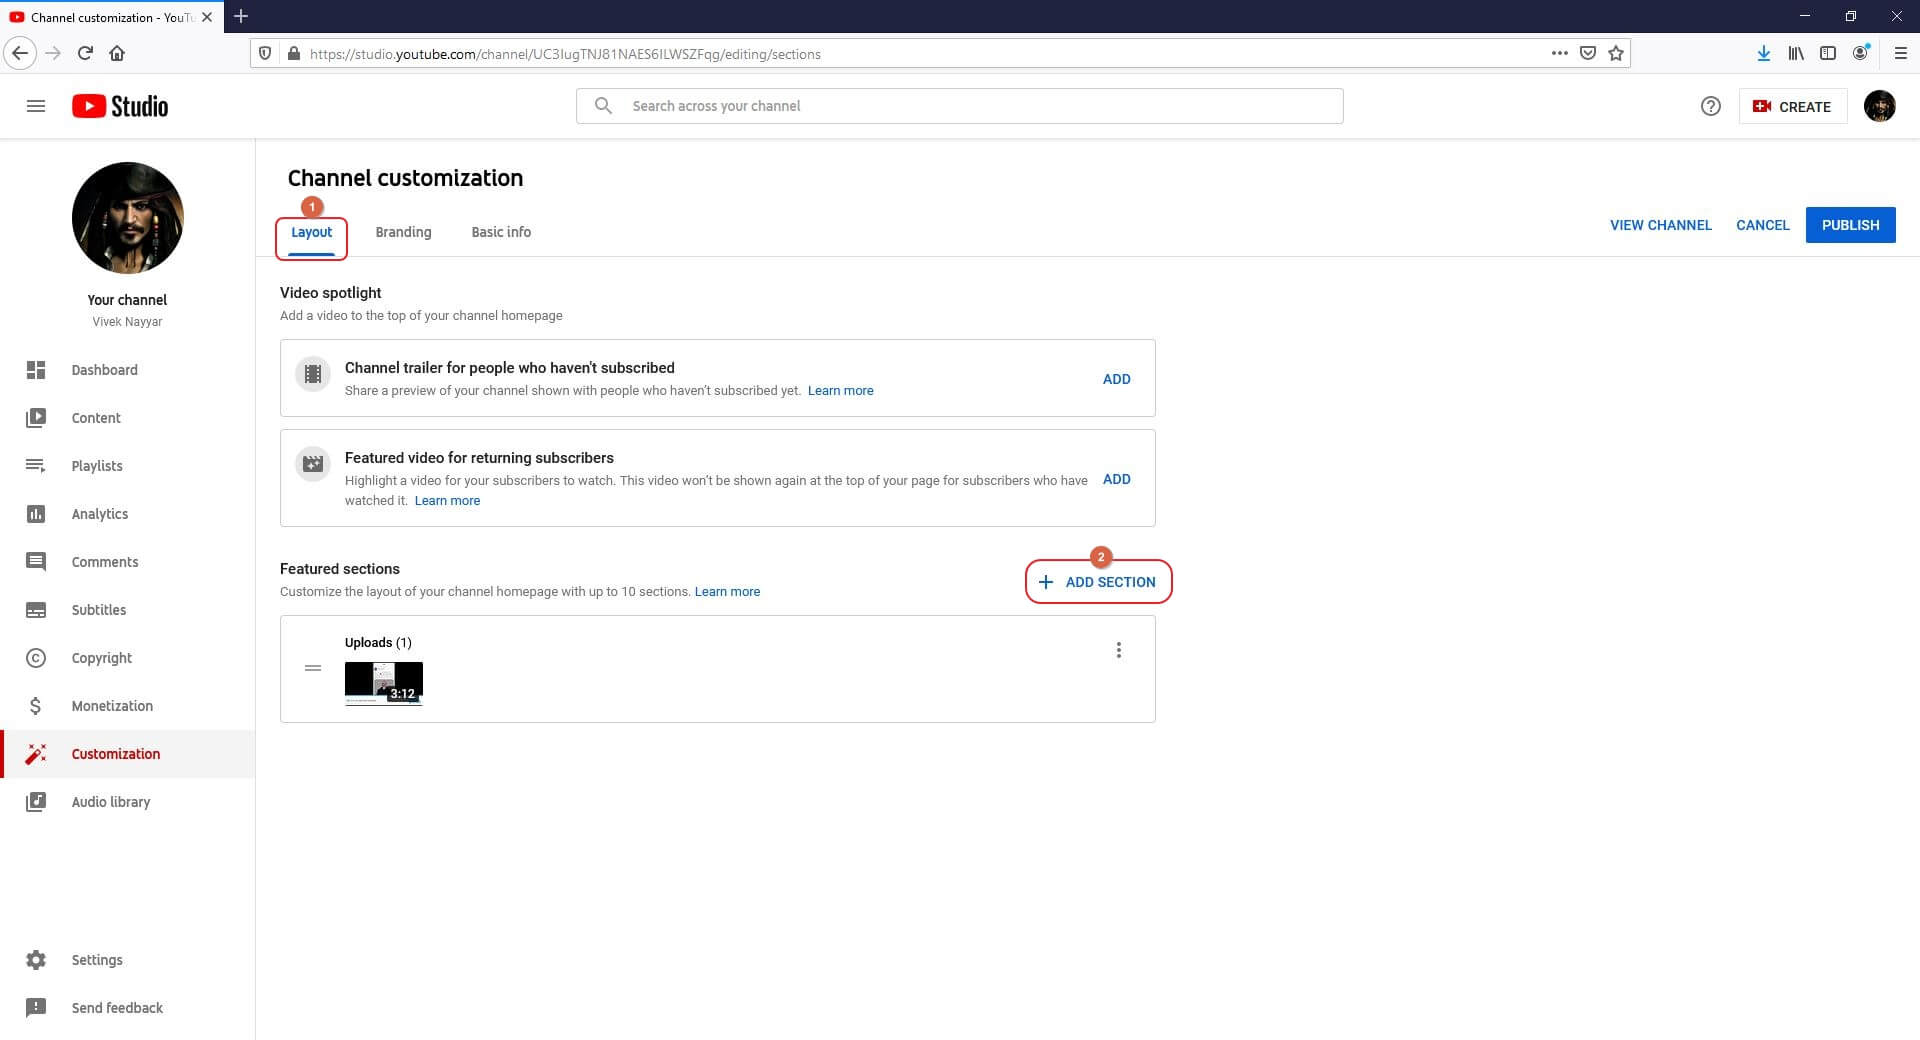
Step 3: Add Short videos to Featured sections and Save the Changes
Hold the Short videos bar from the moving handle at the left, and move it right below the Featured sections segment. Once the Short videos category is in the right place, click PUBLISH from the top-right corner of the page to save the changes. From this point onward, any YouTube Shorts video that you publish on your channel will be automatically added as ‘Featured’ after its approval.
Part 2: Create Attractive Thumbnail for YouTube Shorts to Get More Views
The thumbnails are the face of the videos that you publish anywhere online. Therefore, it is imperative to take down the default one that is automatically added by YouTube, and add your own, custom image instead.
To have your own thumbnail, you can either pick any frame from within the video itself, or you can upload a separate photo from your PC, and replace the existing one with it.
Things to Consider for creating attractive thumbnail
While using your custom image as a thumbnail for your YouTube Shots videos, a few things that you should keep in mind include:
- Relevance
Make sure that the new photo that you are planning to use as a thumbnail is relevant to the short video. Any image that is out of context might confuse the viewers, and you may lose your audience and the subscribers forever and for good.
- Clarity
Always use an image with clear content and large text (if any). This lets the viewers easily determine whether the video is of their interest.
- Correctness
You should avoid using misleading images as thumbnails. While such photos would attract more viewers initially, people will gradually lose trust in your channel if they do not find what they expect by the glimpse of the thumbnail.
Part 3: Optimize YouTube Shorts to Get More Views
The fact of the matter is, YouTube Shorts videos aren’t much different that any other video that you publish on the platform. Therefore, the process of optimizing both short and regular videos is identical.
A few things that are extremely important, and play a vital role in optimizing YouTube Shorts videos include:
- Attractive Thumbnail
As mentioned above, the thumbnail of a video is its face, and the prettier and appealing the face is the more audience will it attract, and the more hits your video will get. Therefore, ensure to make the thumbnail of your short videos as attractive as you possibly can.
- Compelling Title
The title says it all. Your short videos will have good chances of getting noticed and hits if they have an impulsive and compelling title that can give the viewers a summary of what they can expect from the clip.
- Detailed Description
The description of your short videos should be complete, and must explain the theme, genre, and nature of the clip. With the detailed description, the viewers will be able to assess if the video would be helpful to them in some manner.
- Tags
Make sure to add relevant tags to your short videos. For instance, adding ‘#Shorts’ in the title or description of the video tells YouTube that the clip is created for YouTube Shorts. Likewise, other tags that are related to the genre and/or theme of the short videos help YouTube suggest your media to the relevant audiences across the website.
![]()

Filmora - Best YouTube Shorts Video Editor for PC
- Easily record a video on PC and Mac.
- Edit videos quickly with a wide range of gaming effects.
- Rich video tempaltes and resources for YouTube videos.
- Export to MP4, MOV, MKV, GIF and multiple formats.
For Win 7 or later (64-bit)
For macOS 10.12 or later
 Secure Download


Part 4: How to Analyze YouTube Shorts Performance
YouTube Shorts are videos that are no more than 60 seconds long in length. When added under the ‘Featured’ category, you can see a significant amount of increment in the hits, and therefore the view count and the playback duration of your YouTube channel gets directly affected.
However, because these short videos cannot be monetized, at times you may notice that even though the total playback duration and view counts of your YouTube channel are high, your earnings may not be as much as what you would receive if those clips were published as regular videos.
FAQ: Will YouTube Shorts Performance Impact Other YouTube Stats?
Yes. As mentioned above, the view counts and playback durations of YouTube Shorts videos are added to your channel’s statistics. Therefore, with the number of views your short videos get, the overall performance of your YouTube stats is affected accordingly.
Richard Bennett
Richard Bennett is a writer and a lover of all things video.
Follow @Richard Bennett
Richard Bennett
Mar 27, 2024• Proven solutions
One of the biggest challenges that people face while using YouTube Shorts is how to get more views. Many new users wonder what and how should they prepare a video that is both 15-to-60 seconds long, and at the same time, it is engaging enough to make the audience view them with excitement.
With that said, the following sections discuss some best practices, and share a couple of tips to increase views on your YouTube Shorts videos.
- Part 1: Get More Views by Adding Shorts Video to the ‘Featured’ Section
- Part 2: Create Attractive Thumbnail for YouTube Shorts to Get More Views
- Part 3: Optimize YouTube Shorts to Get More Views
- Part 4: How to Analyze YouTube Shorts Performance
Part 1: Get More Views by Adding Shorts Video to the ‘Featured’ Section
Comparatively different from other videos, the ones that are added under the ‘Featured’ section are recommended to the audience throughout the YouTube platform on the basis of the algorithms that automatically determine which clips should be liked beach viewer individually.
![]()
A cross-platform for making videos anywhere for all creators
Why your video editing isn’t good enough? How about some creative inspo?
- 100 Million+ Users
- 150+ Countries and Regions
- 4 Million+ Social Media Followers
- 5 Million+ Stock Media for Use
* Secure Download
To elaborate, generally, YouTube suggests you a video as per your viewing history, browsing statistics, and other such information that the streaming media giant collects over time. On the other hand, the ‘Featured’ videos are suggested according to what YouTube ‘thinks’ might be of your interest, or could be somehow useful to you.
Therefore, when any clip is added as a ‘Featured’ video, YouTube suggests it to more viewers as compared to those that are published under the ‘Recommended’ category.
Note: Although there is a lot more to cover under the ‘Featured’ videos and channels section such as branding, advertisements, etc., such topics are beyond the scope of this piece.
Adding YouTube Shorts videos to the ‘Featured’ section is fairly simple, and the instructions given below explain how this can be done:
Note: It is assumed that you already have a couple of shorts video published on YouTube.
Step 1: Get to YouTube Studio Customization Section
Go to YouTube on your PC’s web browser, sign in to your Google account, click Your videos from the navigation bar in the left, and click Customization from the left bar when the Studio page opens up.
Step 2: Add YouTube Shorts
Click ADD SECTION from the Layout tab in the right window, and click Short videos from the list that appears next to add the YouTube Shorts category.
Step 3: Add Short videos to Featured sections and Save the Changes
Hold the Short videos bar from the moving handle at the left, and move it right below the Featured sections segment. Once the Short videos category is in the right place, click PUBLISH from the top-right corner of the page to save the changes. From this point onward, any YouTube Shorts video that you publish on your channel will be automatically added as ‘Featured’ after its approval.
Part 2: Create Attractive Thumbnail for YouTube Shorts to Get More Views
The thumbnails are the face of the videos that you publish anywhere online. Therefore, it is imperative to take down the default one that is automatically added by YouTube, and add your own, custom image instead.
To have your own thumbnail, you can either pick any frame from within the video itself, or you can upload a separate photo from your PC, and replace the existing one with it.
Things to Consider for creating attractive thumbnail
While using your custom image as a thumbnail for your YouTube Shots videos, a few things that you should keep in mind include:
- Relevance
Make sure that the new photo that you are planning to use as a thumbnail is relevant to the short video. Any image that is out of context might confuse the viewers, and you may lose your audience and the subscribers forever and for good.
- Clarity
Always use an image with clear content and large text (if any). This lets the viewers easily determine whether the video is of their interest.
- Correctness
You should avoid using misleading images as thumbnails. While such photos would attract more viewers initially, people will gradually lose trust in your channel if they do not find what they expect by the glimpse of the thumbnail.
Part 3: Optimize YouTube Shorts to Get More Views
The fact of the matter is, YouTube Shorts videos aren’t much different that any other video that you publish on the platform. Therefore, the process of optimizing both short and regular videos is identical.
A few things that are extremely important, and play a vital role in optimizing YouTube Shorts videos include:
- Attractive Thumbnail
As mentioned above, the thumbnail of a video is its face, and the prettier and appealing the face is the more audience will it attract, and the more hits your video will get. Therefore, ensure to make the thumbnail of your short videos as attractive as you possibly can.
- Compelling Title
The title says it all. Your short videos will have good chances of getting noticed and hits if they have an impulsive and compelling title that can give the viewers a summary of what they can expect from the clip.
- Detailed Description
The description of your short videos should be complete, and must explain the theme, genre, and nature of the clip. With the detailed description, the viewers will be able to assess if the video would be helpful to them in some manner.
- Tags
Make sure to add relevant tags to your short videos. For instance, adding ‘#Shorts’ in the title or description of the video tells YouTube that the clip is created for YouTube Shorts. Likewise, other tags that are related to the genre and/or theme of the short videos help YouTube suggest your media to the relevant audiences across the website.
![]()
Filmora - Best YouTube Shorts Video Editor for PC
- Easily record a video on PC and Mac.
- Edit videos quickly with a wide range of gaming effects.
- Rich video tempaltes and resources for YouTube videos.
- Export to MP4, MOV, MKV, GIF and multiple formats.
For Win 7 or later (64-bit)
For macOS 10.12 or later
Secure Download
Part 4: How to Analyze YouTube Shorts Performance
YouTube Shorts are videos that are no more than 60 seconds long in length. When added under the ‘Featured’ category, you can see a significant amount of increment in the hits, and therefore the view count and the playback duration of your YouTube channel gets directly affected.
However, because these short videos cannot be monetized, at times you may notice that even though the total playback duration and view counts of your YouTube channel are high, your earnings may not be as much as what you would receive if those clips were published as regular videos.
FAQ: Will YouTube Shorts Performance Impact Other YouTube Stats?
Yes. As mentioned above, the view counts and playback durations of YouTube Shorts videos are added to your channel’s statistics. Therefore, with the number of views your short videos get, the overall performance of your YouTube stats is affected accordingly.
Richard Bennett
Richard Bennett is a writer and a lover of all things video.
Follow @Richard Bennett
Learn to Add YouTube Videos for Richer Google Slate Decks
Create High-Quality Video - Wondershare Filmora
An easy and powerful YouTube video editor
Numerous video and audio effects to choose from
Detailed tutorials provided by the official channel
Google Slide presentation is a powerful tool for creators to keep their audience engaged. This online platform lets you create and demonstrate your ideas. It will capture your viewers’ attention from the very beginning. It also doesn’t matter whatever learning style you engage. Adding YouTube videos to Google Slide will appeal to all levels of individuals.
More so, it is the best way to provide a break for both the audience and the creator. You can break Google Slide presentations with videos to offer some break. Viewers and the presenter get a breather in the process. The presenter can take a short break from speaking while the video plays. Let’s now dive into how to embed a YouTube video in Google Slides.

In this article
01 Why should we add a video to Google Slides?
02 How to add a YouTube video to Google Slide
03 How to choose the right video for your Slides?
Why should we add a video to Google Slides?
There is a great impact of adding video to Google Slides.
For attention
Videos will automatically awaken you, especially if your thoughts have started to sway during a presentation. A video has a direct way of showing creativity. The audience automatically connects the dots between the video and the presentation lines alike.
To stimulate discussion
A picture is worth a thousand words. There is a way that an added video will help the audience connect to the day’s topic. It will bring up several ideas and stir up discussion with the presenter.
Easy following
With videos embedded in Google Slide, viewers will find it easy to understand and digest. Videos automatically eliminate boredom and make any topic interesting.
How to add a YouTube video to Google Slide
Use these two methods to add a YouTube video to Google Slides. Via the Search and Direct link.
Method 1. Embed YouTube video to Google Slide by search and selection
Google has owned YouTube since the year 2006. You can, therefore, integrate Google’s products with YouTube easily.
Step 1. First, go to the slide where you want to embed your video.
Step 2. Then choose the “Insert” option from the menu bar and hit the “Video” option.

Step 3. It would be best if you now viewed the “YouTube” search bar to type in the video you want to embed. You can use keywords to search for the video in question and view instant search results.
Step 4. Then select the video you want to embed, and you’ll see it appear on the “Slide.”

Step 5. Format your video. Remember that the entire video will be embedded. You don’t necessarily need the whole video. It is time to select just a brief but relevant clip from the video to use. Then position your video to the right point using the axes from the exact starting point to the finished part you want the video to appear in.
Method 2. Embed YouTube video to Google Slide by direct link
You can engage this method if you want to include the entire video.
Step 1. Get the URL of the specific YouTube video that you want to use.

Step 2. Then go to your browser’s “Address bar” to copy the YouTube link.
Step 3. Next, open the “Presentation” slide to put your video to.
Step 4. Choose the “Insert” tab from the menu bar.
Step 5. Then hit on the “Video” option from the drop-down menu that appears.
Step 6. A new window will open automatically. Choose the “By URL” tab.
Step 7. Then paste the YouTube video URL in the “Paste YouTube URL Here” bar section.

Step 8. Wait for the video file to load and press the “Select” option. The video will immediately appear in the presentation slide. Just drag and drop the video in your preferred position.
Note: You can do a few edits inside the application. Set the timer when your video should start and when to stop. You can also adjust the video player size.
How to choose the right video for your Slides?
Not all videos will make an impact on your Google Slide. You need to use the best shot that adds value to your presentation. These guidelines will help you to settle on the best video.
Be Professional – choose the best video for your presentation. Remember that the video is part of the presentation and carries more weight. Settling for quality video will bring out the professionalism in you.
Relevant – how do you know that what you are showing your audience corresponds to the presentation piece? Ensure that the video you add has something to do with the Google Slide presentation topic. The two should naturally flow to make it easy to understand the whole concept.
Precise – your presentation is not about the video. The ideal length should not exceed 60 seconds. The longer the video, the greater the chance for your audience to lose track along the way.
Know every footage you are working with – this will help you pick the best shots for your presentation. So, learn every aspect of the video before settling down to use it.
Add new content – even though one content may suit several presentations, don’t rely on the same piece each time. Your audience will want to feel something fresh each time you are presenting. So, compose different videos for different scenarios to make that big impact.
Create an eye-catching video for your Slides with Filmora
The video quality matters when it comes to creating your Slides. The best video creator – Filmora – works in simple steps to give you an eye-catching video. It will create videos for all scenarios like marketing, tutorial, gaming, etc.
Key features of Filmora
- It offers you advanced video effects like filters, motion elements, etc
- You can multiply your fun with multiple screens with the Split Screen feature
- Easily change backgrounds using the Green Screen feature
- The speed control lets you fast forward or slow down a special moment
- Import your video clips to social media platforms
- You can also adjust the audio of your tracks using the Audio Mixer feature
Follow this guide to create a video for your slide with Filmora
Step 1. Launch Filmora
First, begin by downloading and installing Filmora on your computer device. Once installed, launch it and allow it to run. You can either create a new project or open an existing project to work on.
Step 2. Create a new project
Here, click on the “New Project” tab on the app’s welcome screen. The editor should load immediately. Then proceed to register the product. Just hit on the “Register” tab.
Step 3. Import video
Check the upper left corner of your screen to see the “Import” tab. Click on it and choose the “Import Media Files” option. Next, navigate to the location of your computer’s local list to select the clip or video you want to edit. Then, hit the “Import” button to add the video to the timeline for editing.
Step 4. Edit video
Drag and drop the raw footage to Filmora’s timeline to begin editing. Here, you can trim, add other video clips, merge, and add effects as you wish. Likewise, you can add opening titles, subtitles, and end credits to your video. More so, this tool offers different templates to use. Just drag and drop the templates you wish to use to a specific location on the timeline.
Step 5. Preview your file
Last but not least, you can preview your files. Click on the “Play” tab to start previewing your video clips. The main essence of this part is to allow you to make the necessary changes to your clips if there is a need.
Step 6. Export and Share
With Filmora, you can export your file to various social media platforms. But first, go to the “Output window” and select the video file format to use. This software supports several output formats to apply to any platform and device. Just click on the “Format” tab and choose the file format to use. Then also change the resolution and other parameters like frame rate and channel of your video in the “Settings” section. Finally, share your video to your YouTube channel and get ready to add the video to the Google Slide presentation.
For Win 7 or later (64-bit)
For macOS 10.12 or later
Conclusion
● You now know how to put a YouTube video in Google Slides the simple way. You can search for your YouTube videos or directly use the URL link. Whatever the case, remember that it’s the quality of your video that carries more weight. Thanks to the availability of third-party apps that you can use to create and improve the quality of your videos.
● Filmora is at your service to create high-resolution videos that you can export in any format to your YouTube channel. The tool is intuitive, and it won’t matter whether you haven’t tried it before. It is a perfect choice for both professionals and first-time users.
Google Slide presentation is a powerful tool for creators to keep their audience engaged. This online platform lets you create and demonstrate your ideas. It will capture your viewers’ attention from the very beginning. It also doesn’t matter whatever learning style you engage. Adding YouTube videos to Google Slide will appeal to all levels of individuals.
More so, it is the best way to provide a break for both the audience and the creator. You can break Google Slide presentations with videos to offer some break. Viewers and the presenter get a breather in the process. The presenter can take a short break from speaking while the video plays. Let’s now dive into how to embed a YouTube video in Google Slides.
In this article
01 Why should we add a video to Google Slides?
02 How to add a YouTube video to Google Slide
03 How to choose the right video for your Slides?
Why should we add a video to Google Slides?
There is a great impact of adding video to Google Slides.
For attention
Videos will automatically awaken you, especially if your thoughts have started to sway during a presentation. A video has a direct way of showing creativity. The audience automatically connects the dots between the video and the presentation lines alike.
To stimulate discussion
A picture is worth a thousand words. There is a way that an added video will help the audience connect to the day’s topic. It will bring up several ideas and stir up discussion with the presenter.
Easy following
With videos embedded in Google Slide, viewers will find it easy to understand and digest. Videos automatically eliminate boredom and make any topic interesting.
How to add a YouTube video to Google Slide
Use these two methods to add a YouTube video to Google Slides. Via the Search and Direct link.
Method 1. Embed YouTube video to Google Slide by search and selection
Google has owned YouTube since the year 2006. You can, therefore, integrate Google’s products with YouTube easily.
Step 1. First, go to the slide where you want to embed your video.
Step 2. Then choose the “Insert” option from the menu bar and hit the “Video” option.
Step 3. It would be best if you now viewed the “YouTube” search bar to type in the video you want to embed. You can use keywords to search for the video in question and view instant search results.
Step 4. Then select the video you want to embed, and you’ll see it appear on the “Slide.”
Step 5. Format your video. Remember that the entire video will be embedded. You don’t necessarily need the whole video. It is time to select just a brief but relevant clip from the video to use. Then position your video to the right point using the axes from the exact starting point to the finished part you want the video to appear in.
Method 2. Embed YouTube video to Google Slide by direct link
You can engage this method if you want to include the entire video.
Step 1. Get the URL of the specific YouTube video that you want to use.
Step 2. Then go to your browser’s “Address bar” to copy the YouTube link.
Step 3. Next, open the “Presentation” slide to put your video to.
Step 4. Choose the “Insert” tab from the menu bar.
Step 5. Then hit on the “Video” option from the drop-down menu that appears.
Step 6. A new window will open automatically. Choose the “By URL” tab.
Step 7. Then paste the YouTube video URL in the “Paste YouTube URL Here” bar section.
Step 8. Wait for the video file to load and press the “Select” option. The video will immediately appear in the presentation slide. Just drag and drop the video in your preferred position.
Note: You can do a few edits inside the application. Set the timer when your video should start and when to stop. You can also adjust the video player size.
How to choose the right video for your Slides?
Not all videos will make an impact on your Google Slide. You need to use the best shot that adds value to your presentation. These guidelines will help you to settle on the best video.
Be Professional – choose the best video for your presentation. Remember that the video is part of the presentation and carries more weight. Settling for quality video will bring out the professionalism in you.
Relevant – how do you know that what you are showing your audience corresponds to the presentation piece? Ensure that the video you add has something to do with the Google Slide presentation topic. The two should naturally flow to make it easy to understand the whole concept.
Precise – your presentation is not about the video. The ideal length should not exceed 60 seconds. The longer the video, the greater the chance for your audience to lose track along the way.
Know every footage you are working with – this will help you pick the best shots for your presentation. So, learn every aspect of the video before settling down to use it.
Add new content – even though one content may suit several presentations, don’t rely on the same piece each time. Your audience will want to feel something fresh each time you are presenting. So, compose different videos for different scenarios to make that big impact.
Create an eye-catching video for your Slides with Filmora
The video quality matters when it comes to creating your Slides. The best video creator – Filmora – works in simple steps to give you an eye-catching video. It will create videos for all scenarios like marketing, tutorial, gaming, etc.
Key features of Filmora
- It offers you advanced video effects like filters, motion elements, etc
- You can multiply your fun with multiple screens with the Split Screen feature
- Easily change backgrounds using the Green Screen feature
- The speed control lets you fast forward or slow down a special moment
- Import your video clips to social media platforms
- You can also adjust the audio of your tracks using the Audio Mixer feature
Follow this guide to create a video for your slide with Filmora
Step 1. Launch Filmora
First, begin by downloading and installing Filmora on your computer device. Once installed, launch it and allow it to run. You can either create a new project or open an existing project to work on.
Step 2. Create a new project
Here, click on the “New Project” tab on the app’s welcome screen. The editor should load immediately. Then proceed to register the product. Just hit on the “Register” tab.
Step 3. Import video
Check the upper left corner of your screen to see the “Import” tab. Click on it and choose the “Import Media Files” option. Next, navigate to the location of your computer’s local list to select the clip or video you want to edit. Then, hit the “Import” button to add the video to the timeline for editing.
Step 4. Edit video
Drag and drop the raw footage to Filmora’s timeline to begin editing. Here, you can trim, add other video clips, merge, and add effects as you wish. Likewise, you can add opening titles, subtitles, and end credits to your video. More so, this tool offers different templates to use. Just drag and drop the templates you wish to use to a specific location on the timeline.
Step 5. Preview your file
Last but not least, you can preview your files. Click on the “Play” tab to start previewing your video clips. The main essence of this part is to allow you to make the necessary changes to your clips if there is a need.
Step 6. Export and Share
With Filmora, you can export your file to various social media platforms. But first, go to the “Output window” and select the video file format to use. This software supports several output formats to apply to any platform and device. Just click on the “Format” tab and choose the file format to use. Then also change the resolution and other parameters like frame rate and channel of your video in the “Settings” section. Finally, share your video to your YouTube channel and get ready to add the video to the Google Slide presentation.
For Win 7 or later (64-bit)
For macOS 10.12 or later
Conclusion
● You now know how to put a YouTube video in Google Slides the simple way. You can search for your YouTube videos or directly use the URL link. Whatever the case, remember that it’s the quality of your video that carries more weight. Thanks to the availability of third-party apps that you can use to create and improve the quality of your videos.
● Filmora is at your service to create high-resolution videos that you can export in any format to your YouTube channel. The tool is intuitive, and it won’t matter whether you haven’t tried it before. It is a perfect choice for both professionals and first-time users.
Also read:
- [New] Direct Download Destiny #10 Online Tool Reviewers' Choice
- [Updated] Behind the Curtain How YouTube Tally's Its Views
- [Updated] Crafting a Continuous Youtube Video Stream From Separate Files
- Unleashing Potential A Treasury of YouTube Themes for Channels
- Skyrocket Traffic with the Top 12 YouTube Growth Methods
- Easy MP3 Conversion From MP3 Files to YouTube Videos [3 Ways] for 2024
- Elevate Your Game Strategies for Stellar Gaming YouTube Banners for 2024
- 2024 Approved Elevate Views A Guide to Best YouTube Hash Tags
- Elite Screening Pacts How to Choose a CMS for 2024
- [New] Best Practices for YouTube Video Brightness and Contrast
- [New] Ad-Based Revenue Tracking for YouTubers' Success
- [Updated] Cultivating a Distinctive Presence in the Marketplace
- In 2024, Essential Insights for Crafting YouTube Intros A+B Methods
- [New] 1 Ranked YouTube to Text Online Service
- In 2024, Enhanced Audio Experience Top 5 Game Headsets for Streaming
- Unravel Time on Your Screen Fresh Perspectives to Watch YouTube Backwards
- Grow Your Digital Presence Effective Techniques for Multitasking on Youtube and Twitch
- [Updated] Elevate Your Vlogs Optimizing Title, Description & Tags
- Captivating Captions Writing Copy That Drives Engagement and Views
- [Updated] Defining Your Visual and Stylistic Identity [High Relevance]
- 2024 Approved Crafting an Engaging Online Presence The Complete Guide to YouTube Submissions
- [New] Does Recording Your Viewed YouTube Content Violate Laws?
- Epicurean Envoys The Best Food Vloggers to Watch for 2024
- Amplify Your Video's Reach Perfect Title, Description & Tags
- In 2024, Bright Ideas Effective Lighting in Vlogging
- 2024 Approved Echoing Ethos with Closing Credits
- Effortless Music Playlist Creation for YouTube, Anywhere (Web/Mobile)
- [New] Enhance Your Video's Call-to-Action A Step-by-Step Filmora Guide
- [New] Discovering Your YouTube Unique Slot
- [Updated] Boosting Engagement Editing for Perfect Video Titles & Descriptions
- In 2024, Cutting Edge Professional Guide to YouTube Editing
- In 2024, A Guide to Gathering Gold From Guided Goods' Gazes Online
- In 2024, A Step-by-Step Approach to Generating Income with Trailers
- Cutting Through the Clutter How to Stream Top-Notch Upside-Down Content on Youtube for 2024
- [New] Creating Engaging and Memorable YouTube Channel Graphics
- Effortless Free Extraction of YouTube Desktops
- Adding Subtitles A Step-by-Step YouTube Video Approach for 2024
- Perfect Phone Videos Your DIY YouTube Journey
- 2024 Approved Elevating Your YouTube Projects with Enhancements
- [Updated] Best Practices for Producing Encouragement-Driven Vlogs
- A Filmmaker's Guide to Mastering Green Screen Technology
- Soundscapes Perfected Selecting Microphones That Resonate With YouTubers
- In 2024, Deciphering How TSeries Benefits From YouTube
- [Updated] Epic Playlist Over a Hundred Top-Tier Titles
- [Updated] Effortless YouTube File Extraction
- DIY YouTube Openers Technique One & Technique Two
- [New] Comprehensive Review The Journey From Vocaloids to VTubers
- Backtrack Your YouTube Queue, Swiftly & Sweetly
- Removing Advertisements From YouTube Videos on Chrome/Firefox
- In 2024, Earnings Enlightenment Joshi and YouTube Success Stories
- Fake the Location to Get Around the MLB Blackouts on Motorola Edge 40 Neo | Dr.fone
- In 2024, Unlocking Apple iPhone 14 Passcode without a Computer | Dr.fone
- How to Transfer Data from Vivo Y28 5G to Any iOS Devices | Dr.fone
- [Updated] 2024 Approved SnapScreen Scrutiny A Deep Dive Into Recorders
- Audio Creation at Your Fingertips A Comprehensive Look Into Adobes Audio Editor Features
- Mastering Twitter Video Aspect Ratios Made Easy for 2024
- In 2024, How to Remove iPhone XS Max Activation Lock
- Updated 2024 Approved Expert Tips on Removing Audio Fuzziness for Crystal-Clear Video Production
- In 2024, Simple and Effective Ways to Change Your Country on YouTube App Of your Motorola Moto G34 5G | Dr.fone
- [Updated] Flashback to Fame Retro Trends in Today's Twitter World for 2024
- [Updated] Best Quality HD Screensaver Recorders
- In 2024, Getting the Pokemon Go GPS Signal Not Found 11 Error in Nubia Red Magic 9 Pro | Dr.fone
- How to Reset Gmail Password on Poco X5 Devices
- In 2024, Here Are Some Reliable Ways to Get Pokemon Go Friend Codes For Samsung Galaxy A34 5G | Dr.fone
- The Art of Google Meet Modifications Using Masks & Effects
- A Step-by-Step Journey to Revamping Your Win11 Look
- [New] QuickTweet Clip Swiftly Gather Social Media Vids
- [New] 2024 Approved How to Revive a Stuck OBS Fullscreen
- [Updated] Unveiling This Year's Dominant TikTok Styles for 2024
- [New] TeenyScreenMugger Evaluation Insights for 2024
- [New] 10 Top Picks for No-Cost Zoom & Screenshare
- New 2024 Approved Windows 8 FLV Video Editor Convert, Trim, and Enhance Your Videos
- 2024 Approved Ubuntu Video Editing Essentials Top 10 Free Options
- A Complete Guide To OEM Unlocking on Samsung Galaxy F14 5G
- [Updated] Social Snapshot Saver Tool for 2024
- [New] In 2024, Premium 4K Screen Capturing Solutions
- Updated 2024 Approved FCPX Not Your Cup of Tea? Discover These 10 Alternatives
- [New] 2024 Approved Uniting Communication & Visuals A Detailed Plan for Slack + Filmora Meetings
- Elevate Your Content 20 Exceptional TikTok Captions for Success
- Mac Users, Rejoice! Top Windows Movie Maker Alternatives for 2024
- How to Remove Forgotten PIN Of Your Oppo A78 5G
- [New] Professional Posting Hacks for Instagram TV for 2024
- Unlock android phone if you don't have Samsung Galaxy M34 fingerprint
- Elevate Your Gaming Footage FBX Edition
- The Essentials of WhatsApp Room Setup
- [New] Techniques for Efficient Zoom Meeting Recordings for 2024
- 2024 Approved A Comprehensive Tutorial on Making Voice Recordings with Samsung S10 and S9
- Flamboyant Snaps Techniques for Lasting Snapstreaks
- The Essentials of Using TikTok on Both Macs & PCs for 2024
- [New] Top 4 Proven Tactics for Exceptional Loop Videos on IG for 2024
- [New] Mastering Slow-Mo in Snapchat A Comprehensive Tutorial
- Elevate Your Social Media Impact with Inspiring TikTok Usernames
- Title: "Enhancing Visibility Popularize Your YouTube Short Videos"
- Author: Steven
- Created at : 2024-06-10 01:41:25
- Updated at : 2024-06-11 01:41:25
- Link: https://youtube-clips.techidaily.com/enhancing-visibility-popularize-your-youtube-short-videos/
- License: This work is licensed under CC BY-NC-SA 4.0.
