
:max_bytes(150000):strip_icc()/TechLeaders_GettyImages-1145150936_CROPPED2-ee3a30f68b494acf8196f46f29680b70.jpg)
"Enhancing Viewability Creating Custom YouTube Thumbnails"
Enhancing Viewability: Creating Custom YouTube Thumbnails
How To Add Custom Thumbnails to Your YouTube Videos

Richard Bennett
Mar 27, 2024• Proven solutions
YouTube custom thumbnails are a great way to get people’s attention to your YouTube video. It’s a pretty simple process but if you are wondering how to create a thumbnail and add the thumbnail to YouTube video and customize it with the correct size. You have come to the right place. While in this article, I will show you how to create and add a thumbnail to a YouTube video and how to customize the YouTube video thumbnail. Follow these easy steps below and add eyecatching customed thumbnails to your YouTube videos in no time.
- Part 1: Create and Add Custom Thumbnails to YouTube
- Part 2: Tools to Create Custom YouTube Video Thumbnails
- Part 3: How to Change A Thumbnail On YouTube
- Part 4: Things You Need to Know Before Making a YouTube Custom Thumbnail
- Part 5: Tips on How to Make Good YouTube Thumbnails to Get More Clicks
- Part 6: YouTube Thumbnail FAQs
How To Add Custom Thumbnails to Your YouTube Videos [Steps, Tools and Tips]
We have just made a video tutorial about how to make a YouTube video thumbnail, check it below to find out the tips and tricks of making customized YouTube thumbnail.


Part 1: How to Make a Thumbnail for YouTube and Add Custom Thumbnails to YouTube
After you’ve verified your account and made your thumbnail, it’s finally time to upload it to your video and make a custom thumbnail. To do this, go to Creator Studio and then Video Manager. You’ll see a button labeled “Edit” next to each video, and an arrow pointing down. Click Thumbnail Editor.
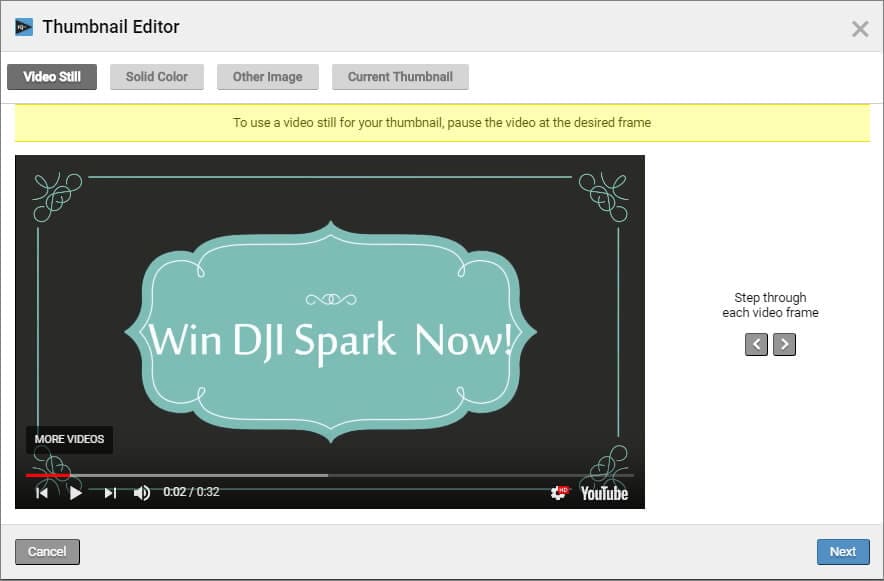
In Thumbnail Editor, you can use the still images in the video as a thumbnail, choose a solid background color for the thumbnail, or add other images from your computer. I will show you the steps of how to customize the video still as a video thumbnail.
1. Preview the video and choose the target video still. You can click the Playback button and check the video and pause it at the desired frame. Or, you can step through each frame by clicking the Preview Frame button and Next Frame icon. Click Next to continue.
2. And now, you can add text, image and shape overlays to the thumbnail. You can change the text font, size, opacity and more.
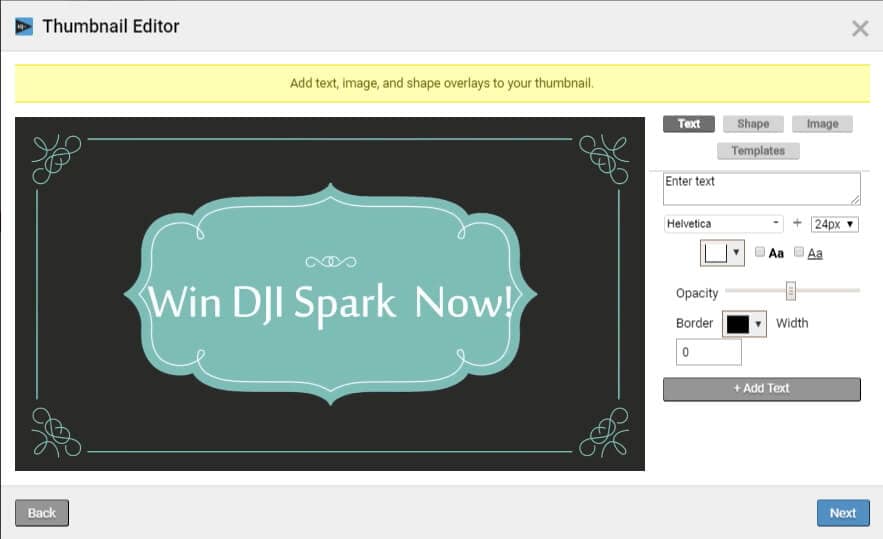
3. Click Next to save the thumbnail and you will see how the thumbnail displays on different platforms such as YouTube, Facebook and Twitter. Click Save to save the video thumbnail.
In this way, you can add a custom thumbnail to the new videos and change the video thumbnail of the previously uploaded videos.
Part 2: Thumbnail Makers to Create Custom YouTube Thumbnails
Of course, you can use some of the best tools to make a YouTube video thumbnail. In this part, we will show you some of the best tools to create custom YouTube thumbnails.
Download Mac Version ](https://tools.techidaily.com/wondershare/filmora/download/ )
1. Create YouTube Thumbnail with Online solution - Canva
Canva is a free, powerful online image editing program with tons of great templates to get you started. One of their templates just happens to be YouTube thumbnails. Open Canva and select the “YouTube Thumbnail” design type. Use your own photo or choose from a huge library, then add text and effects to really make it stand out. Save and share — easy as that.
Check this video tutorial to see how to Make a Youtube Thumbnail using Canva.
You may also like: Best online Photo Editor
2. Design YouTube thumbnail with a Desktop solution - Gimp
Gimp is one of the most popular image editing programs around for one very simple reason: it’s powerful and free! Where Canva uses a lot of templates, Gimp gives you absolute, full control over how you want your image to look. Make a 1280x720 image and start putting together your eye-catching thumbnail exactly how you want to.
Check this video tutorial to see how to make professional Thumbnails for YouTube Videos with Gimp:
Part 3: How to Change A Thumbnail On YouTube
Note: YouTube allows verified YouTube accounts (accounts that provided YouTube with a working phone number) to upload custom thumbnail images and change them accordingly.
In this part, we’ll be going over how to change a thumbnail image on YouTube. There are pictures to make it easy to follow along.
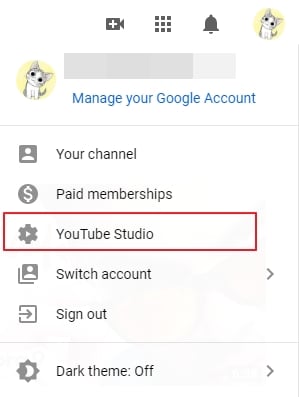
- After signing into YouTube with your Google account, click on your profile on the top right corner. Click on YouTube Studio from the drop-down menu.
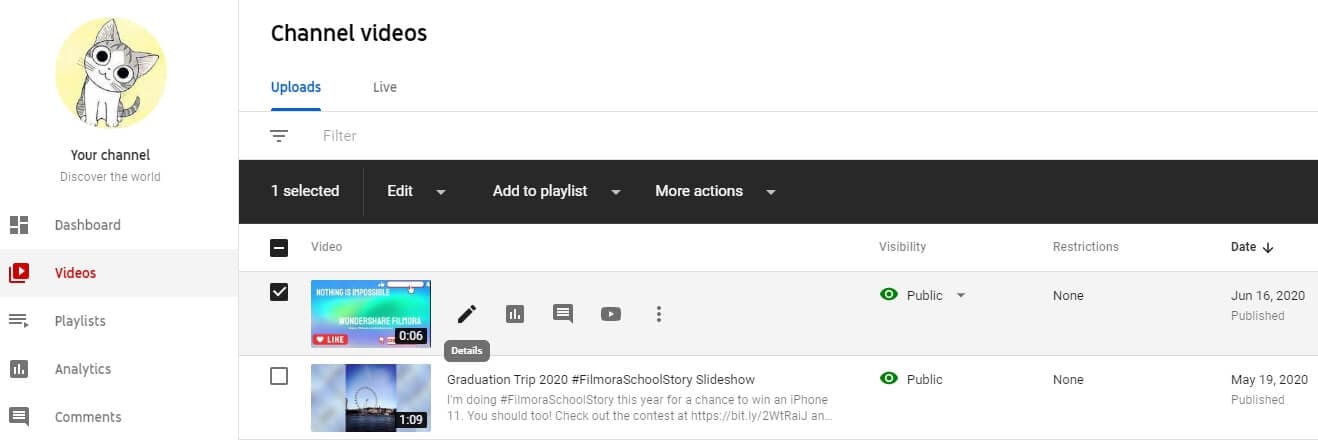
- On the left side of the page, click on Videos and then find your video and click on the details button.
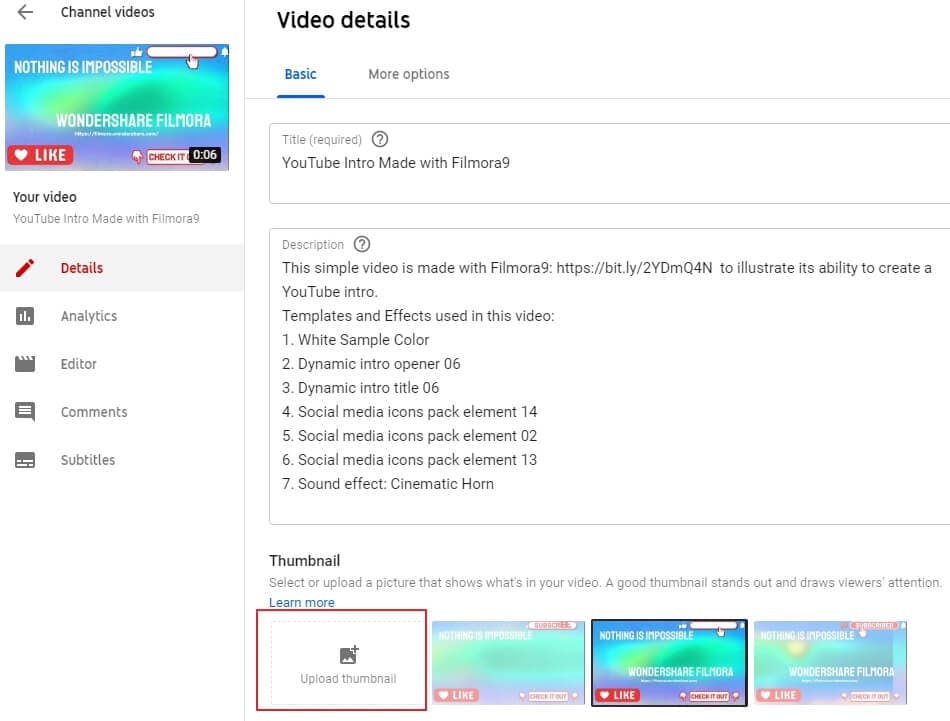
- Find the Thumbnail section in the basic video details tab, and then click the Upload thumbnail to select the image that you want to upload.
- Finally, click on the Save button on the right upper corner. And just like that, in seven easy steps, we’re done changing the thumbnail of a YouTube video.
If you don’t have an image to upload but you want to check out some online resources to make your own, check out our Top YouTube Thumbnail Makers .
Part 4: Things You Need to Know Before Making a Custom Thumbnail
- About the proper YouTube video thumbnail size: Your thumbnail should be 1280x720 pixels in size and be less than 2MB. The minimum width of the image is 640 pixels.
- About the YouTube Image thumbnail format: Use .JPG, .PNG, .GIF or .BMP files for your thumbnail image.
- You’ll want your thumbnails to stand out. Bright colored text is a simple, easy way to draw people’s attention. Red, white, yellow, or orange are all popular choices.
- You can even do a little homework to see what colors others are using for similar videos to yours, and then choose different colors to stand out.
One word of warning: your thumbnail should be related to the content of your video. Misleading thumbnail images, if reported, will reflect poorly on your channel. You’ll get a negative rating in the community status part of your channel. This can actually remove your ability to use custom thumbnails, so keep it honest!
You may also like: How to Make YouTube Channel Art
To make a creative YouTube video, you may also need a powerful video editing software. Check how to edit a YouTube video in Filmora video editor and download it to try.
You may also like: Best video editing software for YouTube
Part 5: Tips on How to Make Good YouTube Thumbnails - Get More Clicks
The thumbnails of your videos play a huge role in convincing people to watch them; a good YouTube thumbnail will get you more views and more potential subscribers. This part will give you 6 tips on creating thumbnails that help grow your channel. Now let’s learn how to make thumbnails using Wondershare PixStudio.
1. Stay On Topic
Your thumbnail should tell a story; it should be clear from looking at it what viewers will get out of watching the video, be it knowledge or entertainment. If your thumbnail sets expectations that your video doesn’t deliver on, people will click away quickly. You may get views quickly, but you won’t get much watch time. That will tell YouTube’s search algorithm ‘people aren’t getting what they want from this, rank it lower’. That leads to fewer views over time, and gives the people who do manage to find your video a negative opinion of your channel.
Very few people intentionally use thumbnails that have nothing to do with the content of their videos – i.e, most people understand not to use a picture of a kitten in the thumbnail for their tech review, unless maybe their kitten is the one doing the review (which would be adorable, someone should do that). People who want serious advice won’t click, and people who click to see a kitten will click away fast.

This thumbnail had better be for a kitten’s iPhone review video or people will click away. Fast.
A mistake a lot of creators do make is creating a thumbnail that is meant to evoke an emotion which the video itself does not justify. For example, if you see a picture of a YouTuber looking nervous alongside text that reads ‘My Secret’, you will think they are going to share something deeply personal. You will be curious, and you may even be worried about them. You’ll probably click. Then, if their secret is that they don’t like pineapple on pizza, you’ll probably be angry. This technique gets clicks, but not a lot of watch time and it will lose you subs in the long run.
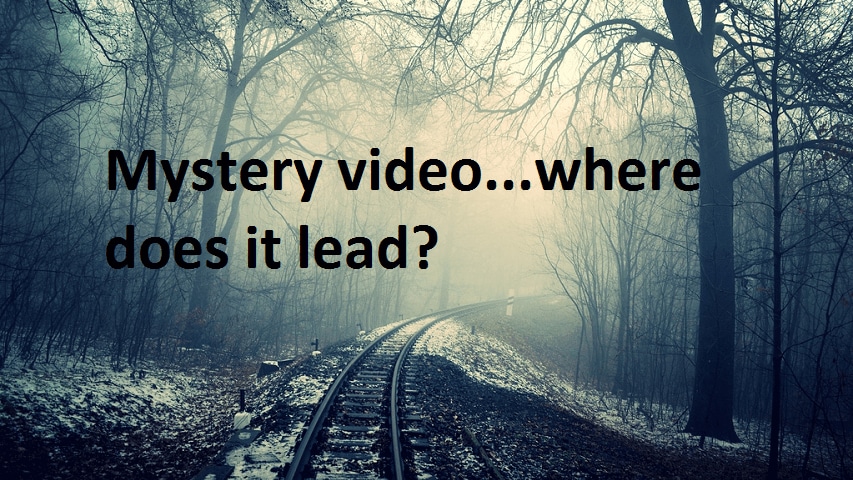
2. Don’t Be Mysterious
A good thumbnail doesn’t make people guess. Your thumbnail should tell people what’s in your video, not make them wonder about it. People want to know what they’re being asked to spend time watching.
Often, they will be looking for the answer to a specific question and will completely ignore anything that doesn’t show – in the thumbnail – that it has their answer.
Sometimes big channels can get away with stuff like this, because large portions of their audiences are interested in them as people and will already be curious about anything they post. This technique will not bring in new viewers, though.
If this came up in a search for ‘smoky eye tutorial’, would you click it?
When people want answers, they want to feel confident that they video they click on will have those answers. If you have great content, then let people know it!
3. People Like People
Viewers are more likely to click on a thumbnail if they feel a connection when they look at it. One of the best ways to create a feeling of connection is through eye contact, and you can apply that principle to your YouTube thumbnails easily.
Just make sure you’re in them.
You can either compose a photo to use as your thumbnail, or use a screenshot from your video. Ideally, the image of you will convey the emotional tone of the video and tell potential viewers what it is about, besides you.
So, if you want to post a funny video that is also about making brownies, maybe a picture of you smiling while holding up a tray of brownies would be a better direction than just showing the brownies?
4. Check Out The Competition
Before you post your video, type your topic into YouTube’s search engine and see what comes up. This will give you insight into what kinds of thumbnails are performing well for other people, as well as what you can do to stand out in comparison.
Phil starts talking about thumbnails at 6:09, and he has great tips on checking out your competition!
For example, if all five of the top-ranked videos for the search ‘how to build a cabinet’ show images of the YouTuber smiling while holding a power tool, then your thumbnail for a video on the same topic should also be a picture of you smiling and holding a power tool. You know that works, so why not do it?
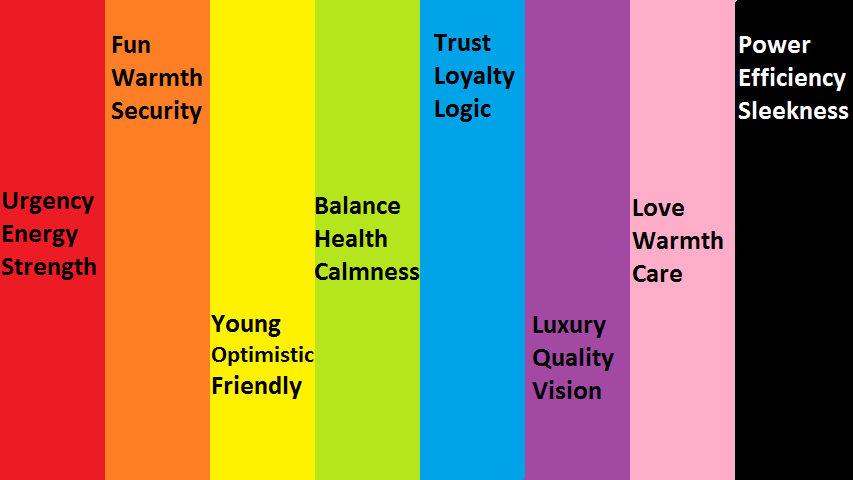
5. Use Color in Interesting Ways
You want to use colors that will help you stand out from the other search results. While checking out your competition if you notice that all the people in the other thumbnails are wearing black or navy blue, it will be a good idea for you to wear a brighter color for your shoot to grab a bit more attention.
Beyond simply using colors that are different from other people’s colors, you should consider the emotions different colors trigger.
Maybe don’t use a lot of green and yellow in the thumbnail for your angry video rant?
6. Make Your Text Huge
Usually, you’ll want to use a bit of text in your thumbnail. It might be the full title of your video, or just a keyword or phrase. You don’t want to use a full sentence because you won’t have room for it if you’re using huge text.
The reason you should use huge text is so that people can read it. Remember that when people see your thumbnail in their search results, it will be much smaller than it will look while you are creating it. Text that looks big enough while you are creating your thumbnail will be much smaller when people are actually trying to read it, and that goes double for viewers watching on their small smartphone screens.
Frequently Asked Questions about YouTube Thumbnail
1. What is YouTube Thumbnail?
When you upload a video on YouTube, YouTube gives you three images to choose from in the selection of your video’s thumbnail image. These three images are just freeze-frame snapshots from different parts of your video, which may not tell your viewers what your video is really all about.
2. Can You Change YouTube Thumbnail After Publishing?
Yes, you can replace the auto-generated thumbnail with the customized thumbnail you like. But YouTube only allows verified YouTube accounts to upload custom thumbnail images.
3. How Long Does It Take for a Thumbnail to Change on YouTube?
Normally, if you have a good internet connection, you can see the thumbnail is changed within 10 seconds.
4. Why YouTube Thumbnail is Important?
When you get more people watching your video for longer, it increases your watch time and tells YouTube’s search algorithm ‘people like this, rank it higher’. Being ranked higher gets you more views, and even more watch time. It’s a wonderful cycle that all begins with a great thumbnail (paired with a good title and the right tags).
Richard Bennett
Richard Bennett is a writer and a lover of all things video.
Follow @Richard Bennett
Richard Bennett
Mar 27, 2024• Proven solutions
YouTube custom thumbnails are a great way to get people’s attention to your YouTube video. It’s a pretty simple process but if you are wondering how to create a thumbnail and add the thumbnail to YouTube video and customize it with the correct size. You have come to the right place. While in this article, I will show you how to create and add a thumbnail to a YouTube video and how to customize the YouTube video thumbnail. Follow these easy steps below and add eyecatching customed thumbnails to your YouTube videos in no time.
- Part 1: Create and Add Custom Thumbnails to YouTube
- Part 2: Tools to Create Custom YouTube Video Thumbnails
- Part 3: How to Change A Thumbnail On YouTube
- Part 4: Things You Need to Know Before Making a YouTube Custom Thumbnail
- Part 5: Tips on How to Make Good YouTube Thumbnails to Get More Clicks
- Part 6: YouTube Thumbnail FAQs
How To Add Custom Thumbnails to Your YouTube Videos [Steps, Tools and Tips]
We have just made a video tutorial about how to make a YouTube video thumbnail, check it below to find out the tips and tricks of making customized YouTube thumbnail.
Part 1: How to Make a Thumbnail for YouTube and Add Custom Thumbnails to YouTube
After you’ve verified your account and made your thumbnail, it’s finally time to upload it to your video and make a custom thumbnail. To do this, go to Creator Studio and then Video Manager. You’ll see a button labeled “Edit” next to each video, and an arrow pointing down. Click Thumbnail Editor.
In Thumbnail Editor, you can use the still images in the video as a thumbnail, choose a solid background color for the thumbnail, or add other images from your computer. I will show you the steps of how to customize the video still as a video thumbnail.
1. Preview the video and choose the target video still. You can click the Playback button and check the video and pause it at the desired frame. Or, you can step through each frame by clicking the Preview Frame button and Next Frame icon. Click Next to continue.
2. And now, you can add text, image and shape overlays to the thumbnail. You can change the text font, size, opacity and more.
3. Click Next to save the thumbnail and you will see how the thumbnail displays on different platforms such as YouTube, Facebook and Twitter. Click Save to save the video thumbnail.
In this way, you can add a custom thumbnail to the new videos and change the video thumbnail of the previously uploaded videos.
Part 2: Thumbnail Makers to Create Custom YouTube Thumbnails
Of course, you can use some of the best tools to make a YouTube video thumbnail. In this part, we will show you some of the best tools to create custom YouTube thumbnails.
Download Mac Version ](https://tools.techidaily.com/wondershare/filmora/download/ )
1. Create YouTube Thumbnail with Online solution - Canva
Canva is a free, powerful online image editing program with tons of great templates to get you started. One of their templates just happens to be YouTube thumbnails. Open Canva and select the “YouTube Thumbnail” design type. Use your own photo or choose from a huge library, then add text and effects to really make it stand out. Save and share — easy as that.
Check this video tutorial to see how to Make a Youtube Thumbnail using Canva.
You may also like: Best online Photo Editor
2. Design YouTube thumbnail with a Desktop solution - Gimp
Gimp is one of the most popular image editing programs around for one very simple reason: it’s powerful and free! Where Canva uses a lot of templates, Gimp gives you absolute, full control over how you want your image to look. Make a 1280x720 image and start putting together your eye-catching thumbnail exactly how you want to.
Check this video tutorial to see how to make professional Thumbnails for YouTube Videos with Gimp:
Part 3: How to Change A Thumbnail On YouTube
Note: YouTube allows verified YouTube accounts (accounts that provided YouTube with a working phone number) to upload custom thumbnail images and change them accordingly.
In this part, we’ll be going over how to change a thumbnail image on YouTube. There are pictures to make it easy to follow along.
- After signing into YouTube with your Google account, click on your profile on the top right corner. Click on YouTube Studio from the drop-down menu.
- On the left side of the page, click on Videos and then find your video and click on the details button.
- Find the Thumbnail section in the basic video details tab, and then click the Upload thumbnail to select the image that you want to upload.
- Finally, click on the Save button on the right upper corner. And just like that, in seven easy steps, we’re done changing the thumbnail of a YouTube video.
If you don’t have an image to upload but you want to check out some online resources to make your own, check out our Top YouTube Thumbnail Makers .
Part 4: Things You Need to Know Before Making a Custom Thumbnail
- About the proper YouTube video thumbnail size: Your thumbnail should be 1280x720 pixels in size and be less than 2MB. The minimum width of the image is 640 pixels.
- About the YouTube Image thumbnail format: Use .JPG, .PNG, .GIF or .BMP files for your thumbnail image.
- You’ll want your thumbnails to stand out. Bright colored text is a simple, easy way to draw people’s attention. Red, white, yellow, or orange are all popular choices.
- You can even do a little homework to see what colors others are using for similar videos to yours, and then choose different colors to stand out.
One word of warning: your thumbnail should be related to the content of your video. Misleading thumbnail images, if reported, will reflect poorly on your channel. You’ll get a negative rating in the community status part of your channel. This can actually remove your ability to use custom thumbnails, so keep it honest!
You may also like: How to Make YouTube Channel Art
To make a creative YouTube video, you may also need a powerful video editing software. Check how to edit a YouTube video in Filmora video editor and download it to try.
You may also like: Best video editing software for YouTube
Part 5: Tips on How to Make Good YouTube Thumbnails - Get More Clicks
The thumbnails of your videos play a huge role in convincing people to watch them; a good YouTube thumbnail will get you more views and more potential subscribers. This part will give you 6 tips on creating thumbnails that help grow your channel. Now let’s learn how to make thumbnails using Wondershare PixStudio.
1. Stay On Topic
Your thumbnail should tell a story; it should be clear from looking at it what viewers will get out of watching the video, be it knowledge or entertainment. If your thumbnail sets expectations that your video doesn’t deliver on, people will click away quickly. You may get views quickly, but you won’t get much watch time. That will tell YouTube’s search algorithm ‘people aren’t getting what they want from this, rank it lower’. That leads to fewer views over time, and gives the people who do manage to find your video a negative opinion of your channel.
Very few people intentionally use thumbnails that have nothing to do with the content of their videos – i.e, most people understand not to use a picture of a kitten in the thumbnail for their tech review, unless maybe their kitten is the one doing the review (which would be adorable, someone should do that). People who want serious advice won’t click, and people who click to see a kitten will click away fast.
This thumbnail had better be for a kitten’s iPhone review video or people will click away. Fast.
A mistake a lot of creators do make is creating a thumbnail that is meant to evoke an emotion which the video itself does not justify. For example, if you see a picture of a YouTuber looking nervous alongside text that reads ‘My Secret’, you will think they are going to share something deeply personal. You will be curious, and you may even be worried about them. You’ll probably click. Then, if their secret is that they don’t like pineapple on pizza, you’ll probably be angry. This technique gets clicks, but not a lot of watch time and it will lose you subs in the long run.
2. Don’t Be Mysterious
A good thumbnail doesn’t make people guess. Your thumbnail should tell people what’s in your video, not make them wonder about it. People want to know what they’re being asked to spend time watching.
Often, they will be looking for the answer to a specific question and will completely ignore anything that doesn’t show – in the thumbnail – that it has their answer.
Sometimes big channels can get away with stuff like this, because large portions of their audiences are interested in them as people and will already be curious about anything they post. This technique will not bring in new viewers, though.
If this came up in a search for ‘smoky eye tutorial’, would you click it?
When people want answers, they want to feel confident that they video they click on will have those answers. If you have great content, then let people know it!
3. People Like People
Viewers are more likely to click on a thumbnail if they feel a connection when they look at it. One of the best ways to create a feeling of connection is through eye contact, and you can apply that principle to your YouTube thumbnails easily.
Just make sure you’re in them.
You can either compose a photo to use as your thumbnail, or use a screenshot from your video. Ideally, the image of you will convey the emotional tone of the video and tell potential viewers what it is about, besides you.
So, if you want to post a funny video that is also about making brownies, maybe a picture of you smiling while holding up a tray of brownies would be a better direction than just showing the brownies?
4. Check Out The Competition
Before you post your video, type your topic into YouTube’s search engine and see what comes up. This will give you insight into what kinds of thumbnails are performing well for other people, as well as what you can do to stand out in comparison.
Phil starts talking about thumbnails at 6:09, and he has great tips on checking out your competition!
For example, if all five of the top-ranked videos for the search ‘how to build a cabinet’ show images of the YouTuber smiling while holding a power tool, then your thumbnail for a video on the same topic should also be a picture of you smiling and holding a power tool. You know that works, so why not do it?
5. Use Color in Interesting Ways
You want to use colors that will help you stand out from the other search results. While checking out your competition if you notice that all the people in the other thumbnails are wearing black or navy blue, it will be a good idea for you to wear a brighter color for your shoot to grab a bit more attention.
Beyond simply using colors that are different from other people’s colors, you should consider the emotions different colors trigger.
Maybe don’t use a lot of green and yellow in the thumbnail for your angry video rant?
6. Make Your Text Huge
Usually, you’ll want to use a bit of text in your thumbnail. It might be the full title of your video, or just a keyword or phrase. You don’t want to use a full sentence because you won’t have room for it if you’re using huge text.
The reason you should use huge text is so that people can read it. Remember that when people see your thumbnail in their search results, it will be much smaller than it will look while you are creating it. Text that looks big enough while you are creating your thumbnail will be much smaller when people are actually trying to read it, and that goes double for viewers watching on their small smartphone screens.
Frequently Asked Questions about YouTube Thumbnail
1. What is YouTube Thumbnail?
When you upload a video on YouTube, YouTube gives you three images to choose from in the selection of your video’s thumbnail image. These three images are just freeze-frame snapshots from different parts of your video, which may not tell your viewers what your video is really all about.
2. Can You Change YouTube Thumbnail After Publishing?
Yes, you can replace the auto-generated thumbnail with the customized thumbnail you like. But YouTube only allows verified YouTube accounts to upload custom thumbnail images.
3. How Long Does It Take for a Thumbnail to Change on YouTube?
Normally, if you have a good internet connection, you can see the thumbnail is changed within 10 seconds.
4. Why YouTube Thumbnail is Important?
When you get more people watching your video for longer, it increases your watch time and tells YouTube’s search algorithm ‘people like this, rank it higher’. Being ranked higher gets you more views, and even more watch time. It’s a wonderful cycle that all begins with a great thumbnail (paired with a good title and the right tags).
Richard Bennett
Richard Bennett is a writer and a lover of all things video.
Follow @Richard Bennett
Enliven YouTube Images: A Burst of Neon Flair
Your YouTube video, or any other clip published on any forum, gets a larger number of hits if it has an attractive thumbnail. And, the fact is, a thumbnail becomes 10x more attractive when the main character that the image has have a neon border around it.
With that said, in the following sections, you will learn a couple of methods on how to add a YouTube thumbnail border around the main characters and/or objects that are significant to the clip.
In this article
01 Add Glowing Neon Border to YouTube Thumbnail with Filmora
02 Add a Glowing Neon Border in YouTube Thumbnail with Canva
03 Outline a Person in a YouTube Thumbnail with Photoshop
Part 1: How to Add Neon Border to YouTube Thumbnail for Free with Filmora
Being one of the most versatile and intuitive post-production tools available in the market today, Wondershare Filmora X allows you to add a neon border to a YouTube thumbnail quite conveniently. You can learn how to get this done on Windows or Mac by following the steps given below.
For Win 7 or later (64-bit)
For macOS 10.12 or later
Step 1: Define Project Settings and Add Image to the Timeline
Launch Wondershare Filmora X on your PC (a MacBook Pro M1 is used here), ensure that the project aspect ratio is set to 16:9 (Widescreen) on the splash screen, and click New Project. On the main interface, click the Preview quality and display settings icon from the upper-right area of the Timeline, click Change Project Aspect Ratio, click to select 1280 x 720 (HD) from the Resolution menu of the Project Settings box, and click OK to save the custom project settings.

Then select My Media from the menu bar if not already selected, click Project Media from the navigation pane, and click Import from the Media box to select and import the image of the main character or object that you want to use in the thumbnail.

Now, drag the image from the Media box to the Timeline at the bottom.

Step 2: Clear Image Background, Add Border, and Add Custom Background
Go to Effects from the menu bar, click to select the Default tab and then AI Portrait from the navigation pane, and click and drag the Human Segmentation preset from the right box, and place it over the image track in the Timeline.

Double-click the image layer, scroll down the upper-left box to the Video Effects section, and use the Edge Thickness and Edge Feather sliders to adjust the character’s edges to make them as realistic as possible. Click OK when done.

Next, click and drag the Human Border preset over the image track in the Timeline, and follow the same procedure to customize the border. This will give the character a neon border effect.

Now, use the method explained earlier to import a custom image for the background, and drag and place it under the previous track in the Timeline.

If you are running the latest version of Filmora, you will find there are some neon light effects available under AI Portrait as well.

Step 3: Add Titles to Thumbnail
Go to Titles from the menu bar, click to select the Default tab and then Lower 3rds from the navigation pane, and click and drag your preferred lower-third preset from the right window to a separate layer in the Timeline. Double-click the lower-third layer, and use the available options in the upper-left window to change the text, its color, etc., and drag the textbox to place it to your preferred position on the image as well. Click OK to save the changes.
Next, click to select Titles from the navigation pane, and drag your preferred title from the right window to the upper-most track in the Timeline. Now use the method explained earlier to edit the text, its color, position, etc. to make it look professional.

For more tips and tricks for creating YouTube thumbnail, you can check this You Tube thumbnail creating guide.
Step 4: Get the Neon Border Thumbnail
Click the Snapshot (Camera) icon from the upper-right area of the Timeline, go to My Media from the menu bar, right-click the thumbnail of the screenshot you captured, and click Reveal in Finder (on Mac) or Reveal in Explorer (on Windows) to get to the folder the YouTube thumbnail border is saved in.

Part 2: How to Add a Glowing Neon Border in Your YouTube Thumbnail with Canva
Canva is another intuitive editing program that works on the web interface rather than having you download and install an app on your PC. You can add a neon border for YouTube thumbnails using Canva by following the instructions given below:
Step 1: Define Project Settings and Add a Background
After signing in to your Canva account, click Create a design from the top-right corner of the page, click Custom size from the bottom, define 1280 and 720 in the Width and Height fields on the box that appears respectively, and click Create new design.

Now, click to select Background from the navigation bar on the left (if the Background tool is not visible, click More and then choose Background from the expanded list), and click to select a background from the images available in the center pane.

Step 2: Upload an Image and Add Effects
Click Uploads from the navigation bar, click the More icon from the right of the Upload media button present at the top of the center pane, choose your preferred method to upload the image (with the transparent background) that you want to use, upload the image, and drag it from the center pane to the Canvas.
Note: You can use any of the tools available online to remove the background from your image for free.

To add a YouTube thumbnail border, make sure that the image that you added to the Canvas is selected, click the Duplicate icon from the upper-right area, and use the scaling handles of the copy of the image to increase its size a bit. Reposition the image back to its original location as well.
Then, click Edit image from the upper-left corner of the Canvas, click Duotone from the Edit image pane at the center, if need be, click See all, choose your preferred duotone effect to apply on the image, choose your preferred highlight and shadow colors from the box that appears next, and click Back from the top of the pane.

Next, click See all next to the Adjust section from the center pane, and drag the Blur slider to the right to increase the blur effect on the image.

Step 3: Position the Layers
While keeping the duplicate image selected, click the Position button from the upper-right area of the Canvas, and click Background to send the second image behind the first one to get the neon border effect for the photo.

Part 3: How to Outline a Person in a YouTube Thumbnail with Photoshop
Because YouTube thumbnails are nothing but static images, creating YouTube thumbnail border with Adobe Photoshop is comparatively easier. The process of doing this is given below:
Step 1: Define Document Preferences and Import an Image
Launch Adobe Photoshop on your PC, click Create new, and on the New Document customization box, define the width and height values to 1280 and 720 pixels respectively. Select Transparent from the Background Contents menu as well if not already selected. Click Create from the bottom to create a new Photoshop document with the specified document settings. Next, open the folder that contains the source image, drag the photo to Photoshop, and press Enter to place the photo.

Step 2: Remove Background from the Image
Make sure that the image layer is selected in the Layers panel on the right, go to Select from the menu bar at the top, and click Subject. From the bottom of the Layers panel, click the Add a mask icon to get rid of the background, leaving only the human on the Canvas.

Step 3: Add a Custom Background and an Outline Around the Subject
Use the method explained earlier to import a background image of your choice to Photoshop. Drag the background image layer to the bottom in the Layers panel. Double-click the masked layer, click to select Stroke from the left pane of the Layer Style box, and use the options available on the right to manage the size, color, position, etc. of the stroke that has been added around the human subject. Click OK when done, and then export the image normally to use it as a YouTube thumbnail border.

Summary
It is important to know that the default resolution of a YouTube thumbnail is 1280 x 720 pixels that is usually written and referred to as 720p. While adding a YouTube thumbnail border, it is also imperative to have a good sense of color combination and fonts. Furthermore, a decent tool like Wondershare Filmora X must be used to add an appealing neon border around the main subject in the thumbnail image easily and quickly.
02 Add a Glowing Neon Border in YouTube Thumbnail with Canva
03 Outline a Person in a YouTube Thumbnail with Photoshop
Part 1: How to Add Neon Border to YouTube Thumbnail for Free with Filmora
Being one of the most versatile and intuitive post-production tools available in the market today, Wondershare Filmora X allows you to add a neon border to a YouTube thumbnail quite conveniently. You can learn how to get this done on Windows or Mac by following the steps given below.
For Win 7 or later (64-bit)
For macOS 10.12 or later
Step 1: Define Project Settings and Add Image to the Timeline
Launch Wondershare Filmora X on your PC (a MacBook Pro M1 is used here), ensure that the project aspect ratio is set to 16:9 (Widescreen) on the splash screen, and click New Project. On the main interface, click the Preview quality and display settings icon from the upper-right area of the Timeline, click Change Project Aspect Ratio, click to select 1280 x 720 (HD) from the Resolution menu of the Project Settings box, and click OK to save the custom project settings.
Then select My Media from the menu bar if not already selected, click Project Media from the navigation pane, and click Import from the Media box to select and import the image of the main character or object that you want to use in the thumbnail.
Now, drag the image from the Media box to the Timeline at the bottom.
Step 2: Clear Image Background, Add Border, and Add Custom Background
Go to Effects from the menu bar, click to select the Default tab and then AI Portrait from the navigation pane, and click and drag the Human Segmentation preset from the right box, and place it over the image track in the Timeline.
Double-click the image layer, scroll down the upper-left box to the Video Effects section, and use the Edge Thickness and Edge Feather sliders to adjust the character’s edges to make them as realistic as possible. Click OK when done.
Next, click and drag the Human Border preset over the image track in the Timeline, and follow the same procedure to customize the border. This will give the character a neon border effect.
Now, use the method explained earlier to import a custom image for the background, and drag and place it under the previous track in the Timeline.
If you are running the latest version of Filmora, you will find there are some neon light effects available under AI Portrait as well.
Step 3: Add Titles to Thumbnail
Go to Titles from the menu bar, click to select the Default tab and then Lower 3rds from the navigation pane, and click and drag your preferred lower-third preset from the right window to a separate layer in the Timeline. Double-click the lower-third layer, and use the available options in the upper-left window to change the text, its color, etc., and drag the textbox to place it to your preferred position on the image as well. Click OK to save the changes.
Next, click to select Titles from the navigation pane, and drag your preferred title from the right window to the upper-most track in the Timeline. Now use the method explained earlier to edit the text, its color, position, etc. to make it look professional.
For more tips and tricks for creating YouTube thumbnail, you can check this You Tube thumbnail creating guide.
Step 4: Get the Neon Border Thumbnail
Click the Snapshot (Camera) icon from the upper-right area of the Timeline, go to My Media from the menu bar, right-click the thumbnail of the screenshot you captured, and click Reveal in Finder (on Mac) or Reveal in Explorer (on Windows) to get to the folder the YouTube thumbnail border is saved in.
Part 2: How to Add a Glowing Neon Border in Your YouTube Thumbnail with Canva
Canva is another intuitive editing program that works on the web interface rather than having you download and install an app on your PC. You can add a neon border for YouTube thumbnails using Canva by following the instructions given below:
Step 1: Define Project Settings and Add a Background
After signing in to your Canva account, click Create a design from the top-right corner of the page, click Custom size from the bottom, define 1280 and 720 in the Width and Height fields on the box that appears respectively, and click Create new design.
Now, click to select Background from the navigation bar on the left (if the Background tool is not visible, click More and then choose Background from the expanded list), and click to select a background from the images available in the center pane.
Step 2: Upload an Image and Add Effects
Click Uploads from the navigation bar, click the More icon from the right of the Upload media button present at the top of the center pane, choose your preferred method to upload the image (with the transparent background) that you want to use, upload the image, and drag it from the center pane to the Canvas.
Note: You can use any of the tools available online to remove the background from your image for free.
To add a YouTube thumbnail border, make sure that the image that you added to the Canvas is selected, click the Duplicate icon from the upper-right area, and use the scaling handles of the copy of the image to increase its size a bit. Reposition the image back to its original location as well.
Then, click Edit image from the upper-left corner of the Canvas, click Duotone from the Edit image pane at the center, if need be, click See all, choose your preferred duotone effect to apply on the image, choose your preferred highlight and shadow colors from the box that appears next, and click Back from the top of the pane.
Next, click See all next to the Adjust section from the center pane, and drag the Blur slider to the right to increase the blur effect on the image.
Step 3: Position the Layers
While keeping the duplicate image selected, click the Position button from the upper-right area of the Canvas, and click Background to send the second image behind the first one to get the neon border effect for the photo.
Part 3: How to Outline a Person in a YouTube Thumbnail with Photoshop
Because YouTube thumbnails are nothing but static images, creating YouTube thumbnail border with Adobe Photoshop is comparatively easier. The process of doing this is given below:
Step 1: Define Document Preferences and Import an Image
Launch Adobe Photoshop on your PC, click Create new, and on the New Document customization box, define the width and height values to 1280 and 720 pixels respectively. Select Transparent from the Background Contents menu as well if not already selected. Click Create from the bottom to create a new Photoshop document with the specified document settings. Next, open the folder that contains the source image, drag the photo to Photoshop, and press Enter to place the photo.
Step 2: Remove Background from the Image
Make sure that the image layer is selected in the Layers panel on the right, go to Select from the menu bar at the top, and click Subject. From the bottom of the Layers panel, click the Add a mask icon to get rid of the background, leaving only the human on the Canvas.
Step 3: Add a Custom Background and an Outline Around the Subject
Use the method explained earlier to import a background image of your choice to Photoshop. Drag the background image layer to the bottom in the Layers panel. Double-click the masked layer, click to select Stroke from the left pane of the Layer Style box, and use the options available on the right to manage the size, color, position, etc. of the stroke that has been added around the human subject. Click OK when done, and then export the image normally to use it as a YouTube thumbnail border.
Summary
It is important to know that the default resolution of a YouTube thumbnail is 1280 x 720 pixels that is usually written and referred to as 720p. While adding a YouTube thumbnail border, it is also imperative to have a good sense of color combination and fonts. Furthermore, a decent tool like Wondershare Filmora X must be used to add an appealing neon border around the main subject in the thumbnail image easily and quickly.
Also read:
- [New] Chart-Toppers Top 10 YouTube Personalities in Views
- [Updated] Ecological Architecture Merging Nature and City Planning
- [New] Achieve Balance & Vitality - Top 10 Premium Yoga Streams
- Streamlining Profits How AJay Maximizes YouTube Earnings
- 2024 Approved 10 Expert Suggestions to Make Your YT Shorts Stand Out
- Unleash Views The Most Effective 30 FreeFire Tags for Gamers
- Behind the Curtains A Guide to YouTube’s Hidden Videos
- In 2024, Culinary Champions Must-Subscribe Food Bloggers
- Step-by-Step Method for Producing Captivating Video Thumbnails
- In-Depth Analysis of YouTube AdRevenue Average Payout per 1,000 Viewers' Engagement
- The Complete Checklist for YouTube Metrics Mastery Views & Dollars
- [New] Boosting Video Quality Utilizing YouTube Studio's Features
- Transform Your Short-Form Content Top 10 Mobile Video Cutting Tools
- [New] Craft Clearer, Crisper YouTube Videos with Quality Tools
- [Updated] Cost-Effective Audio Equipment for Newcomers
- Enhanced Entertainment Tv-Ready Looping Techniques for Video Content
- 2024 Approved Decoding YouTube's Intricate View Count Mechanics
- [New] Comprehensive Guide to Mobile Video Sharing on YouTube
- Stand Out with a Unique Streamer Identity A Filmora Approach
- [New] Analyzing Youtube AdRevenue Average Payments by Thousands of Views
- 2024 Approved Community Builders Gamer YouTubers
- In 2024, Best YouTube Audio Extractors Free, Easy Download & Convert
- Unbeatable Video Popularity Tracker in YouTube Arena
- Clearing Tactics for YouTube's Stored Video Queue for 2024
- In 2024, Detailed guide of ispoofer for pogo installation On Huawei Nova Y91 | Dr.fone
- Unveiling Dynamic Volume Control Mastering Audio Ducking Techniques for 2024
- [Updated] In 2024, Veiled Glance at Digital Diary (FB)
- In 2024, 8 Safe and Effective Methods to Unlock Your iPhone SE Without a Passcode
- [Updated] Step-by-Step Streaming on Discord Tips to Engage and Retain Viewers
- VideoSnapper Quickly Download Twitter Content on iPhone for 2024
- [Updated] In 2024, Unlock Your Visual Potential The Leading Ten Tools for Instagram Grids
- 3 Ways to Change Location on Facebook Marketplace for Poco C65 | Dr.fone
- Updated Move Smart Top Motion Tracking Apps for Android and iPhone for 2024
- In 2024, The Art of Crafting Engaging IGTV Titles
- Windows 11 Gamers' Ultimate Playbook Top 5 Record Techniques
- New In 2024, Realistic AI Avatars
- Forgot iPhone 13 mini Backup Password? Heres What to Do
- In 2024, How to Transfer Apps from Vivo Y28 5G to Another | Dr.fone
- Title: "Enhancing Viewability Creating Custom YouTube Thumbnails"
- Author: Steven
- Created at : 2024-05-25 19:16:42
- Updated at : 2024-05-26 19:16:42
- Link: https://youtube-clips.techidaily.com/enhancing-viewability-creating-custom-youtube-thumbnails/
- License: This work is licensed under CC BY-NC-SA 4.0.
