:max_bytes(150000):strip_icc()/GettyImages-535072327-57b25f5d3df78cd39c8469c6.jpg)
"Enhance Content Reach and Impact - Social Blade's Role in YouTube Analytics"
Enhance Content Reach and Impact - Social Blade’s Role in YouTube Analytics
Use Social Blade for YouTube Analytics - Stats & How to Use Them

Richard Bennett
Oct 26, 2023• Proven solutions
Want to learn how to use Social Blade for YouTube? SocialBlade.com is a free-to-use website that displays your YouTube statistics – or the stats of any channel you are interested in – using an intuitive layout.
While many of the stats you can find on Social Blade are also available right on YouTube, some people find it easier to read on Social Blade. YouTube provides you with a lot of information, and a lot of it might not be useful to all creators.
Your YouTube Analytics
Social Blade is an excellent place to gauge the growth of your channel. It provides statistics on our subscribers, views, and estimated revenue.
To start using Social Blade, type your channel name into the search bar.
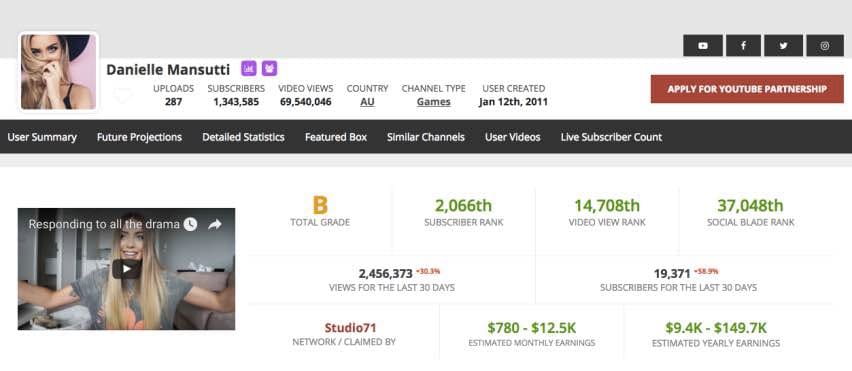
On the top section of the page, several stats will be clearly displayed.
First, you will see the letter grade assigned to your channel by Social Blade. If it is not a very good one, keep in mind that channels with over 10, 000 might still only receive Cs. Only YouTube megastars are getting As and Bs.
Next to your grade are your subscriber and video view ranks, as well as a rank assigned to you by Social Blade.
On the second line, you will see the views and subscribers you got in the last 30 days and the percentage by which you are up or down. Simply searching for yourself and glancing at this line is the easiest way to see whether your channel is growing, even easier than in your YouTube Creator Studio.
The final line of the first section will show you an estimate of your monthly revenue.
If you scroll down to the second section you will be able to see your views, subscribers, and estimated earnings per day rather than per month. Growth is in green and loss is in red.
By looking at this chart you can see which videos benefited your channel most after they were posted (your videos are not listed, but you can see based on the day you posted them). This will give you a good idea of what your audience wants to see.
Spying on Other Channels
When you check your stats, you type your channel name into the search bar. If you want to use Social Blade to monitor somebody else’s stats, type their channel name instead.
By looking up your direct competitors (channels about the same size as yours within your same genre) you will be able to see which of their videos are performing best for them when you combine the daily information Social Blade provides with your knowledge of what videos they posted when.
Knowing what is working for your rivals will help you design your content strategy .
You can also use Social Blade to look up huge YouTube stars who you admire, just to see how well they are doing. Take their estimated revenue with a grain of salt, though – it’s just an estimate.
That’s how you can use Social Blade for YouTube - have you ever used it?
Make Your Videos Stand Out with Powerful Video Editor


Richard Bennett
Richard Bennett is a writer and a lover of all things video.
Follow @Richard Bennett
Richard Bennett
Oct 26, 2023• Proven solutions
Want to learn how to use Social Blade for YouTube? SocialBlade.com is a free-to-use website that displays your YouTube statistics – or the stats of any channel you are interested in – using an intuitive layout.
While many of the stats you can find on Social Blade are also available right on YouTube, some people find it easier to read on Social Blade. YouTube provides you with a lot of information, and a lot of it might not be useful to all creators.
Your YouTube Analytics
Social Blade is an excellent place to gauge the growth of your channel. It provides statistics on our subscribers, views, and estimated revenue.
To start using Social Blade, type your channel name into the search bar.
On the top section of the page, several stats will be clearly displayed.
First, you will see the letter grade assigned to your channel by Social Blade. If it is not a very good one, keep in mind that channels with over 10, 000 might still only receive Cs. Only YouTube megastars are getting As and Bs.
Next to your grade are your subscriber and video view ranks, as well as a rank assigned to you by Social Blade.
On the second line, you will see the views and subscribers you got in the last 30 days and the percentage by which you are up or down. Simply searching for yourself and glancing at this line is the easiest way to see whether your channel is growing, even easier than in your YouTube Creator Studio.
The final line of the first section will show you an estimate of your monthly revenue.
If you scroll down to the second section you will be able to see your views, subscribers, and estimated earnings per day rather than per month. Growth is in green and loss is in red.
By looking at this chart you can see which videos benefited your channel most after they were posted (your videos are not listed, but you can see based on the day you posted them). This will give you a good idea of what your audience wants to see.
Spying on Other Channels
When you check your stats, you type your channel name into the search bar. If you want to use Social Blade to monitor somebody else’s stats, type their channel name instead.
By looking up your direct competitors (channels about the same size as yours within your same genre) you will be able to see which of their videos are performing best for them when you combine the daily information Social Blade provides with your knowledge of what videos they posted when.
Knowing what is working for your rivals will help you design your content strategy .
You can also use Social Blade to look up huge YouTube stars who you admire, just to see how well they are doing. Take their estimated revenue with a grain of salt, though – it’s just an estimate.
That’s how you can use Social Blade for YouTube - have you ever used it?
Make Your Videos Stand Out with Powerful Video Editor
Richard Bennett
Richard Bennett is a writer and a lover of all things video.
Follow @Richard Bennett
From Stillness to Stirring: Tips for Bouncing Text
How to Create Animated Bouncing Text

Liza Brown
Mar 27, 2024• Proven solutions
Earlier, you learned how to have a bounce text effect in Adobe After Effects . However, because AE is a complex application and has a steep learning curve, this section explains the two alternative ways to get the same effect on your existing video footage.
Method 1: How to Create Bouncing Text in Filmora Video Editor?
When talking about Wondershare Filmora , the application is populated with several presets for texts and titles, animations, effects, filters, and much more.
These pre-built templates not only make your task easier, they also save your decent amount of time that you would spend while working with After Effects or any other similar app that requires you to build things from scratch.
You can follow the instructions given below to add animated bounce text to any of your video footages with Filmora:
Step 1: Add a Footage to Timeline
Launch Wondershare Filmora on your Windows or Mac PC. By default, the aspect ratio of the project is set to 16:9. Click anywhere inside the Media window at the upper-left section, and select and import footage you want to add bounce text to.
Step 2: Insert Text and Add Bounce Effect
Click Titles from the standard toolbar at the top, and click and drag your preferred title template from the Library to the timeline. In case you don’t want any specific animation or style on the title, you can use the default title.
In the timeline, double-click the title you just added, use the upper-left section to edit the text, go to the Animation tab from the left pane, scroll down the list, and double-click the Up Down 1 or Up Down 2 preset to apply the bounce effect to the credits. Click OK to save the changes and to get back to the main window.

Step 3: Add Shake Filters
Go to Effects from the standard toolbar, expand the Filters category from the left pane, and click Shake. From the Library window, click and drag your preferred shake filter to the timeline. Here, I will choose Mild.

You can customize the default effect by double-clicking the shake filter in the timeline, using the sliders in the upper-left area of the interface to make necessary adjustments, and then clicking OK to save the changes and to get back to the previous interface.

Step 4: Export the Final Output
Click EXPORT from the top of the interface, go to the Local tab in the Export box, choose your preferred output format from the list in the left, make required customizations from the right pane, and click EXPORT from the bottom-right corner to export the video.

Now, you can add the bouncing text video and the background video to the timeline, and then place the bouncing text video above the background video track.
Double click the text track, go to the Chroma Key effect, select the Color Picker tool, and click anywhere in the Preview window to get things right. Finally, export the entire project to your preferred output format as explained in Step 4.
As explained before, Wondeshare Filmora makes the entire process of creating and adding bounce text effect pretty simple. With all the pre-build templates, and the versatility of the options that can be used to customize those presets, you can come up with the effects that are usually obtained when you start generating them from the scratch.
Method 2: Generate Animated Bouncing Texts Online
If you don’t want any heavy and resource-intensive app on your PC merely for some special text effects, you can try any of the online solutions instead. The benefit of using any such web app is that all the processing is done on site’s server, and it is only a web browser and an Internet connection that you need to have at your side.
Some most trusted websites to generate bounce text are listed below:
1. ENGFTO
Website: https://engfto.com/index/create%5Fanimated%5Fbouncing%5Ftext/0-26

You can follow the instructions given below to use Engfto to generate bouncing text for your footages:
Step 1: Get to the Animated Bouncing Text Page
Launch your favorite web browser, and go to the link given above to get to the Engfto’s animated bouncing text page.
Step 2: Customize Text and Preferences
Modify the values in the fields under the SIZE AREA and TEXT sections to customize the text area, the text itself, its size, and font. Next, adjust the values in the fields under the EFFECT PARAMETERS section to get the required bounce effect. Also, use the fields under the BACKGROUND section to either change the background color, or pick a background image from your PC.
Step 3: Obtain the Animated Text
Click the SAVE GIF ANIMATION button from the lower section of the page to download the animated text to your PC.
2. Loading.io
The instructions given below explain how to use Loading.io to get animated bounce text effect for your footages:
Step 1: Get to the Loading.io Webpage
Launch your favorite web browser and go to https://loading.io/animation/text/ .
Step 2: Customize the Text and Choose Animation Effect

Use the options available on the webpage to type your text, and change its font, color, background, transparency level etc. Select Bounce (or any of its variants) from the Animation drop-down list, and adjust the speed using the Speed slider.
Step 3: Obtain the Text
Click your preferred option from next to the Download As section to download the animated text to your PC.
Note: Regardless of the web solution you choose to generate and obtain animated bounce text, you will still need a post-production tool to add the downloaded text to your footage.
Conclusion
Generating bounce text effect is much simpler when you use Wondershare Filmora or any of the online solutions as explained in Method 2. While the former gives you more flexibility when it comes to customizations, the latter doesn’t require any app to be installed on your PC. In addition, many times the web apps offer their services for free, and therefore they are preferred by the novice users who are not much into post-production processes.
Liza Brown
Liza Brown is a writer and a lover of all things video.
Follow @Liza Brown
Liza Brown
Mar 27, 2024• Proven solutions
Earlier, you learned how to have a bounce text effect in Adobe After Effects . However, because AE is a complex application and has a steep learning curve, this section explains the two alternative ways to get the same effect on your existing video footage.
Method 1: How to Create Bouncing Text in Filmora Video Editor?
When talking about Wondershare Filmora , the application is populated with several presets for texts and titles, animations, effects, filters, and much more.
These pre-built templates not only make your task easier, they also save your decent amount of time that you would spend while working with After Effects or any other similar app that requires you to build things from scratch.
You can follow the instructions given below to add animated bounce text to any of your video footages with Filmora:
Step 1: Add a Footage to Timeline
Launch Wondershare Filmora on your Windows or Mac PC. By default, the aspect ratio of the project is set to 16:9. Click anywhere inside the Media window at the upper-left section, and select and import footage you want to add bounce text to.
Step 2: Insert Text and Add Bounce Effect
Click Titles from the standard toolbar at the top, and click and drag your preferred title template from the Library to the timeline. In case you don’t want any specific animation or style on the title, you can use the default title.
In the timeline, double-click the title you just added, use the upper-left section to edit the text, go to the Animation tab from the left pane, scroll down the list, and double-click the Up Down 1 or Up Down 2 preset to apply the bounce effect to the credits. Click OK to save the changes and to get back to the main window.
Step 3: Add Shake Filters
Go to Effects from the standard toolbar, expand the Filters category from the left pane, and click Shake. From the Library window, click and drag your preferred shake filter to the timeline. Here, I will choose Mild.
You can customize the default effect by double-clicking the shake filter in the timeline, using the sliders in the upper-left area of the interface to make necessary adjustments, and then clicking OK to save the changes and to get back to the previous interface.
Step 4: Export the Final Output
Click EXPORT from the top of the interface, go to the Local tab in the Export box, choose your preferred output format from the list in the left, make required customizations from the right pane, and click EXPORT from the bottom-right corner to export the video.
Now, you can add the bouncing text video and the background video to the timeline, and then place the bouncing text video above the background video track.
Double click the text track, go to the Chroma Key effect, select the Color Picker tool, and click anywhere in the Preview window to get things right. Finally, export the entire project to your preferred output format as explained in Step 4.
As explained before, Wondeshare Filmora makes the entire process of creating and adding bounce text effect pretty simple. With all the pre-build templates, and the versatility of the options that can be used to customize those presets, you can come up with the effects that are usually obtained when you start generating them from the scratch.
Method 2: Generate Animated Bouncing Texts Online
If you don’t want any heavy and resource-intensive app on your PC merely for some special text effects, you can try any of the online solutions instead. The benefit of using any such web app is that all the processing is done on site’s server, and it is only a web browser and an Internet connection that you need to have at your side.
Some most trusted websites to generate bounce text are listed below:
1. ENGFTO
Website: https://engfto.com/index/create%5Fanimated%5Fbouncing%5Ftext/0-26
You can follow the instructions given below to use Engfto to generate bouncing text for your footages:
Step 1: Get to the Animated Bouncing Text Page
Launch your favorite web browser, and go to the link given above to get to the Engfto’s animated bouncing text page.
Step 2: Customize Text and Preferences
Modify the values in the fields under the SIZE AREA and TEXT sections to customize the text area, the text itself, its size, and font. Next, adjust the values in the fields under the EFFECT PARAMETERS section to get the required bounce effect. Also, use the fields under the BACKGROUND section to either change the background color, or pick a background image from your PC.
Step 3: Obtain the Animated Text
Click the SAVE GIF ANIMATION button from the lower section of the page to download the animated text to your PC.
2. Loading.io
The instructions given below explain how to use Loading.io to get animated bounce text effect for your footages:
Step 1: Get to the Loading.io Webpage
Launch your favorite web browser and go to https://loading.io/animation/text/ .
Step 2: Customize the Text and Choose Animation Effect
Use the options available on the webpage to type your text, and change its font, color, background, transparency level etc. Select Bounce (or any of its variants) from the Animation drop-down list, and adjust the speed using the Speed slider.
Step 3: Obtain the Text
Click your preferred option from next to the Download As section to download the animated text to your PC.
Note: Regardless of the web solution you choose to generate and obtain animated bounce text, you will still need a post-production tool to add the downloaded text to your footage.
Conclusion
Generating bounce text effect is much simpler when you use Wondershare Filmora or any of the online solutions as explained in Method 2. While the former gives you more flexibility when it comes to customizations, the latter doesn’t require any app to be installed on your PC. In addition, many times the web apps offer their services for free, and therefore they are preferred by the novice users who are not much into post-production processes.
Liza Brown
Liza Brown is a writer and a lover of all things video.
Follow @Liza Brown
Also read:
- [New] 2024 Approved Essential Websites for Pixel Ringtones
- [New] 2024 Approved Inspirational Themes for Regular Vlogs
- [New] In 2024, Direct Transfer Solution YouTube Content on Dailymotion Now
- [Updated] Discover 9 Free, Whole-Film Festive Movie Gems on Youtube
- [Updated] Recording Your Mac Experience for FREE
- 2024 Approved Boosting Your Video Income on Youtube - Essentials
- 2024 Approved Seamless Integration Tailor-Made YouTube Shorts Images Made Easy
- ChatGPT at the Forefront of Smart Home Evolution
- Crafting Compelling Thumbnails to Captivate YouTube Viewers and Encourage Clicks
- Creating a Narrative Structure in Online Video Tutorials for 2024
- Elevating Your Earning Game with YouTube Monetization Strategies for 2024
- Elite Selection Top 9 Free YouTube Channel Branding Apps for 2024
- Navigating the Complexities of YouTube Copyright Claims
- Solo Sound Setback Fix It Now for 2024
- Troubleshooting Solutions for Minecraft Crossbow Error Codes
- Title: Enhance Content Reach and Impact - Social Blade's Role in YouTube Analytics
- Author: Steven
- Created at : 2025-01-24 22:02:29
- Updated at : 2025-01-29 18:05:12
- Link: https://youtube-clips.techidaily.com/enhance-content-reach-and-impact-social-blades-role-in-youtube-analytics/
- License: This work is licensed under CC BY-NC-SA 4.0.