
:max_bytes(150000):strip_icc()/003_the-best-free-tv-shows-on-youtube-5224600-b9d20004bb3945cb881b775e7271f4ea.jpg)
"Engage, Enchant Elevate Your Unboxing Content for 2024"
Engage, Enchant: Elevate Your Unboxing Content
Versatile Video Editor - Wondershare Filmora
An easy yet powerful editor
Numerous effects to choose from
Detailed tutorials provided by the official channel
Unboxing videos are a bizarre trend. However, these videos are getting the highest traction, and more videos are getting onboard about various products.
And, if you haven’t already checked one, an unboxing video is what it sounds like. At its core, “unboxing” is the procedure of recording the moment when a particular product is removed and opened from the packaging sold in.
Again, you’re probably thinking:
‘Why would anybody gaze at other folks opening their product packaging?’
More than 90,000 people type ‘unboxing’ into YouTube each month, and that’s quite interesting as well as strange. Also, these are just a few of the insane statistics about the eCommerce trend of unboxing videos.
In this article, you’ll see the science behind such unboxing videos and learn how to create an attractive one by taking inspiration from others.
So whether you’re not sure why we admire unboxing videos or you wish to know how to use them to your benefit, you’re in the right place!
In this article
02 5 Best YouTube Unboxing Channels
03 How to Create a Killer Unboxing Video
Part 1: What is an Unboxing Video?
Within the unboxing videos, people open boxes and narrate their actions. Unboxing videos are incredibly famous with kids, grabbing up tons of millions of subscribers as well as millions of views. Such videos are also usually great for kids to watch (with a few caveats). But the matter of the subject of some unboxing videos is not age-appropriate. And, there are niche-specific videos as well on different channels.
Are unboxers paid by the companies whose services or products they consider opening on YouTube? Companies don’t generally pay the YouTuber directly for featuring their products in a video. When an unboxer becomes super popular (with subscribers and tens of millions of views), companies may send the products for free, but not always. Sometimes hosts disclose this, sometimes not. However, companies do sponsor highly famous and influential YouTubers in other areas. For instance, they may pay the YouTuber to make a personal appearance at a toy store or convention.
Part 2: 5 Best YouTube Unboxing Channels
There are considerable merits to offering your customers a branded and personalized unboxing experience.
Even if you decide to get your products featured in a YouTuber’s unboxing videos, you can help promote your brand and improve brand awareness. So which is the perfect or ideal YouTube channel for unboxing videos for you to try to get featured on? The answer is: “It depends!”
Not every YouTuber is the best for every eCommerce business—and a YouTube channel simply being huge and influential doesn’t make it relevant for your brand. So it’s essential to consider brand suitability while trying looking for a YouTuber to create unboxing videos.
This means considering whether they use harsh language or if their target audience has some overlap with your target audience.
Keeping it in mind, here are some of the top YouTube unboxing channels for inspiration:
1. Unbox Therapy
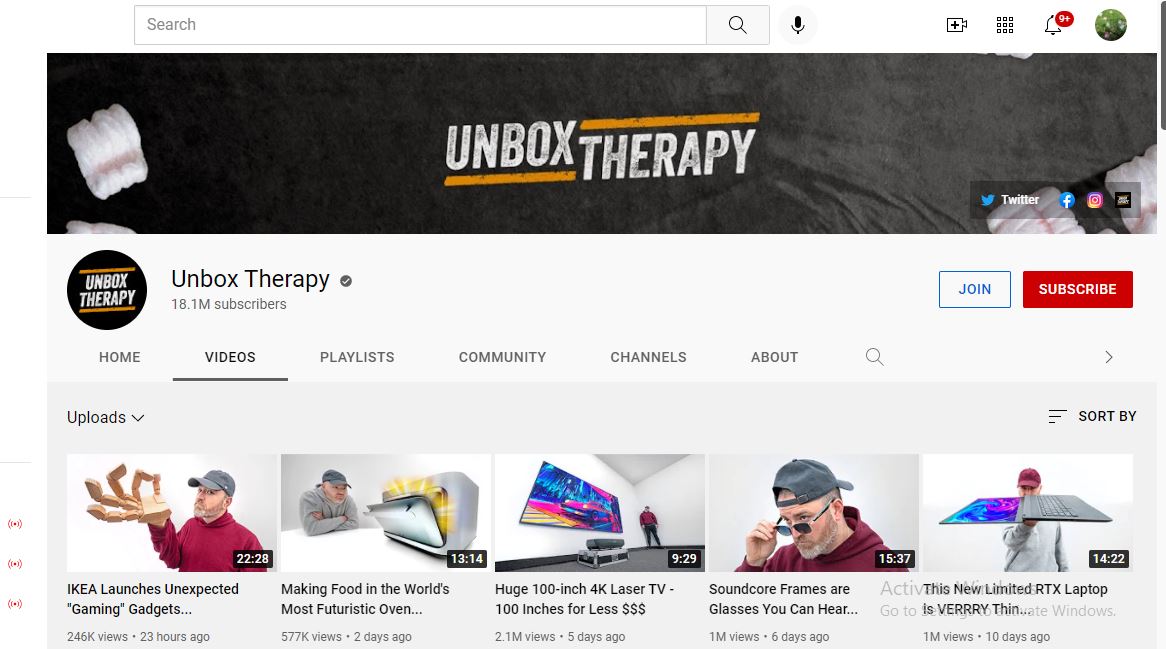
With around 17 million-plus subscribers, Unbox Therapy is a great channel with a ten-year history of sharing various videos presenting the hottest and most excellent products on the planet. According to their YouTube stats, tech gadgets are a regular feature on the channel, and they have amassed four billion-plus views.
2. Ryan’s World
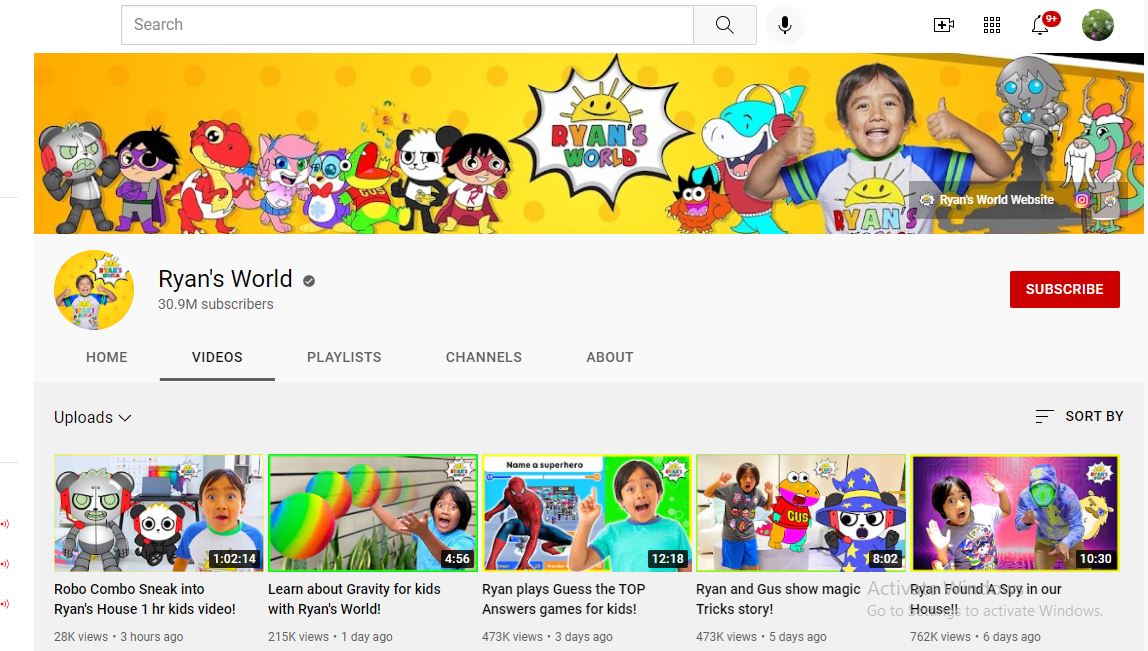
This titan of teeny the unboxing video world is one of the immensely paid YouTubers for a reason. This channel features fun animation and unboxing videos, simple science experiments for kids, and other educational content. Those interested in doing the best unboxing videos for a younger audience could learn a lot from this platform.
3. Tech Unboxing
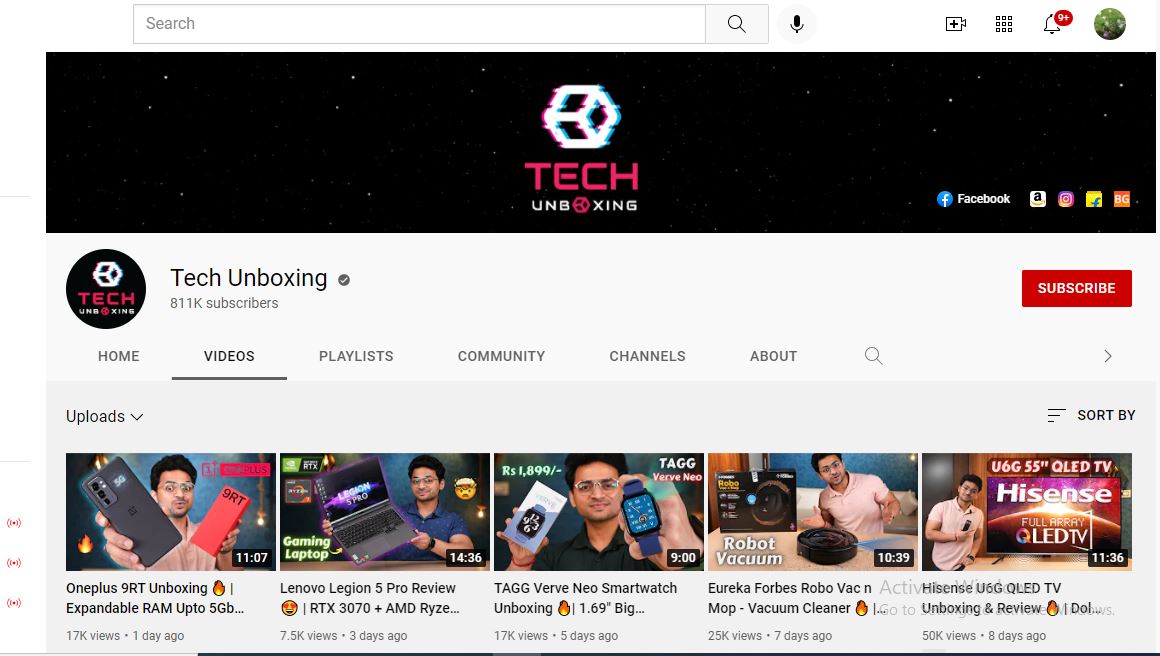
At 700k plus subscribers, Tech Unboxing may not be the most significant content creator on this list, but it’s no slouch. The channel mentions everything about the high-tech gadgets and isn’t afraid to brag about the products reviewed. The track also hosts frequent giveaways of tech products and unboxing videos that the host likes that other tech enthusiasts may look at it with fun.
4. Dr. DeBox
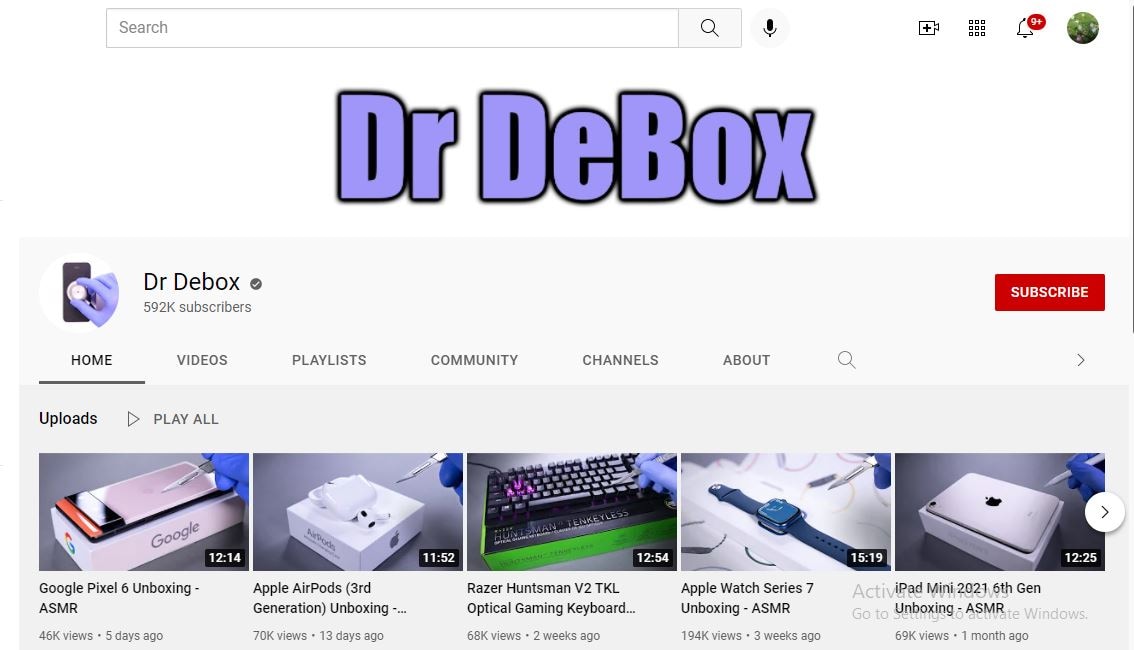
DrDebox looks at tech, gadgets, and other products ordered from online sites and offers viewers rundowns of their functions and how they operate. With 590k plus subscribers and billions of video views, DrDebox has a prominent audience and presence on YouTube that can help improve awareness for the products he reviews.
5. UNBOXING Fashion & Sports
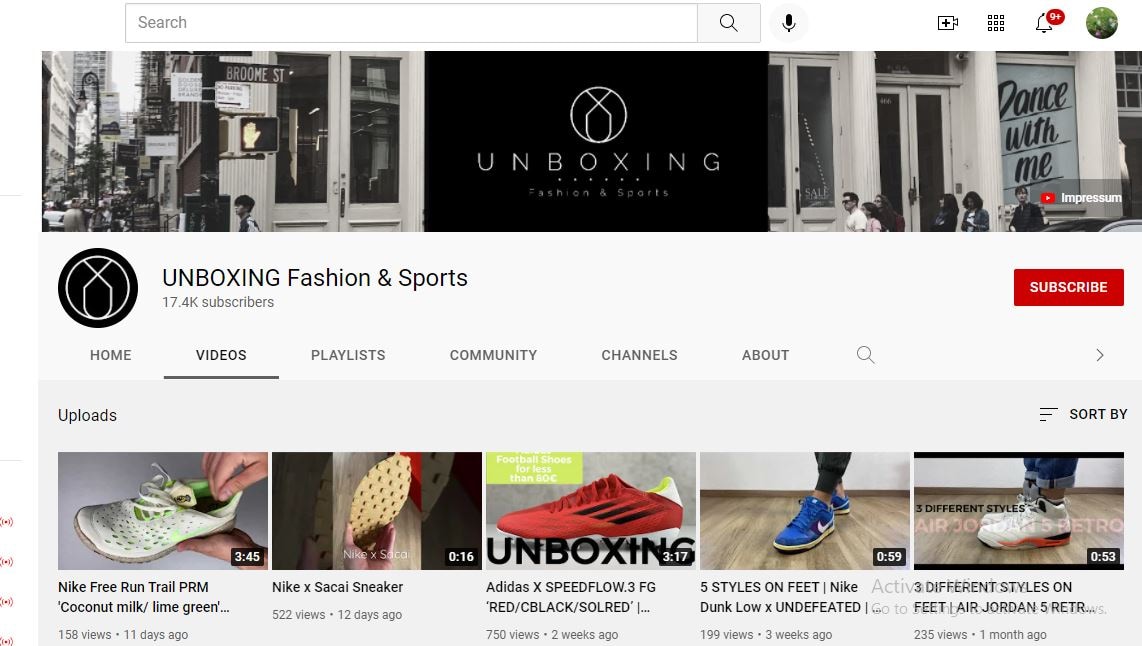
Unboxing Fashion & Sports is a channel specializing in well unboxing videos for a range of sports and fashion apparel (frequently shoe brands like Nike or Adidas). Its content generally features a close-up of the reviewer taking products out of the box and moving them around. At the same time, text highlights relevant product features—all set to catchy music without being disturbing. With 17k plus subscribers and a strong focus on sports apparel, this YouTuber knows how to attract a target market.
Part 3: How to Create a Killer Unboxing Video
Firstly, you have to take note of the following points to create the best unboxing videos.
1. Select an Unboxing Niche
2. Practice Speaking Clearly and Slowly
3. Use the Best Unboxing Set-Up
4. Make Sure to Timely Unbox the Products
5. Don’t Delay the Unboxing in Your Video
6. Show the Product in Use
One of the prominent factors about unboxing videos is that anyone can make them. You don’t need to be uniquely talented but go with the products that have broad appeal. Once you create such videos, you can share them on your social media networks or personal website.
Do you want to create your creative unboxing videos for others to find? Do you like to introduce your customers to your products in your own YouTube Channel, so you have total control over the content and messaging of each video?
Here is a step by step guide to help you revamp the creation of your unboxing video:
1. Use a Good Camera & Video Editing Software
While you probably don’t require that high-tech camera that professional Hollywood filmmakers would consider shooting or filming 8k+ ultra-HD movies, you need a good camera that can capture HD footage (preferably at least 1080p). This allows providing your unboxing videos just enough of a professional look to not deactivate or disable the interest of potential viewers.
In addition to a camera, ensure that you have a stand or a decent tripod for it. This way, you don’t have to hold onto your camera by yourself (or have an assistant hold it) while you’re filming. In addition, this minimizes camera shake, which assists in making easy-to-watch videos.
On the other hand, video editing software is a must for taking all of your video compiling and recording into a cohesive video that will be attractive for viewers to watch. There are tons of accessible video editing tools to choose from and some paid options that may have helpful features. However, our favorite pick is Wondershare Filmora due to its beginner-friendly yet professional editing elements. Let us know what you can’t do with this software! It’s a combination of professionalism and reliability you can consider for all your video editing needs.
The hottest feature of Wondershare Filmora for making attractive unboxing videos is audio ducking. With this feature, you can effectively lower the background vocals while adding your voiceovers. And, that’s extremely valuable in making these kinds of videos.
Wondershare Filmora
Get started easily with Filmora’s powerful performance, intuitive interface, and countless effects!
Try It Free Try It Free Try It Free Learn More >

2. Prepare Your Stage/Photo Lightbox
If you look at some famous unboxing channels listed above, you’ll notice that much of their content is shot in a well-framed space where there isn’t much in the background to disturb them from the product being viewed.
Often, this is a “photo lightbox” or an empty table (a small container with a smooth white backdrop that enhances lighting while reducing shadows for making photos look greater). Lightboxes can also be helpful when you’re taking snapshots of your products to put up on your eCommerce website, so it’s a great idea to make (or buy) one that can fit your products.
3. Practice Making Videos
Before uploading videos to YouTube, take some time to practice making your unboxing videos using random items or already-opened products. This way, you can work upon setting up your stage and camera, keeping the product within an aim, narrating your unboxing video, editing footage to reduce the “dead air” where nothing is being done or said, and more!
When you’re over making your first test video, play it back and look for issues like excessive “ums, ahs,” or things that are out of focus and other sentence fillers. Don’t worry if your first video isn’t that great—that’s what practice (and your video editing software) are for!
4. Don’t Waste Your Viewers’ Time
If you want to make the best unboxing videos, ensure that you get to the “unboxing” section quite instantly! As indicated by the Expert Voice: “remember that you compete for viewers’ attention with lots of other video content. Keep your introductions brief and quickly get to the unboxing.” If you take too much time to get to the section of unboxing video, you risk losing your audience’s interest and them going away from your content before you can introduce your product.
5. Compile Things Up Once in a While
If you unbox your products, you might instantly run out of content ideas to make. You may look up your YouTube channel losing traction without the new content. So, try to compile things up once in a while—as the Ryan’s World channel discussed earlier.
Creating other kinds of content, such as how-to videos and advice videos for specific products, product updates, and simple news, or even short promotional bits, can help keep your publishing frequency top-notch.
Just remember: everything you publish or post should still be related to your brand and your channel’s core content!
6. Promote Your YouTube Video or Channel on Social Media
There are specific odds that your eCommerce business is active on other social media channels, such as LinkedIn, Facebook, Twitter, etc. Taking benefit of your audience on other social media platforms to promote your YouTube channel can assist you promptly earning some easy subscribers and allow you better promote your products for the current followers.
Part 4: FAQs about Unboxing Videos
1 - What should be included in the unboxing video?
As discussed earlier, you can include products related to your channel’s niche in your unboxing videos.
2 - How long should an unboxing video be?
Time will vary depending on the actual unboxing product, but try to keep it below 5 minutes.
3 - Can you monetize unboxing videos?
No. Text-based commentary isn’t acceptable for monetization. It must be vocal, and for you to show your face as well would be even better.
Conclusion
Unboxing videos are a bang on that; hate them or love them, they are here to stay. Whether you’re a brand owner, a consumer, or both, you’ve probably considered one or two while purposelessly browsing.
You can use the above tips or strategies to create a compelling unboxing experience for small brands to get the most out of a best unboxing video.
What are some of your favorite unboxing videos? Comment down below!
Unboxing videos are a bizarre trend. However, these videos are getting the highest traction, and more videos are getting onboard about various products.
And, if you haven’t already checked one, an unboxing video is what it sounds like. At its core, “unboxing” is the procedure of recording the moment when a particular product is removed and opened from the packaging sold in.
Again, you’re probably thinking:
‘Why would anybody gaze at other folks opening their product packaging?’
More than 90,000 people type ‘unboxing’ into YouTube each month, and that’s quite interesting as well as strange. Also, these are just a few of the insane statistics about the eCommerce trend of unboxing videos.
In this article, you’ll see the science behind such unboxing videos and learn how to create an attractive one by taking inspiration from others.
So whether you’re not sure why we admire unboxing videos or you wish to know how to use them to your benefit, you’re in the right place!
In this article
02 5 Best YouTube Unboxing Channels
03 How to Create a Killer Unboxing Video
Part 1: What is an Unboxing Video?
Within the unboxing videos, people open boxes and narrate their actions. Unboxing videos are incredibly famous with kids, grabbing up tons of millions of subscribers as well as millions of views. Such videos are also usually great for kids to watch (with a few caveats). But the matter of the subject of some unboxing videos is not age-appropriate. And, there are niche-specific videos as well on different channels.
Are unboxers paid by the companies whose services or products they consider opening on YouTube? Companies don’t generally pay the YouTuber directly for featuring their products in a video. When an unboxer becomes super popular (with subscribers and tens of millions of views), companies may send the products for free, but not always. Sometimes hosts disclose this, sometimes not. However, companies do sponsor highly famous and influential YouTubers in other areas. For instance, they may pay the YouTuber to make a personal appearance at a toy store or convention.
Part 2: 5 Best YouTube Unboxing Channels
There are considerable merits to offering your customers a branded and personalized unboxing experience.
Even if you decide to get your products featured in a YouTuber’s unboxing videos, you can help promote your brand and improve brand awareness. So which is the perfect or ideal YouTube channel for unboxing videos for you to try to get featured on? The answer is: “It depends!”
Not every YouTuber is the best for every eCommerce business—and a YouTube channel simply being huge and influential doesn’t make it relevant for your brand. So it’s essential to consider brand suitability while trying looking for a YouTuber to create unboxing videos.
This means considering whether they use harsh language or if their target audience has some overlap with your target audience.
Keeping it in mind, here are some of the top YouTube unboxing channels for inspiration:
1. Unbox Therapy
With around 17 million-plus subscribers, Unbox Therapy is a great channel with a ten-year history of sharing various videos presenting the hottest and most excellent products on the planet. According to their YouTube stats, tech gadgets are a regular feature on the channel, and they have amassed four billion-plus views.
2. Ryan’s World
This titan of teeny the unboxing video world is one of the immensely paid YouTubers for a reason. This channel features fun animation and unboxing videos, simple science experiments for kids, and other educational content. Those interested in doing the best unboxing videos for a younger audience could learn a lot from this platform.
3. Tech Unboxing
At 700k plus subscribers, Tech Unboxing may not be the most significant content creator on this list, but it’s no slouch. The channel mentions everything about the high-tech gadgets and isn’t afraid to brag about the products reviewed. The track also hosts frequent giveaways of tech products and unboxing videos that the host likes that other tech enthusiasts may look at it with fun.
4. Dr. DeBox
DrDebox looks at tech, gadgets, and other products ordered from online sites and offers viewers rundowns of their functions and how they operate. With 590k plus subscribers and billions of video views, DrDebox has a prominent audience and presence on YouTube that can help improve awareness for the products he reviews.
5. UNBOXING Fashion & Sports
Unboxing Fashion & Sports is a channel specializing in well unboxing videos for a range of sports and fashion apparel (frequently shoe brands like Nike or Adidas). Its content generally features a close-up of the reviewer taking products out of the box and moving them around. At the same time, text highlights relevant product features—all set to catchy music without being disturbing. With 17k plus subscribers and a strong focus on sports apparel, this YouTuber knows how to attract a target market.
Part 3: How to Create a Killer Unboxing Video
Firstly, you have to take note of the following points to create the best unboxing videos.
1. Select an Unboxing Niche
2. Practice Speaking Clearly and Slowly
3. Use the Best Unboxing Set-Up
4. Make Sure to Timely Unbox the Products
5. Don’t Delay the Unboxing in Your Video
6. Show the Product in Use
One of the prominent factors about unboxing videos is that anyone can make them. You don’t need to be uniquely talented but go with the products that have broad appeal. Once you create such videos, you can share them on your social media networks or personal website.
Do you want to create your creative unboxing videos for others to find? Do you like to introduce your customers to your products in your own YouTube Channel, so you have total control over the content and messaging of each video?
Here is a step by step guide to help you revamp the creation of your unboxing video:
1. Use a Good Camera & Video Editing Software
While you probably don’t require that high-tech camera that professional Hollywood filmmakers would consider shooting or filming 8k+ ultra-HD movies, you need a good camera that can capture HD footage (preferably at least 1080p). This allows providing your unboxing videos just enough of a professional look to not deactivate or disable the interest of potential viewers.
In addition to a camera, ensure that you have a stand or a decent tripod for it. This way, you don’t have to hold onto your camera by yourself (or have an assistant hold it) while you’re filming. In addition, this minimizes camera shake, which assists in making easy-to-watch videos.
On the other hand, video editing software is a must for taking all of your video compiling and recording into a cohesive video that will be attractive for viewers to watch. There are tons of accessible video editing tools to choose from and some paid options that may have helpful features. However, our favorite pick is Wondershare Filmora due to its beginner-friendly yet professional editing elements. Let us know what you can’t do with this software! It’s a combination of professionalism and reliability you can consider for all your video editing needs.
The hottest feature of Wondershare Filmora for making attractive unboxing videos is audio ducking. With this feature, you can effectively lower the background vocals while adding your voiceovers. And, that’s extremely valuable in making these kinds of videos.
Wondershare Filmora
Get started easily with Filmora’s powerful performance, intuitive interface, and countless effects!
Try It Free Try It Free Try It Free Learn More >
2. Prepare Your Stage/Photo Lightbox
If you look at some famous unboxing channels listed above, you’ll notice that much of their content is shot in a well-framed space where there isn’t much in the background to disturb them from the product being viewed.
Often, this is a “photo lightbox” or an empty table (a small container with a smooth white backdrop that enhances lighting while reducing shadows for making photos look greater). Lightboxes can also be helpful when you’re taking snapshots of your products to put up on your eCommerce website, so it’s a great idea to make (or buy) one that can fit your products.
3. Practice Making Videos
Before uploading videos to YouTube, take some time to practice making your unboxing videos using random items or already-opened products. This way, you can work upon setting up your stage and camera, keeping the product within an aim, narrating your unboxing video, editing footage to reduce the “dead air” where nothing is being done or said, and more!
When you’re over making your first test video, play it back and look for issues like excessive “ums, ahs,” or things that are out of focus and other sentence fillers. Don’t worry if your first video isn’t that great—that’s what practice (and your video editing software) are for!
4. Don’t Waste Your Viewers’ Time
If you want to make the best unboxing videos, ensure that you get to the “unboxing” section quite instantly! As indicated by the Expert Voice: “remember that you compete for viewers’ attention with lots of other video content. Keep your introductions brief and quickly get to the unboxing.” If you take too much time to get to the section of unboxing video, you risk losing your audience’s interest and them going away from your content before you can introduce your product.
5. Compile Things Up Once in a While
If you unbox your products, you might instantly run out of content ideas to make. You may look up your YouTube channel losing traction without the new content. So, try to compile things up once in a while—as the Ryan’s World channel discussed earlier.
Creating other kinds of content, such as how-to videos and advice videos for specific products, product updates, and simple news, or even short promotional bits, can help keep your publishing frequency top-notch.
Just remember: everything you publish or post should still be related to your brand and your channel’s core content!
6. Promote Your YouTube Video or Channel on Social Media
There are specific odds that your eCommerce business is active on other social media channels, such as LinkedIn, Facebook, Twitter, etc. Taking benefit of your audience on other social media platforms to promote your YouTube channel can assist you promptly earning some easy subscribers and allow you better promote your products for the current followers.
Part 4: FAQs about Unboxing Videos
1 - What should be included in the unboxing video?
As discussed earlier, you can include products related to your channel’s niche in your unboxing videos.
2 - How long should an unboxing video be?
Time will vary depending on the actual unboxing product, but try to keep it below 5 minutes.
3 - Can you monetize unboxing videos?
No. Text-based commentary isn’t acceptable for monetization. It must be vocal, and for you to show your face as well would be even better.
Conclusion
Unboxing videos are a bang on that; hate them or love them, they are here to stay. Whether you’re a brand owner, a consumer, or both, you’ve probably considered one or two while purposelessly browsing.
You can use the above tips or strategies to create a compelling unboxing experience for small brands to get the most out of a best unboxing video.
What are some of your favorite unboxing videos? Comment down below!
Unveiling the Art of Auditory Enhancement on YouTube
How to Edit Audio on YouTube

Richard Bennett
Mar 27, 2024• Proven solutions
In this article, we are going to show you how to edit audio with YouTube Video Editor, and the tips on adding your own audio file to YouTube.
- Part 1: Add your Own Audio File to YouTube Video
- Part 2: How to Edit Audio with YouTube Video Editor
Part 1: Add your Own Audio File to YouTube Video
Tools You Are Going to Need
YouTube video editor is far from meeting the needs of people who want to have more control on their audio. On the bright side, if you are interested in learning how to edit audio on YouTube, there is a solution. There are many video editors in the market that allow you to add your own music or audio files to a video. Windows Movie Maker, iMovie, Adobe Premiere, and Magisto are some of the video editors available for you to choose from. In this guide, we recommend the Wondershare Filmora video editor. Below is a quick tutorial about how to edit audio in Filmora.
 Download Mac Version ](https://tools.techidaily.com/wondershare/filmora/download/ )
Why Should You Choose Wondershare Filmora?
There are many advantages associated with the use of Wondershare Filmora. You will see that it allows you to fully edit any audio file and gain 100% control over your files. It is an integrated solution that lacks nothing in terms of efficiency and quality standards. To be more specific, Filmora offers the following unique features:
- Built-in audio editing tools that allow you to gain full control of your audio in an easy way
- Exclusive audio track that enables you to mute, detach or even de-noise the audio from video
- All audio effects can easily be adjusted with one click only
- The built-in Equalizer is capable enough to create amazing audio effects
- Directly upload your video to YouTube, Facebook or Vimeo from Wondershare Filmora
How to add audio files to YouTube video with Wondershare Filmora
Do you want to know more about audio editing? Please read this article: How to add audio to video.
Step 1 Import Video Clips into Filmora
Filmora supports a wide range of video formats, such as MKV, MOV, AVI, WebM and MP4, you can import the video clip shot with Camera, smartphone or camcorder easily to it.
Step 2 Detach Audio
If you want to edit the original audio of the video, you can choose to split the audio file from the video by using the Audio Detach option on Wondershare Filmora. Then, the audio file will be shown in the audio track, and you can cut or trim it.

Note: If you do not want to keep the original audio file in the video, you can delete it from the audio track directly.
Step 3Add Audio Files
Wondershare Filmora offers you multiple royalty free audio effects and music in its rich audio library. What is more, you can also import your own music or audio file from your computer or iTunes. Of course, you should know that the audio should be royalty free for you to make use of. In a different situation, you cannot upload it and benefit from its quality and nature.
Step 4Edit Audio
In this step, you can adjust the audio volume and pitch, etc. There are multiple options for you to benefit from, including the Audio Equalizer, Music, Mix Audio. In this way, you can make sure that the audio is exactly like you have wanted it to be. For further information as to how you can improve the sound quality of your recorded videos, you can check out: How to improve sound quality of recorded videos.
Step 5Save Your Work and Upload on YouTube
If you are satisfied with your work on the audio file and you wish to publish it, the process is quite simple. You just hit Export and select to upload the video to YouTube. After signing in to your YouTube account, you will be ready to start uploading the audio file.

In case you wish to edit the audio from an already published video, you have to download the video first. Then, you can follow the steps above to edit the audio file in Filmora. As one of the widely used video editing software for YouTubers, Filmora is here to empower your imagination. Just download the free trial version and try it now.

Part 2: How to Edit Audio with YouTube Video Editor
Unfortunately, YouTube does not allow users to upload audio files such as MP3, WAV, etc. Instead, you can only upload audio files which are offered by YouTube in the first place. Since YouTube has got a plentiful audio library, you can find a lot of audio there. In this part, we will show you how to add and edit audio with YouTube Video Editor.
You may also like: How to Add Music to YouTube Videos >>
Note: From 20th September 2017 users will no longer be able to use the complimentary editing suite. Check the best YouTube video editor alternatives from this complete guide. In the following part, I will show you how to add audio track , replace the original audio and adjust the audio position and length as well.
- Step 1: Sign in to your YouTube account
- **Step 2:**Click your profile avatar and select Creator Studio option.
- Step 3: In the left pane, go to Video Manager and then click Videos. In the Videos list, choose the video that you want to add new audio track, and then select Audio from the Edit button.

- Step 4: Now you can add or replace the audio in your video. Here you will find that there are various songs and audio files you can choose from. Click ADD TO VIDEO and the audio track will be added to the video directly.

- Step 5: Now you will see the audio track appears at the bottom of the player. Here you can trim and drag the audio bar to adjust the audio positon and length. To Trim the audio, click the beginning or the end of the audio bar and then drag it to the left or right. After trimming, drag it to meet the target position.

Conclusion
Normally, it would be better to add and edit audio to video before updating to YouTube. In this case, Filmora is highly recommended as one of the best video editor for YouTubers , which provides some royalty free music sound in the Music Library to choose from and also the audio editing tools like remove background noise from the video, add fade in and fade out effects with ease or play the video backward or fast forward.
Richard Bennett
Richard Bennett is a writer and a lover of all things video.
Follow @Richard Bennett
Richard Bennett
Mar 27, 2024• Proven solutions
In this article, we are going to show you how to edit audio with YouTube Video Editor, and the tips on adding your own audio file to YouTube.
- Part 1: Add your Own Audio File to YouTube Video
- Part 2: How to Edit Audio with YouTube Video Editor
Part 1: Add your Own Audio File to YouTube Video
Tools You Are Going to Need
YouTube video editor is far from meeting the needs of people who want to have more control on their audio. On the bright side, if you are interested in learning how to edit audio on YouTube, there is a solution. There are many video editors in the market that allow you to add your own music or audio files to a video. Windows Movie Maker, iMovie, Adobe Premiere, and Magisto are some of the video editors available for you to choose from. In this guide, we recommend the Wondershare Filmora video editor. Below is a quick tutorial about how to edit audio in Filmora.
Download Mac Version ](https://tools.techidaily.com/wondershare/filmora/download/ )
Why Should You Choose Wondershare Filmora?
There are many advantages associated with the use of Wondershare Filmora. You will see that it allows you to fully edit any audio file and gain 100% control over your files. It is an integrated solution that lacks nothing in terms of efficiency and quality standards. To be more specific, Filmora offers the following unique features:
- Built-in audio editing tools that allow you to gain full control of your audio in an easy way
- Exclusive audio track that enables you to mute, detach or even de-noise the audio from video
- All audio effects can easily be adjusted with one click only
- The built-in Equalizer is capable enough to create amazing audio effects
- Directly upload your video to YouTube, Facebook or Vimeo from Wondershare Filmora
How to add audio files to YouTube video with Wondershare Filmora
Do you want to know more about audio editing? Please read this article: How to add audio to video.
Step 1 Import Video Clips into Filmora
Filmora supports a wide range of video formats, such as MKV, MOV, AVI, WebM and MP4, you can import the video clip shot with Camera, smartphone or camcorder easily to it.
Step 2 Detach Audio
If you want to edit the original audio of the video, you can choose to split the audio file from the video by using the Audio Detach option on Wondershare Filmora. Then, the audio file will be shown in the audio track, and you can cut or trim it.
Note: If you do not want to keep the original audio file in the video, you can delete it from the audio track directly.
Step 3Add Audio Files
Wondershare Filmora offers you multiple royalty free audio effects and music in its rich audio library. What is more, you can also import your own music or audio file from your computer or iTunes. Of course, you should know that the audio should be royalty free for you to make use of. In a different situation, you cannot upload it and benefit from its quality and nature.
Step 4Edit Audio
In this step, you can adjust the audio volume and pitch, etc. There are multiple options for you to benefit from, including the Audio Equalizer, Music, Mix Audio. In this way, you can make sure that the audio is exactly like you have wanted it to be. For further information as to how you can improve the sound quality of your recorded videos, you can check out: How to improve sound quality of recorded videos.
Step 5Save Your Work and Upload on YouTube
If you are satisfied with your work on the audio file and you wish to publish it, the process is quite simple. You just hit Export and select to upload the video to YouTube. After signing in to your YouTube account, you will be ready to start uploading the audio file.
In case you wish to edit the audio from an already published video, you have to download the video first. Then, you can follow the steps above to edit the audio file in Filmora. As one of the widely used video editing software for YouTubers, Filmora is here to empower your imagination. Just download the free trial version and try it now.
Part 2: How to Edit Audio with YouTube Video Editor
Unfortunately, YouTube does not allow users to upload audio files such as MP3, WAV, etc. Instead, you can only upload audio files which are offered by YouTube in the first place. Since YouTube has got a plentiful audio library, you can find a lot of audio there. In this part, we will show you how to add and edit audio with YouTube Video Editor.
You may also like: How to Add Music to YouTube Videos >>
Note: From 20th September 2017 users will no longer be able to use the complimentary editing suite. Check the best YouTube video editor alternatives from this complete guide. In the following part, I will show you how to add audio track , replace the original audio and adjust the audio position and length as well.
- Step 1: Sign in to your YouTube account
- **Step 2:**Click your profile avatar and select Creator Studio option.
- Step 3: In the left pane, go to Video Manager and then click Videos. In the Videos list, choose the video that you want to add new audio track, and then select Audio from the Edit button.
- Step 4: Now you can add or replace the audio in your video. Here you will find that there are various songs and audio files you can choose from. Click ADD TO VIDEO and the audio track will be added to the video directly.
- Step 5: Now you will see the audio track appears at the bottom of the player. Here you can trim and drag the audio bar to adjust the audio positon and length. To Trim the audio, click the beginning or the end of the audio bar and then drag it to the left or right. After trimming, drag it to meet the target position.
Conclusion
Normally, it would be better to add and edit audio to video before updating to YouTube. In this case, Filmora is highly recommended as one of the best video editor for YouTubers , which provides some royalty free music sound in the Music Library to choose from and also the audio editing tools like remove background noise from the video, add fade in and fade out effects with ease or play the video backward or fast forward.
Richard Bennett
Richard Bennett is a writer and a lover of all things video.
Follow @Richard Bennett
Also read:
- 2024 Approved Achieving a Noiseless Presence on Social Video Platforms
- Musical Milestones Celebrate Your Growth with These 15 Vids
- [Updated] 10 Ultimate Immersive VR Video Hits
- Utilizing Free, Royalty-Free Audio Tracks in Video Media
- Decode the Art of YouTube Shorts with Hit Songs
- 2024 Approved Craftsman of the Multimedia Medley
- The Ultimate Guide to Convert YouTube Shorts to Mp4
- Safely Stream Your Soundtracks Three Methods From YouTube
- [Updated] Becoming a Leader in Video Marketing on YouTube
- From Wanderlusts To Web Presence Your Strategy for Professional Blogging Success
- Are There Legal Restrictions to Recording YouTube Videos for 2024
- In 2024, Crafting the Ideal YouTube Playlist An Easy, Step-by-Step Method
- Up-to-Date Strategies for YouTube Earnings
- [Updated] Elevate Your YouTube Presence with These 8 Free Courses
- 2024 Approved Easy Transition From Local to Global Stream Spotify Playlists on YouTube
- Perfect Pick The Best Microphones For All YT Content Types
- Cutting Edge Professional Guide to YouTube Editing for 2024
- Ranking Top 10 Budget-Friendly Video Editing Apps
- Elevating YouTube Consumption Strategies for Organizing Videos for Future Viewing
- 5 Simplified Steps for Sequential YouTube Video Viewing (Free)
- Hire Wisdom Top 10 Recruiting Video Guide
- Pro Convert Solutions Efficient YTVideo to Text Converters
- Ever-Fading Memories Revived YouTube's Lost Content Hunt for 2024
- Humor Hits The Best Funny YouTube Short Ideas on the Block
- In 2024, Customize & Captivate Thumbnail Magic for Shorts
- Uploading Tunes A Guide to Posting on YouTube
- How to Gauge if an MCN Is Right for Your YouTube Journey
- Mastering Your Content Delivery Insights on IGTV and YouTube
- [New] Champion Toolkit 10 Budget-Friendly Caption Extractors
- Quick-Witness YouTube Techniques for Rapid Rendering
- [New] Enhance Productions No-Cost Sounds Available
- Mastering YouTube Banner Success A Complete Strategy
- Bring Playlists Down to YouTube The 5 Best Conversion Resources
- [New] Accelerate/Decelerate Your YouTube Videos A Step-by-Step Guide
- Banish Odd Greens in Your YouTube Videos Using Mac Techniques
- Skyrocketing Views Simple Strategies Without Cost
- 10 YT Channels Surging Ideas and Insights Unleashed
- Laughing Skits Building a Parody Film
- [New] Channel Success Story Optimal Themes and Ideas to Boost Content
- 10 Fastest Growing YouTube Channels to Light Up Your Mind
- 2024 Approved Elite Tech for Saving Your On-Camera Video Memories
- [New] Charting a Course to Riches YouTube's Monetary Milestones
- The Art of Mixing on YouTube Music
- Dissecting YouTube's Activities Post-Uploading Videos for 2024
- [New] Dive Into Digital Green Magic Top 4 YouTube Sources for No-Cost Background Workshops
- Beginner's Guide to Choosing Lenses and Cameras for YouTube Vloggers
- 2024 Approved Ethical Download Strategies for YouTube to MP4 Files
- [New] An Expert's Blueprint for Calculating Your Video's Impact & Income
- Updated Expert-Recommended 4K Video Converters (Free Trial & Paid Options)
- New The Top 4K Video Editing Solutions for Professionals
- How to Unlock Apple iPhone 12 Pro Max Passcode without Computer?
- How to Unlock iPhone 13 Pro Max without Passcode or Face ID | Dr.fone
- [New] In 2024, Plate Pleasures Iconic International Dishes Unveiled
- In 2024, How to Unlock iPhone 15 Passcode without Computer?
- Set Your Preferred Job Location on LinkedIn App of your Huawei Nova Y71 | Dr.fone
- How Can Xiaomi Redmi Note 12 Pro 5GMirror Share to PC? | Dr.fone
- Video Framing Technique Adding BB and Letterbox Overlays to FB for 2024
- Why does the pokemon go battle league not available On Vivo S18e | Dr.fone
- New The Ultimate Guide on How to Promoting Music Videos on YouTube for 2024
- Fake the Location to Get Around the MLB Blackouts on Samsung Galaxy F14 5G | Dr.fone
- How To Cut Video For Instagram On Mac for 2024
- Epic Game Viewing Spots #1-#9
- 2024 Approved Top 12 Tycoons - The Ultimate Challenge for Every Gamer
- The Ultimate Guide to Unlocking Apple Watch Or iPhone 15 from iCloud
- In 2024, Android's Ultimate Capture Secrets Revealed
- Does Xiaomi Redmi 12 support MKV video files?
- [Updated] In 2024, IMovie Techniques for Squaring Up Your Instagram Feed
- [New] In 2024, How to Speed Up Video Streams on TikTok
- How To Transfer Data From Apple iPhone 15 Pro To Other iPhone 12 Pro Max devices? | Dr.fone
- In 2024, How to Transfer Data After Switching From Itel A05s to Latest Samsung | Dr.fone
- Updated Free and Paid Android Video Editing Apps Compared Top 10 for 2024
- [New] Optimize Your Online Visuals Learn and Adjust Facebook Video Sizes & Ratios
- [New] FrameFraction Review
- 2024 Approved Prevent Video Playback Issues in Android Apps
- [New] Igniting Interest How to Elevate Your Instagram Content's Impact for 2024
- Updated Free WMV Video Cutter Tools Top Picks for 2024
- Updated In 2024, The Ultimate List of Free Online Video Invitation Generators
- How to Move Custom Ringtones from Apple iPhone 6s Plus to Android? | Dr.fone
- [Updated] IPhone's Video Fix Combat Blurry Facebook Videos for 2024
- New In 2024, The Best Automatic Transcription Software
- [New] Unmissable TikTok Gifts on Amazon Top 30 Findings for 2024
- In 2024, The Magnificent Art of Pokemon Go Streaming On Oppo A78 5G? | Dr.fone
- In 2024, 3 Effective Ways to Bypass Activation Lock from Apple iPhone X
- In 2024, Stepwise Guide to iPad Time-Lapse Mastery
- 2024 Approved Mouthwatering Moves The Hottest Foods on TikTok
- Endless Playback Top Free Video Loopers for Windows and Mac for 2024
- [New] From Roots to Refined Rogue's Journey Through Genres
- Navigating Closer Views for Efficient Tech Meetings
- 3 Ways to Change Location on Facebook Marketplace for Honor 100 Pro | Dr.fone
- Hacks to do pokemon go trainer battles For Realme 10T 5G | Dr.fone
- [New] In 2024, Top VoIP Platforms Face-Off Discord Vs Skype Showdown
- [Updated] In 2024, Accessing Your Twitter History
- [New] 2024 Approved Ultimate Guide to Gameplay in Simulated Liquids
- Title: "Engage, Enchant Elevate Your Unboxing Content for 2024"
- Author: Steven
- Created at : 2024-05-25 19:15:31
- Updated at : 2024-05-26 19:15:31
- Link: https://youtube-clips.techidaily.com/engage-enchant-elevate-your-unboxing-content-for-2024/
- License: This work is licensed under CC BY-NC-SA 4.0.
