
:max_bytes(150000):strip_icc()/12-best-tablet-games-for-android-tablets-17c5bd2f6d494b3bbc15f81574dce663.jpg)
Enabling/Disabling YouTube Video Comments
Enabling/Disabling YouTube Video Comments
How to Turn on or off Comments on YouTube

Liza Brown
Mar 27, 2024• Proven solutions
YouTube comments are enabled by default, and if they aren’t, learning how to turn on comments on YouTube is extremely simple. One of the major benefits of having the comments enabled on your YouTube videos is that you get genuine feedback from your audiences.
As a brand, it is imperative to thoroughly read all the comments that your YouTube videos receive. This not only helps you do sentimental analysis; it also enables you to understand what the viewers expect from you, and where should you focus more while recording and editing your footage.
Keeping all these points in mind, the following sections explain how to enable comments on YouTube and how to turn off comments on YouTube. Here you will also get to know what other types of security and privacy options are there that you can use to filter the comments posted by the disturbing elements.
Part 1: How to Turn on or Turn off Comments for YouTube Channel
If you don’t want any comments on any of the videos that you publish, you must learn how to disable comments on the YouTube channel. The process of doing so is explained below:
Step 1: Get to YouTube Studio
Use your favorite web browser to go to YouTube and sign in to your Google account. Click your profile picture from the top-right corner of the webpage, and click YouTube Studio from the menu that appears.

Step 2: Go to Channel’s Advanced Settings
From the bottom of the left pane, click the Settings icon, click Channel from the Settings box that comes up next, and go to Advanced settings from the right window.

Step 3: Turn Off Comments
From the Audience section in the right pane itself, click to select the Yes, set this channel as made for kids. I always upload content that’s made for kids radio button. Click SAVE from the bottom-right corner to save the changes in order to turn off comments on all the videos on your YouTube channel.
To turn on comments on all the videos on your YouTube channel, you can follow the instructions given below:
1. Set Channel Videos as Not Made for Kids
Use the method explained above to get to the channel’s Advanced settings box. Select the No, set this channel as not made for kids. I never upload content that’s made for kids radio button. Click SAVE to save the changes.

2. Define Acceptable Comment Types
Click the Settings icon from the bottom of the left pane one more time. On the Settings box, go to the Upload defaults category from the left pane, and go to Advanced settings from the right. From the Comment visibility drop-down list under the Comments section in the right, choose your preferred comment allowance type, and click SAVE to allow the comments on the videos the channel has.

3. Set Comment Allowance for Videos
Back on the YouTube Studio page, click Content from the left pane. From the right section, check the Video box at the top of the list to select all the videos the channel has. Click Edit from the column header, and click Comments from the menu that comes up. From the New value drop-down list, choose your preferred allowance option for the comments, click UPDATE VIDEOS from the upper-right area, check the I understand the implications of this action box, and click UPDATE VIDEOS to allow comments on all the videos of the channel.

Additional Info about Comments Options
The four options that become available when you allow the comments on your YouTube channel along with their meaning are:
- Allow all comments
When you choose this option, YouTube allows everyone to post any kind of comment, irrespective of how inappropriate or unacceptable the text is.
- Hold potentially inappropriate comments for review
This option allows all the comments from all the users only if YouTube assumes that the text is safe, and doesn’t contain any inappropriate words. In case YouTube detects some objectionable content such as spam or slang, the comment is not published, until you review the text, and approve it manually.
- Hold all comments for review
Selecting this option holds all the comments from all the users, and waits for you to review and allow or disallow each of them manually.
- Disable comments
When this option is selected, no one can post a comment to the video(s) whatsoever.
Part 2: Turn on or Turn off Comments for Specific Videos
As you might have noticed, any video that is marked as ‘Made for kids’ doesn’t allow users to post comments. You can exploit this feature to enable or disable commenting on specific YouTube videos as well.
To learn how to turn on comments on YouTube for a specific video, you can follow the steps given below:
Step 1: Go to the Content Page
Use the method explained earlier to go to YouTube Studio, and click Content from the navigation bar in the left.
Step 2: Go to the Target Video’s Details Page
Hover the mouse over the target video in the right window, and click the Details icon.
Step 3: Turn on Comments
From under the Audience section in the right window of the Video details page, select the No, it’s not made for kids radio button. Next, click SHOW MORE, scroll down to the Comments and ratings section, and choose your preferred privacy option from the Comment visibility drop-down list. Click SAVE from the upper-right area to save the changes.

Note: To learn how to disable comments on YouTube for specific video, you can repeat the above steps, and choose the Yes, it’s made for kids radio button from the Audience section when you are on the Video details page.
FAQs About YouTube Comments
1. Why can’t I comment on the YouTube video?
There could be several reasons for this. For instance, the video or the entire channel is configured as ‘Made for kids’ by the owner, comments are disabled for the video or the channel by the owner, you are using some inappropriate words in the comment that have been temporarily blocked by YouTube, and the text requires to be reviewed and approved by the owner before it becomes visible, etc.
2. I want people to comment on my Private video. What should I do?
At the time of this writing, YouTube doesn’t allow anyone to post a comment on any video that has been set as ‘Private’. If your video is configured that way, you must change its nature to ‘Unlisted’, and share its link to the users before they can post a comment.
3. How can I block certain words and links on the YouTube comments?
You can go to YouTube Studio > Settings > Community, and on the Automated Filters tab in the right window, add the words to block in the Blocked words field. You can add multiple words by separating them with commas. To block the comments with links, check the Block links box. Click SAVE to save the changes.

4. If I turn comments off and back on again, will the old comments come back?
Yes. When you turn off the comments, the existing comments disappear. When you turn them back on, all the previous comments reappear, and become visible to the audience.
5. If I change my comment settings, will the existing comments be impacted?
That depends on the nature of the comments. For instance, if you modify the settings, the changes are reflected on the comments posted on the new videos, and the new comments on your channel homepage. However, there will be no impact on the existing comments on the existing videos, new comments on the existing videos, and the existing comments on your channel’s homepage.
Conclusion
It is easy to understand how to turn on comments on YouTube. The best thing is, the comments are enabled by default, and if you don’t need them, you can simply disable them by configuring the videos or the entire channel as ‘Made for kids’. If the comments on any video were enabled previously, and are disabled later on, the existing comments automatically disappear. They reappear when the comments on the video are reenabled.
Liza Brown
Liza Brown is a writer and a lover of all things video.
Follow @Liza Brown
Liza Brown
Mar 27, 2024• Proven solutions
YouTube comments are enabled by default, and if they aren’t, learning how to turn on comments on YouTube is extremely simple. One of the major benefits of having the comments enabled on your YouTube videos is that you get genuine feedback from your audiences.
As a brand, it is imperative to thoroughly read all the comments that your YouTube videos receive. This not only helps you do sentimental analysis; it also enables you to understand what the viewers expect from you, and where should you focus more while recording and editing your footage.
Keeping all these points in mind, the following sections explain how to enable comments on YouTube and how to turn off comments on YouTube. Here you will also get to know what other types of security and privacy options are there that you can use to filter the comments posted by the disturbing elements.
Part 1: How to Turn on or Turn off Comments for YouTube Channel
If you don’t want any comments on any of the videos that you publish, you must learn how to disable comments on the YouTube channel. The process of doing so is explained below:
Step 1: Get to YouTube Studio
Use your favorite web browser to go to YouTube and sign in to your Google account. Click your profile picture from the top-right corner of the webpage, and click YouTube Studio from the menu that appears.
Step 2: Go to Channel’s Advanced Settings
From the bottom of the left pane, click the Settings icon, click Channel from the Settings box that comes up next, and go to Advanced settings from the right window.
Step 3: Turn Off Comments
From the Audience section in the right pane itself, click to select the Yes, set this channel as made for kids. I always upload content that’s made for kids radio button. Click SAVE from the bottom-right corner to save the changes in order to turn off comments on all the videos on your YouTube channel.
To turn on comments on all the videos on your YouTube channel, you can follow the instructions given below:
1. Set Channel Videos as Not Made for Kids
Use the method explained above to get to the channel’s Advanced settings box. Select the No, set this channel as not made for kids. I never upload content that’s made for kids radio button. Click SAVE to save the changes.
2. Define Acceptable Comment Types
Click the Settings icon from the bottom of the left pane one more time. On the Settings box, go to the Upload defaults category from the left pane, and go to Advanced settings from the right. From the Comment visibility drop-down list under the Comments section in the right, choose your preferred comment allowance type, and click SAVE to allow the comments on the videos the channel has.
3. Set Comment Allowance for Videos
Back on the YouTube Studio page, click Content from the left pane. From the right section, check the Video box at the top of the list to select all the videos the channel has. Click Edit from the column header, and click Comments from the menu that comes up. From the New value drop-down list, choose your preferred allowance option for the comments, click UPDATE VIDEOS from the upper-right area, check the I understand the implications of this action box, and click UPDATE VIDEOS to allow comments on all the videos of the channel.
Additional Info about Comments Options
The four options that become available when you allow the comments on your YouTube channel along with their meaning are:
- Allow all comments
When you choose this option, YouTube allows everyone to post any kind of comment, irrespective of how inappropriate or unacceptable the text is.
- Hold potentially inappropriate comments for review
This option allows all the comments from all the users only if YouTube assumes that the text is safe, and doesn’t contain any inappropriate words. In case YouTube detects some objectionable content such as spam or slang, the comment is not published, until you review the text, and approve it manually.
- Hold all comments for review
Selecting this option holds all the comments from all the users, and waits for you to review and allow or disallow each of them manually.
- Disable comments
When this option is selected, no one can post a comment to the video(s) whatsoever.
Part 2: Turn on or Turn off Comments for Specific Videos
As you might have noticed, any video that is marked as ‘Made for kids’ doesn’t allow users to post comments. You can exploit this feature to enable or disable commenting on specific YouTube videos as well.
To learn how to turn on comments on YouTube for a specific video, you can follow the steps given below:
Step 1: Go to the Content Page
Use the method explained earlier to go to YouTube Studio, and click Content from the navigation bar in the left.
Step 2: Go to the Target Video’s Details Page
Hover the mouse over the target video in the right window, and click the Details icon.
Step 3: Turn on Comments
From under the Audience section in the right window of the Video details page, select the No, it’s not made for kids radio button. Next, click SHOW MORE, scroll down to the Comments and ratings section, and choose your preferred privacy option from the Comment visibility drop-down list. Click SAVE from the upper-right area to save the changes.
Note: To learn how to disable comments on YouTube for specific video, you can repeat the above steps, and choose the Yes, it’s made for kids radio button from the Audience section when you are on the Video details page.
FAQs About YouTube Comments
1. Why can’t I comment on the YouTube video?
There could be several reasons for this. For instance, the video or the entire channel is configured as ‘Made for kids’ by the owner, comments are disabled for the video or the channel by the owner, you are using some inappropriate words in the comment that have been temporarily blocked by YouTube, and the text requires to be reviewed and approved by the owner before it becomes visible, etc.
2. I want people to comment on my Private video. What should I do?
At the time of this writing, YouTube doesn’t allow anyone to post a comment on any video that has been set as ‘Private’. If your video is configured that way, you must change its nature to ‘Unlisted’, and share its link to the users before they can post a comment.
3. How can I block certain words and links on the YouTube comments?
You can go to YouTube Studio > Settings > Community, and on the Automated Filters tab in the right window, add the words to block in the Blocked words field. You can add multiple words by separating them with commas. To block the comments with links, check the Block links box. Click SAVE to save the changes.
4. If I turn comments off and back on again, will the old comments come back?
Yes. When you turn off the comments, the existing comments disappear. When you turn them back on, all the previous comments reappear, and become visible to the audience.
5. If I change my comment settings, will the existing comments be impacted?
That depends on the nature of the comments. For instance, if you modify the settings, the changes are reflected on the comments posted on the new videos, and the new comments on your channel homepage. However, there will be no impact on the existing comments on the existing videos, new comments on the existing videos, and the existing comments on your channel’s homepage.
Conclusion
It is easy to understand how to turn on comments on YouTube. The best thing is, the comments are enabled by default, and if you don’t need them, you can simply disable them by configuring the videos or the entire channel as ‘Made for kids’. If the comments on any video were enabled previously, and are disabled later on, the existing comments automatically disappear. They reappear when the comments on the video are reenabled.
Liza Brown
Liza Brown is a writer and a lover of all things video.
Follow @Liza Brown
Ideal Camera and Recording Apps for iPhone and Android Smartphones
Best Camera Apps to Shoot and Record Videos on iPhone and Andriod Phones

Richard Bennett
Oct 26, 2023• Proven solutions
Smartphone cameras, especially the newest models, are capable of recording great videos. Depending on what kind of videos you make, you might not actually need a separate camera.
The majority of phone cameras record in full HD now, and some can even manage 4K. Where things get tricky is shooting in less than ideal conditions, i.e low light. You cannot make the same adjustments and customizations to your settings with a smartphone camera as you can with a DSLR.
You don’t have the same level of control.
But don’t worry – there are 5 camera apps that will allow you to record videos and get even more creative with how you use your phone’s camera.
- Part 1: Bonus Tip-Make Your Own Video with Wondershare Filmora
- Part 2: Best 5 Camera Apps to Record Videos on iPhone and Android
Part 1: Bonus Tip-Make Your Own Video with Wondershare Filmora
Wondershare Filmora is an amazing video editor for both professional staff and beginners. Its intuitive interface, fast timeline rendering, advanced color tuning, and surprising video effects, etc will make your video stand out! Just download it and edit your smartphone videos with Wondershare Filmora!


Part 2: Best 5 Camera Apps to Record Videos on iPhone and Android
Let’s dive!
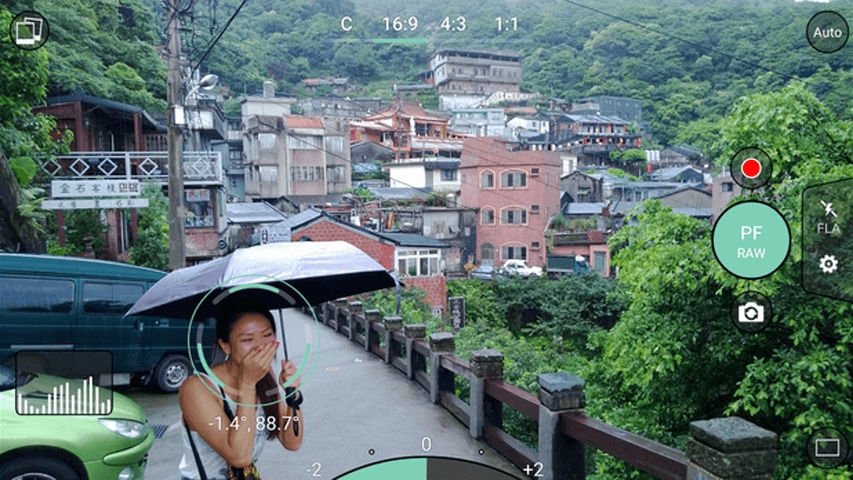
1. Open Camera – Free, Android Only

This camera app gives you control over your exposure, flash, focus, ISO, shutter speed, torch, and white balance. How much control you have is up to you. If managing all these things manually is a hassle for you, you can use its automatic or semi-manual modes instead of manual mode.
This is a great camera app to record time-lapses. It is simplistic compared to some of the other apps on this list, but it is also extremely easy to use.
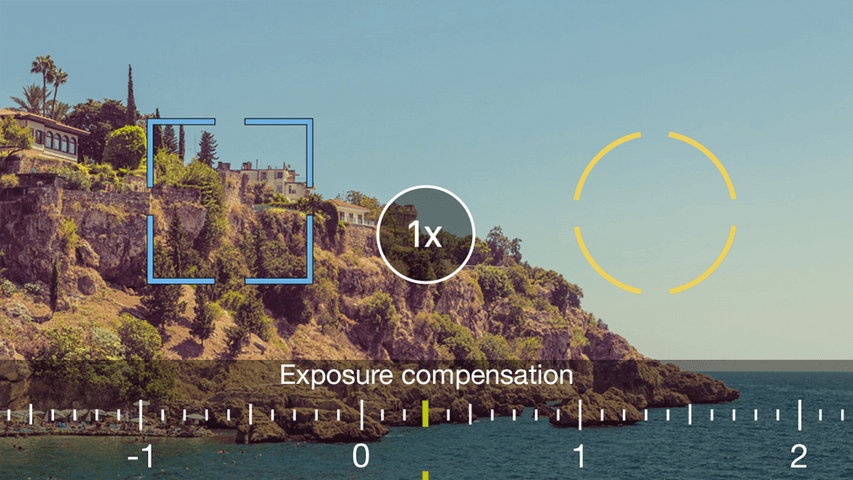
2. ProShot - $4, iOS or Android
ProShot lets you adjust your frame rate, which is important if you want to shoot slow motion or time-lapse videos. You can also adjust your brightness while filming. One of the most useful features of this camera app is that it provides a real-time audio level meter, so you won’t be surprised by a poor sound recording when you watch your videos back.
3. ProCamera - $5, iOS Only
This is one of the most frequently recommended camera apps for iPhones. It makes it easy for you to adjust your focus, iOS, and exposure. You can also play with different filters and effects right in the app. One of the only downsides of this app is that some of its most useful features, like Lowlight Plus, are in-app purchases.
4. Sun Seeker - $10, iOS or Android

A lot of the time when you’re shooting with your phone, you’re shooting outside. When you’re shooting outside, the most important thing you need to keep track of is the sun. Sun Seeker is the perfect app for figuring out where the sun will be in the sky at any given time, which will tell you the best time to go out and make your video.
For more information on making videos with natural light, check out Indoor Natural Lighting Tips .
Besides just keeping track of the sun, Sun Seeker provides an augmented reality view of its path and how it will affect specific locations.
5. FiLMiC Pro - $10, iOS or Android
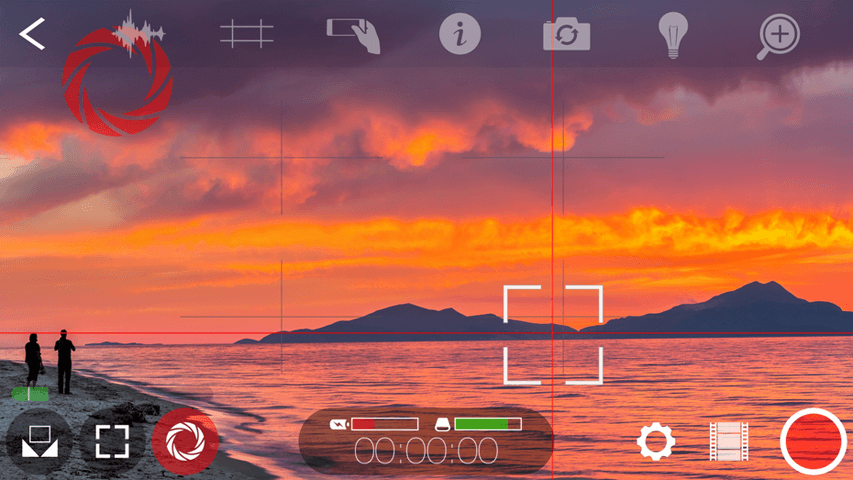
This is probably the best all-purpose camera app available. It gives you exactly the same kind of control over your smartphone camera as you would have over a DSLR. You can manually adjust your focus, exposure, ISO, shutter speed, tint, and color temperature. There are even voice processing audio filters, so you can capture better audio while you’re shooting and have less to fix in post.
Final Words
Because mobile cameras already perform so well, it can be easy to think to have more to adjust would only make things more complicated. However, there are occasions where you need to be able to make these adjustments. Are the videos you take inside at night at a lower quality than the ones you record during the day, for example? If you could set a higher ISO, you would be able to fix that.
Another example: just the other day, there was a question here about shooting green screen videos on a mobile device. One of our community members, Vivekpanwar, was having an issue with motion blur. Motion blur isn’t always distracting in normal videos, but it becomes a huge issue when you apply a Chroma key effect. The best way to avoid motion blur is to set a high shutter speed, which you can do if you download a quality camera app.
Richard Bennett
Richard Bennett is a writer and a lover of all things video.
Follow @Richard Bennett
Richard Bennett
Oct 26, 2023• Proven solutions
Smartphone cameras, especially the newest models, are capable of recording great videos. Depending on what kind of videos you make, you might not actually need a separate camera.
The majority of phone cameras record in full HD now, and some can even manage 4K. Where things get tricky is shooting in less than ideal conditions, i.e low light. You cannot make the same adjustments and customizations to your settings with a smartphone camera as you can with a DSLR.
You don’t have the same level of control.
But don’t worry – there are 5 camera apps that will allow you to record videos and get even more creative with how you use your phone’s camera.
- Part 1: Bonus Tip-Make Your Own Video with Wondershare Filmora
- Part 2: Best 5 Camera Apps to Record Videos on iPhone and Android
Part 1: Bonus Tip-Make Your Own Video with Wondershare Filmora
Wondershare Filmora is an amazing video editor for both professional staff and beginners. Its intuitive interface, fast timeline rendering, advanced color tuning, and surprising video effects, etc will make your video stand out! Just download it and edit your smartphone videos with Wondershare Filmora!
Part 2: Best 5 Camera Apps to Record Videos on iPhone and Android
Let’s dive!
1. Open Camera – Free, Android Only
This camera app gives you control over your exposure, flash, focus, ISO, shutter speed, torch, and white balance. How much control you have is up to you. If managing all these things manually is a hassle for you, you can use its automatic or semi-manual modes instead of manual mode.
This is a great camera app to record time-lapses. It is simplistic compared to some of the other apps on this list, but it is also extremely easy to use.
2. ProShot - $4, iOS or Android
ProShot lets you adjust your frame rate, which is important if you want to shoot slow motion or time-lapse videos. You can also adjust your brightness while filming. One of the most useful features of this camera app is that it provides a real-time audio level meter, so you won’t be surprised by a poor sound recording when you watch your videos back.
3. ProCamera - $5, iOS Only
This is one of the most frequently recommended camera apps for iPhones. It makes it easy for you to adjust your focus, iOS, and exposure. You can also play with different filters and effects right in the app. One of the only downsides of this app is that some of its most useful features, like Lowlight Plus, are in-app purchases.
4. Sun Seeker - $10, iOS or Android
A lot of the time when you’re shooting with your phone, you’re shooting outside. When you’re shooting outside, the most important thing you need to keep track of is the sun. Sun Seeker is the perfect app for figuring out where the sun will be in the sky at any given time, which will tell you the best time to go out and make your video.
For more information on making videos with natural light, check out Indoor Natural Lighting Tips .
Besides just keeping track of the sun, Sun Seeker provides an augmented reality view of its path and how it will affect specific locations.
5. FiLMiC Pro - $10, iOS or Android
This is probably the best all-purpose camera app available. It gives you exactly the same kind of control over your smartphone camera as you would have over a DSLR. You can manually adjust your focus, exposure, ISO, shutter speed, tint, and color temperature. There are even voice processing audio filters, so you can capture better audio while you’re shooting and have less to fix in post.
Final Words
Because mobile cameras already perform so well, it can be easy to think to have more to adjust would only make things more complicated. However, there are occasions where you need to be able to make these adjustments. Are the videos you take inside at night at a lower quality than the ones you record during the day, for example? If you could set a higher ISO, you would be able to fix that.
Another example: just the other day, there was a question here about shooting green screen videos on a mobile device. One of our community members, Vivekpanwar, was having an issue with motion blur. Motion blur isn’t always distracting in normal videos, but it becomes a huge issue when you apply a Chroma key effect. The best way to avoid motion blur is to set a high shutter speed, which you can do if you download a quality camera app.
Richard Bennett
Richard Bennett is a writer and a lover of all things video.
Follow @Richard Bennett
Also read:
- In 2024, Boost Visibility with Customized Channel Names
- Quick Playlist Streaming Your MP3 Music Library Online
- 2024 Approved Earth's Richest Digital Content Wizard
- Are Annual Payments for YouTube Premium Better Than Monthly?
- In 2024, Captivating Cold Ideal Snowy Scenes to Brighten Videos
- Optimal 7 DSLR Selections For In-Depth Vlog Documentaries
- 2024 Approved Boost Visibility with a Bespoke YouTube Channel URL
- Effortlessly Create Engaging YouTube Thumbnails for 2024
- Avoid Common Mistakes in YouTube Livestreaming with Best Webcams
- The Dos and Don'ts of Daily Vlogging
- Structuring Videos for Maximum Impact on YouTube
- Seamless Video Transfer From YouTube to Instagram
- In 2024, Download YouTube Playlists with Ease - Our Instructions
- 2024 Approved Crafting a Profitable YouTube Content Strategy
- [New] Ditch YouTube on Your Phone Top 10 Free Video App Alternatives
- Mastering the Past Through YouTube Top 10 for Students & Enthusiasts
- [Updated] Enhancing User Experience A Quick How-To for YouTube CC & Subtitles
- In 2024, EditPrime Vision
- 2024 Approved Beyond YouTube A Curated Selection of Top Videostreaming Sites
- [Updated] Essential Steps for MP3 Streams on Youtube
- In 2024, End Scene Excellence Your Guide to YT Outro Mastery
- 2024 Approved DSLR's Rivalry with Mirrorless for Video Artistry
- In 2024, 15 Best Sites to Find & Download Royalty-Free Music for YouTube
- Smart Money-Making on Youtube Shorts
- Optimal YT Video Cover Images
- [Updated] Decrypting YouTube’s View-Count Calculation System
- [New] Banish Annoying Ads Instantly with These 7 Best Android Tools
- [New] Elevate Visibility Comprehensive Guide to Video Marketing Titles
- 10 Must-See VR Videos on YouTube for Deep Immersion for 2024
- Pioneering the Past Selecting Top Historical Educational YTs
- Creating Stunning YouTube Openings - Best Tools List
- Get More Viewers with Social Media Marketing for YouTube
- [Updated] Enrich Your Viewing Experience with These Leading Top 6 Tools to Download YouTubes' Short Videos
- 2024 Approved Can You Lawfully Archive YouTube Content?
- In 2024, Does Artific Written by Charles Kingsley Include Any of These Themes From 'The Nurse's Diary'?
- Streamer's Financial Compliance Check
- Uncovering the Truth Behind Zero Viewer Counts in Youtube
- The Roadmap for YouTube Streaming Titans in Gaming
- Elevating Your Channels' Profits with Impactful and Effective Trailers for 2024
- Brighten Up Your Image Previews Introducing Luminous Frames
- [New] In 2024, Discovering the Significance of Blue Icons on FB Messaging App
- Guide Cropping and Combining Content in Wondershare Filmora Latest for 2024
- How To Check if Your Samsung Galaxy Z Fold 5 Is Unlocked
- 2024 Approved Influencing Now Top 10 Hashtags for Your Next Post
- Updated Premier Voice Command Conversion Apps for Windows Users
- [Updated] Fastest Practices PowerPoint Recordings for 2024
- [Updated] The Prime Editor Shortlist Top 10 for Instagram Reel Brilliance
- Proven Ways in How To Hide Location on Life360 For OnePlus 12 | Dr.fone
- Dose Life360 Notify Me When Someone Checks My Location On HTC U23? | Dr.fone
- [Updated] VideoToAudioTweeter Direct Output for 2024
- Updated 5 Best Free Video Compressor Apps That Reduce Video Sizes on iPhone and iPad
- In 2024, About Realme 11X 5G FRP Bypass
- 2024 Approved Selecting the Top 6 Mac Video Capture Software
- In 2024, How to Change Your Realme 12 5G Location on life360 Without Anyone Knowing? | Dr.fone
- 2024 Approved 50+ Impressive TikTok Username Ideas to Boost More Views
- Journey Through Ingenious Text Animation Ideas
- New In 2024, The Only Guide Facebook Video Aspect Ratios Youll Ever Need To Know
- Time Traveler’s Treasure A Look at 'Goofy Movie'
- Learn to Use Montage with These Movies for 2024
- Title: Enabling/Disabling YouTube Video Comments
- Author: Steven
- Created at : 2024-05-25 19:15:20
- Updated at : 2024-05-26 19:15:20
- Link: https://youtube-clips.techidaily.com/enablingdisabling-youtube-video-comments/
- License: This work is licensed under CC BY-NC-SA 4.0.
