
:max_bytes(150000):strip_icc()/OnePlus12R-6ad235dd079f49769ee85f0ce837c606.jpeg)
"Elevating Video Quality Sharing iMovie Work via YouTube"
Elevating Video Quality: Sharing iMovie Work via YouTube
How to Upload a Video from iMovie to YouTube?

Liza Brown
Aug 18, 2022• Proven solutions
“Is iMovie good for YouTube?”
The iMovie is not only good for YouTube but various other social media platforms. The thing is, you have to compromise with the quality offered by Apple’s video editor iMovie. Well, iMovie is perfect for getting started for beginners. But, the professionals and ones who want a bit high features than basic ones should look elsewhere. Thus, we always recommend alternatives to a particular software for our audience. In this article, there is a mention of Wondershare Filmora to overcome the drawbacks of iMovie.
Without further ado, let’s begin with how to upload a video from iMovie to YouTube. We want to lead with the best iMovie export settings, specific troubleshooting issues, and our alternative intro section to overcome iMovie’s limitations.
Part 1: How to Upload a Video from iMovie to YouTube?
iMovie is ideal for making YouTube videos if you are too basic and are not looking for advanced features. Remember that professionalism pays in these platforms and helps you stand better among others. If you’re still interested in making introductory videos, here is a step-by-step guide on uploading a video to YouTube from iMovie on Mac first and leading with iPhone.
Step-by-Step Tutorial on how to upload a video from iMovie to YouTube on Mac
Step 1: Create a Project
On the first step, go to iMovie on Mac and click the Create New tab below.
Step 2: Import Media
Click the Import Media button and browse the files on your computer, as shown below.
Step 3: Edit Clips
It’s time to edit video footage. Drag your video to the timeline, as shown below.
Then, you can trim and drag the edges of video clips to allow editing.
Step 4: Add Titles
You can add titles by clicking the Title tab and further drag the Title’s template into the timeline.
Step 5: Export the Video
Click the Export button as follows after editing is over.
Select YouTube to upload your video over the platform directly.
Step 6: Save
After selecting the desired platform, click the Next tab to proceed with saving the file.
At last, save your video as shown below.
Step-by-Step Tutorial on how to upload iMovie to YouTube from iPhone
Step 1: Share the iMovie Project
Go to iMovie on your iPhone. Open the iMovie project on your iPhone and tap the Share button to select YouTube. Enter the information of Title, Description, Size, Tags, Privacy, and Location (optional).
Step 2: Upload iMovie Files
For ease of use, you can upload saved videos in Photo Library on your iPhone. Then, you can upload iMovie videos via the YouTube iOS app. Sign In to YouTube and click the Camera icon at the top of the Home page. Select your iPhone Photo Library file and set the video Title, Description, Size, Tags, and Privacy. Then, hit the Upload button to confirm.
Part 2: The Best iMovie Export Settings for YouTube Videos
As we all know that iMovie consists of a bit long procedure to export projects. Here are some tips on the best iMovie export settings to avoid an unnecessary headache.
- Set small resolution: Small resolution plays a more significant role, especially while uploading. Thus, you can set the smallest resolution in the Email tab of the Export button.
2. Change Export settings in the File tab: There is a File tab under the Export button. Click it and find various settings that you need to change to get the best export settings for YouTube 2021. Make the Title of the video as small as possible. Set the resolution at 1080P than 4K.
However, it isn’t going to upgrade the resolution if your video is already in the 1080P definition. Now, the last setting that will crazily offer you the best quality and lots of space-saving. You have to select Best (ProRes) in quality settings for this purpose. These settings also take less time to upload to YouTube.
3. Compress is not for speed: Various options you see in the Compresstab are not for speed. They are for how you save the video on a desktop. Thus, always choose the Better Quality tab than Faster.
- Do not export directly to YouTube: iMovie is pretty basic and doesn’t offer great settings to upload your video instantly. You may have to make changes to the uploaded video even if you do this as per our step-by-step guide mentioned above.
Part 3: How to fix the “Failed to Upload to YouTube” Error on iMovie?
The “iMovie to YouTube failed” problem occurs when you directly upload a YouTube video from iMovie. The issue will result if you upload from any third-party uploader. That is why the direct upload doesn’t work, especially in iMovie. You can opt to share your video to the desktop first and then drag it to upload to the YouTube platform.
Part 4: Upload Videos to YouTube with the Best Alternative to iMovie - Wondershare Filmora
“What can I use instead of iMovie to overcome its limitations?”
When you see that iMovie is not uploading to YouTube or iMovie upload to YouTube got stuck, go for a better alternative. In this section, we’d like to recommend Wondershare Filmora that offers the best export settings compared to iMovie. It is the go-to solution if you can’t upload video from iMovie to YouTube directly. Filmora further provides intuitive editing tools that professionally make your YouTube video projects.
Export Key Aspects of Wondershare Filmora in comparison to iMovie:
- It offers a long list of export resolutions to choose from.
- You get separate video and audio settings such as Encoder, Channel, Frame Rate, Bit Rate, Resolution, etc.
- It is further compatible with export to various devices including the iPhone, Samsung, iPod, Apple TV, iPad, Google Pixel, PSP, Smart TV, etc.
Step-by-Step Guide on how to upload a video from iMovie to YouTube via Wondershare Filmora
Step 1: Click the Export button and select resolution
After your project in Wondershare Filmora is over, click the Export tab and select video resolution from the Local tab, as shown below.
It has a list of formats. You can also edit the Name and saving location here.
Step 2: Select Quality
Select the Settings button and choose from three quality levels of Best, Better, and Good. You can also adjust video and audio parameters, including the Encoder, Frame Rate, Resolution, Bit Rate, etc.
Step 3: Select platform
Select the YouTube tab, Sign In to your YouTube account, and hit the Export button after modifying the Title and Quality if needed. Also, make sure to check the Enable GPU accelerated video encoding tab.
Select Wondershare Filmora as the ultimate solution even if iMovie upload to YouTube not showing up.
Conclusion
Hopefully, we’ve informed you of the relevant facts on how to upload a video from iMovie to YouTube. We have also examined the number of troubleshooting issues involved in the iMovie video editor. Well, you will get to face similar kinds of export difficulties in the iMovie editor. Also, the entire procedure to end the exporting task is a bit long in iMovie compared to any other video editing software. Thus, it’s crucial to check out what other alternatives the technological world has today. We can’t state to you a better beginner-friendly yet advanced editing option than Wondershare Filmora that rightly outtakes the iMovie video editor in all aspects.
Liza Brown
Liza Brown is a writer and a lover of all things video.
Follow @Liza Brown
Liza Brown
Aug 18, 2022• Proven solutions
“Is iMovie good for YouTube?”
The iMovie is not only good for YouTube but various other social media platforms. The thing is, you have to compromise with the quality offered by Apple’s video editor iMovie. Well, iMovie is perfect for getting started for beginners. But, the professionals and ones who want a bit high features than basic ones should look elsewhere. Thus, we always recommend alternatives to a particular software for our audience. In this article, there is a mention of Wondershare Filmora to overcome the drawbacks of iMovie.
Without further ado, let’s begin with how to upload a video from iMovie to YouTube. We want to lead with the best iMovie export settings, specific troubleshooting issues, and our alternative intro section to overcome iMovie’s limitations.
Part 1: How to Upload a Video from iMovie to YouTube?
iMovie is ideal for making YouTube videos if you are too basic and are not looking for advanced features. Remember that professionalism pays in these platforms and helps you stand better among others. If you’re still interested in making introductory videos, here is a step-by-step guide on uploading a video to YouTube from iMovie on Mac first and leading with iPhone.
Step-by-Step Tutorial on how to upload a video from iMovie to YouTube on Mac
Step 1: Create a Project
On the first step, go to iMovie on Mac and click the Create New tab below.
Step 2: Import Media
Click the Import Media button and browse the files on your computer, as shown below.
Step 3: Edit Clips
It’s time to edit video footage. Drag your video to the timeline, as shown below.
Then, you can trim and drag the edges of video clips to allow editing.
Step 4: Add Titles
You can add titles by clicking the Title tab and further drag the Title’s template into the timeline.
Step 5: Export the Video
Click the Export button as follows after editing is over.
Select YouTube to upload your video over the platform directly.
Step 6: Save
After selecting the desired platform, click the Next tab to proceed with saving the file.
At last, save your video as shown below.
Step-by-Step Tutorial on how to upload iMovie to YouTube from iPhone
Step 1: Share the iMovie Project
Go to iMovie on your iPhone. Open the iMovie project on your iPhone and tap the Share button to select YouTube. Enter the information of Title, Description, Size, Tags, Privacy, and Location (optional).
Step 2: Upload iMovie Files
For ease of use, you can upload saved videos in Photo Library on your iPhone. Then, you can upload iMovie videos via the YouTube iOS app. Sign In to YouTube and click the Camera icon at the top of the Home page. Select your iPhone Photo Library file and set the video Title, Description, Size, Tags, and Privacy. Then, hit the Upload button to confirm.
Part 2: The Best iMovie Export Settings for YouTube Videos
As we all know that iMovie consists of a bit long procedure to export projects. Here are some tips on the best iMovie export settings to avoid an unnecessary headache.
- Set small resolution: Small resolution plays a more significant role, especially while uploading. Thus, you can set the smallest resolution in the Email tab of the Export button.
2. Change Export settings in the File tab: There is a File tab under the Export button. Click it and find various settings that you need to change to get the best export settings for YouTube 2021. Make the Title of the video as small as possible. Set the resolution at 1080P than 4K.
However, it isn’t going to upgrade the resolution if your video is already in the 1080P definition. Now, the last setting that will crazily offer you the best quality and lots of space-saving. You have to select Best (ProRes) in quality settings for this purpose. These settings also take less time to upload to YouTube.
3. Compress is not for speed: Various options you see in the Compresstab are not for speed. They are for how you save the video on a desktop. Thus, always choose the Better Quality tab than Faster.
- Do not export directly to YouTube: iMovie is pretty basic and doesn’t offer great settings to upload your video instantly. You may have to make changes to the uploaded video even if you do this as per our step-by-step guide mentioned above.
Part 3: How to fix the “Failed to Upload to YouTube” Error on iMovie?
The “iMovie to YouTube failed” problem occurs when you directly upload a YouTube video from iMovie. The issue will result if you upload from any third-party uploader. That is why the direct upload doesn’t work, especially in iMovie. You can opt to share your video to the desktop first and then drag it to upload to the YouTube platform.
Part 4: Upload Videos to YouTube with the Best Alternative to iMovie - Wondershare Filmora
“What can I use instead of iMovie to overcome its limitations?”
When you see that iMovie is not uploading to YouTube or iMovie upload to YouTube got stuck, go for a better alternative. In this section, we’d like to recommend Wondershare Filmora that offers the best export settings compared to iMovie. It is the go-to solution if you can’t upload video from iMovie to YouTube directly. Filmora further provides intuitive editing tools that professionally make your YouTube video projects.
Export Key Aspects of Wondershare Filmora in comparison to iMovie:
- It offers a long list of export resolutions to choose from.
- You get separate video and audio settings such as Encoder, Channel, Frame Rate, Bit Rate, Resolution, etc.
- It is further compatible with export to various devices including the iPhone, Samsung, iPod, Apple TV, iPad, Google Pixel, PSP, Smart TV, etc.
Step-by-Step Guide on how to upload a video from iMovie to YouTube via Wondershare Filmora
Step 1: Click the Export button and select resolution
After your project in Wondershare Filmora is over, click the Export tab and select video resolution from the Local tab, as shown below.
It has a list of formats. You can also edit the Name and saving location here.
Step 2: Select Quality
Select the Settings button and choose from three quality levels of Best, Better, and Good. You can also adjust video and audio parameters, including the Encoder, Frame Rate, Resolution, Bit Rate, etc.
Step 3: Select platform
Select the YouTube tab, Sign In to your YouTube account, and hit the Export button after modifying the Title and Quality if needed. Also, make sure to check the Enable GPU accelerated video encoding tab.
Select Wondershare Filmora as the ultimate solution even if iMovie upload to YouTube not showing up.
Conclusion
Hopefully, we’ve informed you of the relevant facts on how to upload a video from iMovie to YouTube. We have also examined the number of troubleshooting issues involved in the iMovie video editor. Well, you will get to face similar kinds of export difficulties in the iMovie editor. Also, the entire procedure to end the exporting task is a bit long in iMovie compared to any other video editing software. Thus, it’s crucial to check out what other alternatives the technological world has today. We can’t state to you a better beginner-friendly yet advanced editing option than Wondershare Filmora that rightly outtakes the iMovie video editor in all aspects.
Liza Brown
Liza Brown is a writer and a lover of all things video.
Follow @Liza Brown
Evolution of Engagement: Key Post-VidCon Events
Beyond VidCon - A Guide to the Most Important YouTube Events

Richard Bennett
Dec 30, 2022• Proven solutions
Want to meet your favorite creators? Or, do you want to become a better creator yourself? There are huge conventions you can go to where you can both indulge in fandom and work on your skills. Here are the 7 largest and most well-known:
- VidCon (US/Europe/Australia)
- PlayList Live (US)
- Beautycon (US/UK)
- YouTube Fanfest (Various international locations)
- RTX (US/UK/Australia)
- Amplify Live (Australia)
- Summer in the City (UK)
The Most Important YouTube Events
Want to be a youtube creator too? Go and get Wondershare Filmora, the video editing software for all creators.


1. VidCon
VidCon US: June (Anaheim, California)
VidCon Europe (Amsterdam): March/April
VidCon Australia: August/September
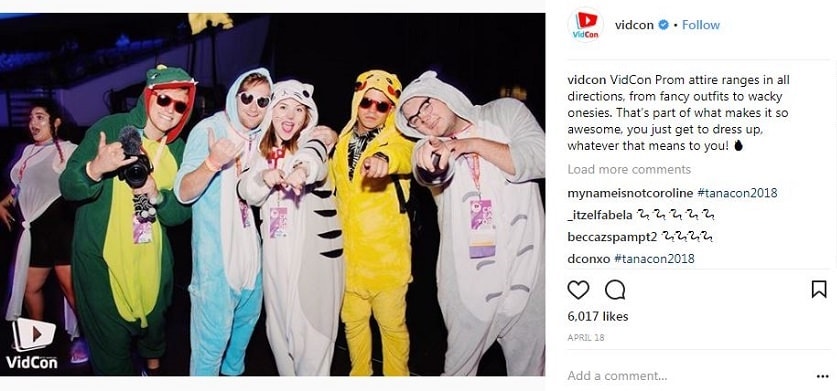
In 2017 over 30,000 YouTube enthusiasts – from fans to A-list creators – attended VidCon US, and that was thousands of more people than attended in 2016. It’s hard to imagine that this event – the biggest convention for YouTube and online video – will do anything but grow over the next few years.
VidCon was founded by the Vlogbrothers in 2010 as a place for internet friends to meet in real life.
Passes:
There are three different types of passes for VidCon – the Community Track, the Creator Track, and the Industry Track.
The Community Track is for anyone who loves YouTube and wants a chance to see their favorite creators and meet other fans. Pricing ranges from $100 to $180, depending on how early you buy your ticket.
The Creator Track gets you to access to all the same events as the Community badges (except for the Meet & Greet Lottery*), plus even more panels and workshops that will help you become a better creator. Pricing ranges from $150 to $250 depending on how early you buy your ticket.
The Industry Track is for anyone working in online video or video-adjacent industries, like advertising, branding, or talent management. There are panels on online marketing and working with influencers. Pricing ranges from $550 to $850, depending on when you buy your ticket.
*The Meet and Greet Lottery is a chance for anyone attending with a Community or Industry pass to meet their favorite creator. You rank the 15 creators you’d most like to meet according to how much you want to meet them. A computerized system will determine who gets into which Meet & Greet.
You have a two-week window (usually the first half of May) to submit your choices.
2. PlayList Live
Orlando, Florida: April/May
Tri-State (Secaucus, New Jersey): September
Washington DC: September
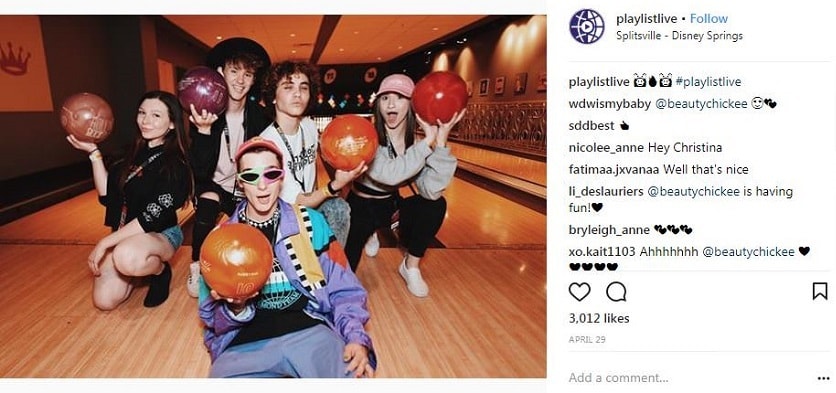
Playlist Live is a YouTube event for creators and their supporters that has a particular focus on music. Where VidCon is advertised using images of sunshine, crowded convention halls, and speakers, Playlist Live is advertised with images of city skylines, concerts, and fireworks.
Playlist Live prides itself on having ‘non-stop interactive activities.’ These include chances to meet your favorite creators on the Saturday and Sunday of the event. Which meetups you get to attend are determined by first-come-first-serve online signup.
Passes:
Pricing may vary depending on which event you are attending and how early you purchase your ticket. The following ranges are an estimate. Not all pass types are available for all events.
The Standard Pass ($75 - $130) is the basic pass for fans of the online video who want to meet their favorite creators, play games, and have a great time.
The Standard Pass + Merch ($100-$155) gets you into the same events as the standard pass plus a t-shirt and a wristband.
The Standard Deluxe ($120 - $205) comes with a hoodie, sunglasses, and a commemorative ticket.
The Parent Pass/Parent + Merch/Parent Deluxe ($75-$200) is for parents who want to chaperone their kids around Playlist Live and includes access to everything the Standard Pass can access.
The Insight Pass ($150-$205) is for anyone who wants to learn more about being a digital creator. You get Standard access as well as workshops and panels for successful creators and industry professionals designed to help you on your path.
The Insight + Merch/Insight Deluxe Passes ($175-$280) you get the same access as an Insight Pass plus goodies like shirts, wristbands, commemorative tickets, and sunglasses.
The Premium Pass ($250-$404) grants you standard access plus early access for meetup registration and a special VIP meetup.
There is also business Passes with Merch and Deluxe (Business Deluxe can cost up to $330) options for people working in marketing, publicity, production, etc. These passes include access to an extra day of business and industry-specific programming.
3. Beautycon Festivals
Los Angeles: July
New York: April
London, UK: November
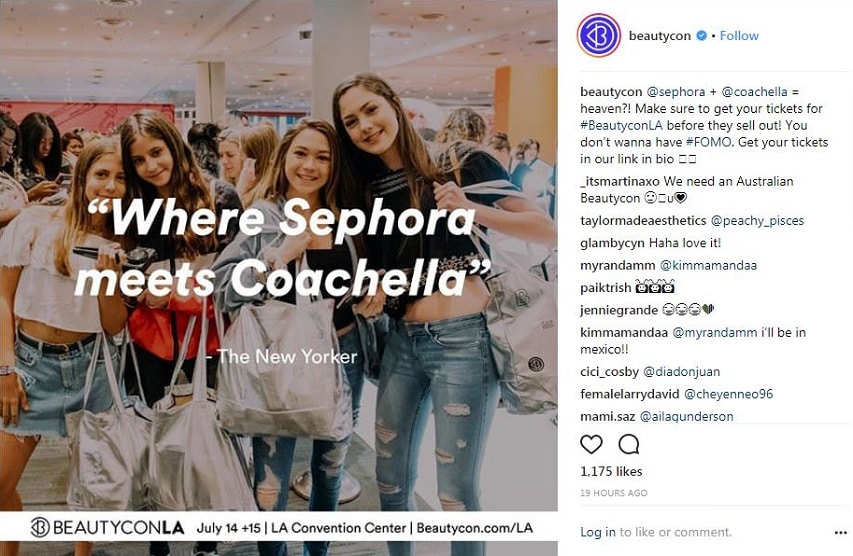
Beautycon is an event meant to highlight innovators in the fields of Beauty, Makeup, and Lifestyle. They bring together online creators, fans, celebrities, and brands for two-day festivals full of fun, panel discussions, shopping, and free samples.
In 2017, 30,000 people attended Beautycon festivals internationally.
Passes:
Two-Day General Admission ($69) gets you in for the whole weekend, and you’ll also get a fabric wristband and other goodies.
You can also get a One-Day General Admission to pass for $49.
The Two-Day Hauler pass ($199) gets you in the doors 2 hours before the General Admission passes, plus a VIP swag bag.
General Admission and Hauler passes do not include access to programmed meetups.
Two-Day All Access passes ($999) include early entry as well as reserved seating in the front row at the Min Stage, photo opportunities in the Halo Room, a tour of the Creator Gifting Suite, custom merch, credit at the Beautycon Shop online, plus everything from the General and Hauler packs.
The final type of pass, the Two-Day Beauty Insider ($1999) pass, has everything the All-Access pass has plus a 2-night stay at a hotel downtown (for the LA festival).
4. YouTube FanFest
These events are customized to the wherever festival is visiting, so you’re always sure to see the big and rising YouTube stars from your region. Generally, these events include performances and activities as well as a Meet & Greet.
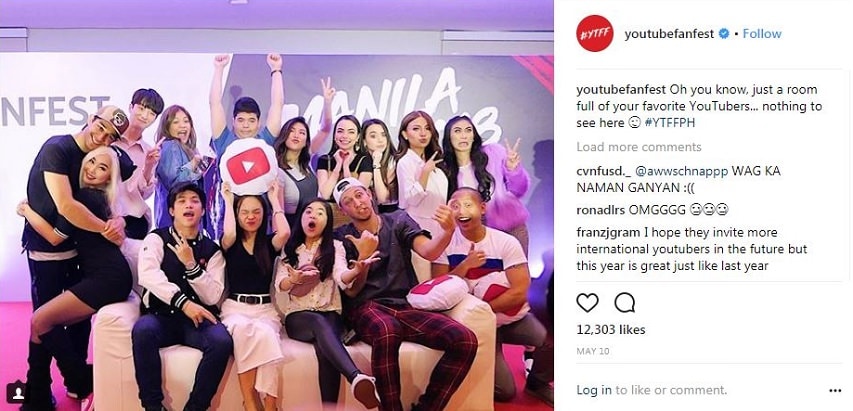
There is not a steady annual schedule for FanFests, but it has visited these cities in the past: Manila, Mumbai, Seoul, Toronto, Sao Paulo, Jakarta, Tokyo, Jeddah, Bangkok, Ho Chi Minh City, Hong Kong, and Washington, DC.
5. RTX
Austin, Texas: August
London: September
Sydney, Australia: February
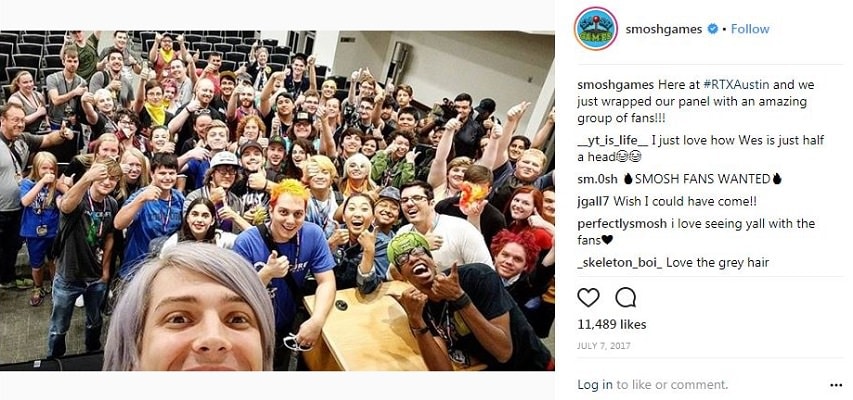
Brought to you by the creators behind Rooster Teeth, RTX is a celebration of internet culture and gaming. It includes exhibitors, live events, panels, and activities targeting gamers. Partners include Twitch and multiple gaming companies.
Passes:
It costs $50 for a Friday or Sunday pass, and $55 for just Saturday. You’ll get an attendee bag and lanyard with your pass.
The Weekend pass costs $110, and you get access to all 3 days plus the bag/lanyard and 1 autograph code.
A Weekend Plus ($335) pass gets you everything the Weekend pass gets you plus 2 autograph codes, early access to the Expo hall on Friday, lounge access, and reserved seating at the stage.
The Platinum pass is the most expensive at $729, and it includes everything the Weekend Plus pass does plus a priority line for panels, priority seating, and an exclusive party.
6. Amplify Live
Sydney, Australia: April
Melbourne, Australia: April
These events showcase the biggest social medial talent and musical acts in Australia and New Zealand. In 2017 the headliners of the Cool for Summer tour were Lindsey Stirling, Dan & Phil, and Nash Grier.
Tickets for the Cool for Summer tour cost $65 or $75 AUD depending on how early you buy them.
For VIP access, you can buy a Deluxe pass for $125-$150 AUD.
Meet and Greet tickets must be purchased separately from your event ticket.
Silver Meet and Greet, $80 AUD: access to the ‘Cool for Summer Celebrity Zone’ featuring non-headliner talent.
Gold Meet and Greet, $189 AUD: access to the ‘Cool for Summer Celebrity Zone’ plus a guaranteed meeting with one of the headliners (you choose which when you purchase).
Platinum Meet & Greet, $450 AUD: meet all the headliners and get access to an exclusive VIP area, merch pack, and special entry.
7. Summer in the City
London, UK: August
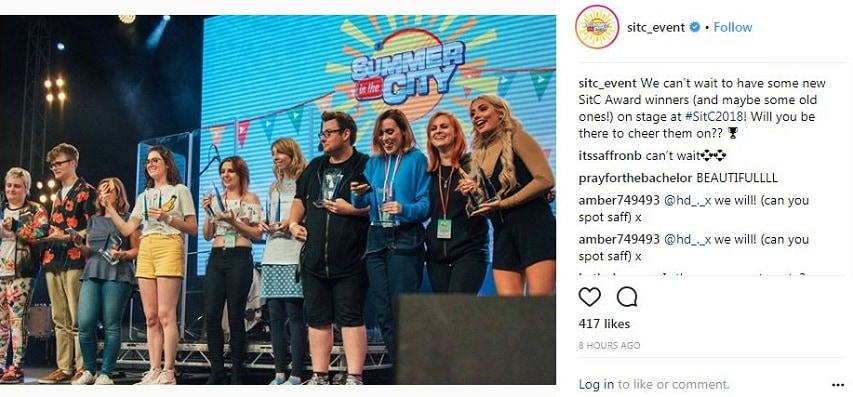
This is the largest online video festival in the UK. It features discussion panels, workshops, and live performances targeted at creators, fans of online video, and industry professionals. YouTubers might hang out on the show floor meeting fans, and there are also Meet and Greet sessions for top creators. All ticket holders can submit online ballots for a chance at Meet and Greet access.
Summer in the City even has its own awards show, SitC, to honor the best in online content. Previous winners include Dodie, Tomska, Jack & Dean, and Nathan Zed.
There is one day of Summer in the City called ‘Creator Day’ (generally on Friday), which features educational workshops for creators and industry professionals.
Passes:
If you buy your tickets during early bird pricing, the prices will look like this:
Saturday OR Sunday: £30.00
Saturday AND Sunday: £45.00
Creator Day: £30.00
Creator Day + Weekend: £60.00
Industry Ticket: £100.00
Have you ever attended an offline YouTube event? Which one, and how did you like it?
Richard Bennett
Richard Bennett is a writer and a lover of all things video.
Follow @Richard Bennett
Richard Bennett
Dec 30, 2022• Proven solutions
Want to meet your favorite creators? Or, do you want to become a better creator yourself? There are huge conventions you can go to where you can both indulge in fandom and work on your skills. Here are the 7 largest and most well-known:
- VidCon (US/Europe/Australia)
- PlayList Live (US)
- Beautycon (US/UK)
- YouTube Fanfest (Various international locations)
- RTX (US/UK/Australia)
- Amplify Live (Australia)
- Summer in the City (UK)
The Most Important YouTube Events
Want to be a youtube creator too? Go and get Wondershare Filmora, the video editing software for all creators.
1. VidCon
VidCon US: June (Anaheim, California)
VidCon Europe (Amsterdam): March/April
VidCon Australia: August/September
In 2017 over 30,000 YouTube enthusiasts – from fans to A-list creators – attended VidCon US, and that was thousands of more people than attended in 2016. It’s hard to imagine that this event – the biggest convention for YouTube and online video – will do anything but grow over the next few years.
VidCon was founded by the Vlogbrothers in 2010 as a place for internet friends to meet in real life.
Passes:
There are three different types of passes for VidCon – the Community Track, the Creator Track, and the Industry Track.
The Community Track is for anyone who loves YouTube and wants a chance to see their favorite creators and meet other fans. Pricing ranges from $100 to $180, depending on how early you buy your ticket.
The Creator Track gets you to access to all the same events as the Community badges (except for the Meet & Greet Lottery*), plus even more panels and workshops that will help you become a better creator. Pricing ranges from $150 to $250 depending on how early you buy your ticket.
The Industry Track is for anyone working in online video or video-adjacent industries, like advertising, branding, or talent management. There are panels on online marketing and working with influencers. Pricing ranges from $550 to $850, depending on when you buy your ticket.
*The Meet and Greet Lottery is a chance for anyone attending with a Community or Industry pass to meet their favorite creator. You rank the 15 creators you’d most like to meet according to how much you want to meet them. A computerized system will determine who gets into which Meet & Greet.
You have a two-week window (usually the first half of May) to submit your choices.
2. PlayList Live
Orlando, Florida: April/May
Tri-State (Secaucus, New Jersey): September
Washington DC: September
Playlist Live is a YouTube event for creators and their supporters that has a particular focus on music. Where VidCon is advertised using images of sunshine, crowded convention halls, and speakers, Playlist Live is advertised with images of city skylines, concerts, and fireworks.
Playlist Live prides itself on having ‘non-stop interactive activities.’ These include chances to meet your favorite creators on the Saturday and Sunday of the event. Which meetups you get to attend are determined by first-come-first-serve online signup.
Passes:
Pricing may vary depending on which event you are attending and how early you purchase your ticket. The following ranges are an estimate. Not all pass types are available for all events.
The Standard Pass ($75 - $130) is the basic pass for fans of the online video who want to meet their favorite creators, play games, and have a great time.
The Standard Pass + Merch ($100-$155) gets you into the same events as the standard pass plus a t-shirt and a wristband.
The Standard Deluxe ($120 - $205) comes with a hoodie, sunglasses, and a commemorative ticket.
The Parent Pass/Parent + Merch/Parent Deluxe ($75-$200) is for parents who want to chaperone their kids around Playlist Live and includes access to everything the Standard Pass can access.
The Insight Pass ($150-$205) is for anyone who wants to learn more about being a digital creator. You get Standard access as well as workshops and panels for successful creators and industry professionals designed to help you on your path.
The Insight + Merch/Insight Deluxe Passes ($175-$280) you get the same access as an Insight Pass plus goodies like shirts, wristbands, commemorative tickets, and sunglasses.
The Premium Pass ($250-$404) grants you standard access plus early access for meetup registration and a special VIP meetup.
There is also business Passes with Merch and Deluxe (Business Deluxe can cost up to $330) options for people working in marketing, publicity, production, etc. These passes include access to an extra day of business and industry-specific programming.
3. Beautycon Festivals
Los Angeles: July
New York: April
London, UK: November
Beautycon is an event meant to highlight innovators in the fields of Beauty, Makeup, and Lifestyle. They bring together online creators, fans, celebrities, and brands for two-day festivals full of fun, panel discussions, shopping, and free samples.
In 2017, 30,000 people attended Beautycon festivals internationally.
Passes:
Two-Day General Admission ($69) gets you in for the whole weekend, and you’ll also get a fabric wristband and other goodies.
You can also get a One-Day General Admission to pass for $49.
The Two-Day Hauler pass ($199) gets you in the doors 2 hours before the General Admission passes, plus a VIP swag bag.
General Admission and Hauler passes do not include access to programmed meetups.
Two-Day All Access passes ($999) include early entry as well as reserved seating in the front row at the Min Stage, photo opportunities in the Halo Room, a tour of the Creator Gifting Suite, custom merch, credit at the Beautycon Shop online, plus everything from the General and Hauler packs.
The final type of pass, the Two-Day Beauty Insider ($1999) pass, has everything the All-Access pass has plus a 2-night stay at a hotel downtown (for the LA festival).
4. YouTube FanFest
These events are customized to the wherever festival is visiting, so you’re always sure to see the big and rising YouTube stars from your region. Generally, these events include performances and activities as well as a Meet & Greet.
There is not a steady annual schedule for FanFests, but it has visited these cities in the past: Manila, Mumbai, Seoul, Toronto, Sao Paulo, Jakarta, Tokyo, Jeddah, Bangkok, Ho Chi Minh City, Hong Kong, and Washington, DC.
5. RTX
Austin, Texas: August
London: September
Sydney, Australia: February
Brought to you by the creators behind Rooster Teeth, RTX is a celebration of internet culture and gaming. It includes exhibitors, live events, panels, and activities targeting gamers. Partners include Twitch and multiple gaming companies.
Passes:
It costs $50 for a Friday or Sunday pass, and $55 for just Saturday. You’ll get an attendee bag and lanyard with your pass.
The Weekend pass costs $110, and you get access to all 3 days plus the bag/lanyard and 1 autograph code.
A Weekend Plus ($335) pass gets you everything the Weekend pass gets you plus 2 autograph codes, early access to the Expo hall on Friday, lounge access, and reserved seating at the stage.
The Platinum pass is the most expensive at $729, and it includes everything the Weekend Plus pass does plus a priority line for panels, priority seating, and an exclusive party.
6. Amplify Live
Sydney, Australia: April
Melbourne, Australia: April
These events showcase the biggest social medial talent and musical acts in Australia and New Zealand. In 2017 the headliners of the Cool for Summer tour were Lindsey Stirling, Dan & Phil, and Nash Grier.
Tickets for the Cool for Summer tour cost $65 or $75 AUD depending on how early you buy them.
For VIP access, you can buy a Deluxe pass for $125-$150 AUD.
Meet and Greet tickets must be purchased separately from your event ticket.
Silver Meet and Greet, $80 AUD: access to the ‘Cool for Summer Celebrity Zone’ featuring non-headliner talent.
Gold Meet and Greet, $189 AUD: access to the ‘Cool for Summer Celebrity Zone’ plus a guaranteed meeting with one of the headliners (you choose which when you purchase).
Platinum Meet & Greet, $450 AUD: meet all the headliners and get access to an exclusive VIP area, merch pack, and special entry.
7. Summer in the City
London, UK: August
This is the largest online video festival in the UK. It features discussion panels, workshops, and live performances targeted at creators, fans of online video, and industry professionals. YouTubers might hang out on the show floor meeting fans, and there are also Meet and Greet sessions for top creators. All ticket holders can submit online ballots for a chance at Meet and Greet access.
Summer in the City even has its own awards show, SitC, to honor the best in online content. Previous winners include Dodie, Tomska, Jack & Dean, and Nathan Zed.
There is one day of Summer in the City called ‘Creator Day’ (generally on Friday), which features educational workshops for creators and industry professionals.
Passes:
If you buy your tickets during early bird pricing, the prices will look like this:
Saturday OR Sunday: £30.00
Saturday AND Sunday: £45.00
Creator Day: £30.00
Creator Day + Weekend: £60.00
Industry Ticket: £100.00
Have you ever attended an offline YouTube event? Which one, and how did you like it?
Richard Bennett
Richard Bennett is a writer and a lover of all things video.
Follow @Richard Bennett
Also read:
- Amplify Views & Engagement Through Google Analytics Expertise
- [New] Choosing YouTube Downloader Apps on Your Android Device
- Delving Into TSeries' Streaming Revenue Model on YouTube for 2024
- In 2024, Building a Sustainable Income via YouTube and AdSense
- Diverging Paths YouTube Licensing & Creative Commons
- Exploring Determinants of Your YouTube View Count Status
- 2024 Approved Craft Your Channel's Moniker YouTube Naming Tools and Tips
- 6 Game-Changing Tactics to Increase Watch Time and Reduce Churn Rate
- Unmasking How To Locate My Comments Posts Online
- Dynamic Viewership Statistics Platforms
- [New] 10 YouTube Tips for Teachers
- In 2024, How to Easily Add Subtitles and Closed Captions to YouTube Video
- Breakdown of Mr. Beast's Financial Powerhouse for 2024
- The Speedy Escalator to 100 Million – YouTube's Favorites of '24
- [Updated] Avoid Common Pitfalls with Proper Use of YouTube Tags
- [New] 3 Innovative Ways to Neon-Border YouTube Thumbnails
- [New] Bite-Sized Beginnings Easy Steps to Launch Personal/Business Channels From Phones
- [Updated] Best Practices for Adding Content Enhancements (Cards)
- [Updated] A Filmmaker's Essential Guide to Free Royalty-Free Audiosites
- Cultivating Confidence for Captivating Your YouTube Audience for 2024
- 2024 Approved Dazzling Deception YouTube's Editors Magic Showcase
- [New] Assemble Your Own Google VR Viewing Device
- [Updated] 2024 Approved 3 Simplified Ways to Save Lenovo Screenshots
- Updated Say Cheese! Top Apps to Convert Your Photos Into Cartoons for 2024
- Home Button Not Working on Infinix Note 30? Here Are Real Fixes | Dr.fone
- How to Easily Hard reset my Honor X50 GT | Dr.fone
- New In 2024, Top-Rated Free Video Editing Software for Newbies
- Win11 Screen Recording Leaderboard Top 15 Software (Best)
- [New] Global Gala Top Videos to Binge for 2024
- 2024 Approved Comprehensive Movement Study 2023
- Identify missing your drivers with Windows Device Manager on Windows 7
- [Updated] Online Platform Analysis Which Suits You Best? Discord/Skype for 2024
- A Detailed VPNa Fake GPS Location Free Review On Realme GT Neo 5 | Dr.fone
- New 2024 Approved Guide to Create a Timelapse Video in After Effects
- Mastering AutoTune Effects A Guide for Audacity Users
- [Updated] 2024 Approved Easy-to-Follow Guide to Mobile Recording Snapchat Edition
- 3 Best Tools to Hard Reset Realme 11 Pro+ | Dr.fone
- The Easiest Methods to Hard Reset Infinix Smart 8 Pro | Dr.fone
- Title: "Elevating Video Quality Sharing iMovie Work via YouTube"
- Author: Steven
- Created at : 2024-05-25 19:14:09
- Updated at : 2024-05-26 19:14:09
- Link: https://youtube-clips.techidaily.com/elevating-video-quality-sharing-imovie-work-via-youtube/
- License: This work is licensed under CC BY-NC-SA 4.0.
