
"Elevating Video Experience Non-Youtube Hubs Explained for 2024"
Elevating Video Experience: Non-Youtube Hubs Explained
YouTube Alternatives: 3 Best Video Sharing Sites

Richard Bennett
Mar 27, 2024• Proven solutions
YouTube is a great platform where almost everyone goes to watches videos. It is not the best platform for every video creator, though. This article will introduce you to some YouTube alternatives.
There are a lot of reasons you might want to learn about other websites like YouTube. You might want a site with less ads, or different ways of monetizing. YouTube can sometimes remove videos unfairly, so you may want a site where copyright claims are handled by people instead of robots. A lot of users simply want a site that is more like YouTube was when it was younger. There are features, like customizable channel pages, which have been discarded over the years.


YouTube Alternatives: 3 Best Video Sharing Sites
Here is a list of other places where you can upload videos:
1. Dailymotion
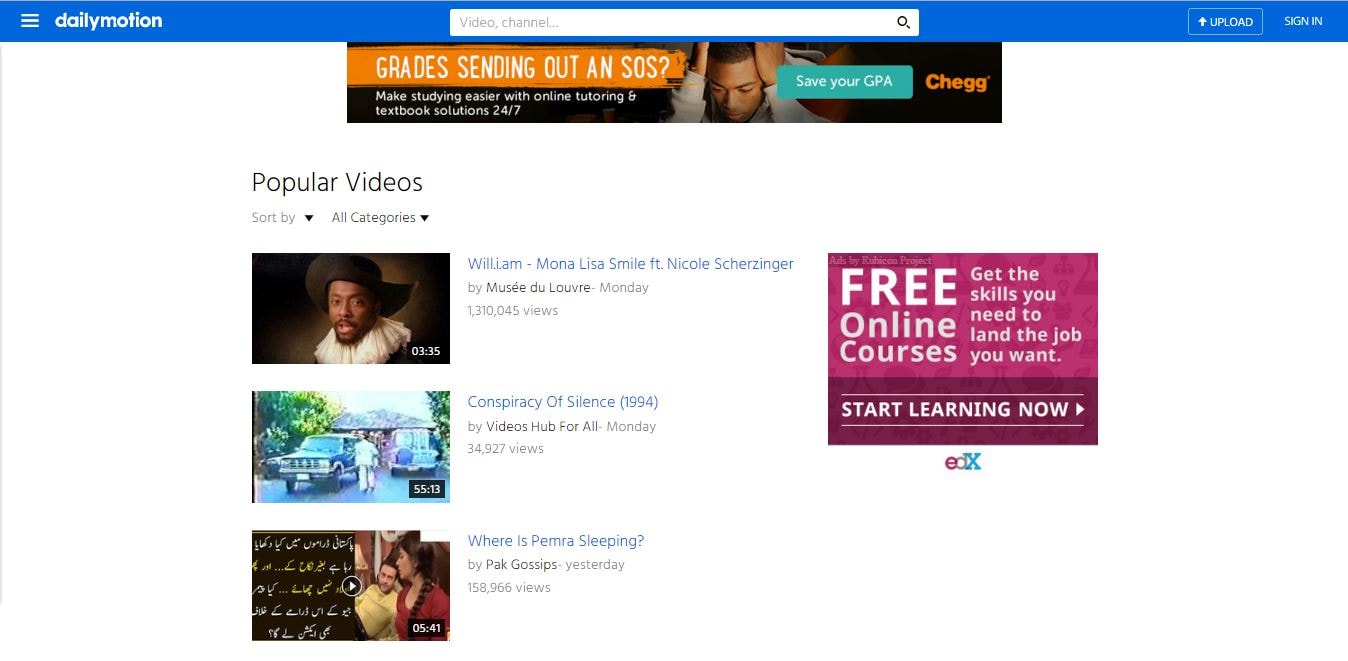
This may be the second most popular free video sharing website, and it is very similar to YouTube in appearance. Like YouTube, Dailymotion recommends videos to users based on what is trending as well as their personal viewing habits. Also like YouTube, there are ads in and around videos and you have the option of monetizing your content to earn ad revenue. There is more than one way to become a Dailymotion partner, though. You can sell a subscription for your channel instead of monetizing ads in your videos.
The main difference between Dailymotion and YouTube is that where YouTube has an abundance of both amateur and professional quality video, Dailymotion skews towards professional. There are personal vlogs and cat videos, but these are less the norm on Dailymotion than on YouTube. You may find less competition in your genre here. However, you should be aware that the expectations of viewers might be higher.
2. Vimeo
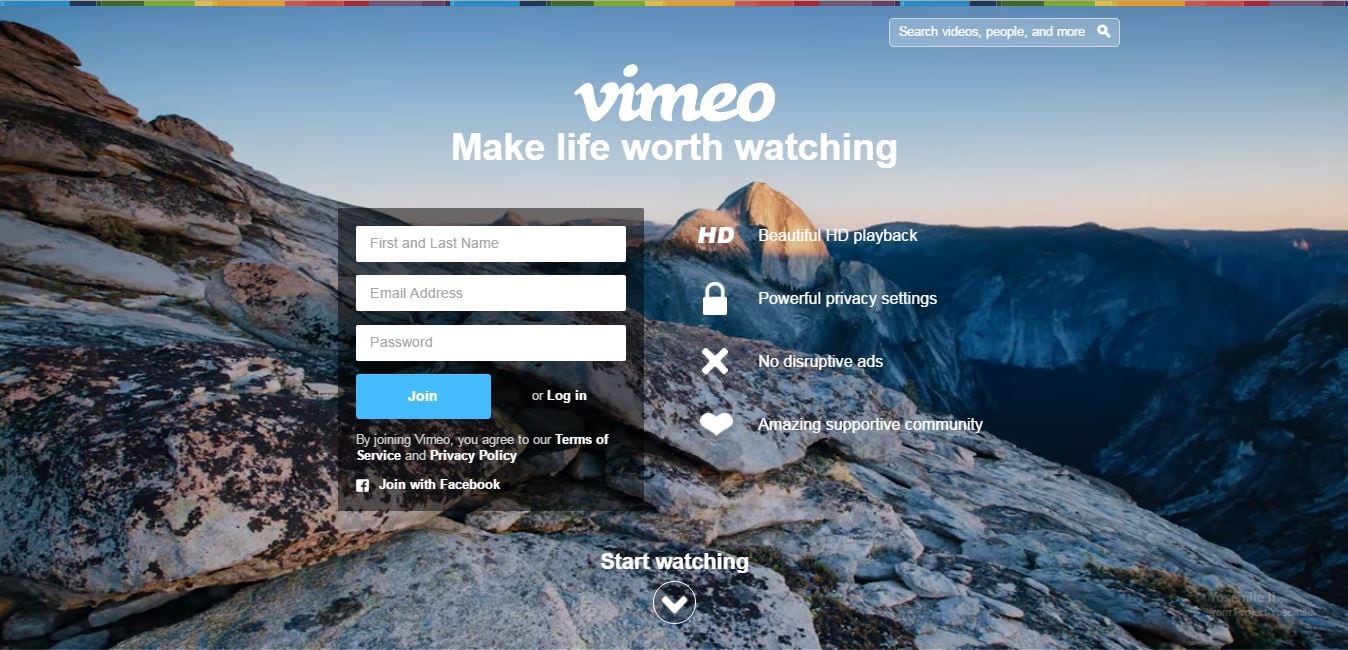
Although Vimeo is also a very popular video site, it is very different from YouTube. Everything from appearance to the types of comments left on videos is vastly different. The front page of this site does not display trending videos, for example. Instead it features high quality creative content that has been reviewed and singled out by Vimeo’s staff as some of the best the site has to offer.
There also are not any ads on Vimeo, whereas YouTube is full of them.
If you create, or are interested in creating, short films then this is where you should be posting. Many festival quality shorts are posted to Vimeo. There are vlogs there too, but they tend to be by serious video creators. The community on Vimeo tends to be a lot friendlier than YouTube so if you are still an amateur, but have dreams of being a pro, then this is probably still the site for you. You should be able to find real constructive criticism here rather than trolls.
Vimeo has a wider variety of privacy settings than YouTube. You can make videos watchable by everyone, just certain people, or require a password.
3. ZippCast
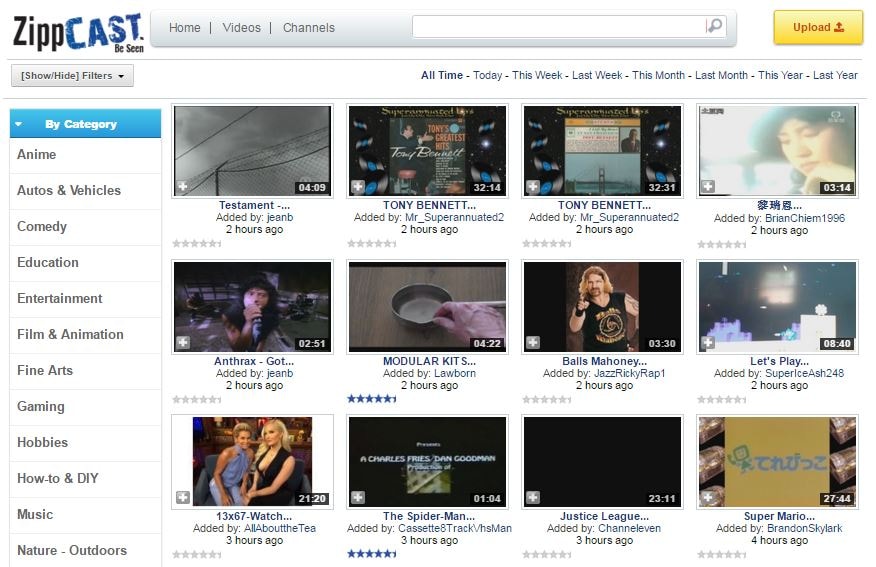
ZippCast is praised by some for being very similar to pre-Google YouTube. While the expectations for video quality may be slightly higher on DailyMotion than YouTube, and are much higher on Vimeo, they are basically the same on ZippCast. Comedy, gaming, music, animation, and vlogging are the most popular categories and almost all content is posted by average people with average skill levels. One of the ways in which ZippCast is like the ‘old’ YouTube is that you can customize the design of your channel.
One of the things users appreciate most about ZippCast is that identifying and removing copyrighted videos is done by humans rather than an automated system, like on YouTube. This means that if you use copyrighted content that is licensed to you or protected by fair use your video should not be taken down. It is common for YouTubers to have their videos unfairly removed, although disputing the copyright claim will usually result in getting the video restored.
Although it is definitely large enough to be considered an alternative to YouTube, ZippCast has been unreliable in the past (i.e shutting down randomly) and has lost the trust of many users.
Richard Bennett
Richard Bennett is a writer and a lover of all things video.
Follow @Richard Bennett
Richard Bennett
Mar 27, 2024• Proven solutions
YouTube is a great platform where almost everyone goes to watches videos. It is not the best platform for every video creator, though. This article will introduce you to some YouTube alternatives.
There are a lot of reasons you might want to learn about other websites like YouTube. You might want a site with less ads, or different ways of monetizing. YouTube can sometimes remove videos unfairly, so you may want a site where copyright claims are handled by people instead of robots. A lot of users simply want a site that is more like YouTube was when it was younger. There are features, like customizable channel pages, which have been discarded over the years.
YouTube Alternatives: 3 Best Video Sharing Sites
Here is a list of other places where you can upload videos:
1. Dailymotion
This may be the second most popular free video sharing website, and it is very similar to YouTube in appearance. Like YouTube, Dailymotion recommends videos to users based on what is trending as well as their personal viewing habits. Also like YouTube, there are ads in and around videos and you have the option of monetizing your content to earn ad revenue. There is more than one way to become a Dailymotion partner, though. You can sell a subscription for your channel instead of monetizing ads in your videos.
The main difference between Dailymotion and YouTube is that where YouTube has an abundance of both amateur and professional quality video, Dailymotion skews towards professional. There are personal vlogs and cat videos, but these are less the norm on Dailymotion than on YouTube. You may find less competition in your genre here. However, you should be aware that the expectations of viewers might be higher.
2. Vimeo
Although Vimeo is also a very popular video site, it is very different from YouTube. Everything from appearance to the types of comments left on videos is vastly different. The front page of this site does not display trending videos, for example. Instead it features high quality creative content that has been reviewed and singled out by Vimeo’s staff as some of the best the site has to offer.
There also are not any ads on Vimeo, whereas YouTube is full of them.
If you create, or are interested in creating, short films then this is where you should be posting. Many festival quality shorts are posted to Vimeo. There are vlogs there too, but they tend to be by serious video creators. The community on Vimeo tends to be a lot friendlier than YouTube so if you are still an amateur, but have dreams of being a pro, then this is probably still the site for you. You should be able to find real constructive criticism here rather than trolls.
Vimeo has a wider variety of privacy settings than YouTube. You can make videos watchable by everyone, just certain people, or require a password.
3. ZippCast
ZippCast is praised by some for being very similar to pre-Google YouTube. While the expectations for video quality may be slightly higher on DailyMotion than YouTube, and are much higher on Vimeo, they are basically the same on ZippCast. Comedy, gaming, music, animation, and vlogging are the most popular categories and almost all content is posted by average people with average skill levels. One of the ways in which ZippCast is like the ‘old’ YouTube is that you can customize the design of your channel.
One of the things users appreciate most about ZippCast is that identifying and removing copyrighted videos is done by humans rather than an automated system, like on YouTube. This means that if you use copyrighted content that is licensed to you or protected by fair use your video should not be taken down. It is common for YouTubers to have their videos unfairly removed, although disputing the copyright claim will usually result in getting the video restored.
Although it is definitely large enough to be considered an alternative to YouTube, ZippCast has been unreliable in the past (i.e shutting down randomly) and has lost the trust of many users.
Richard Bennett
Richard Bennett is a writer and a lover of all things video.
Follow @Richard Bennett
Precision Cutting for Impressive YouTube Videos
How to Trim YouTube Videos?
Richard Bennett
Mar 27, 2024• Proven solutions
The world’s largest video sharing platform currently has nearly two billion active monthly users who upload over 400 hours of video content to their channels each minute. It is to see from these statistics why every video aspiring YouTubers post on their channels has to be perfect in every way in order to reach a wide audience. Fortunately, trimming a video even after you’ve uploaded it to YouTube is a quick and easy process, and in this article, we are going to show you a few different methods you can use to trim the videos you upload to YouTube. So, let’s get started.
In this article
- How to Trim a Video After You Upload it to Your YouTube Channel?
- Trimming a Video Before Posting On YouTube with Filmora Video Editor [4 Ways]
- Using Online Video Editing Platforms to Trim YouTube Videos
How to Trim a Video After You Upload it to Your YouTube Channel?
The YouTube Studio is no longer in beta phase, which means that the feature is here to stay. This is good news for all video creators who frequently update their YouTube videos after they upload them, as they no longer have to go through the endless uploads just because they wanted to trim a video.
Make sure that you’re signed into your YouTube channel, then click on your profile picture and select the YouTube Studio (Beta) option. On the left side of the screen, you’ll be able to see a menu that contains different subcategories like Analytics, Dashboard or Videos, so just click on the Videos option and proceed to select a video you’d like to trim. After the Videos submenu appears on the screen you should click on the Editor option and the video you selected will open in the YouTube’s video editor.

Click on the Trim button to start trimming the video and drag the blue bars located at the start and the end of the file to designate the portion of the video you’d like to remove. Preview the changes and confirm what you’ve made by clicking on the Save button located in the upper right corner of the screen and the new shortened version of the video will become available within a couple of hours.

In this way, you don’t need to take down the original video, edit it and re-upload. One of the benefits of trimming YouTube videos with the Trim feature in YouTube Editor is that this will keep your video URL and views and ranks etc.
Trimming a Video Before Posting On YouTube with Filmora Video Editor
Method 1: Trim on Timeline
YouTubers who don’t want to rely on YouTube’s video editing capabilities can trim their footage with Filmora (to be honest, the Editor in YouTube platform has limited features). Filmora video editing software for PC and Mac computers offers a few different tools for trimming videos. After you’ve created a new project in Filmora, you should import a video clip into the editor by clicking on the Import drop-down menu and select the Import Media Files option. Each file you add to a project will be displayed in the Media tab, and you can just drag and drop it to a video track on the timeline.
All you have to do in order to trim a video after you’ve placed it on the timeline is drag one of its ends to the left or to the right. As you drag one of the clip’s edges the editor will only display the remaining footage while rendering the rest invisible. If at any point you want to access a portion of the video you’ve trimmed you just have to extend the file by dragging it until you’re able to see the segment you’re searching for.

Method 2: Using Filmora Split Tool
Filmora’s Split tool can help you separate the portion of the clip you want to remove from the segment you’d like to keep. Simply place the playhead at the exact location in the video clip where you want to make a cut, and click on the Split icon that looks like a pair of scissors. After the video is split, you should click on the clip you no longer need in order to select it and then hit the Delete button on your keyboard to remove it from the timeline.
Method 3: Using Scene Detection
Wondershare’s video editor also offers an automatic way to split a video clip into a number of separate scenes. Right-click on the video file located in the Filmora’s Media tab, and select the Scene Detection option from the menu and proceed to click on the Detect button, after the Scene Detection window pops up on the screen. The software will then automatically analyze the footage and divide it into separate scenes. Simply click on the Add to Timeline button once the process is completed to continue editing the video clip you’ve just split.

Method 4: Using Instant Cutter Tool
The Instant Cutter Tool enables you to quickly trim or merge high-resolution files recorded on action cameras as soon as you import them into a project in Filmora. Select the Import with Instant Cutter Tool option from the Import drop-down menu and wait for the Filmora Instant Cutter window to appear on the screen. In the upper left corner of this window, you will be able to see Trim and Merge tabs. Make sure that the Trim tab is selected and then click on the Open File button to import a video clip you’d like to trim. You can then use the trimming sliders to designate the parts of the video you’d like to remove or the set the In and Out points by clicking on the Set In Point or Set Out Point icons. Click on the Export button to save the new version of the video clip and click OK to complete the process.

Using Online Video Editing Platforms to Trim YouTube Videos
In case you’re looking for a tool that lets you save extracts of scenes from YouTube to your computer free of charge YT Cutter may be one of your best options.

This online video editing platform is remarkably easy to use since you just have to copy the link to the YouTube video you’d like to trim into YT Cutter’s URL box and then select how long the new video should be. Click on the Start and End buttons to set the duration of the video and click on the Download button to choose if you want to create a video, GIF or an audio file. The trimmed YouTube video will be available for download as soon as the platform processes it, and you just need to specify a folder on your hard drive before clicking on the Save button.
There’re many online video trimmers available on the market, some of them are totally free to use, check our guide about How to Trim Videos for Free Online .
Read More to Get : How to Download YouTube Videos without Any Software Easily >>
Conclusion
Trimming a video online or with a video editing software like Filmora is an effortless task that can be completed in just a couple of minutes. However, it is better to complete the entire video editing process before you upload a video to your YouTube channel because YouTube Studio and other online video editing platforms still offer only a limited amount of video editing tools. Which method of trimming YouTube videos do you like using the most? Leave a comment and share your opinions with us.
Richard Bennett
Richard Bennett is a writer and a lover of all things video.
Follow @Richard Bennett
Richard Bennett
Mar 27, 2024• Proven solutions
The world’s largest video sharing platform currently has nearly two billion active monthly users who upload over 400 hours of video content to their channels each minute. It is to see from these statistics why every video aspiring YouTubers post on their channels has to be perfect in every way in order to reach a wide audience. Fortunately, trimming a video even after you’ve uploaded it to YouTube is a quick and easy process, and in this article, we are going to show you a few different methods you can use to trim the videos you upload to YouTube. So, let’s get started.
In this article
- How to Trim a Video After You Upload it to Your YouTube Channel?
- Trimming a Video Before Posting On YouTube with Filmora Video Editor [4 Ways]
- Using Online Video Editing Platforms to Trim YouTube Videos
How to Trim a Video After You Upload it to Your YouTube Channel?
The YouTube Studio is no longer in beta phase, which means that the feature is here to stay. This is good news for all video creators who frequently update their YouTube videos after they upload them, as they no longer have to go through the endless uploads just because they wanted to trim a video.
Make sure that you’re signed into your YouTube channel, then click on your profile picture and select the YouTube Studio (Beta) option. On the left side of the screen, you’ll be able to see a menu that contains different subcategories like Analytics, Dashboard or Videos, so just click on the Videos option and proceed to select a video you’d like to trim. After the Videos submenu appears on the screen you should click on the Editor option and the video you selected will open in the YouTube’s video editor.
Click on the Trim button to start trimming the video and drag the blue bars located at the start and the end of the file to designate the portion of the video you’d like to remove. Preview the changes and confirm what you’ve made by clicking on the Save button located in the upper right corner of the screen and the new shortened version of the video will become available within a couple of hours.
In this way, you don’t need to take down the original video, edit it and re-upload. One of the benefits of trimming YouTube videos with the Trim feature in YouTube Editor is that this will keep your video URL and views and ranks etc.
Trimming a Video Before Posting On YouTube with Filmora Video Editor
Method 1: Trim on Timeline
YouTubers who don’t want to rely on YouTube’s video editing capabilities can trim their footage with Filmora (to be honest, the Editor in YouTube platform has limited features). Filmora video editing software for PC and Mac computers offers a few different tools for trimming videos. After you’ve created a new project in Filmora, you should import a video clip into the editor by clicking on the Import drop-down menu and select the Import Media Files option. Each file you add to a project will be displayed in the Media tab, and you can just drag and drop it to a video track on the timeline.
All you have to do in order to trim a video after you’ve placed it on the timeline is drag one of its ends to the left or to the right. As you drag one of the clip’s edges the editor will only display the remaining footage while rendering the rest invisible. If at any point you want to access a portion of the video you’ve trimmed you just have to extend the file by dragging it until you’re able to see the segment you’re searching for.
Method 2: Using Filmora Split Tool
Filmora’s Split tool can help you separate the portion of the clip you want to remove from the segment you’d like to keep. Simply place the playhead at the exact location in the video clip where you want to make a cut, and click on the Split icon that looks like a pair of scissors. After the video is split, you should click on the clip you no longer need in order to select it and then hit the Delete button on your keyboard to remove it from the timeline.
Method 3: Using Scene Detection
Wondershare’s video editor also offers an automatic way to split a video clip into a number of separate scenes. Right-click on the video file located in the Filmora’s Media tab, and select the Scene Detection option from the menu and proceed to click on the Detect button, after the Scene Detection window pops up on the screen. The software will then automatically analyze the footage and divide it into separate scenes. Simply click on the Add to Timeline button once the process is completed to continue editing the video clip you’ve just split.
Method 4: Using Instant Cutter Tool
The Instant Cutter Tool enables you to quickly trim or merge high-resolution files recorded on action cameras as soon as you import them into a project in Filmora. Select the Import with Instant Cutter Tool option from the Import drop-down menu and wait for the Filmora Instant Cutter window to appear on the screen. In the upper left corner of this window, you will be able to see Trim and Merge tabs. Make sure that the Trim tab is selected and then click on the Open File button to import a video clip you’d like to trim. You can then use the trimming sliders to designate the parts of the video you’d like to remove or the set the In and Out points by clicking on the Set In Point or Set Out Point icons. Click on the Export button to save the new version of the video clip and click OK to complete the process.
Using Online Video Editing Platforms to Trim YouTube Videos
In case you’re looking for a tool that lets you save extracts of scenes from YouTube to your computer free of charge YT Cutter may be one of your best options.
This online video editing platform is remarkably easy to use since you just have to copy the link to the YouTube video you’d like to trim into YT Cutter’s URL box and then select how long the new video should be. Click on the Start and End buttons to set the duration of the video and click on the Download button to choose if you want to create a video, GIF or an audio file. The trimmed YouTube video will be available for download as soon as the platform processes it, and you just need to specify a folder on your hard drive before clicking on the Save button.
There’re many online video trimmers available on the market, some of them are totally free to use, check our guide about How to Trim Videos for Free Online .
Read More to Get : How to Download YouTube Videos without Any Software Easily >>
Conclusion
Trimming a video online or with a video editing software like Filmora is an effortless task that can be completed in just a couple of minutes. However, it is better to complete the entire video editing process before you upload a video to your YouTube channel because YouTube Studio and other online video editing platforms still offer only a limited amount of video editing tools. Which method of trimming YouTube videos do you like using the most? Leave a comment and share your opinions with us.
Richard Bennett
Richard Bennett is a writer and a lover of all things video.
Follow @Richard Bennett
Also read:
- [New] 2024 Approved Expert Shortcuts for Savvy Screen Capture on Your PC
- [New] Building a YouTubing Brand From Scratch with These 8 Courses
- [Updated] Counteract Fake Views Boosting Genuine Audience Size
- [Updated] Ecological Architecture Merging Nature and City Planning
- Citation Techniques for Artificial Intelligence Outputs, Including ChatGPT
- Comprehensive Breakdown VSCO Photography Tools for 2024
- Essential Driver Downloads for Logitech T630: Supported by Windows 7, 8 & 10
- Guarding Against Genuine Geniuses: Spotting Automated Prose
- How To Restore Missing Call Logs from Vivo X100 Pro
- In 2024, Enhancing Video Quality with Right Lighting
- In 2024, Essential Listings for Easy Access to YouTube Intro Files
- No Charge HP Audio Control Software - Swift and Effortless Installation Guide
- Storing Your Stories and Snaps Safely on iOS Devices
- Title: Elevating Video Experience Non-Youtube Hubs Explained for 2024
- Author: Steven
- Created at : 2025-01-27 02:06:19
- Updated at : 2025-01-30 03:49:05
- Link: https://youtube-clips.techidaily.com/elevating-video-experience-non-youtube-hubs-explained-for-2024/
- License: This work is licensed under CC BY-NC-SA 4.0.