Elevate Your YouTube Presence with Custom Animated Subscription Buttons in Filmora
Elevate Your YouTube Presence with Custom Animated Subscription Buttons in Filmora
How to Make Your YouTube Animated Subscribe Button Easily With Filmora

Richard Bennett
Mar 27, 2024• Proven solutions
The main goal of every content creator is to increase its audience to expand its reach and views. To do so, it’s essential to provide something unique and different to the viewer. Without providing them the content they are looking for, it is impossible to grow your channel and reach. Once your content is ready and you are getting many views, it is essential to make these potential viewers your permanent viewers. The animated subscribe button will help you achieve this goal. While your viewers are watching your videos, you must remind them about subscribing to your channel for receiving such incredible content in the future. Subscribe animation plays a vital role in converting your viewers into subscribers.
There are so many platforms on the internet from where you can get Youtube subscribe button animation free, and you can also purchase these subscribe png gifs. But creating your own animated subscribe button can make you stand out from the crowd and make your videos unique and exclusive. Because it enables you to design it the way you want according to your brand, so, let’s create your own subscribe animation using Wondershare Filmora .
Step-By-Step guide
Step 1: To get started,open Filmora X. On your upper left corner, click on the “Sample Colors,” select the Green color and drag it to Video Track into the timeline. We are using a Green background to easily remove it using the green screen feature in Filmora to use it in our future projects after exporting it, without creating it again. Adjust the duration of this track according to your requirement. In my case, I am trying to make an animated subscribe button of 5 seconds.
Step 2: Lock this track by clicking on the lock icon to work on subscribe animation without disturbing the background easily.
Step 3: Now it’s time to design the subscribe png gif. Go to the Sample colors again and drag the red color into the time above the green background.
Step 4: Double click on the red color in the timeline and adjust its size. Make it look like a subscribe button that is a rectangle and place it at the bottom center of the background. You can put it anywhere you want it to appear in your future videos.
Step 5: Now, let’s add Subscribe text into the button. Go to the Title and select any style that you like. “Basic 6” will work perfectly fine for this purpose. Drag and drop it into the timeline above all tracks.
Step 6: Double click on the Title on the timeline and edit it with “Subscribe” and place it under the red rectangle and click OK.
Step 7: We have put a cursor that can click on the animated subscribe button. You can use Google Search to find a transparent cursor. Make sure to save it in png format. Download it and import it into Filmora.
Step 8: Drag and drop the cursor into the timeline and place it above all the other three tracks to make it prominent. Adjust the size of the cursor place it on the Subscribe button where you want it to appear.
Step 9: Now, it’s time to animate the design using keyframes. First of all, let’s animate the red rectangle. Double click on the red color on the timeline. Go to the ‘Animation’ tab and then click ‘Customize.’ Move to the 1 second in the timeline and click ‘Add.’
Step 10: Now go back to the beginning in the timeline and adjust the scale to 0%. It will make the rectangle pop up when you play the clip.
Step 11: Text needs to be animated as well to match it with the rectangle. Double click on the text in the timeline and click ‘ADVANCED.’
Step 12: In this Advance text editor, go to the ‘Animation’ tab and select any animation that you like. On the timeline under the preview screen, adjusts the dark areas according to the time you set on the rectangle, which was 1 second. We want the text to appear on the screen in 1 second, like the rectangle. Also, adjust the ending time when you want the text to disappear again. We have set it on 4 seconds. Which means it will start to fade after 4 seconds.
Step 13: Now, to animate the mouse cursor, we will use the same process we used for a rectangle that is key framing. Double click on the cursor track on the timeline and move the time on your timeline to a point when you want the cursor to appear. Now add a key frame by clicking ‘Add’.
Step 14: Now jump back to a point in your timeline, when the cursor will start appearing from outside the screen. Move the cursor outside the screen from where you want it to start moving toward the subscribe animation.
Step 15: To animate the click of the cursor, move ahead a little bit into your timeline and scale down the cursor to around 70%. Move it a little further and scale it up to 100%.
Step 16: You can add the sound of mouse click to make it more realistic. You can find this sound anywhere on the internet. Download it and import it into Filmora. Now place it into the timeline where it can match the movement of the cursor.
Step 17: Now it’s time to make this subscribe animation button disappear. Move forward into the time to the end, at around 4 seconds. Double click on the red button in the timeline and add a key frame at its actual scale.
Step 18: After that, move further in the timeline to the end and make its scale 0. It will make it disappear.
Step 19: Do the same with the cursor. Double click on the cursor in the time and add a key frame at its actual position.
Step 20: Move ahead when you want it to disappear. Move the cursor out of the screen and click ‘OK’.
Step 21: Your Subscribe png gif is ready to be exported and used in your videos. Click on export and choose from various formats and options to choose from while exporting it.
You may also like: How to Get People to Subscribe Channel
Conclusion:Your own Animated Subscribe Button is ready to be used in your future videos and projects. This is a ready-to-use subscribe button that can be easily used using the green screen effect in Filmora. Just import the clip, remove the green screen, and you are good to go. You can also customize this Subscribe Animation using your channel and more. Keep experimenting with new things using Filmora.


Richard Bennett
Richard Bennett is a writer and a lover of all things video.
Follow @Richard Bennett
Richard Bennett
Mar 27, 2024• Proven solutions
The main goal of every content creator is to increase its audience to expand its reach and views. To do so, it’s essential to provide something unique and different to the viewer. Without providing them the content they are looking for, it is impossible to grow your channel and reach. Once your content is ready and you are getting many views, it is essential to make these potential viewers your permanent viewers. The animated subscribe button will help you achieve this goal. While your viewers are watching your videos, you must remind them about subscribing to your channel for receiving such incredible content in the future. Subscribe animation plays a vital role in converting your viewers into subscribers.
There are so many platforms on the internet from where you can get Youtube subscribe button animation free, and you can also purchase these subscribe png gifs. But creating your own animated subscribe button can make you stand out from the crowd and make your videos unique and exclusive. Because it enables you to design it the way you want according to your brand, so, let’s create your own subscribe animation using Wondershare Filmora .
Step-By-Step guide
Step 1: To get started,open Filmora X. On your upper left corner, click on the “Sample Colors,” select the Green color and drag it to Video Track into the timeline. We are using a Green background to easily remove it using the green screen feature in Filmora to use it in our future projects after exporting it, without creating it again. Adjust the duration of this track according to your requirement. In my case, I am trying to make an animated subscribe button of 5 seconds.
Step 2: Lock this track by clicking on the lock icon to work on subscribe animation without disturbing the background easily.
Step 3: Now it’s time to design the subscribe png gif. Go to the Sample colors again and drag the red color into the time above the green background.
Step 4: Double click on the red color in the timeline and adjust its size. Make it look like a subscribe button that is a rectangle and place it at the bottom center of the background. You can put it anywhere you want it to appear in your future videos.
Step 5: Now, let’s add Subscribe text into the button. Go to the Title and select any style that you like. “Basic 6” will work perfectly fine for this purpose. Drag and drop it into the timeline above all tracks.
Step 6: Double click on the Title on the timeline and edit it with “Subscribe” and place it under the red rectangle and click OK.
Step 7: We have put a cursor that can click on the animated subscribe button. You can use Google Search to find a transparent cursor. Make sure to save it in png format. Download it and import it into Filmora.
Step 8: Drag and drop the cursor into the timeline and place it above all the other three tracks to make it prominent. Adjust the size of the cursor place it on the Subscribe button where you want it to appear.
Step 9: Now, it’s time to animate the design using keyframes. First of all, let’s animate the red rectangle. Double click on the red color on the timeline. Go to the ‘Animation’ tab and then click ‘Customize.’ Move to the 1 second in the timeline and click ‘Add.’
Step 10: Now go back to the beginning in the timeline and adjust the scale to 0%. It will make the rectangle pop up when you play the clip.
Step 11: Text needs to be animated as well to match it with the rectangle. Double click on the text in the timeline and click ‘ADVANCED.’
Step 12: In this Advance text editor, go to the ‘Animation’ tab and select any animation that you like. On the timeline under the preview screen, adjusts the dark areas according to the time you set on the rectangle, which was 1 second. We want the text to appear on the screen in 1 second, like the rectangle. Also, adjust the ending time when you want the text to disappear again. We have set it on 4 seconds. Which means it will start to fade after 4 seconds.
Step 13: Now, to animate the mouse cursor, we will use the same process we used for a rectangle that is key framing. Double click on the cursor track on the timeline and move the time on your timeline to a point when you want the cursor to appear. Now add a key frame by clicking ‘Add’.
Step 14: Now jump back to a point in your timeline, when the cursor will start appearing from outside the screen. Move the cursor outside the screen from where you want it to start moving toward the subscribe animation.
Step 15: To animate the click of the cursor, move ahead a little bit into your timeline and scale down the cursor to around 70%. Move it a little further and scale it up to 100%.
Step 16: You can add the sound of mouse click to make it more realistic. You can find this sound anywhere on the internet. Download it and import it into Filmora. Now place it into the timeline where it can match the movement of the cursor.
Step 17: Now it’s time to make this subscribe animation button disappear. Move forward into the time to the end, at around 4 seconds. Double click on the red button in the timeline and add a key frame at its actual scale.
Step 18: After that, move further in the timeline to the end and make its scale 0. It will make it disappear.
Step 19: Do the same with the cursor. Double click on the cursor in the time and add a key frame at its actual position.
Step 20: Move ahead when you want it to disappear. Move the cursor out of the screen and click ‘OK’.
Step 21: Your Subscribe png gif is ready to be exported and used in your videos. Click on export and choose from various formats and options to choose from while exporting it.
You may also like: How to Get People to Subscribe Channel
Conclusion:Your own Animated Subscribe Button is ready to be used in your future videos and projects. This is a ready-to-use subscribe button that can be easily used using the green screen effect in Filmora. Just import the clip, remove the green screen, and you are good to go. You can also customize this Subscribe Animation using your channel and more. Keep experimenting with new things using Filmora.
Richard Bennett
Richard Bennett is a writer and a lover of all things video.
Follow @Richard Bennett
Boost Engagement and Growth - Unlocking YouTube Analytics via Social Blade
Use Social Blade for YouTube Analytics - Stats & How to Use Them
Richard Bennett
Oct 26, 2023• Proven solutions
Want to learn how to use Social Blade for YouTube? SocialBlade.com is a free-to-use website that displays your YouTube statistics – or the stats of any channel you are interested in – using an intuitive layout.
While many of the stats you can find on Social Blade are also available right on YouTube, some people find it easier to read on Social Blade. YouTube provides you with a lot of information, and a lot of it might not be useful to all creators.
Your YouTube Analytics
Social Blade is an excellent place to gauge the growth of your channel. It provides statistics on our subscribers, views, and estimated revenue.
To start using Social Blade, type your channel name into the search bar.
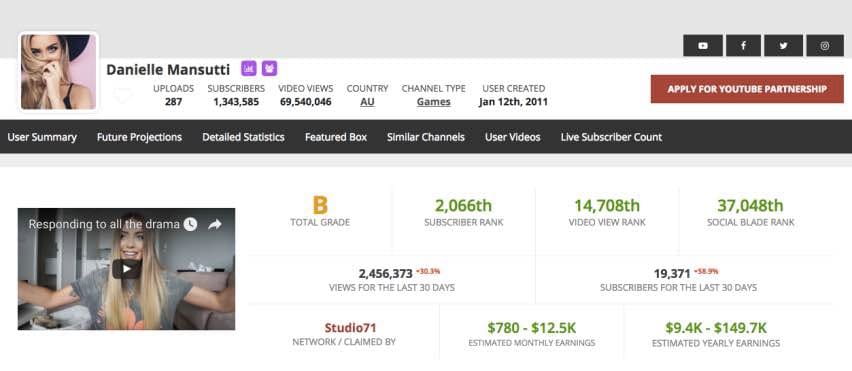
On the top section of the page, several stats will be clearly displayed.
First, you will see the letter grade assigned to your channel by Social Blade. If it is not a very good one, keep in mind that channels with over 10, 000 might still only receive Cs. Only YouTube megastars are getting As and Bs.
Next to your grade are your subscriber and video view ranks, as well as a rank assigned to you by Social Blade.
On the second line, you will see the views and subscribers you got in the last 30 days and the percentage by which you are up or down. Simply searching for yourself and glancing at this line is the easiest way to see whether your channel is growing, even easier than in your YouTube Creator Studio.
The final line of the first section will show you an estimate of your monthly revenue.
If you scroll down to the second section you will be able to see your views, subscribers, and estimated earnings per day rather than per month. Growth is in green and loss is in red.
By looking at this chart you can see which videos benefited your channel most after they were posted (your videos are not listed, but you can see based on the day you posted them). This will give you a good idea of what your audience wants to see.
Spying on Other Channels
When you check your stats, you type your channel name into the search bar. If you want to use Social Blade to monitor somebody else’s stats, type their channel name instead.
By looking up your direct competitors (channels about the same size as yours within your same genre) you will be able to see which of their videos are performing best for them when you combine the daily information Social Blade provides with your knowledge of what videos they posted when.
Knowing what is working for your rivals will help you design your content strategy .
You can also use Social Blade to look up huge YouTube stars who you admire, just to see how well they are doing. Take their estimated revenue with a grain of salt, though – it’s just an estimate.
That’s how you can use Social Blade for YouTube - have you ever used it?
Make Your Videos Stand Out with Powerful Video Editor
Richard Bennett
Richard Bennett is a writer and a lover of all things video.
Follow @Richard Bennett
Richard Bennett
Oct 26, 2023• Proven solutions
Want to learn how to use Social Blade for YouTube? SocialBlade.com is a free-to-use website that displays your YouTube statistics – or the stats of any channel you are interested in – using an intuitive layout.
While many of the stats you can find on Social Blade are also available right on YouTube, some people find it easier to read on Social Blade. YouTube provides you with a lot of information, and a lot of it might not be useful to all creators.
Your YouTube Analytics
Social Blade is an excellent place to gauge the growth of your channel. It provides statistics on our subscribers, views, and estimated revenue.
To start using Social Blade, type your channel name into the search bar.
On the top section of the page, several stats will be clearly displayed.
First, you will see the letter grade assigned to your channel by Social Blade. If it is not a very good one, keep in mind that channels with over 10, 000 might still only receive Cs. Only YouTube megastars are getting As and Bs.
Next to your grade are your subscriber and video view ranks, as well as a rank assigned to you by Social Blade.
On the second line, you will see the views and subscribers you got in the last 30 days and the percentage by which you are up or down. Simply searching for yourself and glancing at this line is the easiest way to see whether your channel is growing, even easier than in your YouTube Creator Studio.
The final line of the first section will show you an estimate of your monthly revenue.
If you scroll down to the second section you will be able to see your views, subscribers, and estimated earnings per day rather than per month. Growth is in green and loss is in red.
By looking at this chart you can see which videos benefited your channel most after they were posted (your videos are not listed, but you can see based on the day you posted them). This will give you a good idea of what your audience wants to see.
Spying on Other Channels
When you check your stats, you type your channel name into the search bar. If you want to use Social Blade to monitor somebody else’s stats, type their channel name instead.
By looking up your direct competitors (channels about the same size as yours within your same genre) you will be able to see which of their videos are performing best for them when you combine the daily information Social Blade provides with your knowledge of what videos they posted when.
Knowing what is working for your rivals will help you design your content strategy .
You can also use Social Blade to look up huge YouTube stars who you admire, just to see how well they are doing. Take their estimated revenue with a grain of salt, though – it’s just an estimate.
That’s how you can use Social Blade for YouTube - have you ever used it?
Make Your Videos Stand Out with Powerful Video Editor
Richard Bennett
Richard Bennett is a writer and a lover of all things video.
Follow @Richard Bennett
Also read:
- [New] 2024 Approved Direct Pathway Streamlined Capturing Techniques (Dell)
- [New] A Step-by-Step Guide to YouTube Stats Analysis via Social Blade Platform
- [New] Craft a Memorable YouTube Channel Brand for More Viewers
- 如何使用 XCopy 和 Robocopy 或替代簡單方法,仅复制新檔案
- Boost or Bust Is Investing in Video Popularity Worthwhile?
- Configuring Filter Criteria: Step-by-Step Tutorial on Using the Condition Editor Panel
- Creating Costless Webinars on YouTube A Handbook for 2024
- From Concept to Recording Best Practices for iPhone/iPad Podcasts
- FullView Media Collaboration Guidebook
- In 2024, Premier 9 Multi-Device Video Communication Tools for Smartphones
- New 2024 Approved FCPX Glitch Busters Quick Fixes for Common Problems
- Top Video Formats for Maximum YouTube Engagement
- Title: Elevate Your YouTube Presence with Custom Animated Subscription Buttons in Filmora
- Author: Steven
- Created at : 2025-01-24 20:02:50
- Updated at : 2025-01-29 23:57:30
- Link: https://youtube-clips.techidaily.com/elevate-your-youtube-presence-with-custom-animated-subscription-buttons-in-filmora/
- License: This work is licensed under CC BY-NC-SA 4.0.